|
|||
|
|
~ The bLog Home ~ |
||
| Click here to read entries from June 16 to June 30. | |||
THURSDAY, JUNE 15, 2006 |
|||
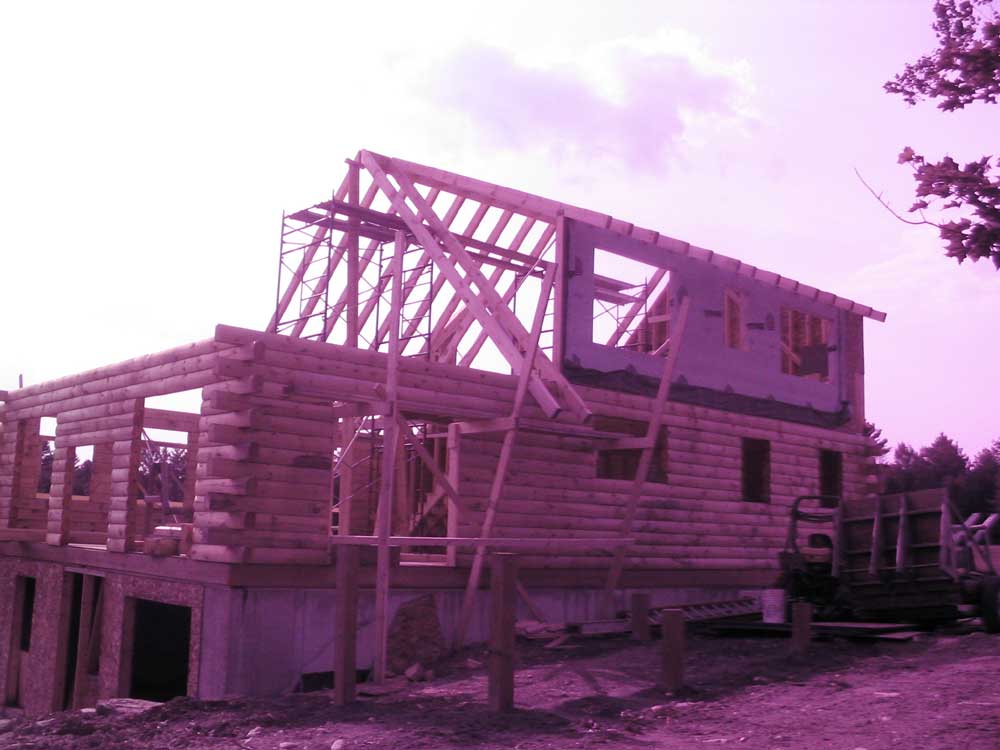
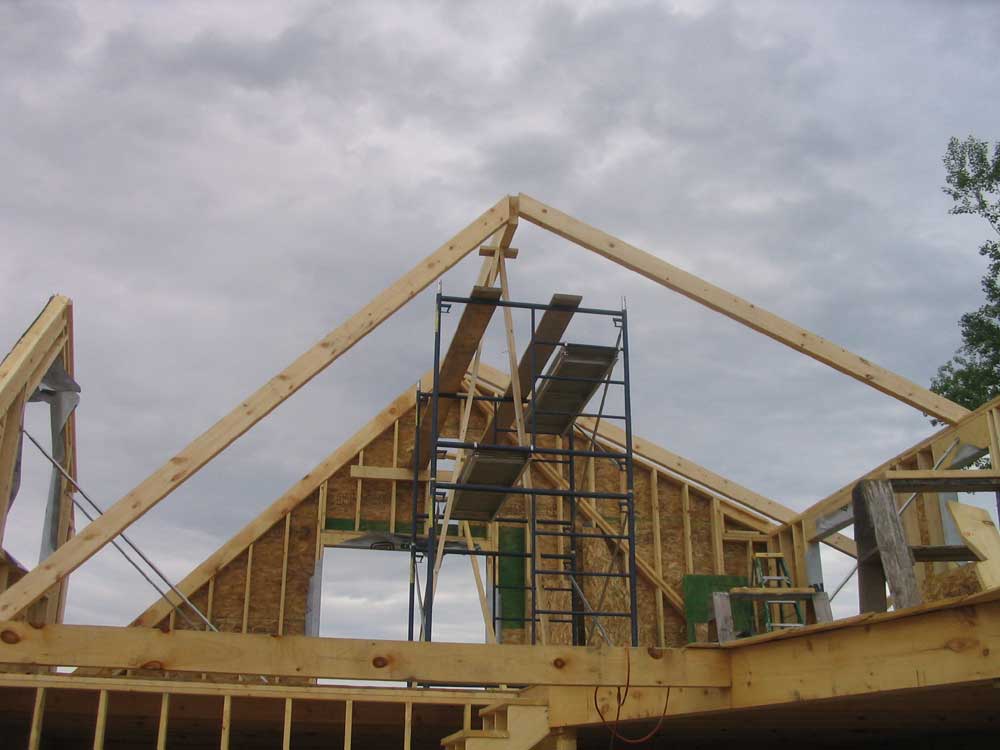
 What
a difference a day makes! We made up for lost time yesterday
by managing to put up the next 16' section of ridge and all 17
rafters thereunto attached. And we were even done by 4!
Things just fell into place nicely. What
a difference a day makes! We made up for lost time yesterday
by managing to put up the next 16' section of ridge and all 17
rafters thereunto attached. And we were even done by 4!
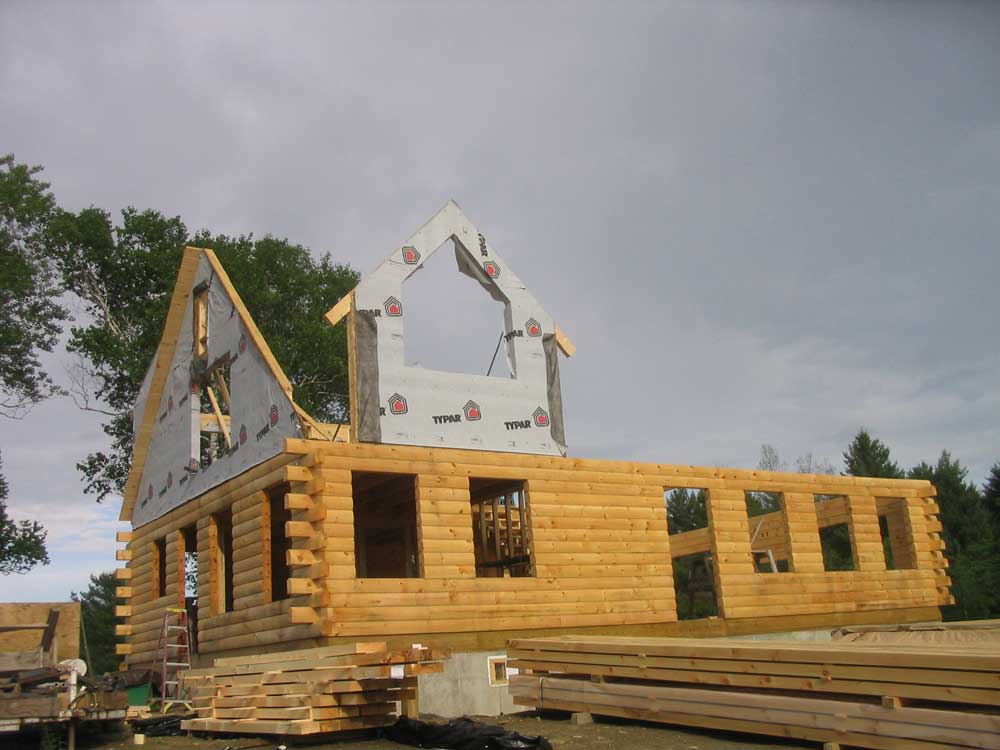
Things just fell into place nicely.We began, reluctantly, with addressing the next piece of ridge. Neither of us looked forward to getting the large timber up in the air, and the skyhooks we had ordered never showed up. This forced us, of course, to hoist the beam up by hand, much the way we did with the first section. |
|||
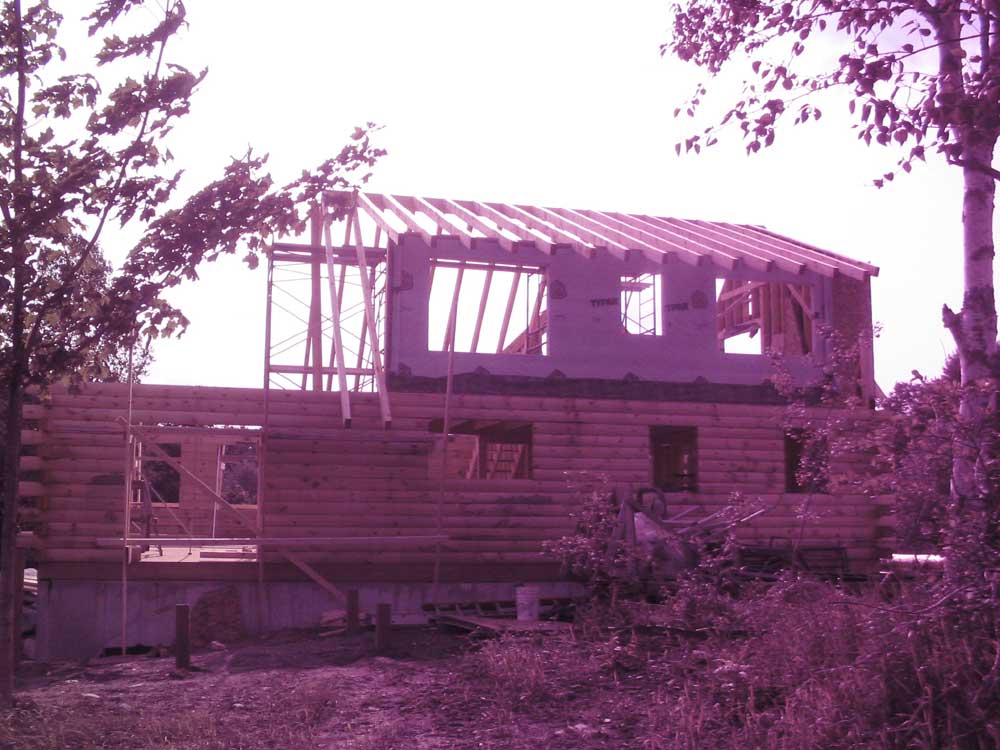
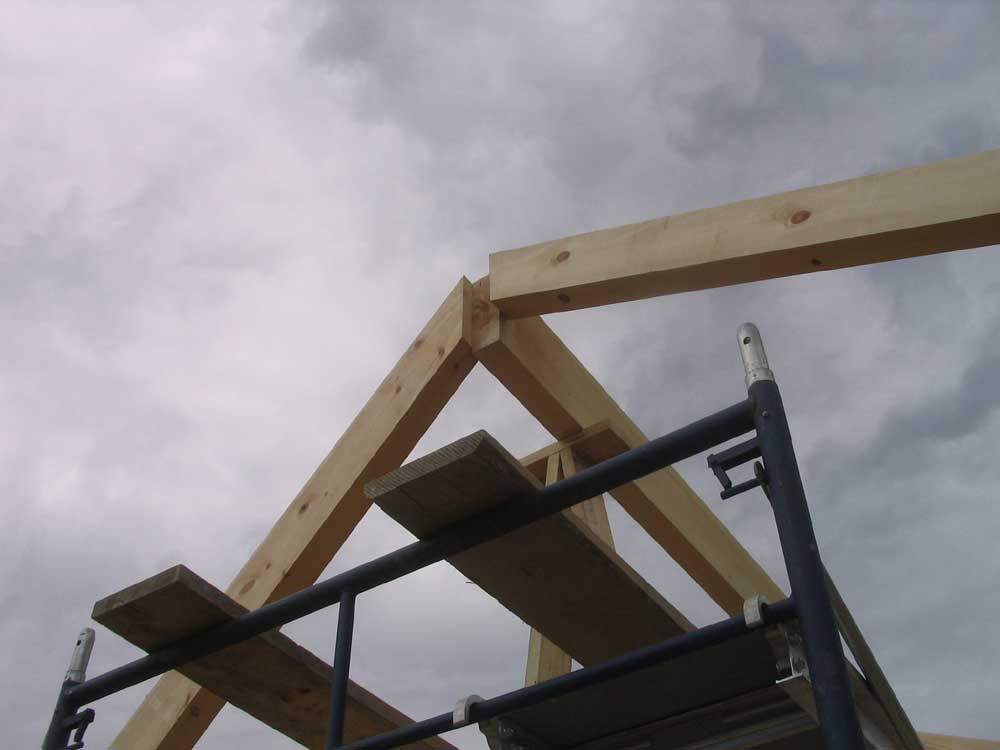
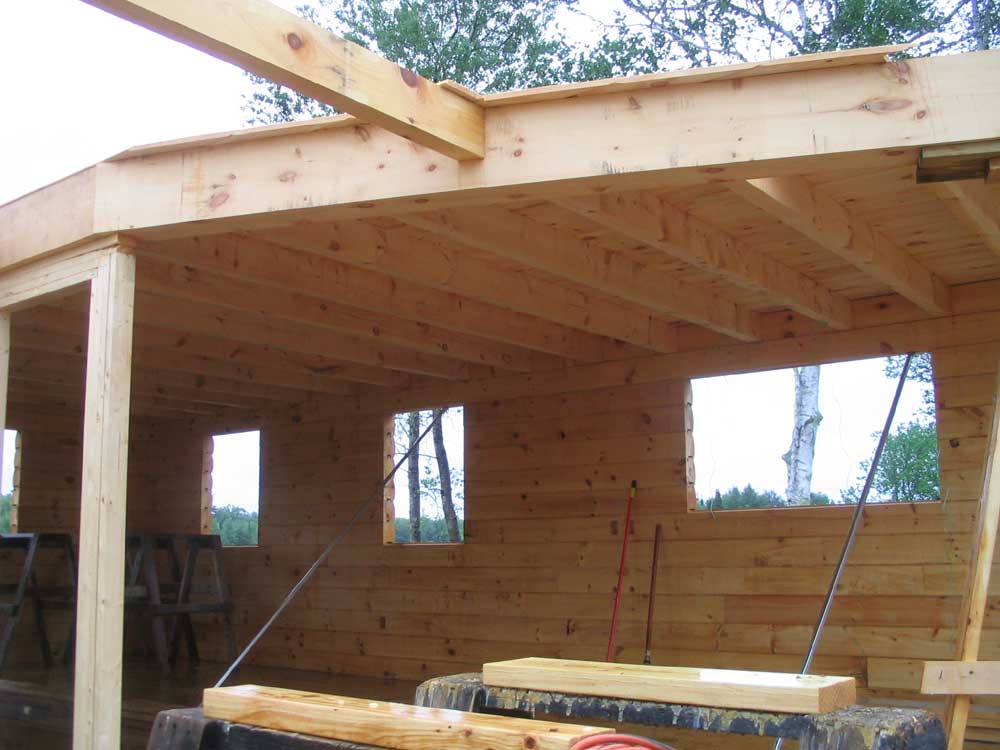
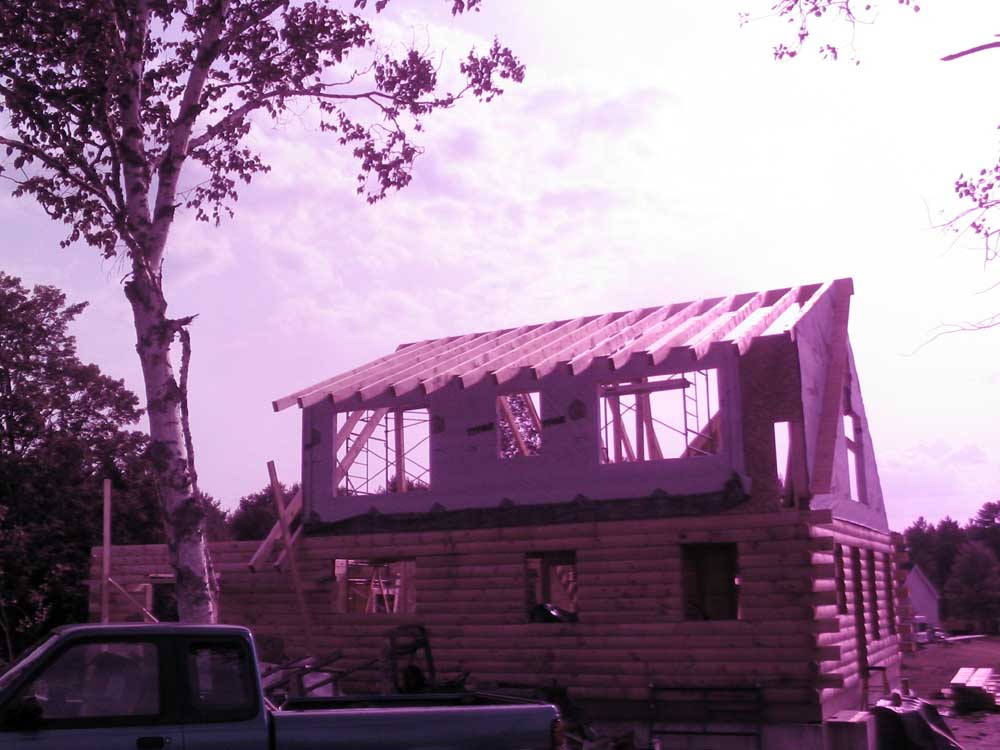
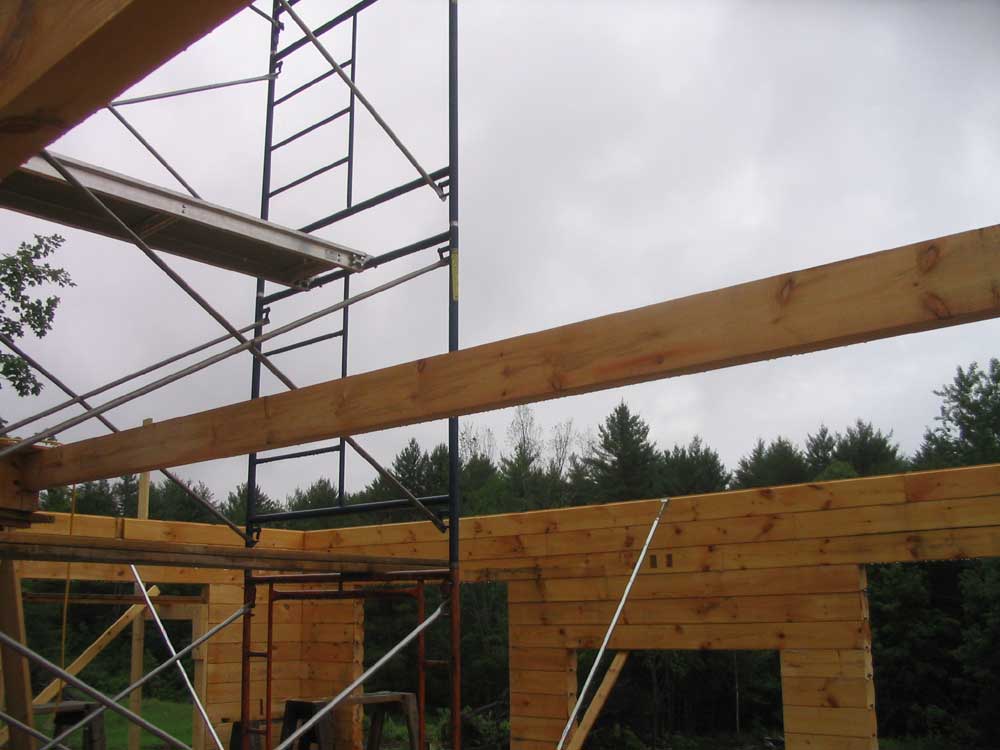
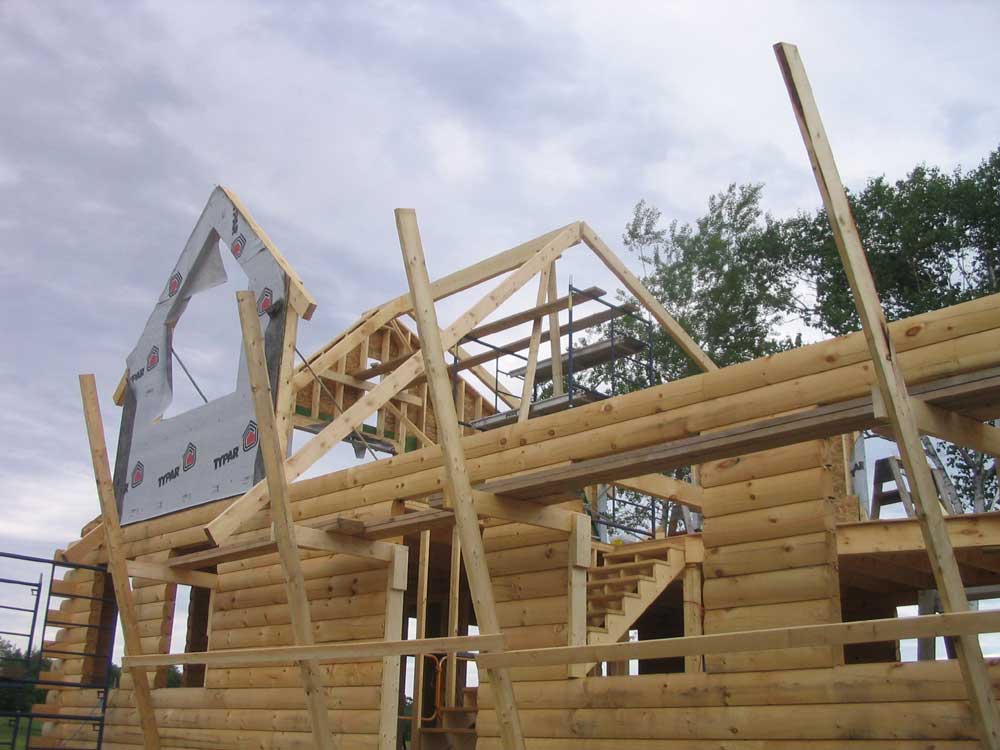
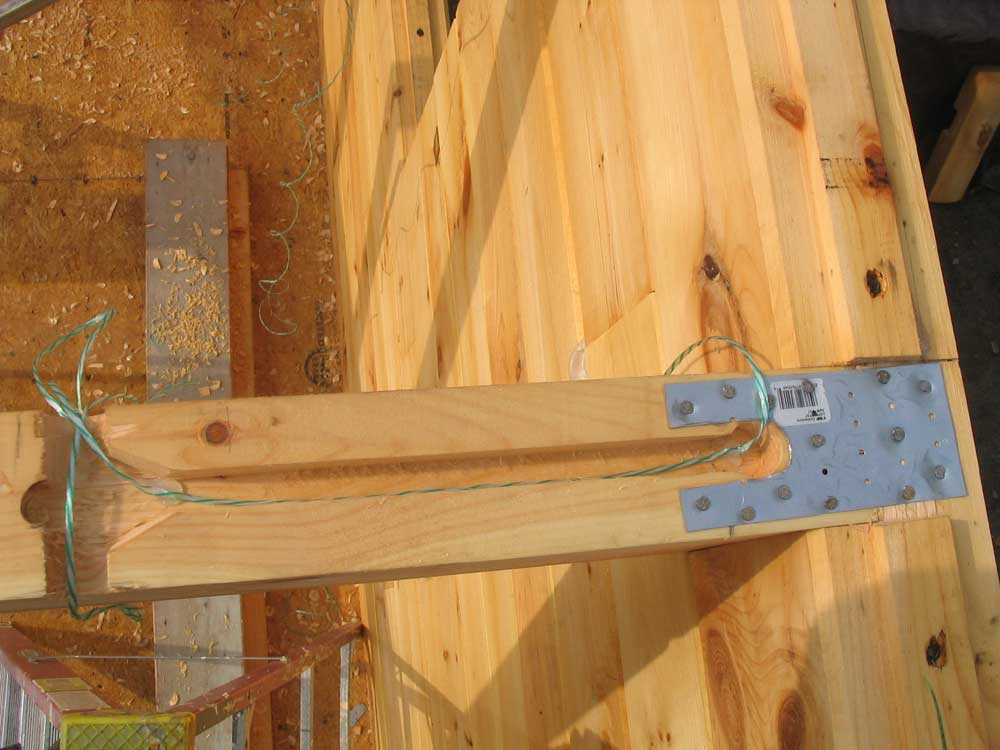
Getting a post to support the far (right) side of the second ridge section was a bit more involved. Since the break in the ridge fell directly above the second ceiling tie in the main room, I installed a post made from 2-2x6s beneath the tie and directly over the center carrying beam, while Bob built a similar post to go between the top of the beam and the bottom of the to-be-installed ridge section. With that out of the way, we hoisted the ridge up by carrying first one end, then the other, up to the tops of two stepladders, then carrying each end respectively up to the staging above. Then, with Bob on one section of staging and I on the other, we hoisted the beam the rest of the way (a few feet) and into place. Fun stuff, this. Photos note: my camera is going wacko, so many of these photos have a unique look. I decided to go ahead and post them since they actually look sort of cool, and almost as if they were relics from the pioneer days (if you try really hard...). Later, you're sure to see better photos of these areas. |
|||
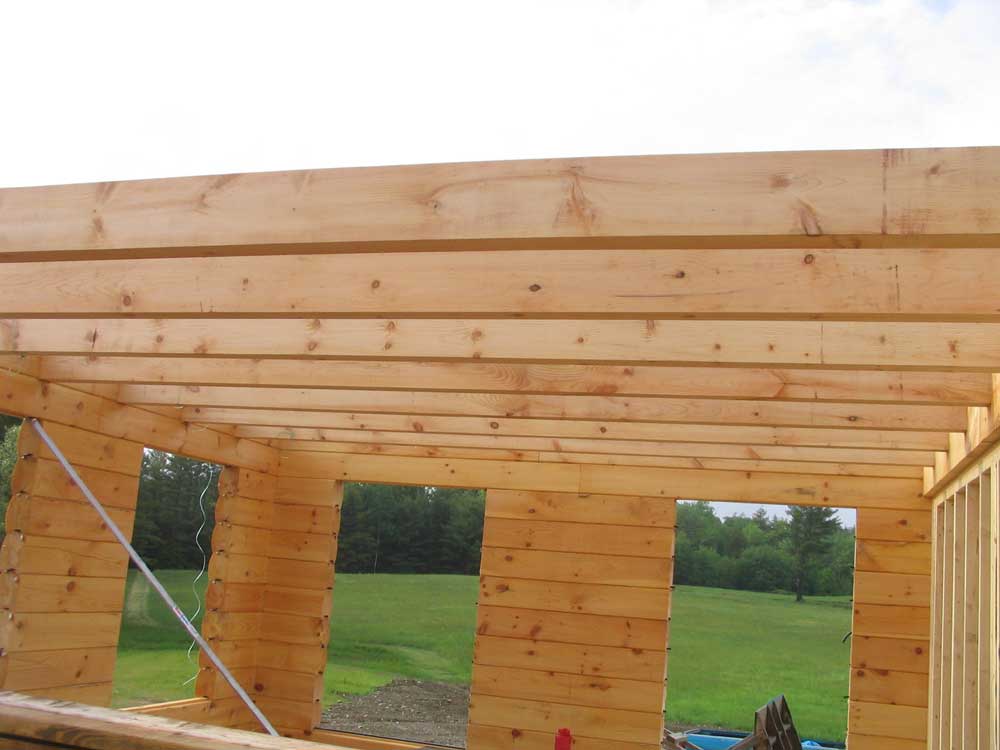
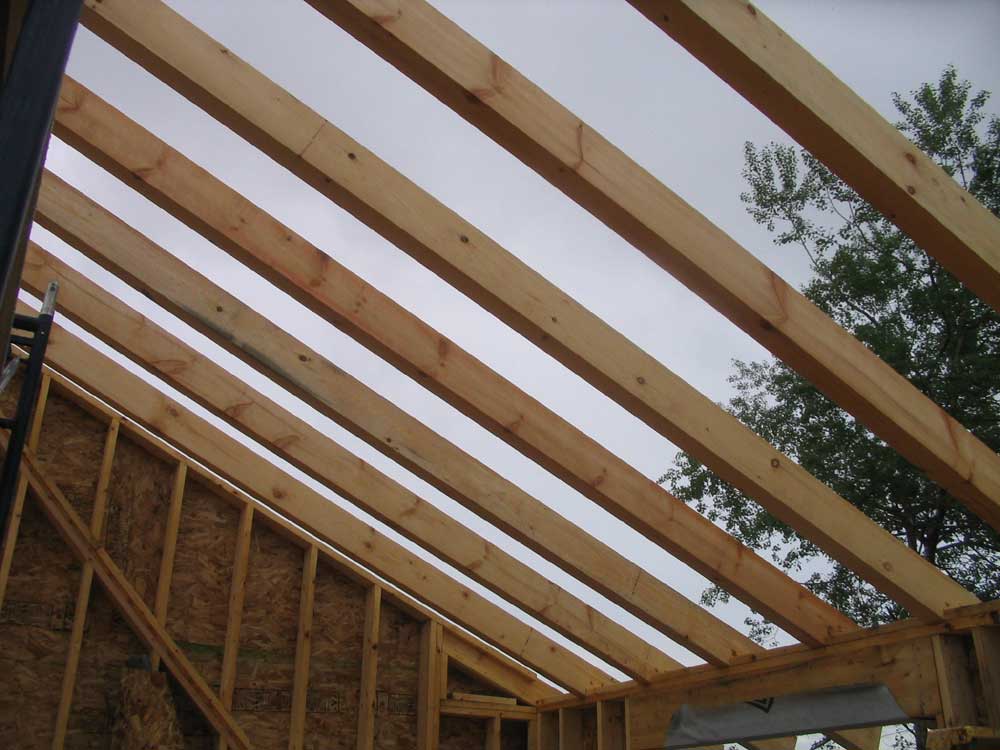
 Next
we cut an opposing pair of rafters for the far end of the ridge, and
installed them in a similar way to those we did on previous days.
Despite initial worries about the difficulty of this, we found a
method that worked well--pure manual labor, really--and got the two
pieces installed, steadying the ridge. T hen, we installed a
similar pair in the center of the ridge before blitzing the
remaining 7 backside (shed dormer) rafters before lunch. Those
were the easy ones, as they were only about 17' long. Again, we let
the tails hang out overlong for later trimming. Next
we cut an opposing pair of rafters for the far end of the ridge, and
installed them in a similar way to those we did on previous days.
Despite initial worries about the difficulty of this, we found a
method that worked well--pure manual labor, really--and got the two
pieces installed, steadying the ridge. T hen, we installed a
similar pair in the center of the ridge before blitzing the
remaining 7 backside (shed dormer) rafters before lunch. Those
were the easy ones, as they were only about 17' long. Again, we let
the tails hang out overlong for later trimming. |
|||
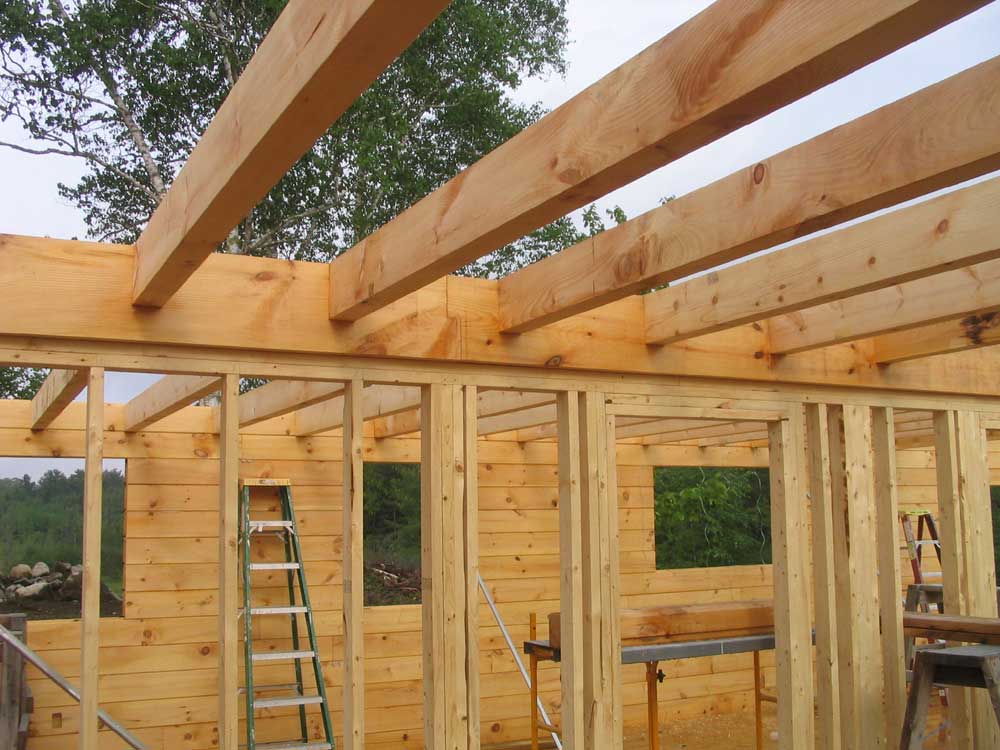
 After
lunch, we continued by cutting and fitting the steeper rafters on
the front of the house. For each one, we cut the necessary
cuts on the ground, then raised it to the second floor by lifting
one end up from below and placing the end on the staging outside the
house, then lifting that end to the second floor, then pushing the
beam up from the ground, with one of us upstairs pulling. Once
half the beam was past the edge, it became balanced from the top and
could easily be pulled in over the deck to safety. After
lunch, we continued by cutting and fitting the steeper rafters on
the front of the house. For each one, we cut the necessary
cuts on the ground, then raised it to the second floor by lifting
one end up from below and placing the end on the staging outside the
house, then lifting that end to the second floor, then pushing the
beam up from the ground, with one of us upstairs pulling. Once
half the beam was past the edge, it became balanced from the top and
could easily be pulled in over the deck to safety. |
|||
|
|
|||
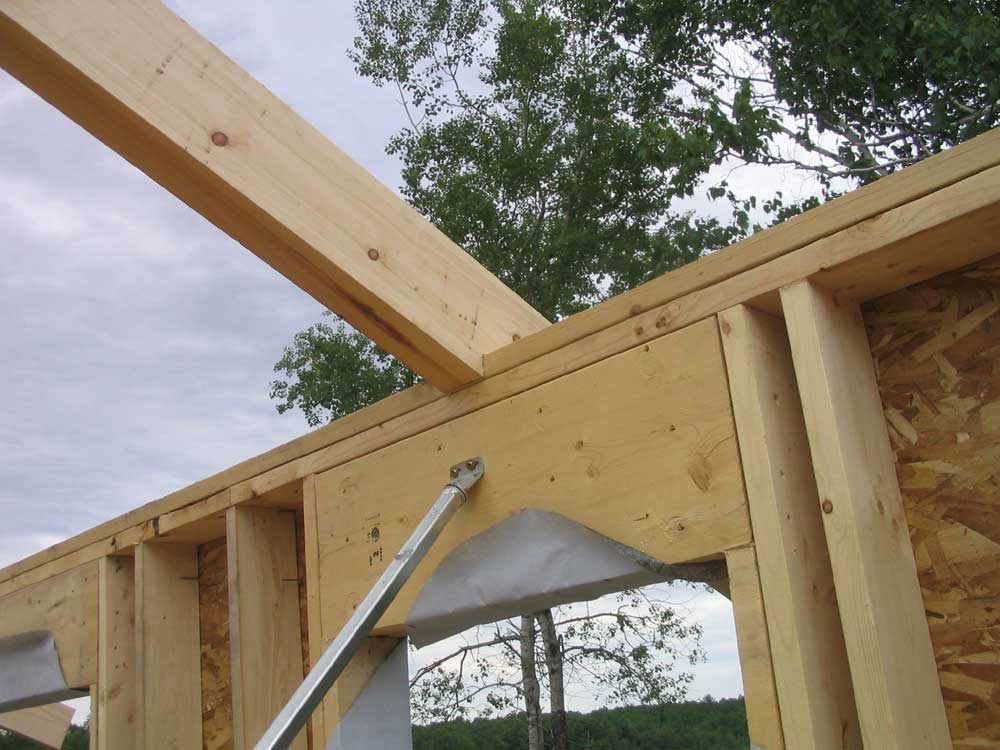
 Then,
we raised the ridge end up using a similar method, and with Bob up
top and me on the staging outside the house, we walked each rafter
down to its final location for installation. Since most of
these rafters in the front now fell directly on a solid log wall, I
used Sikaflex beneath these rafters at the outside wall; the ones on
the second floor deck and on framed walls did not need the sealant.
We cut the tails of the rafters on the front at a line level with
the 13th course of logs, since this is where the ceiling joists for
the front porch would later be installed. Since our front
porch will have an enclosed--rather than open--ceiling, the rafter
tails would not be exposed here. Then,
we raised the ridge end up using a similar method, and with Bob up
top and me on the staging outside the house, we walked each rafter
down to its final location for installation. Since most of
these rafters in the front now fell directly on a solid log wall, I
used Sikaflex beneath these rafters at the outside wall; the ones on
the second floor deck and on framed walls did not need the sealant.
We cut the tails of the rafters on the front at a line level with
the 13th course of logs, since this is where the ceiling joists for
the front porch would later be installed. Since our front
porch will have an enclosed--rather than open--ceiling, the rafter
tails would not be exposed here. |
|||
 By
the end of the day, all the rafters were installed, and we looked
forward to working on the gable dormer rafters in the morning.
I let it be known that my goal was to have the house roofed by July,
which Bob thought was reasonable. Now let's hope the current
good weather holds...that would make all the difference. By
the end of the day, all the rafters were installed, and we looked
forward to working on the gable dormer rafters in the morning.
I let it be known that my goal was to have the house roofed by July,
which Bob thought was reasonable. Now let's hope the current
good weather holds...that would make all the difference. |
|||
 |
|||
WEDNESDAY, JUNE 14, 2006 |
|||
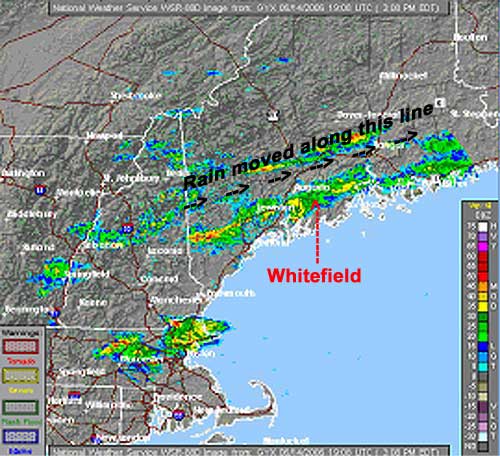
| Oh
good: more rain! I was starting to shrivel up, after
having no rain all day Tuesday. Fortunately for my hydration
needs--and those of the house and land--the day started off with a
bang (literally), as we received a thunderstorm and some heavy rain
at about 0630. What was interesting about this was the
fact that, according to the weather radar, the storm seemed to form
virtually directly overhead; the radar was clear mere minutes
before, but watching the loop later showed the storm forming
instantaneously. Later events would show that this was a trend
for the entire day; we seemed to be stuck in an unstable air mass
boundary that set this line of rain and storms passing right through
our area for much of the day. Good gravy! (This image shows the line of rain and thunderstorms as of about 1500; if set in motion, you'd see how everything moved northeastward along this very line. |
|||
|
|
|||
| Kidding aside, the rain ended by about 0700 and didn't impact the beginning of our workday. Bob was a bit late this morning, so I swept the water out of the house--again--while I waited, and then we got to work cutting and installing 5 additional rafters in the back of the house, on the shed dormer. This completed the back rafters on the first section of ridge. | |||
 After
a brief conference, we decided to continue installing the ridge
rather than move staging and start installing the rafters for the
front gable dormer, which had been our other thought. But it
seemed more efficient to leave the staging where it was upstairs and
use it to work towards a yet-to-be-erected set of staging that we'd
put up from the first floor below. After
a brief conference, we decided to continue installing the ridge
rather than move staging and start installing the rafters for the
front gable dormer, which had been our other thought. But it
seemed more efficient to leave the staging where it was upstairs and
use it to work towards a yet-to-be-erected set of staging that we'd
put up from the first floor below. |
|||
 First,
though, we installed the next cross tie between the loft deck and
the front wall of the house, so that it would be all set before we
needed to install rafters over it. This tie, a 4"x8" beam
about 18' long, was exceedingly heavy thanks to the pitch content in
the wood, but we got it installed without issue; this was becoming
old hat, after all. First,
though, we installed the next cross tie between the loft deck and
the front wall of the house, so that it would be all set before we
needed to install rafters over it. This tie, a 4"x8" beam
about 18' long, was exceedingly heavy thanks to the pitch content in
the wood, but we got it installed without issue; this was becoming
old hat, after all. |
|||
 With
that done, we began to set up the staging in the living room.
We set up three 5' lifts of pipe staging, but found that the height
wasn't quite high enough to make working easy on the ridge above.
We needed a couple feet, so Bob left to go retrieve his 2' set of
pipe staging, which was at his son's house a few towns over.
It also happened to be lunchtime, so that was no bother. The
sky looked slightly threatening, so, thinking we might have a brief
sprinkle or shower, we brought most of the tools down under the
second floor for some basic protection. I went down for lunch. With
that done, we began to set up the staging in the living room.
We set up three 5' lifts of pipe staging, but found that the height
wasn't quite high enough to make working easy on the ridge above.
We needed a couple feet, so Bob left to go retrieve his 2' set of
pipe staging, which was at his son's house a few towns over.
It also happened to be lunchtime, so that was no bother. The
sky looked slightly threatening, so, thinking we might have a brief
sprinkle or shower, we brought most of the tools down under the
second floor for some basic protection. I went down for lunch. |
|||
 It
began to rain, sure enough, but it was a lot harder than a pleasant
sprinkle; it turned quickly into a downpour, so I put on a slicker
and drove my truck up to the house to save the electric tools that
were still outdoors, putting them all under a tarp on the bench.
When Bob returned a little later, the rain seemed to have retreated,
and we got the 2' section of staging erected on top of the other
three sections. It
began to rain, sure enough, but it was a lot harder than a pleasant
sprinkle; it turned quickly into a downpour, so I put on a slicker
and drove my truck up to the house to save the electric tools that
were still outdoors, putting them all under a tarp on the bench.
When Bob returned a little later, the rain seemed to have retreated,
and we got the 2' section of staging erected on top of the other
three sections.
Soon, though, it began to rain again, and we retreated to Bob's truck to wait it out--or so we thought. Unfortunately, the rain never really stopped; it would peter out briefly, but before long would begin again at one intensity or another, all of which were too heavy in which to work. We hung out for a couple hours, waiting and hoping, but by 1500 it was clear that we were beaten once again, so Bob went home and I put the tools away and came down myself. |
|||
 OK,
Mother Nature: you win! You are all-powerful and
omniscient, and I sincerely regret my bold statements of a few days
ago where I opined--albeit jokingly--that I might, just might, have
some control over your whims. I stand most humbly corrected,
and beg your forgiveness for my near-unforgivable transgression. By
way of penance, I do hereby offer myself, knave-like, as a dedicated
lifetime "weather crier", in which capacity I shall make it known to
all who will listen--and some who won't--just how powerful you
indeed are, and that no man, ever, should begin to be so naive as to
think that he--nay the entire human race, for that matter--has
anything more than the most subtle of effects on your wiley ways.
You are the queen of all that is important, and I acquiesce. OK,
Mother Nature: you win! You are all-powerful and
omniscient, and I sincerely regret my bold statements of a few days
ago where I opined--albeit jokingly--that I might, just might, have
some control over your whims. I stand most humbly corrected,
and beg your forgiveness for my near-unforgivable transgression. By
way of penance, I do hereby offer myself, knave-like, as a dedicated
lifetime "weather crier", in which capacity I shall make it known to
all who will listen--and some who won't--just how powerful you
indeed are, and that no man, ever, should begin to be so naive as to
think that he--nay the entire human race, for that matter--has
anything more than the most subtle of effects on your wiley ways.
You are the queen of all that is important, and I acquiesce. |
|||
TUESDAY, JUNE 13, 2006 |
|||
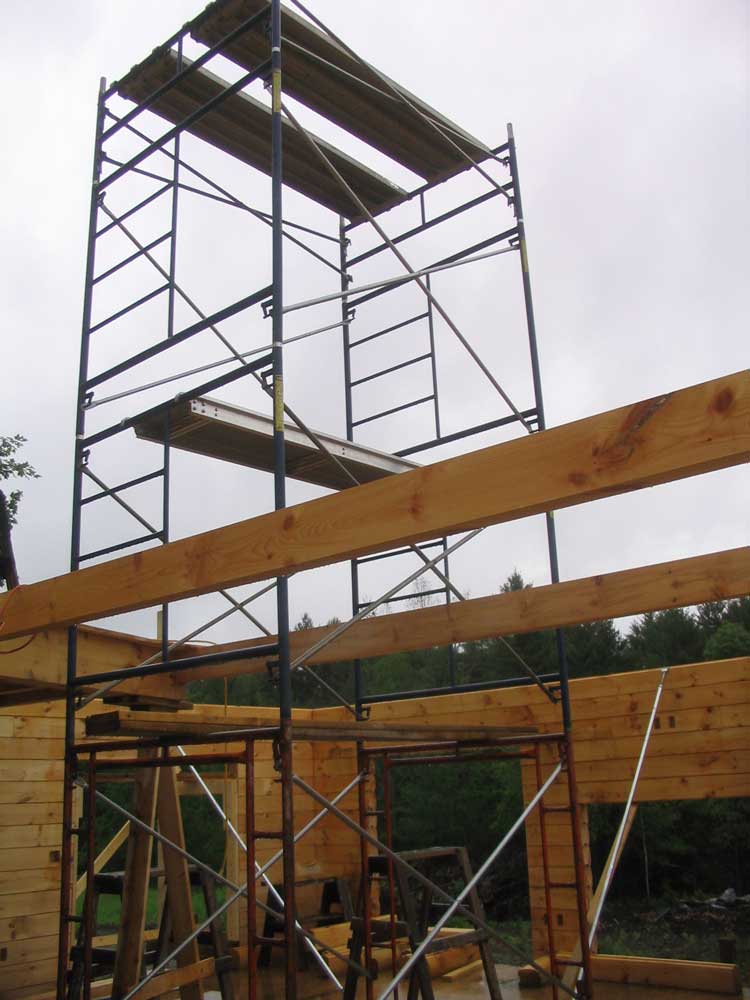
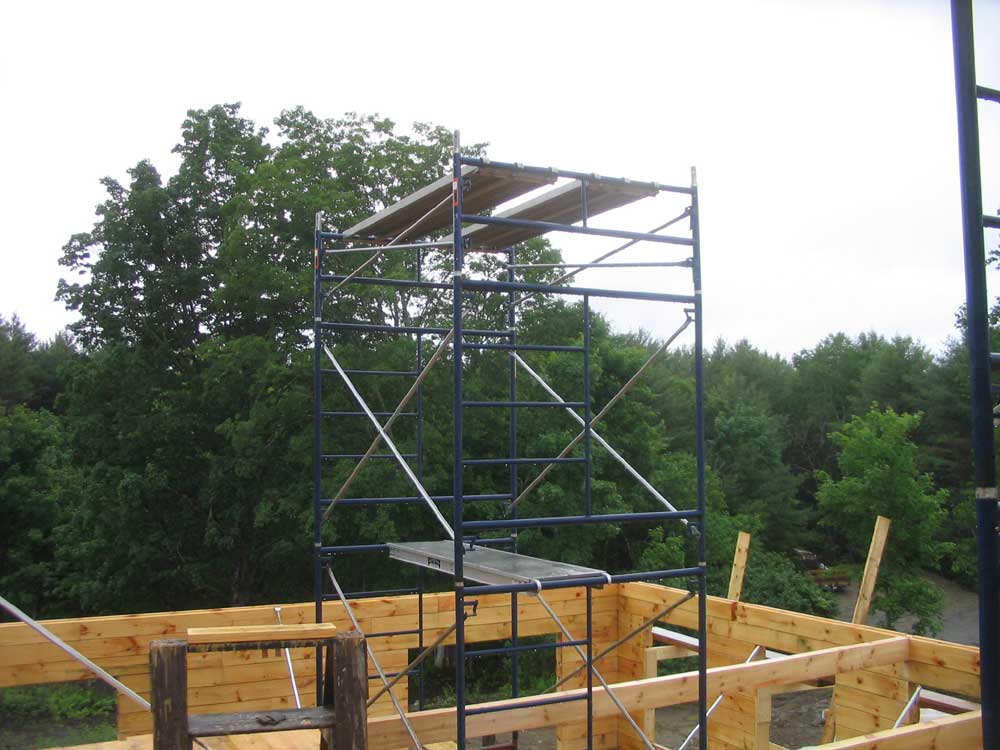
 Before
we could continue, we needed to set up some staging. Over the
period of a couple hours in the morning, we set up staging inside
and outside the house: some pipe staging on the second floor,
to allow us to reach the ridge pole and rafter tops, and some
site-built wooden staging around the outside of the front and back
walls on the cathedral end (south) of the house, made up from
dimensional lumber nailed inside the window and door openings (where
the nail holes wouldn't show later) with vertical supports and
bracing as needed. Before
we could continue, we needed to set up some staging. Over the
period of a couple hours in the morning, we set up staging inside
and outside the house: some pipe staging on the second floor,
to allow us to reach the ridge pole and rafter tops, and some
site-built wooden staging around the outside of the front and back
walls on the cathedral end (south) of the house, made up from
dimensional lumber nailed inside the window and door openings (where
the nail holes wouldn't show later) with vertical supports and
bracing as needed. |
|||
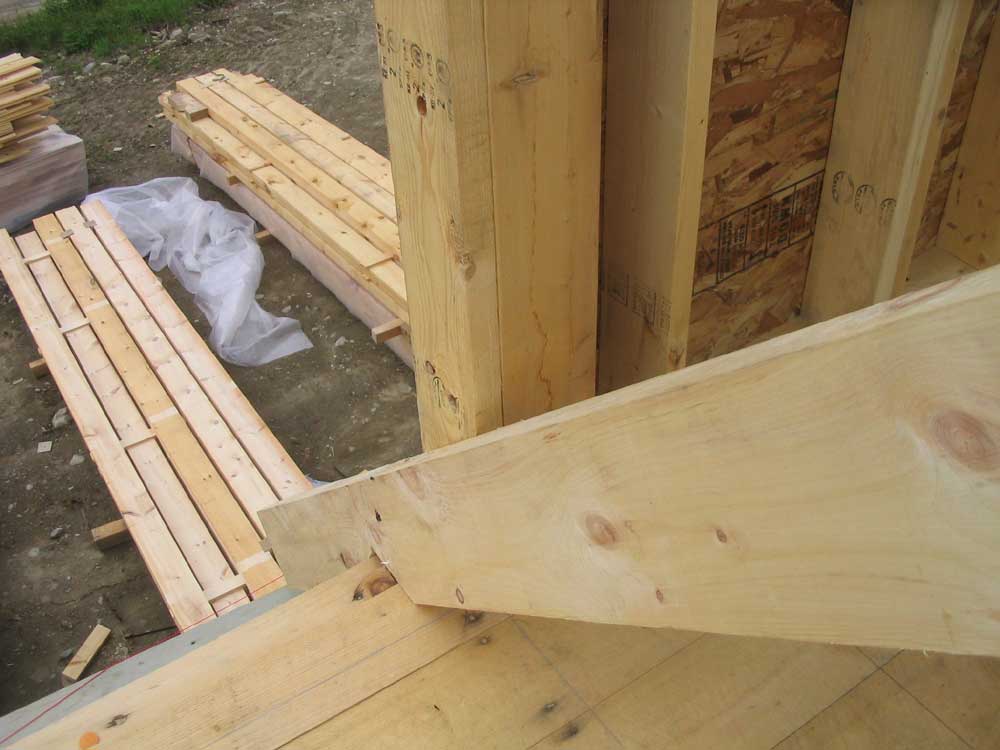
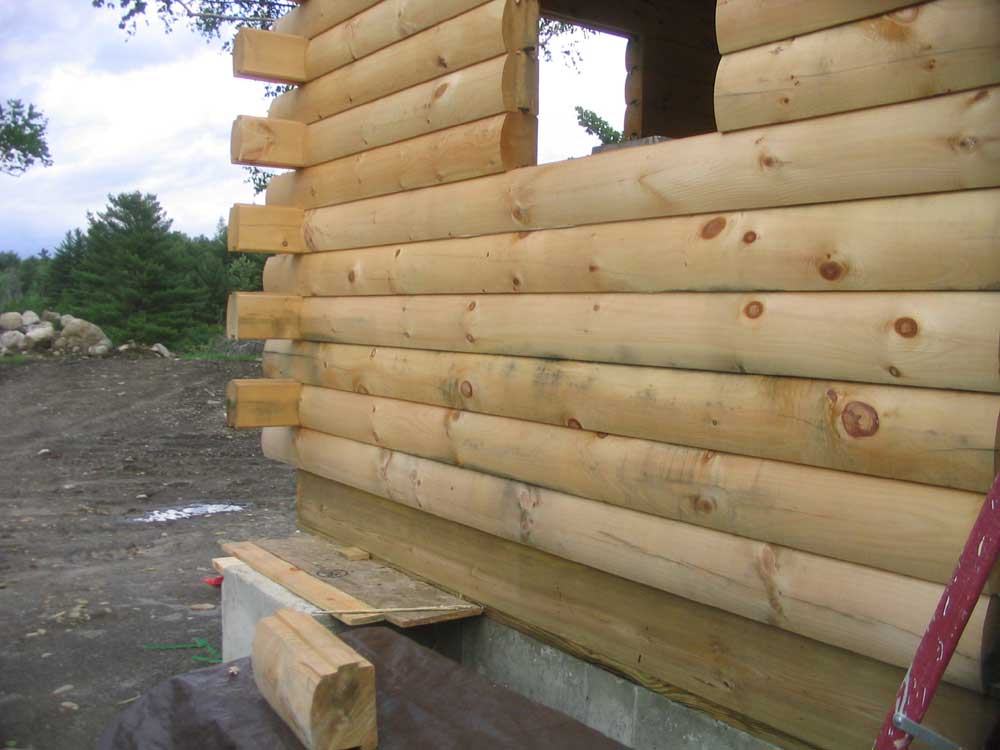
With the staging set up and ready for use, it was time to consider the installation of the first section of ridge pole--a 14' piece of 4" x 12" pine. There was no way to get it up there without simply just getting it up there, so we horsed it into the building and then cantilevered it onto the second floor, where Bob cut it to the proper length to allow for the 12" overhang outside the gable, and to have the ridge break exactly at a rafter location. Now, we had to get it an additional
13' in the air, up to its final location. The beam was heavy,
and initially it seemed like a nearly insurmountable problem, but we
came up with a plan to tip the beam up on end and then lift
and cantilever it over the 10' pipe staging. In this manner,
it was surprisingly easy to lift the beam up to the level of the
staging.
Flush with success, we climbed down for lunch, but then I noticed that we had installed the ridge upside down; we had chosen the better side to face down, and had marked the top accordingly. However, to prevent damage to the bottom, exposed side, we had slid the beam up onto the staging on its top. Once there, we had of course forgotten to flip the beam over before installing it. Fortunately, it was a relatively easy fix, and after lunch we flipped the beam and reinstalled it. |
|||
 Next,
it was time to address the rafters; with the rafters measuring 4"x8"
and up to 22' long, neither of us had been looking forward to this
task. The longest rafters proved to be quite heavy, but we
managed to get one from its pallet out front, up the stairs and onto
the second floor for cutting. We also brought up an 18-footer
for the opposing rafter, which would lay across the shed dormer and
was therefore shorter. Next,
it was time to address the rafters; with the rafters measuring 4"x8"
and up to 22' long, neither of us had been looking forward to this
task. The longest rafters proved to be quite heavy, but we
managed to get one from its pallet out front, up the stairs and onto
the second floor for cutting. We also brought up an 18-footer
for the opposing rafter, which would lay across the shed dormer and
was therefore shorter. |
|||
 Bob
cut the rafters and bird's mouths to shape, and we prepared to
install the two pieces. For now, we left the rafter tails
long, so that after all the rafters were installed we could snap a
line and cut them all off evenly for best appearance. Bob
cut the rafters and bird's mouths to shape, and we prepared to
install the two pieces. For now, we left the rafter tails
long, so that after all the rafters were installed we could snap a
line and cut them all off evenly for best appearance.Even though it was fewer than 24 hours ago as of this writing, I honestly can't remember if we installed the back rafter or the front rafter first. I think we started with the back (shorter) rafter, and this proved to be easier than anticipated. We lifted one end up on the back wall and slid it out a ways until it cleared the staging. Then, we lifted the other end onto the staging and eventually lifted it to the ridge, where Bob secured it with some toenails. |
|||
 We
moved onto the front rafter, which extended right next to the front
gable dormer and would form the first part of the cheek wall.
The seat cut at the bird's mouth sat right on the second floor,
which helped hold the rafter in place while we lifted the top end
onto the staging and, eventually, to the ridge. Once both
rafters were tacked at the ridge, we installed some 12" log screws
to permanently secure them, and then permanently secured the two
rafter tails. We
moved onto the front rafter, which extended right next to the front
gable dormer and would form the first part of the cheek wall.
The seat cut at the bird's mouth sat right on the second floor,
which helped hold the rafter in place while we lifted the top end
onto the staging and, eventually, to the ridge. Once both
rafters were tacked at the ridge, we installed some 12" log screws
to permanently secure them, and then permanently secured the two
rafter tails. |
|||
For the next pair of rafters--this one located on the other side of the front gable dormer--we changed tactics a bit, and cut the long rafter right down on its pile before lifting it onto the second floor from the front of the house, saving the extra effort of maneuvering the unwieldy timber through the maze of braces and staging on the smallish second floor. This worked surprisingly well, and, coupled with our knowledge and success gained from the first installations, we soon had the second pair of rafters installed. |
|||
|
|
|||
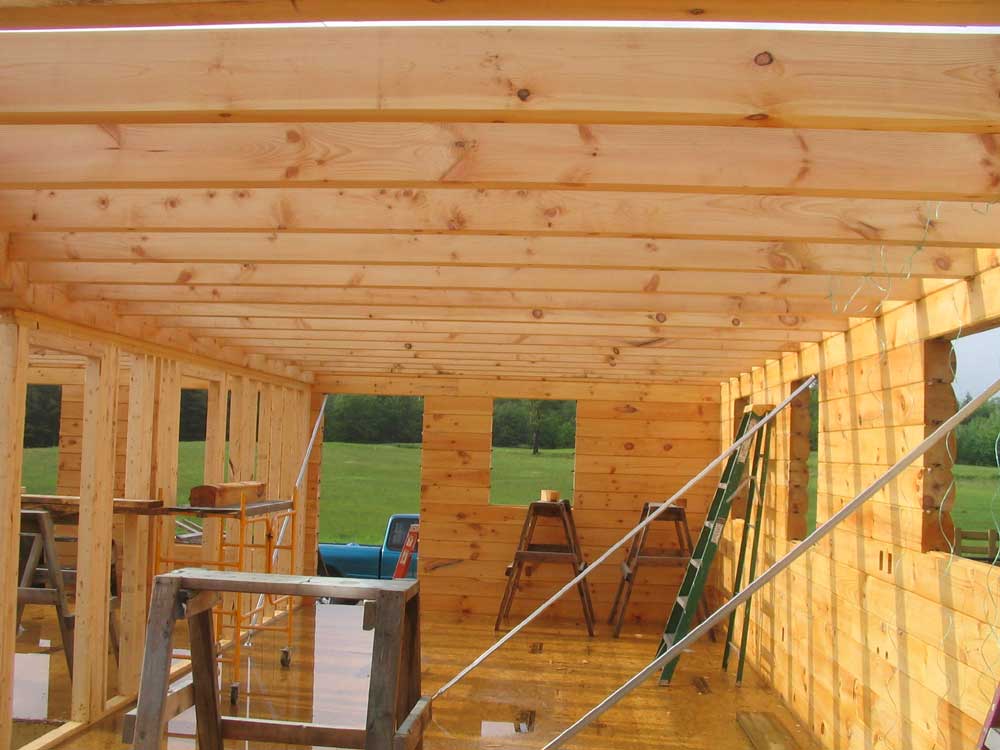
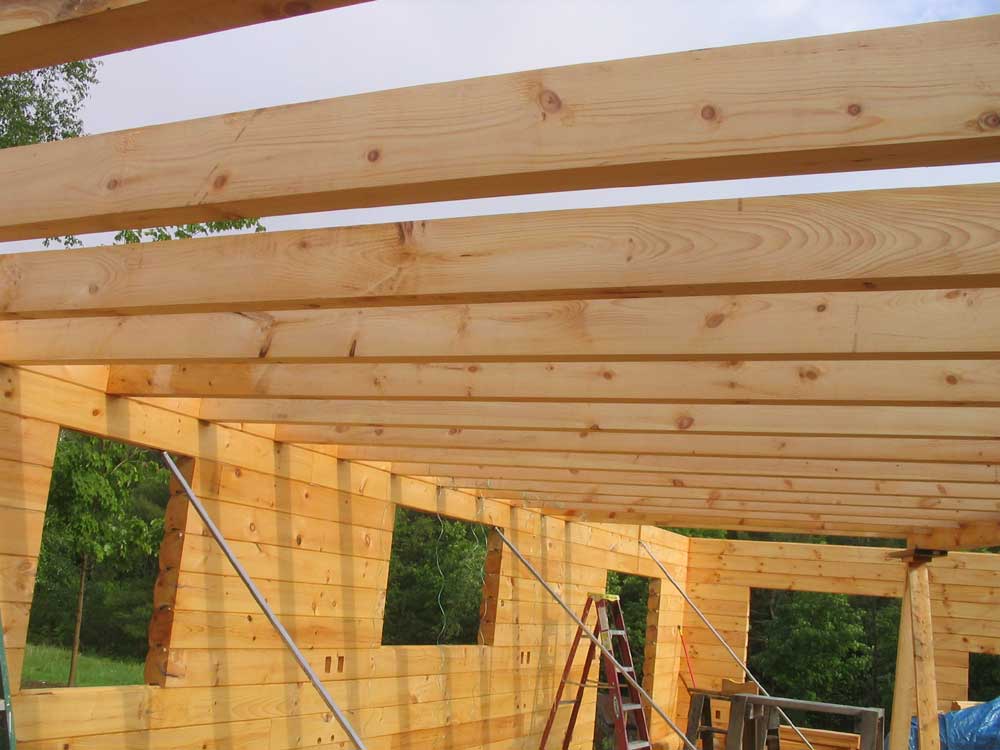
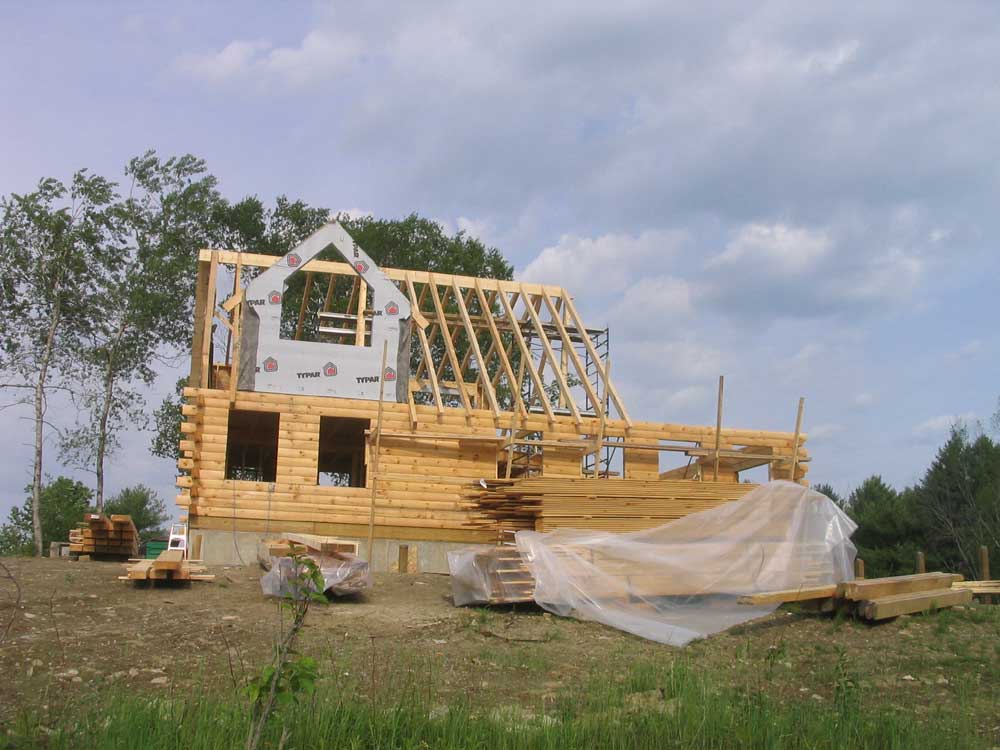
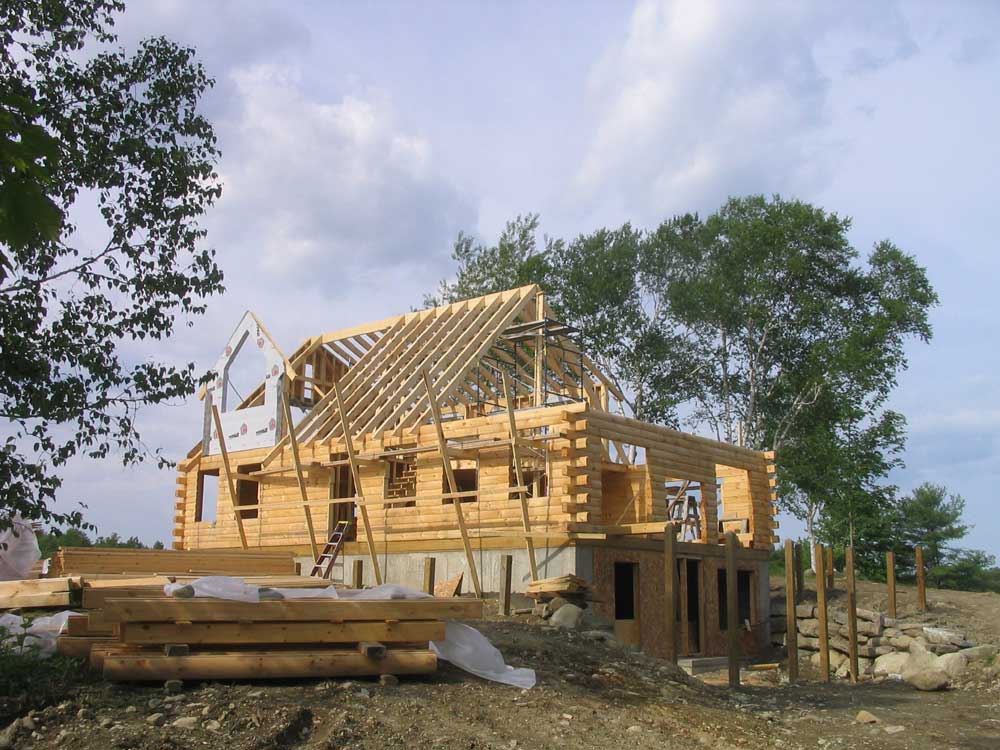
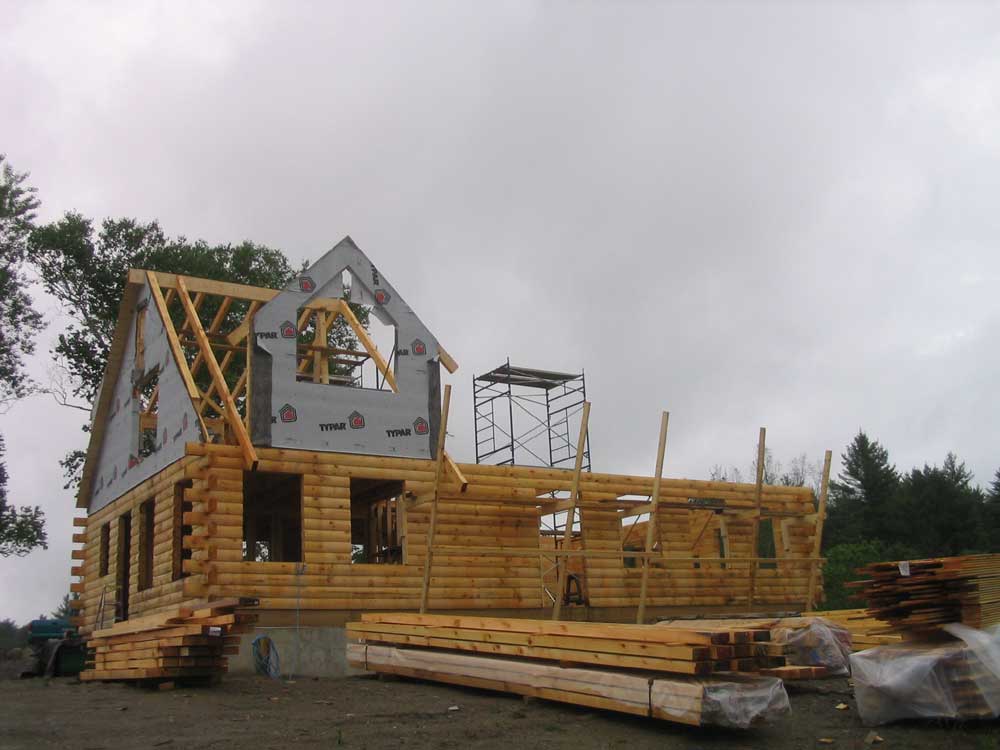
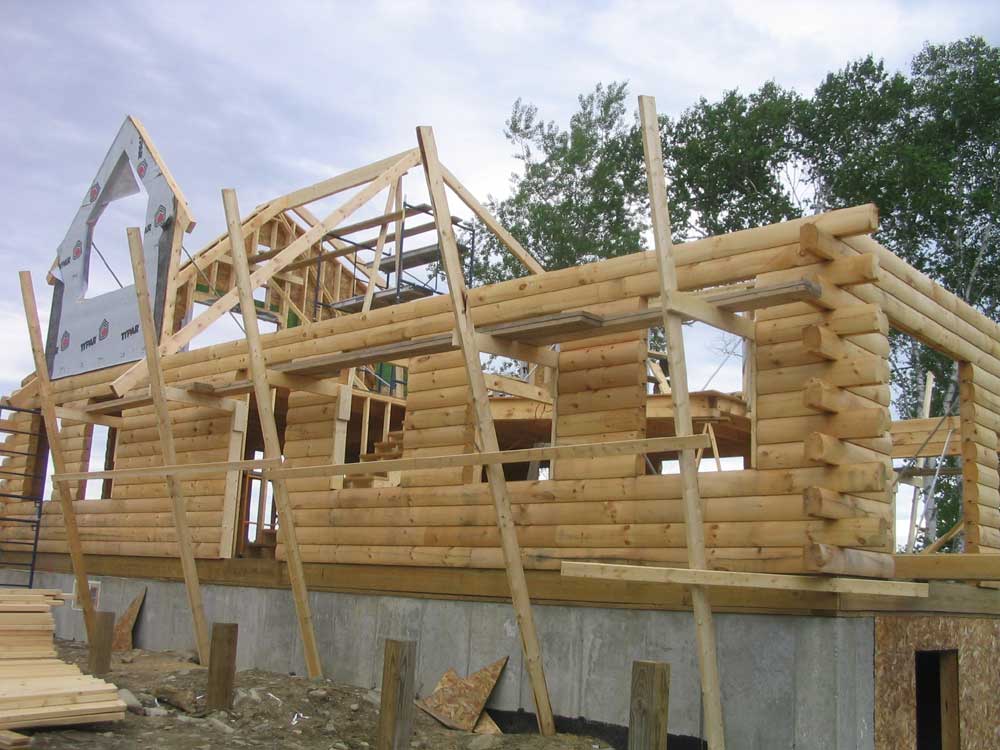
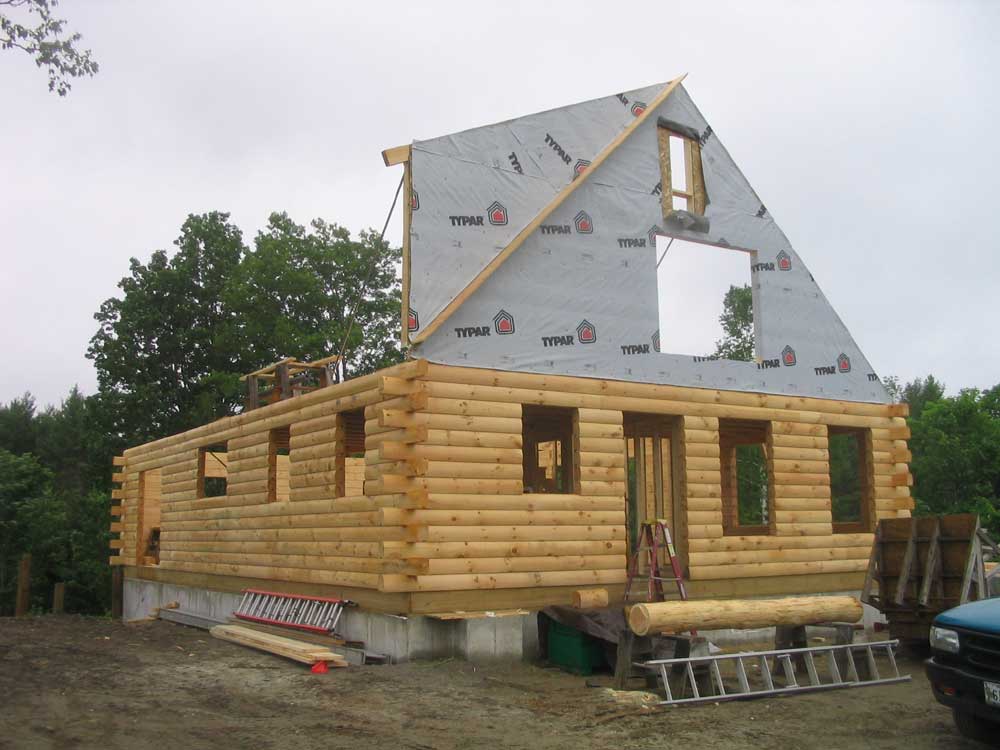
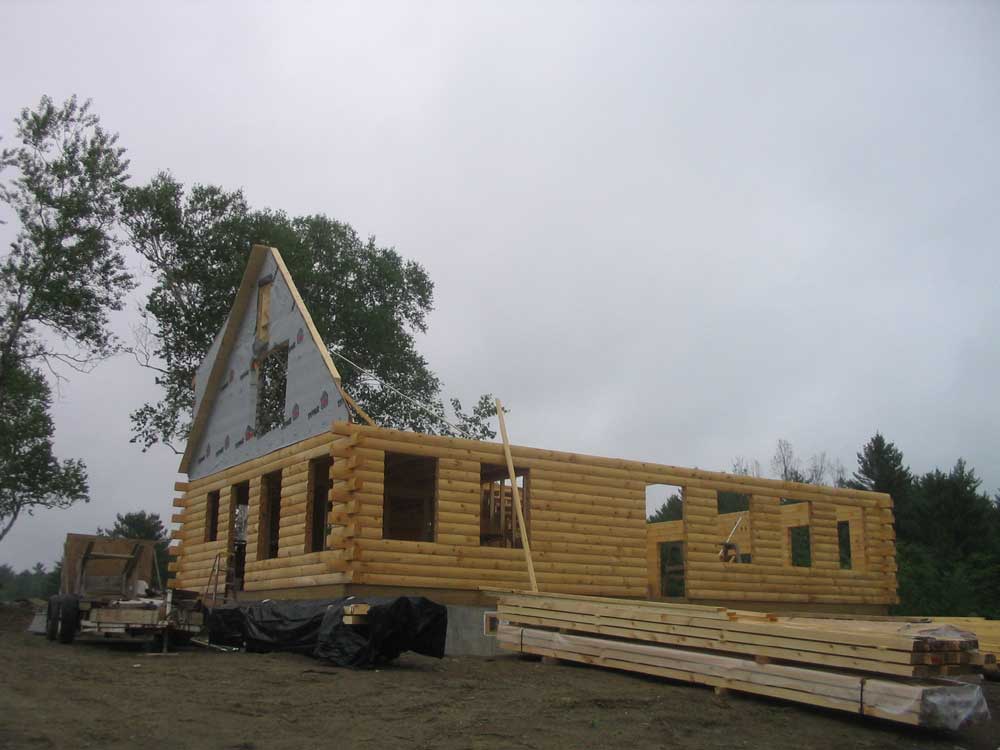
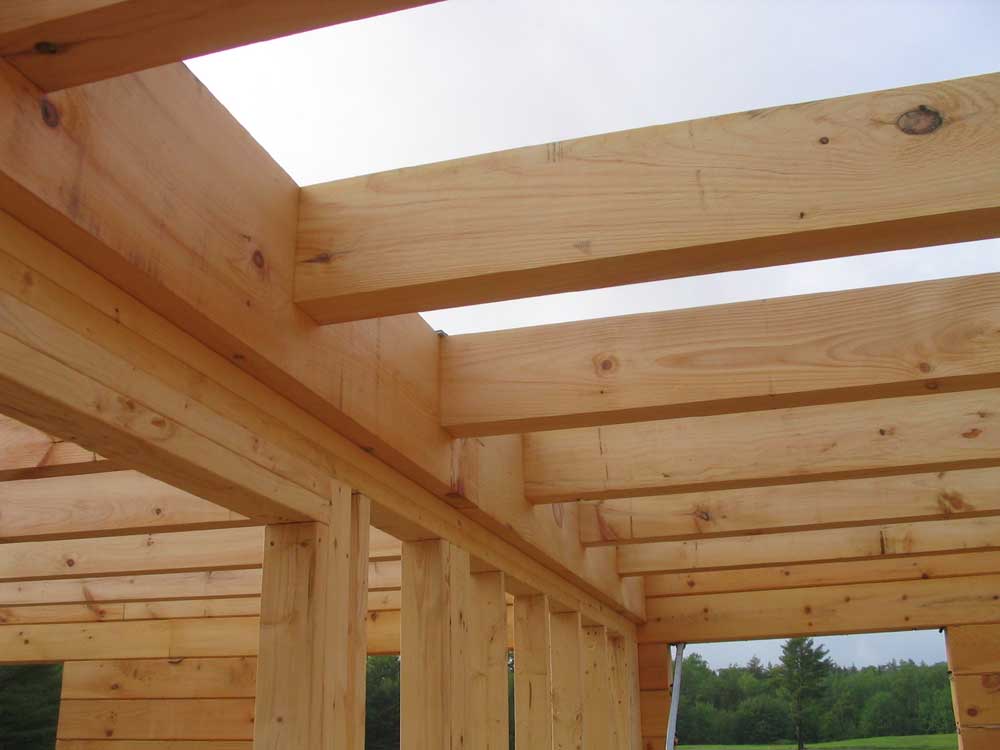
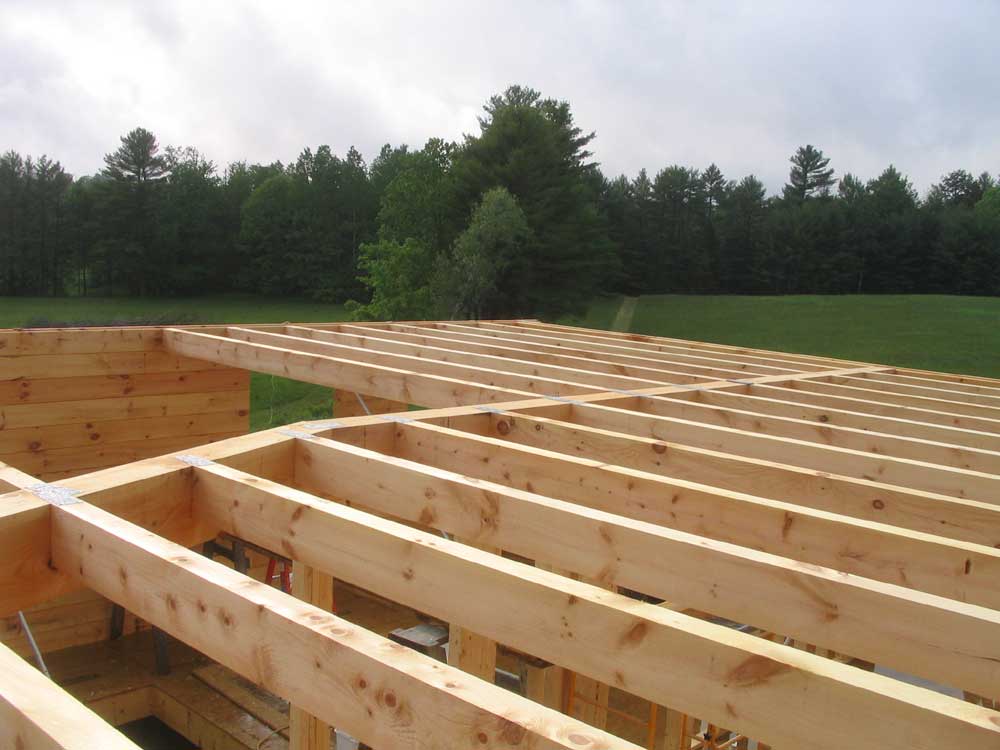
 The
section of ridge and rafters began to truly define the roofline and
the overall look of the house. With the size and heft of the
timbers, daily progress would be slow in comparison to traditional
framed roof systems, but with continued good weather it seemed as if
we could keep making good progress each day. The
section of ridge and rafters began to truly define the roofline and
the overall look of the house. With the size and heft of the
timbers, daily progress would be slow in comparison to traditional
framed roof systems, but with continued good weather it seemed as if
we could keep making good progress each day. |
|||
|
|
|||
MONDAY, JUNE 12, 2006 |
|||
| We
had more good weather today, though there was more rain overnight
that had me concerned once again--and enough rain to get the whole
house wet again, and leave large puddles on the floor that I had
carefully swept dry yesterday. Sigh. We jumped right into things, and set to framing up the back of the shed dormer in the usual way. By late morning, we had the wall stood up, secured, and braced. |
|||
|
|
|||
 After
lunch, we got to work on the gable end for the front gable dormer in
the bedroom, and spent the afternoon laying out and framing this
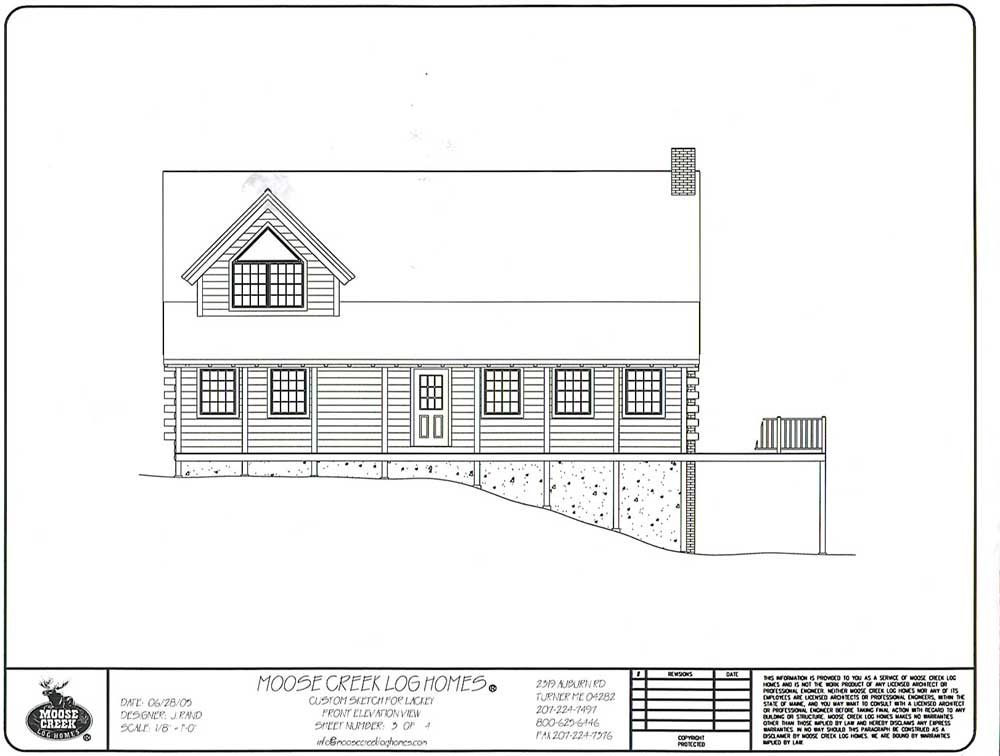
deceptively small wall. The wall contains a large window, and
we spent the bulk of the time figuring out at exactly what height
the window should be located. The plans for the house didn't
give a lot of specific guidance in this area, but eventually we
extrapolated the information we needed from several of the
elevations of the house in the plans, and chose a height that would,
when complete, approximate closely that shown on the front
elevation. After
lunch, we got to work on the gable end for the front gable dormer in
the bedroom, and spent the afternoon laying out and framing this
deceptively small wall. The wall contains a large window, and
we spent the bulk of the time figuring out at exactly what height
the window should be located. The plans for the house didn't
give a lot of specific guidance in this area, but eventually we
extrapolated the information we needed from several of the
elevations of the house in the plans, and chose a height that would,
when complete, approximate closely that shown on the front
elevation. |
|||
 The
height of the bottom of the window was important, since the porch
roof would eventually come in just beneath the finished window, so
we had to ensure that the window was located high enough to avoid
that. Once we figured that out, the remaining layout fell into
place easily, and we completed the frame on the wall. This was
surprisingly time consuming thanks to the number of cuts required;
plus, we had to install two of the 4x8 pine rafters in the wall,
each of which requires several cuts for the bird's mouth where it
crosses the plate. We stood up this wall, secured and braced
it, and that was pretty much it for the day. The
height of the bottom of the window was important, since the porch
roof would eventually come in just beneath the finished window, so
we had to ensure that the window was located high enough to avoid
that. Once we figured that out, the remaining layout fell into
place easily, and we completed the frame on the wall. This was
surprisingly time consuming thanks to the number of cuts required;
plus, we had to install two of the 4x8 pine rafters in the wall,
each of which requires several cuts for the bird's mouth where it
crosses the plate. We stood up this wall, secured and braced
it, and that was pretty much it for the day. |
|||
|
|
|||
SUNDAY, JUNE 11, 2006 |
|||
| I've
been trying, through these past rainy weeks, to keep my sense of
humor and perspective, and to just accept the fact that I cannot
change the weather. The delays in construction, while
frustrating, can be dealt with. But I was about ready to lose
it this morning! The house hasn't had a chance to truly dry out for weeks. The constant barrage of rain and dampness, with hardly any sunshine at all even when it's not raining, is taking its toll, and the logs are discoloring and beginning to mildew. This is discouraging, and is forcing me over the edge, mood-wise. I know that the staining will clean up with TSP and bleach, oxalic acid, and sanding, but the need to do this simply creates more work down the road--and I worry that if the weather doesn't improve drastically soon, I may be unable to get all the staining out of what began as very clean and fresh logs. The increase in staining and mildew in just the past few days is exponential. |
|||
|
|
|||
 Certainly
this isn't the first time a log house under construction has been
rained on, but we have had a pretty extraordinarily bad
stretch of weather since we began construction back in May. As
if last week's heavy rain on 3 days wasn't enough, on top of the
heavy rains of the week before and the week before that, we got even
more rain--in the form of a couple hours of very heavy precipitation
that just sort of rotated through our area out of nowhere--early
this morning, further compounding the misery and wetness. Poor
Heidi had to endure listing to me rant on for several minutes; while
it's pointless to complain about unchangeable things, sometimes one
just has to vent a bit! Certainly
this isn't the first time a log house under construction has been
rained on, but we have had a pretty extraordinarily bad
stretch of weather since we began construction back in May. As
if last week's heavy rain on 3 days wasn't enough, on top of the
heavy rains of the week before and the week before that, we got even
more rain--in the form of a couple hours of very heavy precipitation
that just sort of rotated through our area out of nowhere--early
this morning, further compounding the misery and wetness. Poor
Heidi had to endure listing to me rant on for several minutes; while
it's pointless to complain about unchangeable things, sometimes one
just has to vent a bit! |
|||
Fortunately for my mood, the weather actually improved today, late in the morning; the sky cleared (partly), and the sun came out, bringing a much-needed boost to morale. It's funny: this is the second time in recent memory that I have railed against the weather and shaken my proverbial fist to the skies in frustration, only to have the conditions drastically improve shortly thereafter. Last summer, coming home from our cruise, I had a similar "discussion" with the weather Gods about some stubborn fog that we were stuck in; imagine my surprise when, mere minutes later, the fog lifted completely. With today's events, I was starting to think that perhaps--just perhaps--I had some influence over the weather. Hmmm...
|
|||
|
|
|||
SATURDAY, JUNE 10, 2006 |
|||
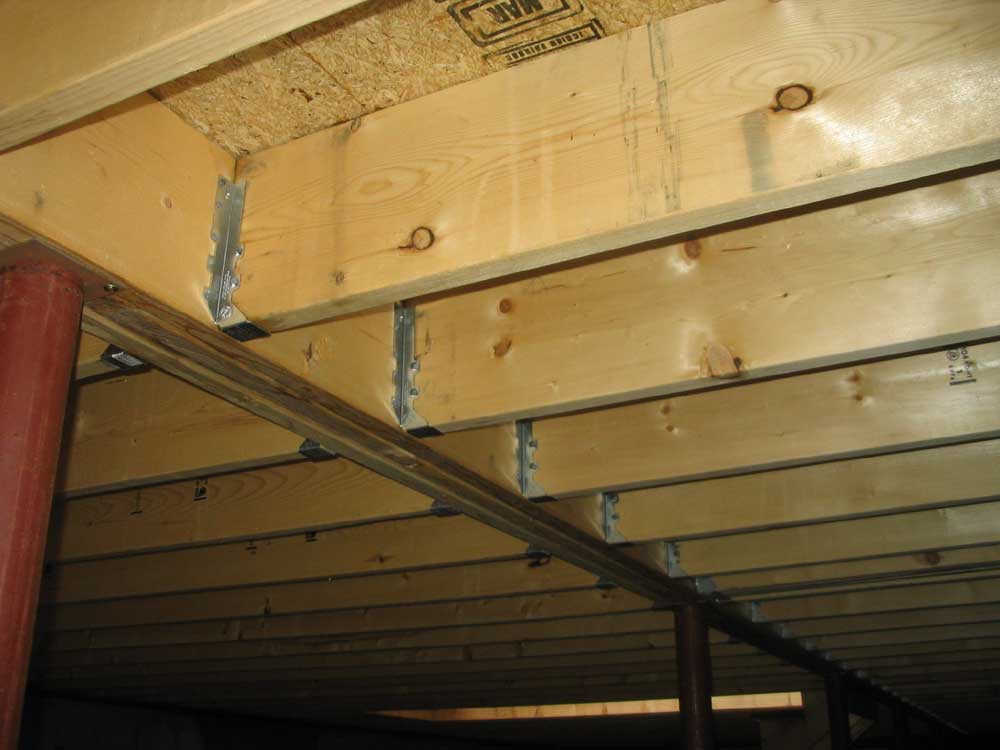 With
rain showers of varying intensity this morning--yet again--I forced
myself to go up to the house and finish installing the joist hangers
in the basement. Other than an occasional drip through one of
the Advantech seams over my head, I stayed dry, and wrapped up the
task in a couple hours. It was hardly a satisfying or
noteworthy task, but nonetheless was one more thing to check off the
list. With
rain showers of varying intensity this morning--yet again--I forced
myself to go up to the house and finish installing the joist hangers
in the basement. Other than an occasional drip through one of
the Advantech seams over my head, I stayed dry, and wrapped up the
task in a couple hours. It was hardly a satisfying or
noteworthy task, but nonetheless was one more thing to check off the
list. |
|||
FRIDAY, JUNE 9, 2006 |
|||
| The
weather today was quite acceptable, actually, but unfortunately we
had a "planned no-work day" since Bob had to finish the plumbing at
his son Will's house. It was just too bad that this happened
to fall on one of the only decent days of the week, but what can you
do. To compensate, I started work on the tedious chore of installing joist hangers in the basement, to support the first floor joists. During initial deck construction, we had just toenailed each joist to the center beam; now, it was time to consider getting these hangers installed--exciting stuff. But progress is progress, after all. I worked on the hangers in the sopping wet, dark, dank basement for about an hour, getting about 1/3 of them installed (each hanger requires 12 nails, so it takes a while), before I decided that the weather outside was nice enough to do some outdoor tractor work, so I quit at that point and enjoyed the relatively good weather for a change. |
|||
THURSDAY, JUNE 8, 2006 |
|||
| Rain. All day. Heavy. | |||
WEDNESDAY, JUNE 7, 2006 |
|||
| Well, the weather was once again uncooperative, but that didn't stop us from getting the north gable wall stood up and secured in place. With the forecast calling for rain, and the leading edge of the precipitation at the Maine border first thing t his morning, we knew we were on borrowed time, and at least we managed to get the wall up--and just in time, because as we finished up, the rain began spitting. (What a bore this is becoming, this rain.) | |||
 Before
beginning, there were a few preparatory details to be dealt with.
First, Bob installed a couple pieces of scrap metal banding material
(from the material deliveries) to the bottom plate of the wall,
nailing them inside to the second floor. He had to remove a
piece of the sheathing on one side for sufficient access, as he had
forgotten to put this banding in place before. The banding
would hold the base of the wall in place during lifting, not only
properly aligning the wall, but also preventing it from slipping
over the side and catastrophically to the ground--a hinge,
basically. Before
beginning, there were a few preparatory details to be dealt with.
First, Bob installed a couple pieces of scrap metal banding material
(from the material deliveries) to the bottom plate of the wall,
nailing them inside to the second floor. He had to remove a
piece of the sheathing on one side for sufficient access, as he had
forgotten to put this banding in place before. The banding
would hold the base of the wall in place during lifting, not only
properly aligning the wall, but also preventing it from slipping
over the side and catastrophically to the ground--a hinge,
basically. |
|||
 While
he did that, I installed some pine cleats to the top of the log
walls to make the portion outside the log tongue even with the 2nd
floor decking inside. The manual had recommended cutting off
the tongue on the 14th log course, but this seemed like unnecessary
work; instead, I milled some scrap pine into strips of wood 3/4"
wide and about 7/8" thick, to match the thickness of the shiplap
pine decking. Adding the strips was required since the bottom
plate of the wall sat out over the edge of the decking, across the
log tongue, and onto this cleat for support. While
he did that, I installed some pine cleats to the top of the log
walls to make the portion outside the log tongue even with the 2nd
floor decking inside. The manual had recommended cutting off
the tongue on the 14th log course, but this seemed like unnecessary
work; instead, I milled some scrap pine into strips of wood 3/4"
wide and about 7/8" thick, to match the thickness of the shiplap
pine decking. Adding the strips was required since the bottom
plate of the wall sat out over the edge of the decking, across the
log tongue, and onto this cleat for support. |
|||
 Next,
we installed the Typar house wrap over the sheathing and stapled it
down with a special staple gun that drove the staples through a
small plastic disc for increased holding power. Finally, we
installed two wall jacks, one on each side of the wall, with which
to lift the wall into place. I installed some of the foam that
we used between the logs on the log tongue beneath the bottom plate,
and then two heavy beads of Sikaflex, and we were ready to go. Next,
we installed the Typar house wrap over the sheathing and stapled it
down with a special staple gun that drove the staples through a
small plastic disc for increased holding power. Finally, we
installed two wall jacks, one on each side of the wall, with which
to lift the wall into place. I installed some of the foam that
we used between the logs on the log tongue beneath the bottom plate,
and then two heavy beads of Sikaflex, and we were ready to go. |
|||
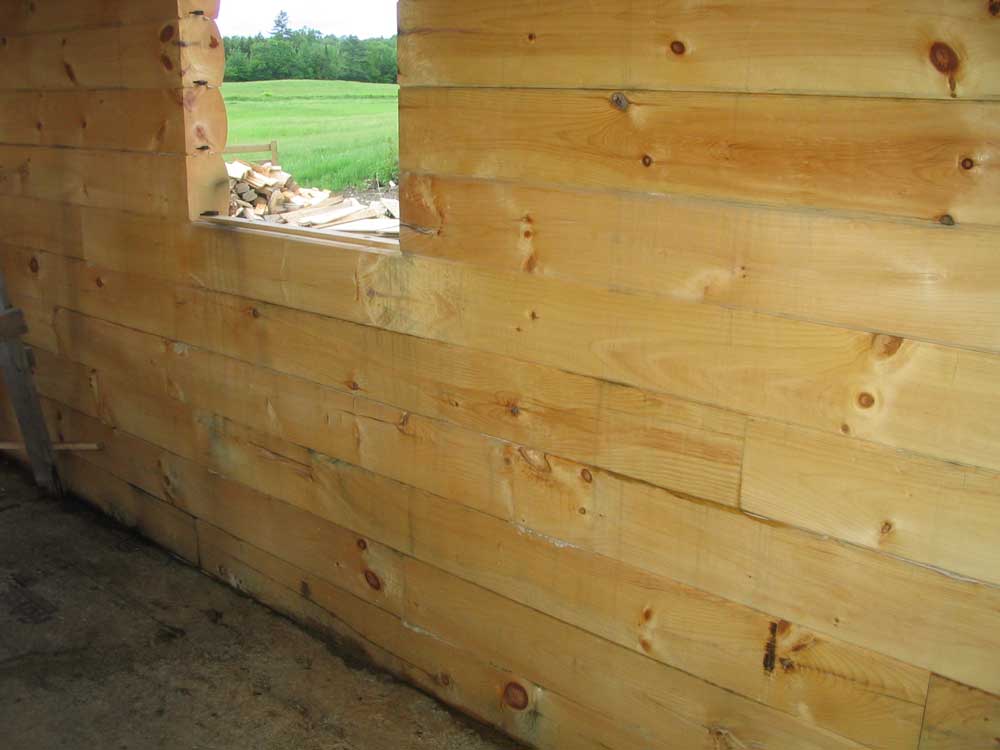
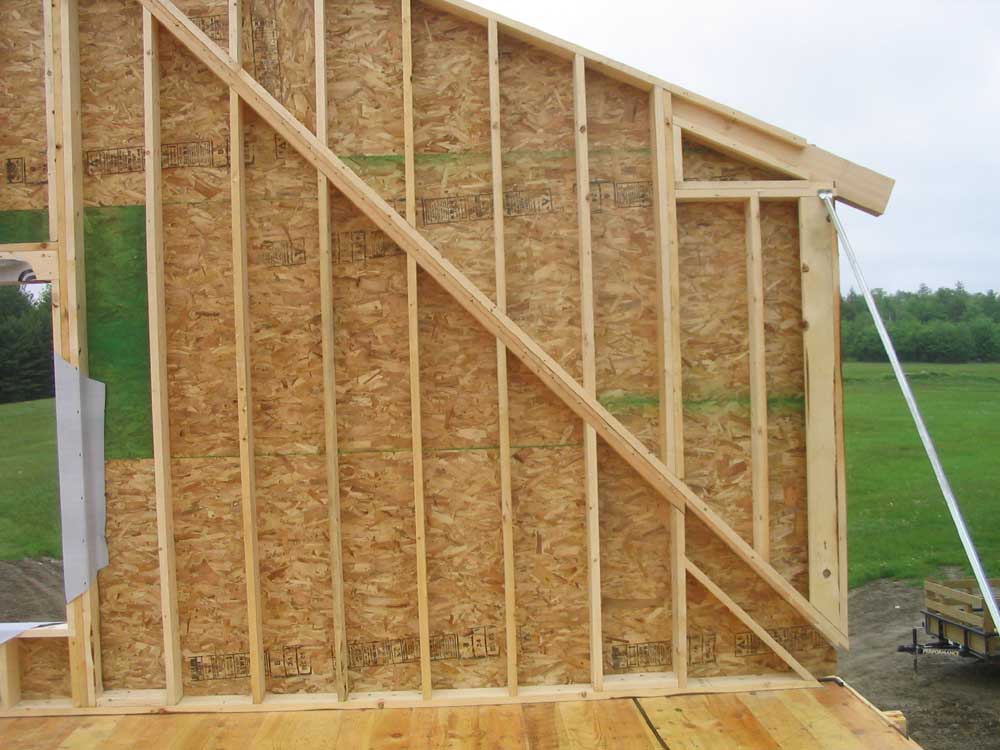
 Once
we started lifting, however, it was clear that the wall wasn't
lifting right; the left-hand (front) jack was in the wrong place.
To make it right, Bob had to cut out a piece of the sheathing in the
center of the gable, and install the jack through the studs there.
So in the pictures, the slot above the window is temporary, and
represents where the jack was installed. Once
we started lifting, however, it was clear that the wall wasn't
lifting right; the left-hand (front) jack was in the wrong place.
To make it right, Bob had to cut out a piece of the sheathing in the
center of the gable, and install the jack through the studs there.
So in the pictures, the slot above the window is temporary, and
represents where the jack was installed. |
|||
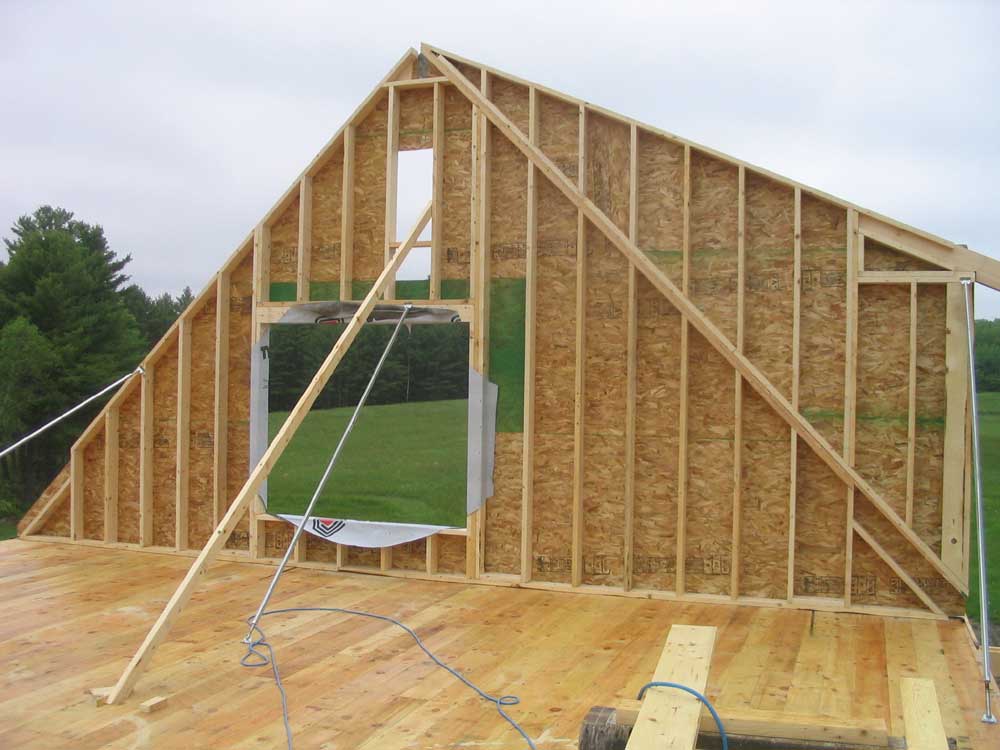 Once
the jack was repositioned, things went swimmingly, and soon the wall
was upright--and looking immense. We braced it with some metal
wall braces, as well as one 2x4, and screwed it to the first floor
logs with log screws. At about this time, it began to rain,
thus marking the end of our day, sadly. Once
the jack was repositioned, things went swimmingly, and soon the wall
was upright--and looking immense. We braced it with some metal
wall braces, as well as one 2x4, and screwed it to the first floor
logs with log screws. At about this time, it began to rain,
thus marking the end of our day, sadly.The inside of the sheet of OSB at the top right of the window opening is painted green, but this photo makes it look like the hayfield beyond, as the color matches so closely. |
|||
With the wall standing, I have the opportunity to help clarify some of yesterday's construction detail. |
|||
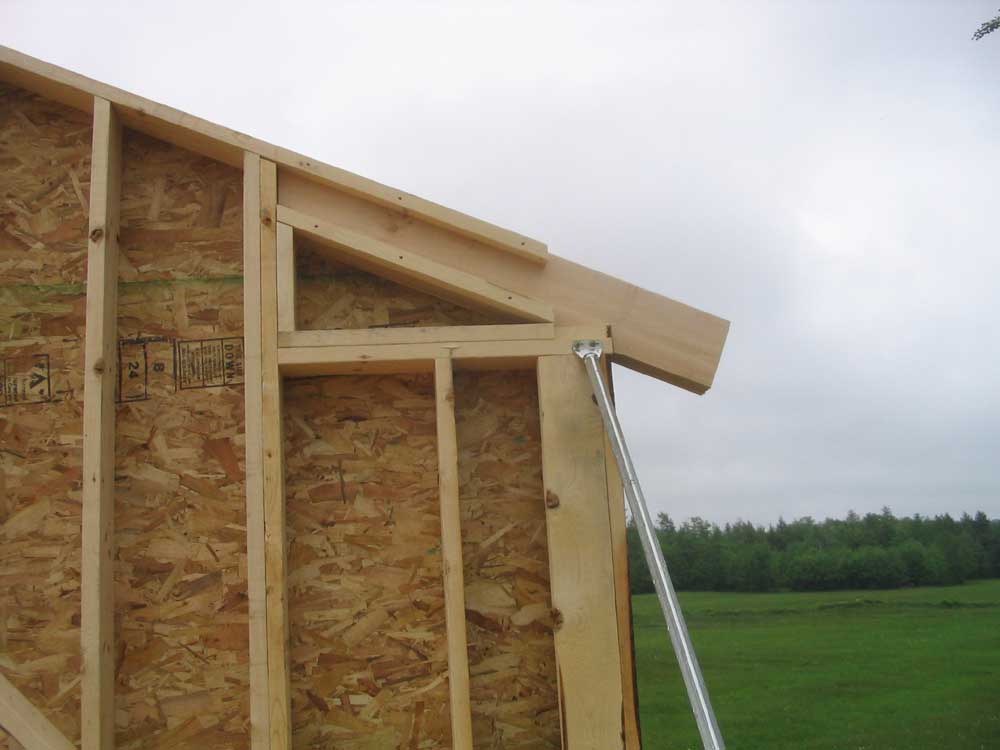
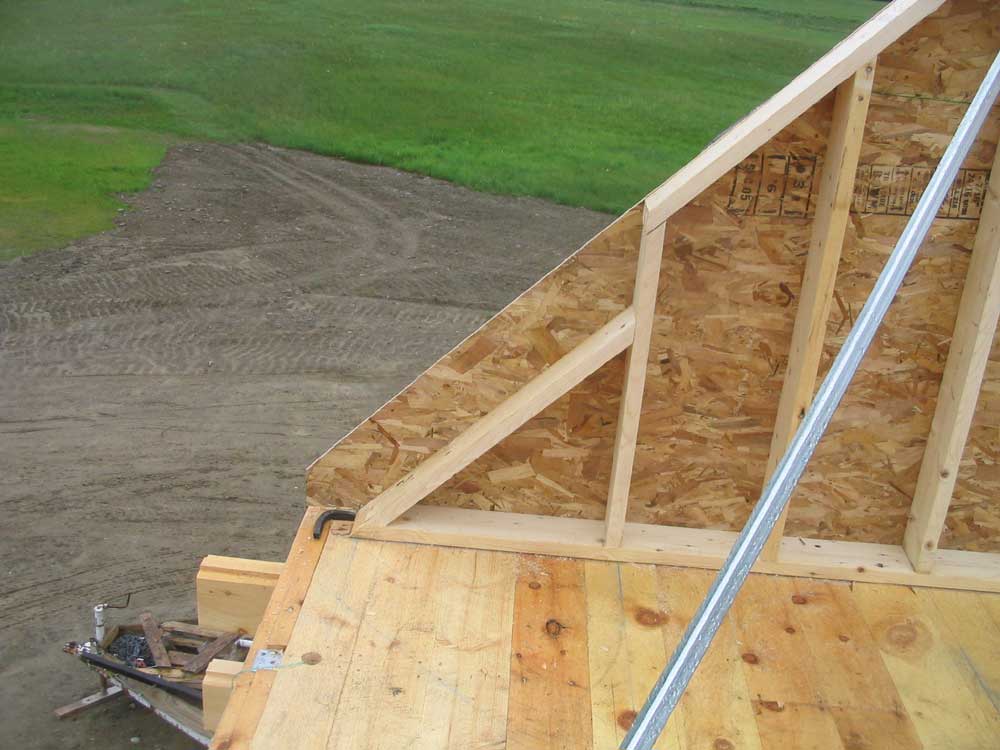 This
is a pocket in the front side of the gable roof. Later, we'll
slide a 4x8 pine beam in here to match the full-length pine rafters
that will make up most of the roof framing. We saw no need to
use a real rafter here on the gable end, and Bob came up with this
idea. This
is a pocket in the front side of the gable roof. Later, we'll
slide a 4x8 pine beam in here to match the full-length pine rafters
that will make up most of the roof framing. We saw no need to
use a real rafter here on the gable end, and Bob came up with this
idea. |
|||
 This
is the same thing on the back side of the gable. This
is the same thing on the back side of the gable. |
|||
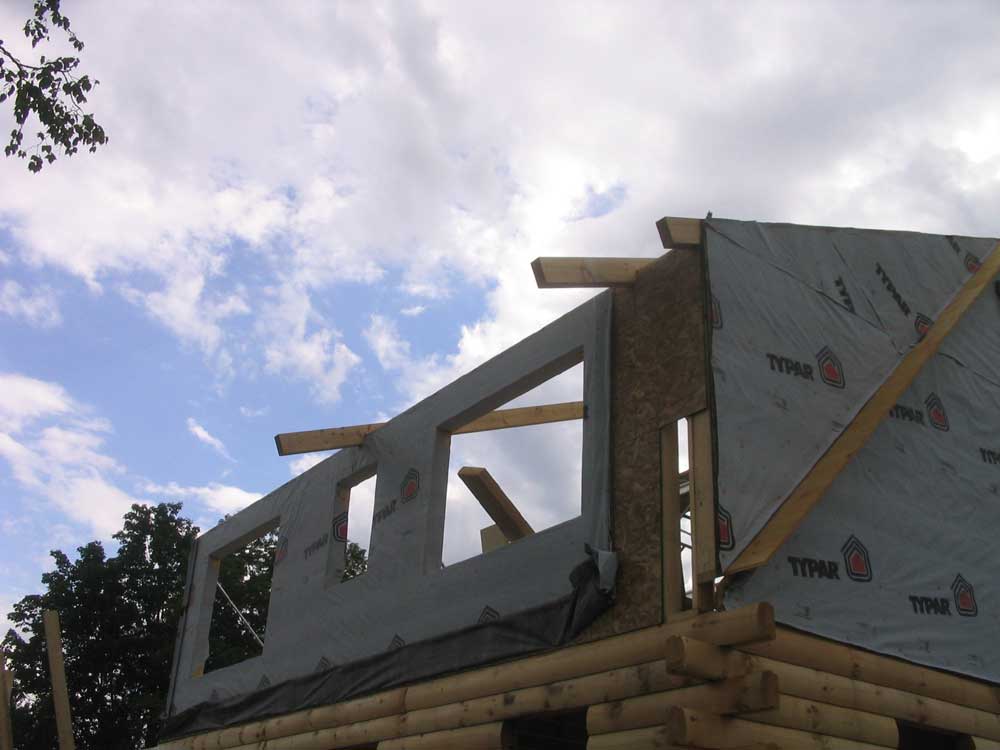
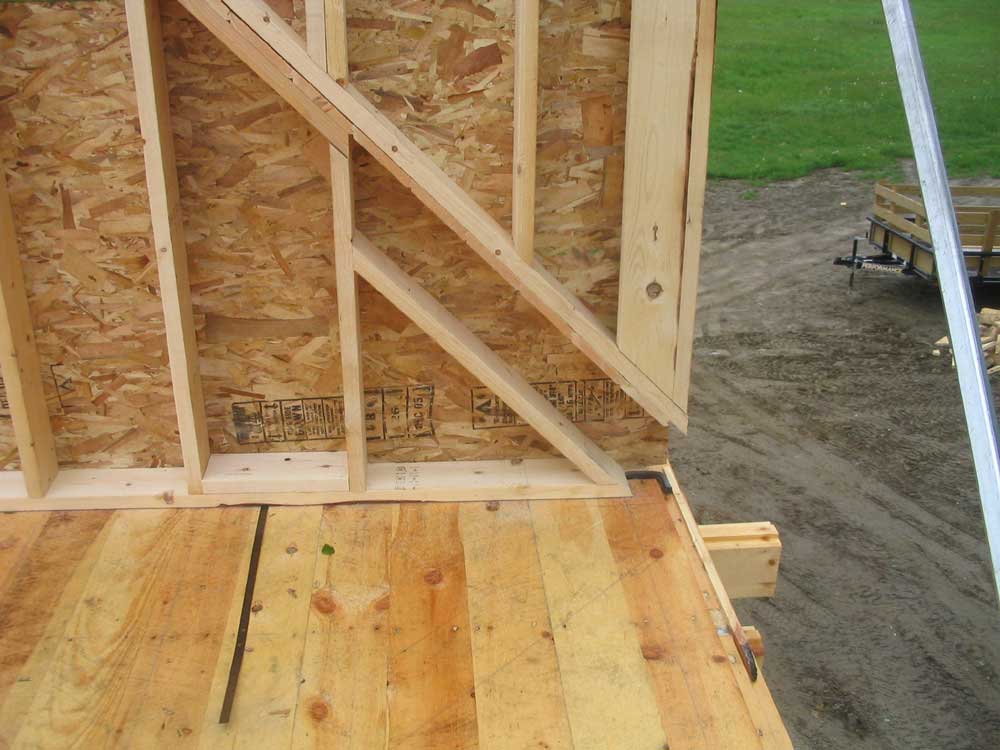
 This
shows most of the shed dormer framing at the gable wall. The
angled framing down the center is the line the roof would take
without the dormer (the 12:12 pitch), and is where the shiplap pine
overhang boards are nailed. The portion of these boards that
extends outside of the gable represents the plane the roof would
take if not for the shed dormer in this area. This
shows most of the shed dormer framing at the gable wall. The
angled framing down the center is the line the roof would take
without the dormer (the 12:12 pitch), and is where the shiplap pine
overhang boards are nailed. The portion of these boards that
extends outside of the gable represents the plane the roof would
take if not for the shed dormer in this area. |
|||
 The
shed dormer roof gets pine rafters too (exposed from inside, as are
those in the main roof), but again: in the gable, we saw no
need to use a real rafter, so here is the short piece installed in a
pocket similar to those seen a couple photos above. Unlike
conventionally framed homes, the exposed ends of the rafters in this
log home will not be plumb cut, but will remain straight cut as seen
here. The
shed dormer roof gets pine rafters too (exposed from inside, as are
those in the main roof), but again: in the gable, we saw no
need to use a real rafter, so here is the short piece installed in a
pocket similar to those seen a couple photos above. Unlike
conventionally framed homes, the exposed ends of the rafters in this
log home will not be plumb cut, but will remain straight cut as seen
here. |
|||
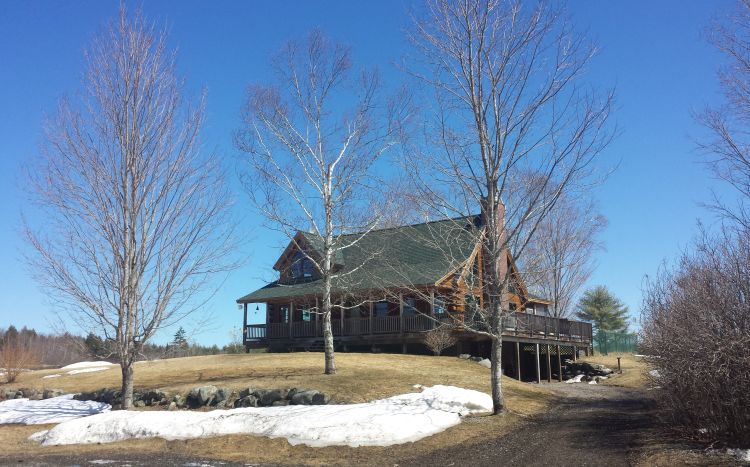
Now, it's time for a little fun. (Can you tell that it's raining and I have no construction to do?) I found a picture from exactly one year ago today that happens to be taken at generally the same vantage point from which I take the header (top of page) photos that you see frequently changing. What a difference a year makes! In this photo, work on the driveway had just gotten underway--our very first step in the construction process. The house sits there just as I envisioned it would way back when...even better, perhaps. The blue arrows are pointing to the same trees in each photo. |
|||
June
7, 2005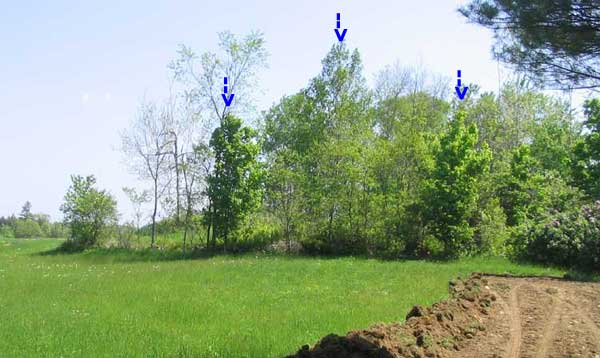 |
|||
June
7, 2006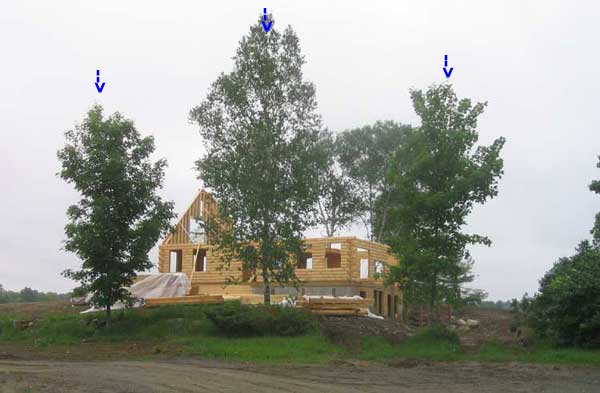 |
|||
TUESDAY, JUNE 6, 2006 |
|||
| Finally: a good day! The day began with fog, but the blue sky was visible through the fog and by mid-morning the fog had cleared, leaving behind bright skies and gentle breezes. Of course, the forecast was already calling for more rain tomorrow, and the next day, and quite possibly the next day and into the weekend...ho hum. This winter weather pattern we're in has got to change soon. It's driving everyone batty. | |||
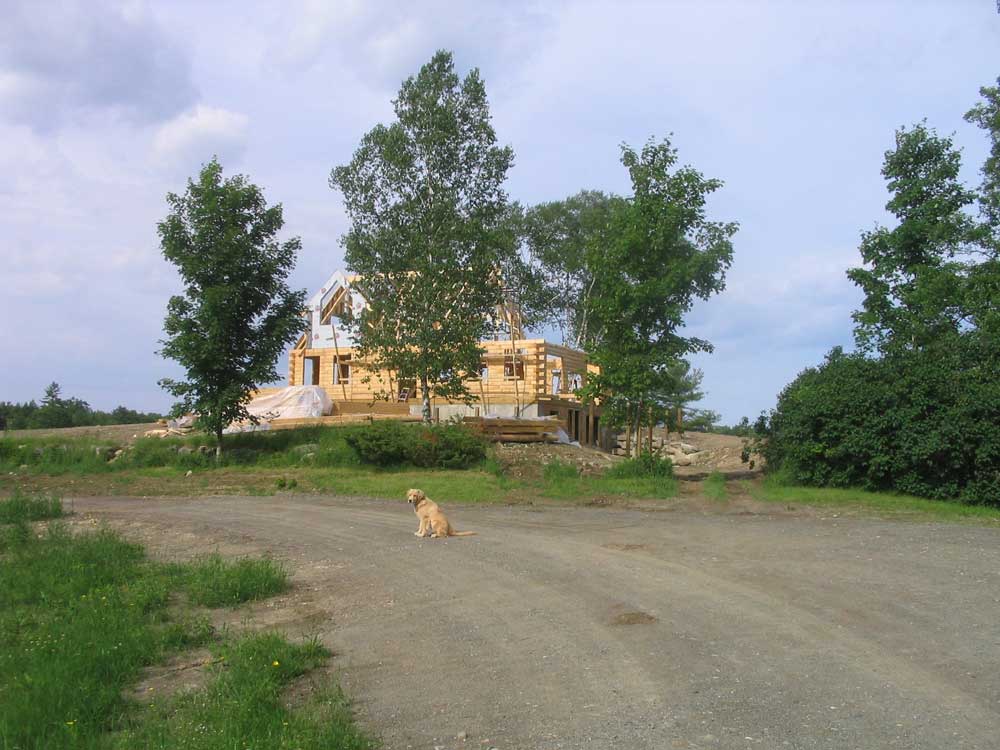
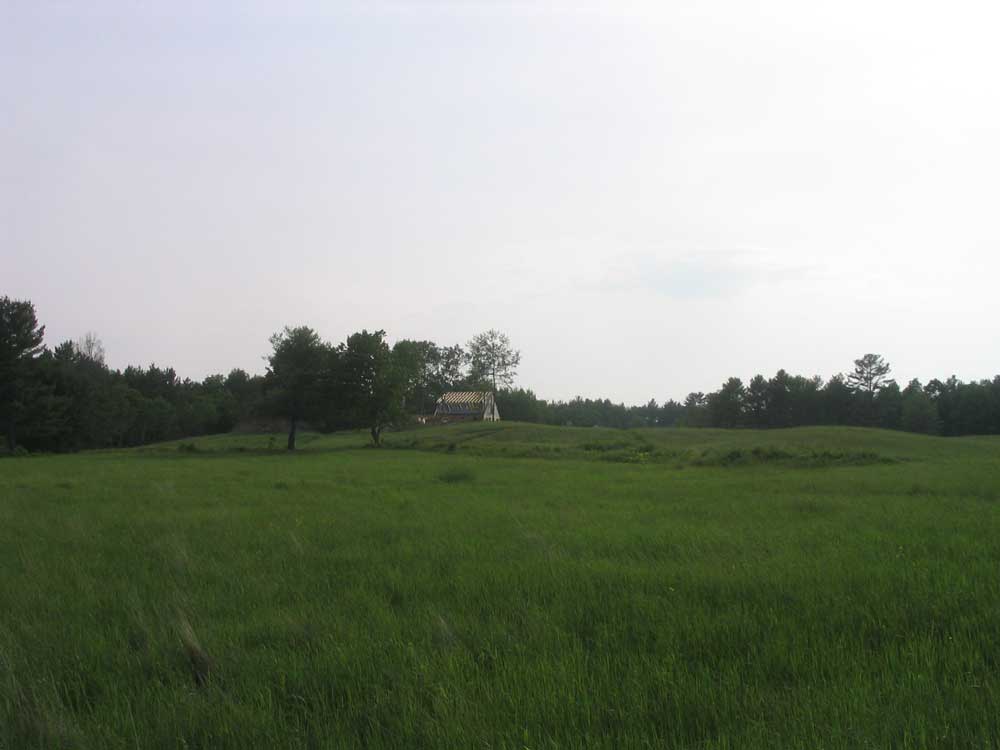
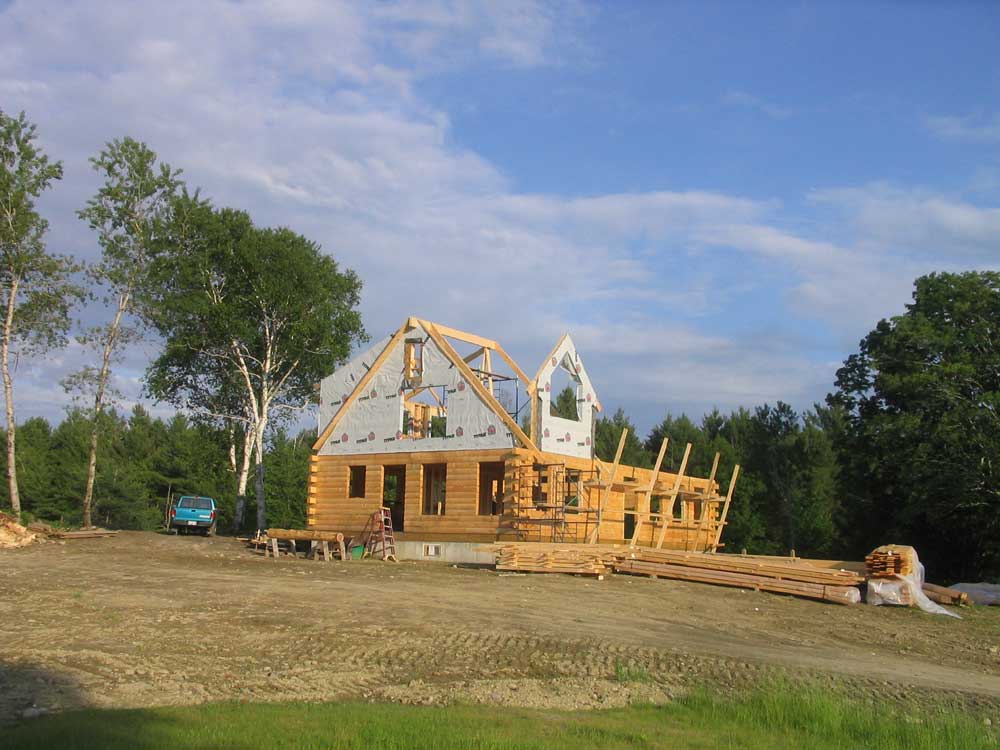
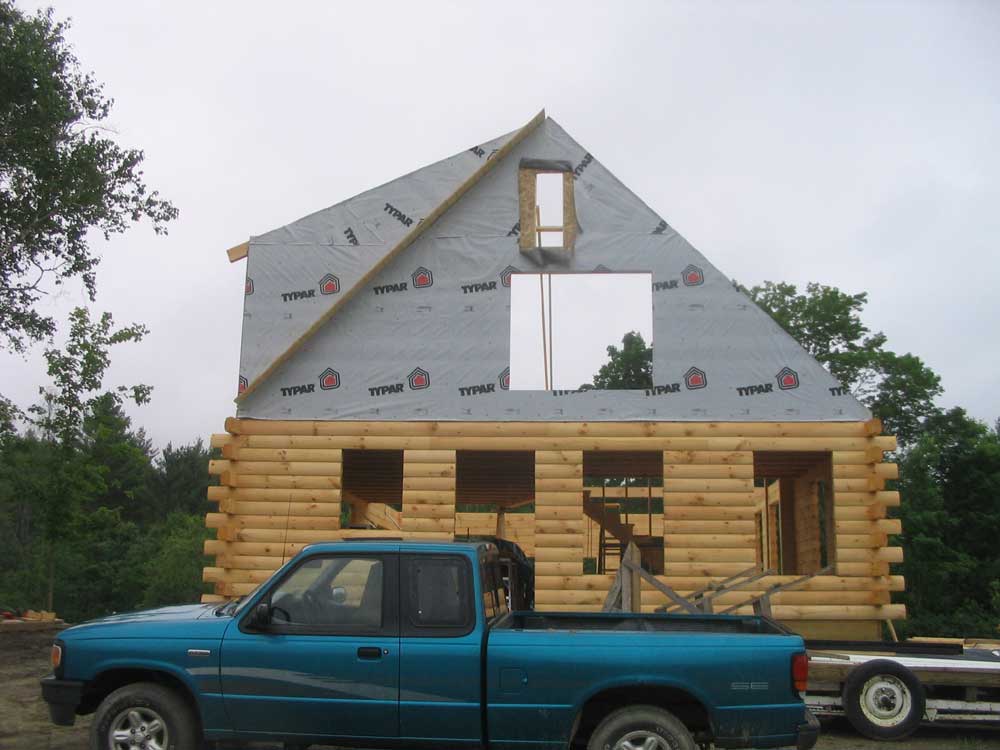
We got a lot done today, but it was one of those days where much of the progress--important progress--was not something I can show you. We (meaning mostly Bob) spent a good part of the morning head scratching and figuring out the gable end and the rafter details. I don't think I can adequately explain the various issues that had to be taken into account when determining the cuts on the rafter ends, all of which needed to be figured before any further building could continue, but suffice it to say that I would have been completely lost without Bob's experience and foresight. Oh, I would have eventually figured things out, I'm sure, but it would have taken much longer, with more frustration, and probably a less good end result in the end. And I doubt I would have thought of some of the details he did, meaning that later in the process I would have had to improvise a solution--do-able, but better this way! I thought it might be interesting, for those of you who have not been to the site, to see a picture showing the relationship between house and barn. |
|||
|
|
|||
Now, we have a detailed construction manual provided by the log home company, which covers many of the aspects of building the house--particularly those details specific to the logs and some of the related features. It contains many good drawings of various joints and techniques, but as time goes on we find more and more holes in the coverage. With Bob's experience, we have never relied entirely on the manual, of course, using it as a guideline to often point us in the right direction; like all writings and other directions, complete reliance on such things can often lead to dead ends. Log homes are often touted as DIY friendly and capable of being built by a husband-and-wife team. While this is essentially true, I suppose, it would be extremely challenging for people with little or no building experience and equipment to build one, especially once the house becomes more complicated than a basic cabin or ranch. The manual is helpful in a general sense, but does not--and cannot, of course--cover every possibility or situation that might arise.
|
|||
 In
any event, after several hours of figuring and making templates, we
(Bob) finally had things figured out, and it was time to start
building the northern gable wall. The upstairs walls are
traditional stick-framed, while the southern gable wall is solid
log. Both gable ends needed to be built before we could
install roof rafters, since the ridge would need the support from
the two ends. To build the north gable, we began by laying out
the wall right on the second deck--essentially lofting the wall, to
borrow terminology from boatbuilding. Then, we cut the top and
bottom plates, and fitted the studs in between. In
any event, after several hours of figuring and making templates, we
(Bob) finally had things figured out, and it was time to start
building the northern gable wall. The upstairs walls are
traditional stick-framed, while the southern gable wall is solid
log. Both gable ends needed to be built before we could
install roof rafters, since the ridge would need the support from
the two ends. To build the north gable, we began by laying out
the wall right on the second deck--essentially lofting the wall, to
borrow terminology from boatbuilding. Then, we cut the top and
bottom plates, and fitted the studs in between. |
|||
 One
complicated portion of the thought process required to get to this
stage was how to handle part of the roof overhang, the portion
outside of the rear dormer wall. (If you can't follow this,
you're excused; I had enough trouble envisioning what Bob was
suggesting and I was standing right there the whole day. It
took a good bit for me to finally understand the issues.)
Because the side of the rear shed dormer is in the same plane as the
gable end, and because we have a "false" rafter on the outside to
match the angle of the overhang on the front of the house (rather
than have a blank wall run right up to the shallow 5:12 pitch of the
shed dormer, the "false", or fly rafter will mimic the 12:12 pitch
of the main roof and break up the side for much better appearance),
the roof boards, which extend past the roof and into a 12" overhang
at the gables, would have to somehow be tacked onto the side of the
house in this one area. One
complicated portion of the thought process required to get to this
stage was how to handle part of the roof overhang, the portion
outside of the rear dormer wall. (If you can't follow this,
you're excused; I had enough trouble envisioning what Bob was
suggesting and I was standing right there the whole day. It
took a good bit for me to finally understand the issues.)
Because the side of the rear shed dormer is in the same plane as the
gable end, and because we have a "false" rafter on the outside to
match the angle of the overhang on the front of the house (rather
than have a blank wall run right up to the shallow 5:12 pitch of the
shed dormer, the "false", or fly rafter will mimic the 12:12 pitch
of the main roof and break up the side for much better appearance),
the roof boards, which extend past the roof and into a 12" overhang
at the gables, would have to somehow be tacked onto the side of the
house in this one area. |
|||
 I
know it's impossible to imagine what I'm talking about, but in any
event Bob came up with a very effective way to do this, sandwiching
18" pieces of the WP-11 shiplap pine roof boards (which get
installed face down above the rafters, providing the finished
interior ceiling just the way they did on the second floor) between
the top plate of the angled gable wall and the small dormer wall
built directly on top of the rear side of the gable. Later in
the process, we'll hang a fly rafter from these boards to mimic the
appearance of the "real" roof, and then add spacers, sheathing, and
shingles so that it looks like the remainder of the roof. I
know it's impossible to imagine what I'm talking about, but in any
event Bob came up with a very effective way to do this, sandwiching
18" pieces of the WP-11 shiplap pine roof boards (which get
installed face down above the rafters, providing the finished
interior ceiling just the way they did on the second floor) between
the top plate of the angled gable wall and the small dormer wall
built directly on top of the rear side of the gable. Later in
the process, we'll hang a fly rafter from these boards to mimic the
appearance of the "real" roof, and then add spacers, sheathing, and
shingles so that it looks like the remainder of the roof. |
|||
 By
the end of the afternoon, we had the wall built and sheathed and
ready to stand up. Bob didn't have his wall jacks with him,
and the wall was too heavy to lift with two people, so we left it
right on the deck until the morning. By
the end of the afternoon, we had the wall built and sheathed and
ready to stand up. Bob didn't have his wall jacks with him,
and the wall was too heavy to lift with two people, so we left it
right on the deck until the morning.Next: the rear dormer wall, and onwards from there. But given the weather forecast for this week, there may not be a whole lot more to discuss for a few days. |
|||
MONDAY, JUNE 5, 2006 |
|||
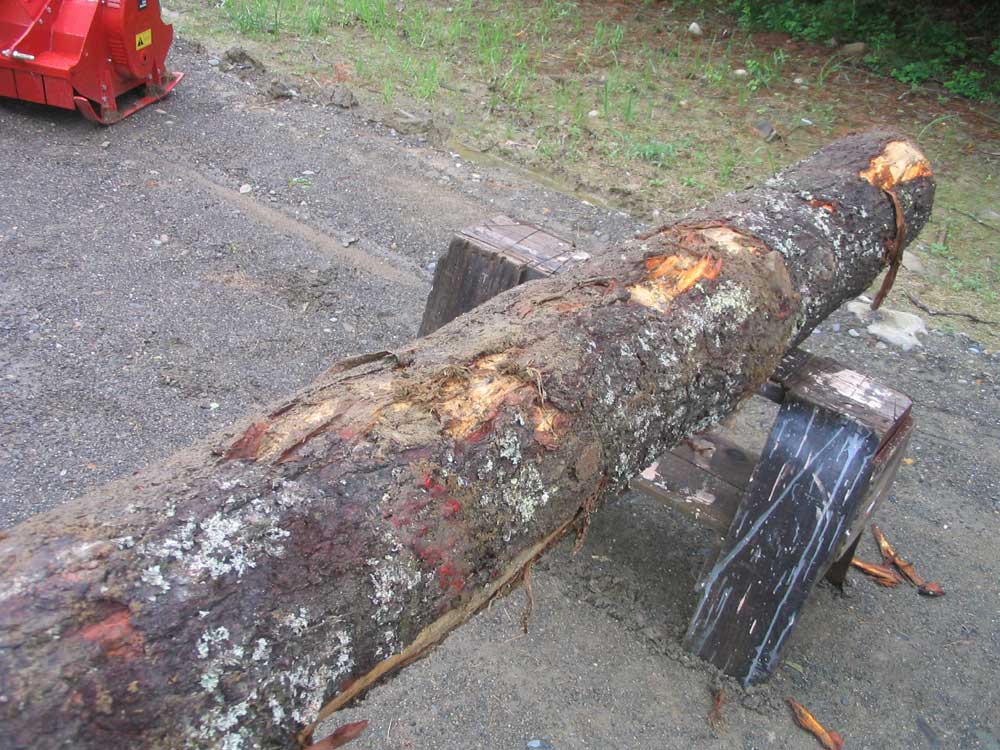 Today
was "frontier day" on the site. Bob had some running around to
do in the morning, so with his delayed arrival I decided to attack
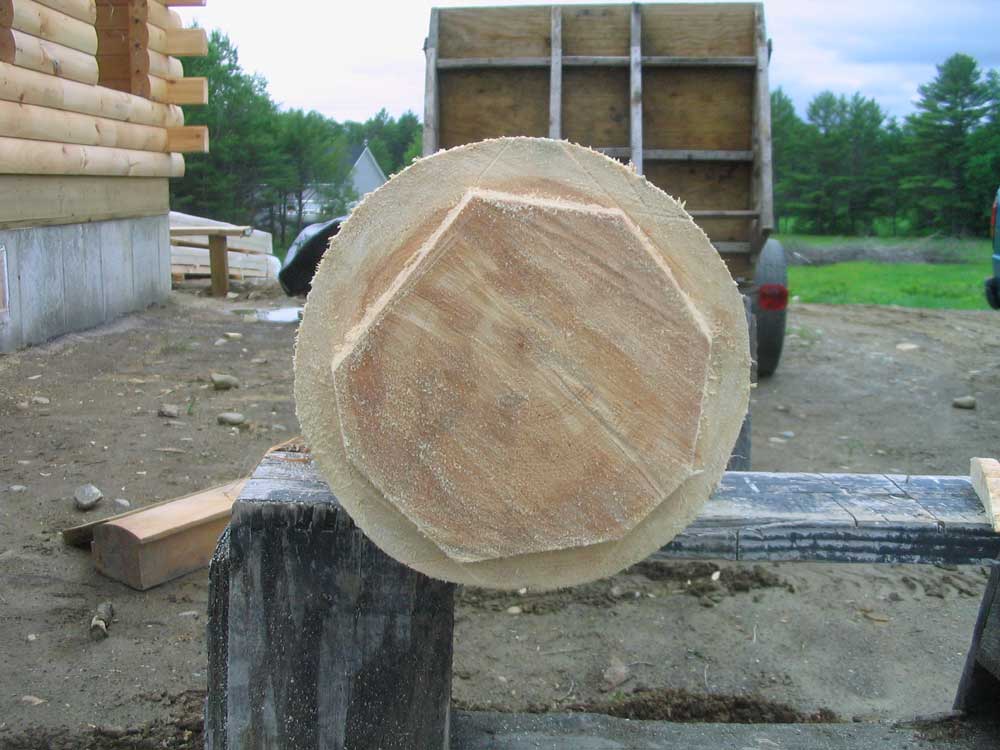
the bark-covered log for the kitchen post. Late Sunday,
the rain had let up enough to allow me to transport the log down
near the shop where I'd have access to water for cleaning and if
necessary to loosen the bark, so I was ready to go. Today
was "frontier day" on the site. Bob had some running around to
do in the morning, so with his delayed arrival I decided to attack
the bark-covered log for the kitchen post. Late Sunday,
the rain had let up enough to allow me to transport the log down
near the shop where I'd have access to water for cleaning and if
necessary to loosen the bark, so I was ready to go. |
|||
 Armed
with a draw knife, I began stripping the bark off the log. I
had no idea what to expect; Bob had filled me with debarking horror
stories, but I was pleasantly pleased to find that the knife did a
great job, and that the bark came off fairly easily.
Nonetheless, I was just as glad that I didn't need to do this to all
the logs for the house--it was quite a bit of work, but kind of fun,
too. Armed
with a draw knife, I began stripping the bark off the log. I
had no idea what to expect; Bob had filled me with debarking horror
stories, but I was pleasantly pleased to find that the knife did a
great job, and that the bark came off fairly easily.
Nonetheless, I was just as glad that I didn't need to do this to all
the logs for the house--it was quite a bit of work, but kind of fun,
too. |
|||
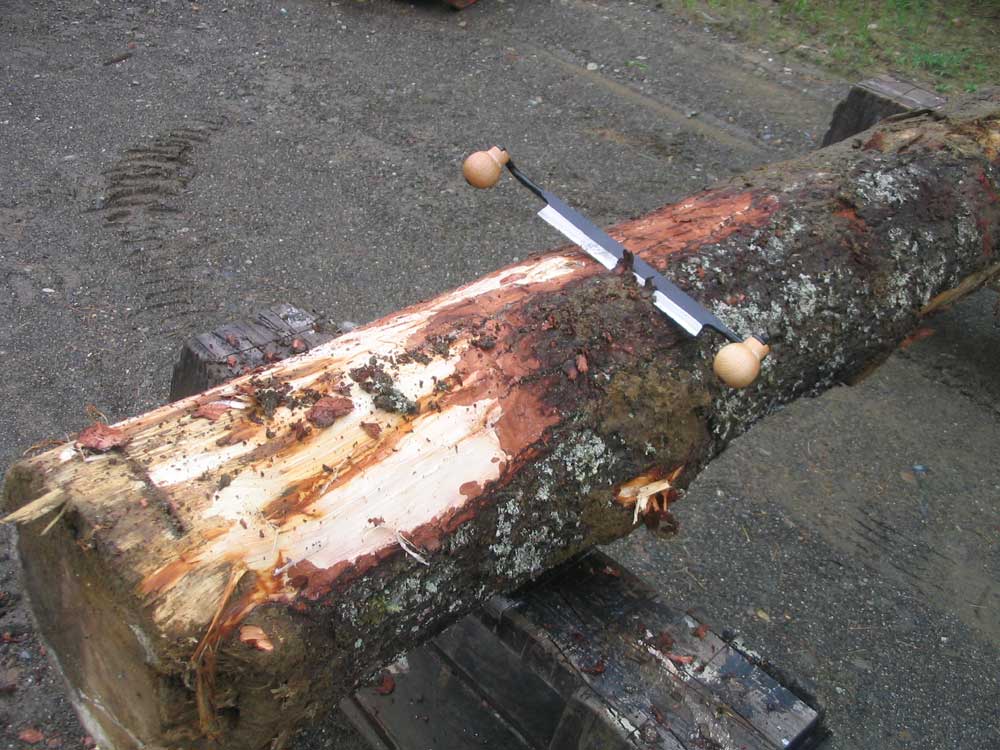
 Once
I had the bark removed, I rinsed the log to remove residual dirt and
the like from the wood and from the numerous branch ends/knots.
This also loosened up a sort of inner layer of material--a soft,
clean white layer of new wood which I then scraped off with the draw
knife, exposing the older, straight-grained material beneath. Once
I had the bark removed, I rinsed the log to remove residual dirt and
the like from the wood and from the numerous branch ends/knots.
This also loosened up a sort of inner layer of material--a soft,
clean white layer of new wood which I then scraped off with the draw
knife, exposing the older, straight-grained material beneath. |
|||
 Later
in the day, I used a chisel to knock the knots down flush with the
surrounding surface and clean up the surrounding areas a bit.
Then, I used a chainsaw to saw the butt (bottom) end straight and at
roughly 90° to the log. Finally, I cut a notch all the way
around the base of the log, extending an inch or so towards the
center of the log, to allow the future 3/4" wood flooring in the
house to extend beneath the post after installation, thereby
avoiding the need to cut and scribe those many pieces of wood. Later
in the day, I used a chisel to knock the knots down flush with the
surrounding surface and clean up the surrounding areas a bit.
Then, I used a chainsaw to saw the butt (bottom) end straight and at
roughly 90° to the log. Finally, I cut a notch all the way
around the base of the log, extending an inch or so towards the
center of the log, to allow the future 3/4" wood flooring in the
house to extend beneath the post after installation, thereby
avoiding the need to cut and scribe those many pieces of wood. |
|||
|
|
|||
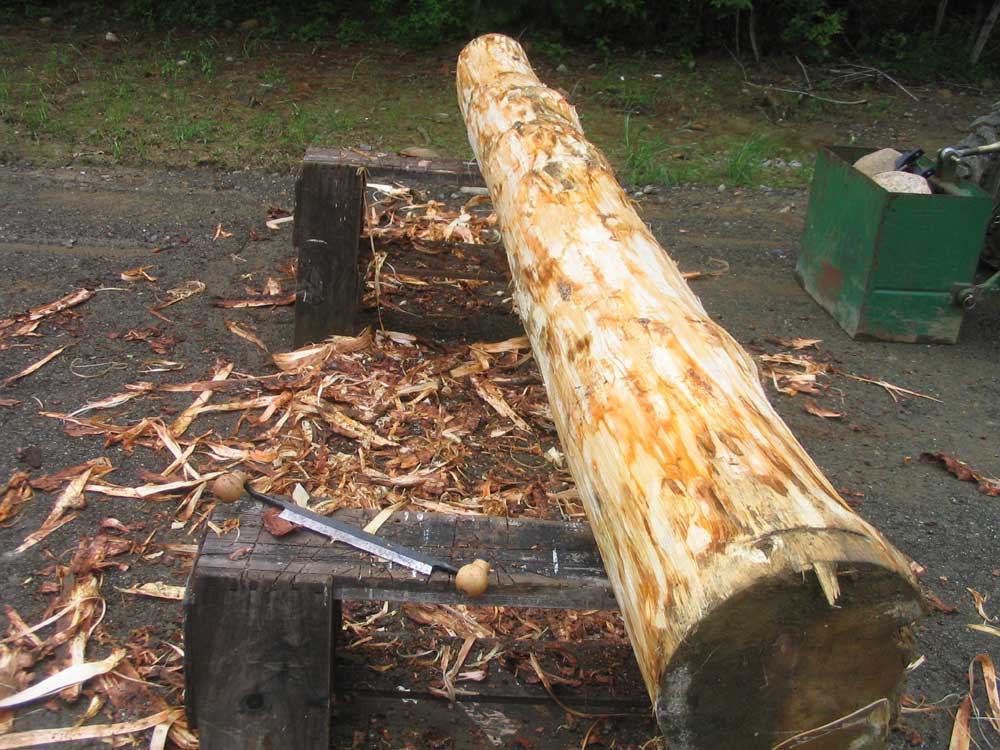
Once I had finished with the log (it only took an hour or so to remove the bark and clean up the log, and it was late in the afternoon before I completed the tasks described above), I moved the chop saw station from the "living room" in the house over beneath  the
second floor, in the hallway area, to give us room to stage in the
living room for the upcoming roof framing work and truss
construction. All the rain from the weekend had left
significant amounts of water on the deck and in the basement, so I
spent more time pushing the water out with a broom in a generally
futile attempt to dry things up; some surprisingly heavy rain
showers came through during the morning, something that had not been
forecast. As if we needed the extra water...sigh. the
second floor, in the hallway area, to give us room to stage in the
living room for the upcoming roof framing work and truss
construction. All the rain from the weekend had left
significant amounts of water on the deck and in the basement, so I
spent more time pushing the water out with a broom in a generally
futile attempt to dry things up; some surprisingly heavy rain
showers came through during the morning, something that had not been
forecast. As if we needed the extra water...sigh.Bob arrived at 1100 or so, and we set to work on the two staircases, a relatively boring task but necessary and useful nonetheless. We built both sets of stairs--basement and second floor--over a period of a couple hours. |
|||
 We
were expecting a materials delivery today--all the rafters and other
roof framing materials. By the time we finished up the stairs, a
little before two, the load had not yet arrived, and since we needed
those materials to continue, Bob decided to head off to greener
pastures. The delivery arrived around 4, with the truck loaded
to the hilt with the 22' rafters (4x8"), ridge (4x12"), and two
large piles of the shiplap pine ceiling/roof boards, as well as
additional logs for the gable end. We
were expecting a materials delivery today--all the rafters and other
roof framing materials. By the time we finished up the stairs, a
little before two, the load had not yet arrived, and since we needed
those materials to continue, Bob decided to head off to greener
pastures. The delivery arrived around 4, with the truck loaded
to the hilt with the 22' rafters (4x8"), ridge (4x12"), and two
large piles of the shiplap pine ceiling/roof boards, as well as
additional logs for the gable end. |
|||
SUNDAY, JUNE 4, 2006 |
|||
 Rain,
rain, rain. Rain,
rain, rain. All I wanted to do this weekend was clean up around the site, move the saw bench under the new ceiling, and work on debarking and cleaning up the raw pine log for the loft support. But this was not to be: it rained, often hard, all day Saturday and most of the day Sunday, eliminating all hope of accomplishing even this small list. That said, I suppose it's better to have the rain come on a weekend rather than during the work week when we really get stuff accomplished. The forecast is decent for the coming week, so with luck we'll get plenty done. |
|||
FRIDAY, JUNE 2, 2006 |
|||
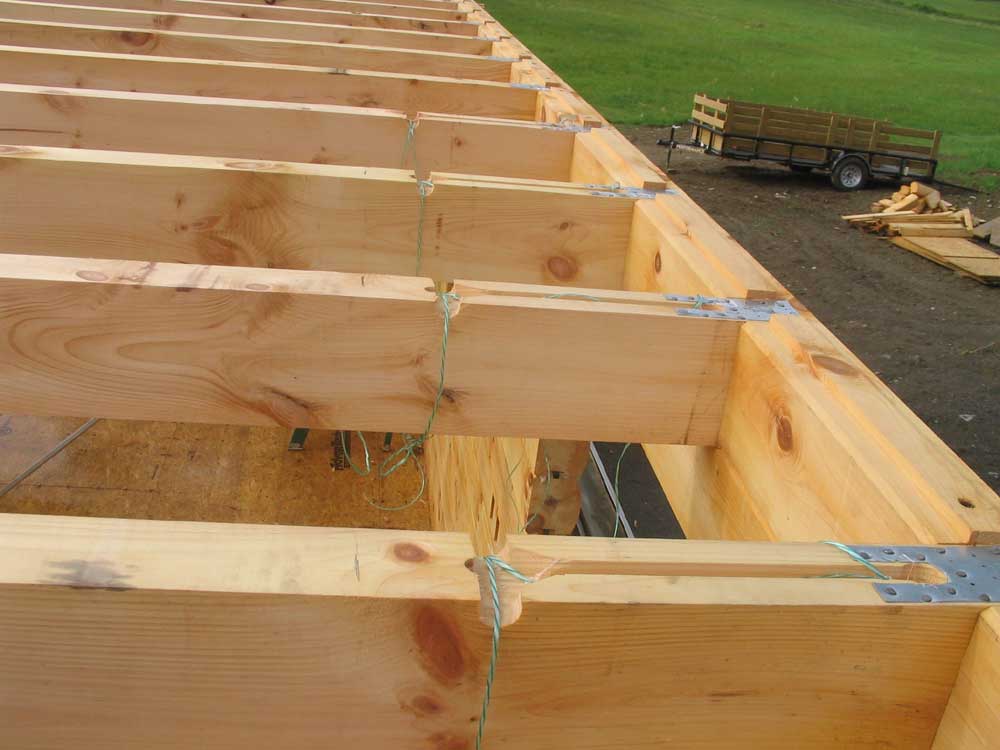
| We began this morning by finishing up the tie plate installation across the various joints between ceiling joists and the log walls and center carrying beam; Bob continued nailing these into place while I undertook the high art of cutting apart wire-collated pneumatic stick nails so that we could hand nail, since we had no dedicated hand nails. Before long, this work was done. | |||
 Next,
we needed to build an interior wall--the one defining the north
(left-hand) side of the main staircase and the back wall of the
closet in Heidi's office, since the ceiling boards needed this wall
for support in that area. As usual, Bob laid out the wall and
I cut the studs to length, after which he nailed it together and we
raised it into position. As before, we lagged the wall to the
exterior logs with 12" lags through a built-up wall stiffener. Next,
we needed to build an interior wall--the one defining the north
(left-hand) side of the main staircase and the back wall of the
closet in Heidi's office, since the ceiling boards needed this wall
for support in that area. As usual, Bob laid out the wall and
I cut the studs to length, after which he nailed it together and we
raised it into position. As before, we lagged the wall to the
exterior logs with 12" lags through a built-up wall stiffener. |
|||
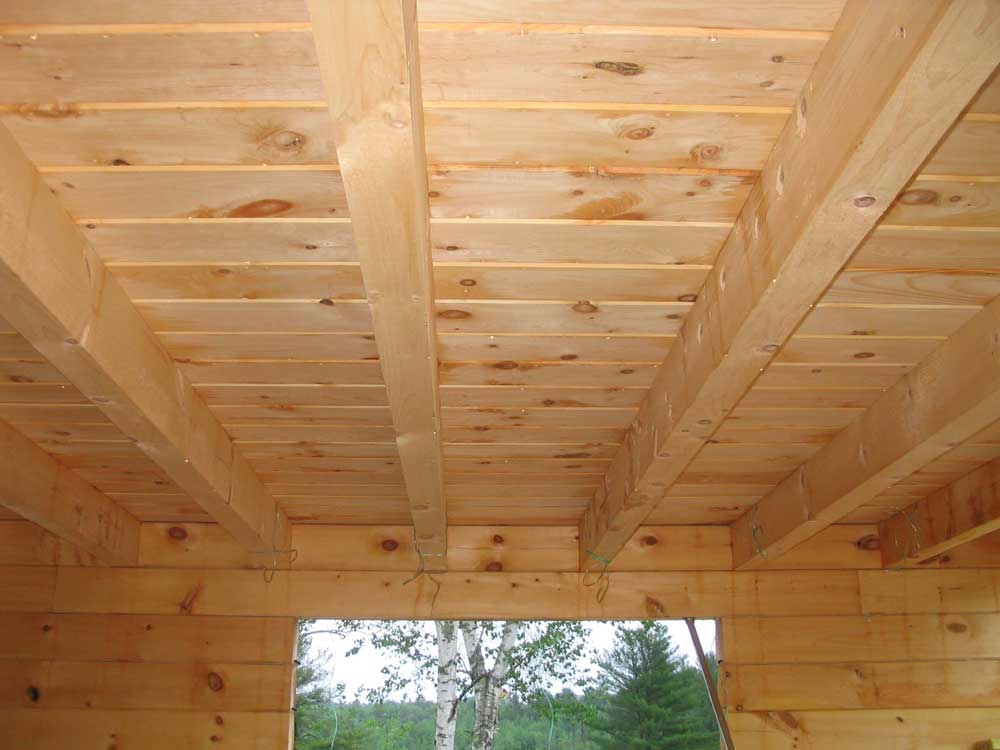
When the wall was complete, I started loading the 7" V-match shiplap pine ceiling boards from the pile in front of the house onto the first floor deck for eventual dispersal. With exposed ceiling beams, these boards, installed face down, represented the finished ceiling for the first floor. We had a large pile of random-length boards, from 4' to 16' in length. I sorted the boards into piles according to length, and then began leaning them up against the second floor framing for easy access from above. |
|||
 We
began at the east (back) wall of the house, and carefully installed
the first boards to avoid nailing into the wire grooves routed in
the tops of the beams in some areas, ensuring that the pull strings
remained free. While Bob cut and hand-tacked the boards in
place from above, I continued sorting and stacking the boards, and
also cut apart more of the stick nails for use in the hand nailing.
With 2 or 3 nails per board, the process continued quickly, and
before long I stacked most of the boards up on the growing second
deck and came up myself to help with the nailing. We
began at the east (back) wall of the house, and carefully installed
the first boards to avoid nailing into the wire grooves routed in
the tops of the beams in some areas, ensuring that the pull strings
remained free. While Bob cut and hand-tacked the boards in
place from above, I continued sorting and stacking the boards, and
also cut apart more of the stick nails for use in the hand nailing.
With 2 or 3 nails per board, the process continued quickly, and
before long I stacked most of the boards up on the growing second
deck and came up myself to help with the nailing. |
|||
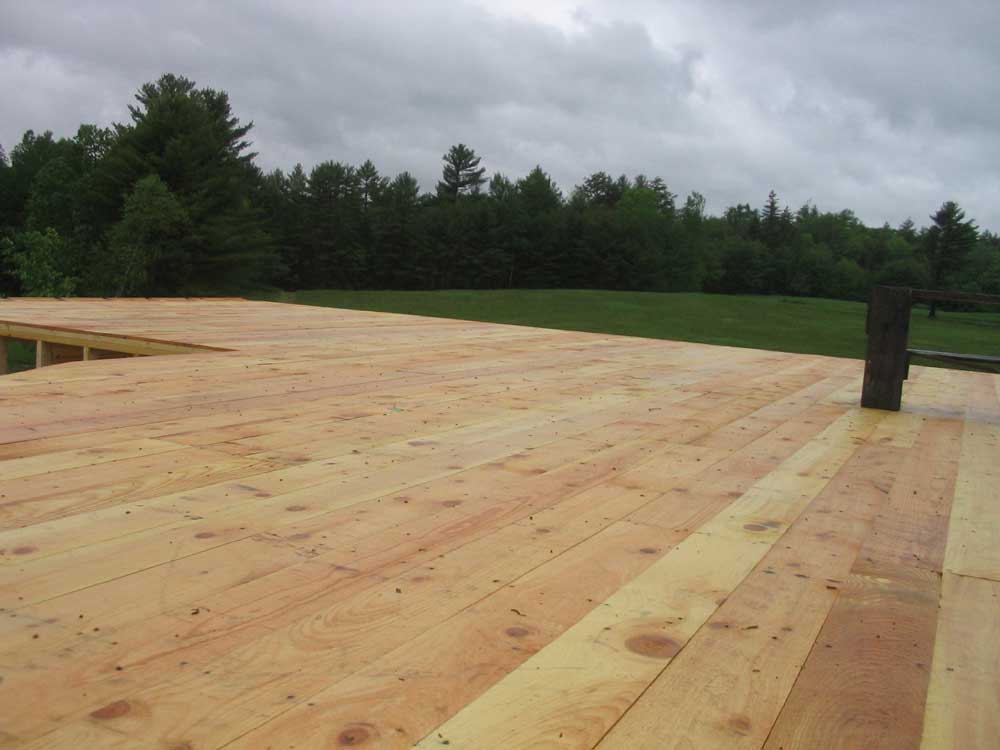 We
ended up being short by about three boards at the far end of the
house, as they had not sent quite enough, so we couldn't completely
finish the deck. More materials were due on Monday, including
roof framing and other materials, so I simply ordered a few more of
the ceiling boards for the same time. Once all the boards were
in place and tack-nailed, we used the air nailer to shoot 2 nails
into each board where they crossed the ceiling joists, permanently
securing them tightly in place. We
ended up being short by about three boards at the far end of the
house, as they had not sent quite enough, so we couldn't completely
finish the deck. More materials were due on Monday, including
roof framing and other materials, so I simply ordered a few more of
the ceiling boards for the same time. Once all the boards were
in place and tack-nailed, we used the air nailer to shoot 2 nails
into each board where they crossed the ceiling joists, permanently
securing them tightly in place. |
|||
 Today
was the day that Heidi and I were to close on the sale of the house
in North Yarmouth, with a closing scheduled for 4 PM in Yarmouth, so
we had to knock off early to allow time to drive down for the
closing. Since we finished up the ceiling boards around 12:30,
we decided to call it a day at that point. Today
was the day that Heidi and I were to close on the sale of the house
in North Yarmouth, with a closing scheduled for 4 PM in Yarmouth, so
we had to knock off early to allow time to drive down for the
closing. Since we finished up the ceiling boards around 12:30,
we decided to call it a day at that point.Next: more layout, and preparing for second floor exterior walls, framing, dormers, and roof framing. That will start Monday. See you then! |
|||
|
|
|||
THURSDAY, JUNE 1, 2006 |
|||
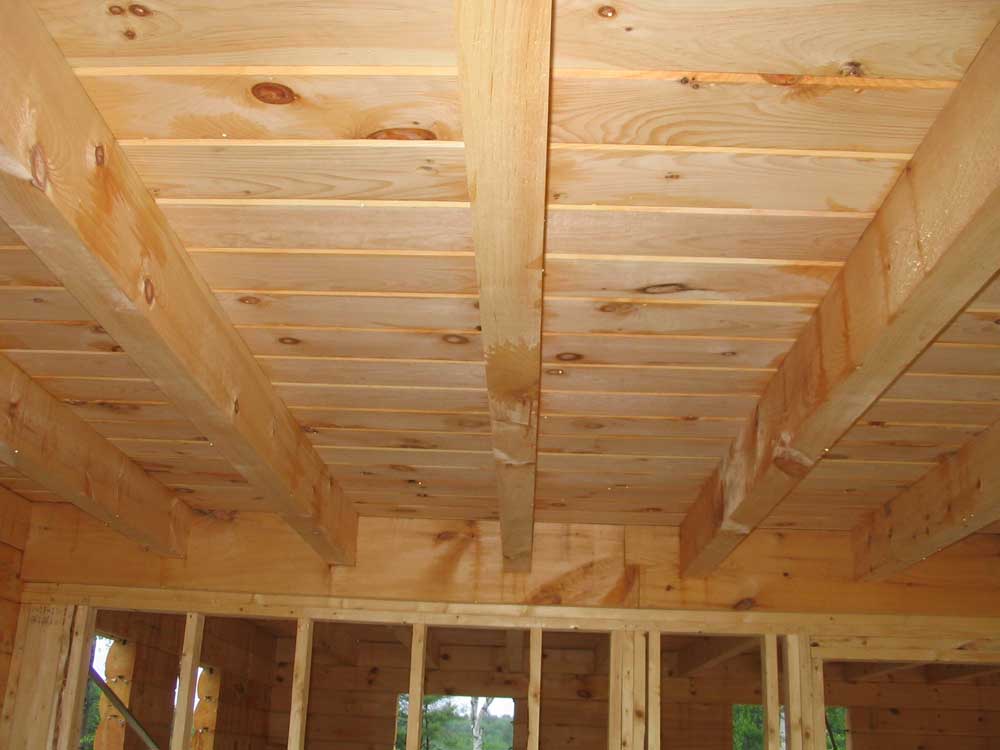
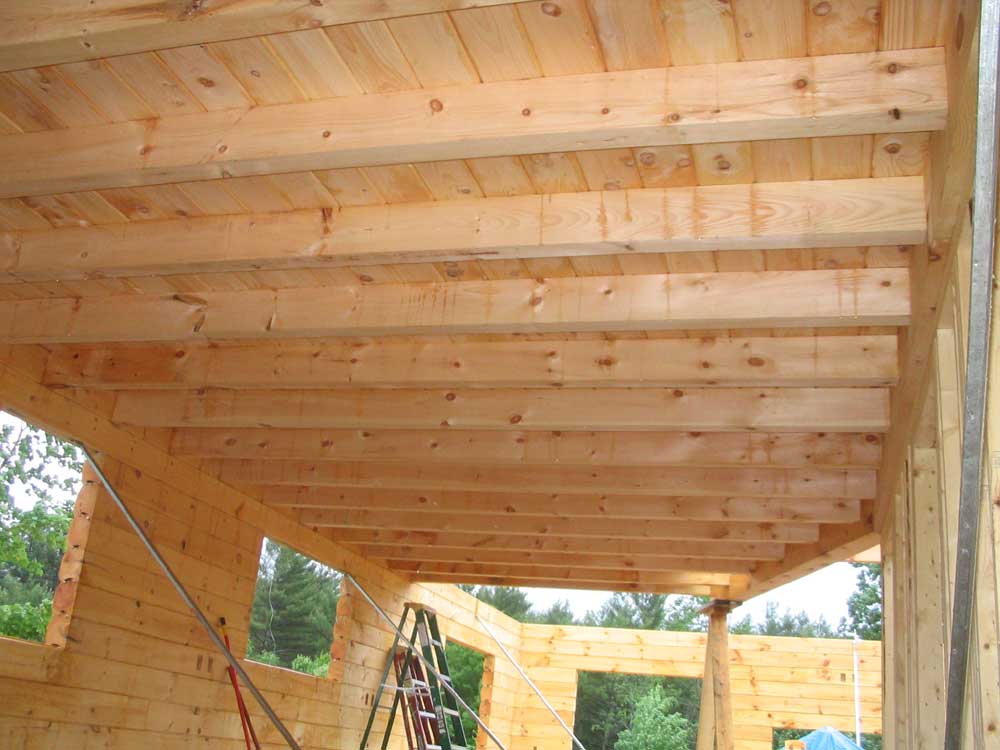
 This
morning, we continued with the ceiling joists, and completed
installing the remaining joists by lunchtime. The installation
was straightforward: cut the 4x8 pine joists to length, and
install them in the mortises cut in the 14th log course and the
center carrying beam, after applying Sikaflex to the exterior
mortise. The fit was very tight on all the joists, but many of
them required significant persuasion from a sledge in order fall
into place at the bottoms of the mortises. But the tight fit
meant that the seam where the beams entered the center carrying beam
were virtually invisible, which was attractive. This
morning, we continued with the ceiling joists, and completed
installing the remaining joists by lunchtime. The installation
was straightforward: cut the 4x8 pine joists to length, and
install them in the mortises cut in the 14th log course and the
center carrying beam, after applying Sikaflex to the exterior
mortise. The fit was very tight on all the joists, but many of
them required significant persuasion from a sledge in order fall
into place at the bottoms of the mortises. But the tight fit
meant that the seam where the beams entered the center carrying beam
were virtually invisible, which was attractive. |
|||
|
|
|||
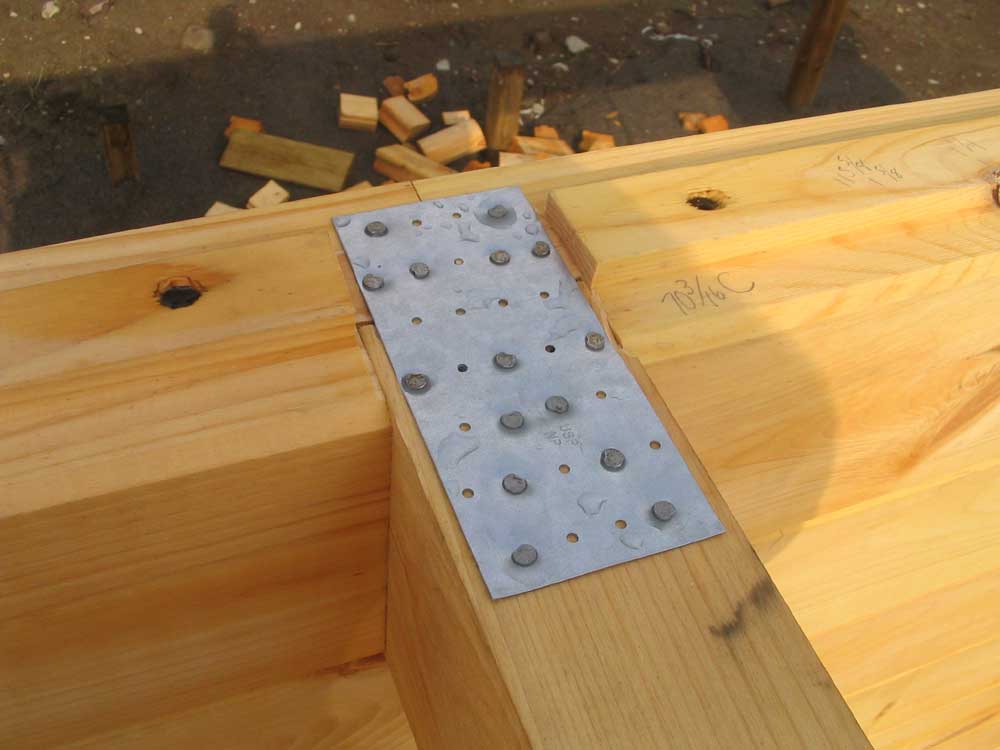 After
lunch, Bob got to work installing slim metal tie plates where the
beams joined the logs and the center beam, to help ensure that they
remained tightly in place and held the sides of the house in the
proper position, and I began to prepare the applicable joists for
wiring, in areas where we planned on lighting in the first floor
ceiling. One thing about log homes: they force you to
plan ahead, and to think several steps ahead at any given time, lest
you forget an important step that only has one opportunity to be
done. While I had general thoughts of what we wanted, I had no
detailed ideas or plans as to the lighting or other electrical, so
at each juncture that these installations were required I was forced
to come up with the ideas on the spot, more or less. After
lunch, Bob got to work installing slim metal tie plates where the
beams joined the logs and the center beam, to help ensure that they
remained tightly in place and held the sides of the house in the
proper position, and I began to prepare the applicable joists for
wiring, in areas where we planned on lighting in the first floor
ceiling. One thing about log homes: they force you to
plan ahead, and to think several steps ahead at any given time, lest
you forget an important step that only has one opportunity to be
done. While I had general thoughts of what we wanted, I had no
detailed ideas or plans as to the lighting or other electrical, so
at each juncture that these installations were required I was forced
to come up with the ideas on the spot, more or less. |
|||
We planned to install track lighting in the kitchen, which is located beneath the loft area, and in Heidi's office in the front of the house. In the first floor bathroom and hallway, we planned a flat ceiling that would hide the pine beams, since the plumbing from the fixtures in the bathroom on the second floor would protrude here anyway and needed to be hidden. So in these rooms, lighting could be done later in the process. |
|||
 I
wanted to be sure there would be plenty of light in the kitchen, so
I figured that I should run wiring down just about every ceiling
joist, to allow a multitude of lighting options using track lighting. With the very
real risk of damaging wire run in the tops of the beams with nails
used to secure the pine ceiling boards, as well as a layer of
Homosote insulation and a final layer of subflooring or final
flooring above, Bob and I came up with a plan to use messenger lines
instead, with which I would pull the wires in later. I
wanted to be sure there would be plenty of light in the kitchen, so
I figured that I should run wiring down just about every ceiling
joist, to allow a multitude of lighting options using track lighting. With the very
real risk of damaging wire run in the tops of the beams with nails
used to secure the pine ceiling boards, as well as a layer of
Homosote insulation and a final layer of subflooring or final
flooring above, Bob and I came up with a plan to use messenger lines
instead, with which I would pull the wires in later. |
|||
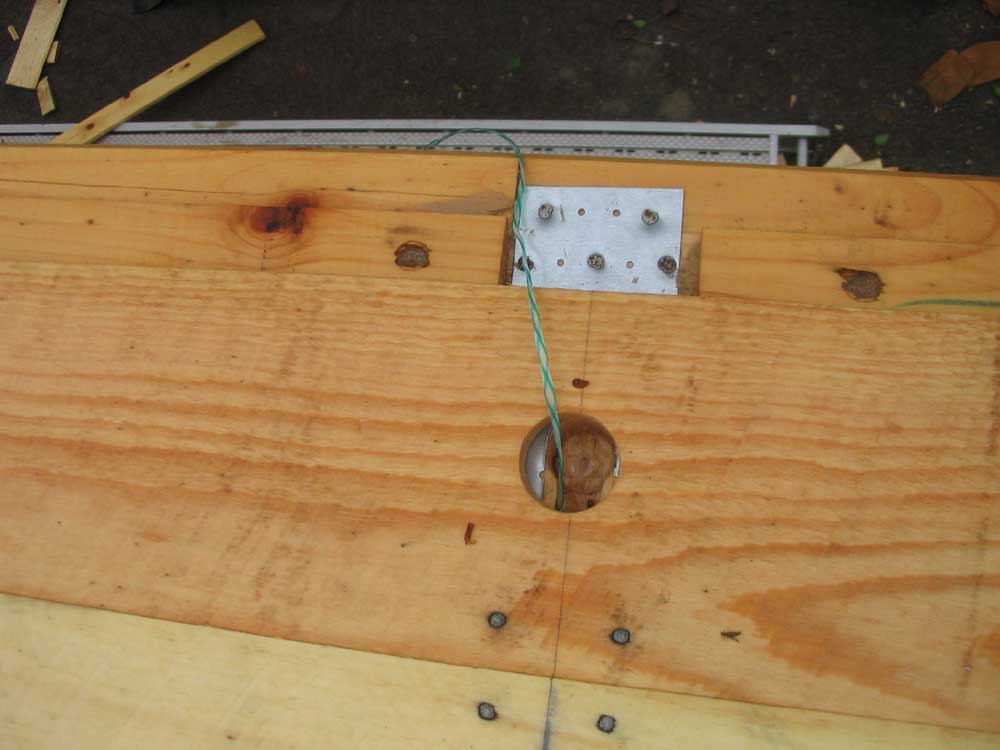
 At
each location, I used a router with a 3/4" straight bit to plow out
a groove in the exterior end of each joist, as close as I could to
the wall (until the router base plate hit the log tongue above).
I ran this groove about 16" out from the wall, and about 1" deep.
Then, at the outer end, I drilled from the side of the beam with a
1-1/4" Forstner bit till it mated with the groove within; I did this
on both sides of the joists, so that I could run track lighting on
either and/or both sides. To bring the slot a bit further
under the eventual second floor framed wall, I drilled another hole
at that end, from the top of the log. With the offset required
from the outside of the logs, and a 2x6 exterior wall in these
areas, the holes would be well inside the wall framing. I used a chisel to ease
the corners inside, so that it would be easier to pull wires through
later. Finally, I installed a length of poly pull twine as a
messenger. Since I had drilled holes on both sides of the
beam, I simply ran the twine around the entire beam, through the
holes, and tied it in a knot to hold the inside end in place; later,
when entering the wiring phase, I will be able to untie the string
and pull wires through the chases. (I hope!) At
each location, I used a router with a 3/4" straight bit to plow out
a groove in the exterior end of each joist, as close as I could to
the wall (until the router base plate hit the log tongue above).
I ran this groove about 16" out from the wall, and about 1" deep.
Then, at the outer end, I drilled from the side of the beam with a
1-1/4" Forstner bit till it mated with the groove within; I did this
on both sides of the joists, so that I could run track lighting on
either and/or both sides. To bring the slot a bit further
under the eventual second floor framed wall, I drilled another hole
at that end, from the top of the log. With the offset required
from the outside of the logs, and a 2x6 exterior wall in these
areas, the holes would be well inside the wall framing. I used a chisel to ease
the corners inside, so that it would be easier to pull wires through
later. Finally, I installed a length of poly pull twine as a
messenger. Since I had drilled holes on both sides of the
beam, I simply ran the twine around the entire beam, through the
holes, and tied it in a knot to hold the inside end in place; later,
when entering the wiring phase, I will be able to untie the string
and pull wires through the chases. (I hope!) |
|||
 As
we were proceeding with our respective tasks, the sky darkened to
the north and west, and we knew we'd be in for a storm before long.
Preparing ahead, we picked up a lot of the tools that we weren't
using and put them away, knowing that when the thunderstorm arrived,
it would begin raining hard at once with little warning. I had
just wrapped up the final electrical groove and pull string around
3:00 when it began to rain, signaling the end of our work day.
Later, during the height of what proved to be a severe storm, we
watched lightning strike the field nearby--or appear to, at least,
accompanied by an immediate and strong clap of thunder. As
we were proceeding with our respective tasks, the sky darkened to
the north and west, and we knew we'd be in for a storm before long.
Preparing ahead, we picked up a lot of the tools that we weren't
using and put them away, knowing that when the thunderstorm arrived,
it would begin raining hard at once with little warning. I had
just wrapped up the final electrical groove and pull string around
3:00 when it began to rain, signaling the end of our work day.
Later, during the height of what proved to be a severe storm, we
watched lightning strike the field nearby--or appear to, at least,
accompanied by an immediate and strong clap of thunder.Next: another interior wall, a few final details, and the beginnings of installing the ceiling boards. |
|||
|
|
|||
|
|||