|
||||||||||||||||||||||||||||||||||
|
|
~ The bLog Home ~ |
|||||||||||||||||||||||||||||||||
|
||||||||||||||||||||||||||||||||||
TUESDAY, MAY 23, 2006 |
||||||||||||||||||||||||||||||||||
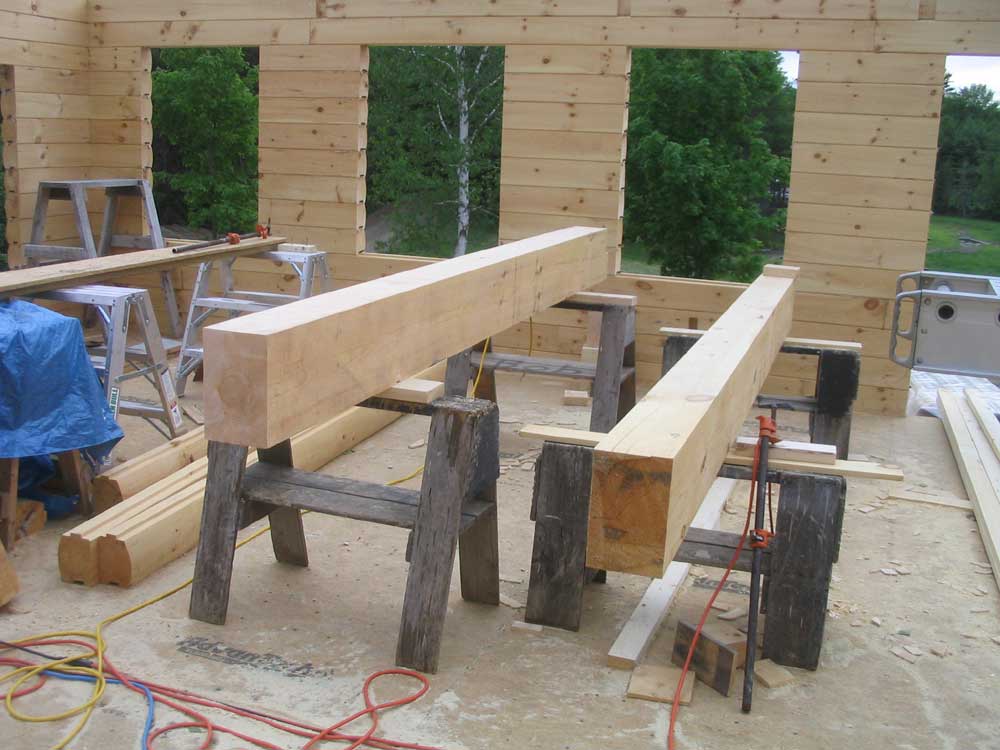
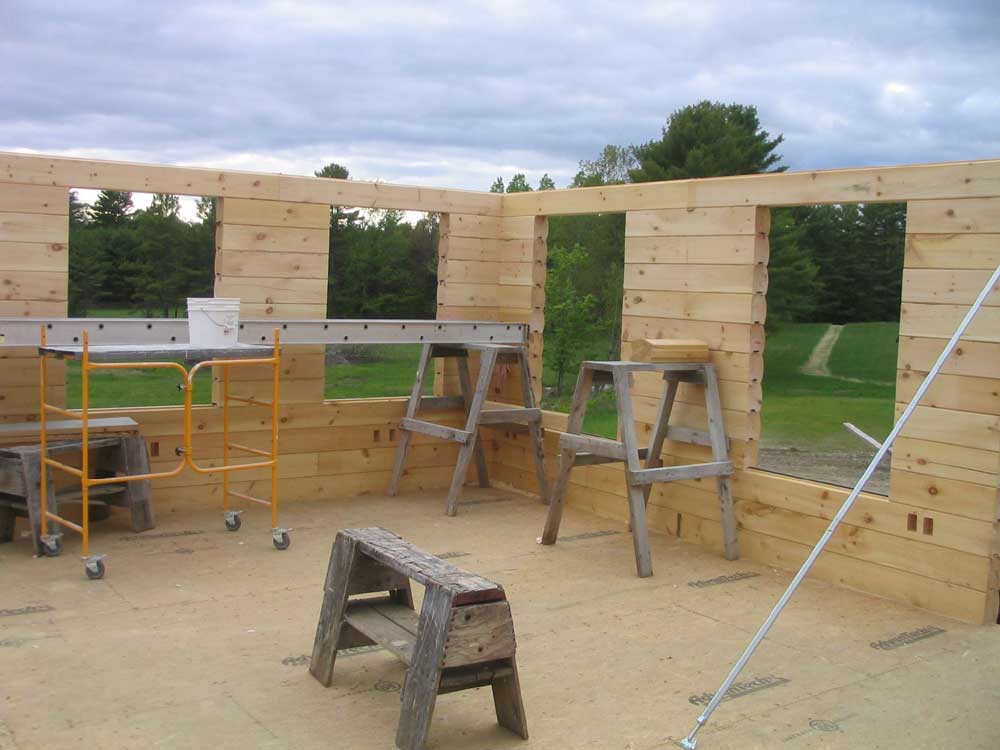
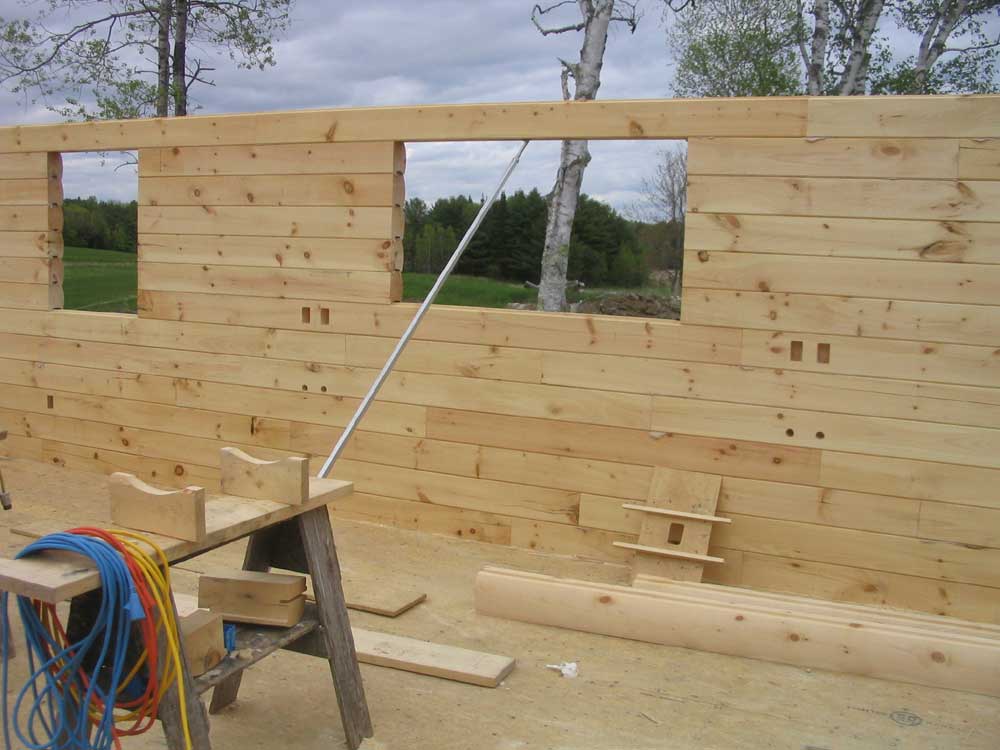
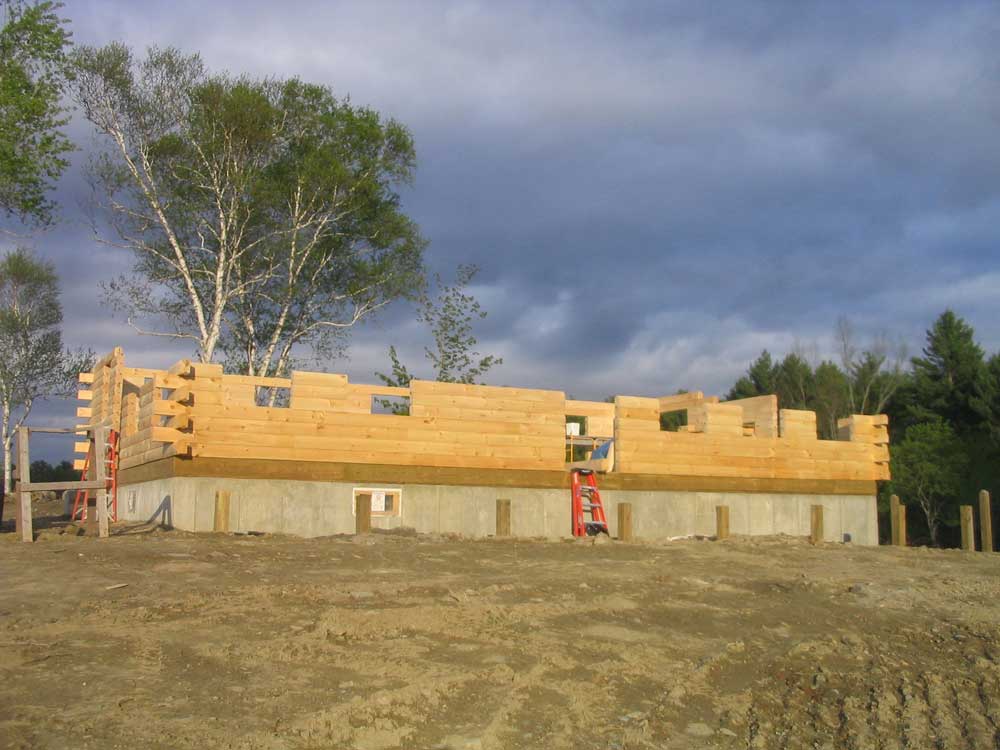
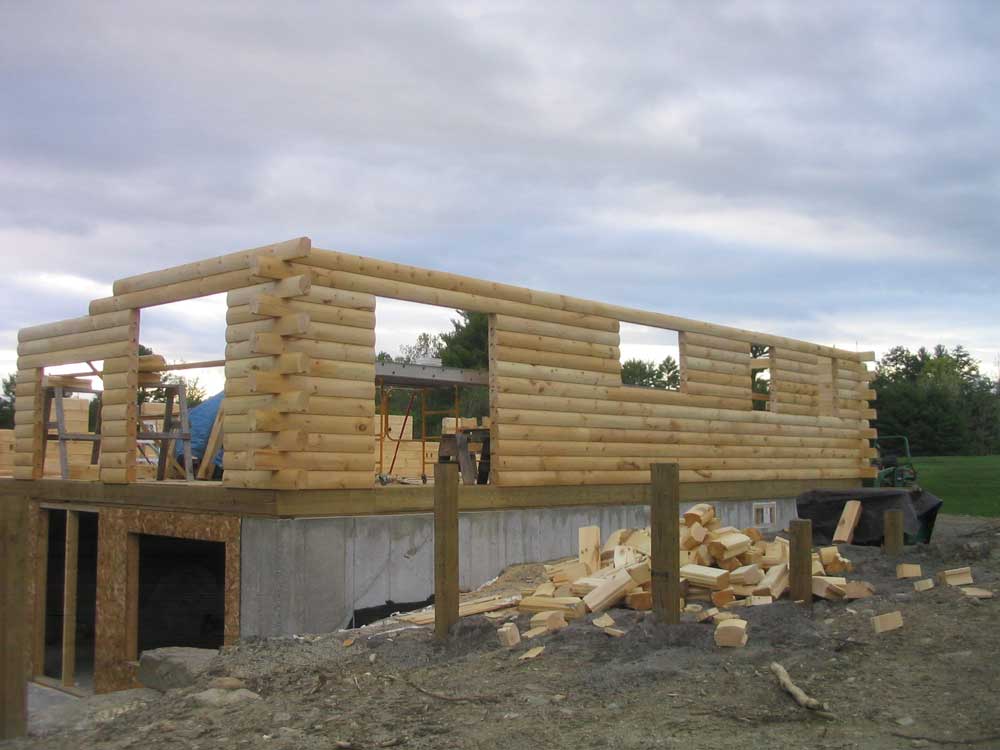
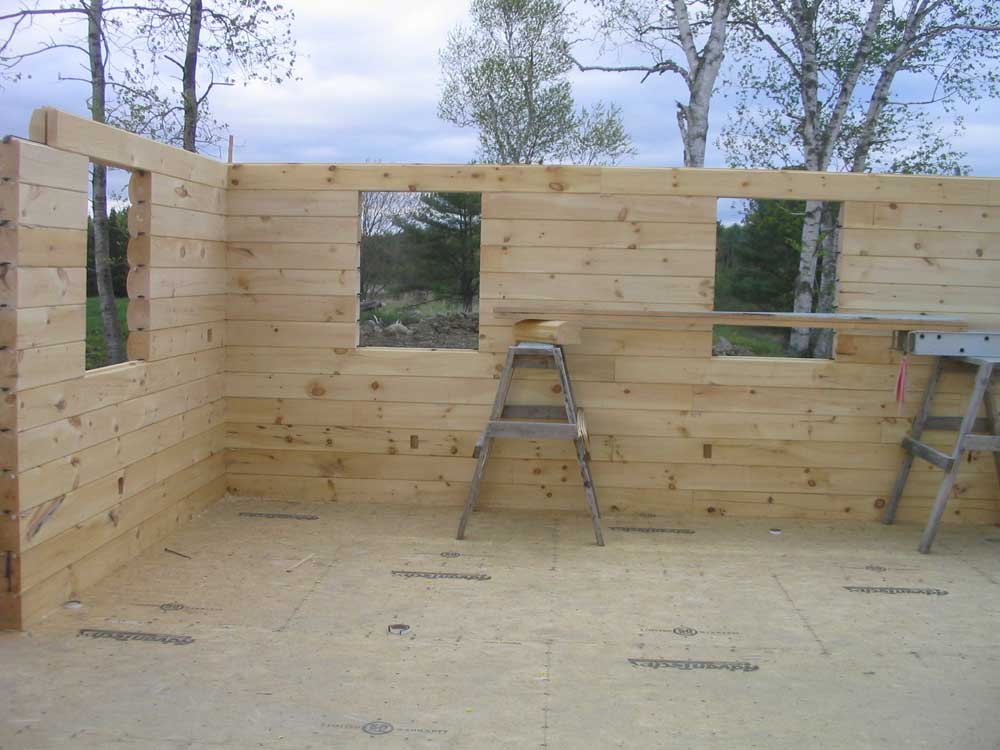
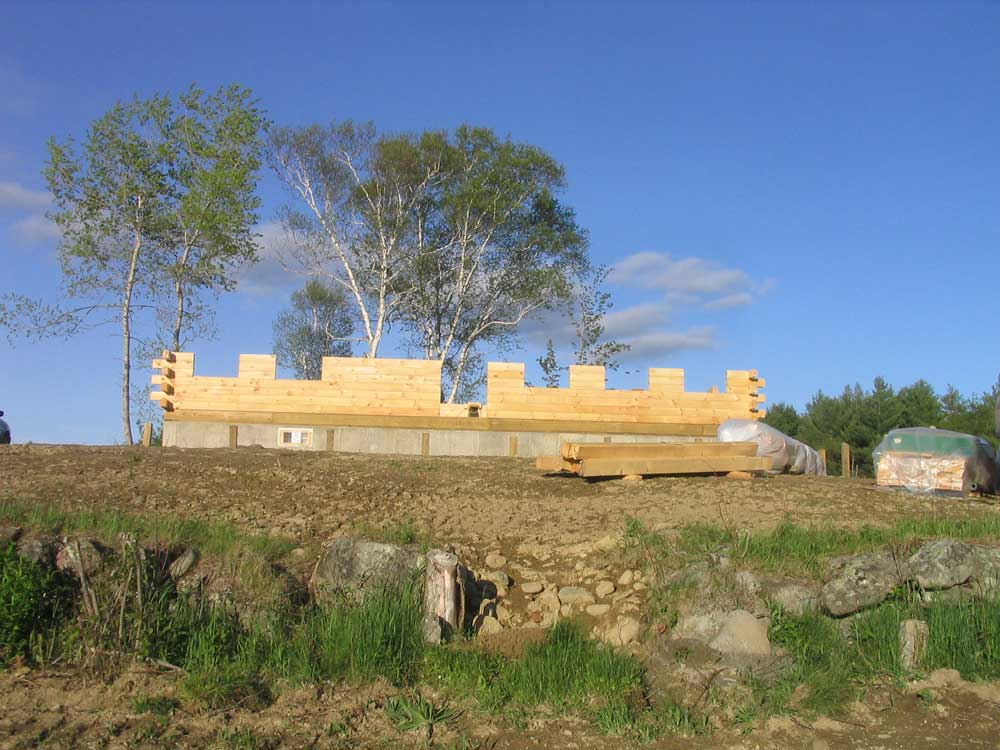
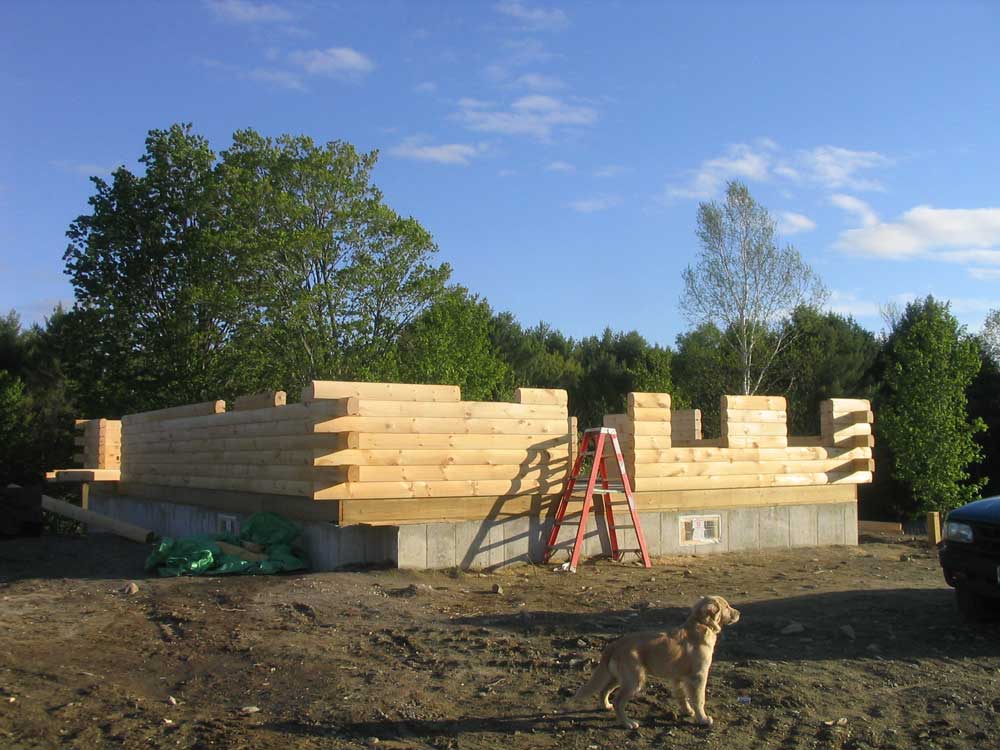
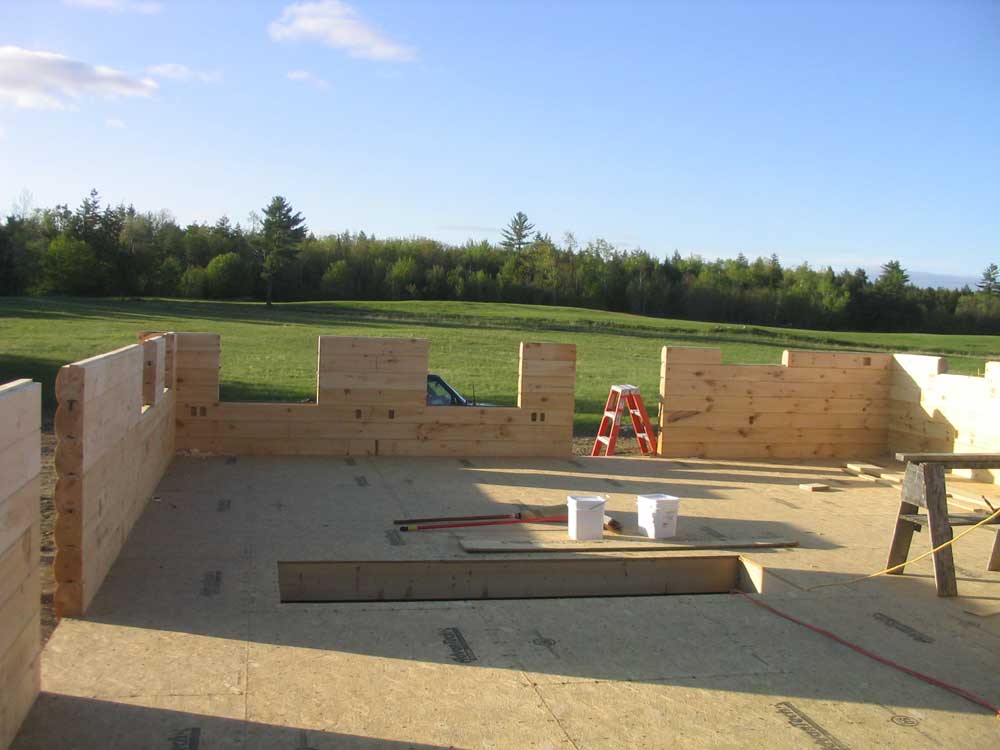
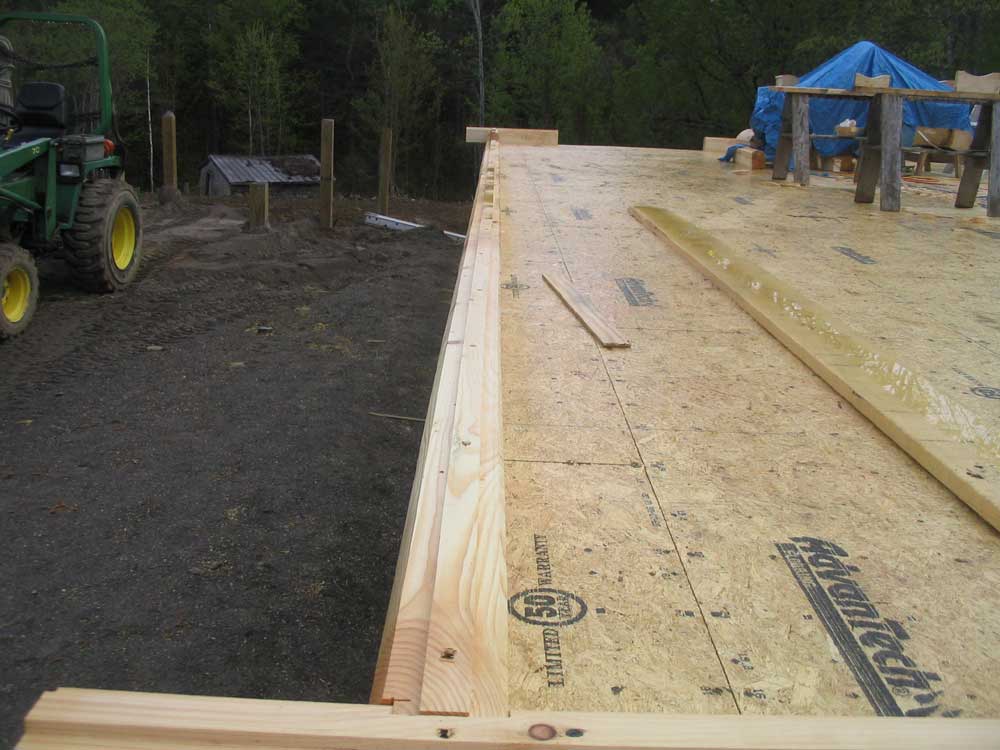
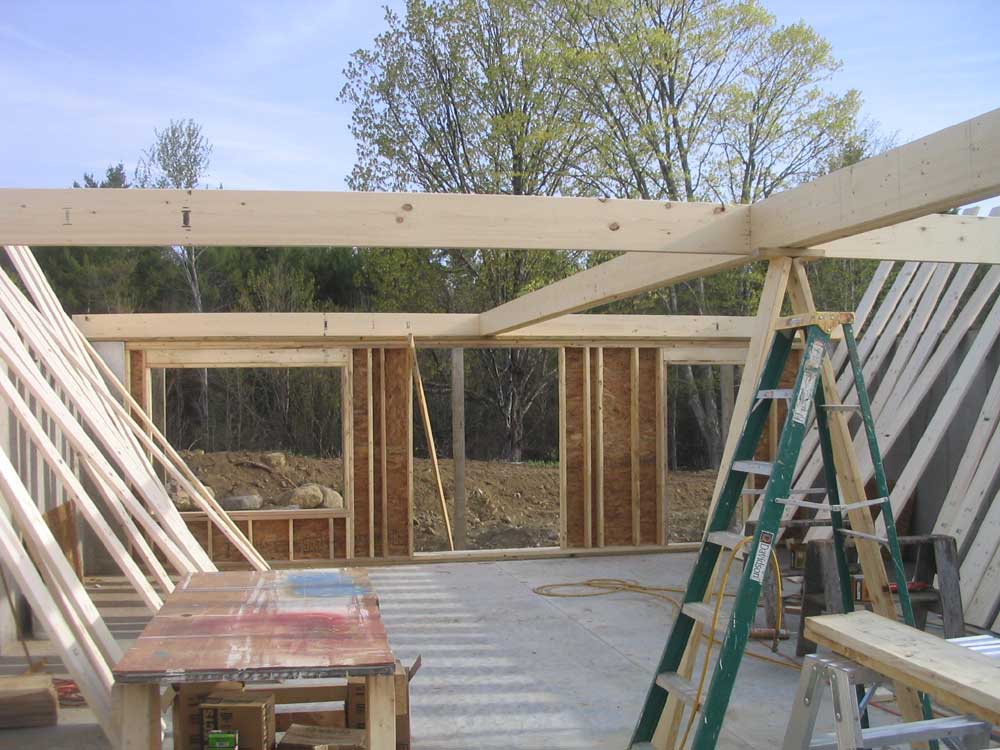
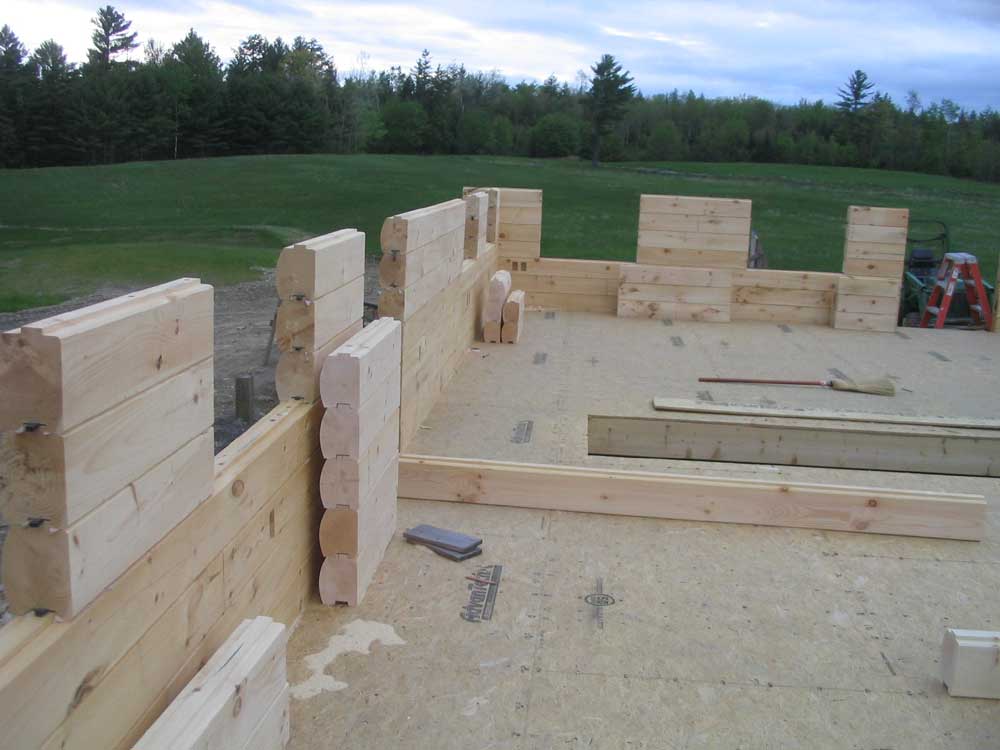
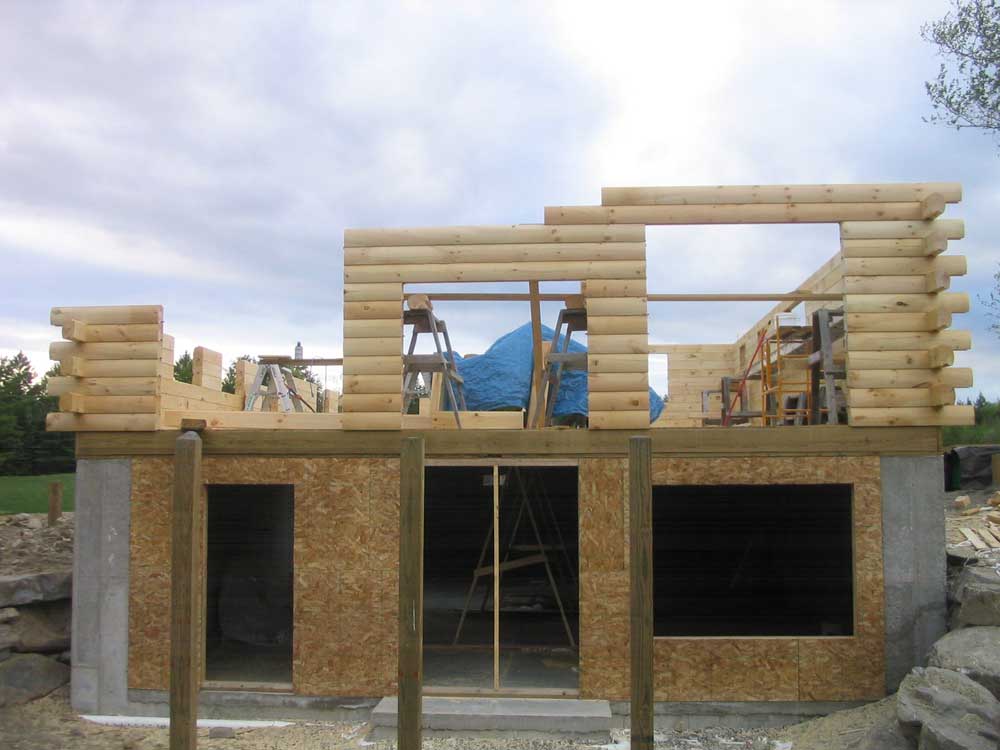
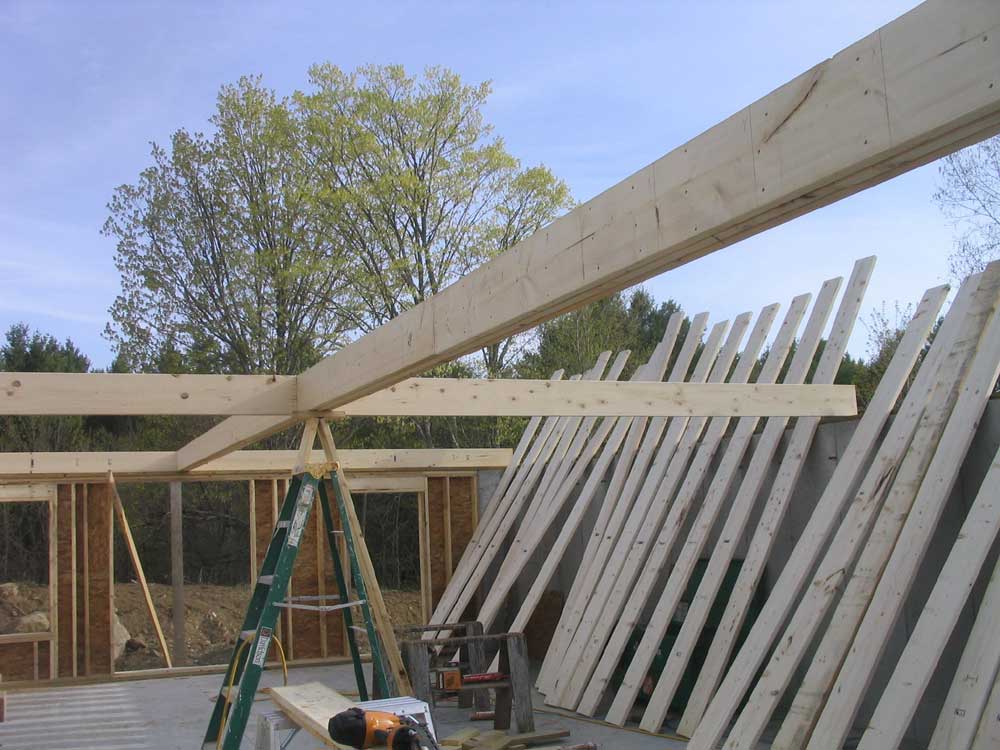
| We approached things a little differently today. With 7 courses of logs already in place, the wall height had reached the limits of our standing on the floor, so we had to set up staging. Since moving staging around is sort of a pain, we decided it made the most sense to set it up in one location and just stack the logs up until complete, before moving the staging to a new location. With Bob's 28' aluminum plank, and several of my large shop staging sawhorses and wooden planks, we could easily span the back wall and two corners, where we decided to start. | ||||||||||||||||||||||||||||||||||
Once
the staging was set up, we got right to work. I began cutting
logs, first for the corners so that Bob had something to do (cut the
mortises and tenons), and then for the other sections as necessary.
Because of the window and door openings, most of the logs
 needed
were fairly short. I kept cutting while Bob installed the logs
from the staging and cut the corner details as needed. In this
manner, the progress went quite quickly, and we stacked and secured
4 more rows before needing to raise the staging a couple feet to
reach the topmost courses of logs. needed
were fairly short. I kept cutting while Bob installed the logs
from the staging and cut the corner details as needed. In this
manner, the progress went quite quickly, and we stacked and secured
4 more rows before needing to raise the staging a couple feet to
reach the topmost courses of logs.Cutting the logs was quicker than installing them, so I kept cutting logs for the various areas of all four walls, trying to use each long length of log to its maximum potential. I stacked the cut logs around the building near the walls where they were to be installed later, and made good progress that should speed things up even more tomorrow, when we move to the front of the house. |
||||||||||||||||||||||||||||||||||
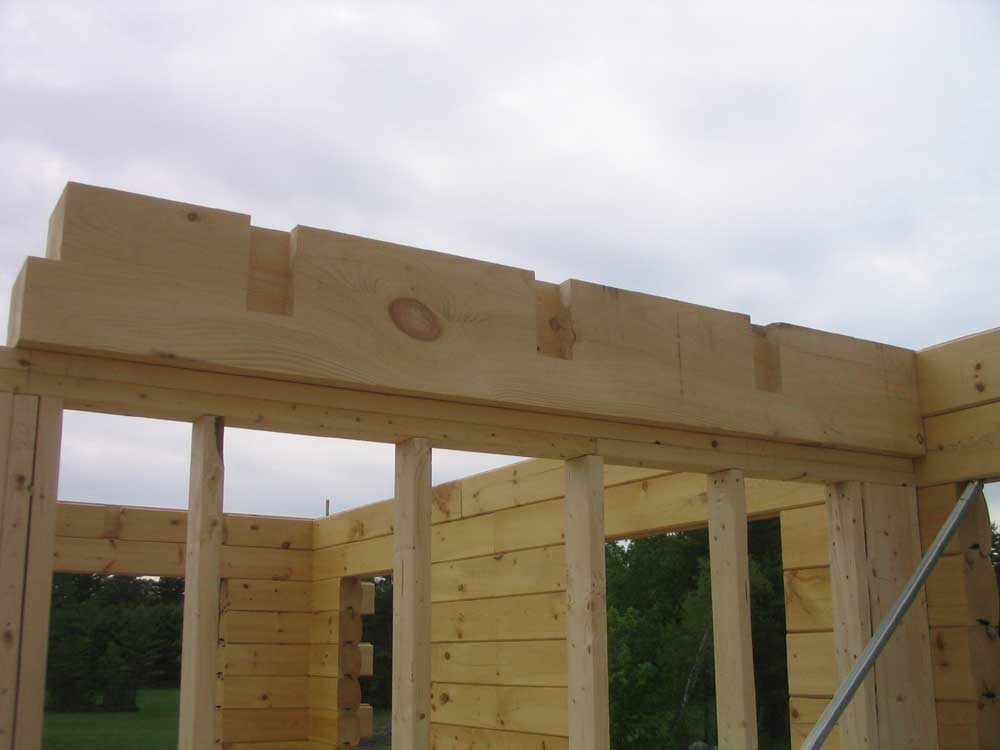
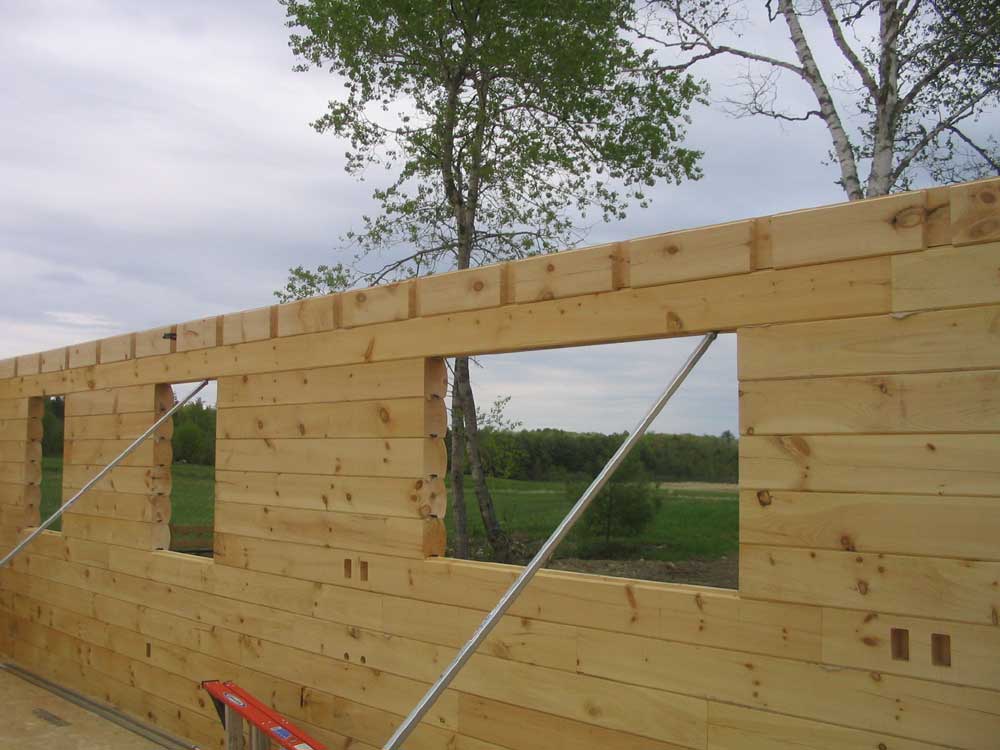
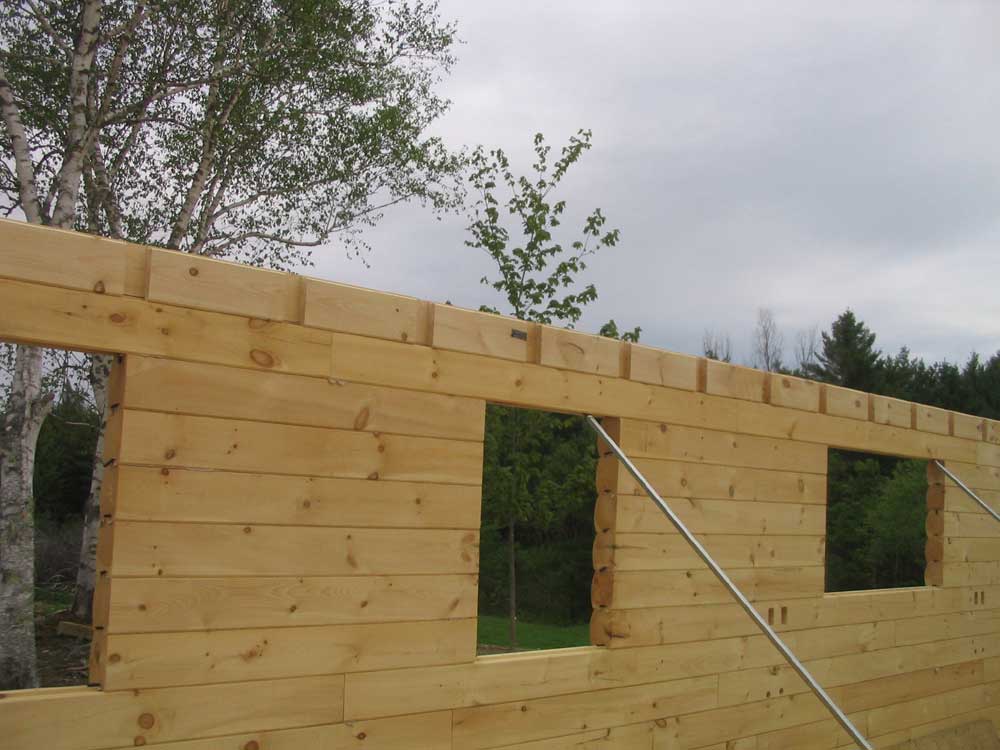
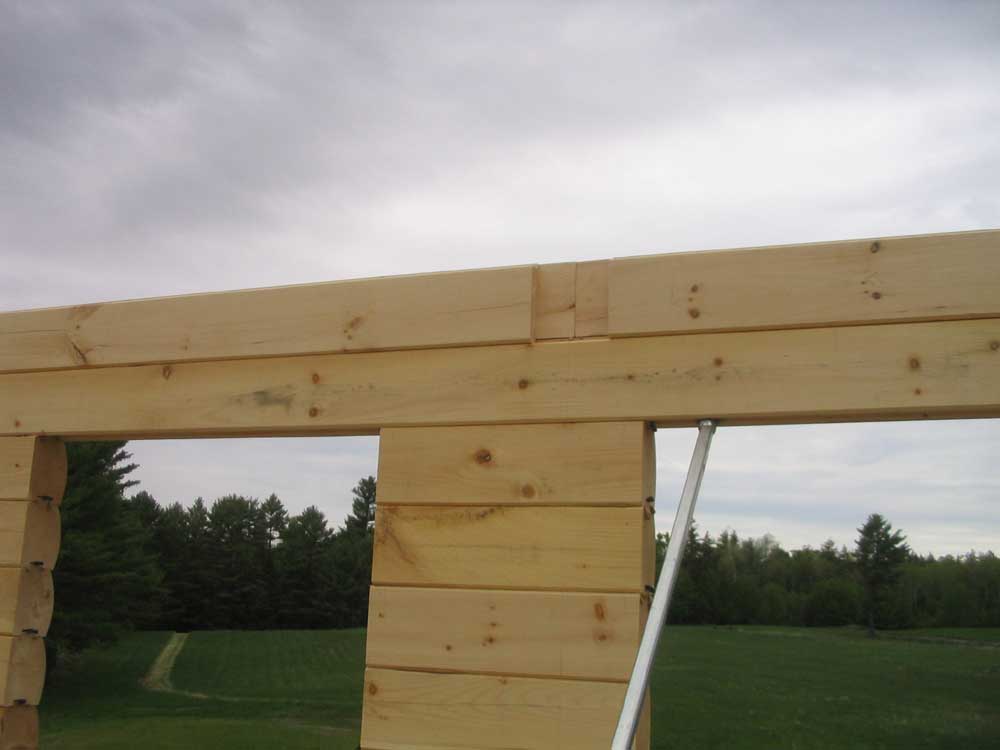
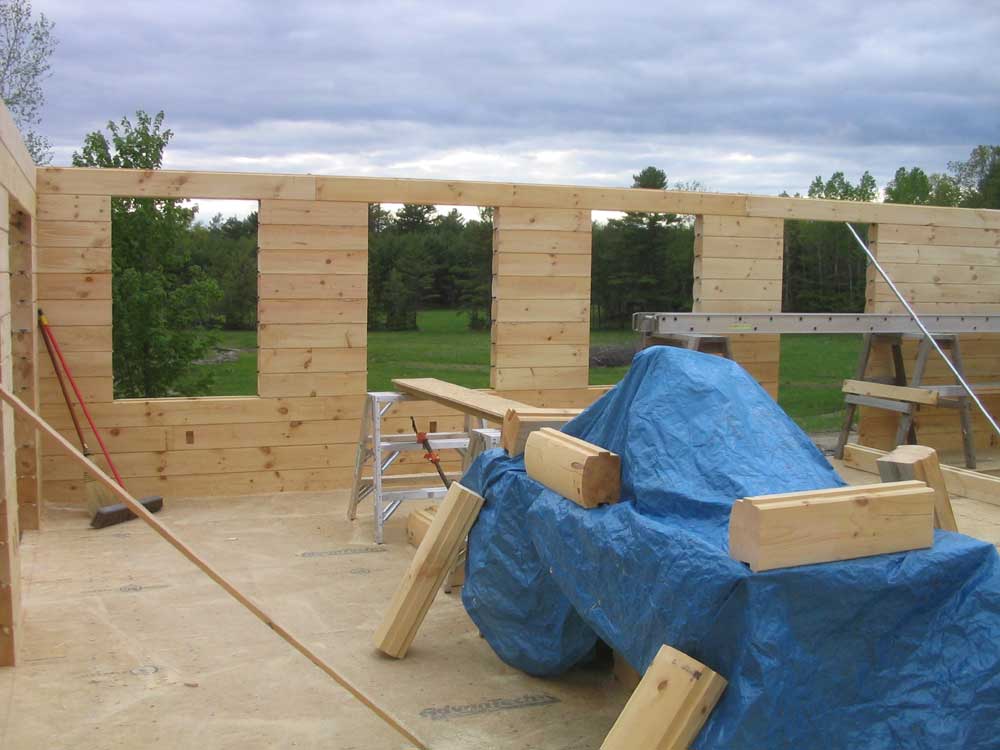
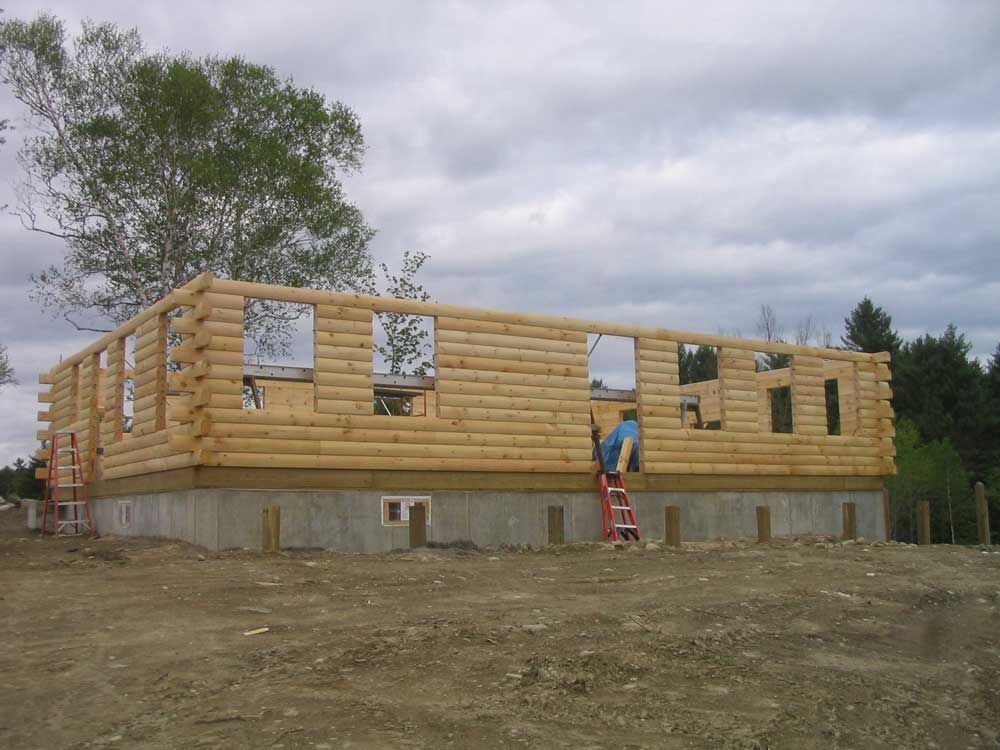
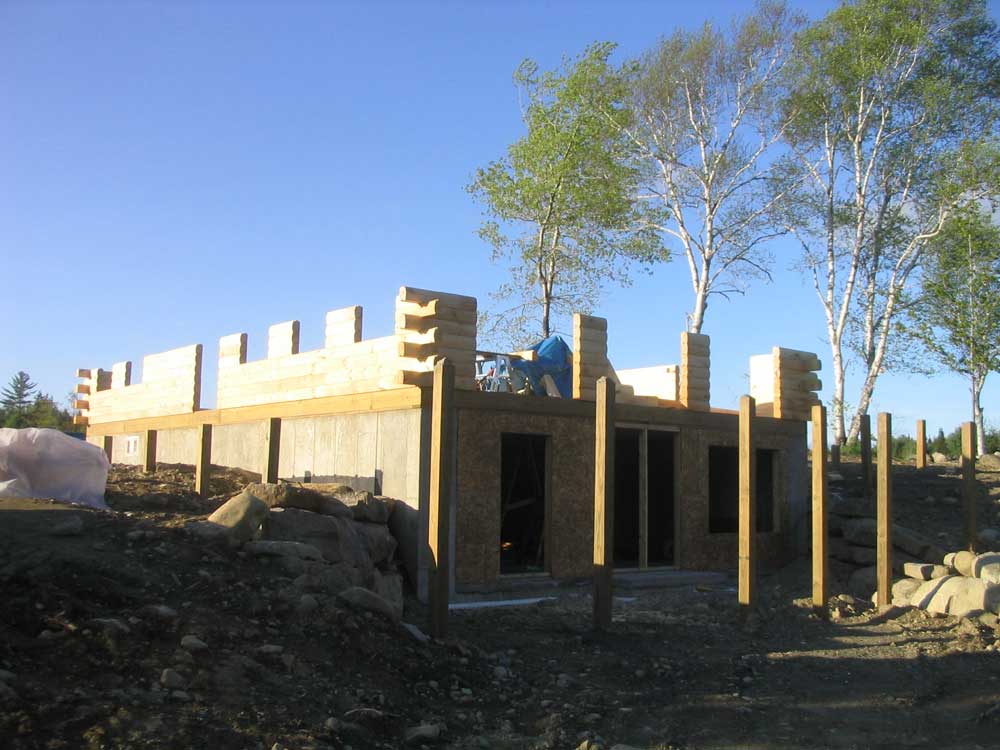
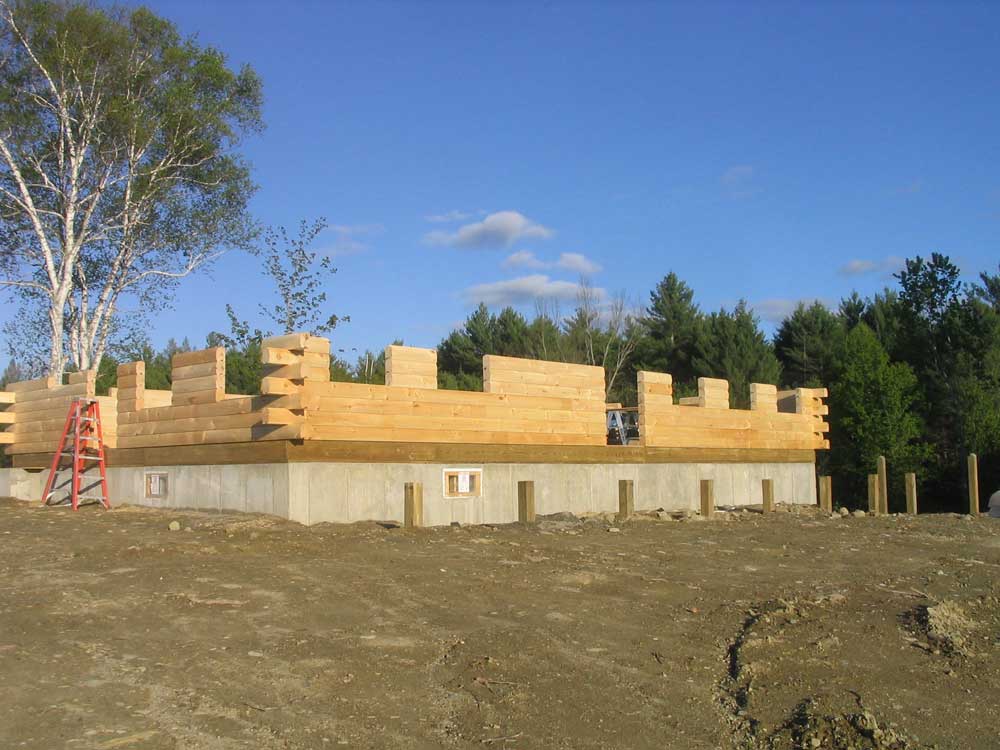
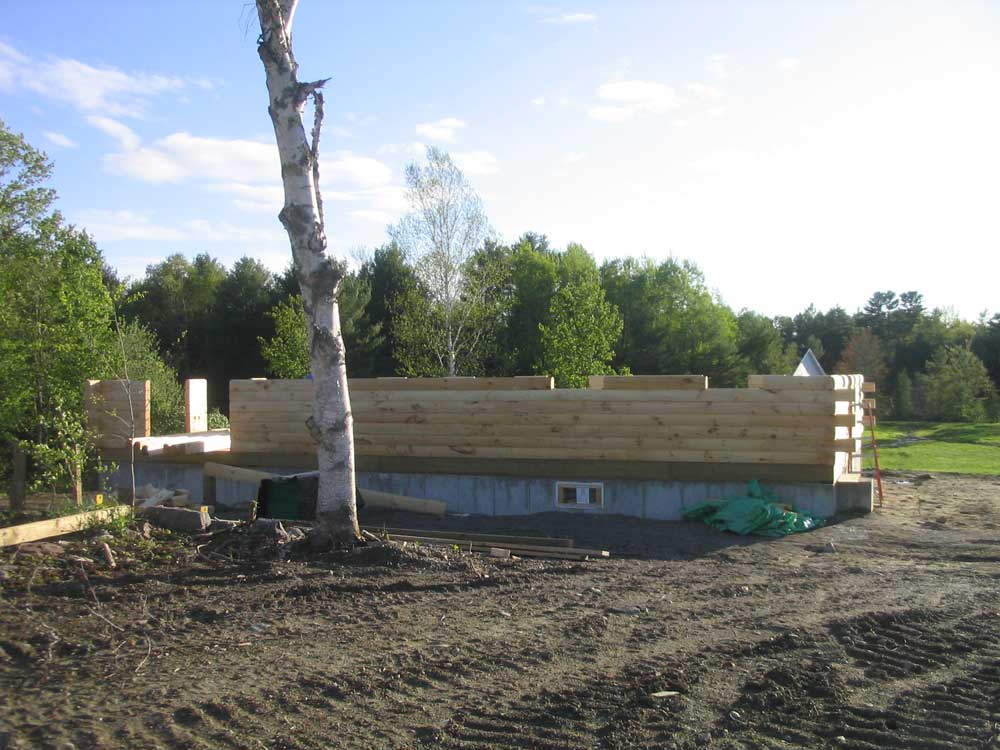
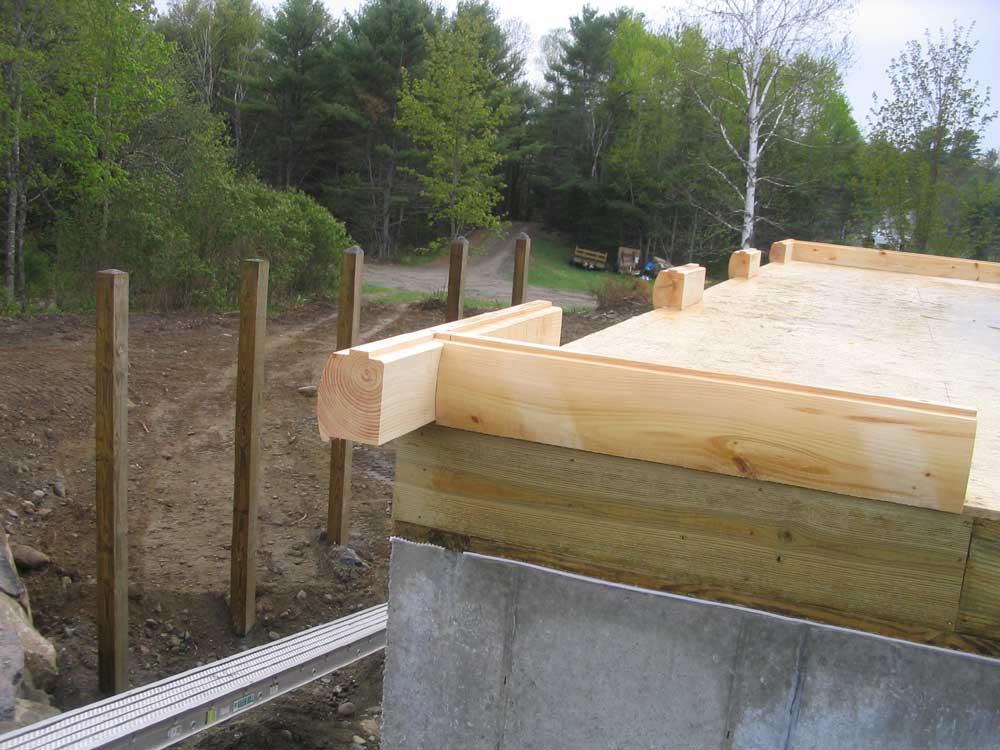
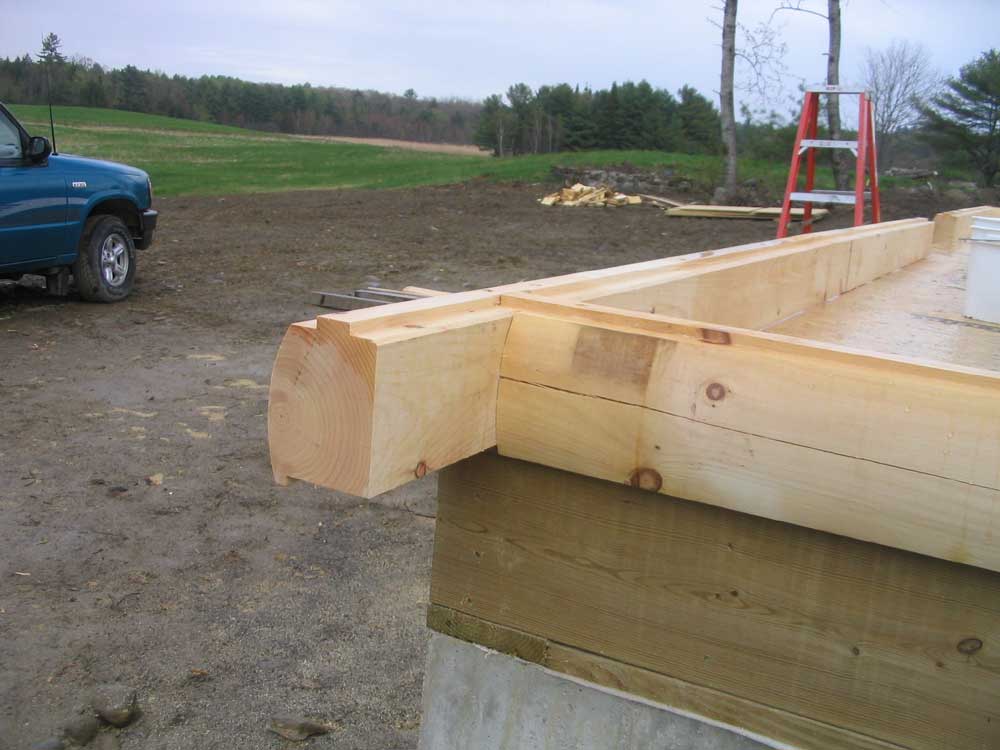
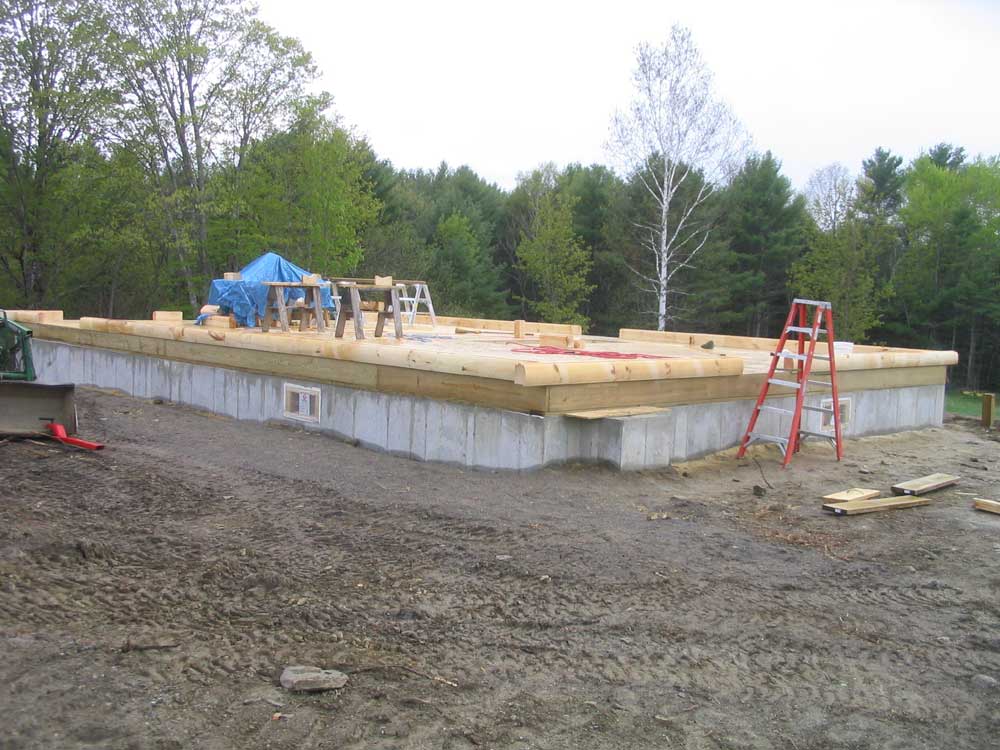
| Once we reached the top of the openings, we had to span the gaps with header logs--logs that for whatever reason had been graded as such and marked at the lumber yard. For most of the doors and windows in the house, the header logs were the 13th course, though the large French doors at the southern end of the house required a header log in the 12th course. The actual openings of all the windows and doors will eventually require that we cut into the logs at the top and bottom of the openings, as the window openings did not fall directly at the tops or bottoms of these logs. More on that later, as it occurs, though. | ||||||||||||||||||||||||||||||||||
 We
worked our way around the two back corners, spanned the fireplace
opening with a header log, and then tied the three walls together
with long logs running off the corners. The installation went
smoothly until the very last log (of course), late in the day.
Up until now, the logs in each corner had run to an opening in the
wall, making installation straightforward; now, with the 13th course
actually closing all the gaps, we had to fit the final log into a
predetermined space, and it had to fit closely. All seemed
fine, but we couldn't get the log to fit properly into position so
that it would drop tightly over the tongue beneath. Nothing
was obviously holding it back, but still it wouldn't go without a
fight. Eventually, with some persuasion and struggle, we
succeeded. We
worked our way around the two back corners, spanned the fireplace
opening with a header log, and then tied the three walls together
with long logs running off the corners. The installation went
smoothly until the very last log (of course), late in the day.
Up until now, the logs in each corner had run to an opening in the
wall, making installation straightforward; now, with the 13th course
actually closing all the gaps, we had to fit the final log into a
predetermined space, and it had to fit closely. All seemed
fine, but we couldn't get the log to fit properly into position so
that it would drop tightly over the tongue beneath. Nothing
was obviously holding it back, but still it wouldn't go without a
fight. Eventually, with some persuasion and struggle, we
succeeded.It was a long, but very satisfying, day. With the back wall basically built to full height (only one course remained), the house really began to look like something. |
||||||||||||||||||||||||||||||||||
|
|
||||||||||||||||||||||||||||||||||
|
|
||||||||||||||||||||||||||||||||||
MONDAY, MAY 22, 2006 |
||||||||||||||||||||||||||||||||||
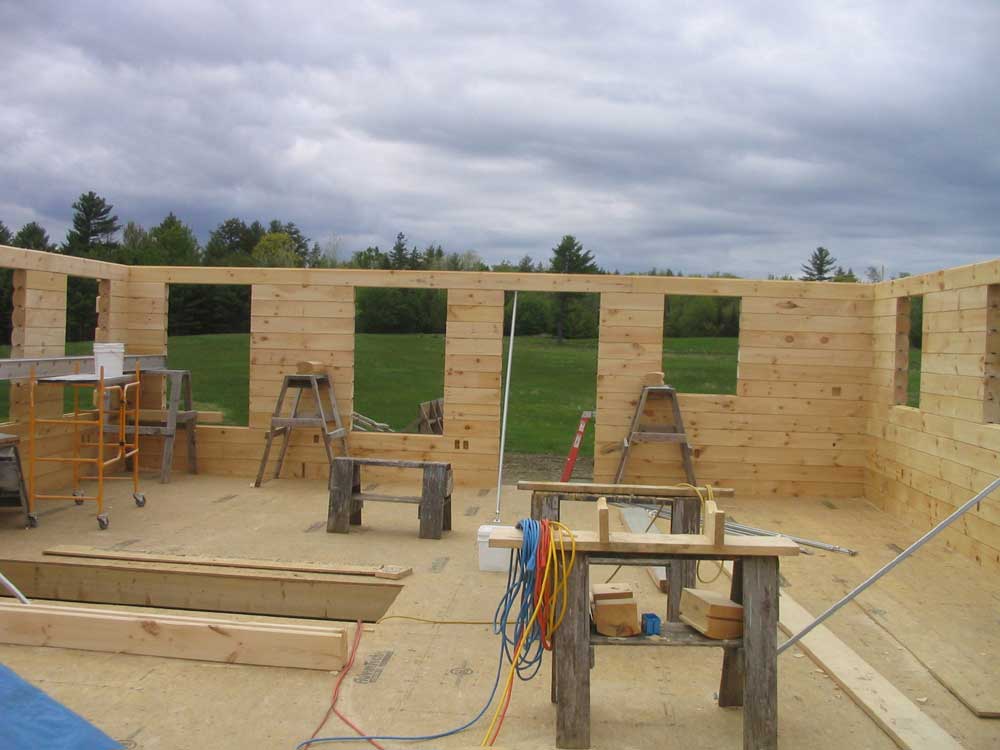
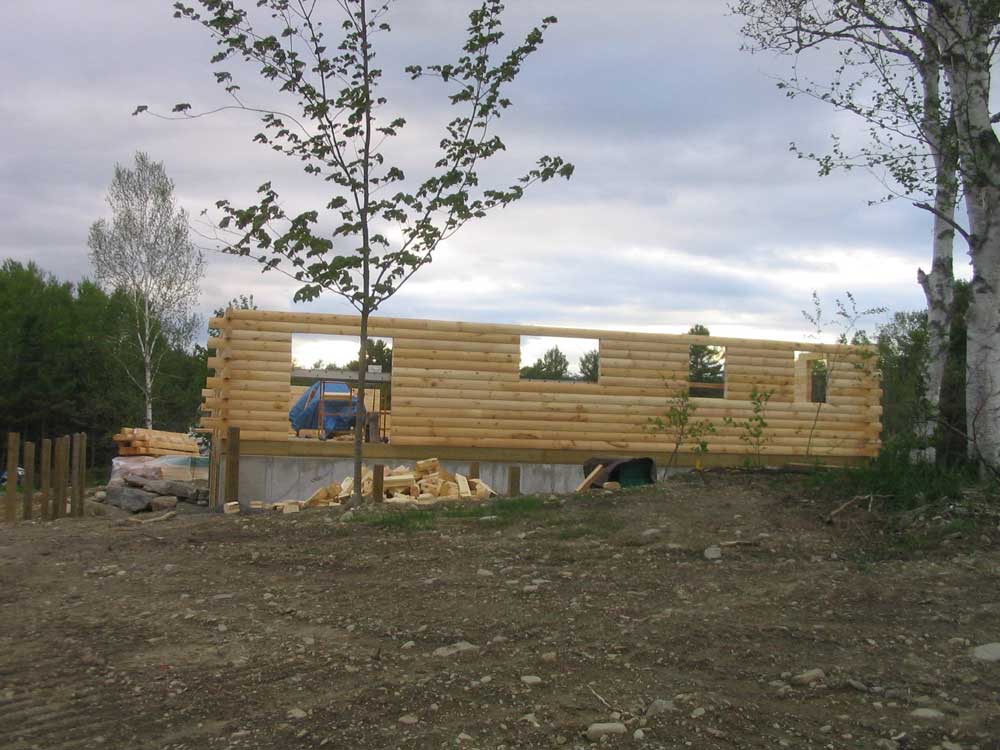
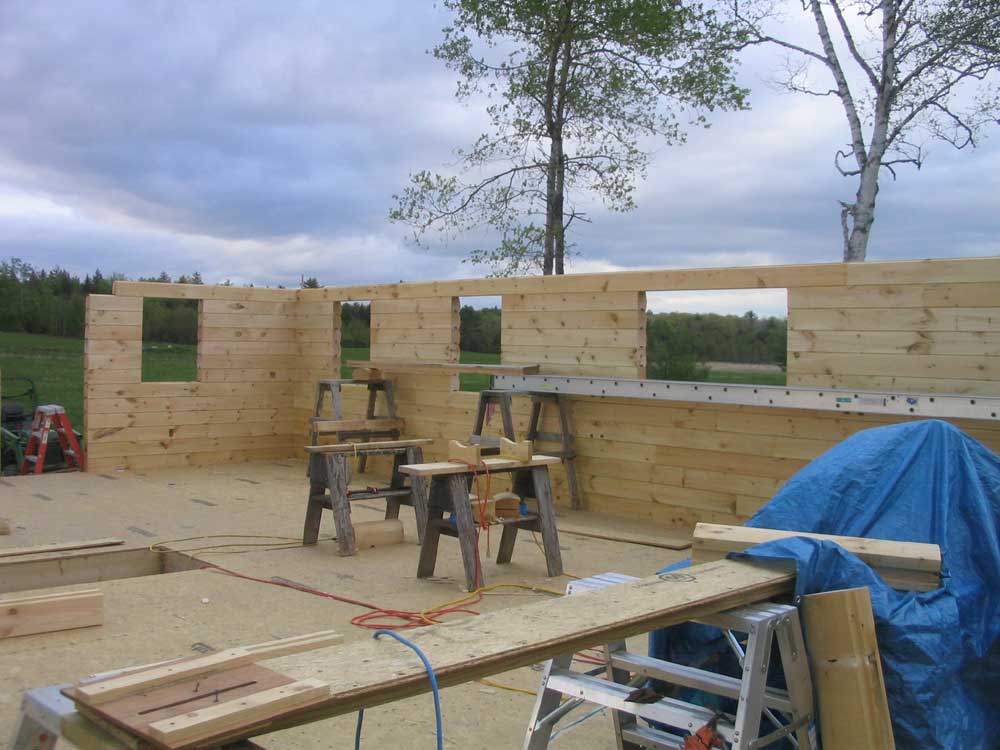
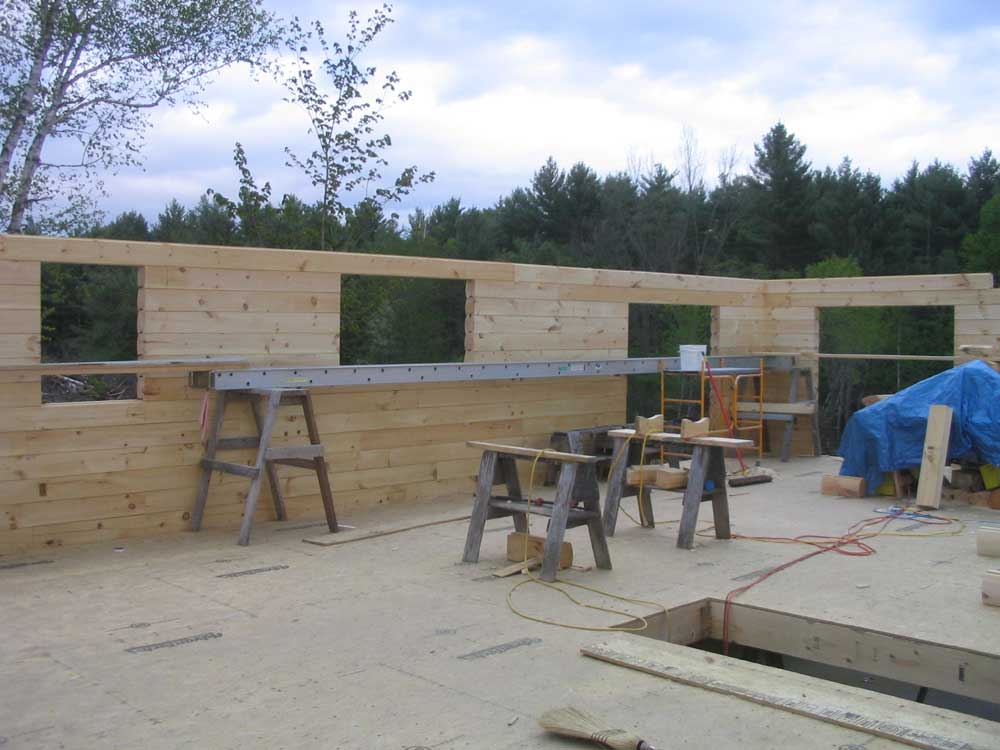
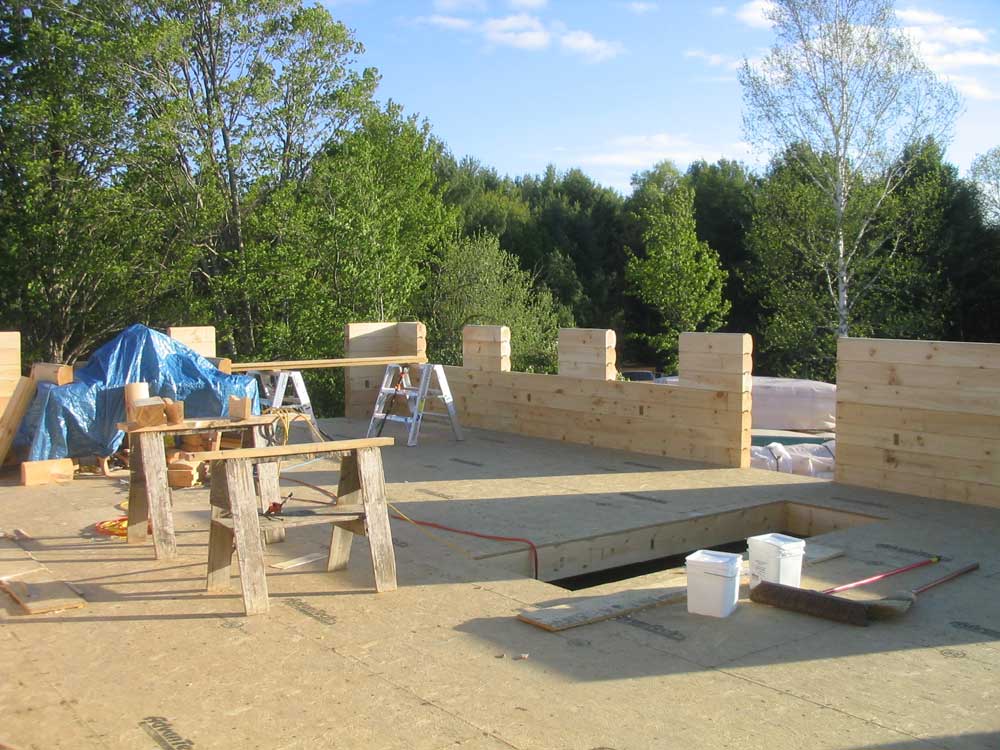
| We made good progress today. We got right into it bright and early, starting at 0630 or so, and by lunchtime we had two rows of logs cut and secured in place. I won't go into the details, as it was just more of the same process that I described in detail last week. The remaining windows in the front and back of the house began to be defined as we cut logs around the openings. | ||||||||||||||||||||||||||||||||||
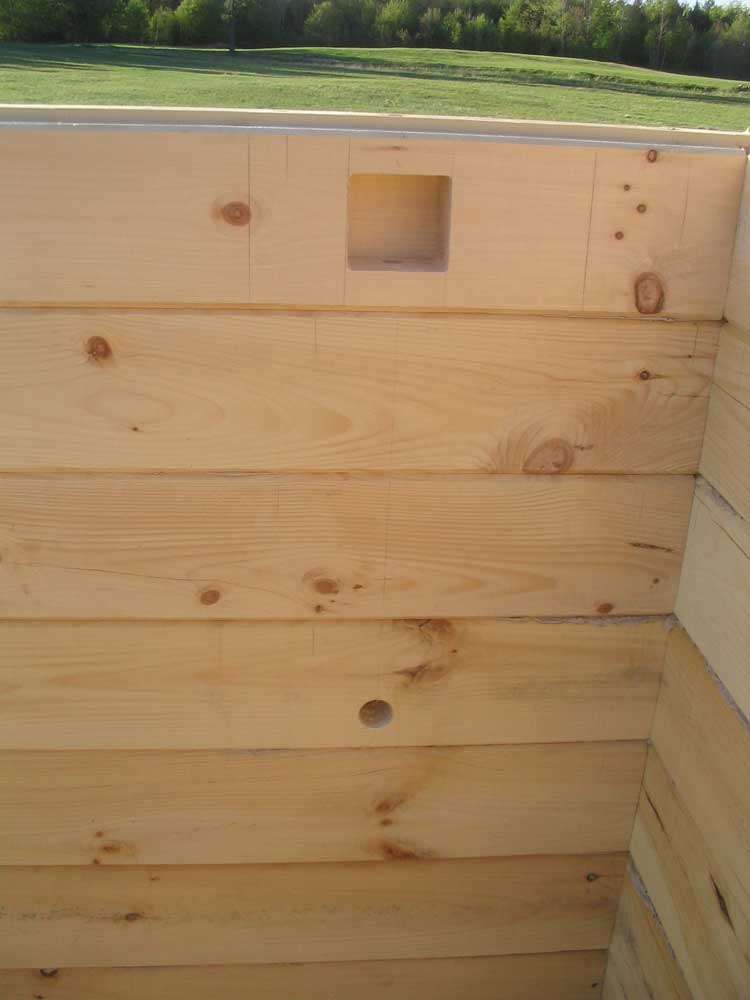 The 7th course of logs is the one that contains the upper level of
outlets (over-counter outlets) and switch boxes. Fortunately,
there were only a few locations: the downstairs bathroom, in
the northeast (back left) corner of the house, and the kitchen area.
I decided to locate virtually all switches on interior walls, to
avoid the complexity of adding them to the solid log walls, but did
place one double gang box near the door to the screen porch in the
back. As before, I located the outlets using the house plan as
a guide, and routed the openings with my big router. The 7th course of logs is the one that contains the upper level of
outlets (over-counter outlets) and switch boxes. Fortunately,
there were only a few locations: the downstairs bathroom, in
the northeast (back left) corner of the house, and the kitchen area.
I decided to locate virtually all switches on interior walls, to
avoid the complexity of adding them to the solid log walls, but did
place one double gang box near the door to the screen porch in the
back. As before, I located the outlets using the house plan as
a guide, and routed the openings with my big router.One difference with these outlets is that the holes for the wiring runs do not extend through all the logs beneath; instead, we drilled through 2 or 3 layers of the logs, and then drilled a large hole through the face of that log so that it met up with the vertical hole leading to the outlet box. Later, countertops would hide these holes. |
||||||||||||||||||||||||||||||||||
|
|
||||||||||||||||||||||||||||||||||
 his
process slowed down the progress somewhat, and I made an error on
one of the logs and routed two boxes too closely together, as I laid
the jig on the wrong layout line. I had to cut a new log and
then re-rout the boxes in the right location. Nevertheless, we
managed to complete and secure the 7th course (our 3rd of the day)
by late afternoon. his
process slowed down the progress somewhat, and I made an error on
one of the logs and routed two boxes too closely together, as I laid
the jig on the wrong layout line. I had to cut a new log and
then re-rout the boxes in the right location. Nevertheless, we
managed to complete and secure the 7th course (our 3rd of the day)
by late afternoon.
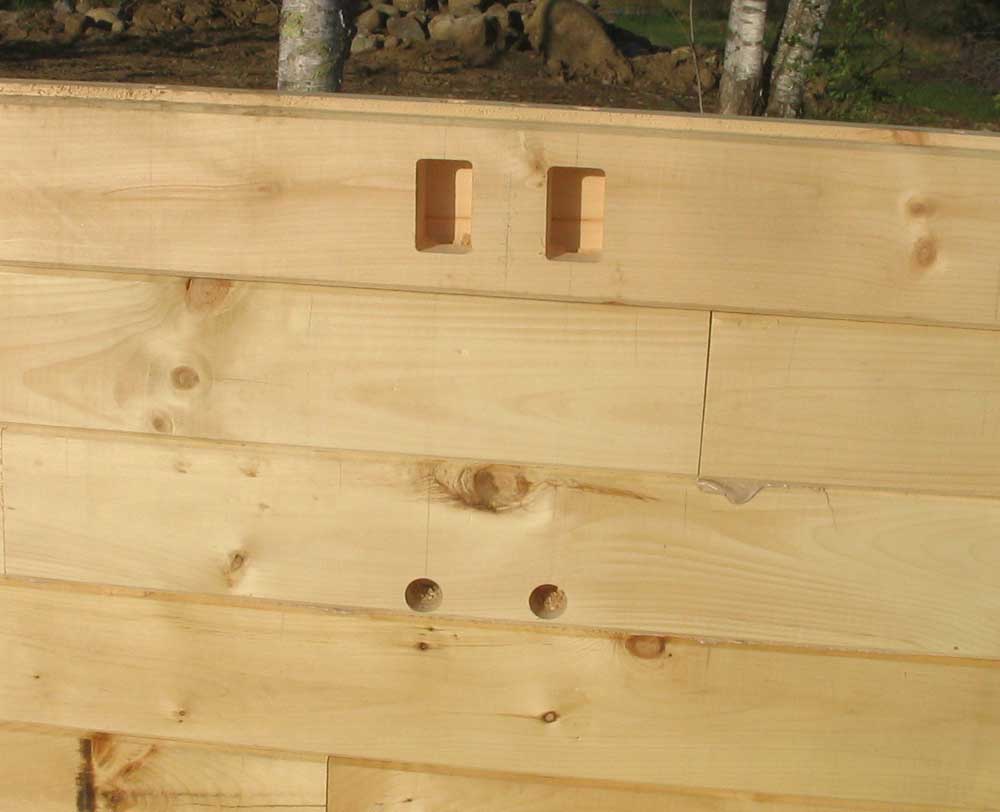
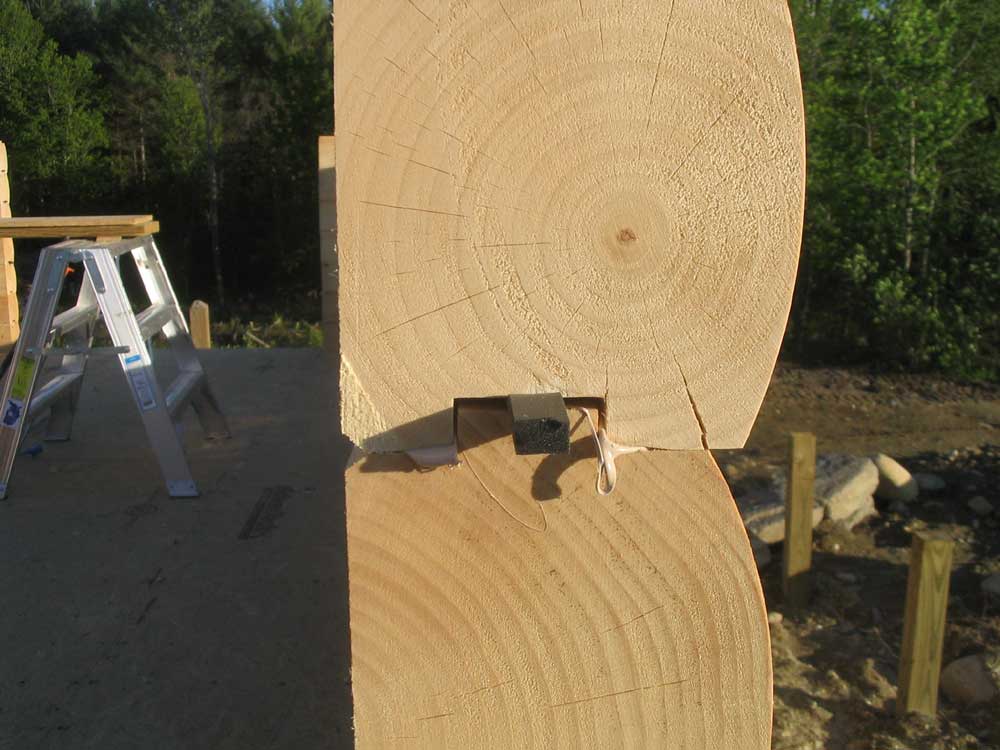
This photo shows the way the logs are secured, and how the two beads of sealant, one on each side of the tongue, fill the slight hollows milled in the log bottoms, and how the foam sealant tape compresses between the tongue and the groove. The overhang on the outside of the log is designed to prevent water from entering the gaps between the logs. Now halfway up the first floor walls, the house was really beginning to take shape! |
||||||||||||||||||||||||||||||||||
|
|
||||||||||||||||||||||||||||||||||
|
|
||||||||||||||||||||||||||||||||||
FRIDAY, MAY 19, 2006 |
||||||||||||||||||||||||||||||||||
|
Well, yesterday you got two for the price of one; today, you get
half. These things have a way of evening out. Turning on the weather at 5 this morning, I was unhappy to see Kevin Mannix predicting heavy rain for today--and relatively soon, too. It was news to me, but then I didn't watch the weather last night. It looked like the rain would be some time getting here, though, and Bob and I decided that at least we could get the as-yet-unsecured 4th row of logs screwed and sealed in place before the rain. He arrived around 8 after an appointment, and by 9:30 the work was done.
|
||||||||||||||||||||||||||||||||||
 I finished up with this chore
around noontime and covered the logs with a tarp to keep the rain
(and, more importantly, the backsplashing of the dirt) off--and none too soon: the promised rain began to
arrive almost immediately thereafter, including some thunder and
heavy downpours. I finished up with this chore
around noontime and covered the logs with a tarp to keep the rain
(and, more importantly, the backsplashing of the dirt) off--and none too soon: the promised rain began to
arrive almost immediately thereafter, including some thunder and
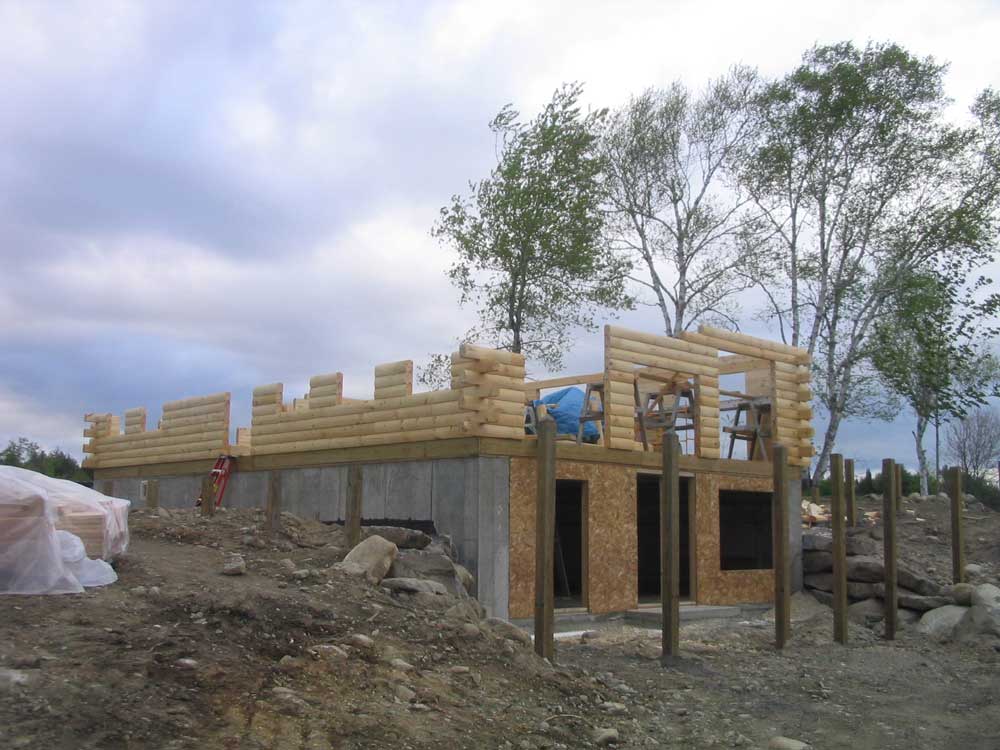
heavy downpours.My goal for next week is to complete all 14 courses (10 remaining) of logs, bringing us to the top of the first floor. It will be a short week, as we are headed off somewhere Memorial Day weekend. |
||||||||||||||||||||||||||||||||||
TUESDAY, MAY 16, 2006 |
||||||||||||||||||||||||||||||||||
| It's
nice that it rains so often, as it gives me the time to post these
logs for your enjoyment. I'd hate to fall behind! Yes, it's another rainy day. At least today, there was no question about it, no hemming and hawing: it was raining, not intermittent drizzle and showers, so we called off the day's work early in the morning. It's too bad, since we were just getting on a roll by the end of yesterday, but we'll get back into it tomorrow. |
||||||||||||||||||||||||||||||||||
MONDAY, MAY 15, 2006 |
||||||||||||||||||||||||||||||||||
| It
was an interesting weekend. Southern Maine and New Hampshire
received more than a foot of rain, causing major flooding, road
closings, and other issues. Meanwhile, north of Portland there
was not a drop, and here in Whitefield we actually had full sun on
Saturday afternoon and all day Sunday.
|
||||||||||||||||||||||||||||||||||
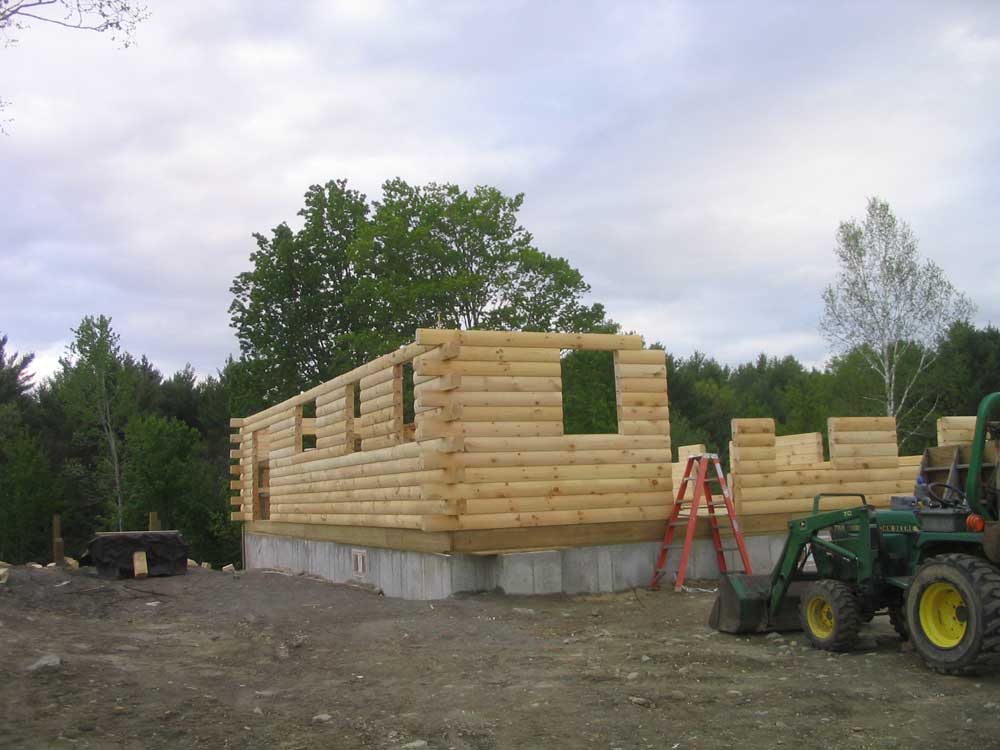
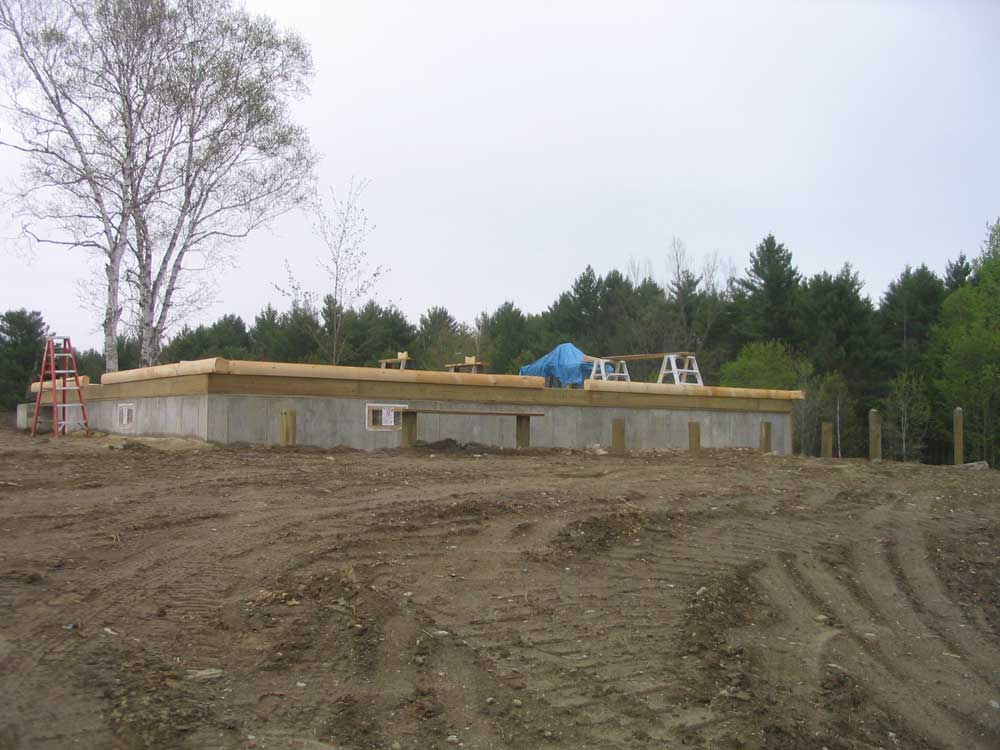
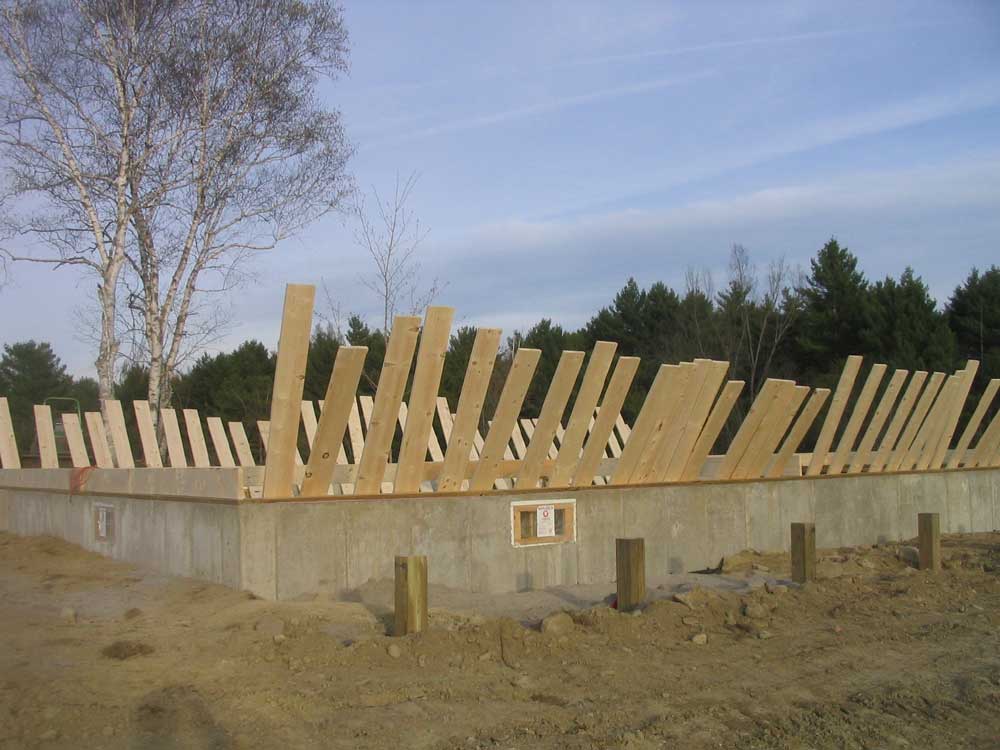
Monday fortunately dawned dry. We got to work right around 7, and began by determining the squareness of the foundation deck (for future reference, I may frequently refer to this only as the "deck". If there's no porch-like deck being built off the house in conjunction with my use of this term, you may assume that I mean the foundation, or first floor, deck). We snapped chalk lines between our corners 4" in from the edge, as instructed. This allows the starter course of logs, which are milled differently from the rest with a flat bottom, to overhang the deck slightly. Later, the gap beneath would be filled with a log skirt around the outside of the box sill, covering the unsightly pressure treated lumber and the very top of the foundation. Then, we laid out the rough openings for the doors and windows, marking them right on the subfloor for future reference. The logs would need to stop at the door openings, and then later at the window openings when we had stacked enough logs to reach that height. |
||||||||||||||||||||||||||||||||||
With that, we were ready to begin working with logs! First, though, we took the time to set up some tool stations for the large miter saw (each log needs its ends trimmed straight and square, and then cut to length as needed) and also worked out the best way to cut the tenons and mortises needed at the ends of the logs for the butt-and-pass corners. It took a couple hours to get properly geared up, but this time would pay off in more accurate and efficient cuts throughout the building process, and would also result in a better finished product. |
||||||||||||||||||||||||||||||||||
We began in one of the south gable corners, where both logs that formed the corner were short--just in case we made a mistake. We cut the log to length and marked for the mortise and tenon as required, and Bob made these cuts while I worked on choosing the next log and cutting it as required. Bob made an error and cut the mortise in the first log too wide, juxtaposing some of the various measurements from the construction manual that we were trying to keep straight in our heads. I had some fun ribbing him for a few minutes until I stupidly cut one of the very short logs that run between the French door opening and the fireplace in the gable wall 1/4" short. Oops! So we were even. Oh well...it was fun while it lasted! |
||||||||||||||||||||||||||||||||||
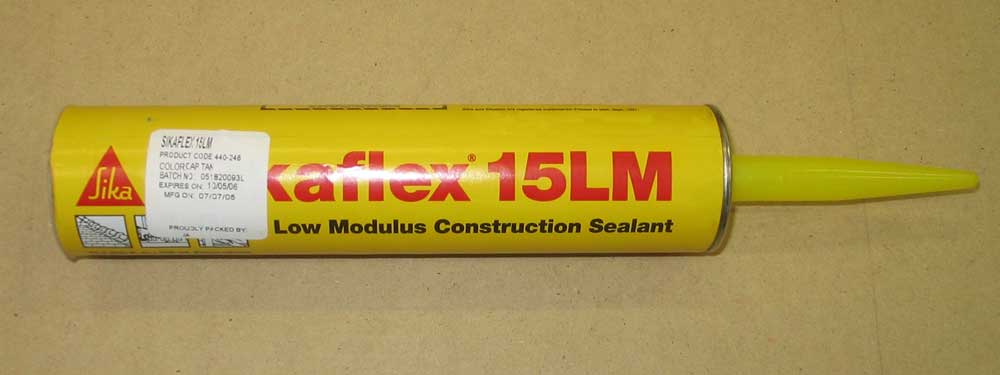
 With
(hopefully) our beginners' mistakes out of the way, and a couple
short pieces of wasted log, we quickly regrouped and successfully
cut both logs for the first corner, and installed them. We set
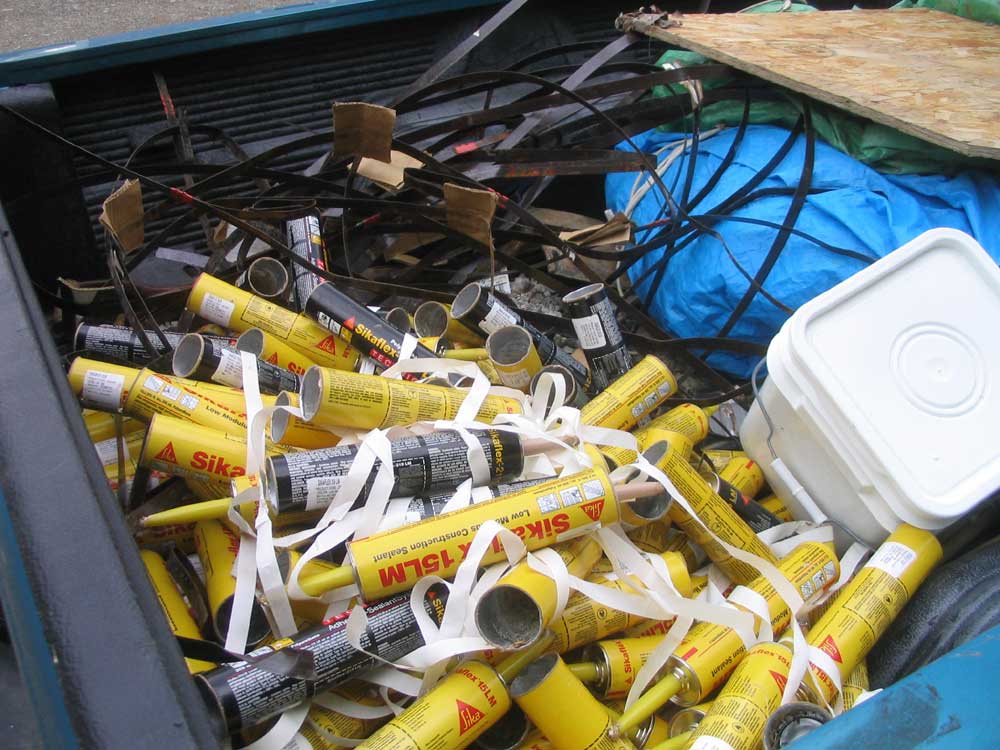
each log on a bed of three 3/8" beads of Sikaflex 15LM polyurethane
sealant, provided with our log package, which not only sealed the
log to the floor against air and moisture filtration, but also would
act as a strong adhesive to hold everything in place. To
secure the logs, we drove 10" log screws through the tongue of the
log and into the subfloor and framing. Moose Creek recommended
these be driven with a slow RPM drill (500 RPM), to ensure that the
screws would pull down the logs and bite into the material
beneath. However, we used Bob's cordless impact driver, which
is optimized for just this sort of thing; the more the screw is
screwed, the slower the tool turned, and the more torque it applied.
It worked very well--so well, in fact, that Bob planned to pick up a
new one for me at his lumber store when he came over next. With
(hopefully) our beginners' mistakes out of the way, and a couple
short pieces of wasted log, we quickly regrouped and successfully
cut both logs for the first corner, and installed them. We set
each log on a bed of three 3/8" beads of Sikaflex 15LM polyurethane
sealant, provided with our log package, which not only sealed the
log to the floor against air and moisture filtration, but also would
act as a strong adhesive to hold everything in place. To
secure the logs, we drove 10" log screws through the tongue of the
log and into the subfloor and framing. Moose Creek recommended
these be driven with a slow RPM drill (500 RPM), to ensure that the
screws would pull down the logs and bite into the material
beneath. However, we used Bob's cordless impact driver, which
is optimized for just this sort of thing; the more the screw is
screwed, the slower the tool turned, and the more torque it applied.
It worked very well--so well, in fact, that Bob planned to pick up a
new one for me at his lumber store when he came over next. |
||||||||||||||||||||||||||||||||||
|
|
||||||||||||||||||||||||||||||||||
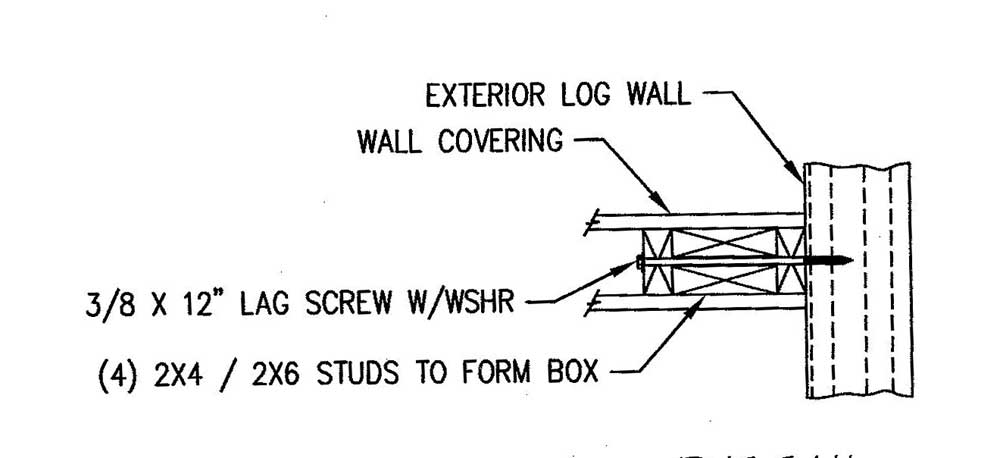
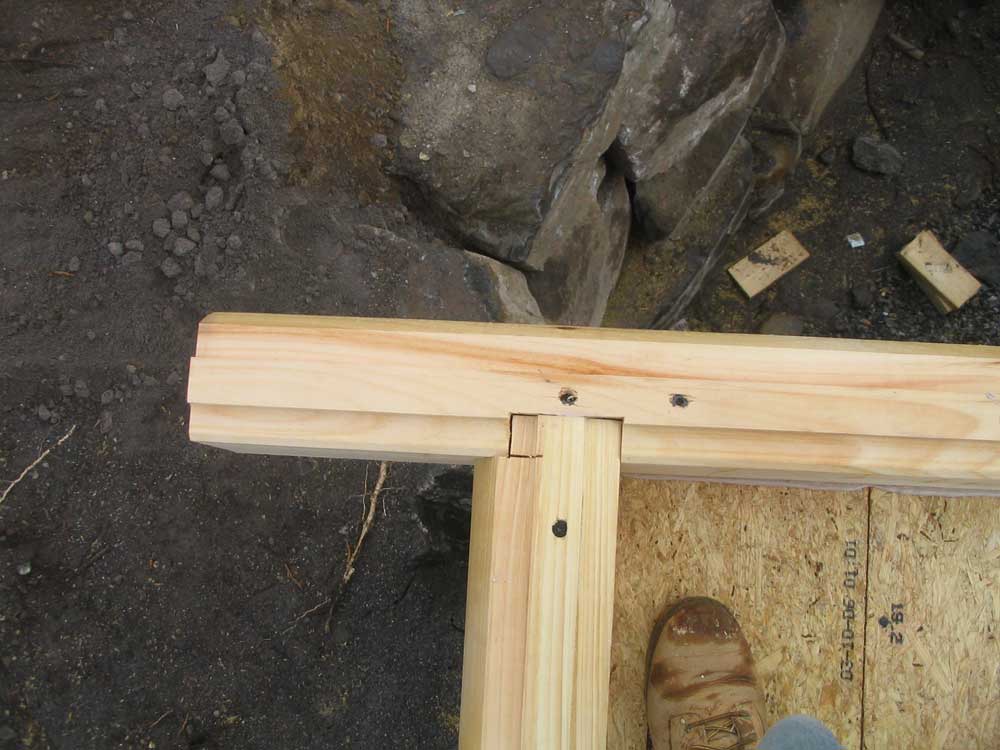
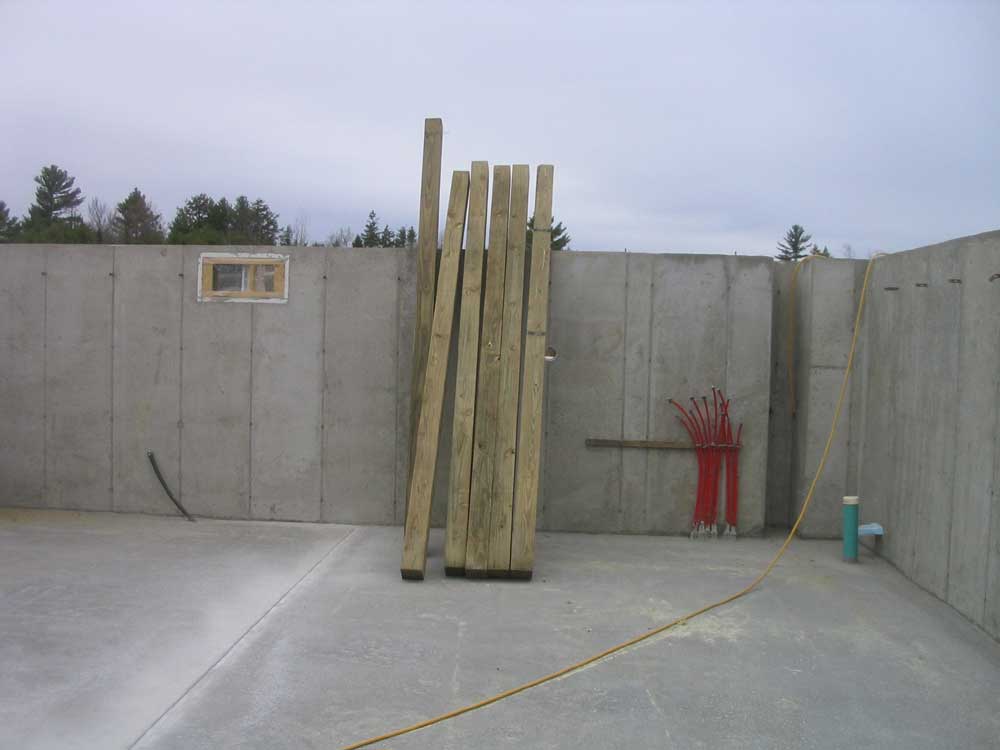
At the corners, one log extends beyond the house framing, and the other log at 90° butts into the "passing" log (hence "butt-and-pass" corner). The second log , with a tenon cut on the end, fit into a corresponding mortise on the passing log. We sealed this joint with more Sikaflex, and drove a log screw into the joint at an angle to pull and hold it together. Later, you'll see how we handle the second (and subsequent) row of logs. |
||||||||||||||||||||||||||||||||||
|
|
||||||||||||||||||||||||||||||||||
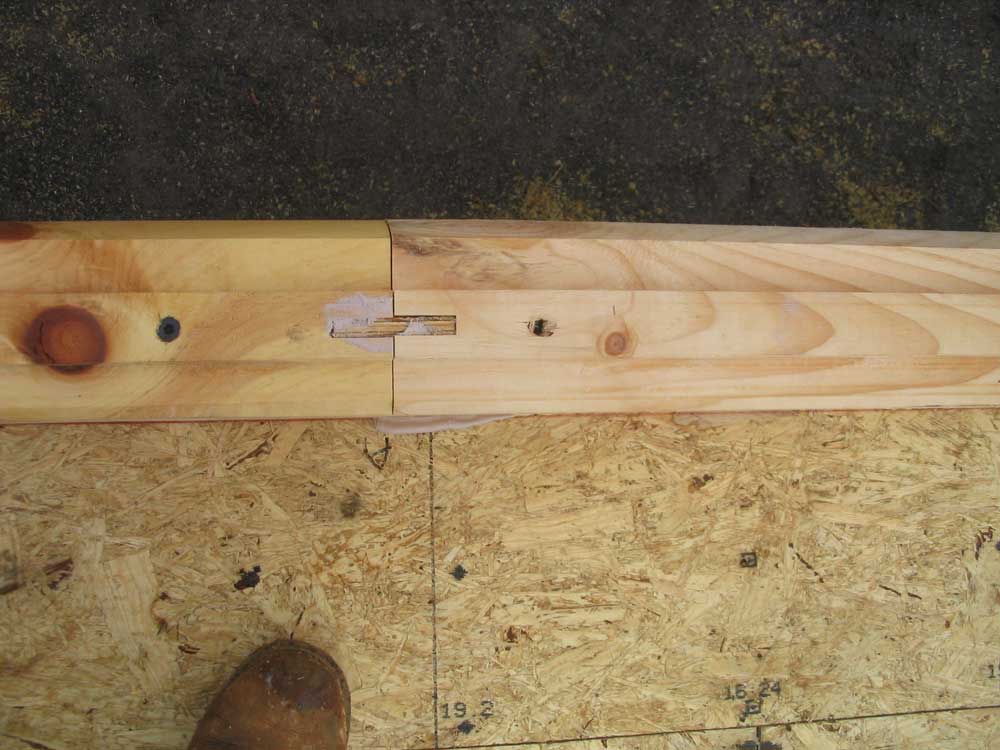 We
completed the four corners in this manner, and then worked to fill
in the remaining lengths with logs as needed, stopping the logs at
the door (and fireplace) openings. Where two lengths of log
met in a butt joint, I milled 1/2" wide by 1-1/2" deep mortises with
a router, using a jig that I built last week. When we
installed the logs, we inserted 1/2" thick, 3" x 7" pieces of
plywood into the mortises at the ends of the logs to act as a
spline, gluing the logs together and also aligning the ends to
prevent future movement. Again, we used the Sikaflex on the
splines and in the joint to seal and adhere the areas. We
completed the four corners in this manner, and then worked to fill
in the remaining lengths with logs as needed, stopping the logs at
the door (and fireplace) openings. Where two lengths of log
met in a butt joint, I milled 1/2" wide by 1-1/2" deep mortises with
a router, using a jig that I built last week. When we
installed the logs, we inserted 1/2" thick, 3" x 7" pieces of
plywood into the mortises at the ends of the logs to act as a
spline, gluing the logs together and also aligning the ends to
prevent future movement. Again, we used the Sikaflex on the
splines and in the joint to seal and adhere the areas.You can see plenty of Sikaflex that oozed out of these joints, and beneath the logs. Later, I'll clean this off, but it's more effective to let it cure and then cut it cleanly away; attempts to wipe it up when uncured only result in a mess, and pressing the sealant into the pores of the wood, forever staining it. |
||||||||||||||||||||||||||||||||||
|
|
||||||||||||||||||||||||||||||||||
|
|
||||||||||||||||||||||||||||||||||
|
|
||||||||||||||||||||||||||||||||||
| It
rained on and off in varying intensities and was generally wet
today, so there was little sense in trying to lay out what we needed
to in order to begin with the logs. I was disappointed, but
there's little that can be done when weather interferes. The lousy wet, drizzly, showery weather was forecast to last most of the way through the weekend, but it looked like Monday might be good--if only a brief respite before more rain scheduled for Tuesday. We didn't really have any April showers, and these May showers may well be helping the May flowers, but they sure are hindering house construction! I spent some time preparing some tools that we'd need for the log construction, and also built some router jigs to make it easier to use this handy tool for creating the log butt spline mortises and cutouts for the electrical boxes in the 3rd course of logs. To assist with this, I pulled a single log out of the pile; it was heavier than I expected, but manageable. Still, with the log pile so far from the house at this point, I thought that my new bucket forks for the tractor would definitely come in handy (I did buy them specifically for this purpose, actually.) Over the weekend, I'll probably work on installing joist hangers, and some other odds and ends as weather allows. I'd also like to set up a work table on the platform for my big chop saw for cutting logs. |
||||||||||||||||||||||||||||||||||
THURSDAY, MAY 11, 2006 |
||||||||||||||||||||||||||||||||||
|
After a rainy day on Wednesday, I was anxious to get back to work.
All that stood in the way of getting the logs started was completing
the subfloor. This morning wasn't too great either, weatherwise, but it was better than yesterday. There was light drizzle/heavy mist for much of the morning, punctuated by a few moments where true raindrops actually fell--but only briefly. A little after 6, I headed up to the site to try and plane the box sills flush--something I had hoped to get done yesterday, but the weather never allowed it. But almost as soon as I began, it started to rain harder. I unplugged the tool and retreated to the basement (not that it offered any shelter), but then I noticed that the rain, as it were, wasn't very heavy, and probably was nothing to worry about. So, over the next 30 minutes or so, I worked on the sills with the planer. The new tool worked extremely well and dispatched of the excess material (as much as 5/8" in some areas) with no fuss, though there was quite a bit of muss. |
||||||||||||||||||||||||||||||||||
|
|
||||||||||||||||||||||||||||||||||
| Mere seconds after I turned off the planer, having completed the job, Bob called to find out what was going on. I told him the weather wasn't too bad, but he decided to wait till around noon to see what happened. I agreed, but I was determined to do something. I didn't know what the weather was going to do either, but it was easy enough for me to try to work, but could also pack it in in short order if need be. | ||||||||||||||||||||||||||||||||||
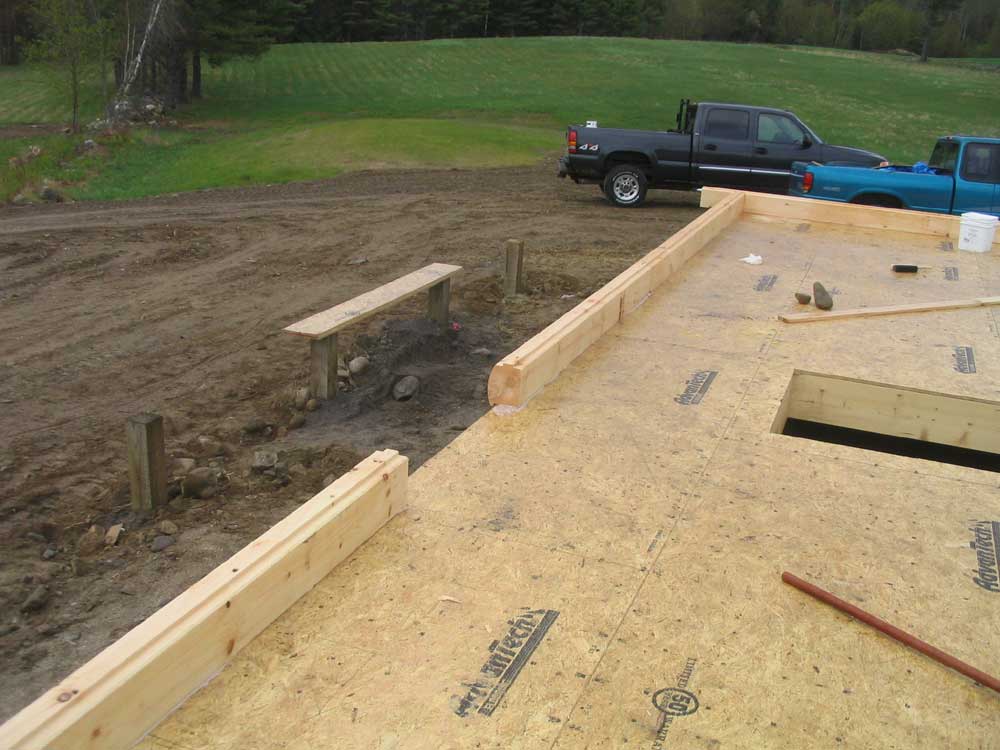
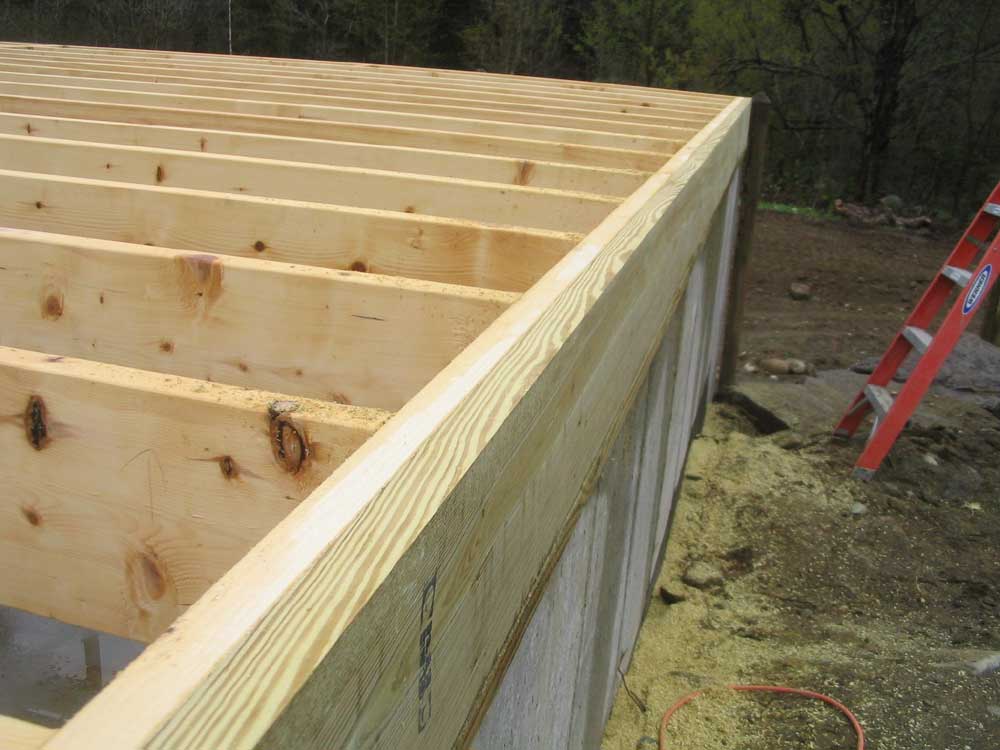
I wanted to install the subfloor, though I was dreading the chore. However, I geared up and got to work. The construction manual for the house indicated that the first run of the sheet material (Advantech subfloor) should be ripped to 3' (to prevent ending up with a very narrow piece on the far side), so I let the first run hang over the box sill by a foot. I glued each sheet to the joists with construction adhesive, and nailed them down with a framing nailer. It's never enjoyable handling sheet goods--heavy and awkward, and this was no exception. |
||||||||||||||||||||||||||||||||||
Though I knew what to do, I soon began to find ways to make the job easier--a better way to knock the tongues into the grooves on adjacent sheets, and a better way to nail the sheets to make subsequent sheets easier to install, and that sort of thing. Still, it was tiring work, but I made progress and had somewhere between 1/3 and 1/2 of the sheathing on by lunchtime. |
||||||||||||||||||||||||||||||||||
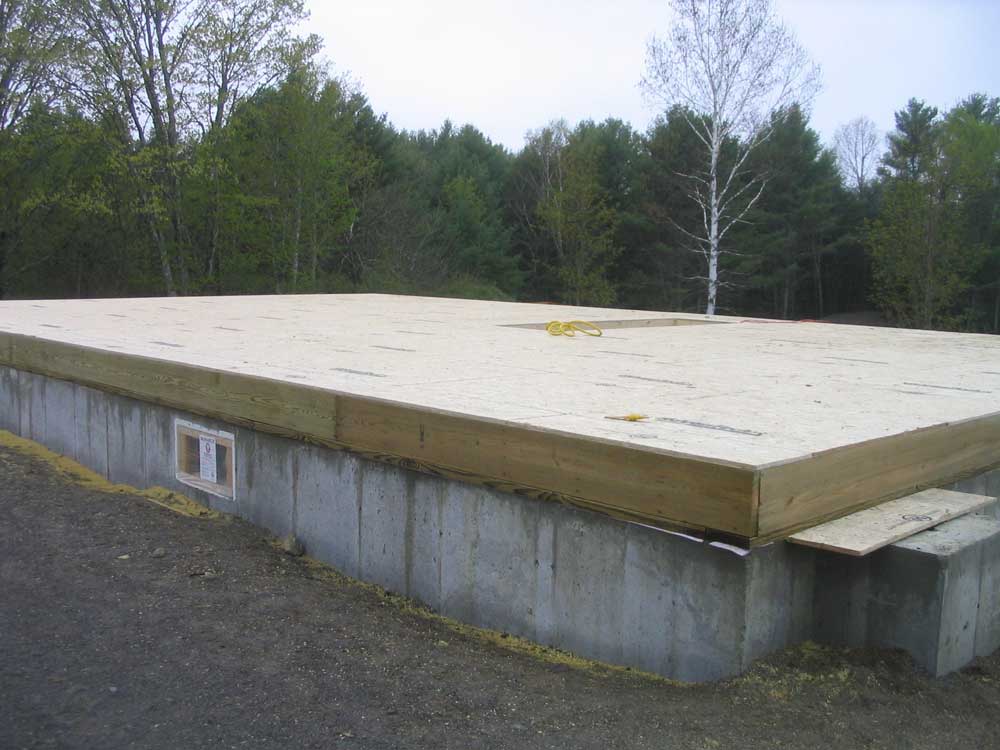
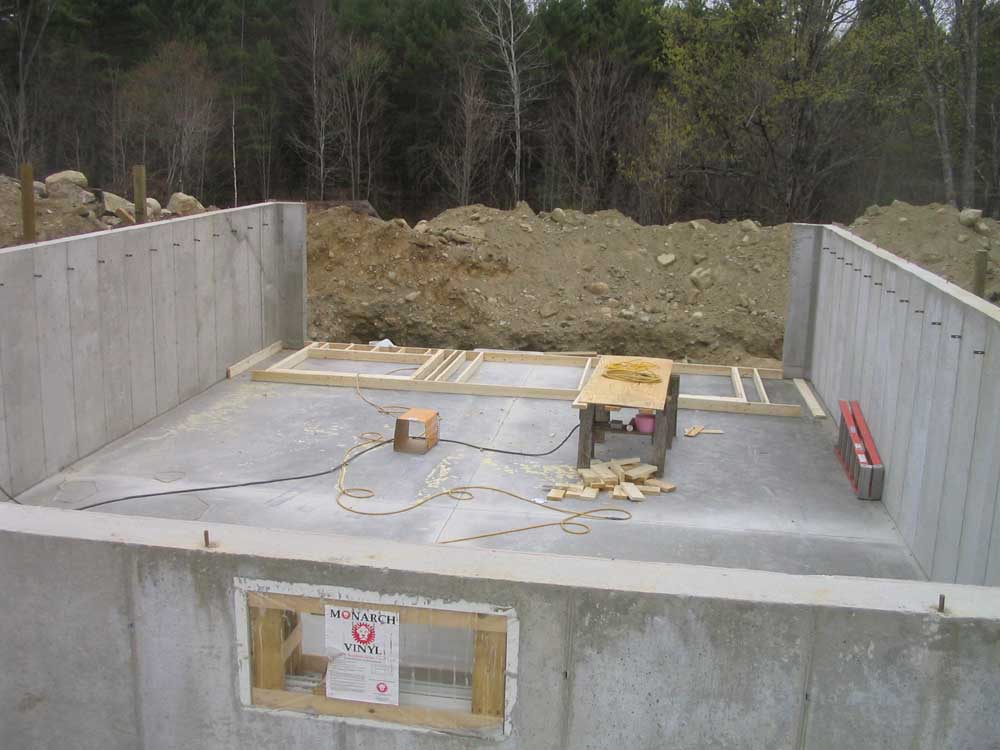
Bob came over after lunch, and with his expertise and, perhaps more importantly, the extra set of hands, the remaining floor went more quickly and smoothly. By about 1500, the subfloor was complete, including straightening the short ends of the box sill as needed, as they were a little wavy. The opening in the floor is for the basement stairs. |
||||||||||||||||||||||||||||||||||
|
|
||||||||||||||||||||||||||||||||||
| I
cleaned up the site a bit to remove the offcuts and other waste, and
also cleaned up the basement a bit, now that it was
semi-weathertight with the floor above. With the drudgery of
the initial critical layout, sill plates, and subfloor out of the
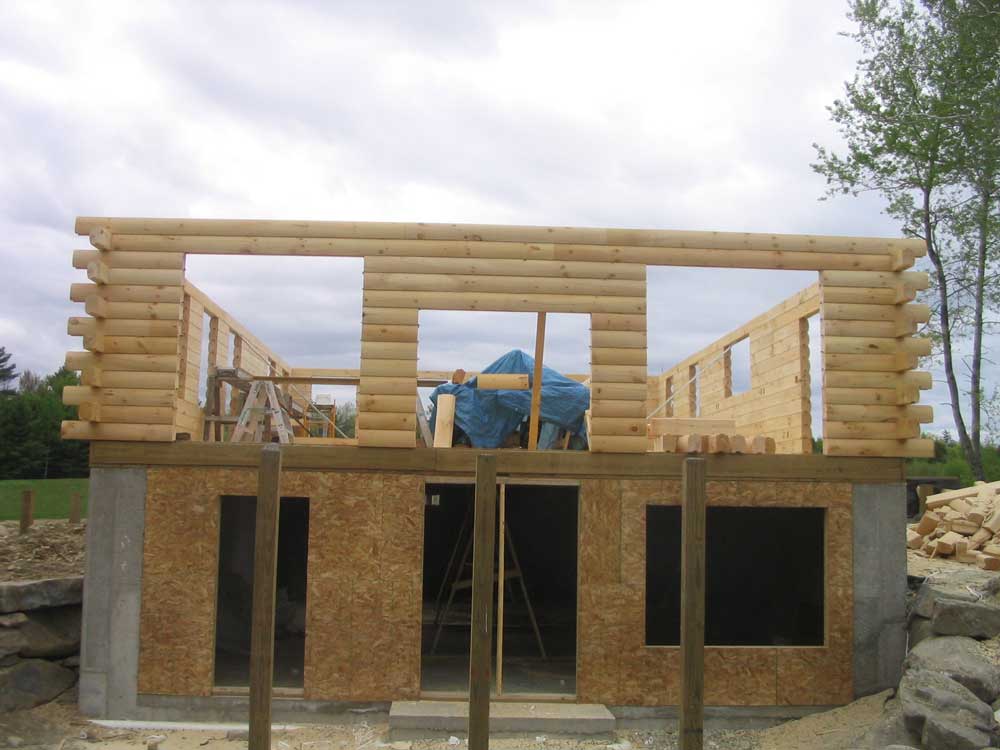
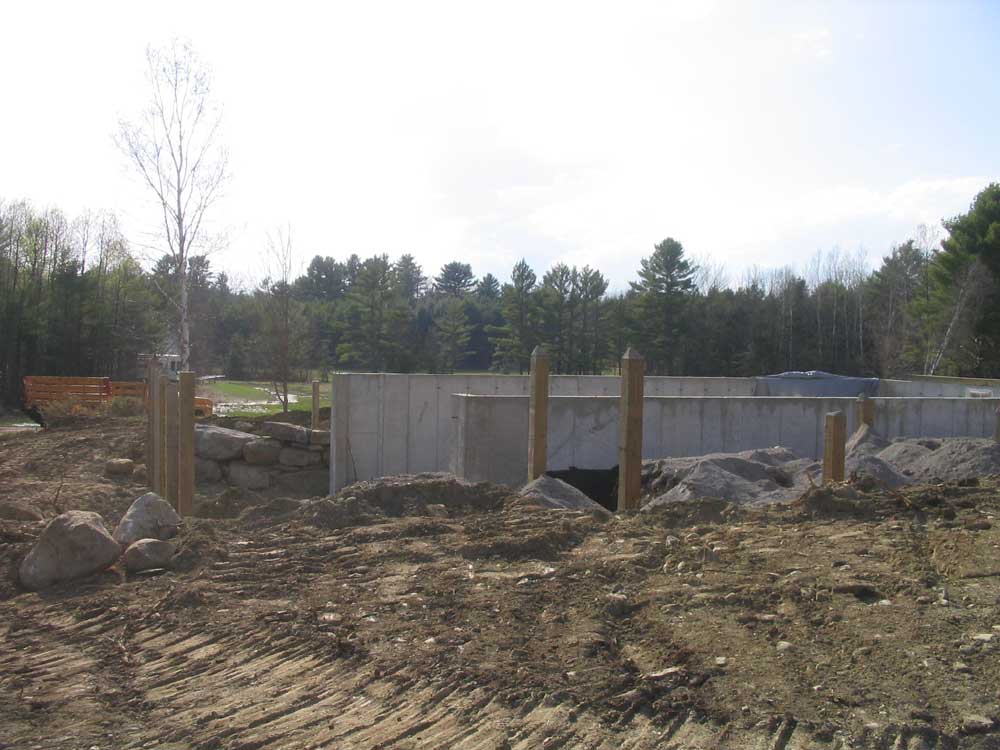
way, I looked forward to beginning to set the logs tomorrow! By the way: the center opening in the daylight basement wall is not a door or window, but is where the chimney will go. |
||||||||||||||||||||||||||||||||||
|
|
||||||||||||||||||||||||||||||||||
TUESDAY, MAY 9, 2006 |
||||||||||||||||||||||||||||||||||
| I
had hoped to make more progress today than we eventually did, but
things conspired against that.
|
||||||||||||||||||||||||||||||||||
 Next,
we moved on to the inner box sill--a spruce 2x10 that was ostensibly
to be nailed around the perimeter of the joists. Sounds easy, right?
Well, it would be, if the lumber were straight. But of course
the lumber was twisted and crowned, and getting the joists (which
were nailed to the sill plate) to line up with the top of the box
sill involved using a flat bar to raise them where necessary, an
unnecessary difficulty. Otherwise, this job went perfectly
well, but it took much longer than it probably should have. I
worked on this while Bob worked on some issues at the daylight
basement end of the frame. Next,
we moved on to the inner box sill--a spruce 2x10 that was ostensibly
to be nailed around the perimeter of the joists. Sounds easy, right?
Well, it would be, if the lumber were straight. But of course
the lumber was twisted and crowned, and getting the joists (which
were nailed to the sill plate) to line up with the top of the box
sill involved using a flat bar to raise them where necessary, an
unnecessary difficulty. Otherwise, this job went perfectly
well, but it took much longer than it probably should have. I
worked on this while Bob worked on some issues at the daylight
basement end of the frame.On the back side, the job went much faster, since the joists were not nailed here. I finished this rather quickly, and then gave Bob a hand with the daylight end. We had noticed a funky bump in the top of the wall here, and Bob set up his transit to check the level of the box sill. It turned out that the slab was 7/8" high in this spot (more careful work by the 'crete guys). The fix that Bob chose involved scribing and then removing the box sill (which was also the floor joists at the ends) and cutting to the scribe mark to shorten the box sill/joists to accommodate the 7/8" outage. More unnecessary, and slow, work. |
||||||||||||||||||||||||||||||||||
 Finally,
I began to install the outer box sill, made from pressure treated
lumber. Of course the PT lumber was of significantly different
dimensions than the spruce lumber within--both 2x10, but varying by
as much as 5/8" in actual height. We felt it was important to
have the two box sills be flat on top, as this forms the main
support for the log walls, and the flatter the beginning point the
better. After some discussion of various ways to deal with
this, including ripping each board as necessary, I located an old
power planer that came from somewhere, and determined that it
worked. This seemed like the easiest and most efficient way to
trim the PT boards, once they were installed, so we pressed on with
nailing the outer box sill in place; I planned to plane off the
excess as needed a little later in the afternoon. Finally,
I began to install the outer box sill, made from pressure treated
lumber. Of course the PT lumber was of significantly different
dimensions than the spruce lumber within--both 2x10, but varying by
as much as 5/8" in actual height. We felt it was important to
have the two box sills be flat on top, as this forms the main
support for the log walls, and the flatter the beginning point the
better. After some discussion of various ways to deal with
this, including ripping each board as necessary, I located an old
power planer that came from somewhere, and determined that it
worked. This seemed like the easiest and most efficient way to
trim the PT boards, once they were installed, so we pressed on with
nailing the outer box sill in place; I planned to plane off the
excess as needed a little later in the afternoon. |
||||||||||||||||||||||||||||||||||
 Bob
was having some stomach pains (muscular?), and by now it was about
1330. Since I had a couple hours' planing ahead, he decided to
head off. I took a break for lunch, and then headed back up to
begin planing. But when I plugged in the tool--nothing.
I checked the plug, the breaker, and everything else I could, but
the tool, which had operated fine an hour or two previously,
remained mute and motionless. Bob
was having some stomach pains (muscular?), and by now it was about
1330. Since I had a couple hours' planing ahead, he decided to
head off. I took a break for lunch, and then headed back up to
begin planing. But when I plugged in the tool--nothing.
I checked the plug, the breaker, and everything else I could, but
the tool, which had operated fine an hour or two previously,
remained mute and motionless.Now it was about 1430, so I tried using a Sawz-All to cut the excess. It would have worked, but would have been slow and painful, and inaccurate and messy. About 3" worth of cut was all it took to convince me that I had to go out and buy a planer. Contemplating an hour or more for a round trip to the Home Despot in Augusta, I thought I would run about 5 miles in the opposite direction to the local lumber store in the hopes that they had a planer in stock; I knew they stocked some tools. But alas: no power planers. So I backtracked and headed to Augusta under threatening skies; the sun of the morning was giving way to thickening clouds, but it wasn't supposed to rain till tonight. But within minutes of leaving the store to head home with my new tool and blitz off the planing chore, it began to sprinkle. I hoped it was only a shower, but it continued raining lightly all the way home, and had become quite steady by the time I got back at around 1600. So much for getting the planing done! Fortunately, I had for some reason chosen to put most of my tools away before I had headed out, so the rain hadn't caused any problems at the site. But the day's work was done, and the forecast for Wednesday looked like rain. Since we can't start putting the Advantech sub flooring down until the box sills are complete, it looked like I would have to get an early start on the first non-rainy morning to go out and start planing so that I could be done by 0700 when Bob normally arrives. Progress...but less than I would have liked, or than there should have been! And so it goes. |
||||||||||||||||||||||||||||||||||
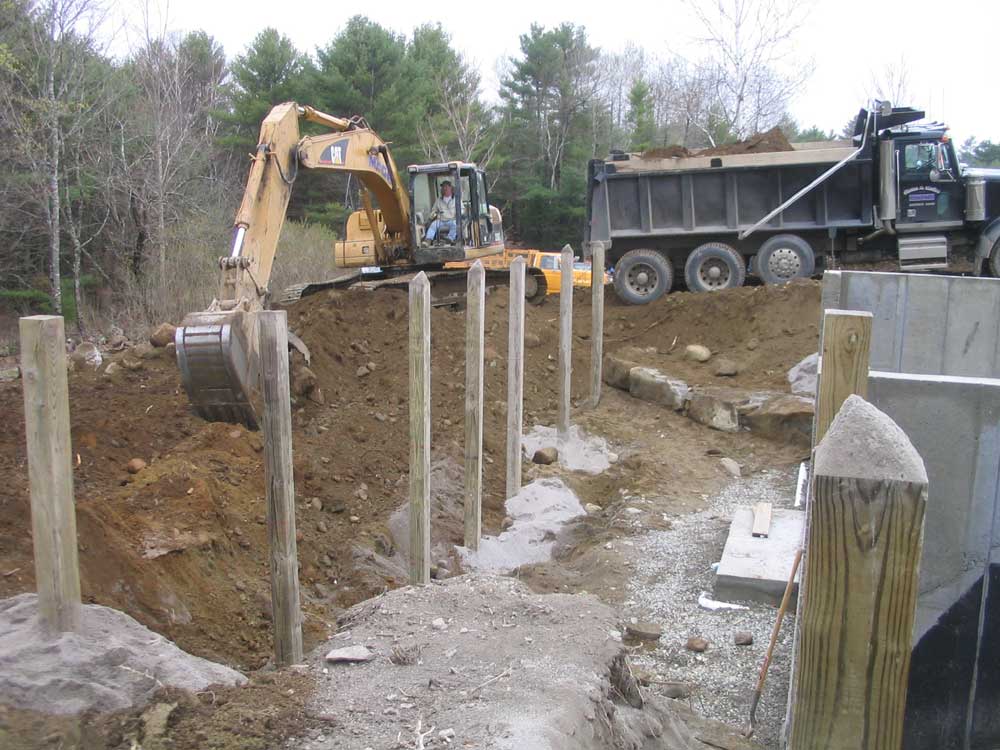
MONDAY, MAY 8, 2006 |
||||||||||||||||||||||||||||||||||
|
Today, Bob Rideout and Pete Pickett finished up their respective
portions of the earthwork. Bob was done by
lunchtime after moving some rocks, completing his backfilling around
the foundation, and a few other chores, and the excavator quickly
loaded onto the waiting lowboy for its next destination; some work
remained around the foundation, but I could take care of that later.
Pete took the whole day to finish rough grading around the house,
and to finish up with spreading the new gravel around the shop.
He also rolled the whole driveway area, compacting the material nicely--a step that I insisted on, and had been surprised was not par for the course when they built the driveway last year. The compacted driveway was outstanding, and I almost looked forward to some rain to test it out. There was some cleaning up around the edges that I would take care of later on, as time allowed. I think I was more excited about the driveway than anything else at this point; it had been such a disgusting mess for so long. |
||||||||||||||||||||||||||||||||||
|
|
||||||||||||||||||||||||||||||||||
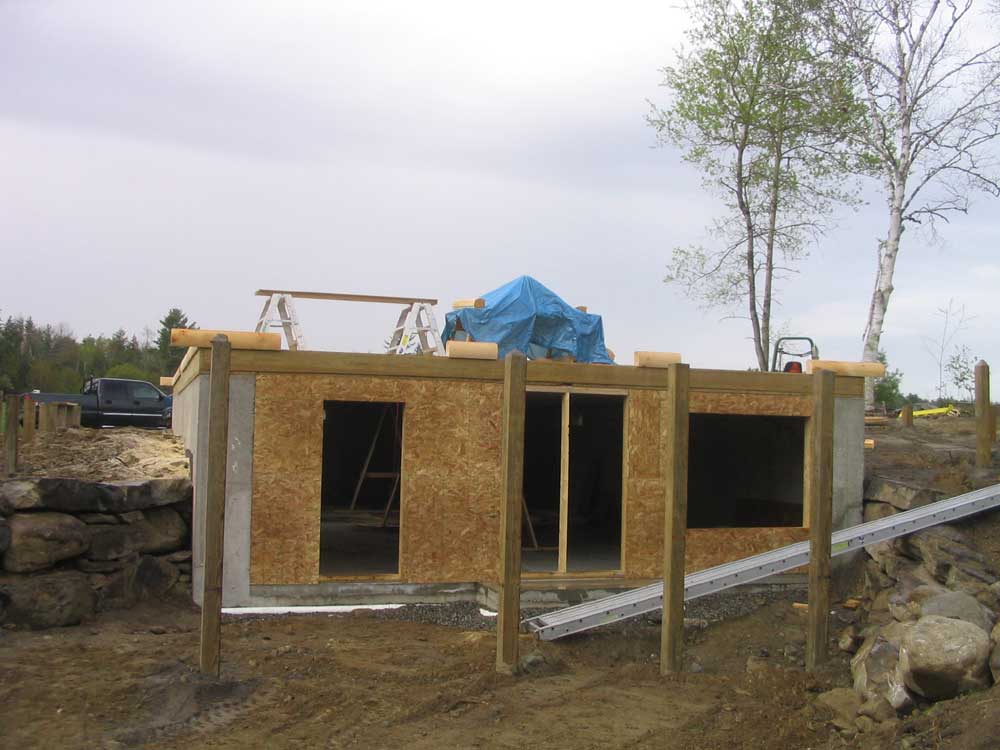
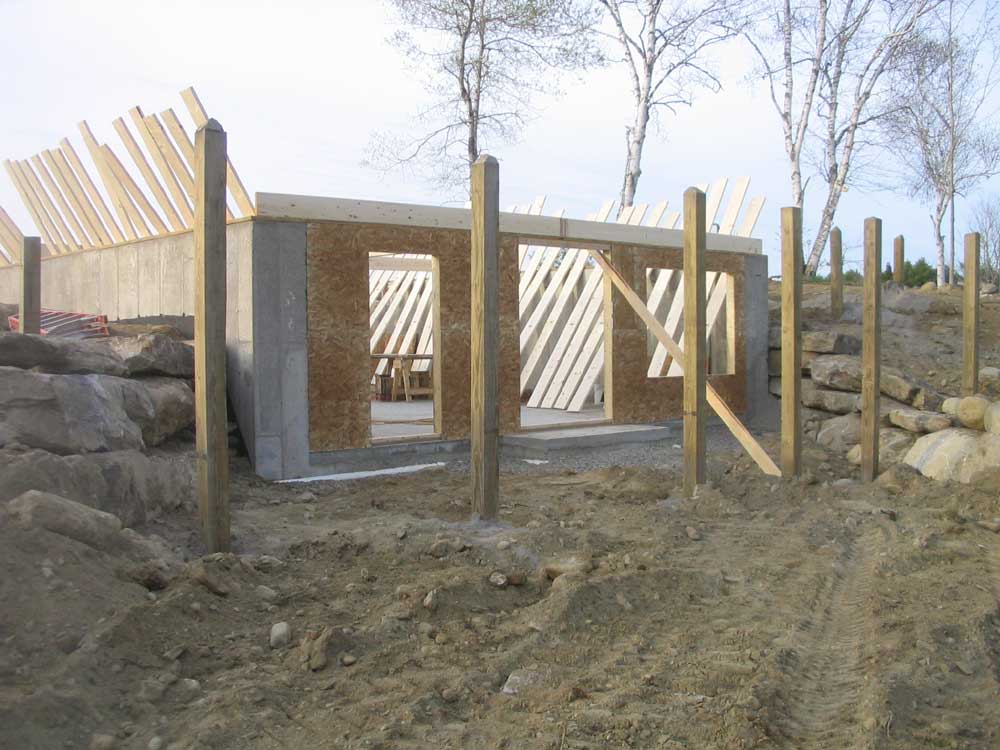
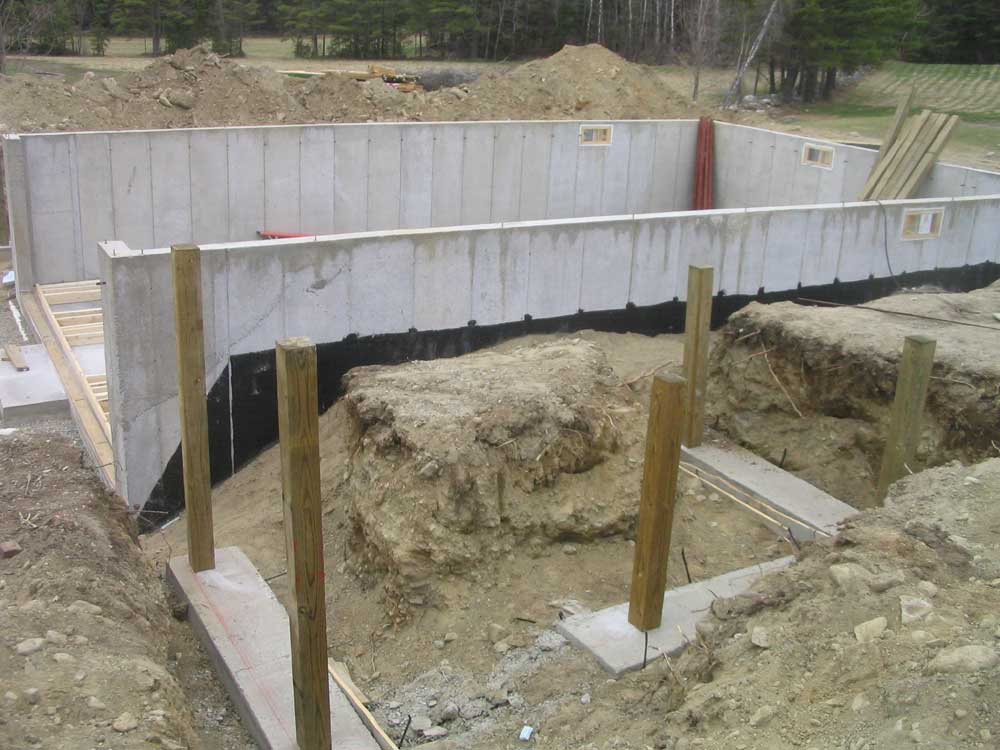
| Bob Emery and I started with the real house construction today. First, we stood up the daylight basement wall, which I sheathed with 7/16" OSB while Bob worked on layout for the sill plates on the foundation. | ||||||||||||||||||||||||||||||||||
|
|
||||||||||||||||||||||||||||||||||
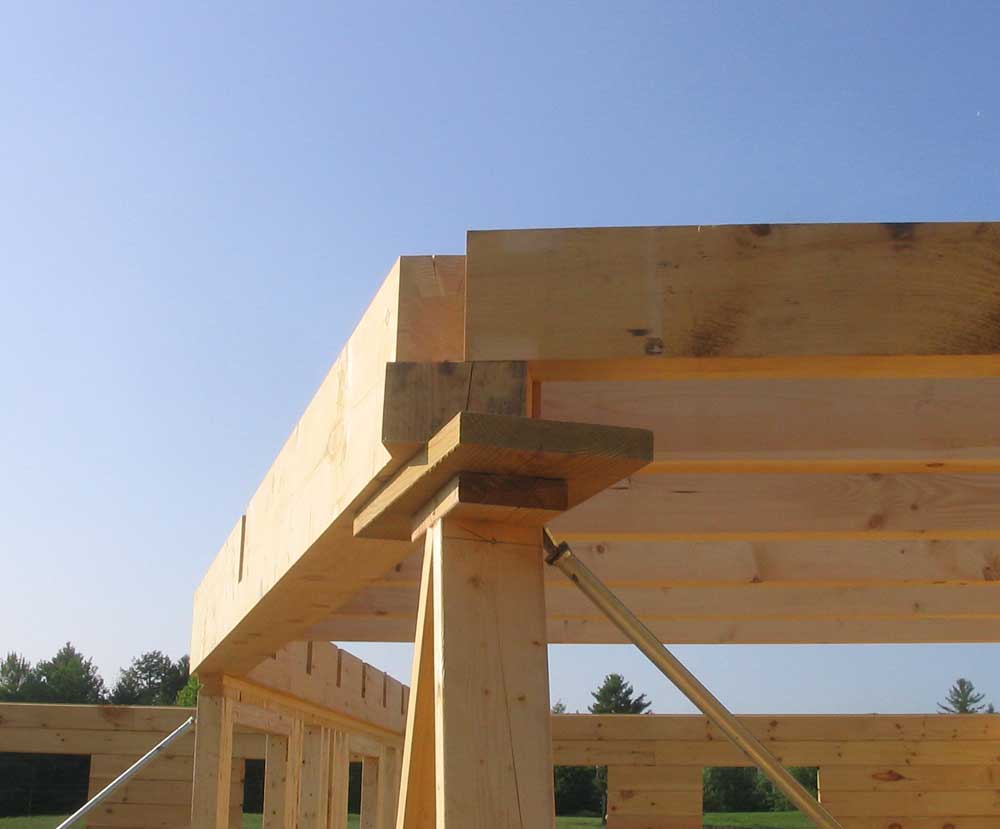
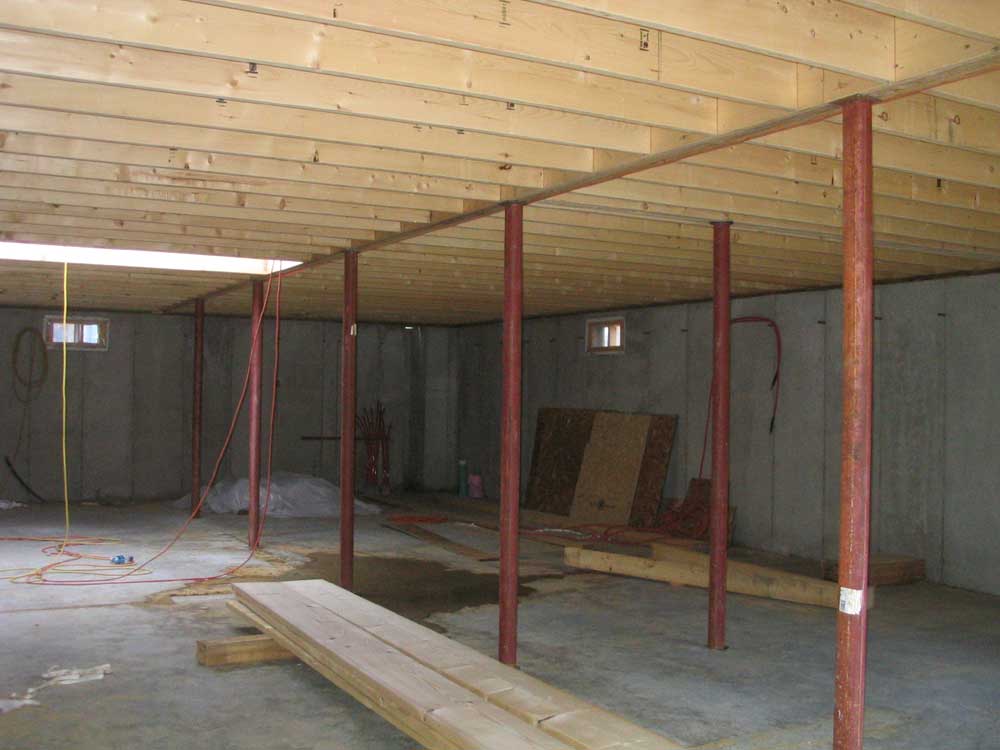
 Once
one side of the sill was complete and bolted down, Bob moved on to
the other side while I began work on the hefty carrying beam that
would run down the center of the house and support the floor.
I built the beam out of three laminations of 2x10 lumber, with 1/2"
plywood sandwiched between the layers, all secured with nails and
construction adhesive. I build the beam right on the sill
plate, so that we could just slide it out into the center of the
foundation without lifting it. Bob tacked together a temporary
A-frame to support the center of the beam, and we planned to build a
couple more to act as construction supports until such time as we
could get the lally columns in place. Once
one side of the sill was complete and bolted down, Bob moved on to
the other side while I began work on the hefty carrying beam that
would run down the center of the house and support the floor.
I built the beam out of three laminations of 2x10 lumber, with 1/2"
plywood sandwiched between the layers, all secured with nails and
construction adhesive. I build the beam right on the sill
plate, so that we could just slide it out into the center of the
foundation without lifting it. Bob tacked together a temporary
A-frame to support the center of the beam, and we planned to build a
couple more to act as construction supports until such time as we
could get the lally columns in place. |
||||||||||||||||||||||||||||||||||
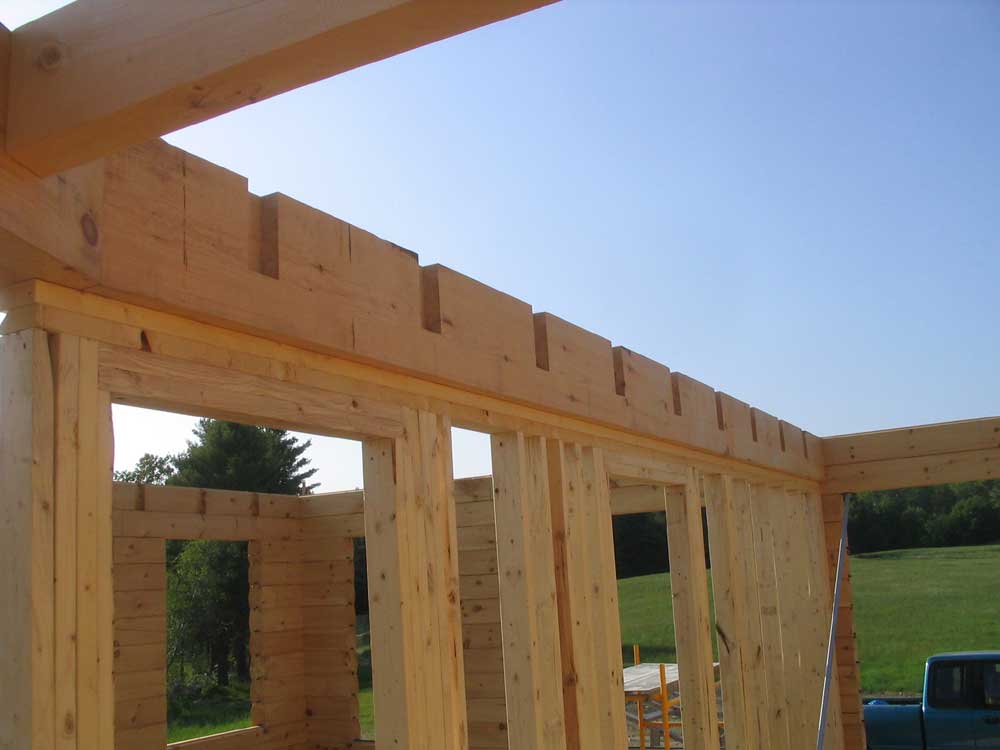
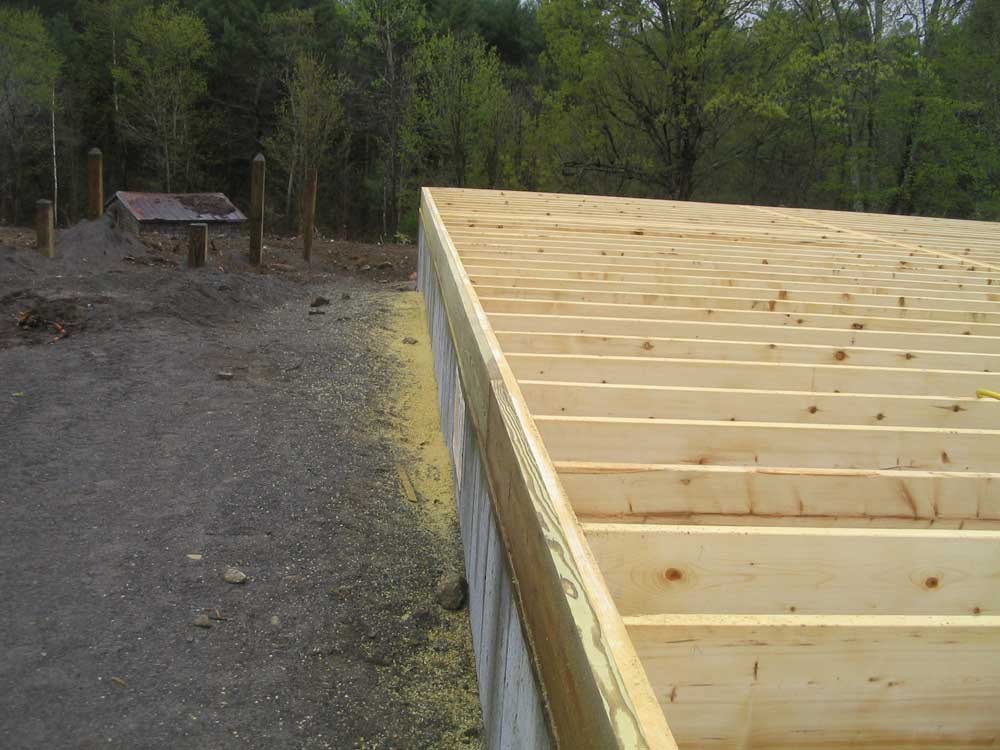
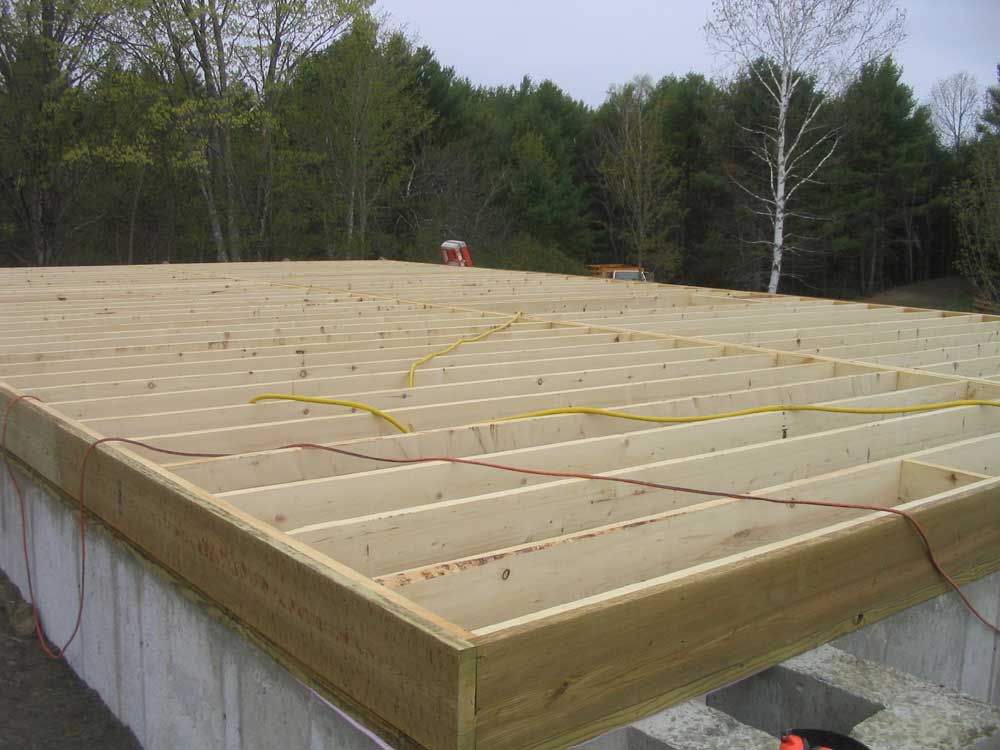
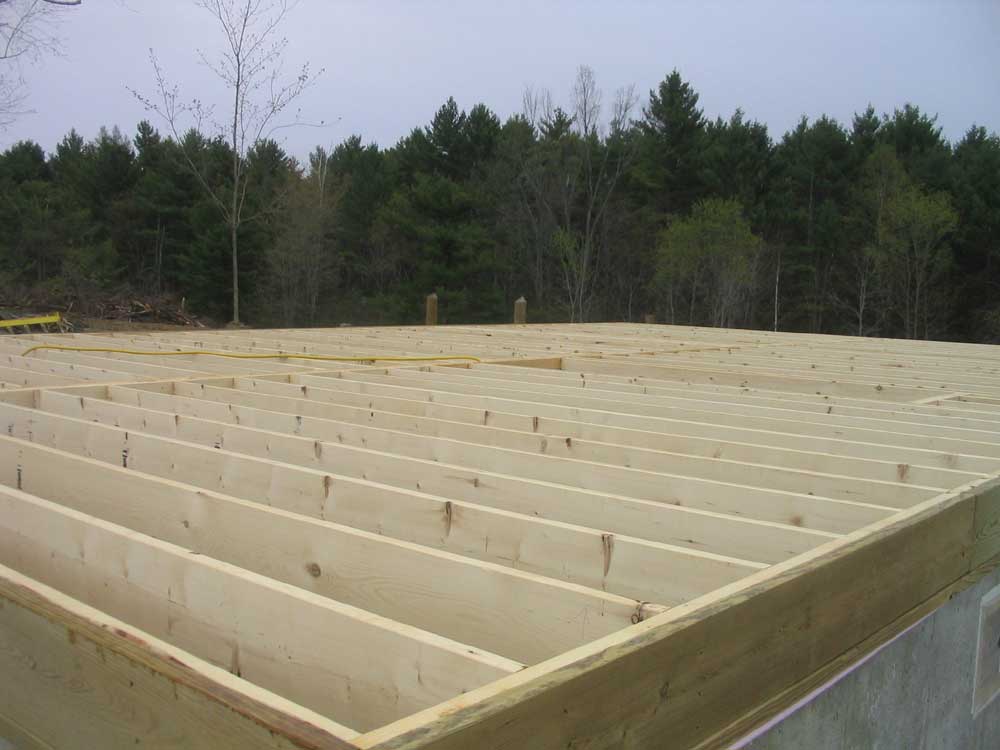
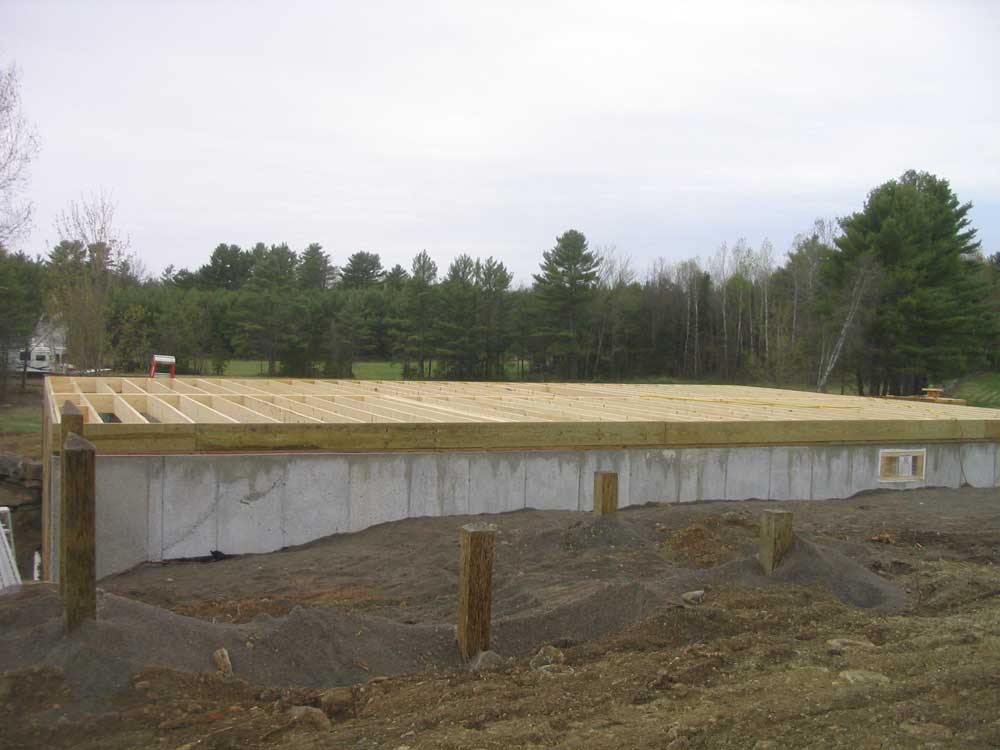
 Once
the carrying beam was built and in place, we figured out the length
of the floor joists, and I spent the rest of the day cutting them
(73 in all) to length and tipping them into the foundation for the
next day. I worked several hours past Bob's departure to
ensure that the joists were all ready for installation tomorrow. Once
the carrying beam was built and in place, we figured out the length
of the floor joists, and I spent the rest of the day cutting them
(73 in all) to length and tipping them into the foundation for the
next day. I worked several hours past Bob's departure to
ensure that the joists were all ready for installation tomorrow. |
||||||||||||||||||||||||||||||||||
Next: installing the joists and subfloor. Then it should be onto stacking logs! The weather is looking iffy for much of the rest of the week, though, so we may end up being delayed, unfortunately. |
||||||||||||||||||||||||||||||||||
FRIDAY, MAY 5, 2006 |
||||||||||||||||||||||||||||||||||
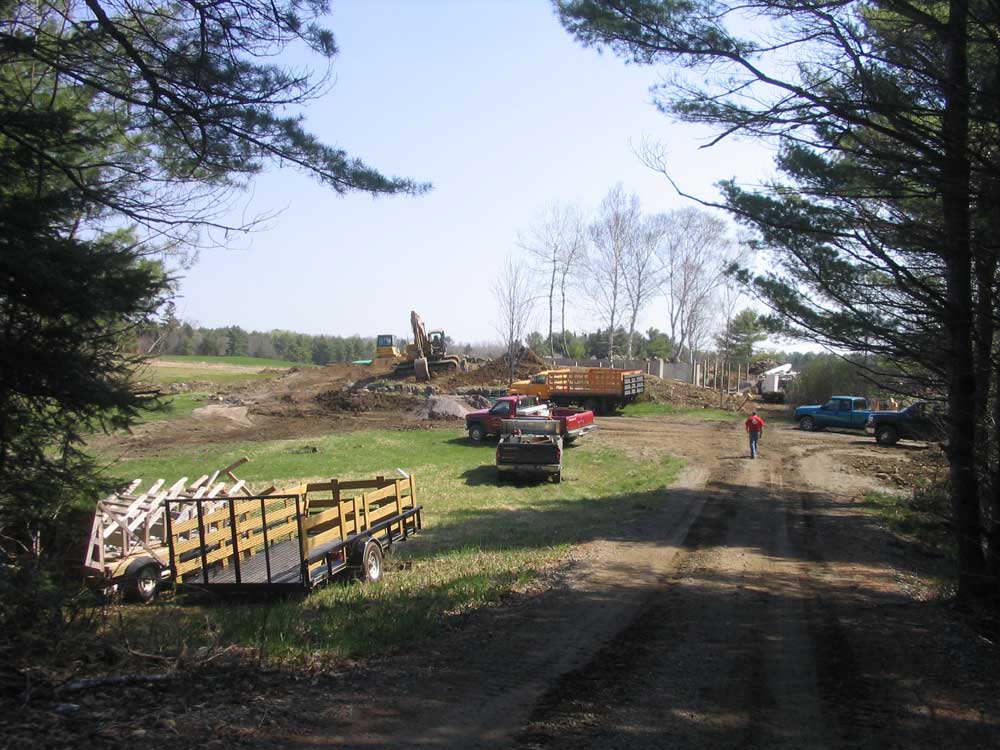
| It
was a hectic day on site, with several different things all going on
at once. The din of the machinery seemed never ending, and for
a time in the morning it seemed as if we were going backwards rather
than making progress.
|
||||||||||||||||||||||||||||||||||
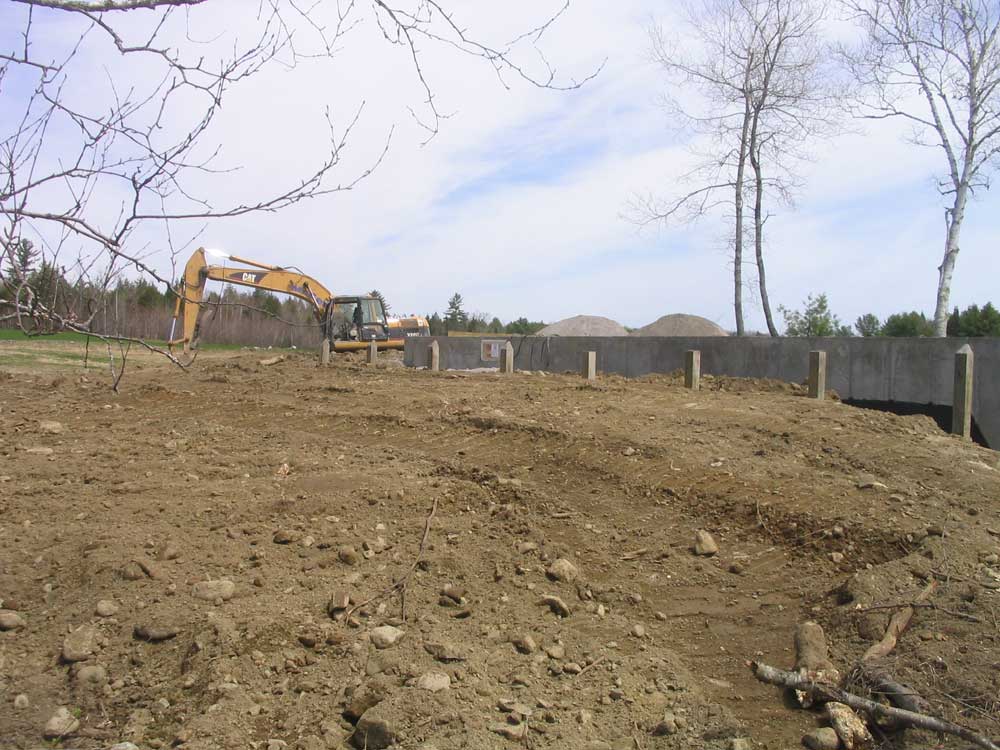
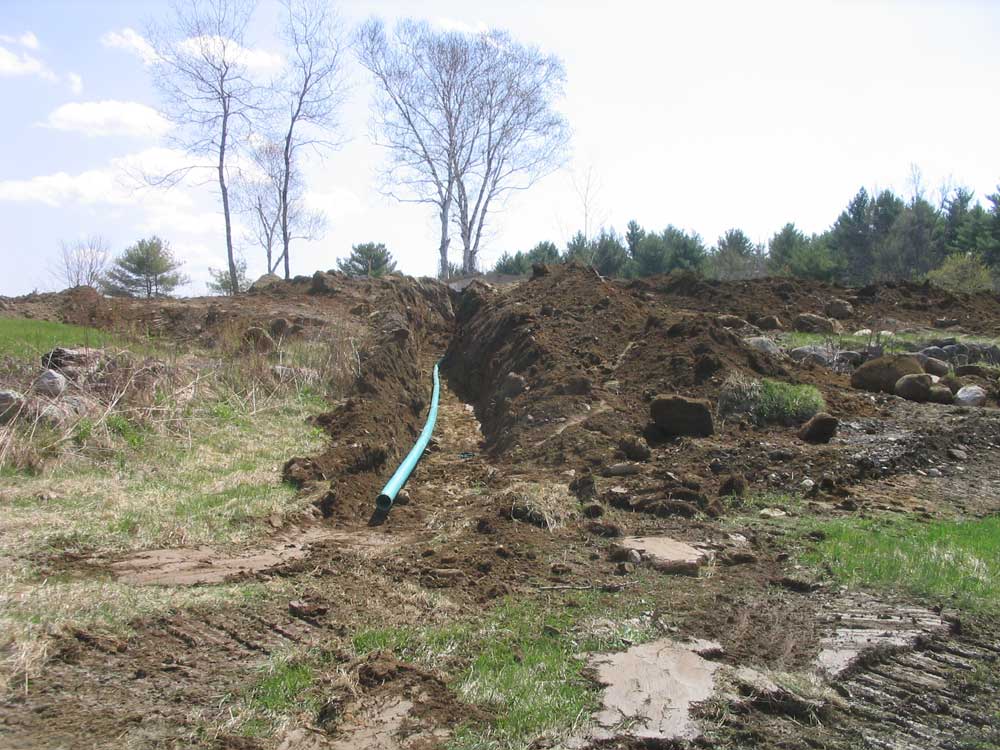
Over the fall and winter, the trench, which seemed to be in the unfortunate position of sitting just about on a natural spring, filled with water and silt. This goopy mess engulfed the excess wire and pipe in the trench and turned the surrounding area to soup. In order to safely dig, we first had to find the stuff in the hole, so as to avoid damaging anything with the excavator, so Bob E. arrived early in the morning armed with the gasoline pump from yesterday, plus the correct suction hose. Pumping out the water revealed a disgusting mess of silty mud. With great care, Bob R. used the machine to slowly peel away the material and reveal the two water lines and, unexpectedly, a power cable for the well pump. Fortunately this discovery did not damage the wire, but no one had remembered it was in there. Eventually, enough material had been cleared out to permit running the water lines up to the foundation and through a pair of holes into the basement. Then, Bob R. covered the water lines with some stone dust, and we then ran the power cable above the stone dust before covering it with more stone dust and other fill, running the red plastic warning tape, and finally covering over the trench entirely. |
||||||||||||||||||||||||||||||||||
 At
the same time, Pete Pickett was on site, and was running his
bulldozer between the house site and the barn, depending on where he
was needed most. In what for me was one of the more exciting
events of the spring, he began peeling back the clay-filled, muddy
gravel next to the shop, digging down till he reached sound material
again--around a foot down, it turned out. After so many months
of living with the mess, I was so happy considered that it might
just be reaching its end. Later in the morning, when he had
spread new material on the driveway in front of the garage doors, I
hitched up the 5th wheel and moved it out of the way so that he
could work on the remaining areas. At
the same time, Pete Pickett was on site, and was running his
bulldozer between the house site and the barn, depending on where he
was needed most. In what for me was one of the more exciting
events of the spring, he began peeling back the clay-filled, muddy
gravel next to the shop, digging down till he reached sound material
again--around a foot down, it turned out. After so many months
of living with the mess, I was so happy considered that it might
just be reaching its end. Later in the morning, when he had
spread new material on the driveway in front of the garage doors, I
hitched up the 5th wheel and moved it out of the way so that he
could work on the remaining areas. |
||||||||||||||||||||||||||||||||||
 Throughout
the day, Pete worked on the driveway, first removing and piling the
bad material, then beginning to spread new material as it arrived
sporadically throughout the day. He also brought the grade up
next to the building, and pitched the grade away so that it would
properly drain in the future. By late in the day, he was
mostly finished, though he needed one more load of gravel. which
wouldn't come till Monday. But the pad was complete at the
back end, so I could move the camper and set up our homestead again. Throughout
the day, Pete worked on the driveway, first removing and piling the
bad material, then beginning to spread new material as it arrived
sporadically throughout the day. He also brought the grade up
next to the building, and pitched the grade away so that it would
properly drain in the future. By late in the day, he was
mostly finished, though he needed one more load of gravel. which
wouldn't come till Monday. But the pad was complete at the
back end, so I could move the camper and set up our homestead again. |
||||||||||||||||||||||||||||||||||
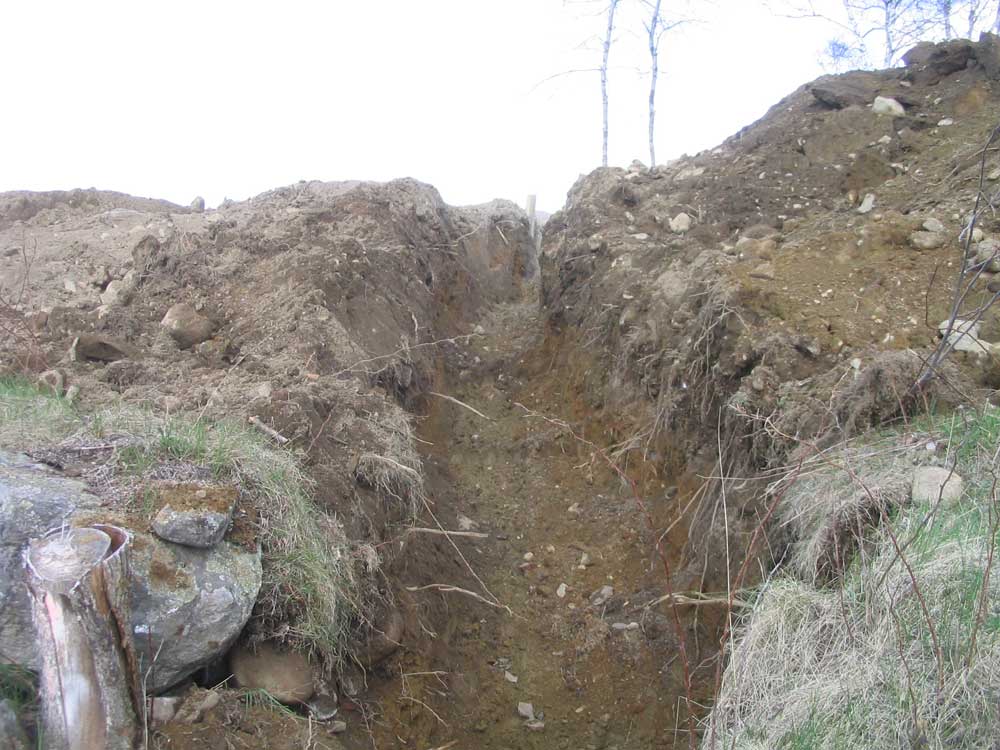
 Back
at the house site, there was more digging to be done: the
foundation drain needed to be piped away from the house and down the
slope. This involved one more long, deep trench, running about
70' away from the corner of the building. Would the digging
never end? With Pete and his bulldozer, and Bob R. and the
excavator, both operating up on the house site at times, plus the
occasional arrival of a dump truck or two, the sound level grew,
filling the air with the distinctive sound of diesel engines
punctuated with the backup alarms on both machines. Crazy! Back
at the house site, there was more digging to be done: the
foundation drain needed to be piped away from the house and down the
slope. This involved one more long, deep trench, running about
70' away from the corner of the building. Would the digging
never end? With Pete and his bulldozer, and Bob R. and the
excavator, both operating up on the house site at times, plus the
occasional arrival of a dump truck or two, the sound level grew,
filling the air with the distinctive sound of diesel engines
punctuated with the backup alarms on both machines. Crazy! |
||||||||||||||||||||||||||||||||||
Meanwhile, Lee Markham and his helper were back, this time to hook up power at the house. Previously, I had installed a piece of scrap plywood, spaced from the wall with 2x4s on the flat, on the basement wall where the panel was to go, and Lee installed the new panel for the house. Having the real panel inside this early was unusual, but I figured I'd just cover it with a tarp to keep any rain off until the house was dried in. IN any event, it would be very nice to have real power on the site for the construction, rather than needing to rely on generators. After all, this had been part of the point all along, since last fall, so it was nice to see it work out. |
||||||||||||||||||||||||||||||||||
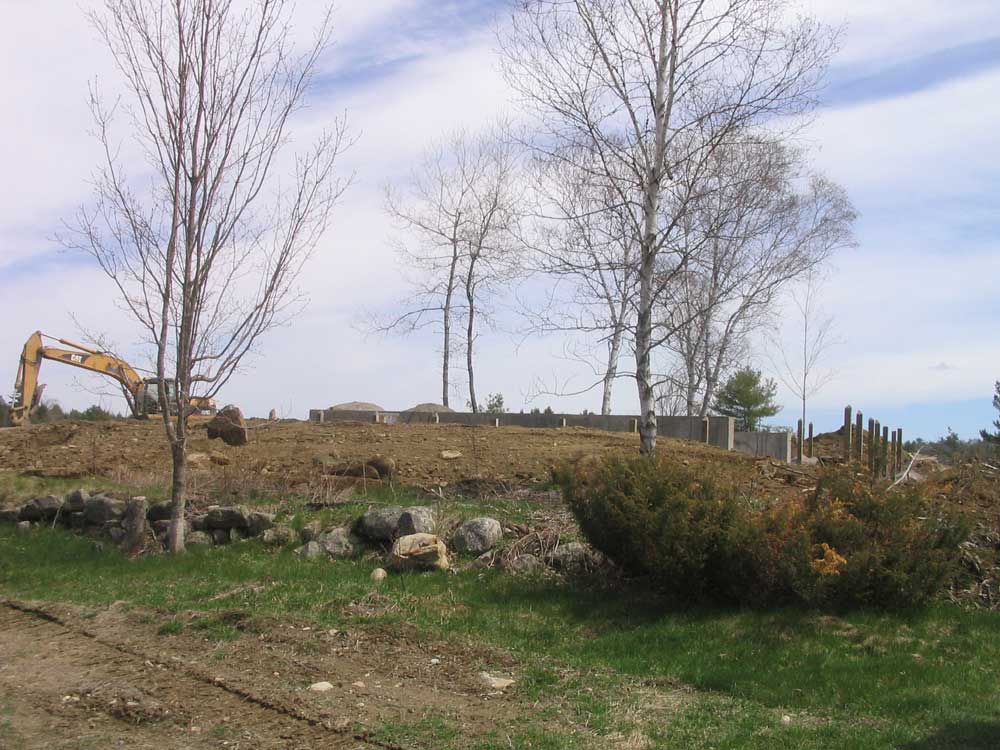
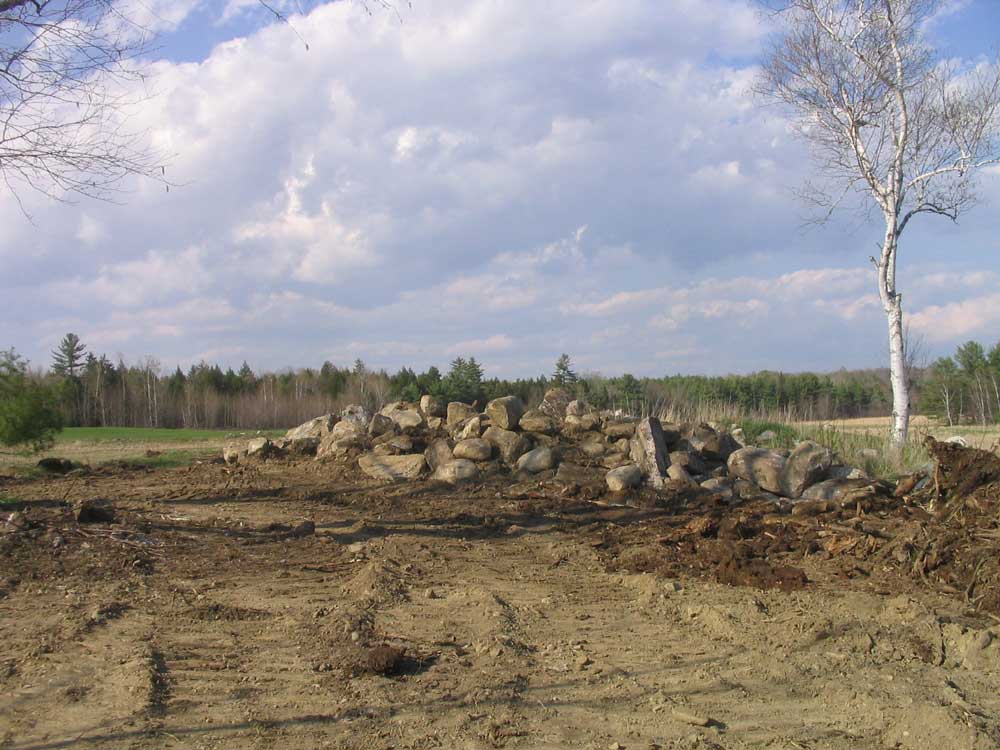 In
between and all around, work continued at the house site. Pete
bulldozed all the rocks from the old foundation and other excavation
into a more or less neat pile behind the house, and also began rough
grading the material wherever he could. As time allowed, Bob
R. helped place some more rocks into the ever-growing retaining
walls next to the house--rustic to be sure, but I liked the way they
were coming out--and all with free material from the site itself.
The true pioneer spirit, no? In
between and all around, work continued at the house site. Pete
bulldozed all the rocks from the old foundation and other excavation
into a more or less neat pile behind the house, and also began rough
grading the material wherever he could. As time allowed, Bob
R. helped place some more rocks into the ever-growing retaining
walls next to the house--rustic to be sure, but I liked the way they
were coming out--and all with free material from the site itself.
The true pioneer spirit, no? |
||||||||||||||||||||||||||||||||||
 It
became clear through the afternoon that neither Bob R. nor Pete
would be finished with the work on this day, which surely would
cause heartburn for Steve McGee, but the work here needed to get
done this time. Poor Bob Rideout was feeling under the gun,
but he made it clear that he wanted the time to finish this job
right, rather than rushing through and leaving earlier than he
should just to satisfy an unrealistic schedule. Considering
Steve hadn't been out to the site at all since a very brief visit
last September, it seemed clear that he probably had little concept
as to the overall scope of the ongoing work. It
became clear through the afternoon that neither Bob R. nor Pete
would be finished with the work on this day, which surely would
cause heartburn for Steve McGee, but the work here needed to get
done this time. Poor Bob Rideout was feeling under the gun,
but he made it clear that he wanted the time to finish this job
right, rather than rushing through and leaving earlier than he
should just to satisfy an unrealistic schedule. Considering
Steve hadn't been out to the site at all since a very brief visit
last September, it seemed clear that he probably had little concept
as to the overall scope of the ongoing work.
Whether he had a clear concept when he bid the job or not I will never know, but one good thing about dealing with this particular company is that the price is the price--no add-ons for additional material or extra time beyond what may have been allotted. The job gets done to satisfaction for the quoted price. This policy, which I find very fair (and extremely rare) has really helped make up for the occasional frustrations, scheduling delays, and initial cost of the earthwork portion of the project. |
||||||||||||||||||||||||||||||||||
 In
any event, everyone involved was on the same side here, and I
jokingly vowed to stand before any attempts to remove the equipment
before the job was done, Tiananmen Square style. In
any event, everyone involved was on the same side here, and I
jokingly vowed to stand before any attempts to remove the equipment
before the job was done, Tiananmen Square style.With the digging finally (dare I say it) done at the house site, before knocking off for the day Bob R. and Pete, working closely together, finished up with the grading on the front side of the house, pushing the excess material off to the north side, where it would be used on Monday to smooth out the grade there. Suddenly, after a destructive day, the whole house site came together, and truly began to look like something decent. The transformation, after so many weeks (months, actually) of disruption, was startling--and pleasing. |
||||||||||||||||||||||||||||||||||
 It
looked like Monday we might actually get to do some real work on the
house. Dare I hope? Bob R. and Pete will be back for at
least part of the day, as required, to finish up their respective
parts, some more of the excess waste material from the original
foundation excavation will be trucked off, and the driveway work
will get completed. We should also be able to finish up the
retaining walls and bring the grade into the walls as needed.
And with luck, Bob E. and I will get going on the sill plates,
center carrying beam, and standing up the daylight basement wall. It
looked like Monday we might actually get to do some real work on the
house. Dare I hope? Bob R. and Pete will be back for at
least part of the day, as required, to finish up their respective
parts, some more of the excess waste material from the original
foundation excavation will be trucked off, and the driveway work
will get completed. We should also be able to finish up the
retaining walls and bring the grade into the walls as needed.
And with luck, Bob E. and I will get going on the sill plates,
center carrying beam, and standing up the daylight basement wall. |
||||||||||||||||||||||||||||||||||
|
|
||||||||||||||||||||||||||||||||||
THURSDAY, MAY 4, 2006 |
||||||||||||||||||||||||||||||||||
| I
thought we were supposed to be backfilling...but it sure seemed like
a whole lot of digging was going on instead! Would there be
any end, or was my destiny to be stuck in a never-ending cycle of
digging and filling, filling and digging? Only time would
tell. It was another slow-ish day for everything but excavation; with so much digging, moving around, and other chores around the foundation, it made sense (sort of) to wait on beginning some real construction for the moment, or so Bob E. said. I chose to defer to his experience here, though I had been hoping for some real progress today. Have I managed to express yet how much I really cannot wait to actually be building this house? At times it becomes extremely frustrating, but then I remember that it's an involved process, and these early tasks must be done--and done right. But still...geez. Bob headed off to run some errands and things for a few hours. |
||||||||||||||||||||||||||||||||||
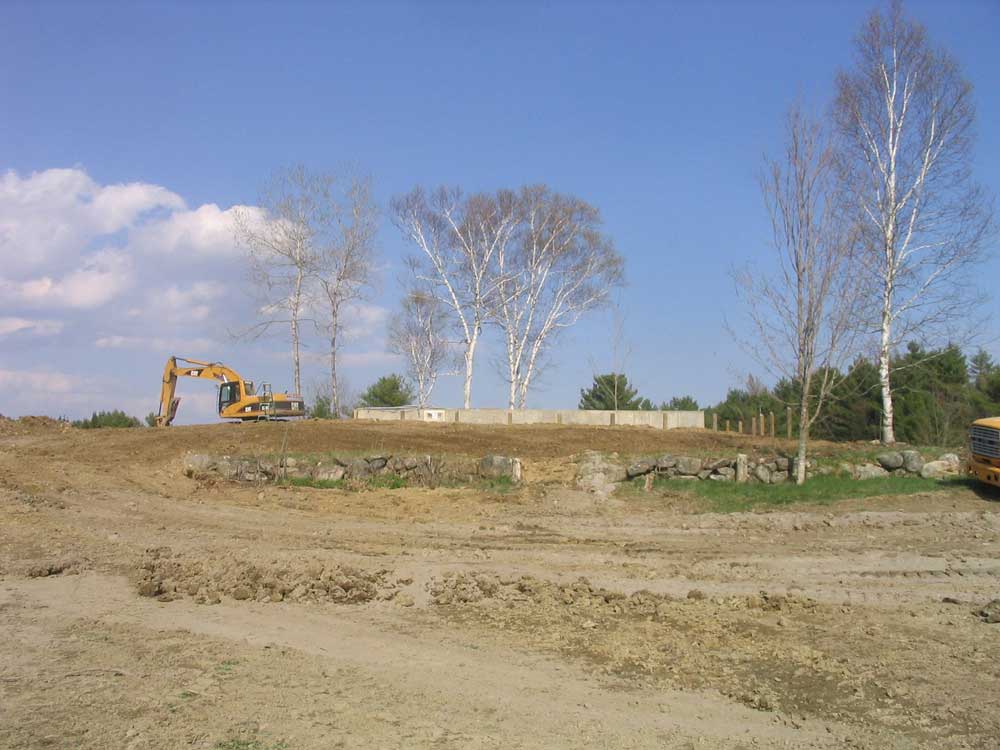
However, Bob R. made progress with the backfilling and grading, and for the first time I got the true vision of what the site might look like when complete. By lunchtime, the front side had been rough graded, though some work remained because of the need to complete the retaining wall and fine tuning better suited to a bulldozer. Despite expectations for a bulldozer to be brought to the site yesterday, it and its operator had still not arrived by noon today--delays plague all aspects of construction. Fortunately, the bulldozer arrived late in the afternoon, signaling that work on the driveway could finally begin. The operator, Pete Pickett, was the same one who originally built the driveway. (Note that the problems with the driveway stem not from its original construction, but from the trenching that occurred last fall.) |
||||||||||||||||||||||||||||||||||
|
|
||||||||||||||||||||||||||||||||||
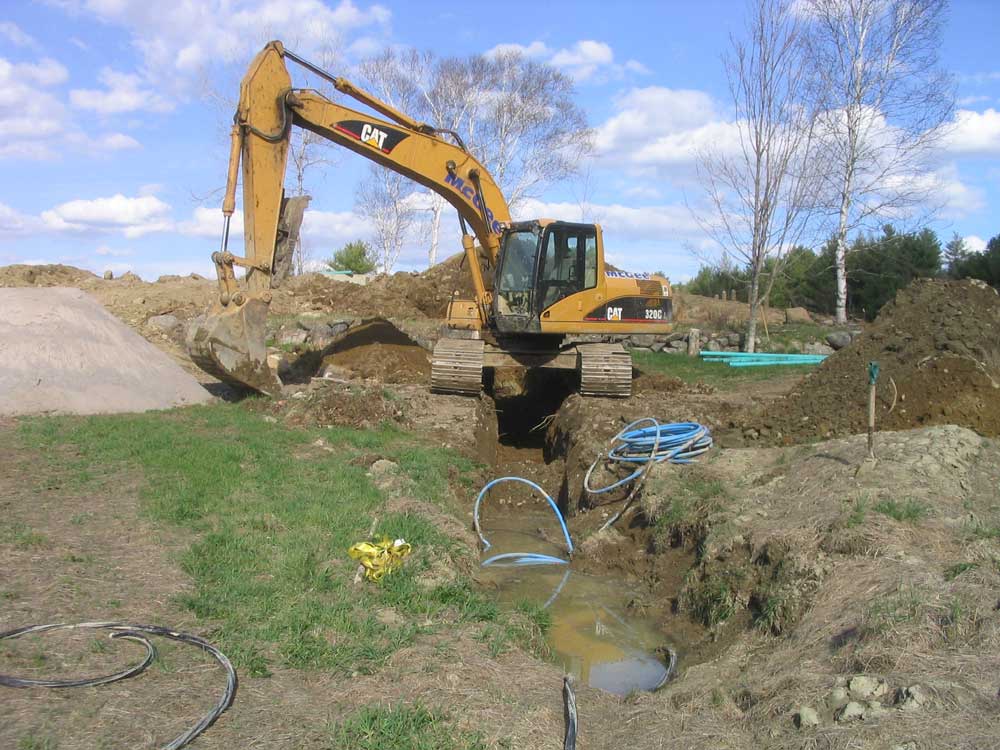
 The
septic tank for the house had arrived late yesterday, and after
lunch Bob R. dug the hole and set the tank. Bob E. returned
around lunchtime, anticipating the need to run the water lines up
through a trench to the house. The trench wasn't dug yet, but
by the end of the day Bob R. had completed that trench, save for a
small dam at the lower end near the end of the hole in the ground
where the water line and electric had been terminated last fall;
this hole was full of water and impossible to work in. Bob E.
had picked up a gasoline pump from the rental place, but they had
provided the wrong suction end, so it was unusable. So this
job got put off till tomorrow. The
septic tank for the house had arrived late yesterday, and after
lunch Bob R. dug the hole and set the tank. Bob E. returned
around lunchtime, anticipating the need to run the water lines up
through a trench to the house. The trench wasn't dug yet, but
by the end of the day Bob R. had completed that trench, save for a
small dam at the lower end near the end of the hole in the ground
where the water line and electric had been terminated last fall;
this hole was full of water and impossible to work in. Bob E.
had picked up a gasoline pump from the rental place, but they had
provided the wrong suction end, so it was unusable. So this
job got put off till tomorrow. |
||||||||||||||||||||||||||||||||||
|
|
||||||||||||||||||||||||||||||||||
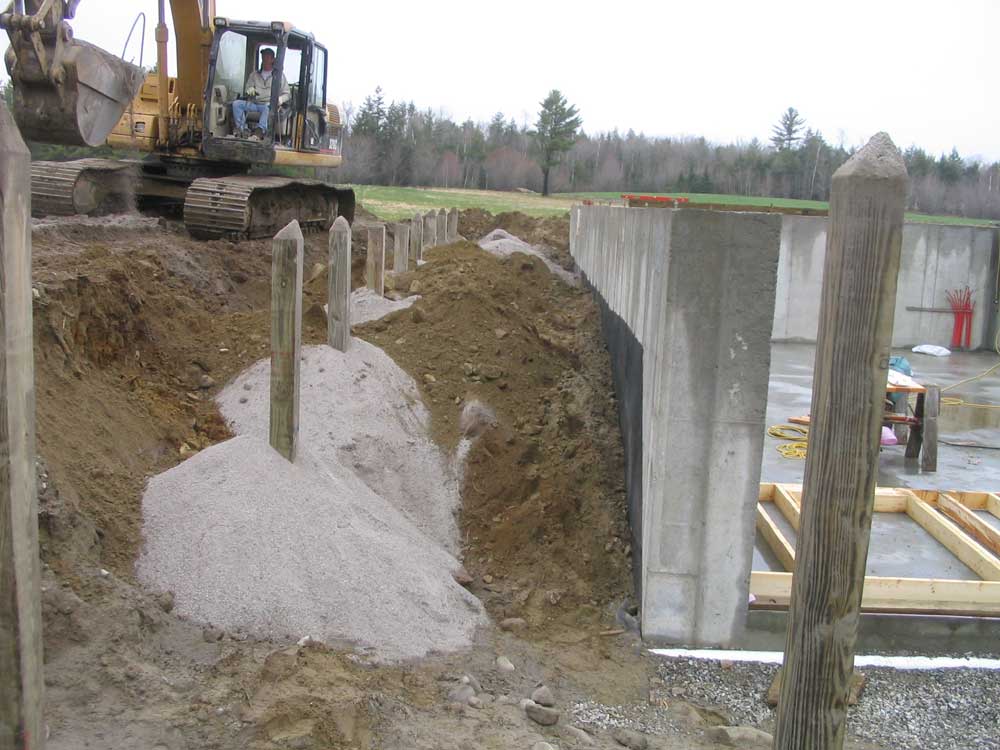
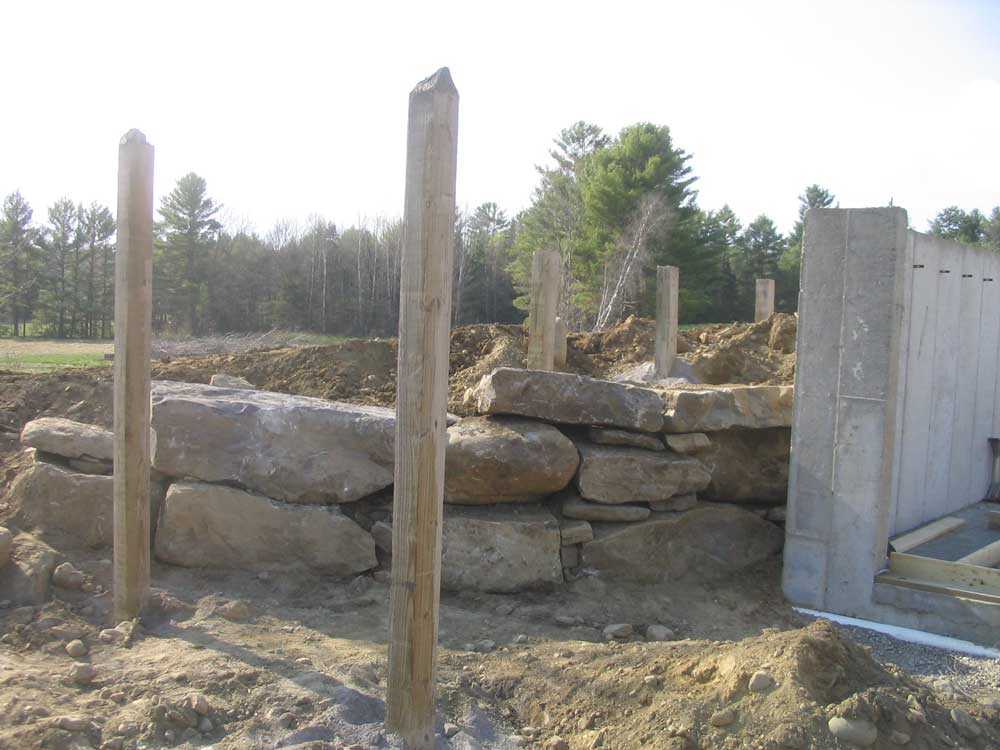
 During
some off time late in the morning, Bob R. spent more time placing
rocks for the retaining wall, using the large excavator surprisingly
delicately within the confines of the deck posts and surrounding
rocks. I worked to help chink in the openings between the
large rocks, and the wall slowly continued to take shape. During
some off time late in the morning, Bob R. spent more time placing
rocks for the retaining wall, using the large excavator surprisingly
delicately within the confines of the deck posts and surrounding
rocks. I worked to help chink in the openings between the
large rocks, and the wall slowly continued to take shape.Coming up: some driveway work, more grading and excavating, and other things, I'm sure. |
||||||||||||||||||||||||||||||||||
WEDNESDAY, MAY 3, 2006 |
||||||||||||||||||||||||||||||||||
| Tuesday afternoon, the truck bearing the excavator arrived, which was welcome news. With substantial rains most of the day, I wasn't sure what might (or might not) happen, but with the machinery on site I knew that things were going to move forward as planned. In a small triumph of justice, the truck became stuck in the very muddy driveway when turning around by the shop, and needed the excavator to pull it free. After weeks of relative dry, the heavy rains overnight and Tuesday morning had turned the driveway once again to a slick, clay-filled mess. Fixing the driveway was one of the main things scheduled to occur during this visit, along with a laundry list of other jobs (see the entry from Wednesday, April 26 to review this long list), and it was about time. I was nearing the end of my wits with the mud. | ||||||||||||||||||||||||||||||||||
Wednesday morning, Bob R. was here early, along with his brother Jerry who drives a dump truck for McGee (they always work together whenever Bob needs a dump truck) with a load of stone dust to use for backfilling around the posts. The stone dust is very fine, and packs excellently; it also lacks the large rocks that can wreak havoc with plumbing posts. During the course of the morning, Jerry would bring several large loads of the stuff. Fortunately, the rains from yesterday had mostly disappeared, with only some light drizzle on and off (mostly off) during the day. And even more fortunately, the home site was still nice and dry, all things considered. |
||||||||||||||||||||||||||||||||||
When Bob E. arrived shortly thereafter, we got to work with the posts, and before too long we had most of the posts backfilled and plumbed in both directions. This took much of the morning, as there was no way for the dump truck to get very close to the foundation at that point, so each bucketful of material had to be carried some distance. By lunchtime, the posts were all stable and mostly backfilled. |
||||||||||||||||||||||||||||||||||
|
|
||||||||||||||||||||||||||||||||||
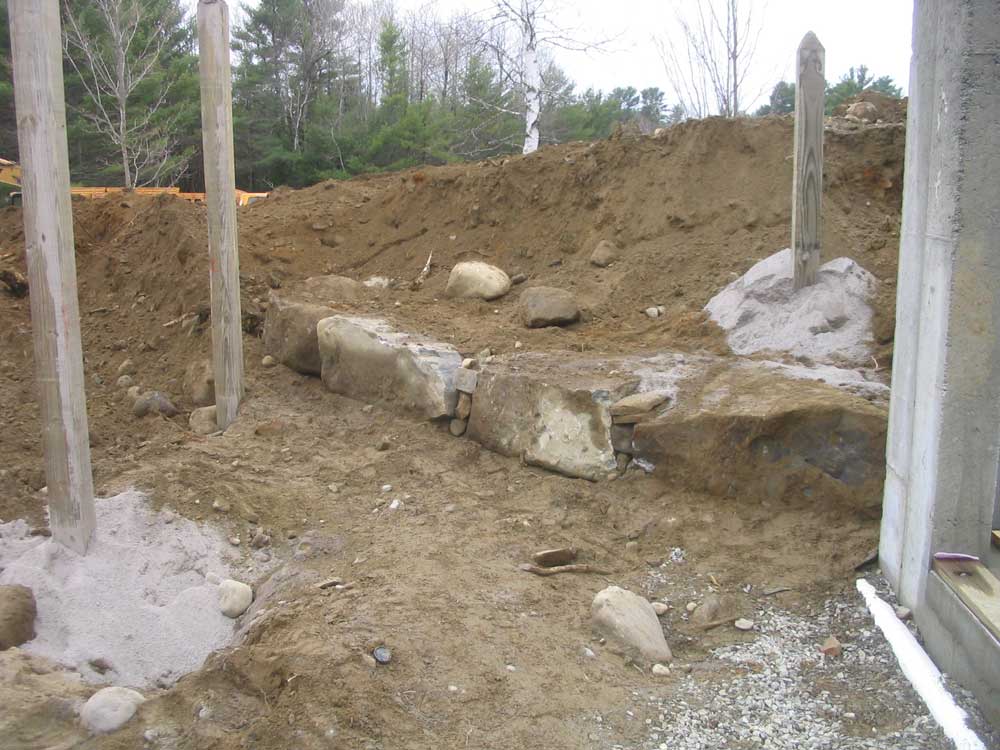
 Bob
R. spent the rest of the afternoon beginning to remove excess
material from the excavation, as well as begin shaping the grade at
the daylight end of the foundation (towards the courtyard).
There was a lot of material to remove. In addition, we began to
install retaining walls of sorts at the daylight end, to hold back
the earth at the corners. With so many large rocks on site
from the old foundation, it made sense to try and place some of
these to form the wall, which seemed to fit in with the concept of
the house. Bob R. did a beautiful job handling the bucket in
tight quarters to place these large rocks, and we managed to get
most of a first row in place while waiting for Jerry to arrive back
with more material. I thought the new wall would look pretty
good--rustic, but neat, and purely functional. Bob
R. spent the rest of the afternoon beginning to remove excess
material from the excavation, as well as begin shaping the grade at
the daylight end of the foundation (towards the courtyard).
There was a lot of material to remove. In addition, we began to
install retaining walls of sorts at the daylight end, to hold back
the earth at the corners. With so many large rocks on site
from the old foundation, it made sense to try and place some of
these to form the wall, which seemed to fit in with the concept of
the house. Bob R. did a beautiful job handling the bucket in
tight quarters to place these large rocks, and we managed to get
most of a first row in place while waiting for Jerry to arrive back
with more material. I thought the new wall would look pretty
good--rustic, but neat, and purely functional. |
||||||||||||||||||||||||||||||||||
|
|
||||||||||||||||||||||||||||||||||
 By
the end of the day, there was still substantial work remaining
around the site, but it looked like things had been done too.
I was pleased with the way the grade was starting to work out at the
south (daylight) end, and could begin to visualize the completed
work. By
the end of the day, there was still substantial work remaining
around the site, but it looked like things had been done too.
I was pleased with the way the grade was starting to work out at the
south (daylight) end, and could begin to visualize the completed
work.Tomorrow promised to be busy, with more grading and material removal, trenching to bring in the water and electric lines, and the septic tank. With better weather predicted, hopefully Bob E. and I can get rolling once more on the construction, since tomorrow's excavator work won't really require any input from us. Oh, and the blackflies have been out in force for the past week or so. |
||||||||||||||||||||||||||||||||||
TUESDAY, MAY 2, 2006 |
||||||||||||||||||||||||||||||||||
|
Yesterday (Monday) was the first day of "real" construction.
The excavator was supposed to be here, but because of delays at
another job (which was supposed to have been done last week), he
couldn't come till Wednesday. While it would have been nice to
get the backfilling done and some of the other chores taken care of,
there was still plenty to do; it just meant that we had to pretend
to be mountain goats as we clambered around the site. The beginnings of house construction require a lot of layout, and determining the best way to get started on everything. The first order of business was to lay out for the porch and deck posts, so that we would be ready when the excavator arrived to backfill. With three decks or porches on the house, the initial layout took a bit of time, but after a couple hours we had marked the concrete footings for the centers of each post.
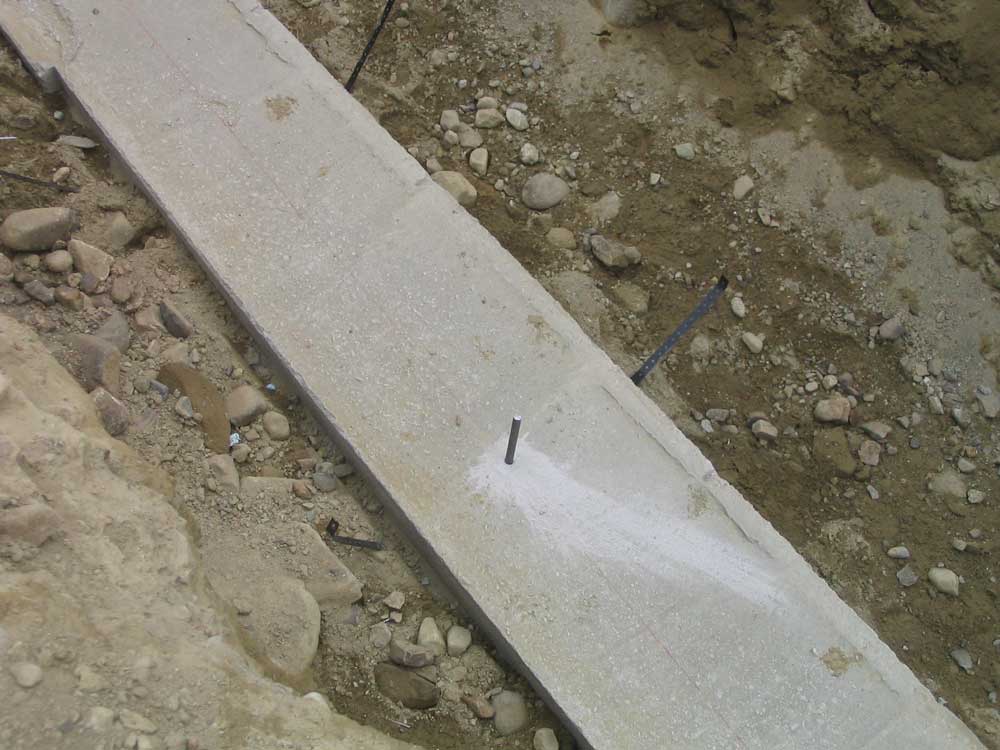
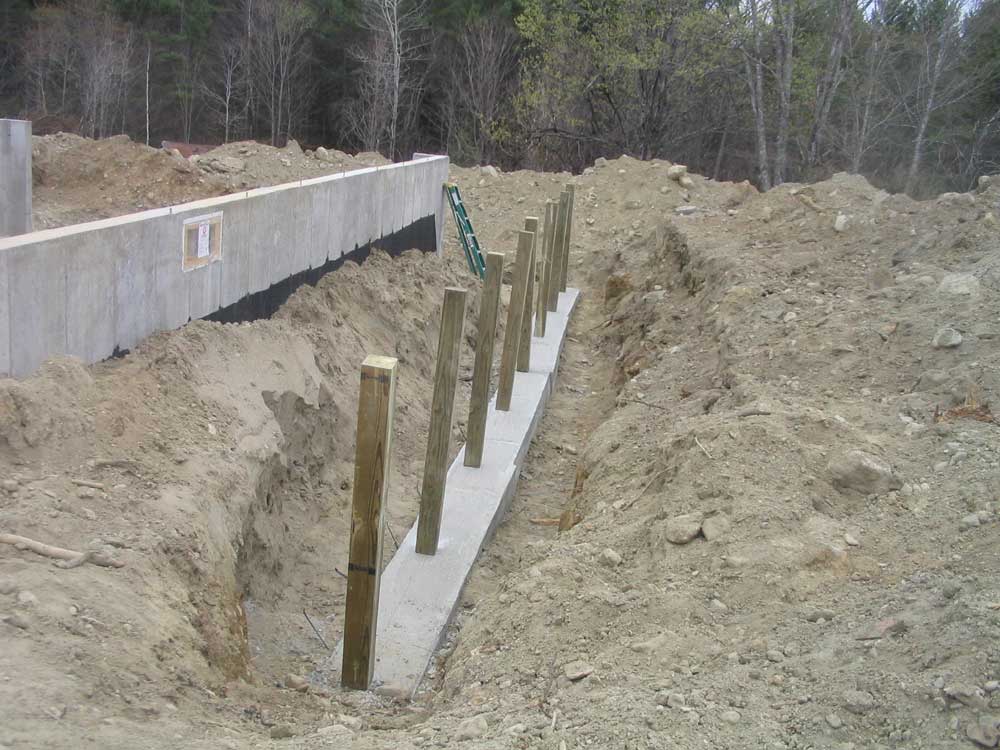
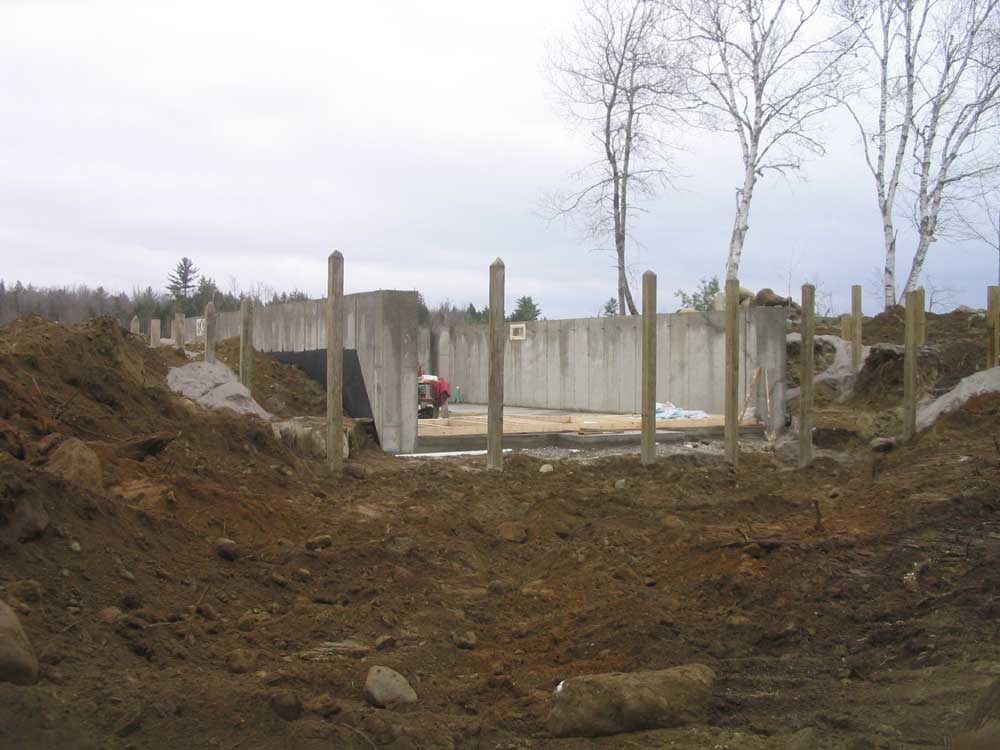
Before proceeding, we had to determine whether we had enough material on the site to accommodate all the posts (20 in all); we had only 15 6x6 pressure treated timbers, and for a time we thought we'd need to arrange for more. However, after substantial figuring we determined that we could cut some of the posts in advance and use shorter ones for the front porch and screen porch. |
||||||||||||||||||||||||||||||||||
 Next,
I cut a number of the posts as needed; I cut several of the 12' long
posts into 5' and 7' sections, which gave us the posts needed for
the screen porch and the last of the south deck posts, which was
located higher than the remainder, which were down deeper in the
excavated area in front of the daylight basement. I also cut
four more posts in half, producing 6' sections that would be
long enough to handle the posts beneath the front porch. This
left enough 12' posts to handle the tallest posts beneath the large
south deck, with two 12-footers left over. Next,
I cut a number of the posts as needed; I cut several of the 12' long
posts into 5' and 7' sections, which gave us the posts needed for
the screen porch and the last of the south deck posts, which was
located higher than the remainder, which were down deeper in the
excavated area in front of the daylight basement. I also cut
four more posts in half, producing 6' sections that would be
long enough to handle the posts beneath the front porch. This
left enough 12' posts to handle the tallest posts beneath the large
south deck, with two 12-footers left over.Finally, I drilled corresponding holes in the middle of the bottoms of the posts, to accommodate the rebar pins in the concrete, and stood up the shorter posts in place, leaving the longer posts till later, as they seemed too tall to stand up on their own for a day or two. |
||||||||||||||||||||||||||||||||||
|
|
||||||||||||||||||||||||||||||||||
 With
that heavy work out of the way, we moved on to framing the daylight
basement wall--a pretty standard framed wall built from 2x6
dimensional lumber. Bob laid out the plates, and I lugged
lumber into the cellar from its nearby--yet nearly
inaccessible--storage place on the other side of the excavated dirt
mounds. Then, with Bob's measurements, I cut the studs to
length as needed. With
that heavy work out of the way, we moved on to framing the daylight
basement wall--a pretty standard framed wall built from 2x6
dimensional lumber. Bob laid out the plates, and I lugged
lumber into the cellar from its nearby--yet nearly
inaccessible--storage place on the other side of the excavated dirt
mounds. Then, with Bob's measurements, I cut the studs to
length as needed.For the window and door headers, we needed some 1/2" plywood to sandwich between pieces of dimensional lumber; since the plywood was stored in the pile beneath the 6 lally columns, our next chore was to lug those heavy things into the basement, where they would be needed shortly anyway. |
||||||||||||||||||||||||||||||||||
 Finally,
we nailed up the wall, which pretty much wrapped up the day. Finally,
we nailed up the wall, which pretty much wrapped up the day.
The weather on Tuesday was rainy, so there was no opportunity to work outside. I looked forward to a drier day on Wednesday. But the wet weather gave me time to write this update you are now reading, so there's a positive side to everything! See you soon. |
||||||||||||||||||||||||||||||||||
|
||||||||||||||||||||||||||||||||||