|
|||
|
|
~ The bLog Home ~ |
||
| Please click here to continue with the logs from November 16 to November 30. | |||
WEDNESDAY, NOVEMBER 15, 2006 |
|||
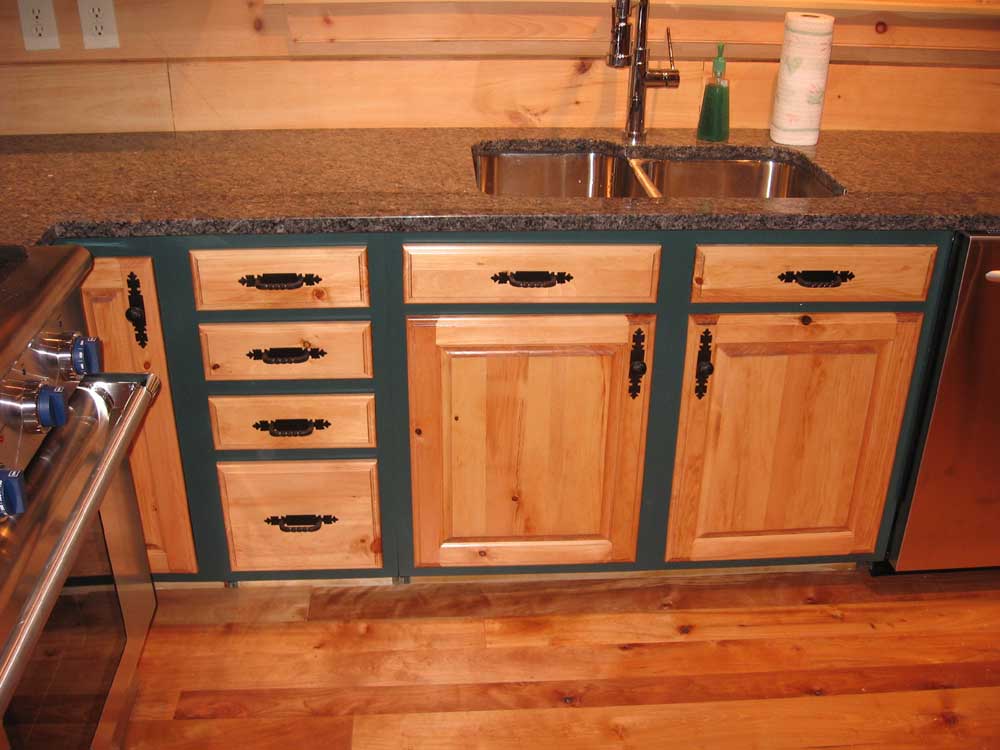
 This
morning, I decided it was time to attack the trim panels on the back
side of the kitchen cabinets in the peninsula. This hadn't
seemed like a priority until it became clear just how noticeable the
ugly, unfinished backs of the cabinets truly were. This
morning, I decided it was time to attack the trim panels on the back
side of the kitchen cabinets in the peninsula. This hadn't
seemed like a priority until it became clear just how noticeable the
ugly, unfinished backs of the cabinets truly were.First, I had to measure the supplied panels and determine if they required trimming--they did, as each was 36" tall; the space available was about 34". So I took the panels, along with pieces of the toekick trim, down to the shop to trim them to the appropriate height on the table saw. While I was doing this, Bob Emery arrived to take some measurements on the chimney (yes, the chimney will be getting underway next week), and of course I had to chat with him for a bit, and also pick his brain for information on finishing off the staircase inside the house--a project I had been postponing for too long. |
|||
|
Afterwards, I finished up trimming the panels, and began installation. This was pretty straightforward, although I had to rip some cleats out of scrap pine to support the ends of a couple of the panels because of variations in the way the base cabinets were built. The straight base cabinets had a slightly inset back, with the plywood sides extending about 1/2" past the back; however, the corner cabinet had a flush back without the extending plywood sides, so this entire cabinet was set 1/2" further in and could not support the panels without the addition of the cleats. |
|||
 I
nailed the panels in place with a brad gun, using a couple
full-width (48") panels and a few cut pieces to fit in the smaller
remaining spaces. I trimmed the panels to width in the
basement using a circular saw and straightedge, rather than lug them
all the way back to the shop and the table saw. I
nailed the panels in place with a brad gun, using a couple
full-width (48") panels and a few cut pieces to fit in the smaller
remaining spaces. I trimmed the panels to width in the
basement using a circular saw and straightedge, rather than lug them
all the way back to the shop and the table saw.Next, I cut and installed baseboard around the base of the cabinet back, which covered the seam between flooring and cabinet and really incorporated the cabinets into the room somehow, visually anchoring them in place. As always, the baseboard was a bit finicky, but not too bad. |
|||
 I
finished up the installation with some small trim pieces (supplied
with the cabinets) to cover the seams between panels, and the one
90° corner. I had to rip a 22.5° angle on one edge of a couple
pieces so that I could install them around the 45° corner in the
cabinets near the log post. I
finished up the installation with some small trim pieces (supplied
with the cabinets) to cover the seams between panels, and the one
90° corner. I had to rip a 22.5° angle on one edge of a couple
pieces so that I could install them around the 45° corner in the
cabinets near the log post.I was extremely pleased with how the back panels came out, and with the huge difference they made to the appearance of the room. I continue to be somehow amazed by the difference that trim makes--even though that's what it's for, proper trim always seems to be a more vast improvement than I expect. |
|||
 This
project ate up the entire morning and part of the early afternoon.
Afterwards, I decided to finish working in the camper to clean it up
and prepare for storage. Heidi had cleaned the rest of the
stuff out this morning, and now I had to give it a good cleaning,
fix a wire to the forward slideout that Chloe chewed up, and a few
other details. This
project ate up the entire morning and part of the early afternoon.
Afterwards, I decided to finish working in the camper to clean it up
and prepare for storage. Heidi had cleaned the rest of the
stuff out this morning, and now I had to give it a good cleaning,
fix a wire to the forward slideout that Chloe chewed up, and a few
other details.Later in the day, I worked on a few odds and ends in the house that aren't worth discussion--and that I can't really remember anyway. This has been a very transitional week for me as I try to juggle the need to get and remain settled in the house with the need for continuing work inside. But we're nearly at a point where the "moving" part is substantially over, and I expect to continue more efficiently with the additional house finishing work in the next couple weeks (other than around Thanksgiving). I will soon need to divide my time between finishing the house and going back to work on boats, but still hope that with hard work and a bit of luck I can mostly finish all the remaining jobs by the end of the year. |
|||
TUESDAY, NOVEMBER 14, 2006 |
|||
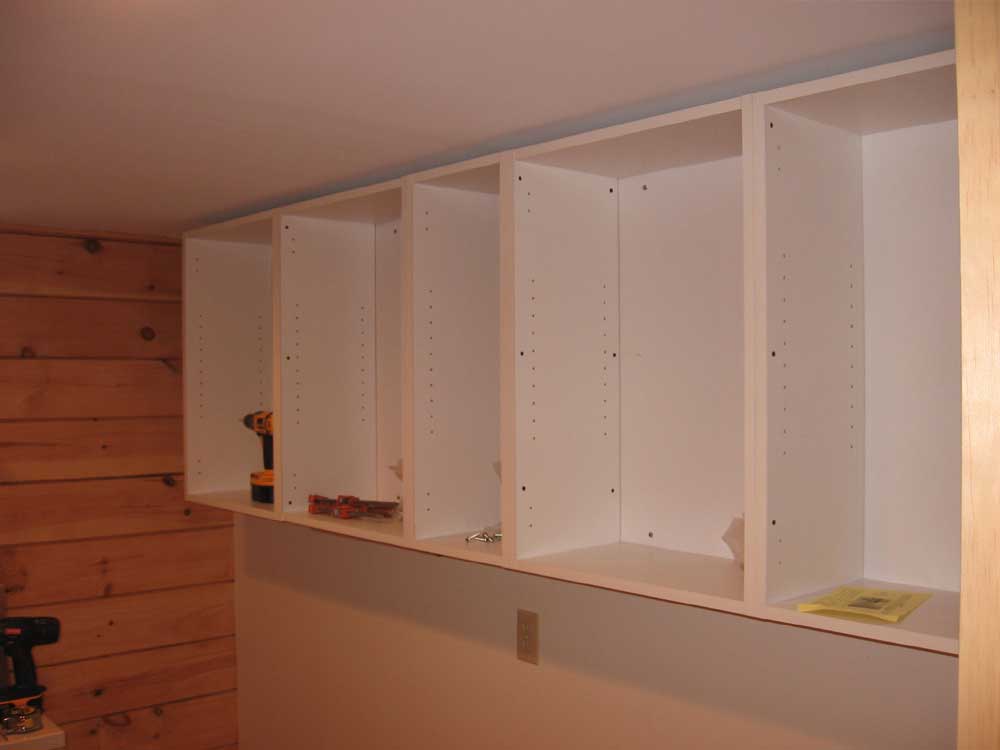
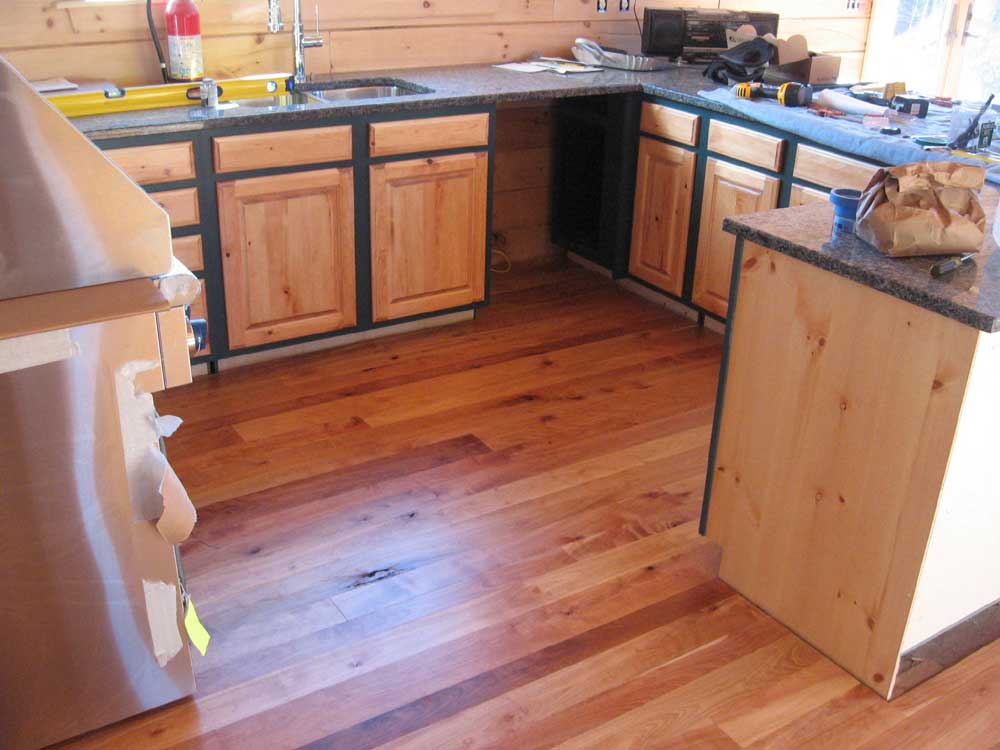
| Today was pantry day. I spent the morning assembling and installing five wall cabinets and four base cabinets on one wall of the pantry. Assembly was pretty straightforward, if tedious after a while. Here's the basic process: | |||
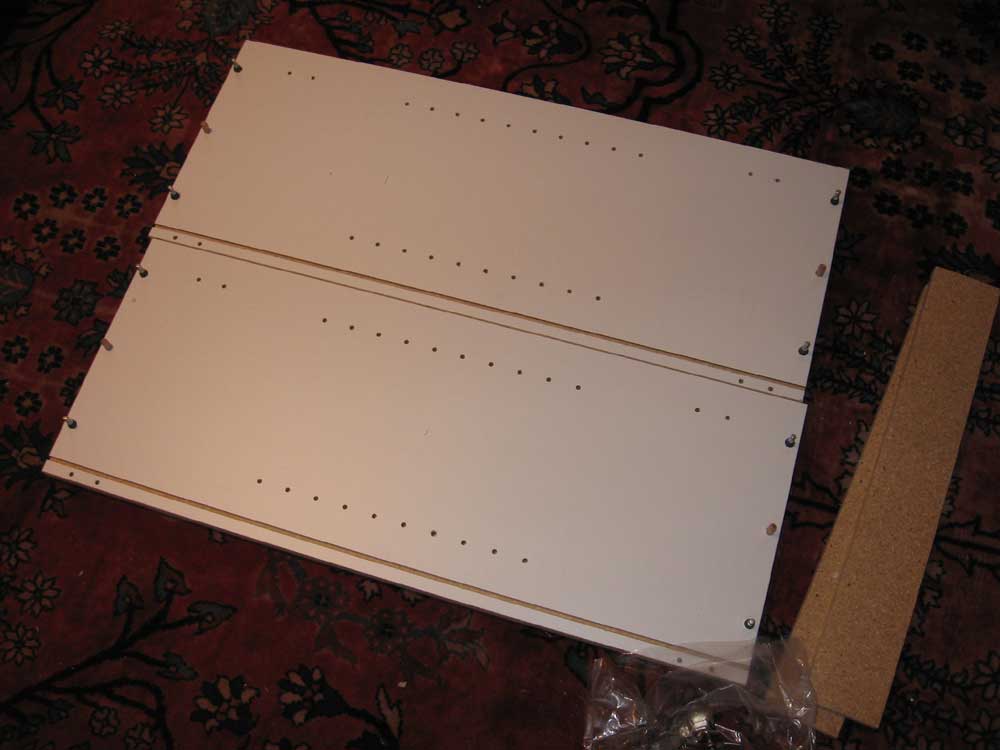 After
removing the pieces from the box, I installed various wooden
alignment dowels and metal/plastic pins that are placed to engage
the screw cams placed in other panels. (See step 2). For
the base cabinets, I also installed drawer support hardware on the
sides; these photos illustrate the wall cabinets, however, which
were just basic boxes. After
removing the pieces from the box, I installed various wooden
alignment dowels and metal/plastic pins that are placed to engage
the screw cams placed in other panels. (See step 2). For
the base cabinets, I also installed drawer support hardware on the
sides; these photos illustrate the wall cabinets, however, which
were just basic boxes. |
|||
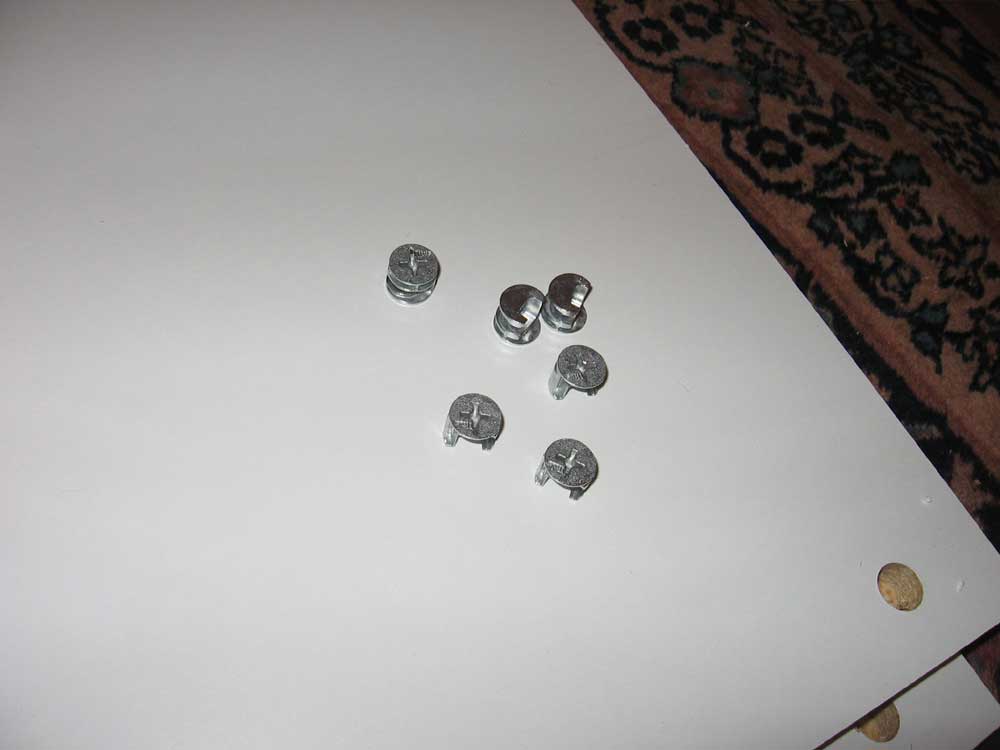 Next,
I installed the cams in the pre-drilled holes in the other pieces of
the cabinet, as required. these just fit in the hole with a
friction fit, and a second, smaller hole on the side of the panel
will eventually accept the metal pins seen above. Next,
I installed the cams in the pre-drilled holes in the other pieces of
the cabinet, as required. these just fit in the hole with a
friction fit, and a second, smaller hole on the side of the panel
will eventually accept the metal pins seen above. |
|||
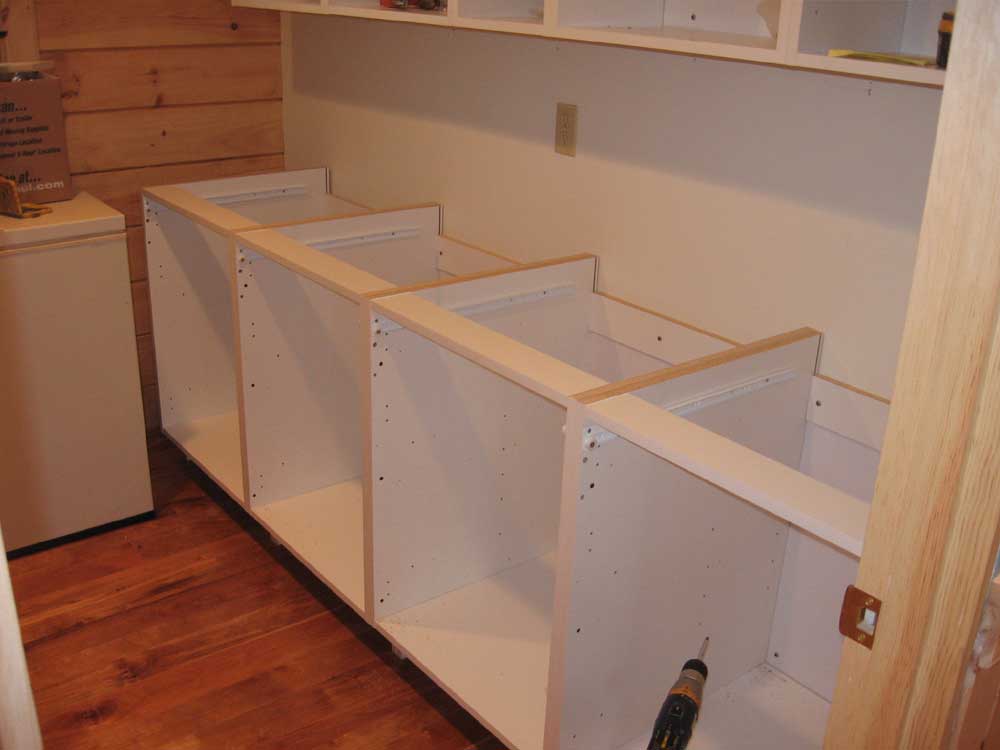
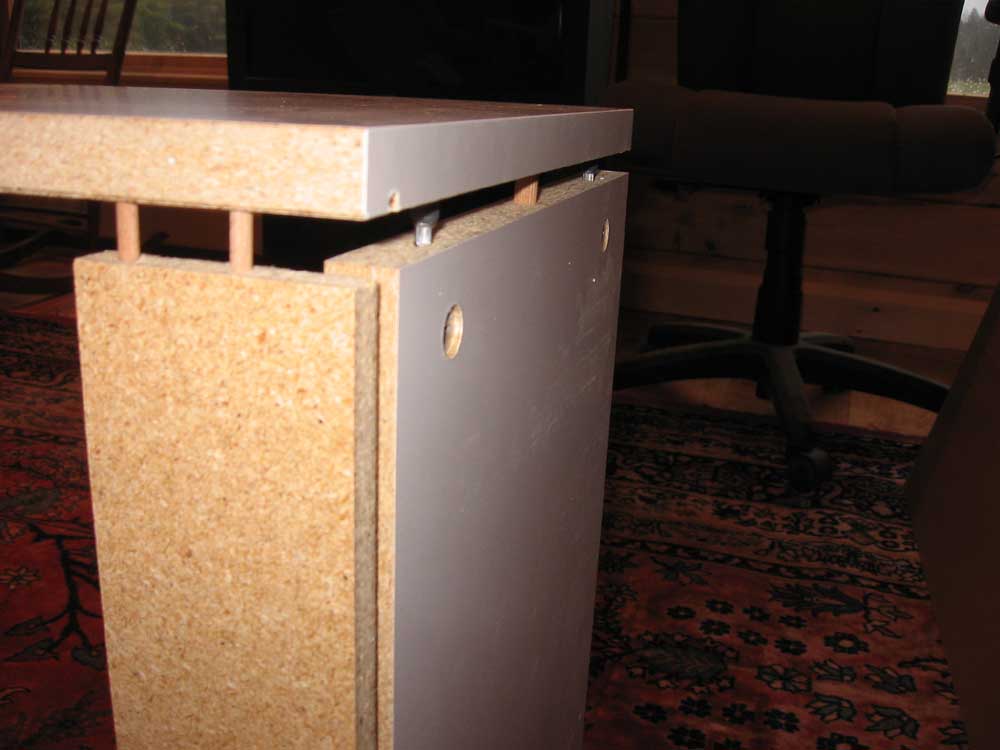 Assembling
the four sides of the box is a matter of aligning the pins with
their appropriate holes in the sides of the other panels... Assembling
the four sides of the box is a matter of aligning the pins with
their appropriate holes in the sides of the other panels... |
|||
 ...and
then twisting the cam with a screwdriver till it pulls the cabinet
together securely. ...and
then twisting the cam with a screwdriver till it pulls the cabinet
together securely. |
|||
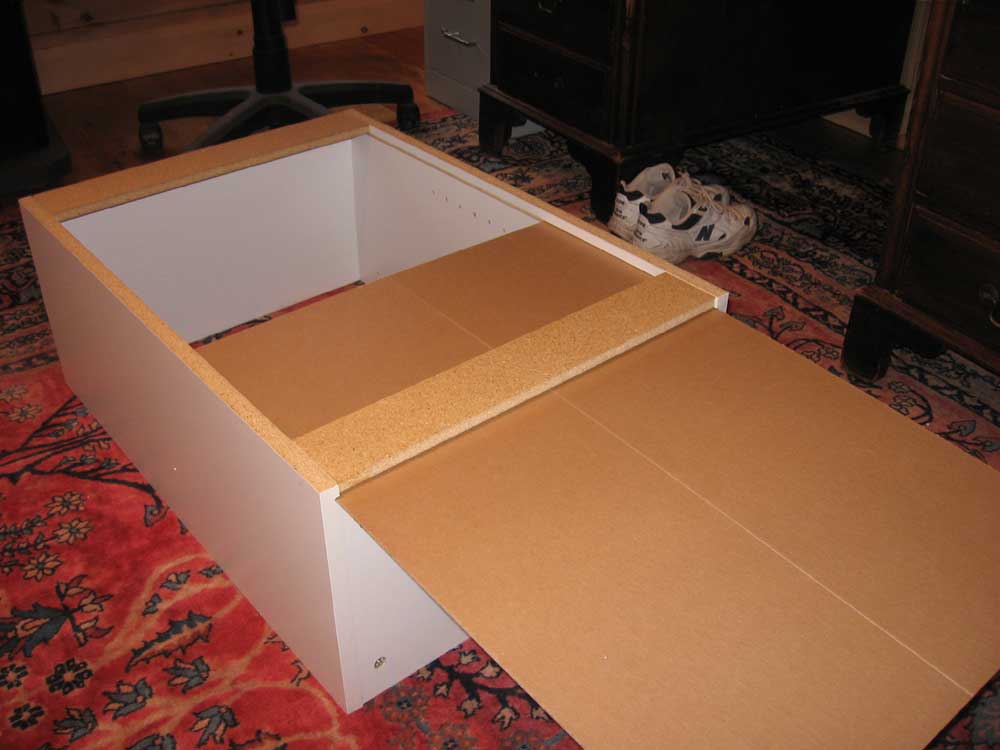 The
cabinet "backs" were pieces of cardboard that simply slide into
pre-milled grooves in the cabinet. The
cabinet "backs" were pieces of cardboard that simply slide into
pre-milled grooves in the cabinet. |
|||
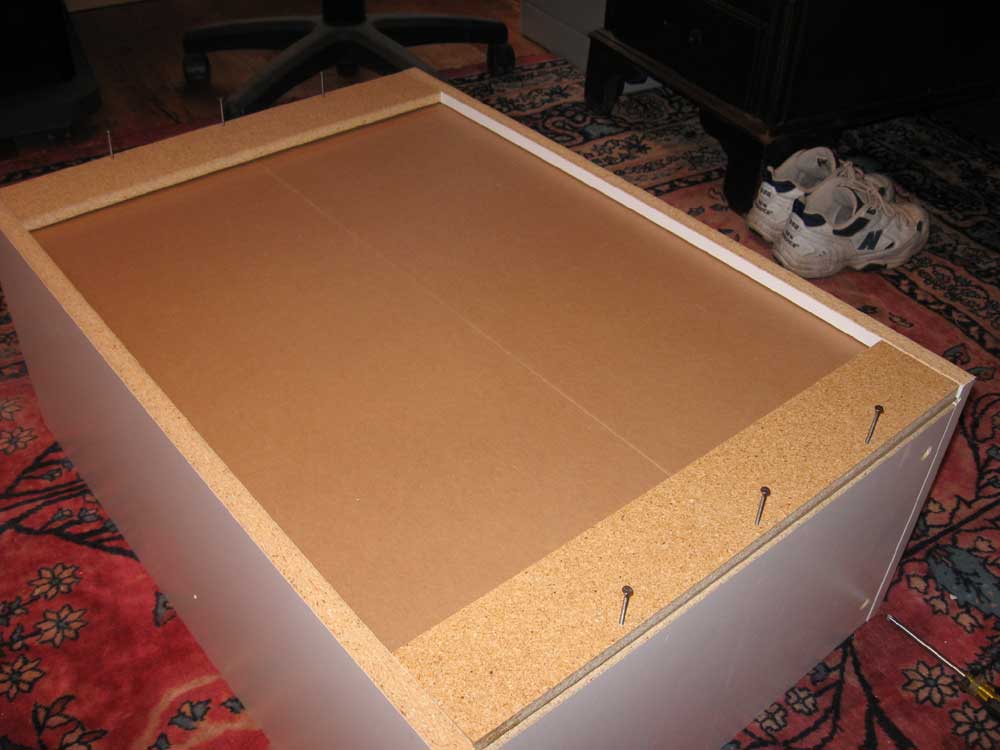 After
squaring the cabinet by measuring diagonally in both directions and
adjusting till the measurements were the same, I secured the backs
with nails through pre-drilled holes. This completed the basic
box, which was now ready for installation. After
squaring the cabinet by measuring diagonally in both directions and
adjusting till the measurements were the same, I secured the backs
with nails through pre-drilled holes. This completed the basic
box, which was now ready for installation. |
|||
|
I was very ready for the task to be done, after 11 cabinets and four hours. As I completed assembly on each box, I hung it on the wall (5 wall cabinets) or installed it on the floor (4 base cabinets. |
|||
|
|
|||
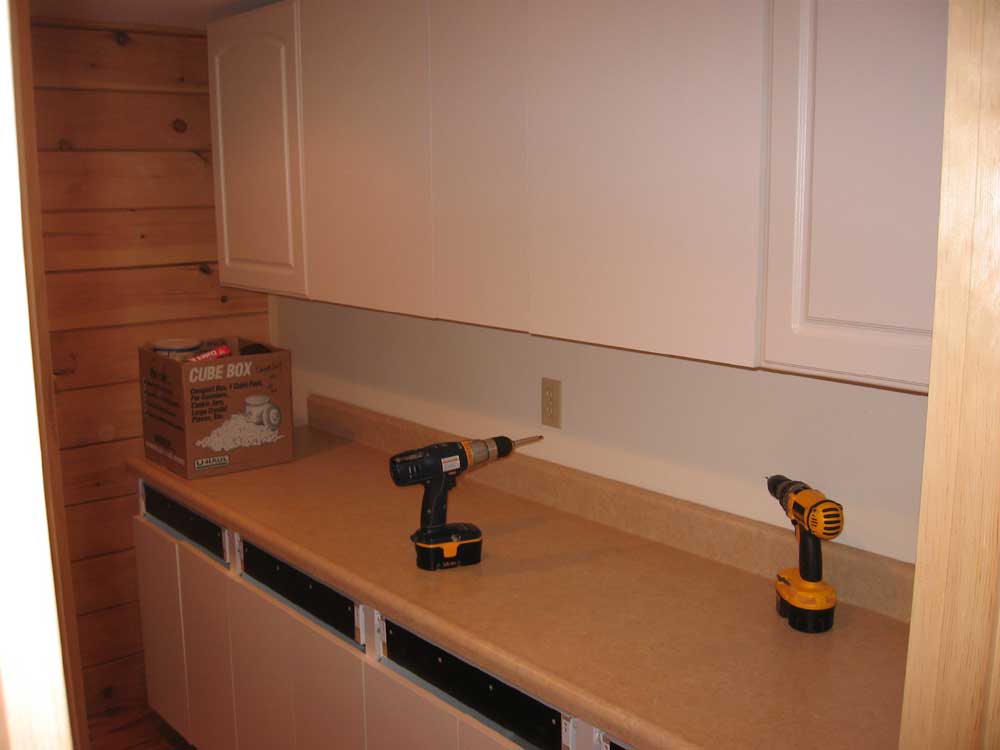 Then,
I installed the pre-fab countertop, a simple matter of a few screws
from beneath. Then,
I installed the pre-fab countertop, a simple matter of a few screws
from beneath. After lunch, I installed door hardware and the doors themselves. I haven't installed the drawer fronts yet because I found that they didn't fit beneath the countertop overhang--an annoying discovery. However, the drawers and cabinets were functional, at least, and all I would have to do would be to trim the drawer fronts on my table saw. If this were my kitchen, I'd be upset; here in the pantry, I really don't care. But I wouldn't have these cabinets or countertop in my kitchen anyway. |
|||
|
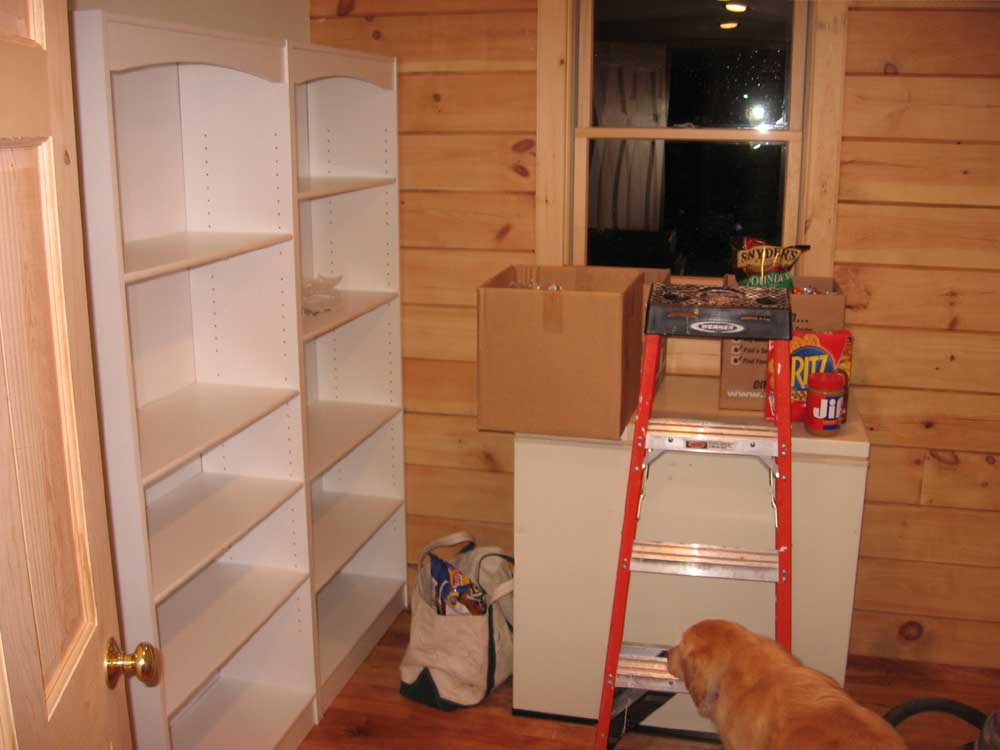
Finally, by midafternoon I was ready to start loading up the pantry. I began with boxes of food, since Heidi planned to unpack the china and dishes and things. I sloppily loaded the stored food into the open shelves on the left side of the room; my goal was to get it all on the shelves with some semblance of organization, but to wait for final cleanup and organization till later, when I had my final section of open shelving in place. I managed to fit everything on the existing two shelf units, but definitely needed the third to truly make it a useful storage space. |
|||
|
Later, I brought up some more boxes for Heidi to unpack tomorrow, and worked on moving some small pieces of furniture around and some other fine-tuning changes in the living room. I find that since moving, I've been getting started a bit later in the day, but also work longer into the evening, since it's "right there"--home and work being the same location now. I haven't made a ton of progress on my construction punch list since moving, but slowly but surely we are getting settled. |
|||
MONDAY, NOVEMBER 13, 2006 |
|||
|
We got our satellite TV moved this
morning--a process that took longer than expected and sort of wasted
most of the morning. I was kind of antsy to take advantage of
the more or less fair weather (at least it wasn't raining) to go buy
the cabinets needed for the pantry, but had to stick around. We had requested a "free move", which they allow you to do, but the guy installed a whole new dish on the house and left the one in place down at the shop--weird. The old one still seemed to work, so with on extra receiver (we only needed three in the house) it looked like I might still get satellite TV in my office. We will see whether our bill reflects anything strange later on, and deal with it then. I spent most of the morning catching up on office work and also working in the camper to continue cleaning it out and cleaning it up. I boxed up the remaining food and pantry supplies and moved them to the basement, and did some cleaning in the kitchen. When the tech finally left, Heidi and I headed off to pick up the cabinets for the pantry. We bought inexpensive wall and base cabinets for one side, and a couple bookshelf units for the other. I needed three bookshelves, but only two were in stock; at least this will get things underway, though. Not having anywhere to store food was starting to crimp our style. We were disgusted by the color choices in pre-fab countertops, but managed to find a only-partially-gross "sandstone" color that we could live with in the pantry. Convenience, and the fact that I couldn't build a countertop for the price, won the day.
Tomorrow, I plan to assemble and install the remaining cabinets and unpack. |
|||
SUNDAY, NOVEMBER 12, 2006 |
|||
|
I'm managing to realize--and slowly to
convince myself--that the ultimate push is now off, since we're
actually living in the house. It's hard to let go after so
many months of daily toil, but despite a long list of projects that
remain to be done, I find that I am relaxing a little--just a
little, mind you.
Now, with that out of the way, it's time to get to work. I started this morning with the closet shelves in the master closet. We picked up 8, 12' length of standard wire shelving, plus adjustable wall brackets and supports, on Friday evening, and today I wanted to get these installed. Installation was pretty basic: find the studs, install the adjustable wall brackets (8' long, and similar in appearance and function to the adjustable bookshelf brackets that you see), and configure the shelving. I found that we didn't buy enough of the brackets to place one on each stud in the closet, so I installed six on each side for now; later, I'll buy and install one or two more per side, as needed, to support the ends of the shelves. For now, it was enough to keep going. I ran a couple full-length shelves at the top on each side, and then some shorter ones to accommodate space for hanging storage with the 6' rods we had also purchased. Once I had the shelves installed, I unpacked all my clothes, sloppily throwing them on the shelves just to get them out of the boxes. Heidi didn't do hers just yet. |
|||
 I
made a couple trips back and forth between the shop/camper and the
house to bring some additional items up, and also installed a mirror
and towel rack in the downstairs bathroom. I
made a couple trips back and forth between the shop/camper and the
house to bring some additional items up, and also installed a mirror
and towel rack in the downstairs bathroom.
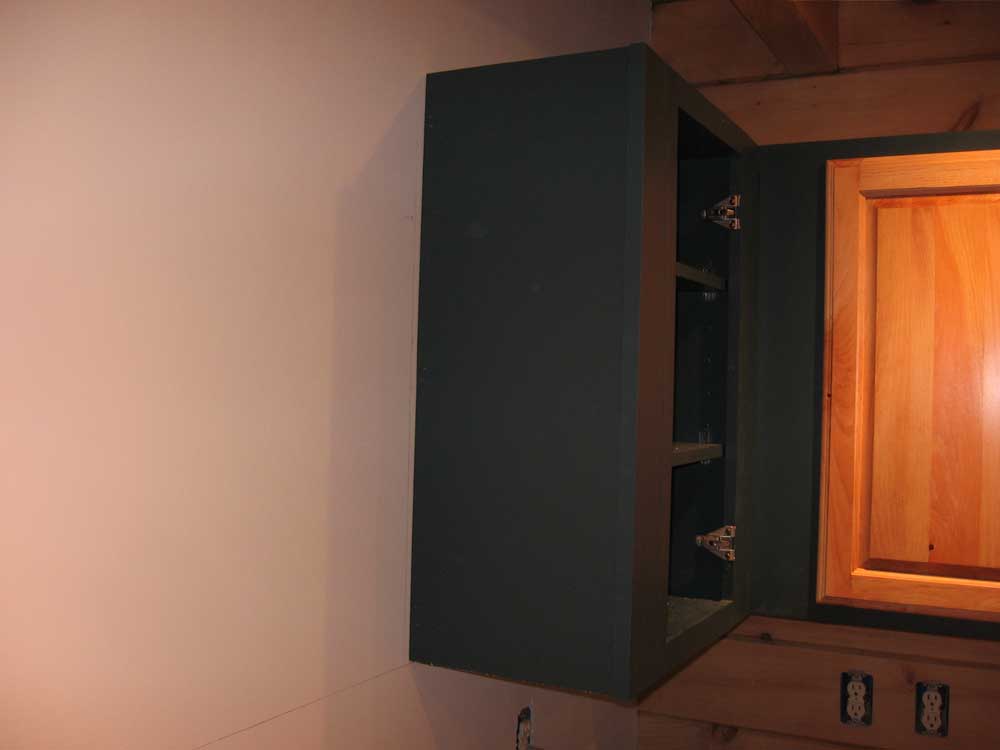
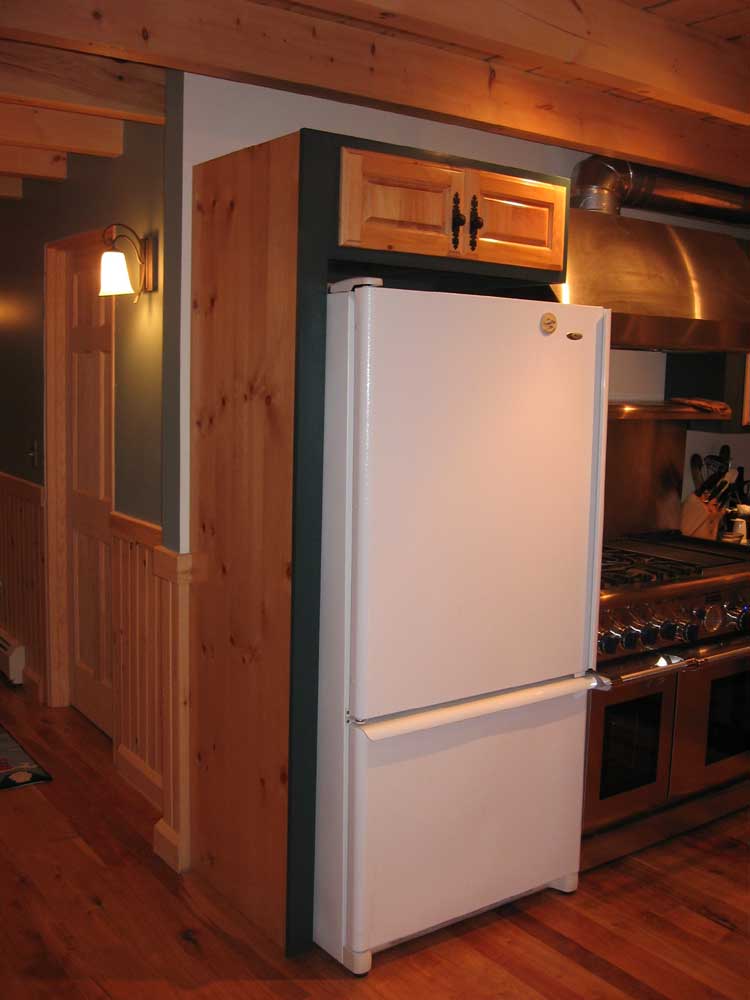
After lunch, I worked on the refrigerator end panel and cabinet above the fridge in the kitchen. Installation turned out to be pretty straightforward, thankfully. I secured the end panel first, using some cleats against the wall into which I could finish-nail the panel, and then installed the cabinet above, screwing it to the wall and also to the frame of the end panel. This really trimmed out the fridge nicely, and finished off the kitchen successfully. It also made the white fridge stand out less; previously, it had seemed very stark and out of place. Now, it looked like something we could live with, which is good since we like the fridge a lot. |
|||
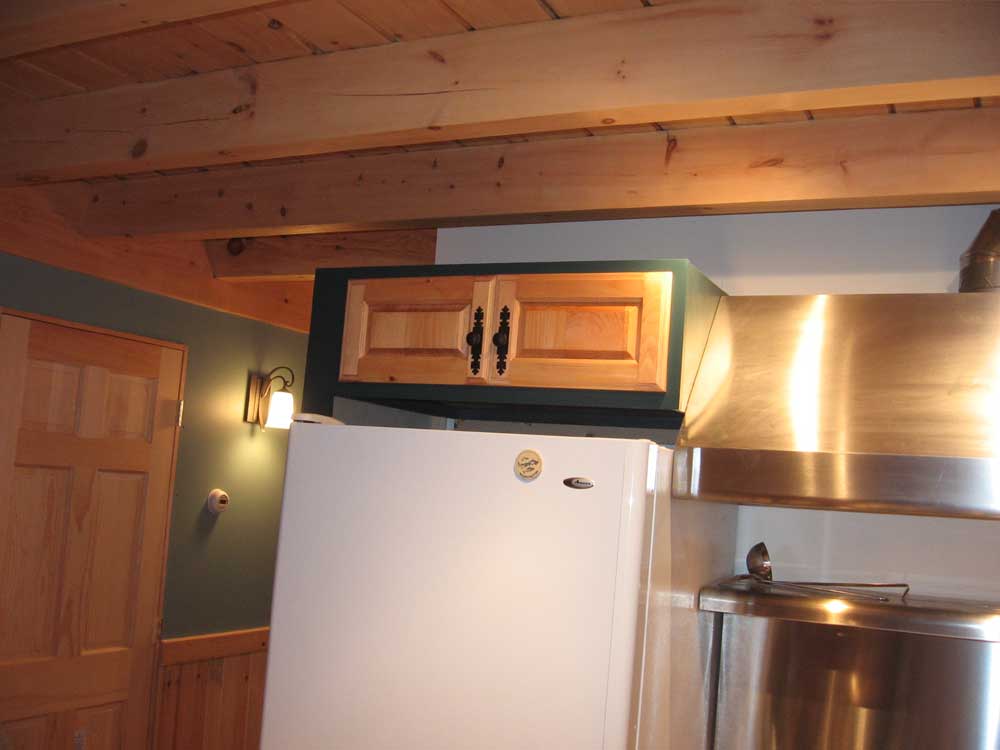 These
over-refrigerator cabinets aren't the most useful things in the
world--they tend to be very deep with narrow openings, never mind
their height above the floor (out of reach to all but NBA stars),
but they do make the installation look much more finished and are
therefore worthwhile. These
over-refrigerator cabinets aren't the most useful things in the
world--they tend to be very deep with narrow openings, never mind
their height above the floor (out of reach to all but NBA stars),
but they do make the installation look much more finished and are
therefore worthwhile. |
|||
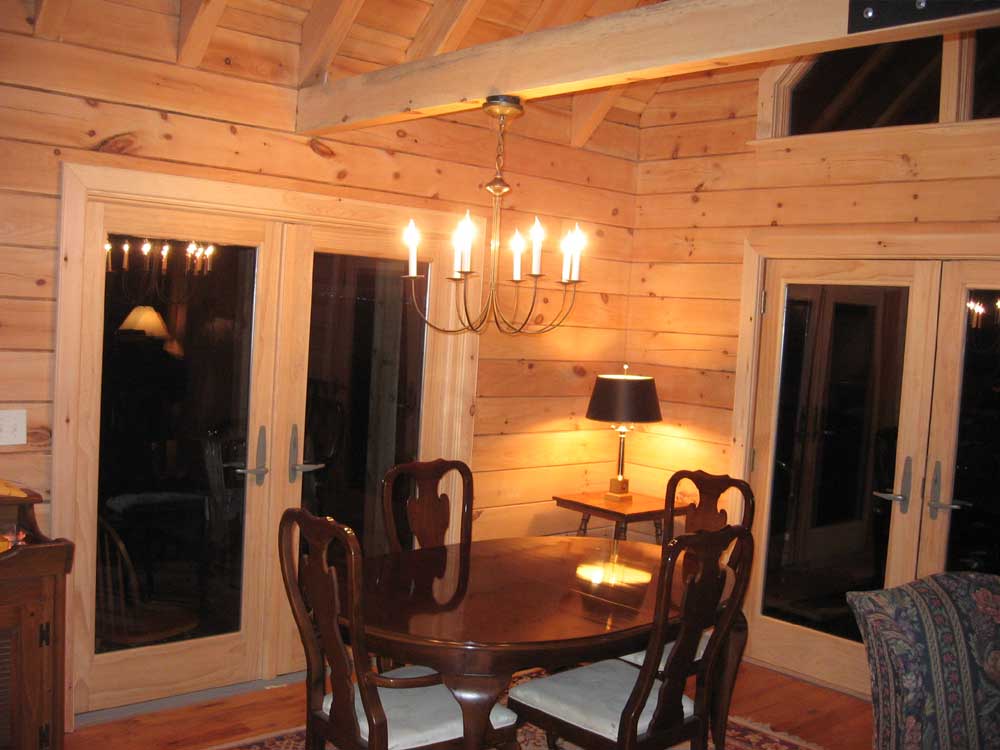 Later
on, I hung the dining room chandelier (it still needs a dimmer
switch, which for some reason I hadn't installed), and hung several
fire extinguishers in key locations. I also did more packing
in the camper, and took care of other related tasks. Later
on, I hung the dining room chandelier (it still needs a dimmer
switch, which for some reason I hadn't installed), and hung several
fire extinguishers in key locations. I also did more packing
in the camper, and took care of other related tasks.
I also did some research and planning for the pantry, which I really wanted to put together. We're planning to use those cheap, put-together-yourself Mill's Pride cabinets from you-know-where in the pantry--base and wall cabinets with a countertop on one side, and open shelves (bookshelf units) on the other. I think I'll even try to buy an 8' postform countertop, which I really don't like at all but will be fine in the pantry. I think this all makes the most sense both from a utility standpoint, as well as economic and efficiency standpoints, rather than trying to self-build the whole thing. I doubt it would cost much less, if any, to purchase raw materials to build shelving of the sort that I want in there, not to mention the time it would eat up. It wasn't the fullest, nor the most active, of days, but nonetheless I was making progress on my list. And I even had some time to enjoy our cozy house on a gross, rainy day. |
|||
SATURDAY, NOVEMBER 11, 2006 |
|||
|
It was nice spending the first night
in the house--nice to have our real bed back, nice to have some
space (and extra space on the bed so Chloe* didn't hog all the
covers), and nice to wake up to the dawn views through the bedroom
and bathroom windows. I slept like a rock and didn't even get
up till 6:30. I made a short list of things I wanted to
accomplish today. I wanted to wrap up the actual "moving" part of moving, so I hooked up the trailer and loaded it with the small pieces of furniture that had been stored in the shop and attic--some chairs, a couple small tables, a TV for Heidi's office, and that sort of thing. Then, I loaded this into the house and cleaned each piece, as they were all dusty. My mom, Bill, and Dave arrived around 10:30 to check the place out, and we had a pleasant 2-hour visit. Afterwards, I tried to refocus on the numerous projects ahead. First, I decided to move the washer and dryer from the shop up to their new permanent home in the basement of the house, so I used the bucket in my tractor to drive them up there and through the basement door, where I used a small flat dolly to roll them across to the other side of the room. Done. Next, I decided that first and foremost, I really wanted to winterize the camper so that I wouldn't have to run the heaters anymore; it was pretty warm out, but who knew how long that would last. Plus, I needed to move the camper within a week so that I'd have the space available for a boat that was arriving here for future work. Winterizing meant that I had to do some cleaning while the water was still operating, so I did that, while Heidi packed up the fridge and a few other things. Then, Heidi went off on a shopping trip--household items and groceries needed for the house--and I winterized the water system. There was still work to do to close up the camper completely for storage--more cleaning and a lot more unloading--but for now, it was safe and ready for cold weather, at least. |
|||
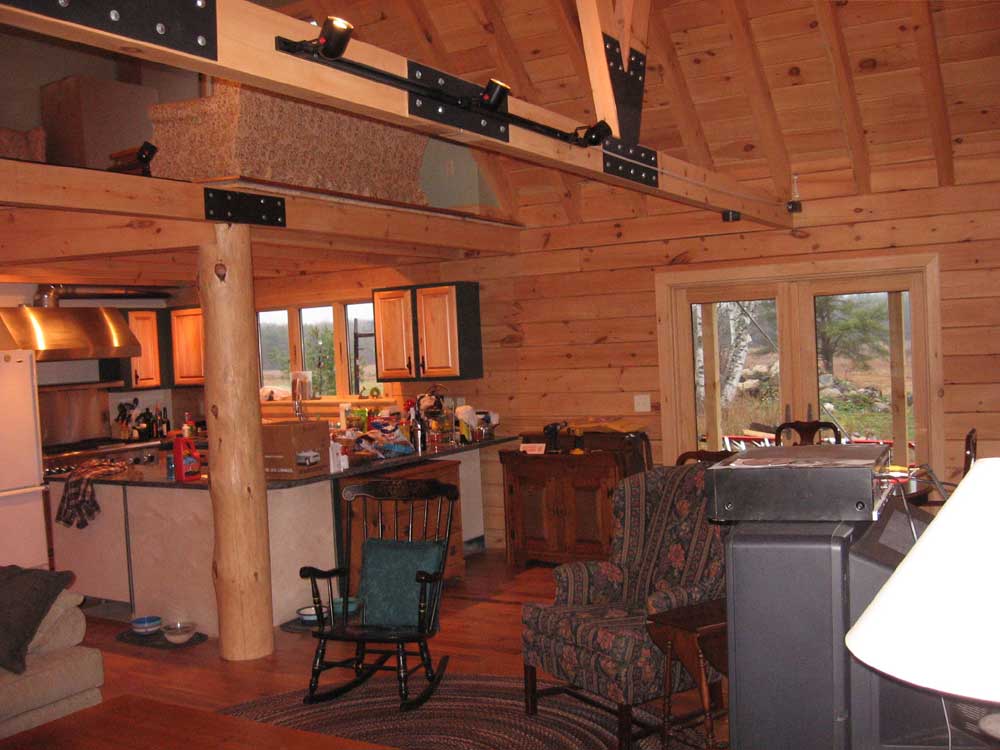
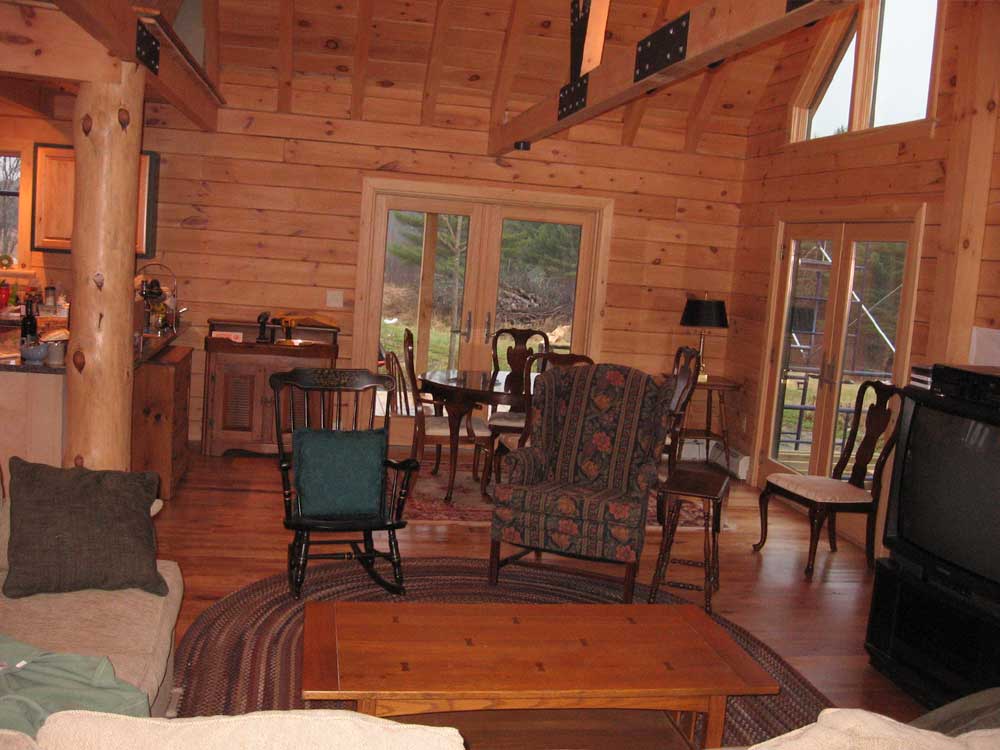
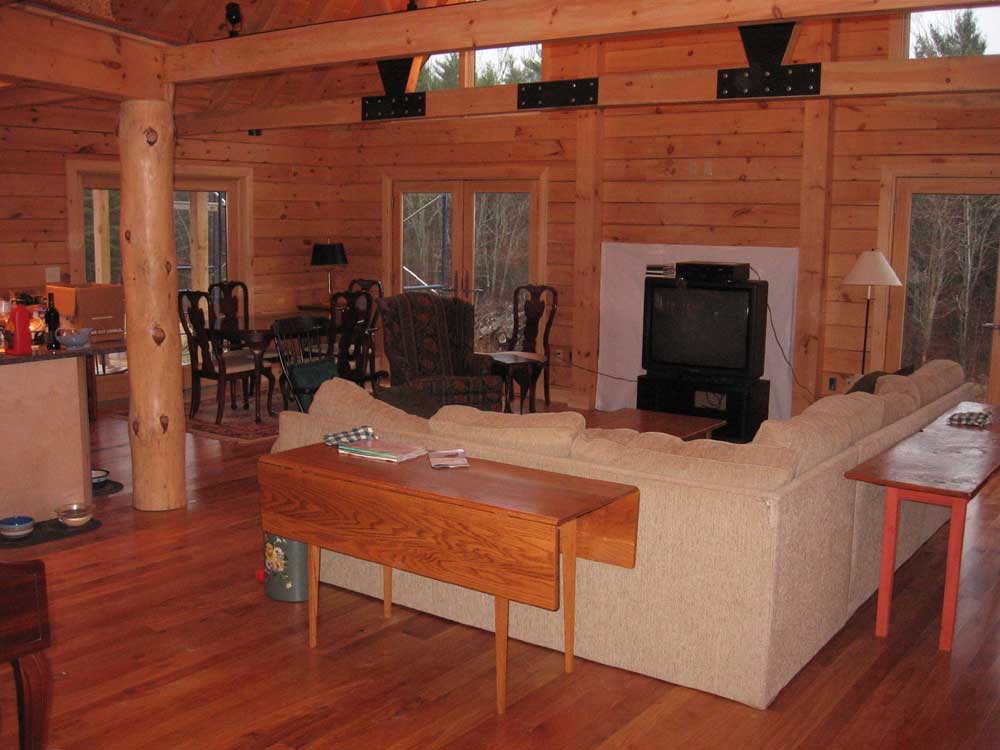
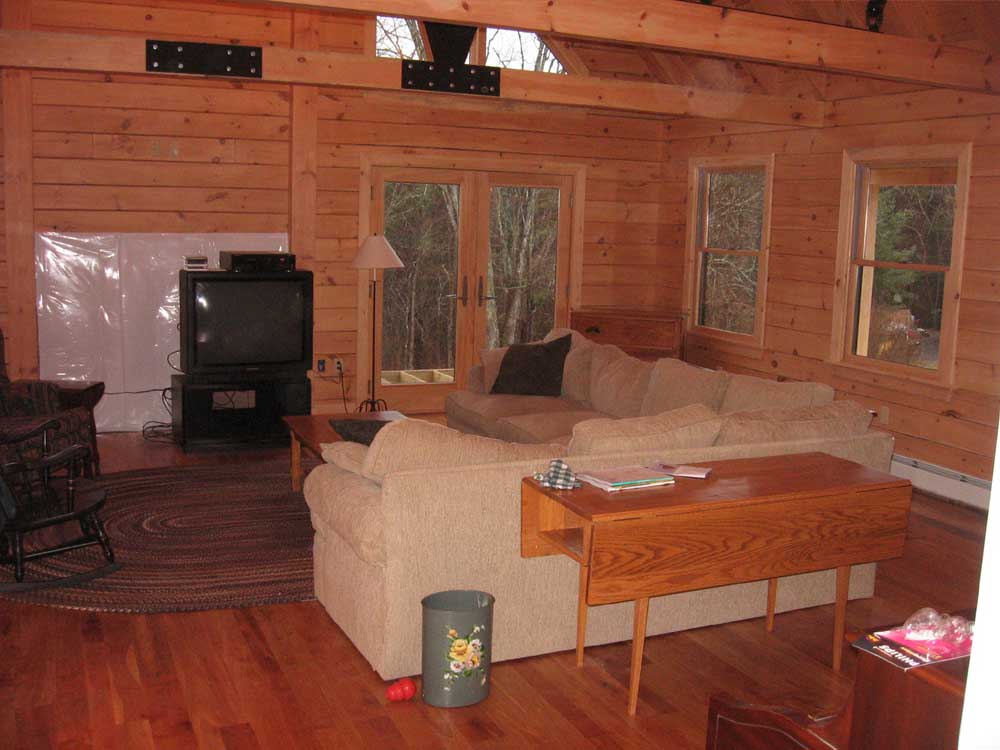
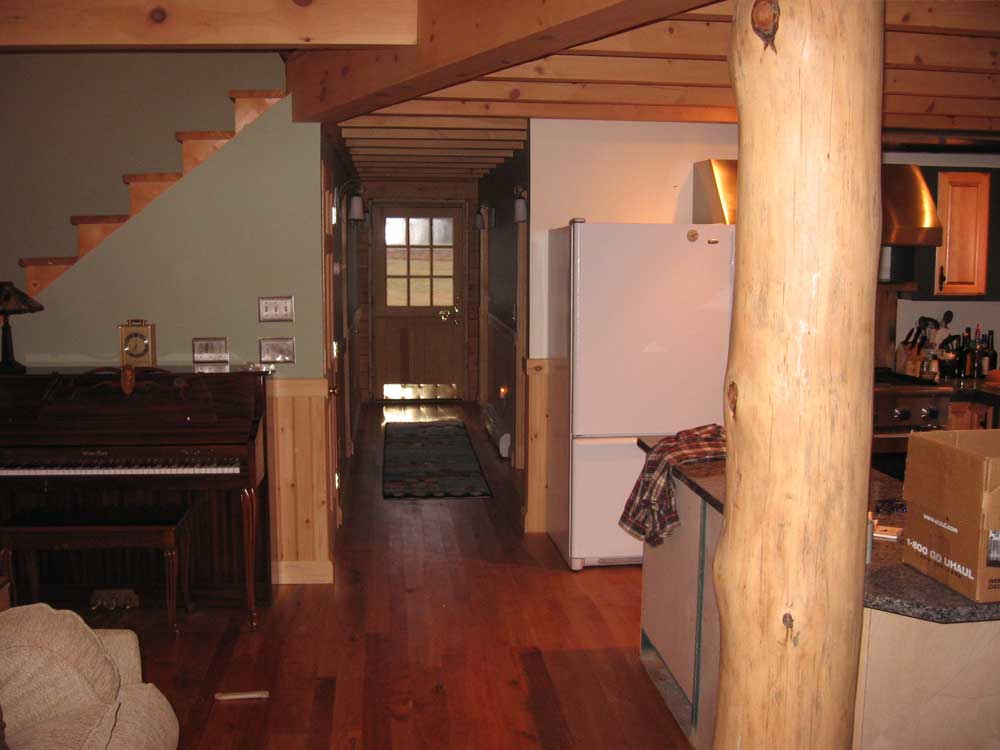
|
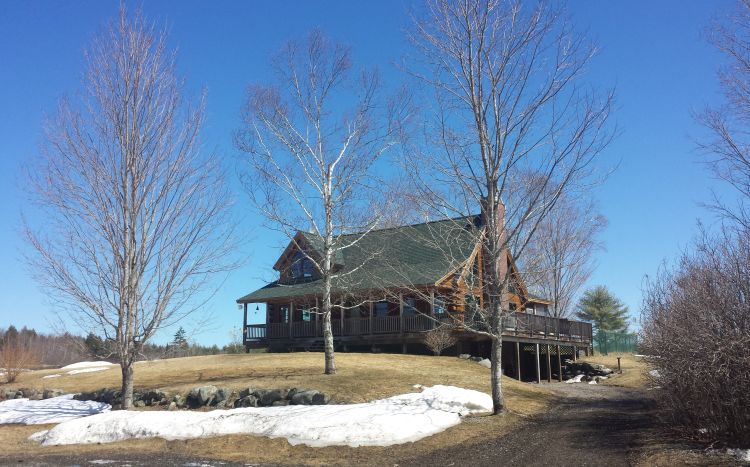
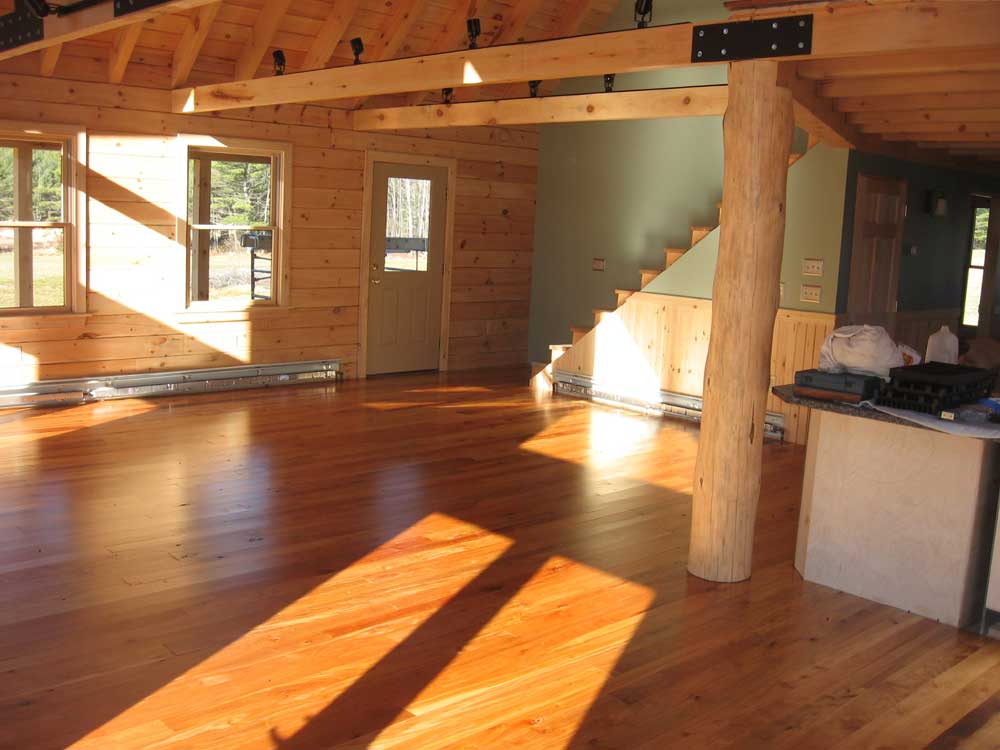
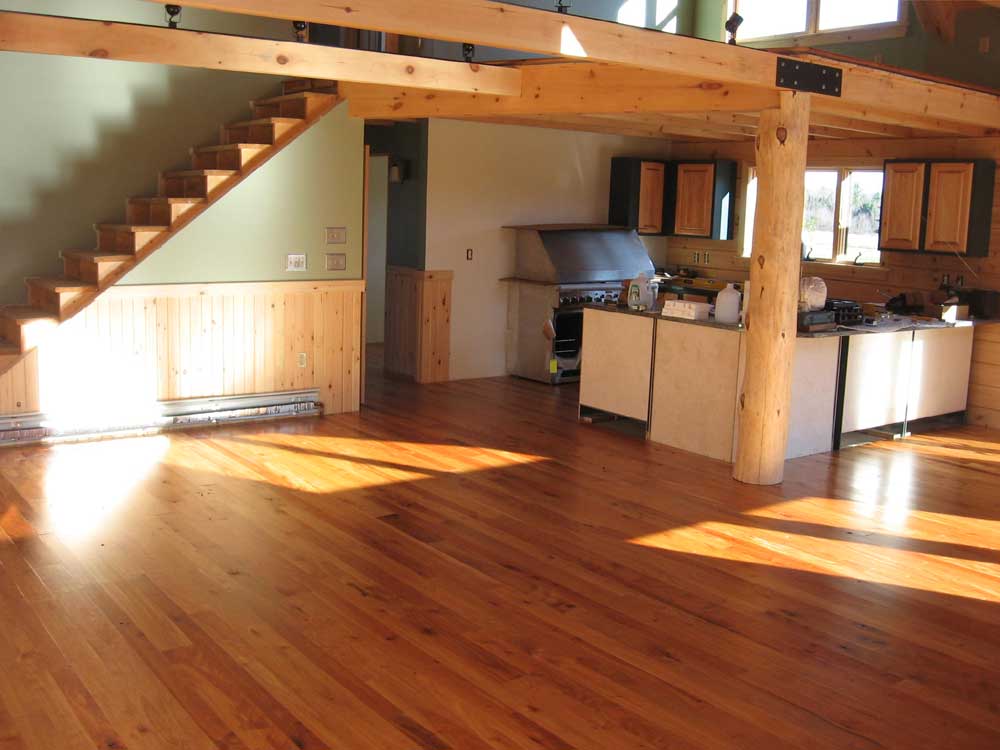
You're probably wondering if I'll ever show you any photos of the interior of the house with furniture in place. Here you go (downstairs, anyway)! Pardon the mess and lack of settlement. |
|||
|
|
|||
| I spent most of the rest of the afternoon and into the evening trying to get some of the kitchen unpacked. It was a bit tough, since we are relying on the pantry to store so much of our foodstuffs and spare dishes, cookware, etc, but the pantry wasn't yet up and running (next week). Still, I needed to do what I could, so that at least we could use the kitchen. I managed to find the daily plates and glasses, silverware, and cooking utensils and pots and pans. | |||
|
Heidi arrived home late, and after unloading the car I searched for places to put the groceries--mostly unsuccessfully since the pantry wasn't ready. I guess I'll figure something out tomorrow. For now, I was beat, and looked forward to cooking and eating our first meal in the new kitchen, and going to bed. The new stove boiled water for rice in no time flat. |
|||
|
I didn't manage to get to the closet shelving today, unfortunately. Tomorrow, I plan to take care of that and get some clothes and stuff put away. I don't know what we're going to do with all these empty boxes. *Chloe is our 11-month Golden Retriever, if you don't know that already. |
|||
FRIDAY, NOVEMBER 10, 2006 |
|||
|
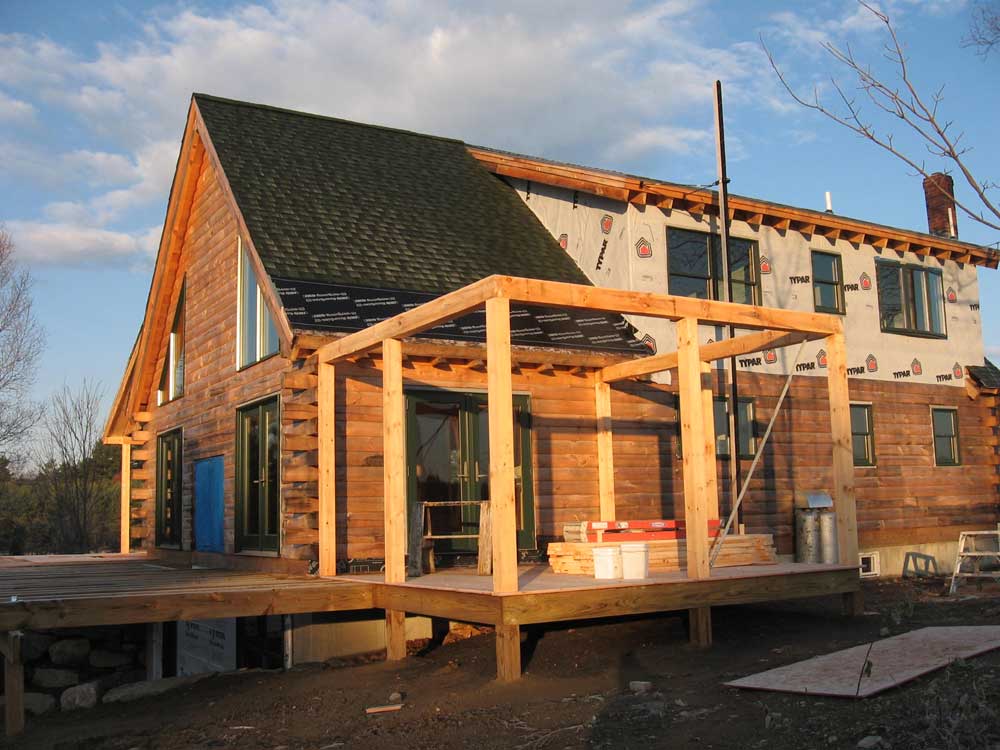
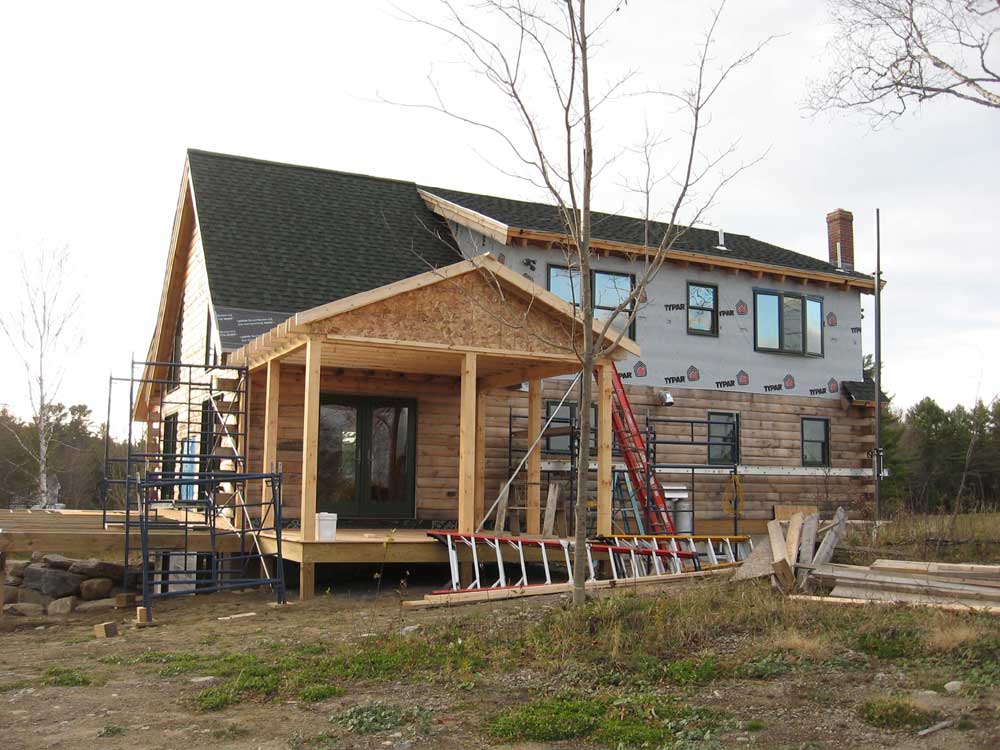
Moving day! I got started right away this morning loading boxes into my trailer to bring up to the house. I planned to empty out the shop bay where the boxes had been stored since March, and organize them in the basement of the new house for easy access and unpacking. I had a full load all set and partially unloaded into the basement when the movers arrived with our furniture at about 0900. After some initial consultation, I continued unloading my boxes while Heidi directed the movers upstairs. During the course of the morning, I loaded and unloaded three full trailers, essentially cleaning out the shop bay--finally. A few odds and ends remained that I planned to accumulate and transport during the remainder of the weekend. The movers finished up around noon--longer than expected--and after lunch I unloaded the last trailer load. Next, I had to turn my attention to some of the things in the house, particularly the refrigerator, which the movers had apparently completely disassembled when they moved it out of our old house--doors, shelves, freezer door, etc. So I wanted to get this back together and up and running. Fortunately, this wasn't as much work as I had anticipated. Meanwhile, Heidi packed up some of the necessities from the camper--clothes, toiletries, etc--and we brought those up to the house. We didn't have to worry about immediately delving into the numerous boxes, since everything in those boxes had been stored for so many months, and most of what we needed for daily life was in the camper. Still, I was anxious to get truly settled. We moved some of the furniture around late in the afternoon, trying to figure out the best way to arrange the living room, and after another run down to the shop/camper for some more supplies, I even found some time to sit on the couch and enjoy my surroundings. The furniture looked great in the house (pictures later...my camera's up there as I type this from my office). Late in the evening, we managed to get to Home Despot to pick up some closet materials so that we could put together some clothes storage upstairs, which I wanted to do tomorrow. Also high on the priority list was figuring out cabinets/shelving in the pantry, which we needed before we could truly unpack the kitchen. There's lots left to do, between moving in, unpacking, closing up and winterizing the camper, not to mention all the work that still remains on the house. Stay tuned. Outside today, Bob shingled the roof on the back porch, finishing up the work there. |
|||
THURSDAY, NOVEMBER 9, 2006 |
|||
|
I spent the day on last-minute chores
on this, the last day before moving in. We can't wait to move
in. It was drizzly and gross for part of the morning, the lingering effects of yesterday's rain, so I worked inside and installed baseboard in the loft. I also made up a couple trim pieces for the inside of the downstairs bathroom door, since the rough opening was rather wide and you could see right in around the jamb. I applied poly to the trim (2 coats) and installed it later in the day; I also finished up two small pieces of baseboard in the bathroom, now that the door trim was installed. I spent another 45 minutes or so installing door hardware on the interior doors. Somehow, I ended up one lockset short, so onto the list it went. |
|||
|
Eventually, the drizzle stopped, and I got right to work preparing to move the excess wood stock and tools out of the basement. I moved a boat, for which I had built a frame and cover last night after work, out of the shop, which freed up a good bit of storage space that I needed for the stuff from the basement. Then, I loaded up my trailer with the excess pine and red birch flooring--an amazing amount of wood, really. It pretty much filled my 14' trailer. Some of this material is awaiting use on things like exterior trimwork and a small amount of remaining interior trim; some is excess and will be returned for credit; and some is just excess that I must keep, namely the flooring. I also kept some short scrap for the time being, if only to use as stickers. |
|||
|
|
|||
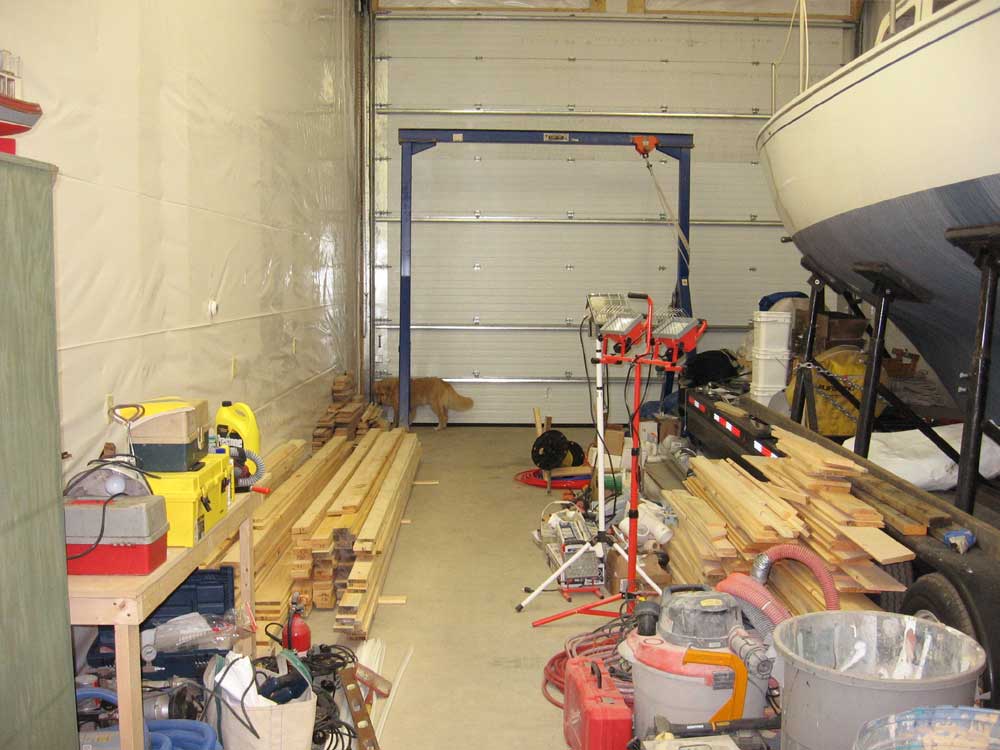 Once
I filled the trailer, I brought it to the shop and unloaded it,
trying to keep things organized and as neat as possible. This
was all exhausting, and I looked forward to lunch after unloading.
After lunch, I loaded the trailer up again with tools, work lights,
and other materials that had been in the basement, and stored those
in the shop bay as well. Most of this stuff will need to be
moved again, since it will be in the way, but at least it was out of
the basement. Once
I filled the trailer, I brought it to the shop and unloaded it,
trying to keep things organized and as neat as possible. This
was all exhausting, and I looked forward to lunch after unloading.
After lunch, I loaded the trailer up again with tools, work lights,
and other materials that had been in the basement, and stored those
in the shop bay as well. Most of this stuff will need to be
moved again, since it will be in the way, but at least it was out of
the basement.By the way, I have come to truly hate shiplap pine, or WP-11 as it is called--the 7" wide stuff that we put on the down-facing side of all the ceilings way back when. There was a large amount of this left over, which I couldn't return partly because it had been outside for a long time, and partly because I had trimmed the ends of all the pieces. I have moved that stuff all over creation: from the front yard to the first floor; to the second floor; back to the first floor; to one part of the basement; to another part of the basement; and finally, to the shop. It's heavy stuff, as it is nearly 1" thick and 7" wide not including the tongues, and I am just sick of it. That's the pile of it on the right side of the photo, against the boat. |
|||
|
It turned into a beautiful afternoon; the sun came out, it was still and calm, and the temperature rocketed well into the 60s--far above normal. I decided I really wanted to install some recessed cans on the front porch, so that we'd have some welcoming lights there at night. I spent most of the remaining daylight installing 3 of the 4 four-inch cans that I had previously purchased; the 4th can was missing parts (again) and would have to be exchanged. The cans, equipped with 40W bulbs, emitted a nice, soft light, just right to dimly light the porch and make the house look welcoming. I've tried several times to take photos of the house at night, lit in various ways, but my pictures, taken without flash, turn out very blurry for some reason. So I didn't even try to take a picture of the new lights tonight. Because I get paranoid about new systems installations, I decided not to leave the lights on overnight, though I really wanted to; I'd prefer to be in the house before leaving them on all night, just to be sure all is well and that they don't get too hot or something silly. |
|||
|
I finished up with a few small things. I realized that I had not pushed the dishwasher far enough back into its opening, so I took care of this. I also swept up the whole house to get it as clean as possible. Tomorrow, moving day, will occur after 156 days of actual work on the house since May, by my records. I arrived at this total because each day that work occurred, I took pictures; each days' pictures went in a separate computer folder, and each folder was numbered sequentially. I'm not done yet. There is plenty of work remaining on the house. But tomorrow night, we'll be in! |
|||
WEDNESDAY, NOVEMBER 8, 2006 |
|||
|
Heidi picked up some replacement light
bulbs for the upstairs track heads, as well as a new glass shade to
replace the one that I broke on the upstairs sconce, so I installed
these first thing this morning, along with a couple more dimmer
switches--one in the upstairs bathroom, and one in Heidi's craft
room.
|
|||
 After
lunch, I prepared to install baseboard. First, though, I
installed the end caps and faceplates on all the pieces of heat
around the house, since the baseboard butts up directly to this--and
it was time to cover the registers anyway. Then, I installed
baseboard in the living room, Heidi's craft room, and hallway, a
process that took most of the afternoon. After
lunch, I prepared to install baseboard. First, though, I
installed the end caps and faceplates on all the pieces of heat
around the house, since the baseboard butts up directly to this--and
it was time to cover the registers anyway. Then, I installed
baseboard in the living room, Heidi's craft room, and hallway, a
process that took most of the afternoon.I needed a bit more baseboard to complete the job in the loft, pantry, and downstairs bathroom, so I measured for the pieces needed and applied two coats poly to 4 more sections so that they'd be ready to install in the morning. |
|||
 Mid-afternoon,
UPS arrived with a box full of the cabinet hardware for the kitchen,
and in between coats of poly on the final baseboard, I installed all
the knobs and drawer pulls. We chose knobs and pulls with
wrought iron look, complete with decorative back plates, which we
felt really complemented the look of the kitchen. Installation
was straightforward and took about an hour and a half. Mid-afternoon,
UPS arrived with a box full of the cabinet hardware for the kitchen,
and in between coats of poly on the final baseboard, I installed all
the knobs and drawer pulls. We chose knobs and pulls with
wrought iron look, complete with decorative back plates, which we
felt really complemented the look of the kitchen. Installation
was straightforward and took about an hour and a half.It rained on and off all day, so there was no work on the porch. I hope Bob can finish up the roofing this week, weather permitting, as that means he should be able to start the big chimney next week. |
|||
|
|
|||
|
Tomorrow is my last day of work before we move in. I plan to finish up the baseboard, and then spend a bit of time cleaning out the basement and removing excess lumber, tools, and anything else I can get out of there. I'll have to make some storage room in the shop by moving one of the boats that I have stored there, after which I can temporarily store all the junk from the house there. |
|||
TUESDAY, NOVEMBER 7, 2006 |
|||
|
Today was all about getting the range
and vent hood operating--the last thing, in my mind, standing
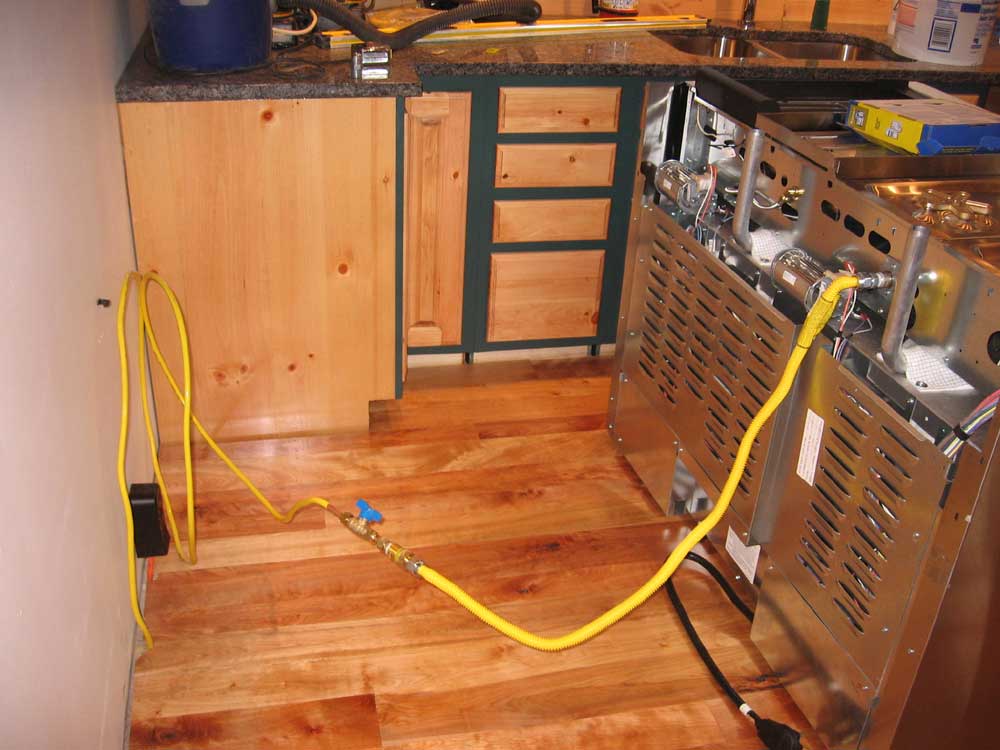
between us and occupancy of the house on Friday. I began the day early with a shopping run. Prime on my list was a length of 8AWG cable for the range electrical supply, as well as a few fittings needed to connect the dishwasher water supply. Unfortunately, Lowe's didn't have the cable I needed; it was on the board, and listed as being in stock, but the guy couldn't find it. I drove to a nearby Home Despot in Topsham, where I was able to find the cable I needed--50' at $2.44/foot. Ouch. I wasn't looking forward to installing this wire, given the miserableness and stiffness of the #10 wire that was already in place, but as it turned out the #8 was stranded wire, rather than solid, and was actually easier to deal with than the solid strand #10. I began by running an end of the cable up behind the stove and connecting it to the plug, after removing the old cable (I didn't pull the whole length of the #10 out of the basement; I just cut the end and left the remainder in place, seeing no reason to remove it.) I left a little slack coiled up beneath the floor so that I could more easily service the receptacle in the future if needed. Then, I ran the cable through the joists and over to the electrical box, a job complicated by the wide variety of tools, materials, and other junk in the way on the floor, making placing my small ladder a challenge. I left the cable unattached for now, as I didn't want to turn off the power while Bob was working. I still like to turn the main breaker off before modifying the inside of the electrical panel, though many electricians don't bother. |
|||
|
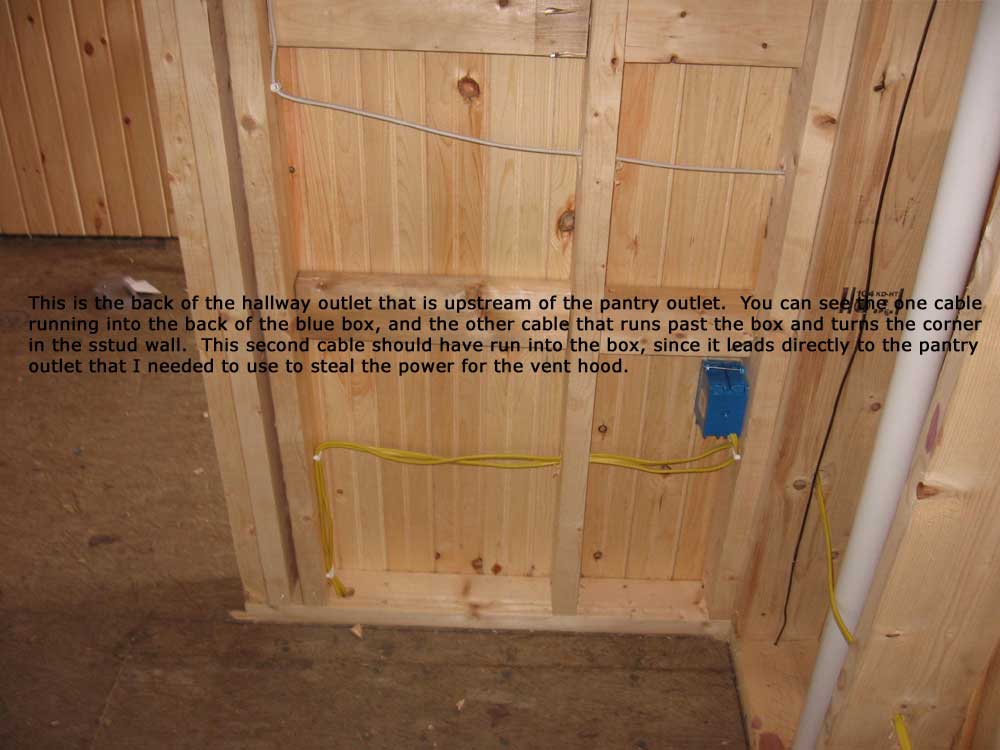
With the new wire attached to the range receptacle, I plugged in the range and pushed it laboriously into position. I had to drag it back out a couple times to adjust the feet so that it was level (though I discovered belatedly that I could probably have reached the back feet adjusters through the front toe kick). I couldn't test the range yet since the electrical was still not connected in the basement. Next, I turned my attention to the electrical supply for the vent hood. I admit that I completely forgot to run a wire for this during rough-in, but fortunately there was a pretty convenient way to steal power from a circuit running the pantry and hallway outlets; one of the pantry outlets was located in the perfect stud bay just behind the range hood, so I thought it'd be pretty straightforward to pull a wire up through the wall.
|
|||
|
Since I was prepared in advance for this, having determined this issue yesterday, I had purchased an "old work" box at the store this morning, and now I removed the existing box from the hallway, using a Sawz-All to cut the nails holding the box in place. From the basement, I drilled a hole directly through the floor and in to the stud bay, after carefully measuring to ensure it would end up in the right place. I ran a wire snake into the opening, then pulled a new length of wire from the box into the basement. Now, I cut the wire leading to the pantry outlet and made a connection between the new length of wire and the old wire in a junction box in the ceiling. Now, the electrical flow was as it should have been in the first place, though I still had one outlet in the pantry that had no connection to anything. I could live with that, at least for now (I could interconnect it later as needed, using a similar procedure), but more importantly, I now had power to the outlet box immediately behind the kitchen wall. Now, I just had to run a wire through the wall to the top of the range hood. I should have done this before I installed the hood yesterday; it would have made access much easier, but as so often happens, I had been focused on that one specific task and aiming to get it done. Now, I had to pay the price in tougher access to the stud bay I needed--which, of course, was directly behind the ductwork leading out of the hood. I drilled a hole through the sheetrock (this whole area will eventually be hidden from view) above the hood, and drilled a large hole in the back of the plastic box in the pantry outlet. Then, I ran a wire snake from the box up to the hole, using a little grabby tool to reach in through the small sheetrock hole and grab the stiff wire snake. This took several attempts, but eventually I got the end out, after which it was a simple matter to pull a length of 14/2 cable down and into the outlet box, where I interconnected it to the existing circuit.
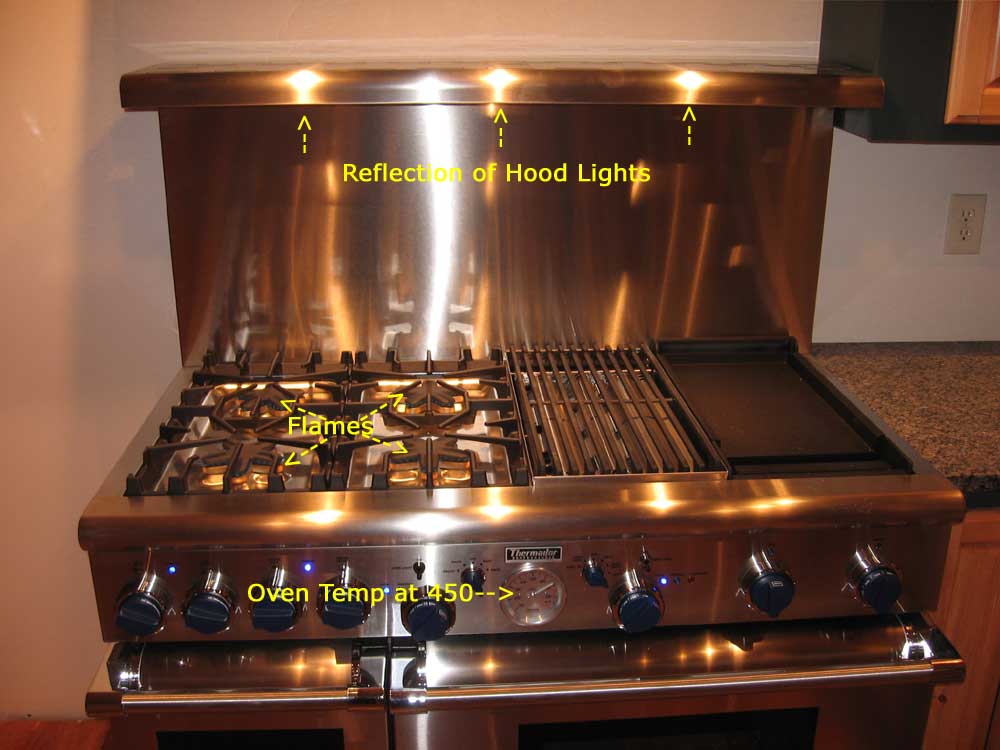
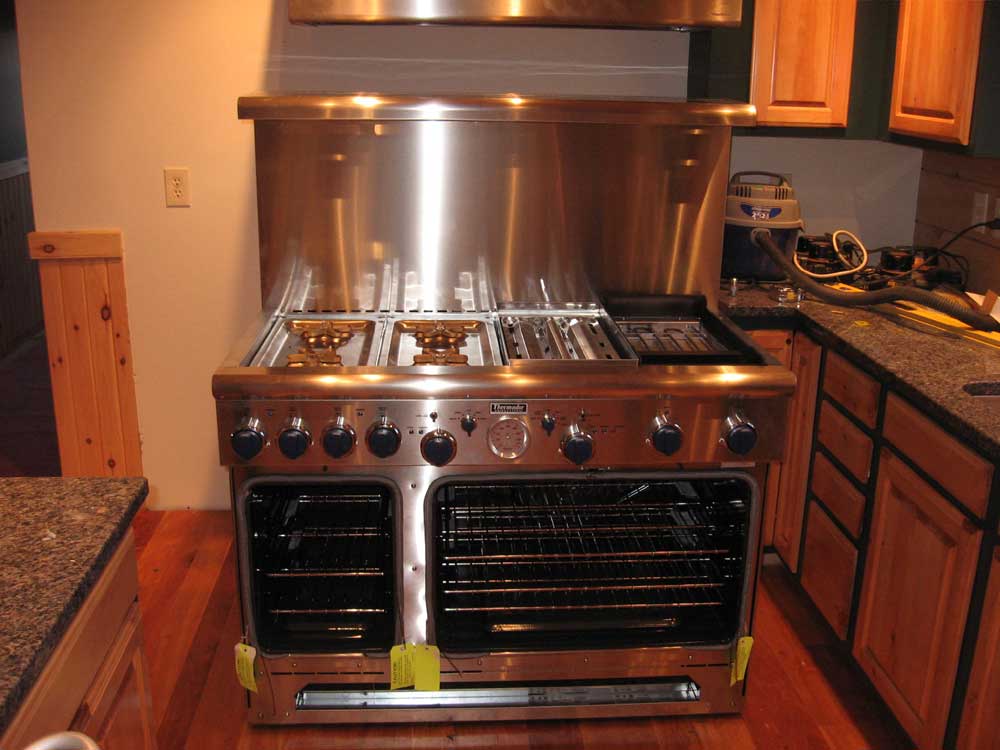
It took several seconds for gas to reach the burners when I first turned them on, making me wonder at first whether something was wrong. But then they lit, and all looked good with the adjustments I had made during the LPG conversion. The gas grill didn't seem to have the proper flame, though, and would require some adjustment, most likely in an air shutter valve. I'll take care of this soon. The ovens and electric griddle also worked as planned, and I ran both ovens at 450° for 30 minutes or so to burn off the manufacturing coatings or whatever. With the vent hood operating, I didn't smell the burning smoke at all. Nice. |
|||
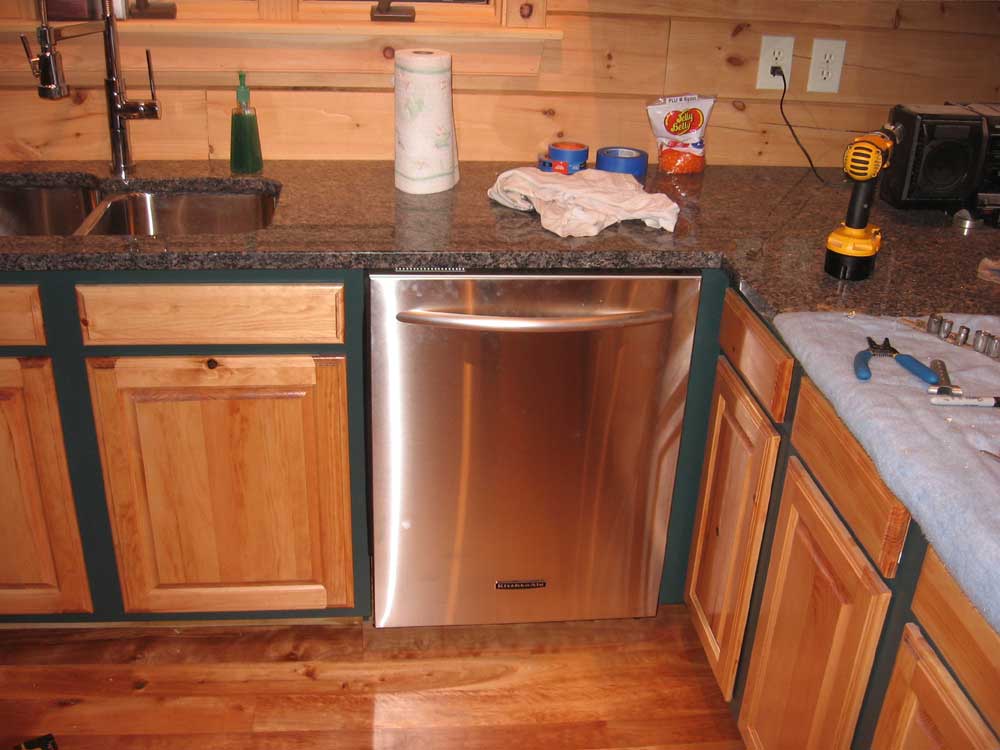 I
also installed the dishwasher, a fairly straightforward process and
one for which I actually had all the parts I needed! I did a
test run of the dishwasher and all seemed well. I
also installed the dishwasher, a fairly straightforward process and
one for which I actually had all the parts I needed! I did a
test run of the dishwasher and all seemed well.I spent the final time in the day clearing excess tools out of the kitchen, and beginning to organize and clean up the basement. I'd have to get some of the excess material out of the basement before Friday, and it was just starting to drive me nuts down there. Getting the range and hood to operate was a load off my mind, and I felt that now I could truly look forward to moving in on Friday. I still had plenty of work to do in the meantime, though, so I won't be sleeping in anytime soon. |
|||
MONDAY, NOVEMBER 6, 2006 |
|||
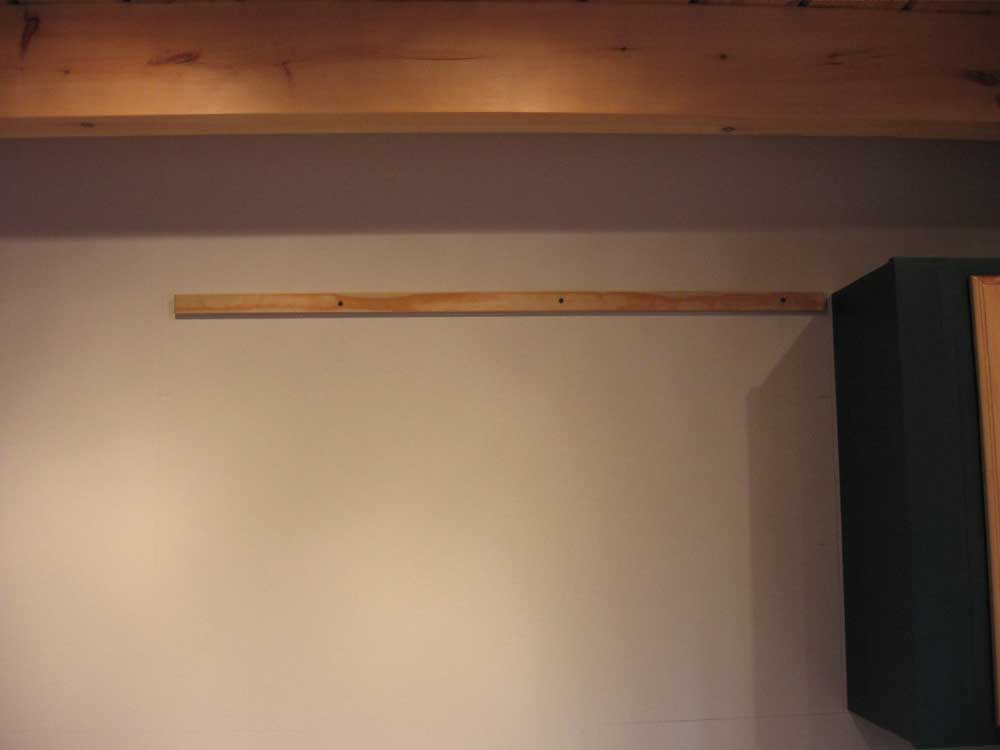 Today
was vent hood day. I couldn't put it off any longer. Today
was vent hood day. I couldn't put it off any longer.I began by removing an inset wooden mounting strip from the back of the hood, which I then secured to the wall in the proper position. I screwed it to the studs, and made sure it was level. |
|||
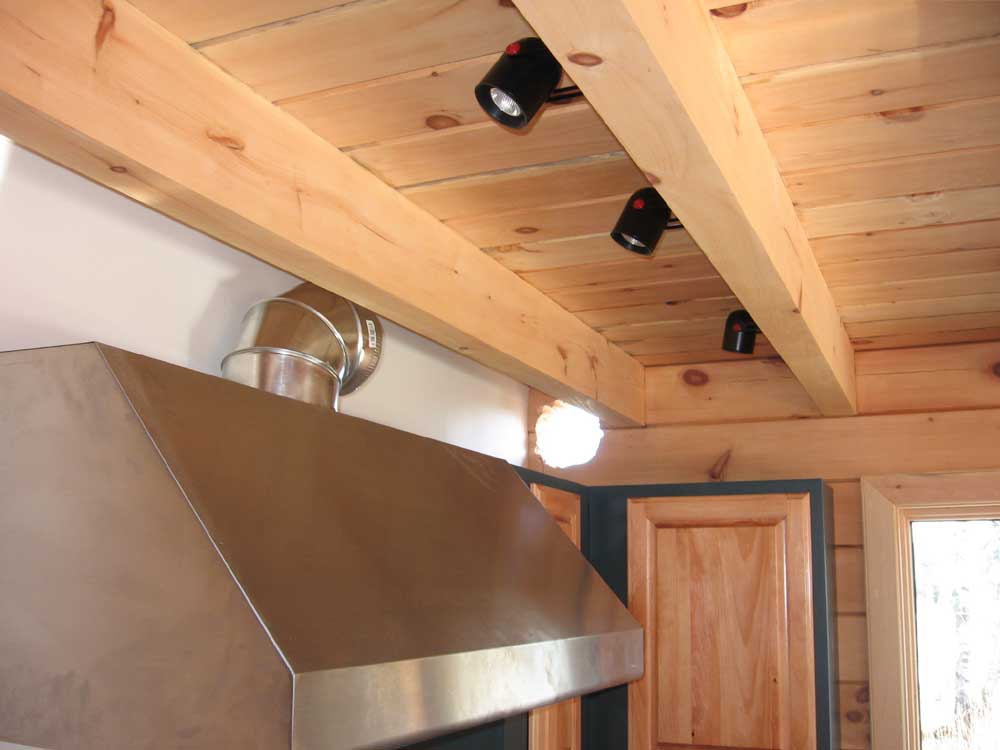
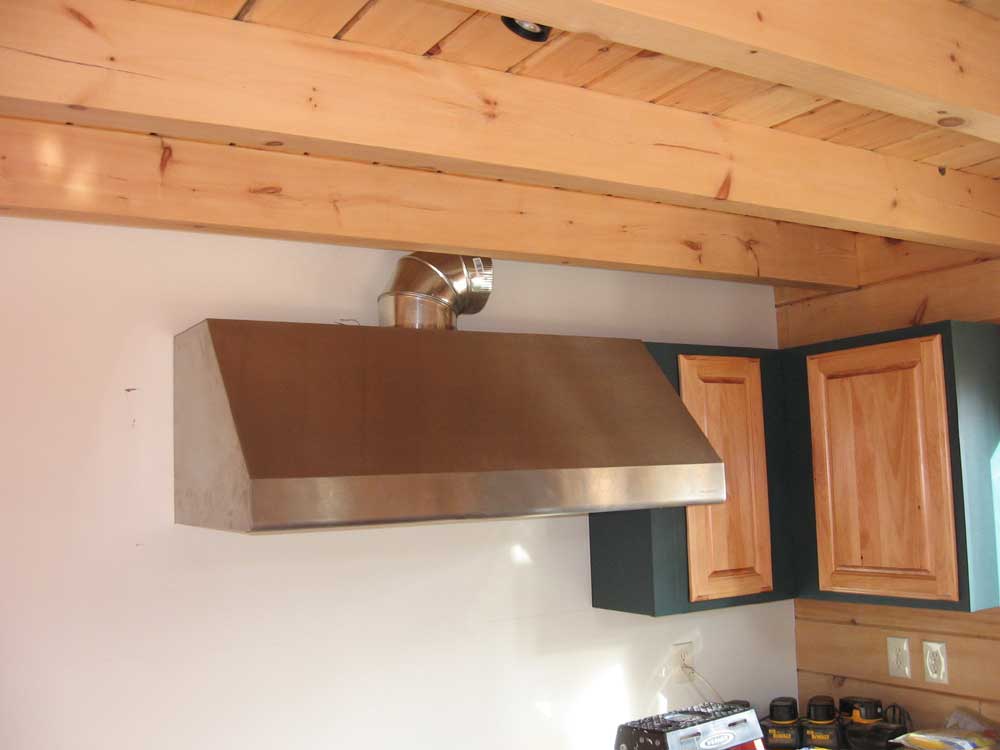 Next,
I hung the hood on this wooden strip, and secured it with two
screws from inside. This held it in place, but I also
installed additional screws at the bottom of the hood to help hold
the weight. Next,
I hung the hood on this wooden strip, and secured it with two
screws from inside. This held it in place, but I also
installed additional screws at the bottom of the hood to help hold
the weight.Bob arrived, and I ran my thoughts on the routing of the 8" vent duct by him. I had pretty much determined that running straight across the cabinets and through the log wall would be the best way, but I wanted some confirmation that this was a good plan, and that it wouldn't be a problem. After discussing some options, we heartily agreed. To locate the hole, I temporarily installed a 90° fitting on top of the vent (seen in these photos), and measured its center from the wall and ceiling. Then, over at the wall, I transferred these measurements, and drilled a pilot hole from the inside. Now, I had something to go by on the outside, where I planned to do the cutting since the access was so much better. |
|||
|
To cut the hole, I first marked out the 8" circle needed, and then used a long 1/4" drill bit to drill numerous holes all around the perimeter of the mark, perhaps one drill bits' width apart, or less. The thin drill bit tended to wander on its way though the log, and even though I had a neat circle on the outside, the holes on the inside were sort of all over the place. This process removed much of the material, and would (I hoped) make the final cutting steps easier and more accurate.
Eventually, I freed up the center portion of the hole, and removed the plug. I had to trim a little bit here and there to open the hole up enough to slip the duct in, but all in all it was a pretty clean process with no real difficulties. |
|||
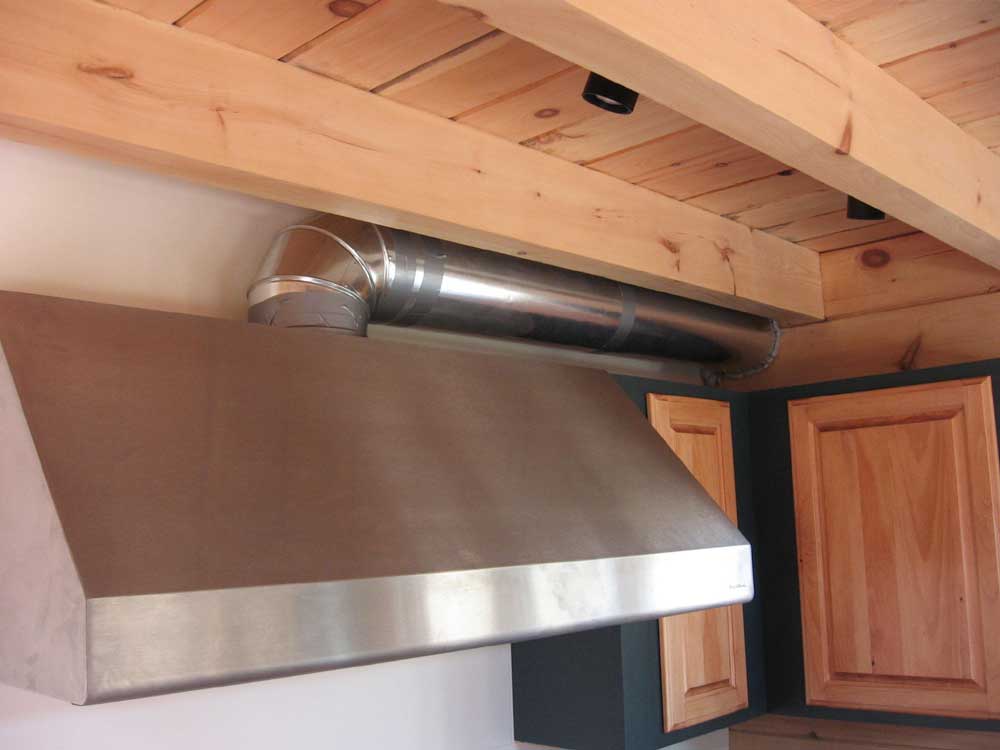 I
even lucked out, and found that a single 6' section of duct
was the perfect length, and left just enough hanging outside the
wall for me to install the proper louver fitting. For now, I
installed another elbow temporarily just to prevent water from
getting into the vent in case it rained. I sealed around the
duct with expanding foam. I
even lucked out, and found that a single 6' section of duct
was the perfect length, and left just enough hanging outside the
wall for me to install the proper louver fitting. For now, I
installed another elbow temporarily just to prevent water from
getting into the vent in case it rained. I sealed around the
duct with expanding foam.Later, I'll build some sort of soffit arrangement to hide the vent duct from the inside. But at least it was ducted! I still have to run a wire and connect that in order to operate the vent; that will come soon. |
|||
 I
continued work on the range, and finished wiring up the cord and
receptacle at the wall. At about this time, though, I noticed
that the documentation called for 8AWG wire and a 50-amp breaker; my
wire was 10AWG, and a 40-amp breaker, which I was sure I had read
somewhere online; that's why I installed these specific things.
I decided that prudence dictated that I change the wire to the
larger 8 AWG, which of course I didn't have (who does), so I put it
on my list for tomorrow. The best laid plans... I
continued work on the range, and finished wiring up the cord and
receptacle at the wall. At about this time, though, I noticed
that the documentation called for 8AWG wire and a 50-amp breaker; my
wire was 10AWG, and a 40-amp breaker, which I was sure I had read
somewhere online; that's why I installed these specific things.
I decided that prudence dictated that I change the wire to the
larger 8 AWG, which of course I didn't have (who does), so I put it
on my list for tomorrow. The best laid plans... |
|||
 At
least now I could reinstall the back panels of the range, and
consider installing the high back guard and shelf. As I began
to install this, though, I realized that it would cover up the gas
connection, so I worked on connecting the appliance flex line first.
I had purchased a kit at the store, and was pleased to discover that
it actually included all the things I needed, so installation was
straightforward. I used pipe dope where appropriate (and not
at the flare fittings), and when all was connected I turned on the
gas and leak tested all the new fittings. No leaks.
Satisfied, I installed the high back, a 22" high stainless steel
back panel with a shelf at the top. At
least now I could reinstall the back panels of the range, and
consider installing the high back guard and shelf. As I began
to install this, though, I realized that it would cover up the gas
connection, so I worked on connecting the appliance flex line first.
I had purchased a kit at the store, and was pleased to discover that
it actually included all the things I needed, so installation was
straightforward. I used pipe dope where appropriate (and not
at the flare fittings), and when all was connected I turned on the
gas and leak tested all the new fittings. No leaks.
Satisfied, I installed the high back, a 22" high stainless steel
back panel with a shelf at the top. |
|||
 I
pulled all the sticky-backed foam protectors off the range and other
pieces, a time-consuming process since the foam featured
perforations every 4" or so that would prevent a large piece from
coming off all at once. Plus, it was quite sticky, and the
foam lacked any strength and would rip easily. This took quite
a while. I
pulled all the sticky-backed foam protectors off the range and other
pieces, a time-consuming process since the foam featured
perforations every 4" or so that would prevent a large piece from
coming off all at once. Plus, it was quite sticky, and the
foam lacked any strength and would rip easily. This took quite
a while.I moved on to the oven doors, which were amazingly heavy. Installation was easy, though, other than removing that miserable foam tape.
|
|||
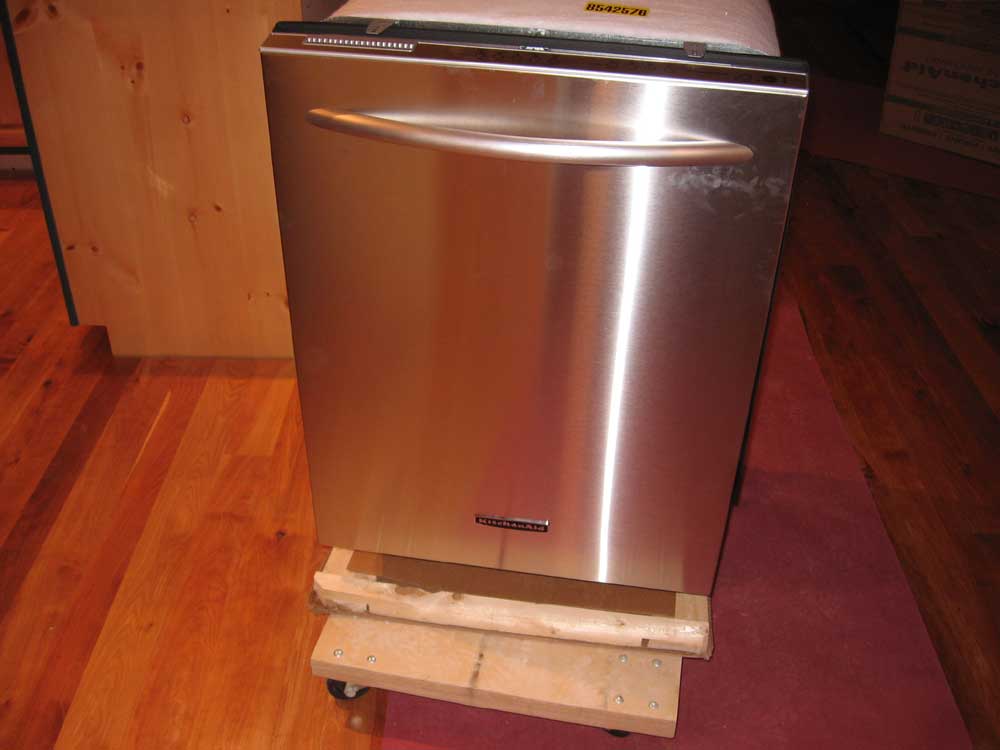 I
also brought the dishwasher up from the shop, mostly so that I could
determine whether I needed any specific fittings for the water
connection, since I planned a Lowe's run in the morning. I did
need some fittings, so I was glad I checked. The dishwasher
isn't a move-in priority, but I expect I'll install it within the
next day or two regardless. I
also brought the dishwasher up from the shop, mostly so that I could
determine whether I needed any specific fittings for the water
connection, since I planned a Lowe's run in the morning. I did
need some fittings, so I was glad I checked. The dishwasher
isn't a move-in priority, but I expect I'll install it within the
next day or two regardless. |
|||
 Outside,
Bob made good progress on the porch today, framing and sheathing the
roof. Like the front porch, this roof features a mild 5:12
pitch, and is traditionally framed with dimensional lumber since the
porch will have a flat, v-matched interior ceiling rather than
exposed rafters like the house. Weather permitting, he should be all
set to trim and hopefully shingle tomorrow. Outside,
Bob made good progress on the porch today, framing and sheathing the
roof. Like the front porch, this roof features a mild 5:12
pitch, and is traditionally framed with dimensional lumber since the
porch will have a flat, v-matched interior ceiling rather than
exposed rafters like the house. Weather permitting, he should be all
set to trim and hopefully shingle tomorrow. |
|||
SUNDAY, NOVEMBER 5, 2006 |
|||
 Today,
I knocked a number of small projects off my punch list. Today,
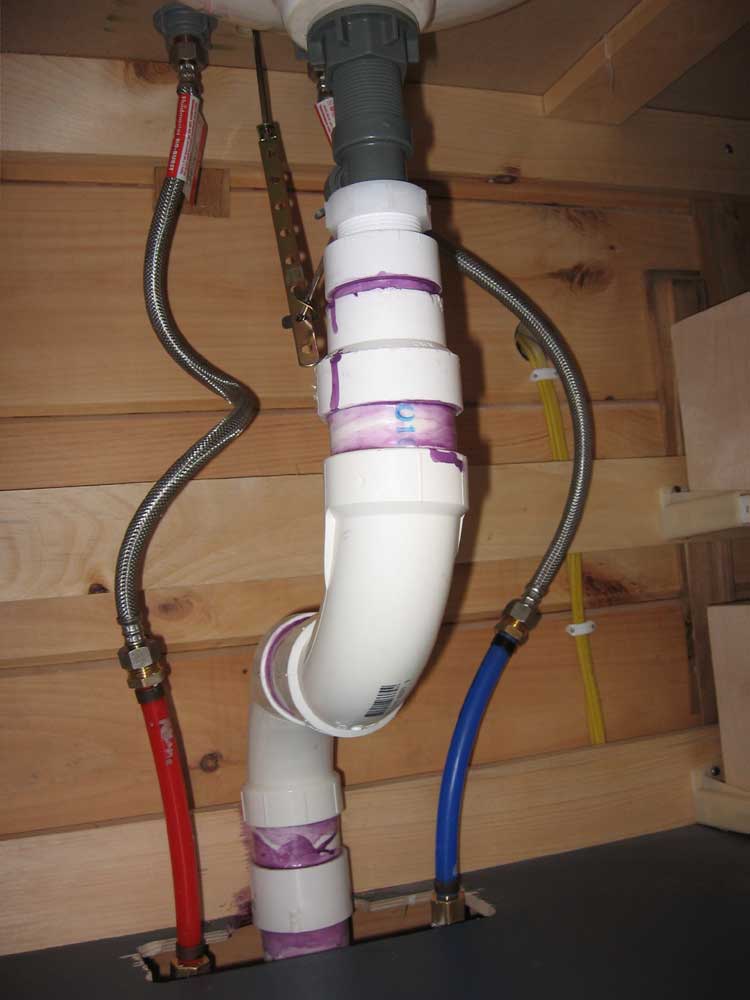
I knocked a number of small projects off my punch list.I began with the infernal drain plumbing in the bathroom sink. Armed with my new parts from last night's emergency trip to the home center, I managed to complete the drain. As always, though, it took some time to figure out the way to run the pipe and fit it in where it needed to fit. In case you're wondering, there's a trap down in the basement, which is why you don't see one inside the cabinet. I did this ostensibly to save room in the cabinet, and to enable me to place the trap closer to the vent (which had to be in the basement). It didn't really save any room in the cabinet, but in any event the drain was complete, finally. |
|||
|
While I was on a roll, I attacked the kitchen sink drain as well. At first, I thought I was lacking the parts I needed, as I didn't have the right tailpiece for one of the two sinks. But then, as I was looking through unrelated parts in the basement, I found the tailpiece I needed--good news. I took a break from the plumbing, though, because it was a beautiful, still day outside, and I thought it would make sense to grab the fine weather and install a few exterior lights and outlets that I'd been meaning to do forever. I installed three motion-activated spotlights in various areas, and also installed three exterior outlets on the deck. |
|||
 With
that complete, I moved back inside and finished up the kitchen sink
plumbing. I managed to just get the double drain system (one
side incorporating a nipple for the dishwasher drain) to fit with
the trap at the bottom, and a clean fit into the drain stub coming
through the floor and bottom of the cabinet. With
that complete, I moved back inside and finished up the kitchen sink
plumbing. I managed to just get the double drain system (one
side incorporating a nipple for the dishwasher drain) to fit with
the trap at the bottom, and a clean fit into the drain stub coming
through the floor and bottom of the cabinet. |
|||
 Later
in the day, I installed the remaining track lighting in the bedroom,
closet, and upstairs bathroom, using the same basic process I
described during earlier installations. I found that we had
been supplied the wrong bulbs for the step cylinders for the closet
and bathroom; the necks weren't long enough to reach the sockets
without the bulb hitting the housing. So I was unable to light
the bathroom and closet, though the tracks were installed and ready. Later
in the day, I installed the remaining track lighting in the bedroom,
closet, and upstairs bathroom, using the same basic process I
described during earlier installations. I found that we had
been supplied the wrong bulbs for the step cylinders for the closet
and bathroom; the necks weren't long enough to reach the sockets
without the bulb hitting the housing. So I was unable to light
the bathroom and closet, though the tracks were installed and ready.I installed a final wall sconce above the door to the bedroom in the loft. Unfortunately, I managed to break the glass shade when I installed it, as I cranked down one turn too much on the securing clamp. Rats! For now, I left the damaged shade in place, as it was still serviceable, but we'll have to order a new shade. |
|||
|
At the end of the day, I spent some time cleaning up the kitchen and removing some of the excess tools that had accumulated there. It's getting harder and harder to stay organized, and with the house in such a "finished" state, I feel as if I'm forever tiptoeing around to avoid damaging something. If we hadn't lost so much time this spring to the bad weather, I feel that we wouldn't have moved into the house much earlier, if at all, but the difference would have been that more of these final projects might have been completed ahead of time, rather than needing to be done in and around other finished products, and after our move. But that's the way it is, and I'm grateful that we're so close to moving in regardless of the minor inconvenience of continuing finish work. |
|||
SATURDAY, NOVEMBER 4, 2006 |
|||
|
Our move-in date can't come soon
enough. This morning, I found that the water line to our
camper was frozen solid--not surprising given the cold temperatures
at night, but this sort of hard freeze is a bit unusual for so early
in November. Actually, yesterday morning, which was also very
cold, I was surprised that the water actually worked. Last spring, after we moved the camper outside in late March, the hose would occasionally slush up right at the strainer entering the camper, but today we experienced a hard freeze; the hose was solid. Nice. It was in the low 20s, after all (22, by my truck thermometer when I departed at about 5:30). In addition, our RV furnace quit working a few weeks back. I have no idea why, but it just won't come on. We used the electric heat pump successfully for a time, but when the temperature drops too much--beyond the lower 40s--the heat pump won't generate heat either. With no time, inclination, or possibility to deal with the furnace at this point (they are virtually non-user serviceable), we bought a couple electric ceramic space heaters, which have been doing a fine job heating the inside, though the colder it gets outside, the more I become aware just how tenuous our existence in the camper is now. One week to go. Anyone wondering what the rush to complete this house is may now have a better idea. It certainly reminded me why I wanted to get in by early November all along! But does anyone really wonder? |
|||
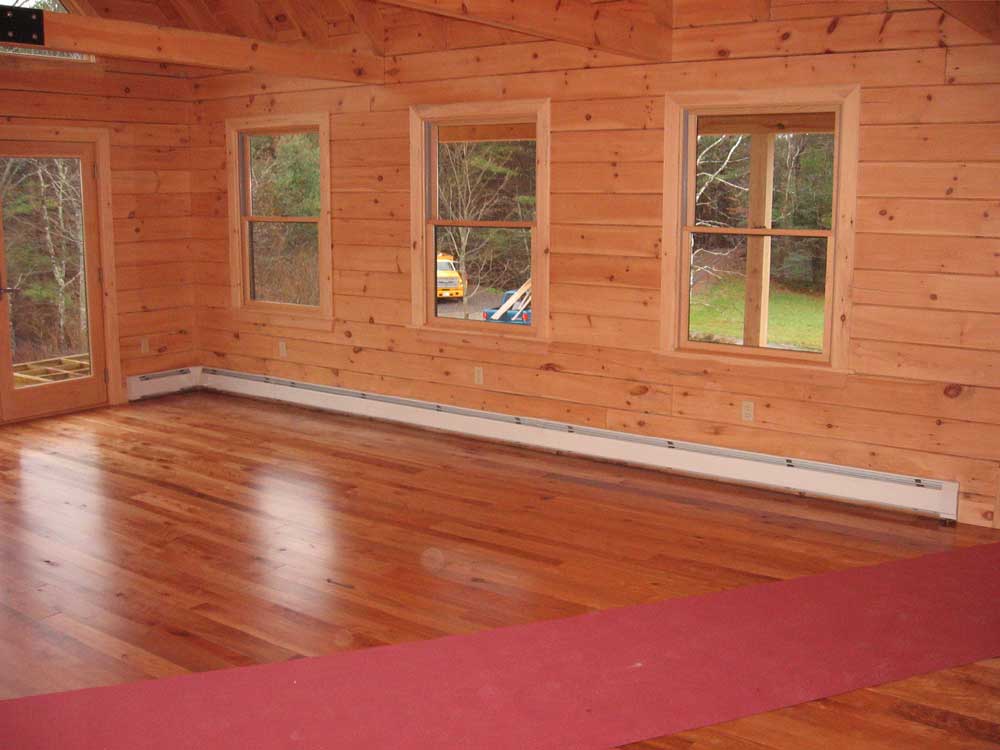
|
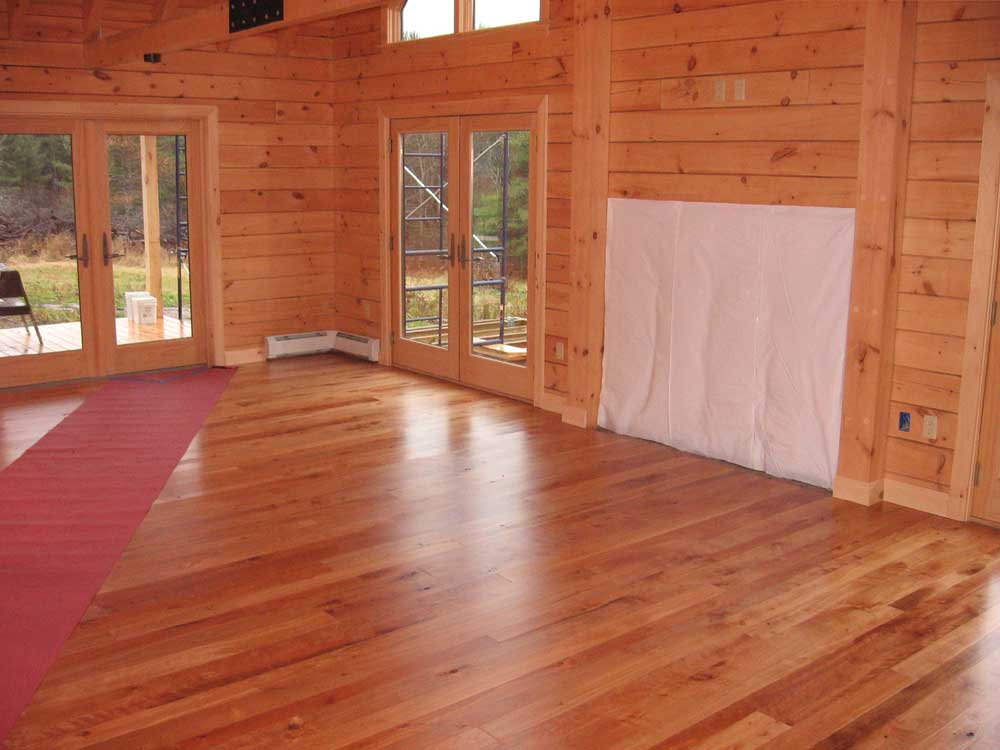
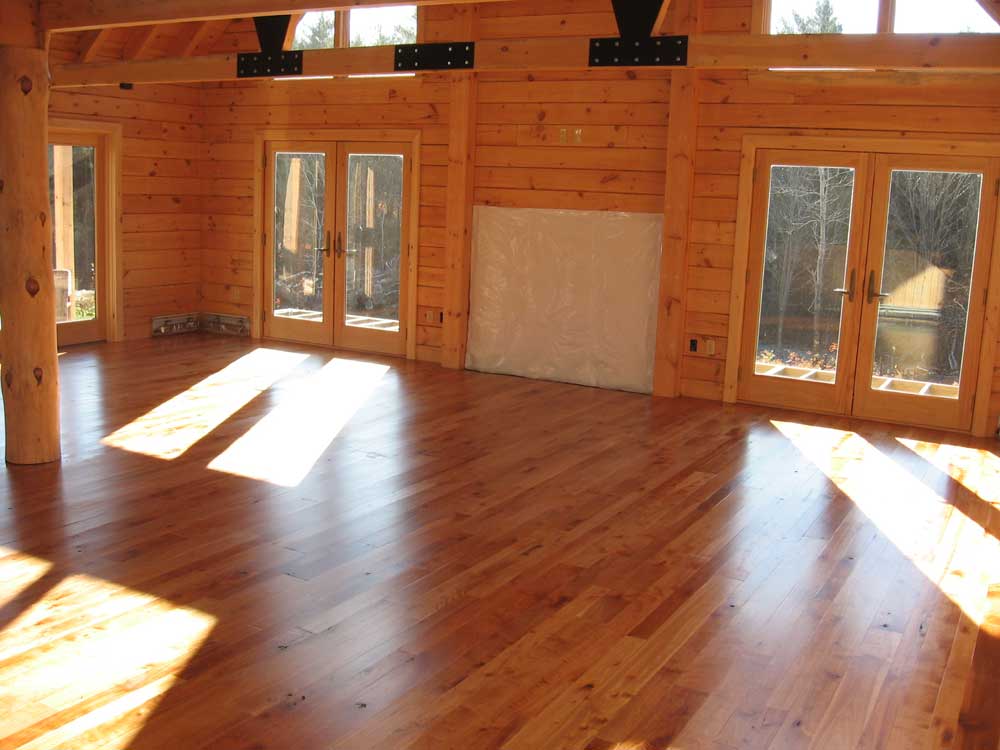
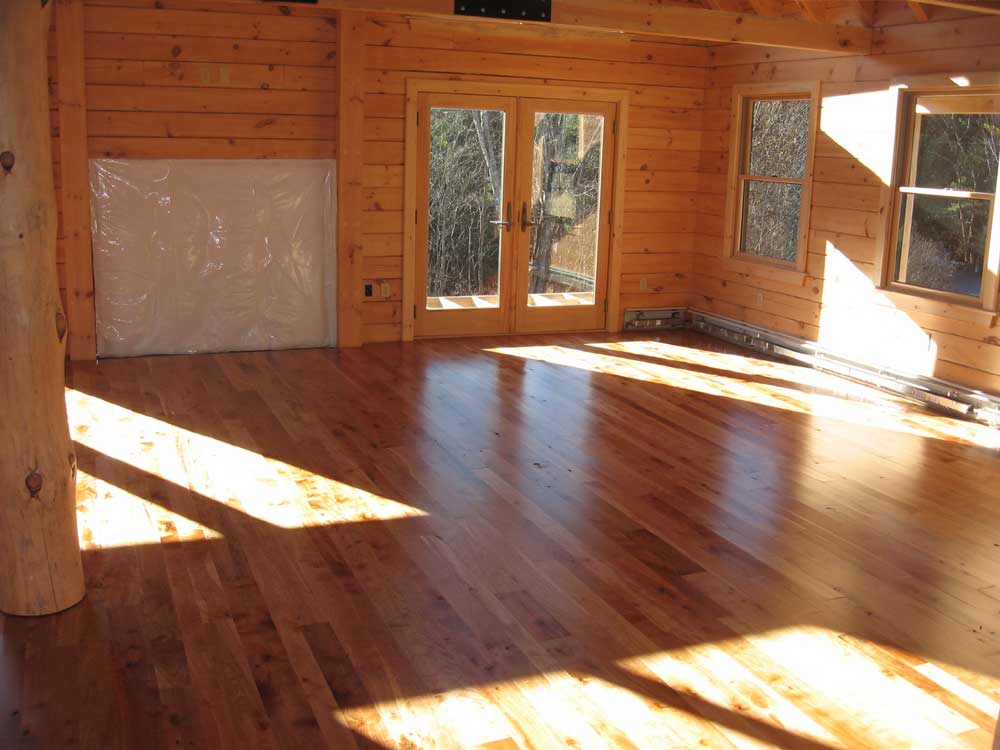
I had to run some errands this morning, and got a late start at the house. It turned out to be one of those generally non-productive days, at least to me. First, though, let me start with some photos of the completed floor. The final coat of satin varnish came out nicely, and I'm pleased to put the big red DUN stamp on this part of the project. |
|||
|
|
|||
|
The floor seemed well cured, but I
didn't want to stick any paper down or walk on it with shoes, so I
was in stocking feet all day. Tomorrow, I can put down some
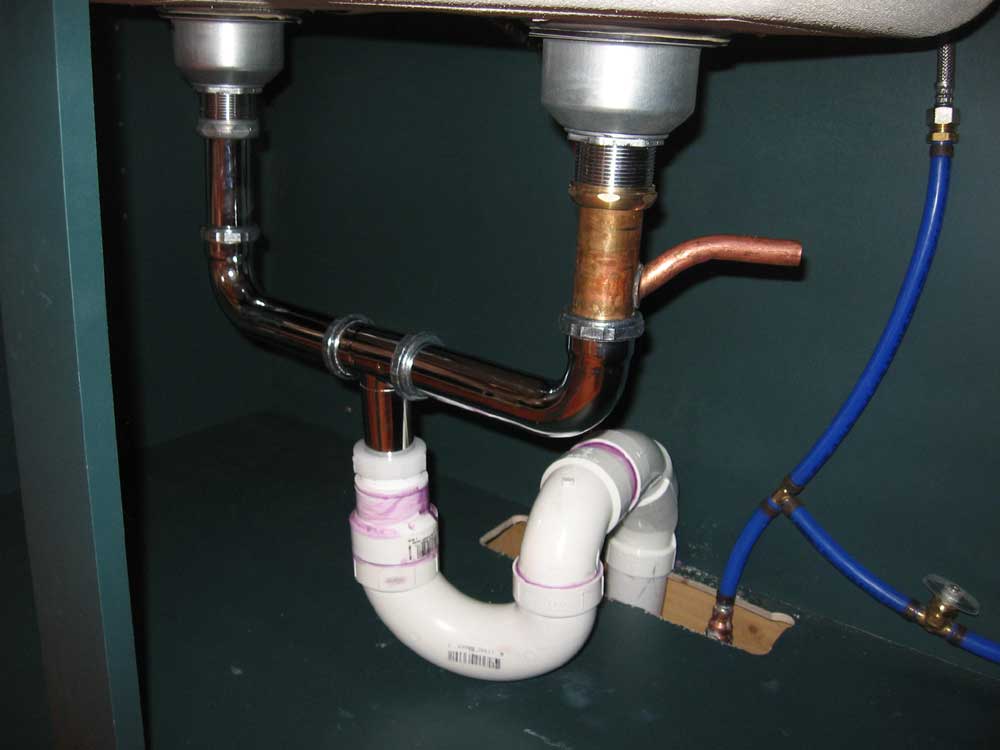
pink rosin paper and worry a little less about the finish. My goal for today was to have running water in at least one of the two sinks installed. I failed--well, technically I succeeded, but the running water, if allowed to run, would make quite a mess inside the house since there were no drains on either sink. But I digress. First, I installed the countertop
in the downstairs bathroom. This was pretty
straightforward--some silicone caulking, and a few screws through
the plastic corner brackets located in the cabinet just for this
purpose. Then, I installed a pine edge
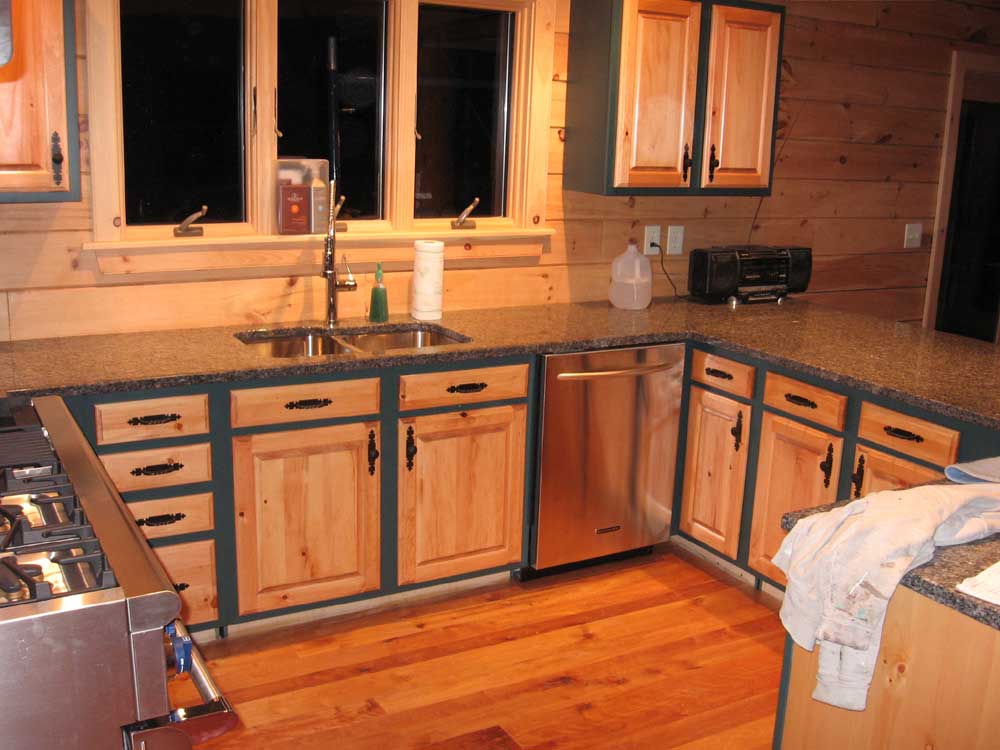
As an aside, I should note that installing these pulls was one of those projects that should have been easy, but took far longer than it should have. On the drawers, the bolts provided with the pulls weren't long enough to penetrate to the inside, so I had to bore a 1" hole inside the drawer to allow the bolts to work. This countersunk the nuts, too, which was nice, but I couldn't tighten them without a socket, which I had to walk down and get. This just drew out the project longer. |
|||
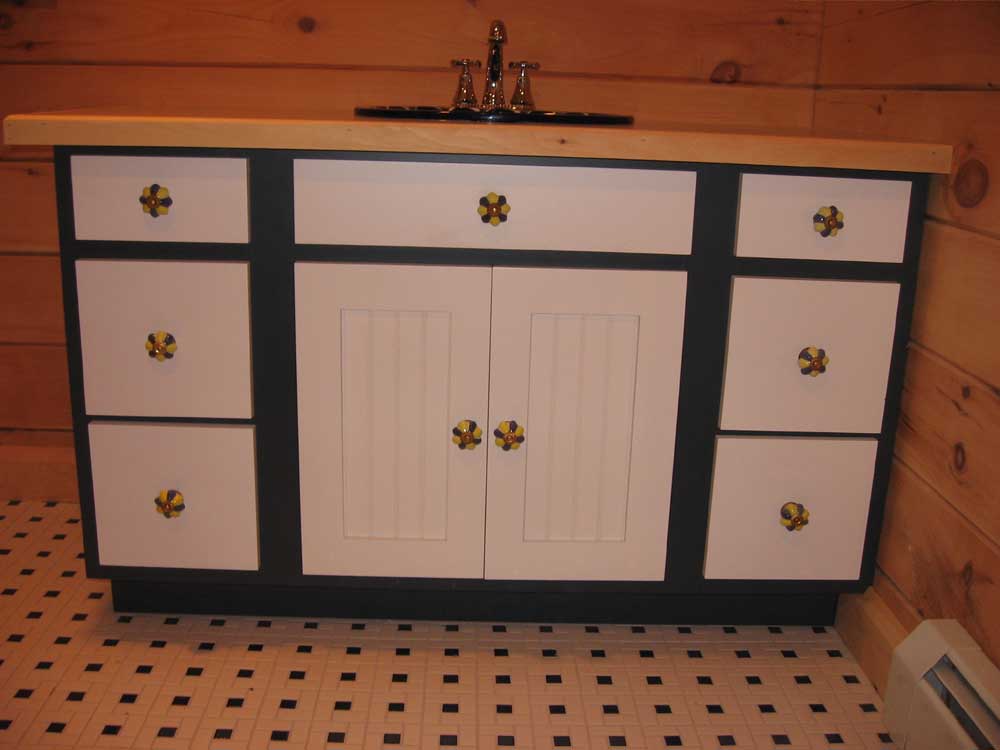
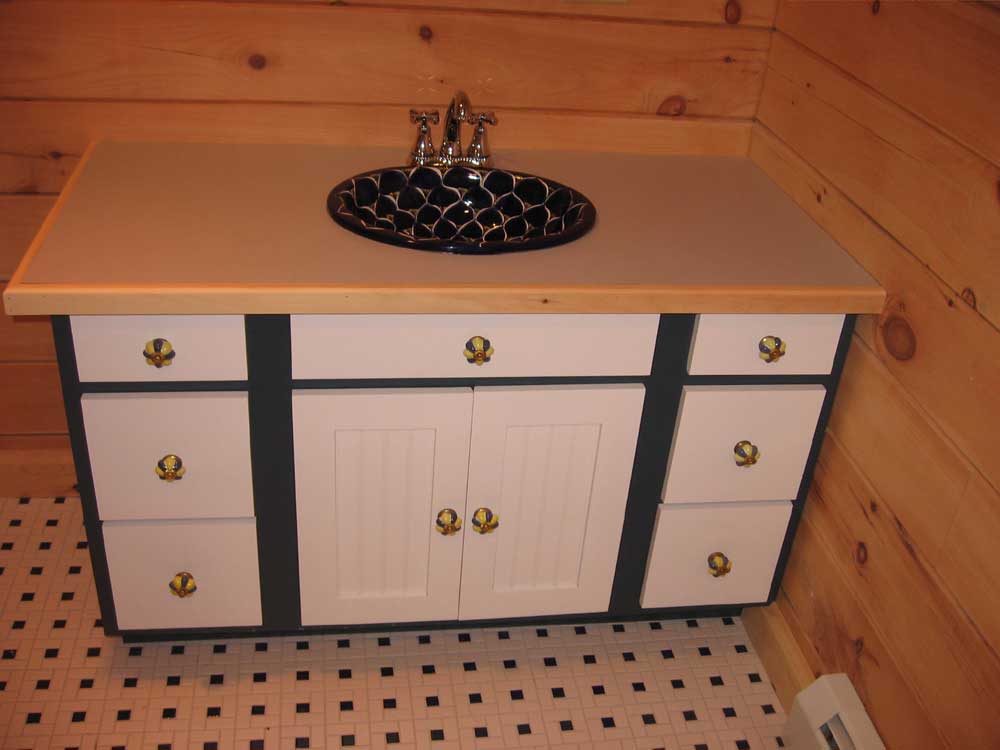
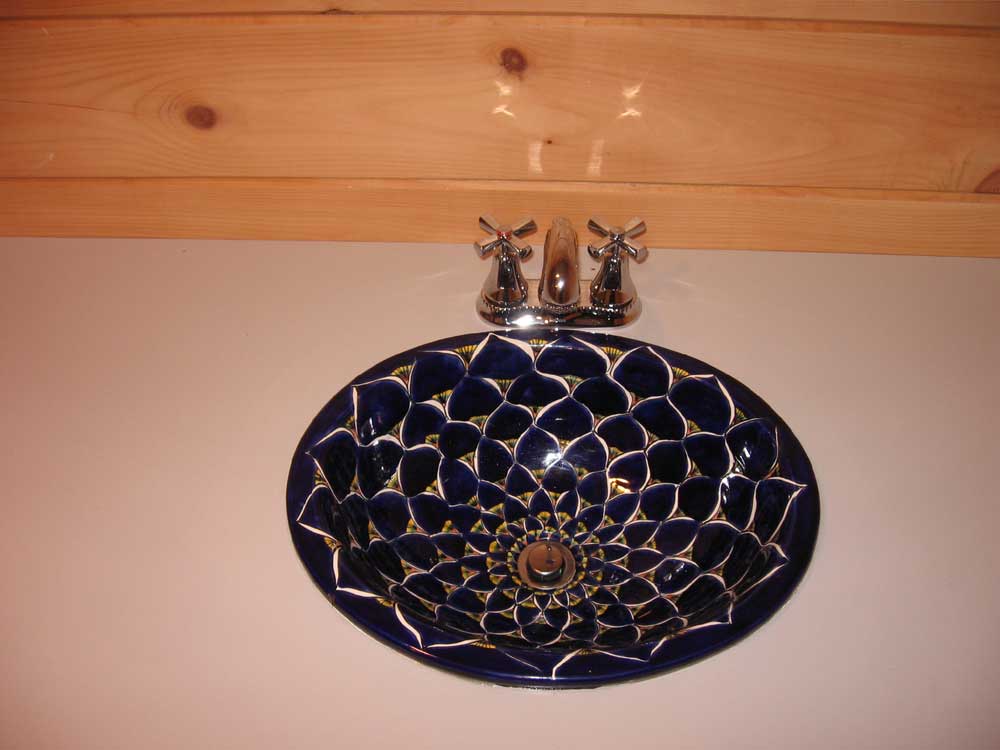 One
of the first things we bought for the house were sinks for the
bathrooms. We saw these unique hand-painted sinks at the log
home show we attended in March of 2005, and thought they'd make
interesting accents in the bathrooms of our yet-to-be built house.
With the countertop done, I installed the drain fitting in the sink
and then installed the sink in the countertop in a bed of silicone. One
of the first things we bought for the house were sinks for the
bathrooms. We saw these unique hand-painted sinks at the log
home show we attended in March of 2005, and thought they'd make
interesting accents in the bathrooms of our yet-to-be built house.
With the countertop done, I installed the drain fitting in the sink
and then installed the sink in the countertop in a bed of silicone.Then, I installed the faucet assembly, for which I had previously drilled holes in the countertop. |
|||
 Next,
I worked on finishing up the plumbing to the new faucet. I had
to extend the stubouts up somewhat, since the stainless steel
braided hoses from the faucets would not reach; I made up the
extensions with PEX. This was one of those times when my
thoughts and planning earlier in the project didn't pan out; I
should have just stubbed out tall lengths of PEX for all the
fixtures, rather than switching to copper the way I did. Live
and learn. Next,
I worked on finishing up the plumbing to the new faucet. I had
to extend the stubouts up somewhat, since the stainless steel
braided hoses from the faucets would not reach; I made up the
extensions with PEX. This was one of those times when my
thoughts and planning earlier in the project didn't pan out; I
should have just stubbed out tall lengths of PEX for all the
fixtures, rather than switching to copper the way I did. Live
and learn.With this, the plumbing to the fixture was complete, but I had no drain set up yet. The drain that came with this faucet was a tiny 1-1/4" diameter, and of course I had no way to adapt that to the 2" drain pipe stubbed out through the floor. So that effectively ended this project for now. |
|||
|
I also plumbed up to the kitchen sink faucet. I had installed the faucet through the countertop a few days ago, and even now I see that I have apparently neglected to take pictures of this. In any event, I created stubout extensions from PEX tubing inside the cabinet, and included a tee fitting and shutoff valve for the dishwater supply line. As with the bathroom sink, though, I didn't have the right drain fittings for the kitchen, and had to add a few things to my list. Later in the evening, I even braved a Home Despot at 6:30 on a Saturday evening in order to pick up pieces that I needed to complete the drains on these sinks; I hate "pending" projects, and just wanted these drains done. |
|||
|
What else did I do today...shockingly, what you read above took most of the day, but I also managed to replace a couple of the switches for the lights with dimmers that I had purchased, and I hung up a simple shower curtain in the bathroom so that the shower could be used if needed. I also contemplated possible routes for the 8" ductwork required for my stove hood, and installed some additional track heads in Heidi's office. As I said, it was just one of those days. |
|||
FRIDAY, NOVEMBER 3, 2006 |
|||
|
First thing this morning, I applied
what I hoped would be the final coat of finish to the floors--satin
this time. The application seemed to go well, and I finished
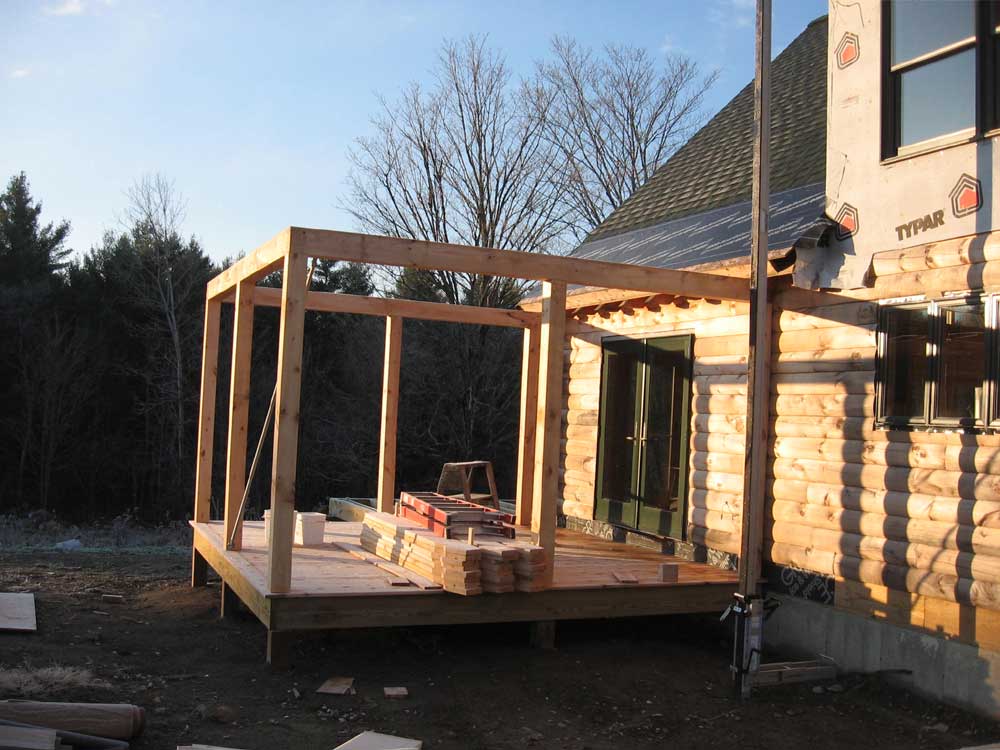
up around 10. I had sort of figured that I'd then make myself available to Bob to help with the roof framing and sheathing of the back porch. But he called and said he couldn't make it today, so I found myself with virtually nothing to do on the house, since of course the whole house was now off limits at least till Saturday morning. In any event, here are a couple photos of the progress to date on the back porch. |
|||
|
|
|||
|
Of course, I couldn't just sit around. Down in the shop, I built the countertop for the downstairs bathroom, a simple matter of cutting a piece of MDF (Medium Density Fiberboard--a manufactured product made from essentially wood dust and glue) to the proper size and gluing a piece of Pionite to the top. I decided to install a pine edge treatment because, frankly, it was easier than dealing with thin strips of Pionite around the edges. Plus, I hoped it would look better than the basic edge would. I cut out the sink hole, and the job was done. I transported this stuff, along with the faucet, up to the house basement for storage till tomorrow or whenever I decide to install the countertop and sink. I'll have some pictures then. |
|||
|
After doing a few odds and ends, mostly straightening the basement and my shop, I cleaned up outside the house, and moved all the remaining material from the front of the house around back where it would be needed and where it was less visible. After all, we're going to be living in this house starting a week from today, and I was getting very sick of the ungainly and increasingly sloppy piles on the front "lawn". From what I could see through the windows, the floor was looking good. I should be able to walk on it tomorrow, though I want to give it as long as possible to cure first. I think light sock traffic will be fine tomorrow. |
|||
THURSDAY, NOVEMBER 2, 2006 |
|||
|
First thing, I addressed a small
wiring issue that had (pardon the pun) come to light last night
after I wired up the wall sconces. One of the three-way
switches was wired incorrectly, so I tracked down the error and
fixed the problem. I had one of the wrong wires attached.
It's so easy to get confused with 3-way switches.
|
|||
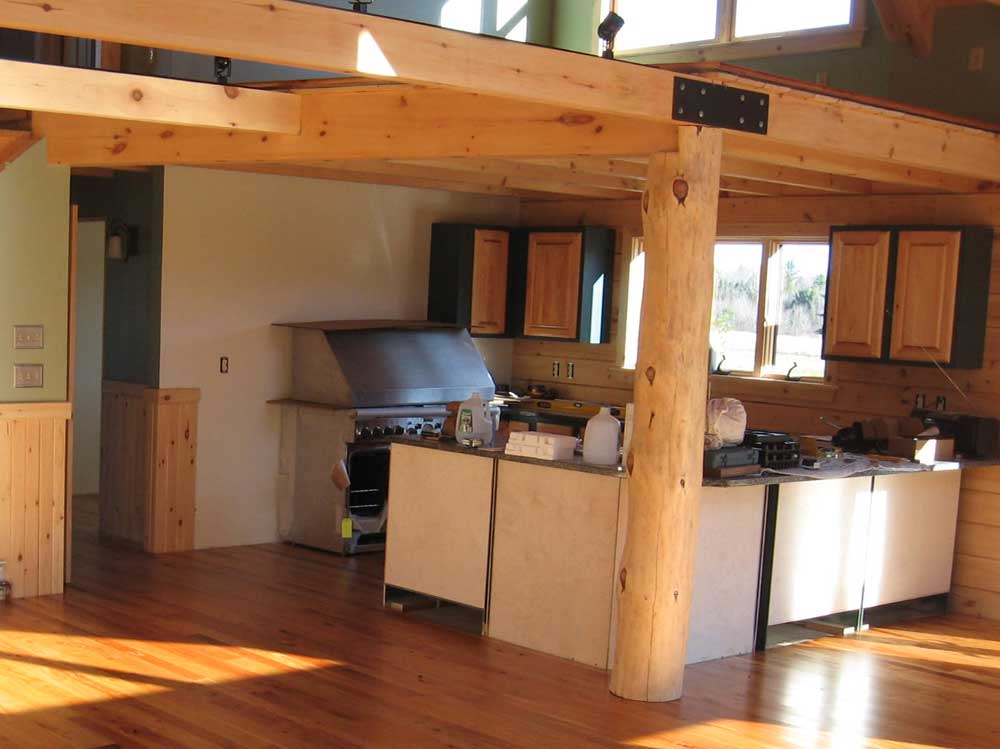
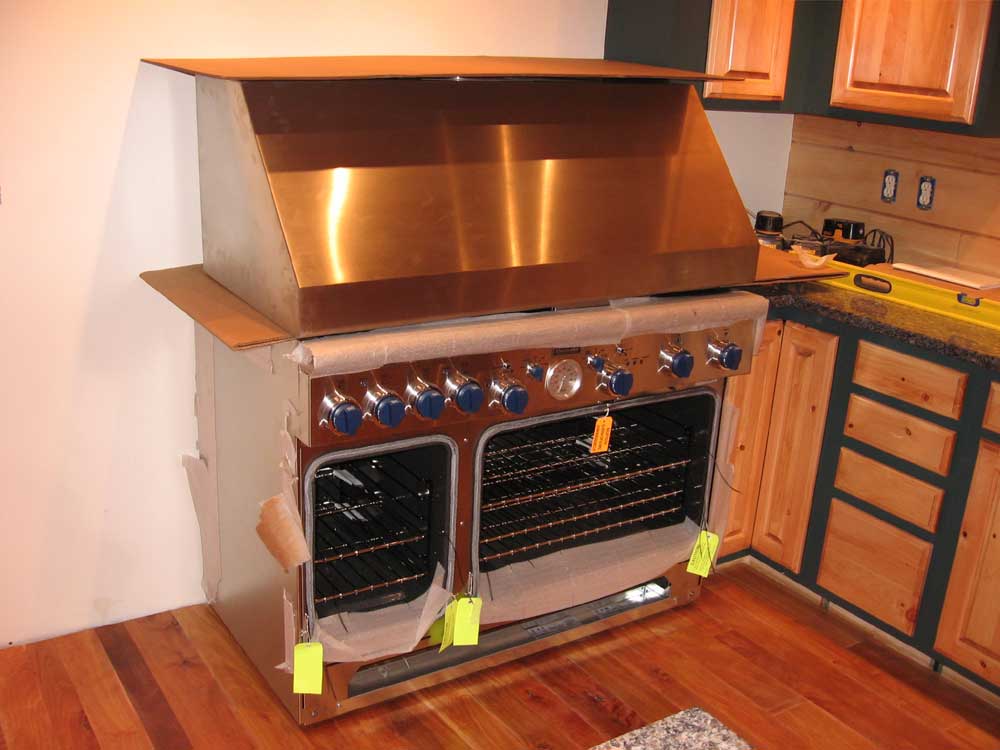 My
kitchen stove arrived today--a huge stainless steel monstrosity.
It turned out that preparing this stove for use and final
installation was going to be a big job, and I spent the rest of the
morning working on installing the LP conversion kit in the stove, as
well as trying to locate an elusive regulator that also required
modification for LP. My
kitchen stove arrived today--a huge stainless steel monstrosity.
It turned out that preparing this stove for use and final
installation was going to be a big job, and I spent the rest of the
morning working on installing the LP conversion kit in the stove, as
well as trying to locate an elusive regulator that also required
modification for LP.I finally located the regulator, and completed the conversion. But there was much work ahead on the stove, including final wiring and gas connections, installing oven doors and trim panels, and, of course, installing the large vent hood above--which required an 8" duct to the outside. Installing this would likely be quite a chore, and wasn't something I was about to try today. |
|||
 Finally,
I moved the stove into its final position, if only temporarily, and
stored the hood on top. I removed the remainder of the pieces
and parts to the basement, so that I could begin to address the
final preparation on the floor varnishing. Using a pole sander
and 120 grit paper, I lightly sanded the whole floor to remove nubs,
dead fly parts (sorry), and dust. Then, I vacuumed the floor,
and finally washed it all with paint thinner. Tomorrow, I
planned to apply the final coat of finish--satin this time. Finally,
I moved the stove into its final position, if only temporarily, and
stored the hood on top. I removed the remainder of the pieces
and parts to the basement, so that I could begin to address the
final preparation on the floor varnishing. Using a pole sander
and 120 grit paper, I lightly sanded the whole floor to remove nubs,
dead fly parts (sorry), and dust. Then, I vacuumed the floor,
and finally washed it all with paint thinner. Tomorrow, I
planned to apply the final coat of finish--satin this time. |
|||
|
I wrapped up the day by installing the hardware on the final set of French doors, which I had postponed forever. I still owe you pictures of the progress on the back porch. It rained today, so Bob didn't come and no progress was made. |
|||
WEDNESDAY, NOVEMBER 1, 2006 |
|||
|
Last night's second coat of floor
varnish had cured sufficiently this morning, allowing me to walk and
work at will. I didn't work on the floor today, though, since
I had deliveries coming on Thursday and didn't want to have a
relatively fresh, final coat of varnish on the floor for that.
Depending on a few other things, I planned to do the final coat
either Thursday afternoon or Friday morning. After fighting with darkness last night, I decided that the priority project was to install some permanent lighting. With daylight savings time over, and the sunset coming at 4:30 in the afternoon, it was ridiculous to continue without some real lights; plus, of course, we needed them to move in. |
|||
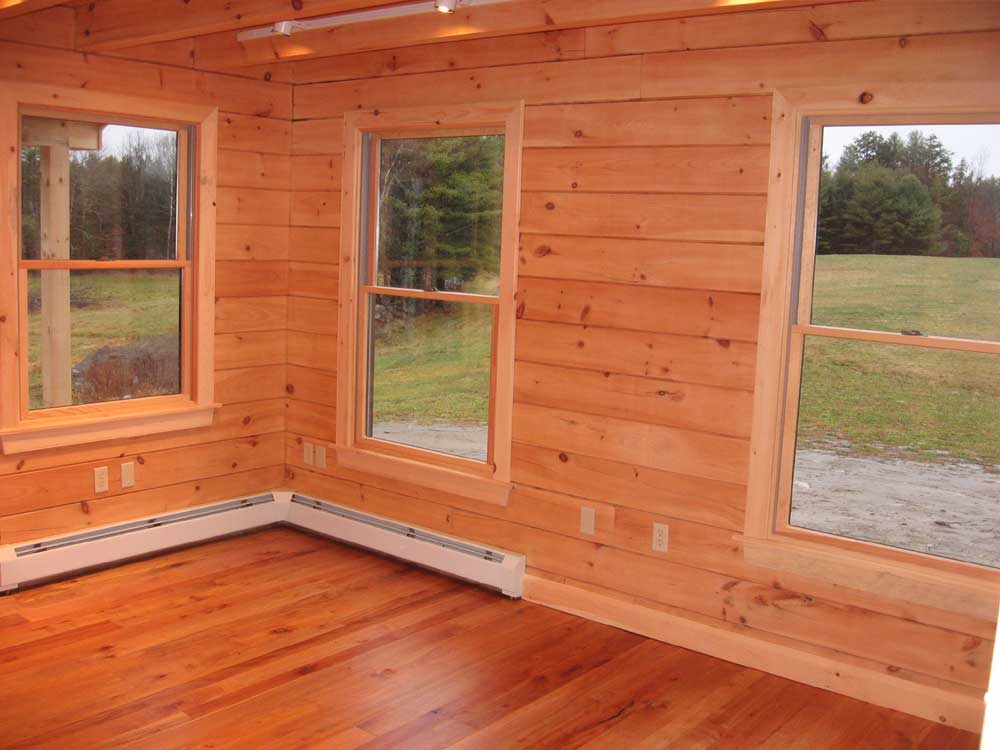
|
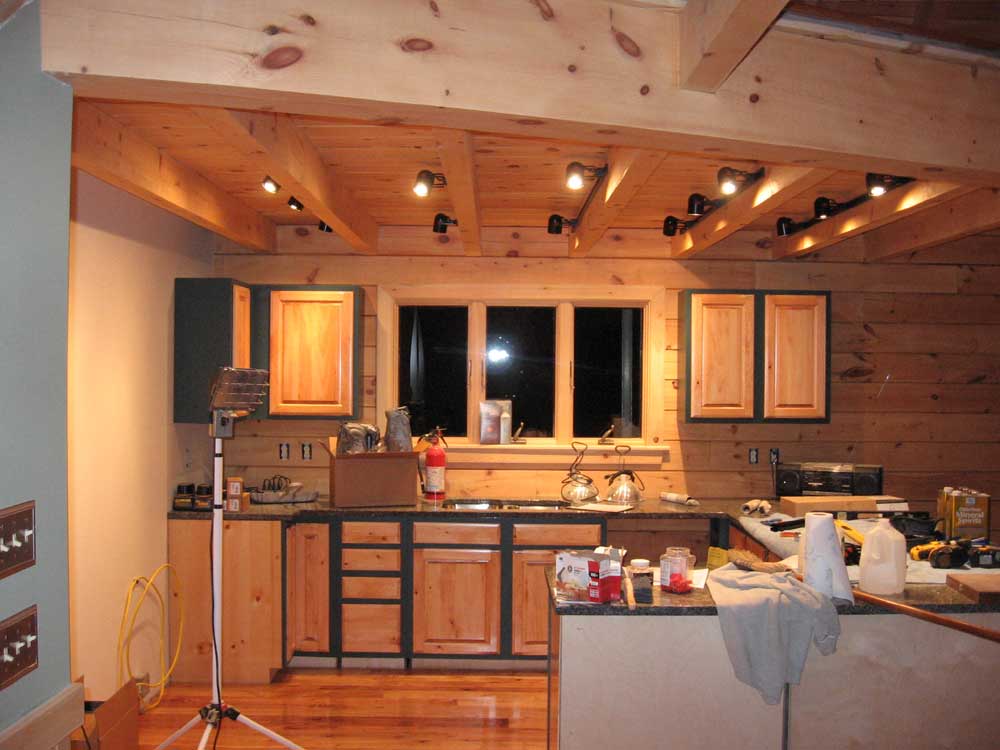
I began with the track lights in the kitchen. We ended up using a lot of track lighting because it just made sense with the log and exposed beam construction, particularly without a specific and detailed lighting plan in place during construction. With a lighting plan, we could have located individual fixtures here and there or wherever, drilling vertically through the beams and joists and hiding the wires in the floor. But we didn't, and, frankly, having any more wires hidden beneath floors that I needed to avoid during various constructions would have been a real hassle. As it was, I had to avoid wires running to the track lights in the kitchen and craft room, and to the ceiling ties outboard of the loft. This took plenty of planning and careful avoidance to prevent any damage to the wires from nails or screws. |
|||
|
The track lights went up pretty easily, at least once I figured out a system for this particular installation. As you may recall, I ran wires out through holes drilled in the tops of the joists for this purpose. Because of the clearance required for the movement of the track heads we chose, I needed to hold the track down just a bit, so the wiring connector was also a bit lower than the hole at the top of the joist. After some experimentation, I figured out the best way to install the tracks in this situation: |
|||
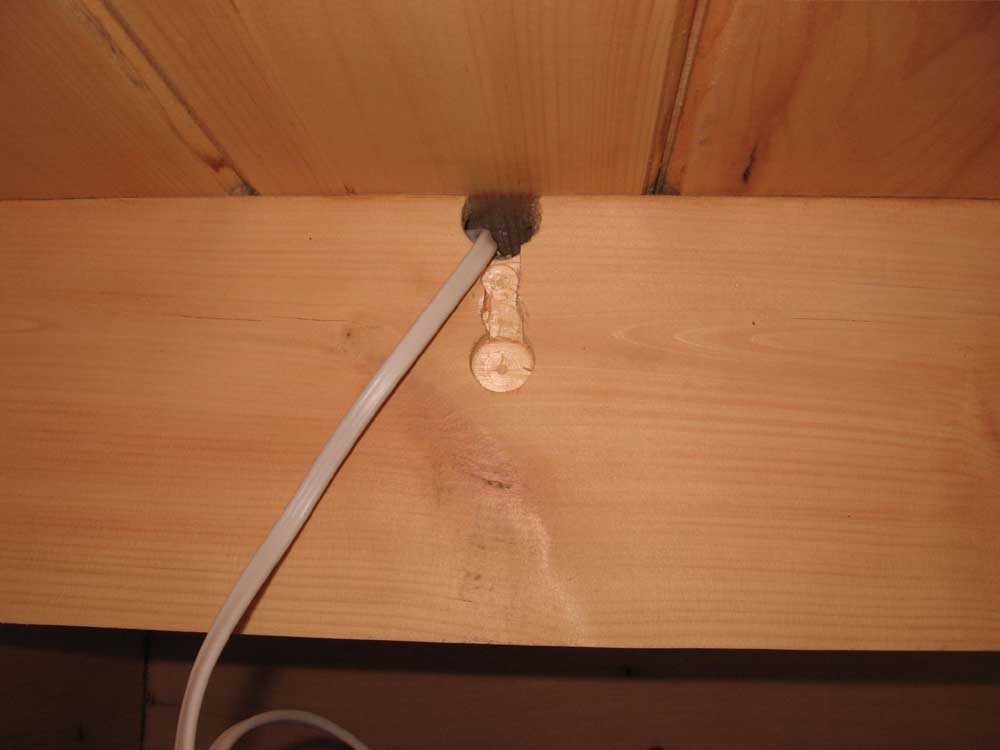 Step
1: Measure down 2-5/8" and out from the wall 15" for a center
point, then drill a 3/4" deep (roughly) hole with a 1" Forstner bit. Step
1: Measure down 2-5/8" and out from the wall 15" for a center
point, then drill a 3/4" deep (roughly) hole with a 1" Forstner bit.Step 2: Drill two 5/8" holes with a Forstner bit between the large hole and the wiring opening. Then, use a chisel to square off this wiring chase. |
|||
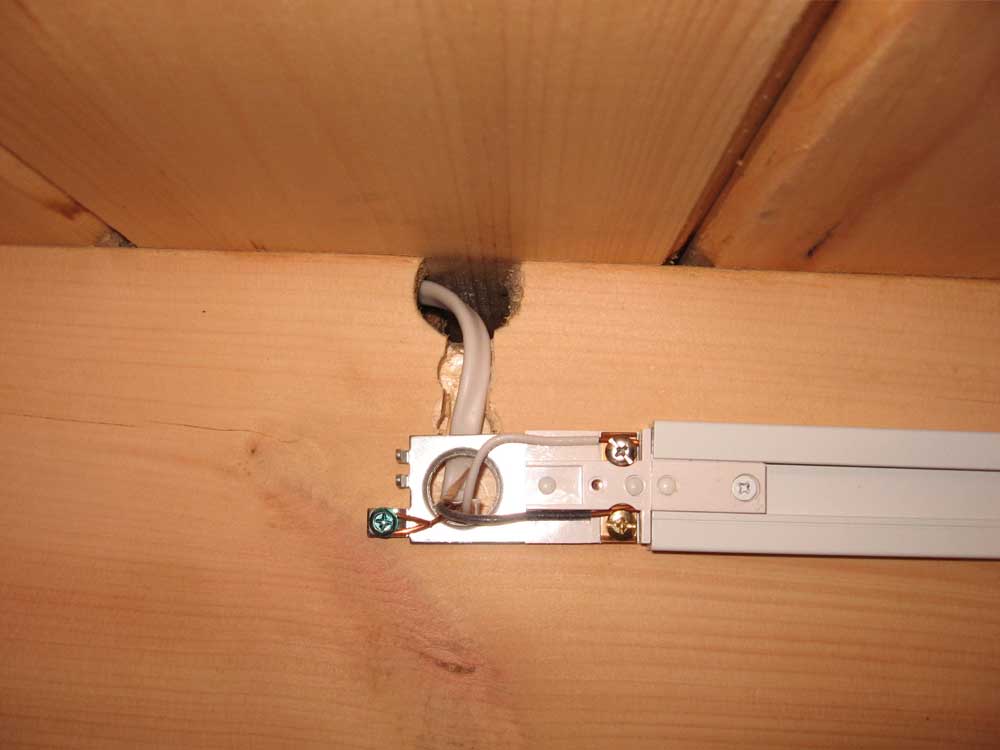 Step
3: Run the wire through this new groove and into the track
lighting connector for attachment. Later, I'll build some
small trim pieces to cover the wiring. Step
3: Run the wire through this new groove and into the track
lighting connector for attachment. Later, I'll build some
small trim pieces to cover the wiring.I followed this procedure to install all the tracks in the kitchen (5), and in the craft room (3). It was exciting to install some of the track heads and flip the switch to see the lights in action! (Or maybe just to me...) With 12 (I think) halogen track heads in the kitchen area, it was extremely bright, which was just what I wanted--particularly after living with a dark kitchen powered by lame Home Despot cheap ceiling lights for the previous 10 years. I have dimmers to install on the switches for all these lights if I care to lower the intensity. |
|||
|
|
|||
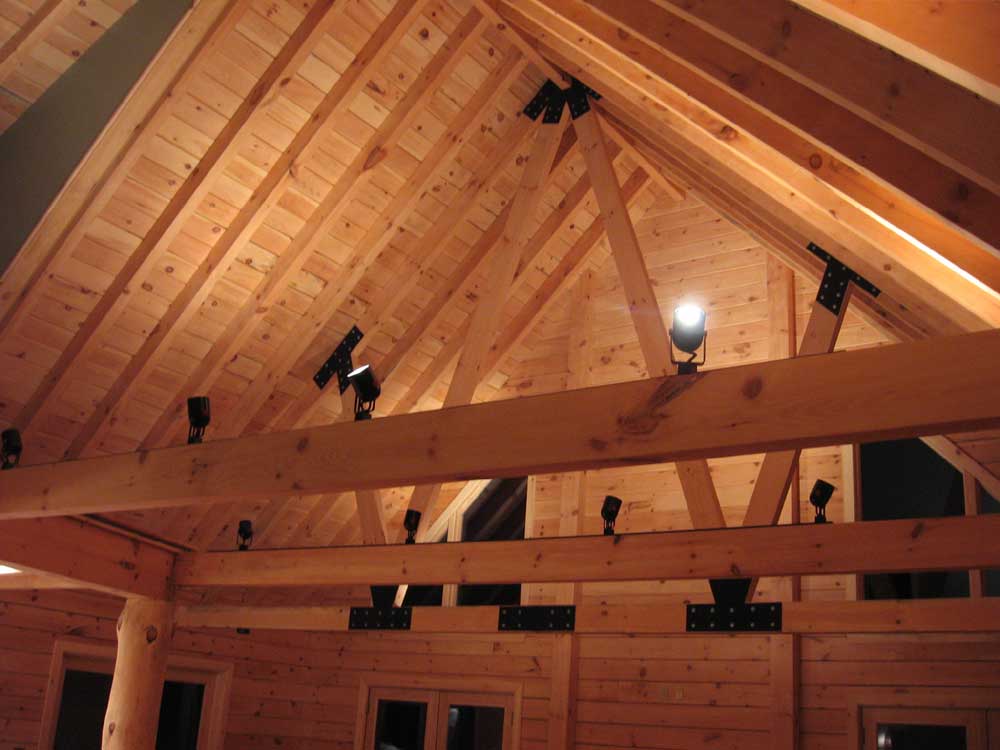 I continued by installing track on top of the two ceiling ties in
the great room. I had thought it would be cool to shoot some
light upwards into the high ceilings, rather than these areas
becoming dark holes at night. I installed 12' of track on each
tie to allow the lights to be spread out, and followed the same
basic installation process described above. I took these
pictures at night with no flash to show the effect. These provide soft indirect
lighting to the room below, but don't really light the room for any
useful purpose. They are intended to light the ceiling just
as you see here. I continued by installing track on top of the two ceiling ties in
the great room. I had thought it would be cool to shoot some
light upwards into the high ceilings, rather than these areas
becoming dark holes at night. I installed 12' of track on each
tie to allow the lights to be spread out, and followed the same
basic installation process described above. I took these
pictures at night with no flash to show the effect. These provide soft indirect
lighting to the room below, but don't really light the room for any
useful purpose. They are intended to light the ceiling just
as you see here.
|
|||
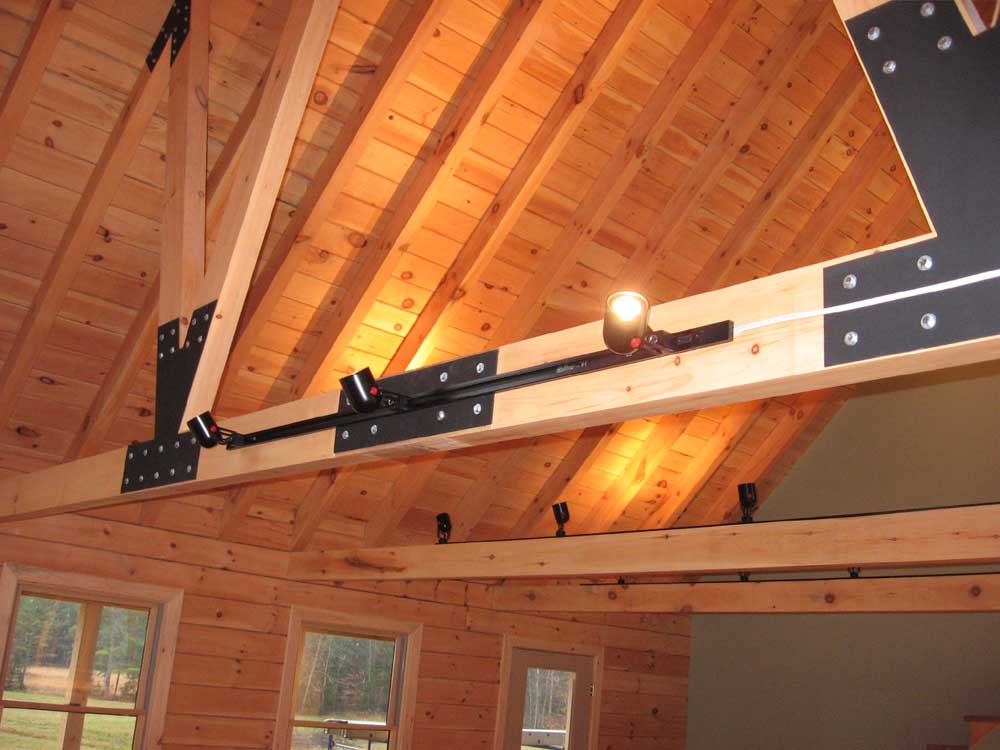 I installed a 6' section of track on the gable side of the truss
beam, with three heads that pointed towards the gable wall.
For this section, I had to run a surface wire across the back side
of the beam; later, I'll cover the wire with trim. I installed a 6' section of track on the gable side of the truss
beam, with three heads that pointed towards the gable wall.
For this section, I had to run a surface wire across the back side
of the beam; later, I'll cover the wire with trim. |
|||
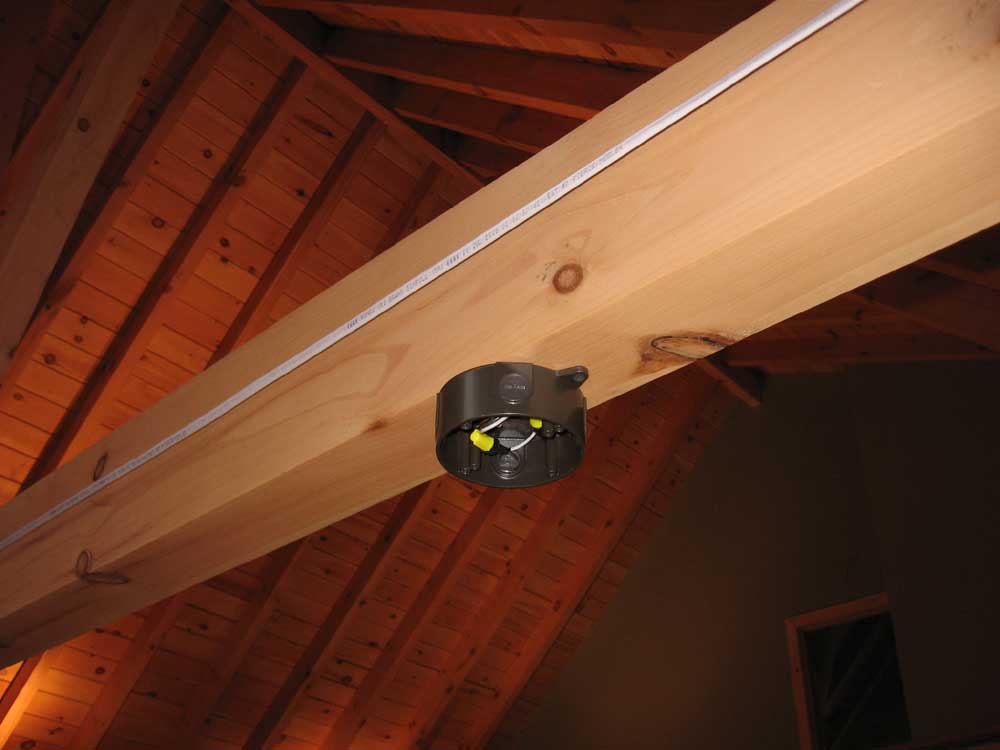 I
also installed a bronze-colored ceiling box for the dining room
chandelier. For this, I drilled straight through the truss
beam from below and above to run a wire from the top into the box.
Later, I will build some trim to cover the wire on top of the beam.
For now, I didn't install the chandelier. I
also installed a bronze-colored ceiling box for the dining room
chandelier. For this, I drilled straight through the truss
beam from below and above to run a wire from the top into the box.
Later, I will build some trim to cover the wire on top of the beam.
For now, I didn't install the chandelier. |
|||
|
|
|||
|
|||