|
|||
|
|
~ The bLog Home ~ |
||
FRIDAY, JUNE 30, 2006 |
|||
|
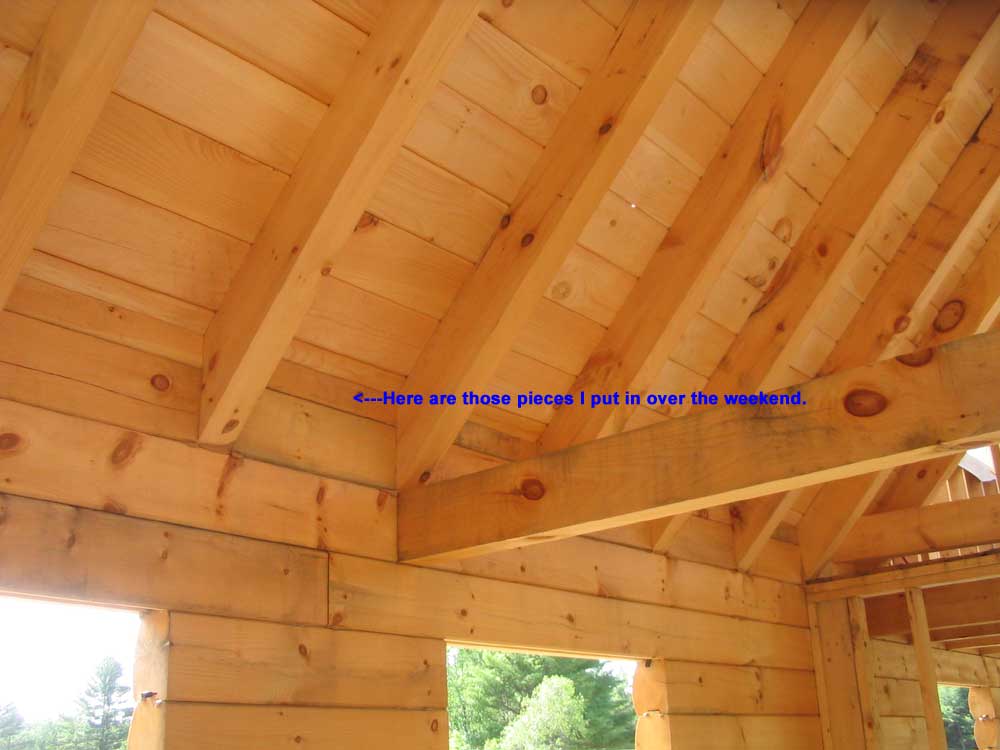
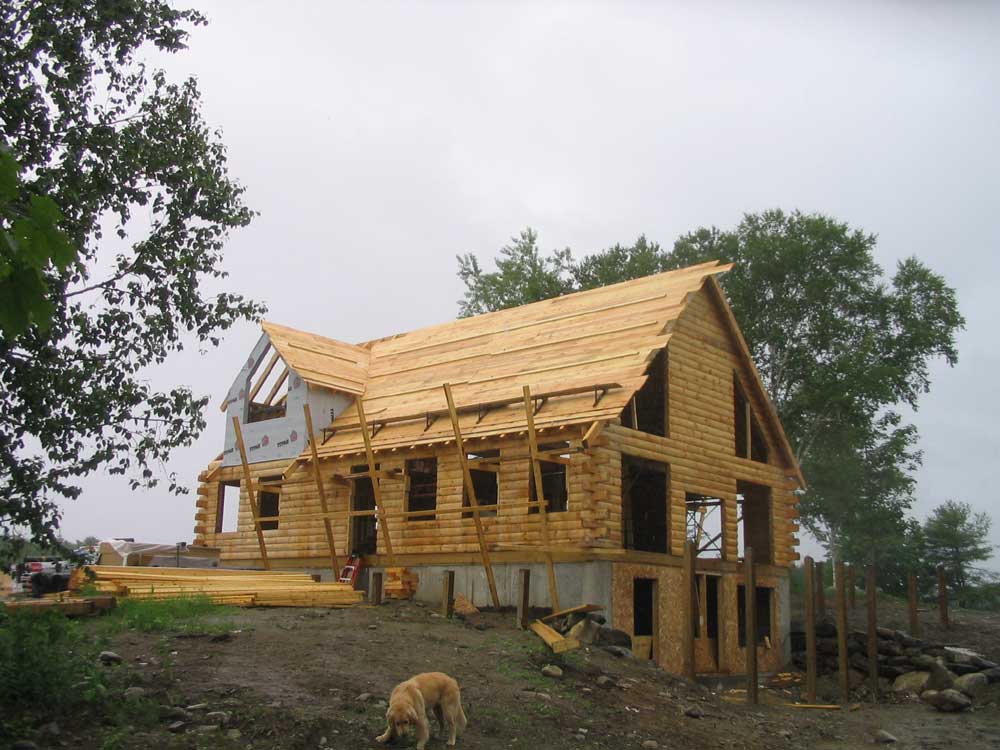
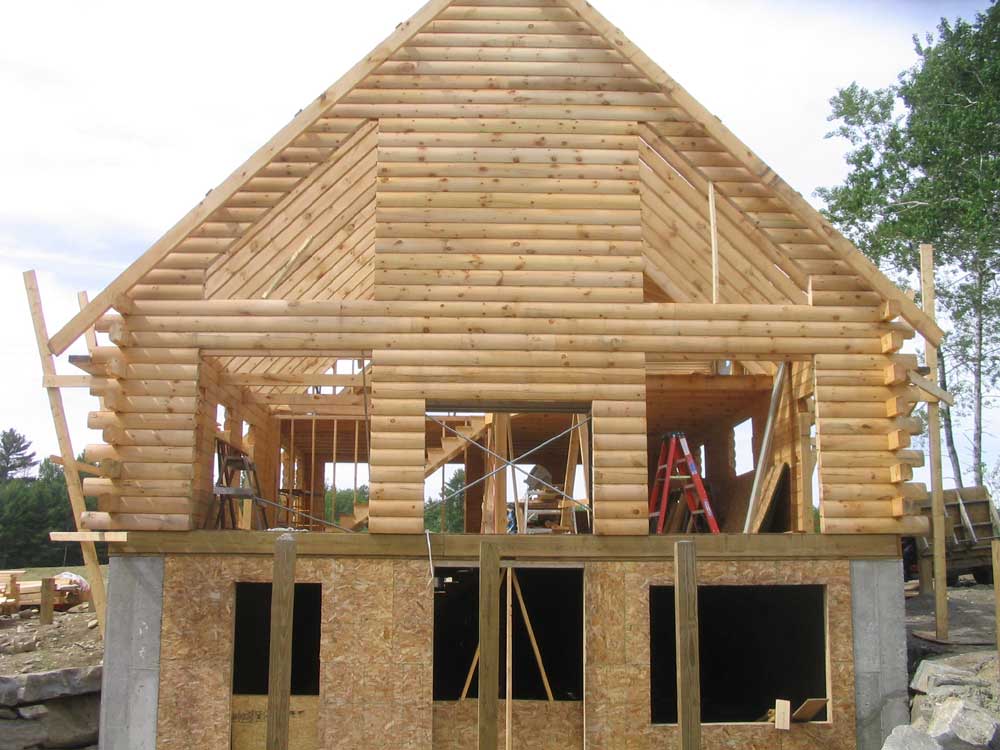
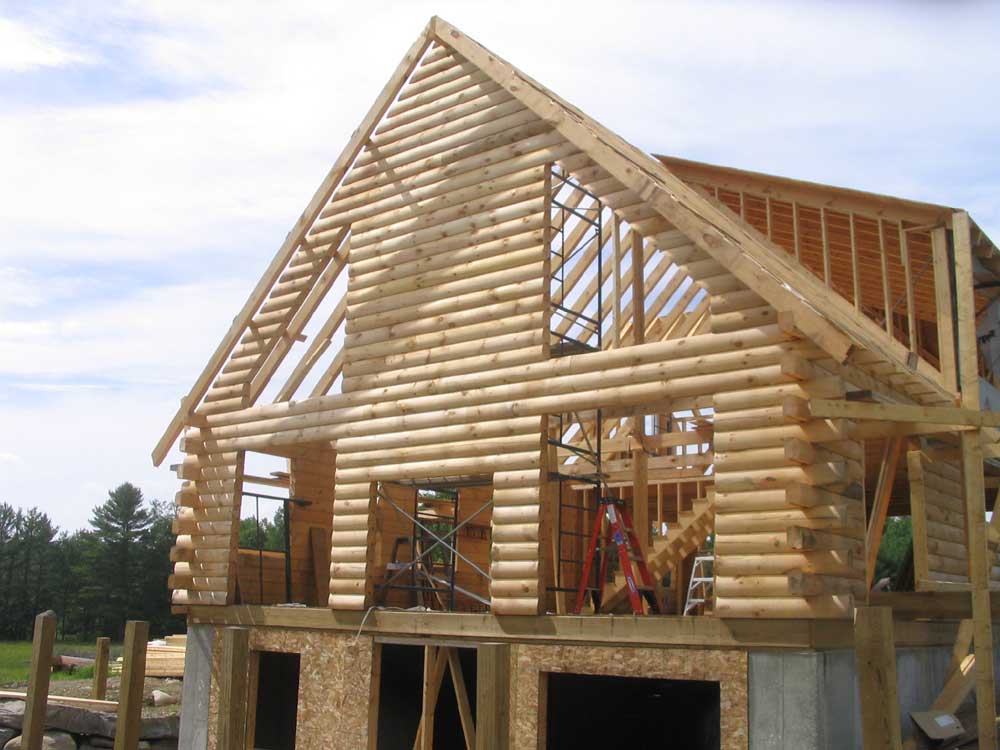
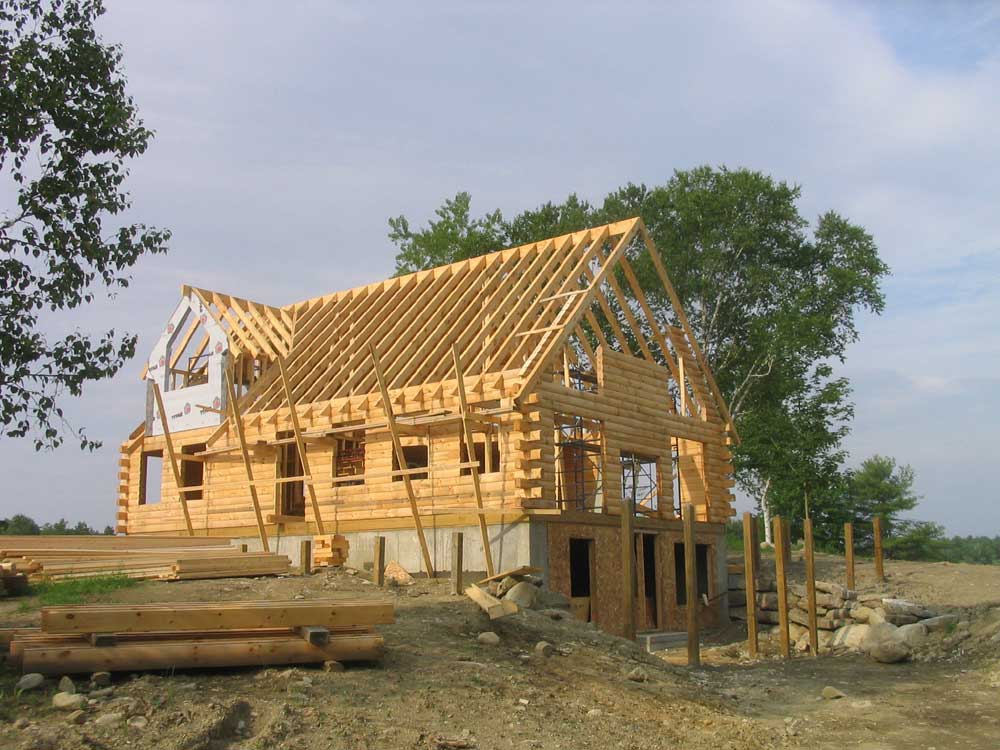
Wow--the last day of June, the month
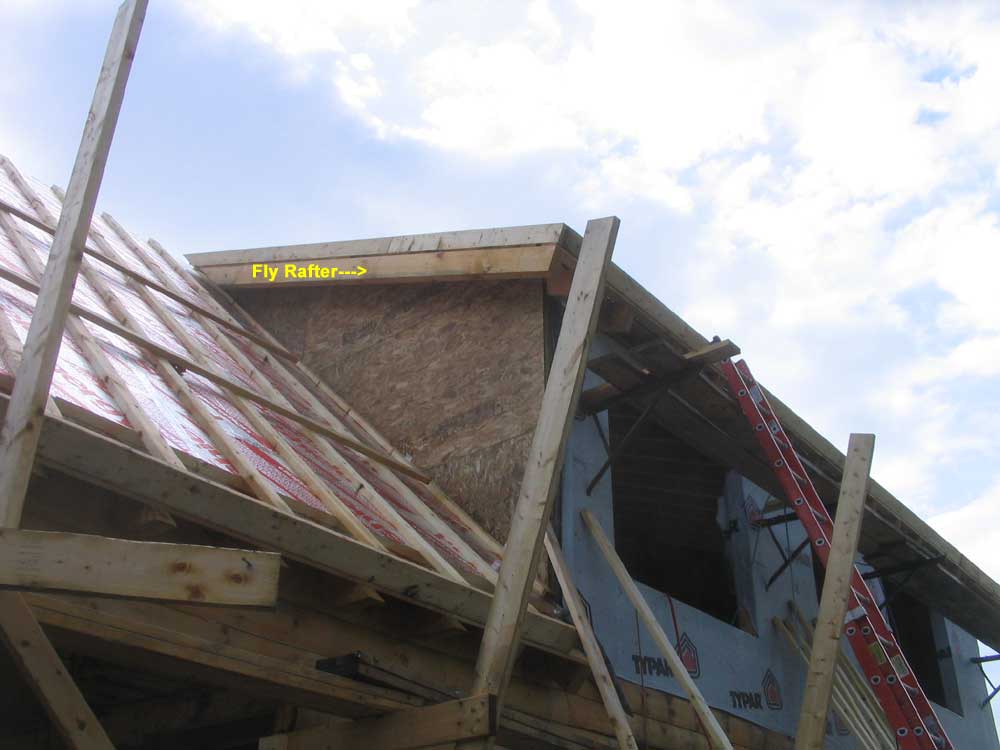
that wasn't. True to form, we started the day off with an early thunderstorm around 5. By a little after 7, the last of the rain showers had stopped, fortunately, so we could consider getting to work. Bob arrived a bit late after picking up his hydraulic personnel lift from another job site. We needed the lift today so that we could install the final fly rafters at the ends of the house. |
|||
|
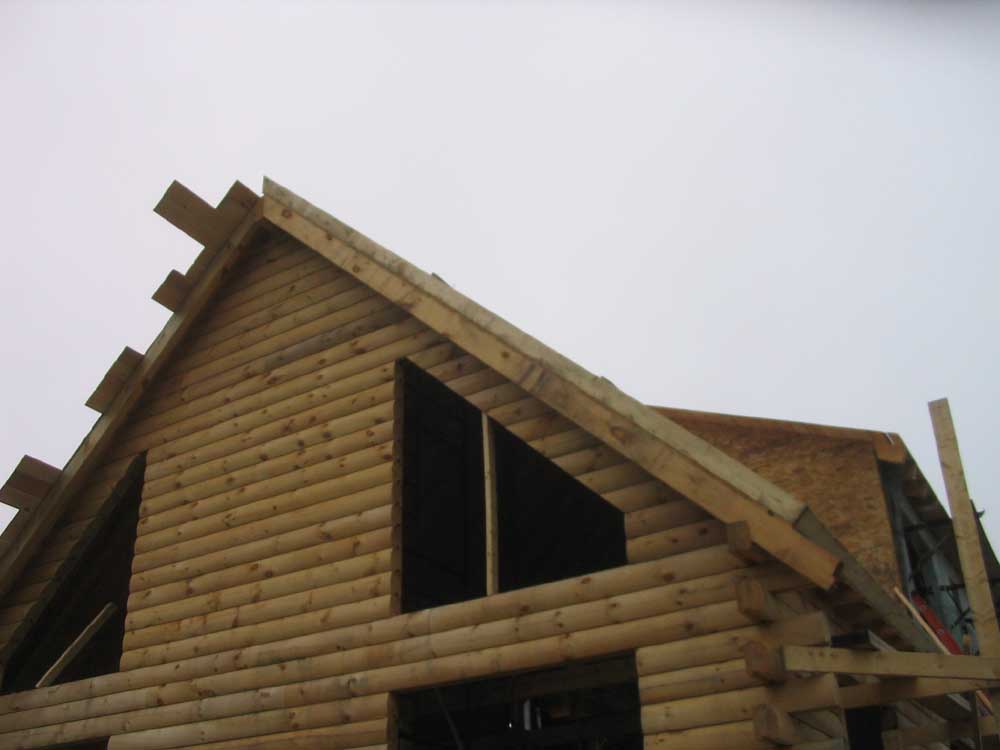
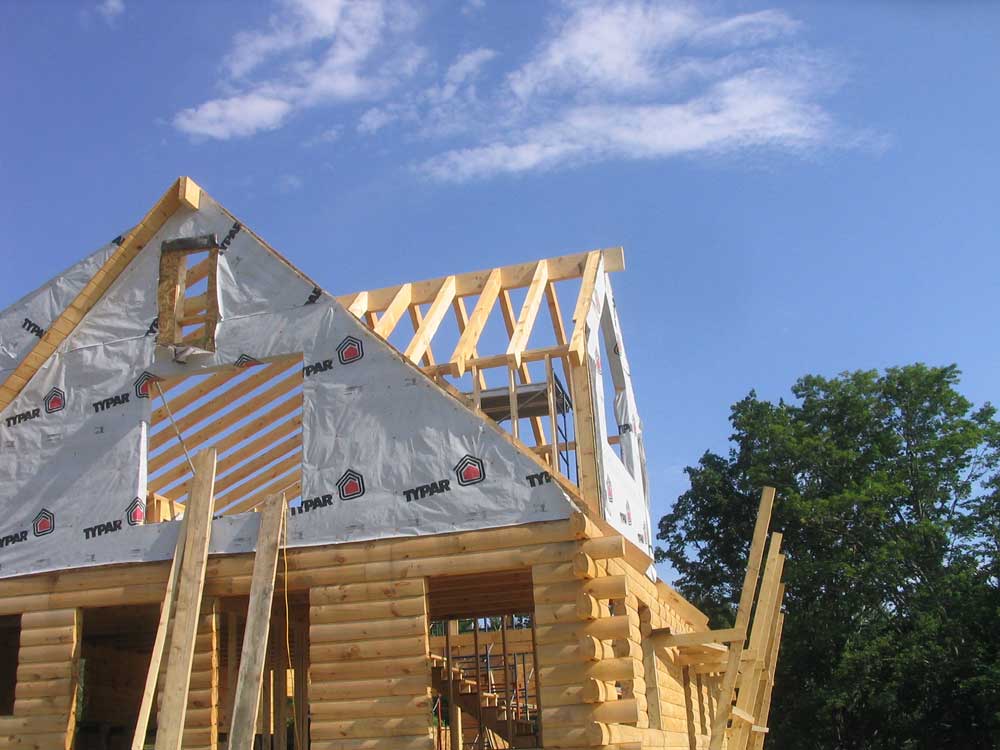
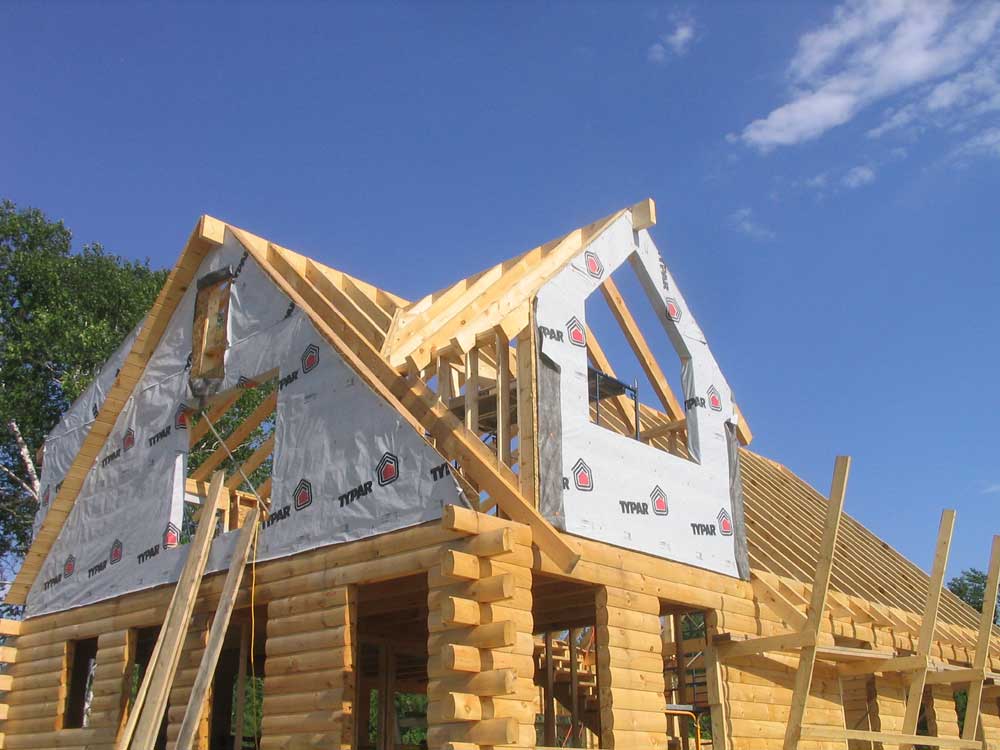
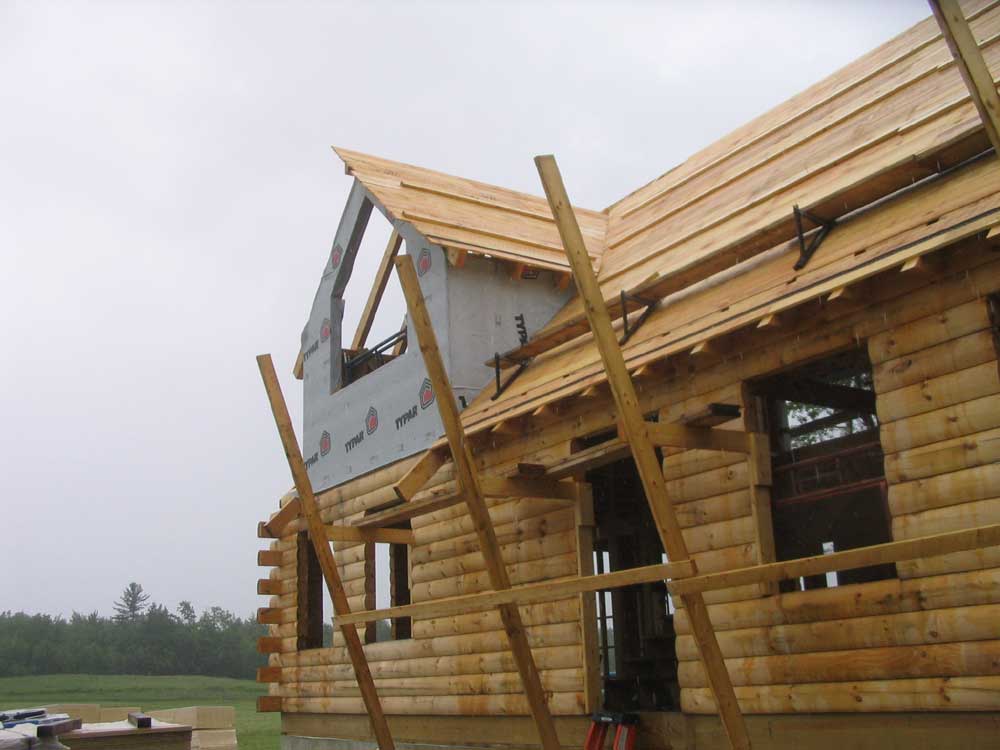
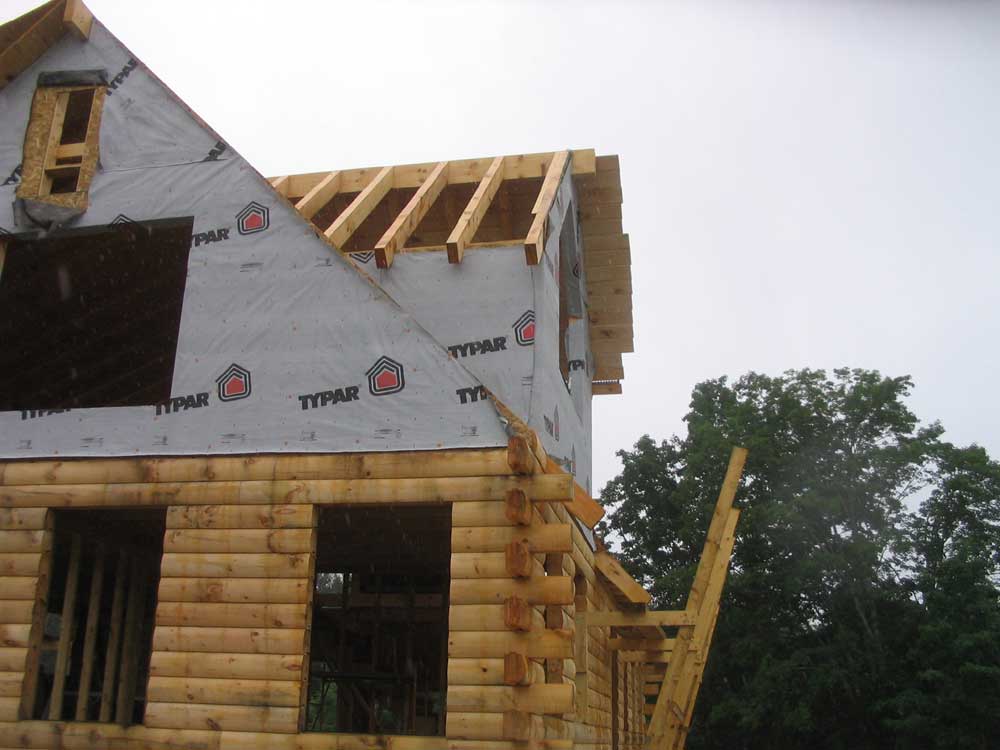
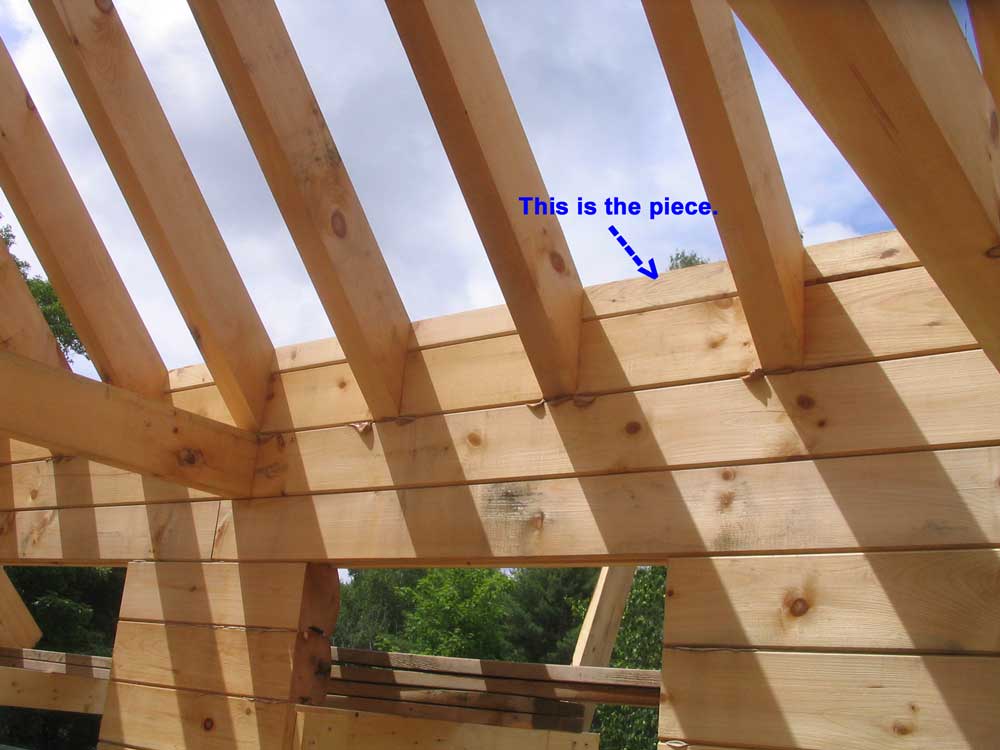
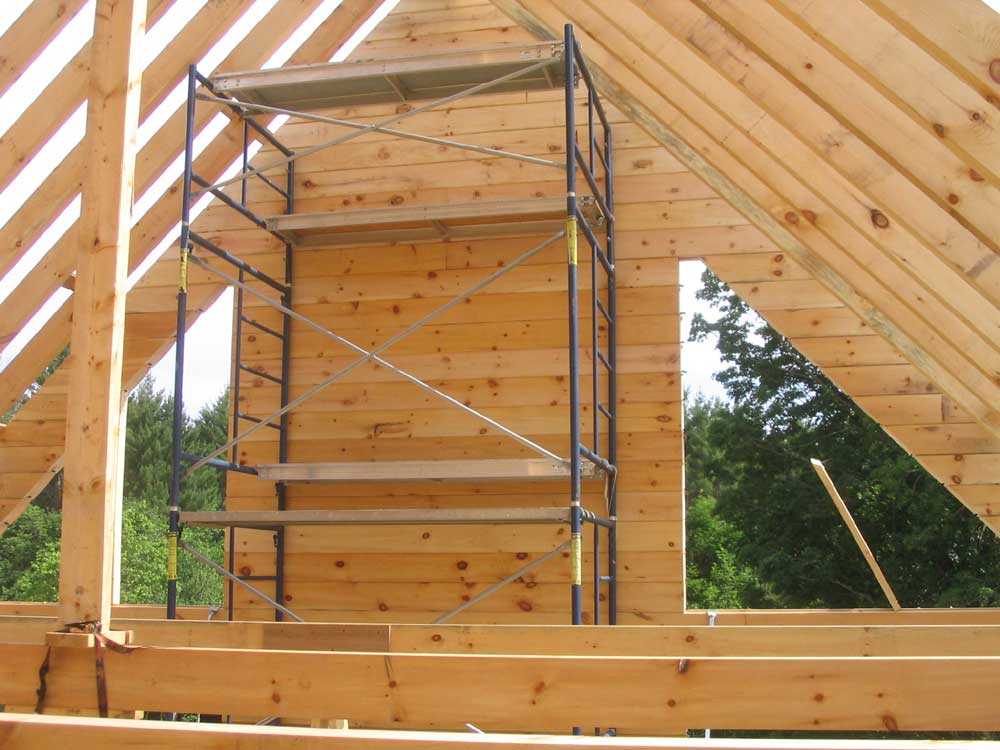
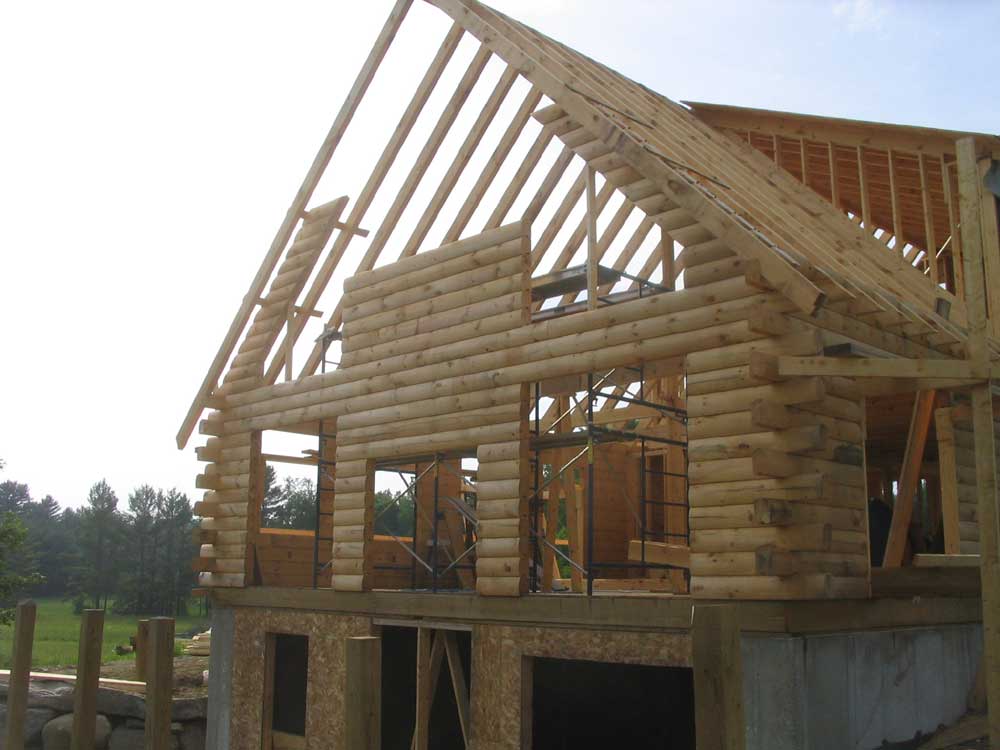
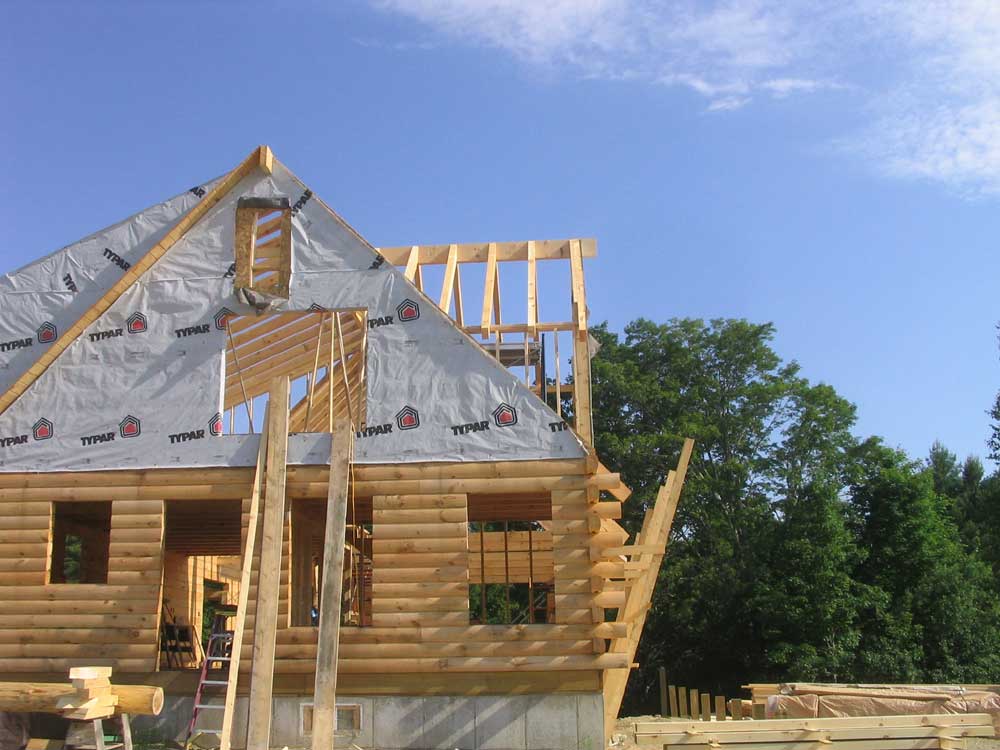
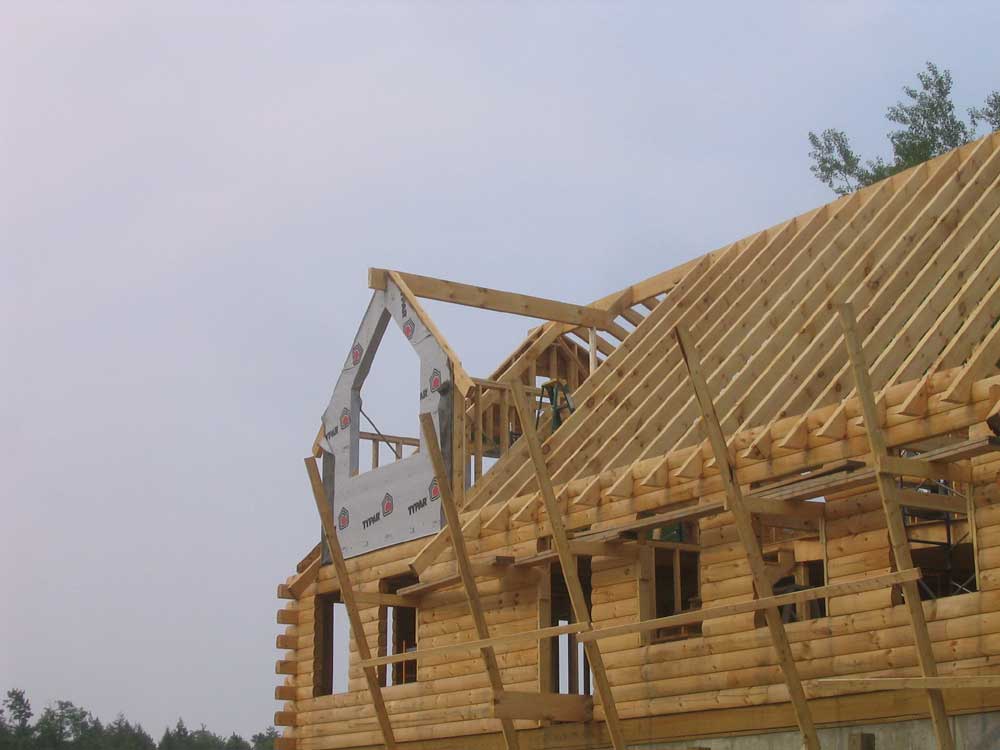
Back on June 6, I tried to explain in the log how we had planned ahead for this step by installing some short pieces of roof board on the false rafter portion of the northern gable. The whole point of all this is to create an overhang that matches those on the opposite end of the house, complete with roof boards, the thickness of the insulation and sheathing, and shingles. After today's log, hopefully the whole situation will seem more clear, as the first thing we did today was work on this fly rafter, as well as the three remaining fly rafters. |
|||
 Earlier,
we had installed the two fly rafters on the southern gable end.
At the gable ends, the fly rafters are supported at the lower ends
by the overhanging log pieces in the top row. We chose to
install these two at the time because we had them on hand and it
seemed easiest to do it in this way. However, we were two
rafters short, thanks to a change in the way we had framed the roof
versus the way it had apparently been planned. So we didn't
have the two lengths required to complete the two flying rafters at
the northernmost end. Bob said we'd use his lift to put these
up later, and we moved on. Earlier,
we had installed the two fly rafters on the southern gable end.
At the gable ends, the fly rafters are supported at the lower ends
by the overhanging log pieces in the top row. We chose to
install these two at the time because we had them on hand and it
seemed easiest to do it in this way. However, we were two
rafters short, thanks to a change in the way we had framed the roof
versus the way it had apparently been planned. So we didn't
have the two lengths required to complete the two flying rafters at
the northernmost end. Bob said we'd use his lift to put these
up later, and we moved on.The two fly rafters at the ends of the shed dormer, however, could not have been installed up front even if we'd so chosen, since they would not be supported by anything at the lower ends. These rafters relied upon the roof boards to hold them in place (they are decorative only), so there was no way to install them until the roof had been boarded. |
|||
 With
all the pieces finally falling into place, and the requirement to
have the remaining rafters installed before we could insulate and
complete the roof system, we spent the morning on their
installation. It took 4 hours to set up, prepare for, and
install all four rafter pieces, as well as some additional related
work such as installing some of the 2x6 pieces required to surround
each roof section (as described in yesterday's entry). With
all the pieces finally falling into place, and the requirement to
have the remaining rafters installed before we could insulate and
complete the roof system, we spent the morning on their
installation. It took 4 hours to set up, prepare for, and
install all four rafter pieces, as well as some additional related
work such as installing some of the 2x6 pieces required to surround
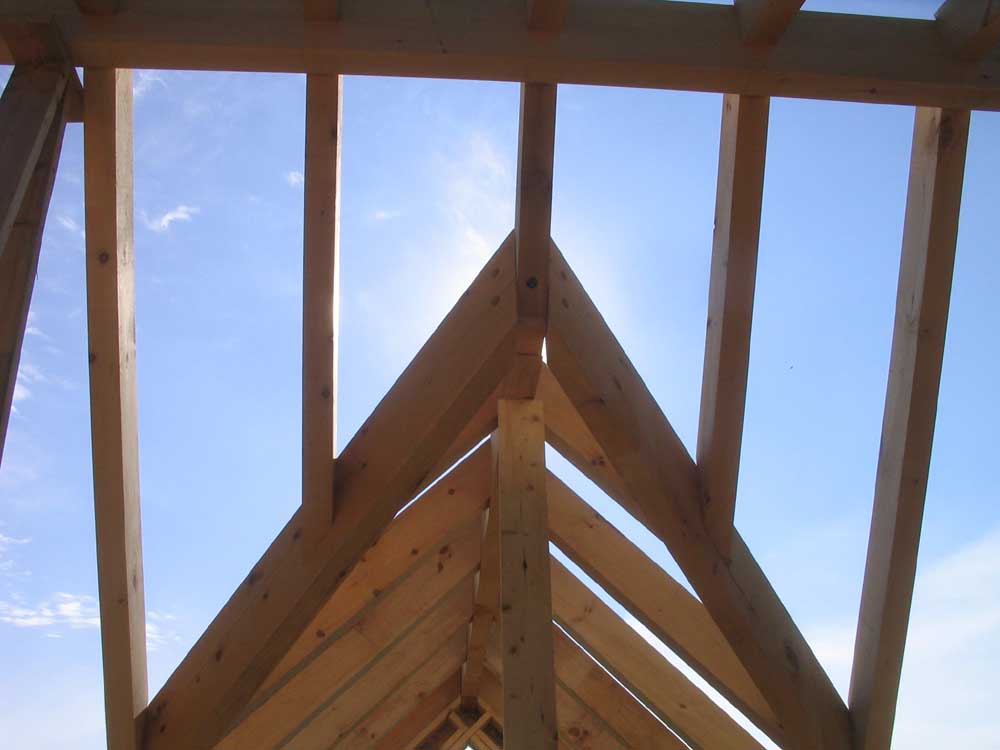
each roof section (as described in yesterday's entry).The most difficult installation was the first one we chose: the northern shed dormer fly rafter. Because of its height, there was nothing I could to to assist, and Bob had to struggle with this 17' beam on the lift by himself. It was quite a trick to get it supported beneath the overhanging roof boards and somehow secured in place, using the lift to raise the beam and also of course support himself, but he managed. I could only watch, powerless, from the ground. It was a relief to see it in place and secured. |
|||
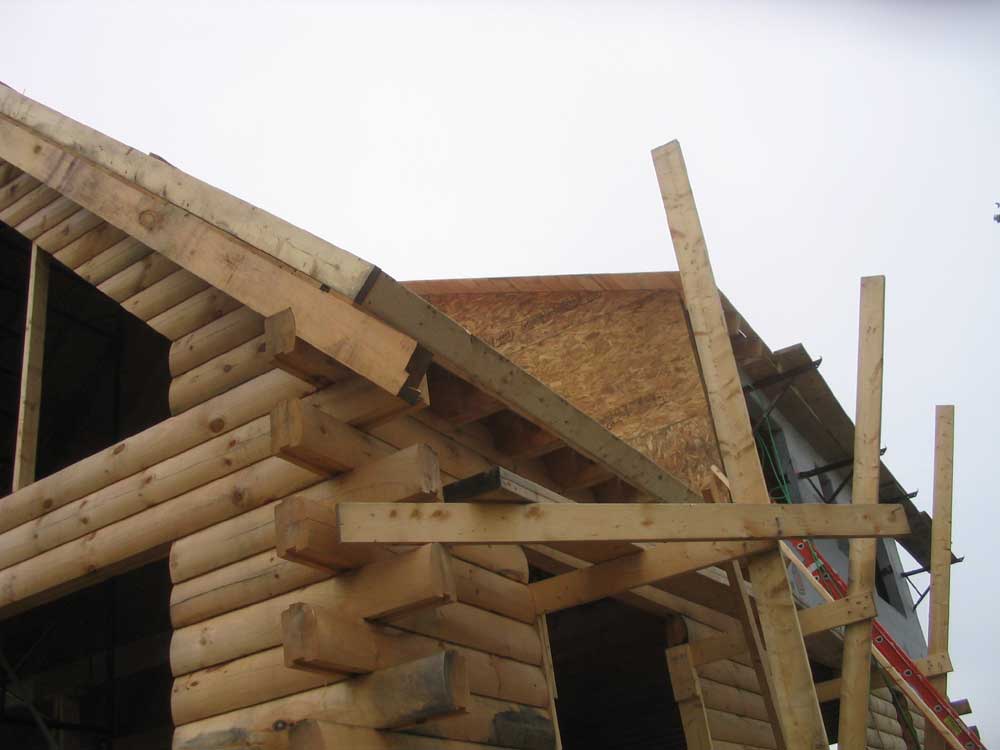
 The
two longer fly rafters demarking the 12:12 portion of the gable end
went better, despite their larger size and heavier weight; the lower
ends of these could be supported by the overhanging log ends, and I
could stand on a ladder and help support and stabilize the lower
ends while Bob, in the lift, worked on the top end. He had to
pull the top of the rafter up to the lift using a rope, and then
raise it the rest of the way by hand. Despite all this, the
process worked well enough. The
two longer fly rafters demarking the 12:12 portion of the gable end
went better, despite their larger size and heavier weight; the lower
ends of these could be supported by the overhanging log ends, and I
could stand on a ladder and help support and stabilize the lower
ends while Bob, in the lift, worked on the top end. He had to
pull the top of the rafter up to the lift using a rope, and then
raise it the rest of the way by hand. Despite all this, the
process worked well enough. |
|||
|
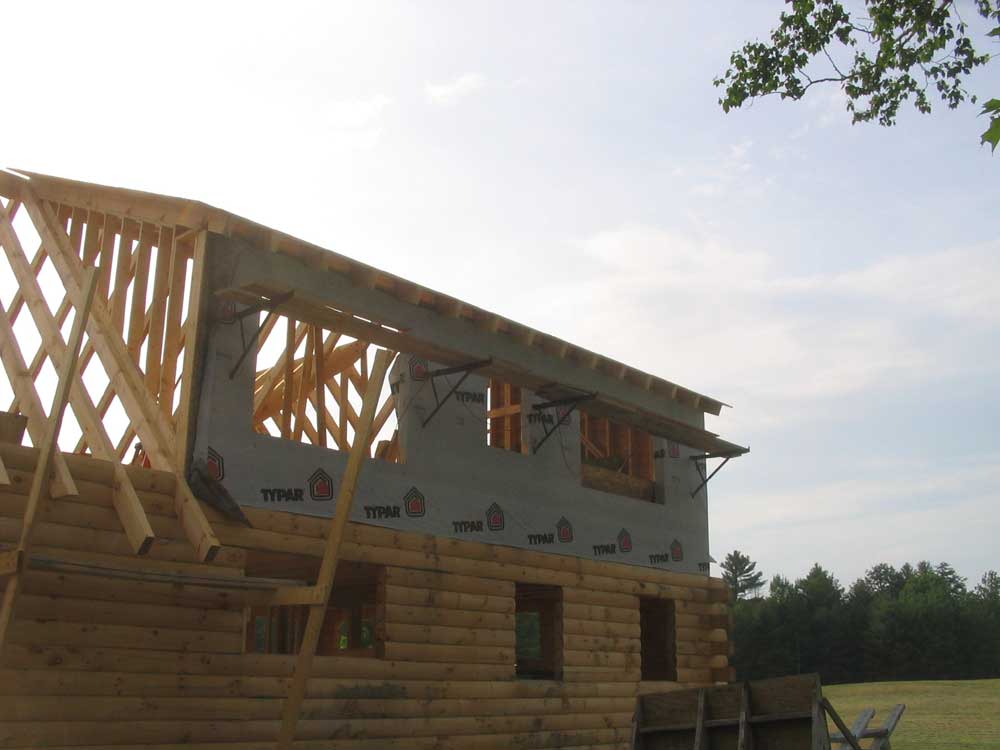
While up in the area, we also installed the 2x6s on the false section of the main gable roof (the back portion), and on the shed dormer end in preparation for later steps. Then, with the work on the gable end done, we installed the final fly rafter on the opposite side of the shed dormer--an easier process that we handled from the staging off the back of the house and from the roof itself. |
|||
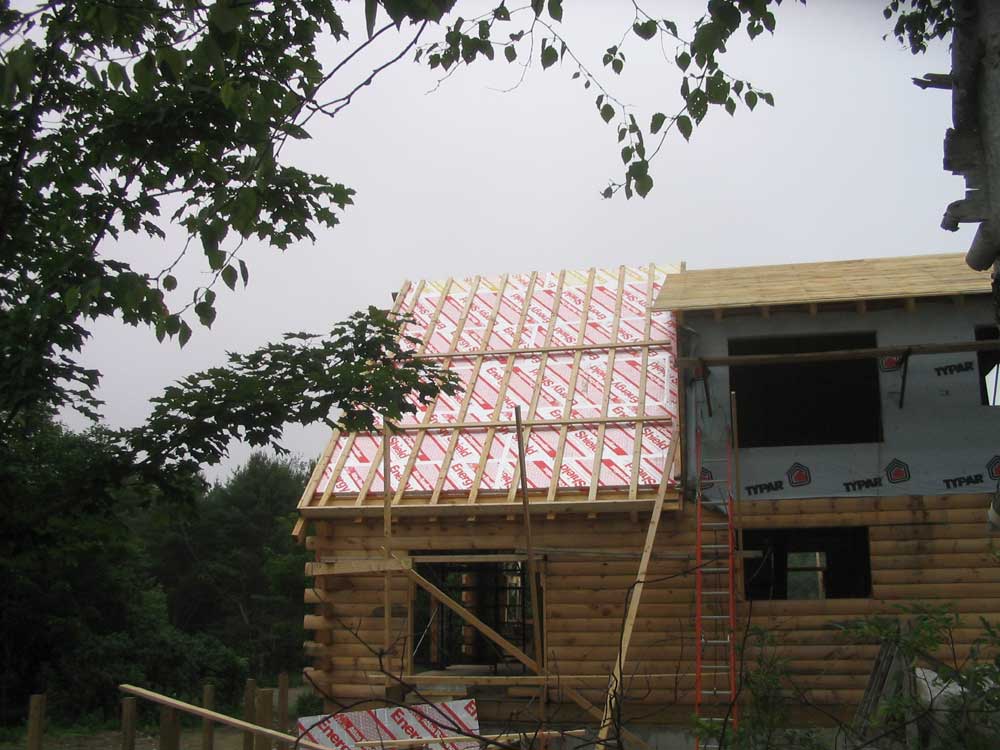
 After
lunch, we got to work on the insulation for the top of the shed
dormer. The installation process was the same as that
described below. As we proceeded and neared the bottom of the
roof section, it was becoming increasingly clear that thunderstorms
were approaching, nearer and nearer. We hurried to get the
insulation done as the wind picked up and thunder boomed in the
ever-shortening distance, and, as it began to imminently threaten,
we rushed to get at least some of the 2x4 strapping pieces in place
over the insulation to help hold it should the wind really pick up.
And just in time, too: we had no sooner managed to get 5 2x4s
strategically placed when the storm hit, bringing heavy rain ,
thunder, and lightning--but no wind. Thus endeth our work day,
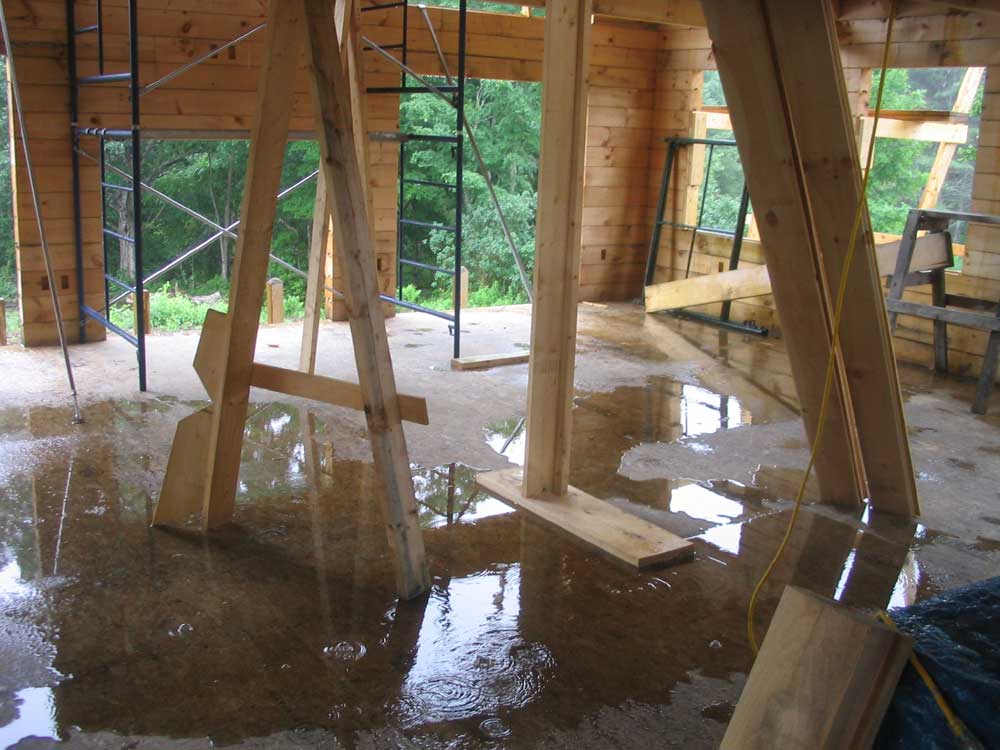
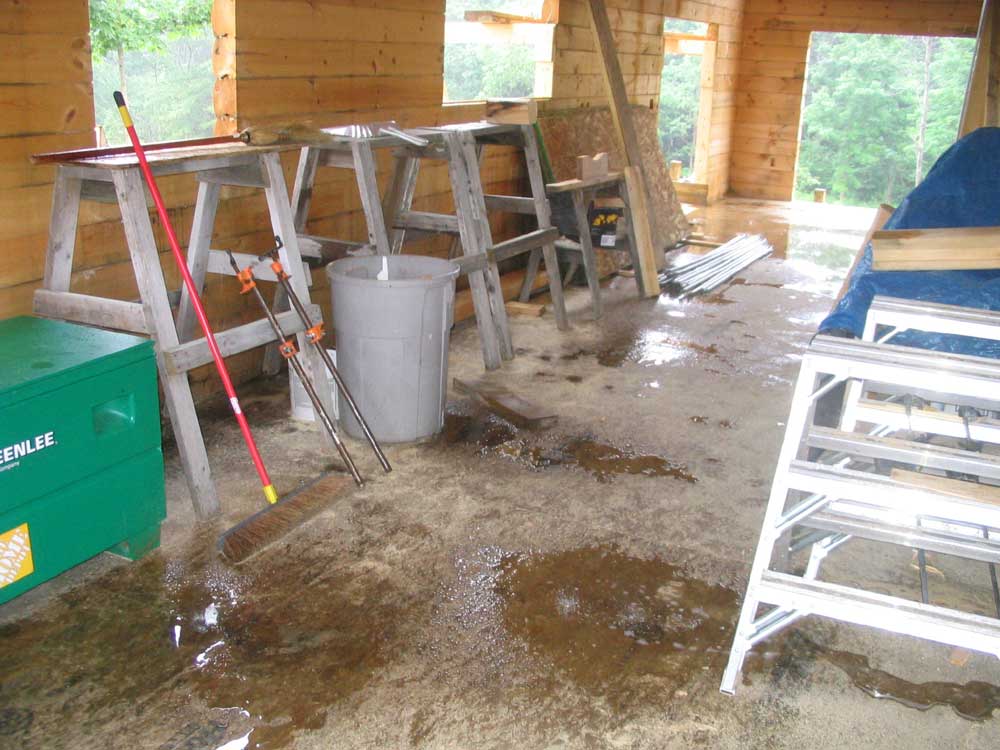
at around 3PM. After
lunch, we got to work on the insulation for the top of the shed
dormer. The installation process was the same as that
described below. As we proceeded and neared the bottom of the
roof section, it was becoming increasingly clear that thunderstorms
were approaching, nearer and nearer. We hurried to get the
insulation done as the wind picked up and thunder boomed in the
ever-shortening distance, and, as it began to imminently threaten,
we rushed to get at least some of the 2x4 strapping pieces in place
over the insulation to help hold it should the wind really pick up.
And just in time, too: we had no sooner managed to get 5 2x4s
strategically placed when the storm hit, bringing heavy rain ,
thunder, and lightning--but no wind. Thus endeth our work day,
at around 3PM.I took the pictures you see here later, after the sun had returned on the heels of the storm. |
|||
|
|
|||
THURSDAY, JUNE 29, 2006 |
|||
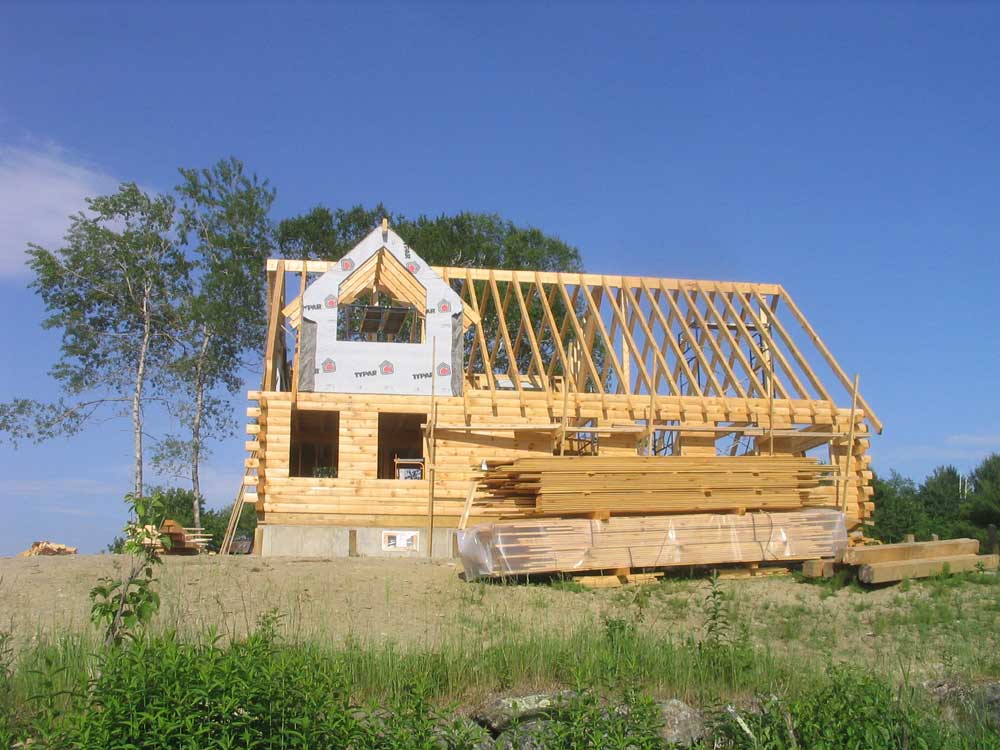
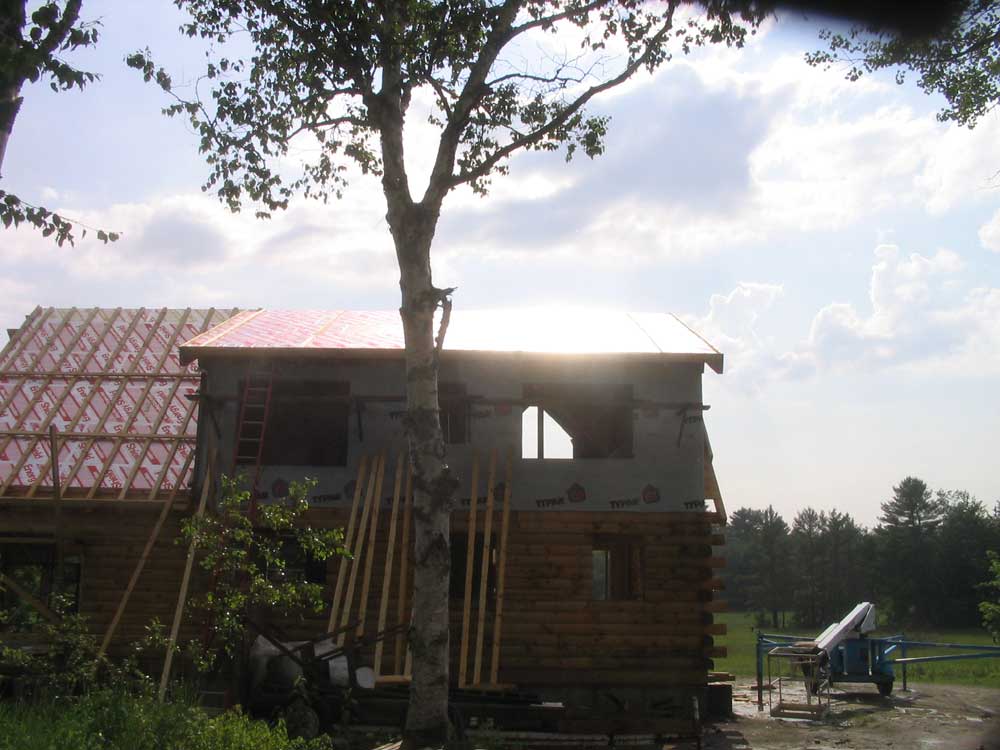
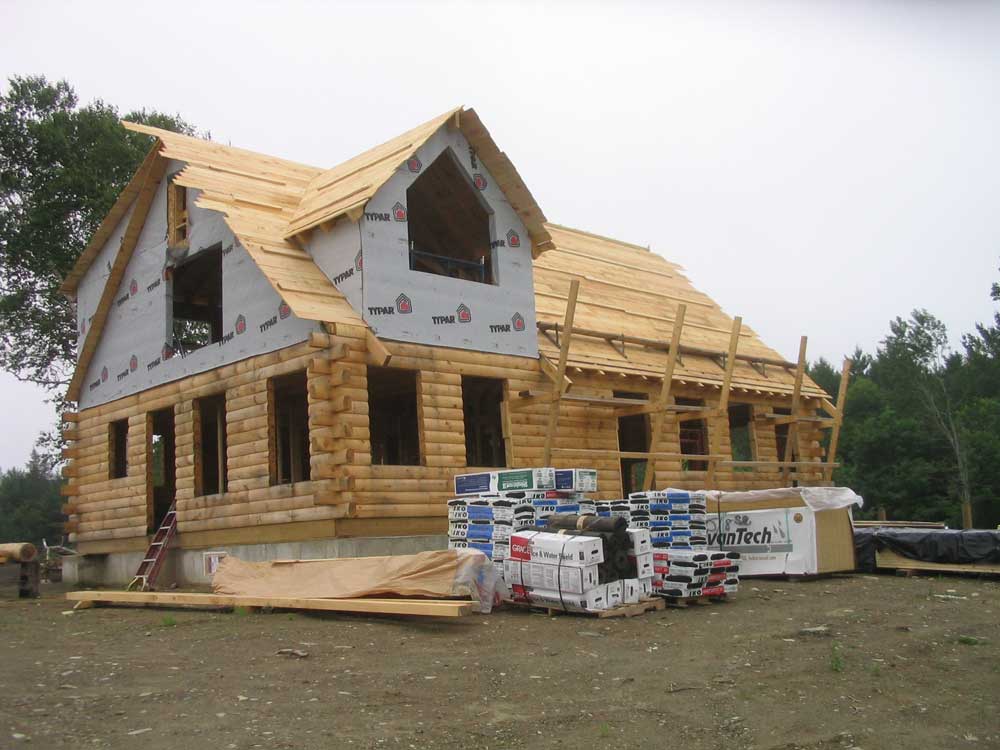
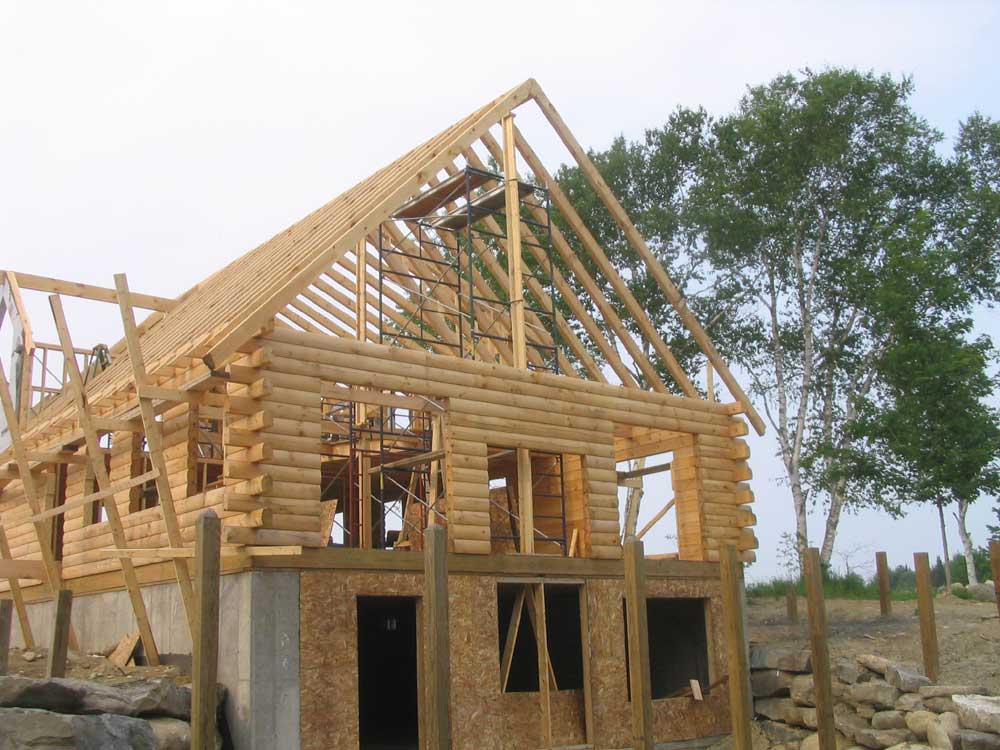
 Today
was a good day, progress-wise. We finally managed to finish up
the roof boarding on the front (and there was much rejoicing...),
and then quickly installed the sheathing on the shed dormer cheek
wall. Afterwards we turned our attention to the next step in
the roofing process: insulation and strapping. Today
was a good day, progress-wise. We finally managed to finish up
the roof boarding on the front (and there was much rejoicing...),
and then quickly installed the sheathing on the shed dormer cheek
wall. Afterwards we turned our attention to the next step in
the roofing process: insulation and strapping. |
|||
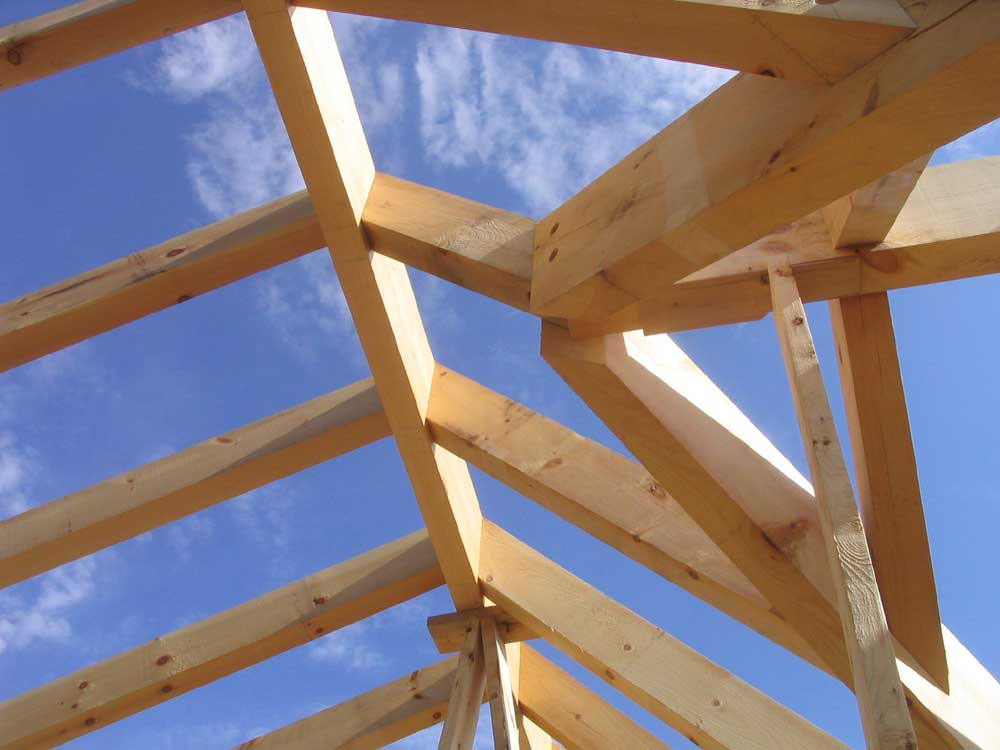
 As
with everything on this very labor-intensive house, the roof system
is complex and comprises multiple steps. Our next task was to
install two layers of 2" polyisocyanurate foam directly over the top
of the roof boards. Though at least this time the product was
lightweight, the process was still time-consuming and brought its
own challenges. As
with everything on this very labor-intensive house, the roof system
is complex and comprises multiple steps. Our next task was to
install two layers of 2" polyisocyanurate foam directly over the top
of the roof boards. Though at least this time the product was
lightweight, the process was still time-consuming and brought its
own challenges. |
|||
|
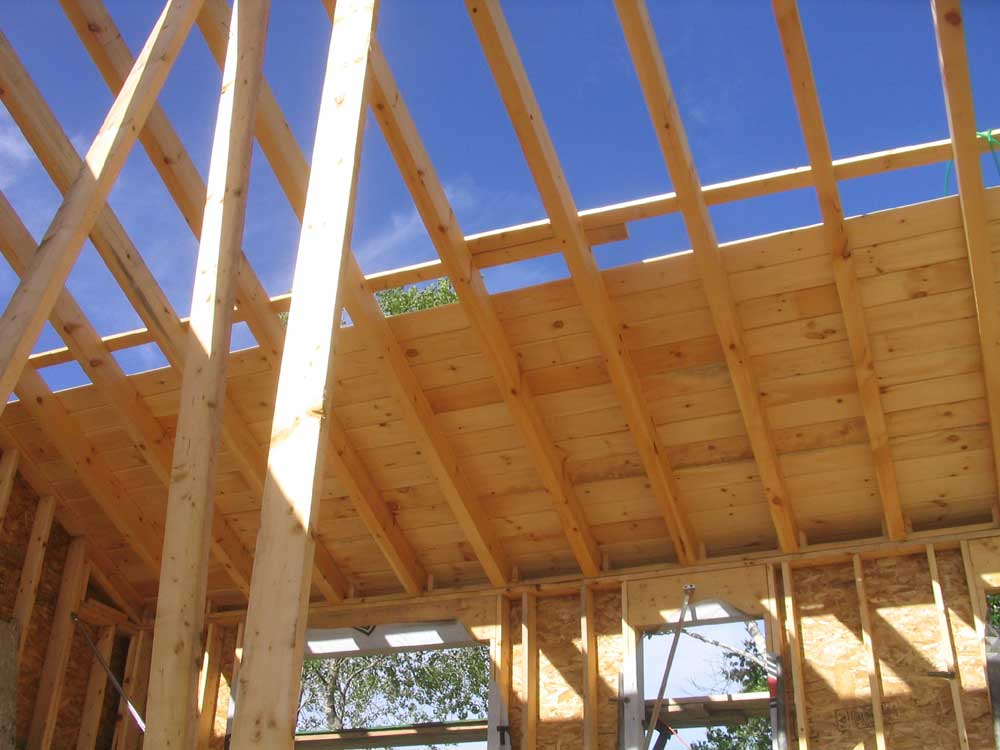
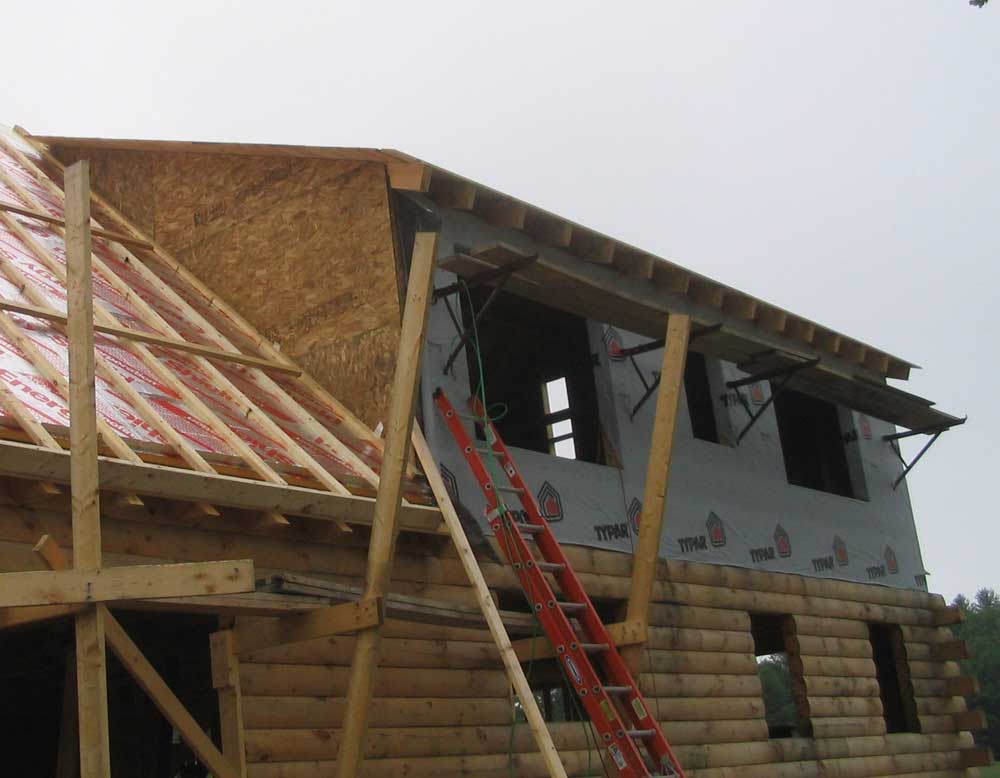
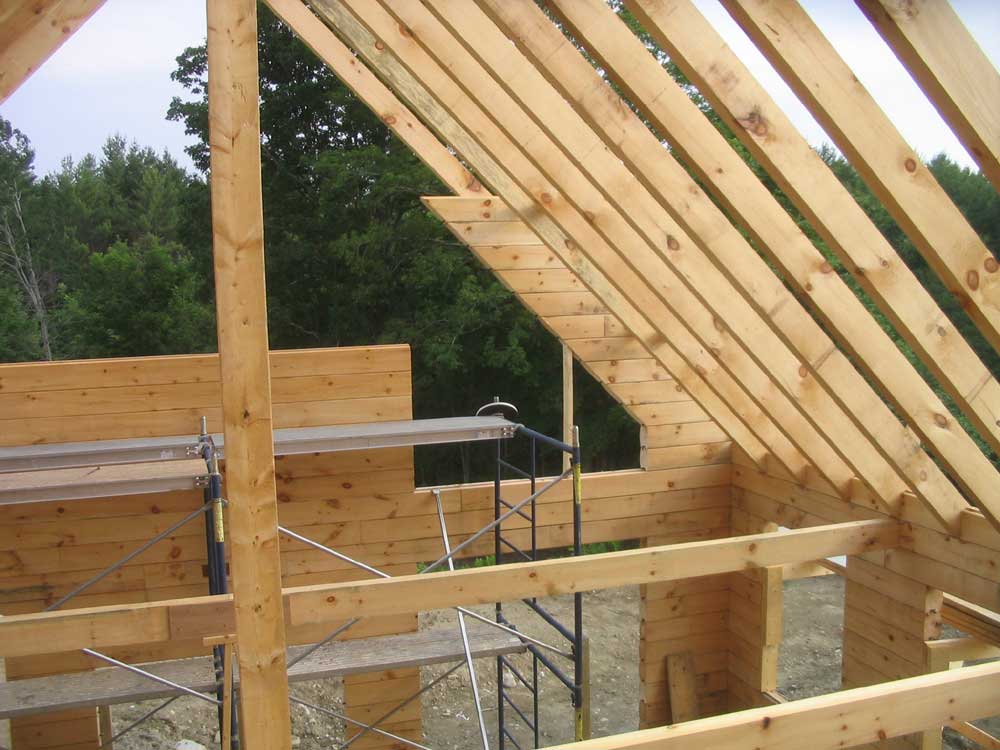
In order to properly trim out the roof, the first step prior to installing the insulation was to install 2x6 board on edge around the edges of the roof. With 4" of insulation and 1-1/2" thick strapping (2x4s on the flat), the 5-1/2" wide 2x6 would be equal in height, and would provide a place to nail the Advantech roof sheathing at the edges later on. In addition, in order to ensure that the roof ventilation system would work properly, the insulation needed to be stopped short of the overhanging soffits, at least those in which vents were installed. So with this large gap, the 2x6 was needed to allow the sheathing to span the gap properly. This was a simple step, but for now we worried only about the small portion of the roof that we intended to insulate this day--the 12:12 section of the back roof adjacent to the shed dormer. |
|||
|
|
|||
|
Now, I'm not a big roof guy. I'll get up and do whatever is necessary whenever it's necessary, but climbing around steep roofs is not something to which I'm accustomed. So by default, throughout the process I had--and continued to be--become the "low guy", cutting material, working at eave height rather than ridge height during the rafter installation, and so forth. And so it continued today: Bob ended up on the roof doing the hard work. It is for this reason--and countless other reasons--that I cut Bob all possible slack and more, and manage to overlook the short-term frustrations that occasionally arise. |
|||
 It
would seem, on the surface, that installing lightweight foam on the
roof would be simple--and the basic process was indeed simple.
However, the simplistic job was complicated by the steep roof pitch,
as well as by the fact that one simply could not tread all over the
insulation or nail things to it for support. So the job had to
begin at the ridge and work downwards, installing two overlapping
layers at once. Bob began at the ridge with full-width sheets
(4x8), and then continued with a 2' wide sheet for the second layer
at the ridge, allowing for the necessary overlap. The seams on
the top layer had to be covered with foil tape as well, a simple if
time-consuming job. I stayed on the ground and passed up sheets of
the insulation, and did any cutting required. Bob used
16 penny spikes to temporarily hold the insulation in place. It
would seem, on the surface, that installing lightweight foam on the
roof would be simple--and the basic process was indeed simple.
However, the simplistic job was complicated by the steep roof pitch,
as well as by the fact that one simply could not tread all over the
insulation or nail things to it for support. So the job had to
begin at the ridge and work downwards, installing two overlapping
layers at once. Bob began at the ridge with full-width sheets
(4x8), and then continued with a 2' wide sheet for the second layer
at the ridge, allowing for the necessary overlap. The seams on
the top layer had to be covered with foil tape as well, a simple if
time-consuming job. I stayed on the ground and passed up sheets of
the insulation, and did any cutting required. Bob used
16 penny spikes to temporarily hold the insulation in place.(Have you noticed the recurring theme of "time-consuming"? All aspects of the work so far have fallen into this category, by nature.) |
|||
 Once all the insulation board was in place, our next step was to
work back up the roof again installing vertical strapping--2x4's
laid on the flat. The strapping had several purposes: to
hold the insulation in place; to allow the roof sheathing to be
secured; and to provide an air space between the soffit vents and
the ridge vent, ensuring that the roof would remain properly
ventilated. We snapped chalk lines at the rafter locations,
and then installed the 2x4s, screwing them to the rafters through
the insulation with 10" log screws. By the time we had
installed all of the strapping on this section, the day was over. Once all the insulation board was in place, our next step was to
work back up the roof again installing vertical strapping--2x4's
laid on the flat. The strapping had several purposes: to
hold the insulation in place; to allow the roof sheathing to be
secured; and to provide an air space between the soffit vents and
the ridge vent, ensuring that the roof would remain properly
ventilated. We snapped chalk lines at the rafter locations,
and then installed the 2x4s, screwing them to the rafters through
the insulation with 10" log screws. By the time we had
installed all of the strapping on this section, the day was over. |
|||
WEDNESDAY, JUNE 28, 2006 |
|||
 We
got a very late start, annoyingly: 1130. What a waste of
time. I really like Bob, and he does good work, but frankly he
has way too many irons in the fire. But what can you do?
Like the weather, there will be no changing this, so I grin and bear
it--and occasionally let you, dear reader, in on a small aspect of
my frustration. Now don't you feel lucky? (Well, do
you, punk?) We
got a very late start, annoyingly: 1130. What a waste of
time. I really like Bob, and he does good work, but frankly he
has way too many irons in the fire. But what can you do?
Like the weather, there will be no changing this, so I grin and bear
it--and occasionally let you, dear reader, in on a small aspect of
my frustration. Now don't you feel lucky? (Well, do
you, punk?) |
|||
 Over
the next few hours, we finished up much of the roof boarding on the
front, and sheathed the two sides of the gable dormer on the front.
Just as we finished up one of the roof sides of the dormer, and
closed in on the very small remaining section of open roof, it began
to rain--very lightly at first, so it seemed like a quick passing
shower. But it soon became deceptively heavy, and steady.
We waited around for a while, hoping (expecting?) that it would
stop, but alas it was not to be. In fact, it continued raining
for at least 2 hours, possibly 3. So we had to leave the
building with just a ridiculously small area of unboarded roof, and
lose yet more time. The hours wasted at either end of the day
are starting to add up alarmingly. Over
the next few hours, we finished up much of the roof boarding on the
front, and sheathed the two sides of the gable dormer on the front.
Just as we finished up one of the roof sides of the dormer, and
closed in on the very small remaining section of open roof, it began
to rain--very lightly at first, so it seemed like a quick passing
shower. But it soon became deceptively heavy, and steady.
We waited around for a while, hoping (expecting?) that it would
stop, but alas it was not to be. In fact, it continued raining
for at least 2 hours, possibly 3. So we had to leave the
building with just a ridiculously small area of unboarded roof, and
lose yet more time. The hours wasted at either end of the day
are starting to add up alarmingly. |
|||
 Other
than stating the facts, the weather situation has progressed far
beyond the point of comment for me. Expect the worst, and get
even worse than that, it seems. It's been nearly 4 months
since we broke ground, and most of the delays are directly related
to the weather. Other
than stating the facts, the weather situation has progressed far
beyond the point of comment for me. Expect the worst, and get
even worse than that, it seems. It's been nearly 4 months
since we broke ground, and most of the delays are directly related
to the weather. |
|||
 We
have many steps remaining before we have a roof complete. I
had hoped that the completion of the roof boards might help keep
things drier inside, thanks to the shiplap joints and the roof
pitch, but the steady rain we had today illustrated just how much
water was still going to get through--and in a short time. We
have many steps remaining before we have a roof complete. I
had hoped that the completion of the roof boards might help keep
things drier inside, thanks to the shiplap joints and the roof
pitch, but the steady rain we had today illustrated just how much
water was still going to get through--and in a short time. |
|||
|
|
|||
TUESDAY, JUNE 27, 2006 |
|||
 Today,
we made good progress on the roof boards. We started on the
back side of the house, and quickly discovered a minor problem:
because we had made some minor changes (for a variety of reasons) to
the rafter spacing on the south half of the house, the boards, which
I had cut to 2' centers, now didn't fall properly on the existing
rafter spacing. All this meant was that the boards had to be
recut appropriately. Neither of us had remembered this small
detail, and it turns out I could have avoided the need to pre-cut
all the boards last week. Oh well. Today,
we made good progress on the roof boards. We started on the
back side of the house, and quickly discovered a minor problem:
because we had made some minor changes (for a variety of reasons) to
the rafter spacing on the south half of the house, the boards, which
I had cut to 2' centers, now didn't fall properly on the existing
rafter spacing. All this meant was that the boards had to be
recut appropriately. Neither of us had remembered this small
detail, and it turns out I could have avoided the need to pre-cut
all the boards last week. Oh well. |
|||
 Minor
problem aside, the boarding went quickly. After finishing the
back of the house, we had to deal with the overlong log gable before
continuing with the boards on the front of the house. This job
turned out to be rather straightforward, fortunately. Bob made
a saw cut on the inside, along a line we struck, and then removed
the remaining material with a power plane. All told, the job
took perhaps 15 minutes and went better than expected. Minor
problem aside, the boarding went quickly. After finishing the
back of the house, we had to deal with the overlong log gable before
continuing with the boards on the front of the house. This job
turned out to be rather straightforward, fortunately. Bob made
a saw cut on the inside, along a line we struck, and then removed
the remaining material with a power plane. All told, the job
took perhaps 15 minutes and went better than expected. |
|||
 We
made very good progress on the front of the house, and would have
finished in the afternoon except that we ran out of nails at about 3
PM, halting progress with about 3/4 of the boards done. This
was a bit of an aggravation since we had expected the nails, along
with another large delivery of roofing material, on Monday.
(The delivery yesterday was put off because of rain (I'm still not
quite sure why, but who am I to argue?), and I had expected them
earlier this morning. As it happened, the truck arrived around
5, bearing roofing and nails. I just hated to lose a couple
hours' work on a good day, but what could be done? My only
complaint was that I had been told one thing, only to have something
entirely opposite happen. And so it goes. We
made very good progress on the front of the house, and would have
finished in the afternoon except that we ran out of nails at about 3
PM, halting progress with about 3/4 of the boards done. This
was a bit of an aggravation since we had expected the nails, along
with another large delivery of roofing material, on Monday.
(The delivery yesterday was put off because of rain (I'm still not
quite sure why, but who am I to argue?), and I had expected them
earlier this morning. As it happened, the truck arrived around
5, bearing roofing and nails. I just hated to lose a couple
hours' work on a good day, but what could be done? My only
complaint was that I had been told one thing, only to have something
entirely opposite happen. And so it goes.I can't wait to have this roof done! I am looking forward to getting some stuff done inside, regardless of the outside weather. |
|||
|
|
|||
MONDAY, JUNE 26, 2006 |
|||
|
Moderate morning rain turned into pesky showers that hung around
much of the day. By mid-morning, it was clear there was little
choice but to give up hope for any work this day. This is an all-too common entry here, is it not? |
|||
SATURDAY, JUNE 24, 2006 & SUNDAY, JUNE 25, 2006 |
|||
| It
turned out to be a nice weekend for a rainy weekend: some
light rain showers ended by late morning Saturday, and by
mid-afternoon the sun was even coming out. Sunday was even
better, with pleasant mix of sun and clouds. Saturday afternoon, I worked in the shop to prepare some pieces for the house. First, I ripped a number of the ceiling boards to be used in the soffits on either side of the soffit vent strips. By my calculations, I needed at least 84 linear feet of board for each side of the vents, so ripping the requisite number took a little while. During my board-squaring marathon on Friday evening, I had set aside most of the 4' and 6' lengths in a separate pile to deal with later, and now I brought these all down to the shop and used the chop saw, along with a temporary stop block, to square one end and cut them to length. The pile of these short boards was a lot larger than I had thought, and by the time I was done I hoped to never see another piece of the stuff again. (Unlikely...) |
|||
I also brought a number of short waste pieces of log down, along with two 12-foot lengths, from which I intended to cut angled strips to fill in the last gap between the roof rafters. You may recall that last weekend I installed short pieces of full log between the rafters, and we could have butted the roofing boards down onto the tops of these sections. Doing so, however, would have left a debris-catching "shelf" in a hard-to-reach area, and also would have left part of the top log's tongue exposed. |
|||
 In
addition, the angled pieces, whose top would be roughly flush with
the rafters' top edge, would provide a place for a good seal beneath
the roof boards, eliminating a potential site for air infiltration
more effectively that had we simply butted the roof boards against
the tops of the logs. In
addition, the angled pieces, whose top would be roughly flush with
the rafters' top edge, would provide a place for a good seal beneath
the roof boards, eliminating a potential site for air infiltration
more effectively that had we simply butted the roof boards against
the tops of the logs.After measuring a number of areas on the house and determining an average height, I set up the saw at 45° and made the cuts; 2 passes were required on each log, since the blade was not tall enough to complete it in one. after I had one piece cut, I took it to the house for a test fit and found that it was too tall, so I marked it accordingly and made the adjustments to the tool before cutting the remainder. |
|||
 Sunday
morning, I installed the angled pieces, and was relieved to find
that they worked as intended. I set each piece in a bed of
Sikaflex, both on the side of the log tongue and also on the portion
of the top of the tongue on which the pieces sat. Then I
nailed them in from the top with the nail gun. Now, when we
went to install the ceiling boards, we could install some foam
gasketing and Sikaflex to help seal over these pieces. They
also cleaned up the look from inside, so that when all was said and
done the wall's appearance would be consistent all the way to the
ceiling. Sunday
morning, I installed the angled pieces, and was relieved to find
that they worked as intended. I set each piece in a bed of
Sikaflex, both on the side of the log tongue and also on the portion
of the top of the tongue on which the pieces sat. Then I
nailed them in from the top with the nail gun. Now, when we
went to install the ceiling boards, we could install some foam
gasketing and Sikaflex to help seal over these pieces. They
also cleaned up the look from inside, so that when all was said and
done the wall's appearance would be consistent all the way to the
ceiling. |
|||
FRIDAY, JUNE 23, 2006 |
|||
|
Today, we finished up the log gable, completing the last task
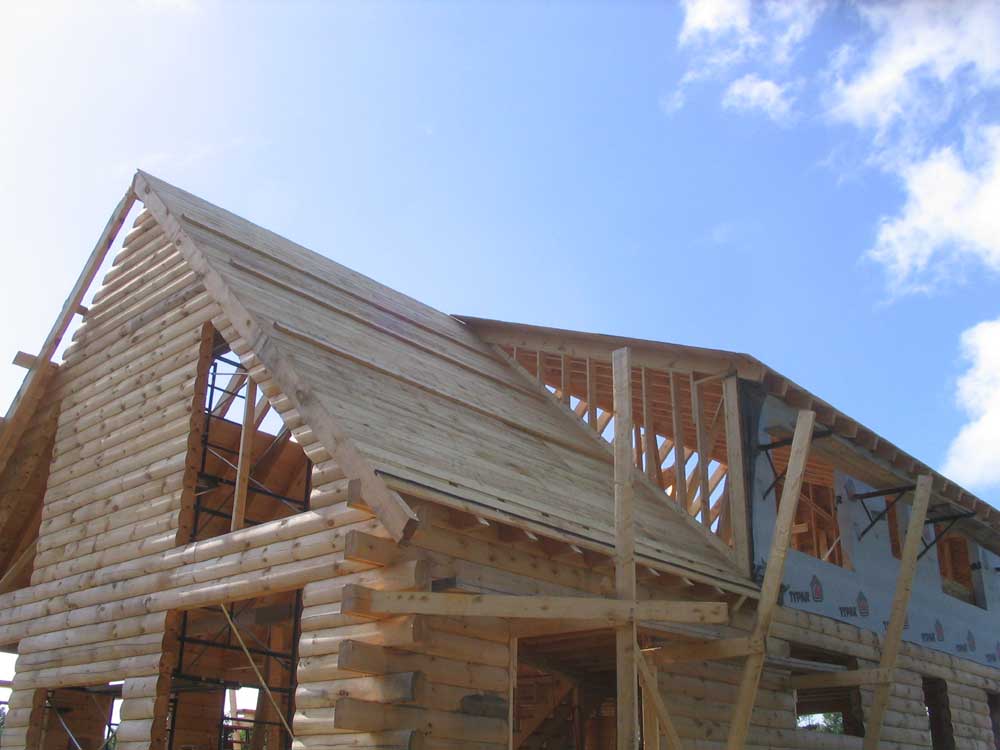
required before we could begin the various roofing steps in earnest. Completing the gable was a mental challenge combined with a bit of physical difficulty. As the staging grew taller and taller, nerves seemed to grow shorter. Even the most minor of errors at this height became larger problems that were less easily overcome--but were overcome nonetheless. An epic tale of man against log? Well, perhaps not, but we were happy to see the final pieces go in nevertheless! It was a day of irritating little errors, wrong cuts, and tropical humidity. |
|||
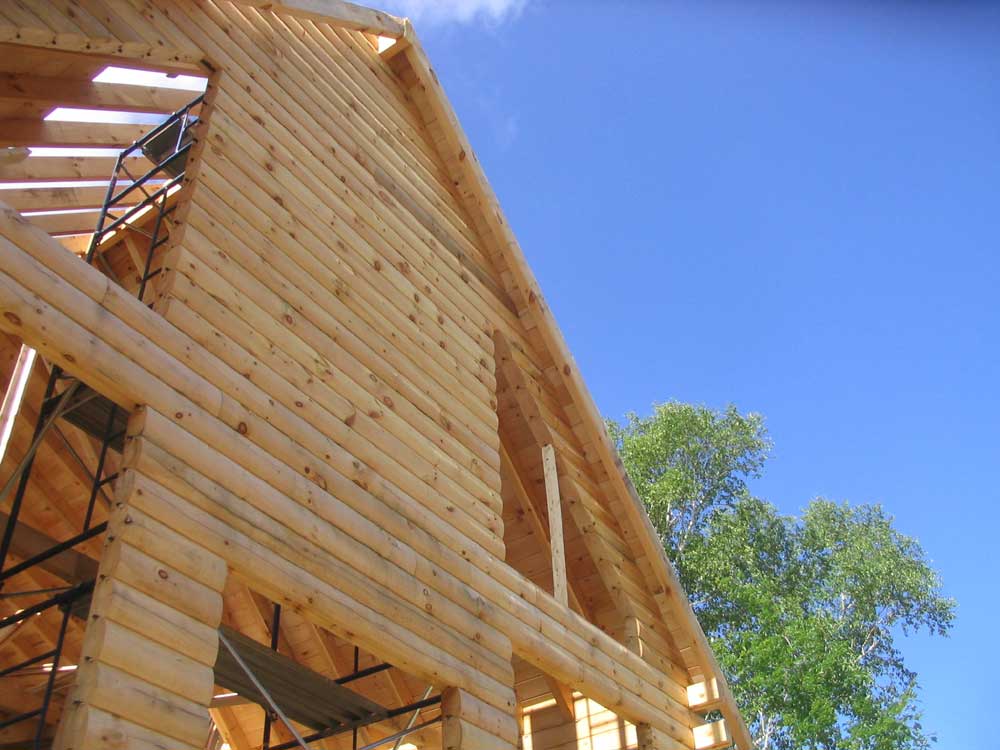
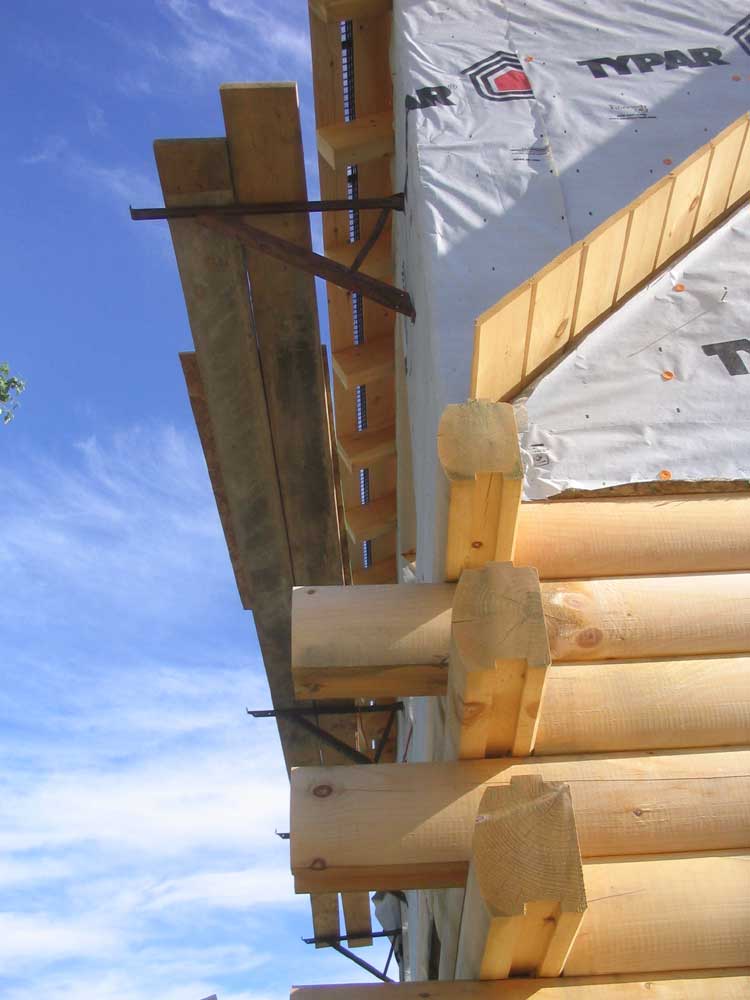
 We
ran into an alignment problem on the southwest side of the gable
(that's the corner nearest you in the picture to the left).
While building up the angled pieces that formed the short walls
outside of the window openings, we had taken pains to ensure that
the cut ends lined up properly with the rafters on either side,
since the roofing system would utilize the log wall as a rafter
here. As we got to the top, we discovered that the top
log was not level, and had dipped inwards towards the window
opening. Simple enough to fix: brace it up to level,
right? We
ran into an alignment problem on the southwest side of the gable
(that's the corner nearest you in the picture to the left).
While building up the angled pieces that formed the short walls
outside of the window openings, we had taken pains to ensure that
the cut ends lined up properly with the rafters on either side,
since the roofing system would utilize the log wall as a rafter
here. As we got to the top, we discovered that the top
log was not level, and had dipped inwards towards the window
opening. Simple enough to fix: brace it up to level,
right? |
|||
 As
it turned out, this was wrong. We never figured out exactly
what happened, but somehow these short logs "grew" outward beyond
the rafters while still managing to be low on the inboard side, at
the window opening. This caused a significant alignment issue
when we reached the top of the window opening and went to install
the longer log pieces that would tie the side sections in with the
wider center section, and cover the top of the window opening.
Leveling the wall section consisting of the short logs pushed their
angled ends far outside of the proper rafter line, but leaving them
along prohibited the tops of the logs from aligning with those in
the center section. As
it turned out, this was wrong. We never figured out exactly
what happened, but somehow these short logs "grew" outward beyond
the rafters while still managing to be low on the inboard side, at
the window opening. This caused a significant alignment issue
when we reached the top of the window opening and went to install
the longer log pieces that would tie the side sections in with the
wider center section, and cover the top of the window opening.
Leveling the wall section consisting of the short logs pushed their
angled ends far outside of the proper rafter line, but leaving them
along prohibited the tops of the logs from aligning with those in
the center section. |
|||
The log we had cut for this area, which was supposed to tie the two sections together, would not work; it was too short by an inch (we thought; later events might contradict this). So this log became the first and only log in the entire building that we had to remove after it had been caulked and installed; we replaced it with a new one. |
|||
 Once
we had the three separate sections of the wall tied in together
above the window openings, things went fairly well, though the issue
with the southwest log angle ends continued to plague us.
Eventually, we had to reconnoiter and at that point we determined
that, for reasons that continued to elude us (and always will), the
angled ends were simply not lining up with the rafters, beginning at
a point about 5 courses up from the bottom of the window opening and
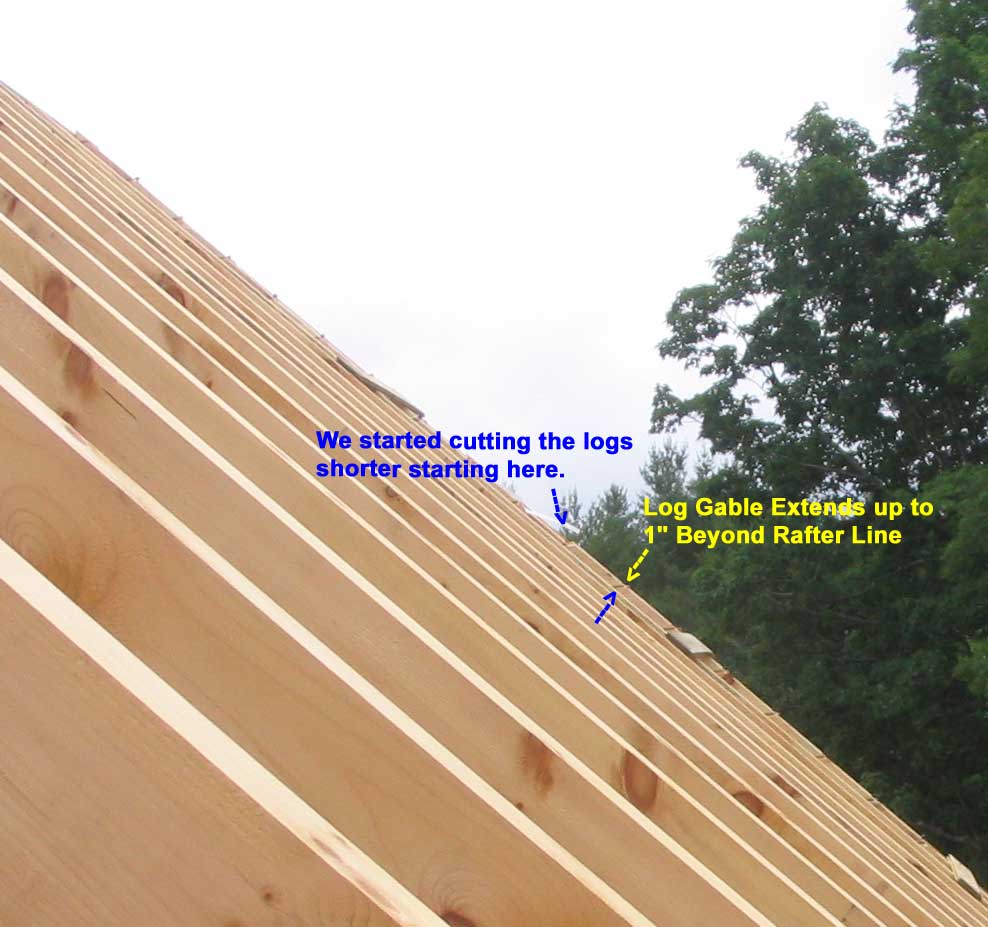
continuing to "grow" from there. We decided there was no other
choice but to cut subsequent logs shorter to ensure that they did
align with the rafters on either side, and simply would have to mark
a line on the overlong ones and cut them off somehow later.
From here on up, things lined up fine. Once
we had the three separate sections of the wall tied in together
above the window openings, things went fairly well, though the issue
with the southwest log angle ends continued to plague us.
Eventually, we had to reconnoiter and at that point we determined
that, for reasons that continued to elude us (and always will), the
angled ends were simply not lining up with the rafters, beginning at
a point about 5 courses up from the bottom of the window opening and
continuing to "grow" from there. We decided there was no other
choice but to cut subsequent logs shorter to ensure that they did
align with the rafters on either side, and simply would have to mark
a line on the overlong ones and cut them off somehow later.
From here on up, things lined up fine. |
|||
|
|
|||
 20/20
hindsight review: it seems we should have used the 1" short
log that we discarded above the window, as we eventually ended up
cutting logs off by this amount anyway. But at the time, the
direction of our thought process seemed clear. The window
openings were plumb, and all logs throughout the remainder project
had stacked cleanly and level without issue. Is there one
short piece in that odd angled section that simply was milled a bit
differently, perhaps, which threw everything out of alignment?
The world may never know. As Bob says, "If 'ifs' and 'buts'
were candy and nuts, it'd be Christmas all year long." 20/20
hindsight review: it seems we should have used the 1" short
log that we discarded above the window, as we eventually ended up
cutting logs off by this amount anyway. But at the time, the
direction of our thought process seemed clear. The window
openings were plumb, and all logs throughout the remainder project
had stacked cleanly and level without issue. Is there one
short piece in that odd angled section that simply was milled a bit
differently, perhaps, which threw everything out of alignment?
The world may never know. As Bob says, "If 'ifs' and 'buts'
were candy and nuts, it'd be Christmas all year long." |
|||
 After
Bob left, following the completion of the gable at 3, I continued
working and managed, over the next several hours, to square the ends
of the remaining large pile of ceiling boards so that they would be
ready for installation on Monday. It was just about the last
thing I wanted to do, but with rain forecast for the weekend, I
figured I'd better get while the getting was good. Grunt work,
to be sure...but one of the necessary--if unglamorous--steps
required in construction. After
Bob left, following the completion of the gable at 3, I continued
working and managed, over the next several hours, to square the ends
of the remaining large pile of ceiling boards so that they would be
ready for installation on Monday. It was just about the last
thing I wanted to do, but with rain forecast for the weekend, I
figured I'd better get while the getting was good. Grunt work,
to be sure...but one of the necessary--if unglamorous--steps
required in construction.We expected delivery of the remaining roofing materials on Monday afternoon, and with some good weather and a bit of luck, my goal of having the place roofed by the end of the month was still glimmering tantalizingly ahead, carrot-like...though realism would suggest that perhaps we might be just a few days behind that lofty goal. |
|||
With at least some rain predicted for Saturday and Sunday, I had a short list of projects that I could prepare in the shop, including ripping more of the ceiling boards to accommodate the soffit vents, and also cutting some angled pieces out of logs to fill in some remaining gaps around the rafters; these pieces would help provide a better air seal at the roof edge, and would also lend a more finished appearance inside the building. I won't bother to try and explain more now. |
|||
THURSDAY, JUNE 22, 2006 |
|||
 Progress
marches onward--perhaps slowly, perhaps not, but it's all in a
forward direction. Progress
marches onward--perhaps slowly, perhaps not, but it's all in a
forward direction.This morning, we finished up the roof boards on the shed dormer, which went smoothly and quickly. Then, we refocused on the log gable end at the south side of the house, which it seemed clear we had been avoiding. |
|||
 Complicating
the gable end, of course, was the fact that 45° cuts had to be made
on the ends of the logs--and, on the ones surrounding the
trapezoidal window openings, on both sides. The 15" chop saw
blade was not large enough to cut all the way through the logs at an
angle (or even straight, for that matter), so each cut required
quite a bit of hand sawing. With these complications, it took
some time before we managed to get into the swing of things on each
side of the wall, but as time went on the process went more smoothly
and quickly. Complicating
the gable end, of course, was the fact that 45° cuts had to be made
on the ends of the logs--and, on the ones surrounding the
trapezoidal window openings, on both sides. The 15" chop saw
blade was not large enough to cut all the way through the logs at an
angle (or even straight, for that matter), so each cut required
quite a bit of hand sawing. With these complications, it took
some time before we managed to get into the swing of things on each
side of the wall, but as time went on the process went more smoothly
and quickly. |
|||
 Because
of the need for staging to reach the wall, and the desire for
repetitious cuts, we concentrated on one side at a time, and stacked
the logs that formed the outside edge of the gable and framed the
edge of the large windows. We stacked 2 straight courses, then
10 angled courses, before moving over to the other side. I cut
the logs, and Bob installed them. As the oddly-shaped wall
grew, we found the need to brace it so that the logs remained
horizontal. The ends of the angled logs also serve as a rafter
for the roof, so they needed to be properly aligned with the rafters
on either side. Because
of the need for staging to reach the wall, and the desire for
repetitious cuts, we concentrated on one side at a time, and stacked
the logs that formed the outside edge of the gable and framed the
edge of the large windows. We stacked 2 straight courses, then
10 angled courses, before moving over to the other side. I cut
the logs, and Bob installed them. As the oddly-shaped wall
grew, we found the need to brace it so that the logs remained
horizontal. The ends of the angled logs also serve as a rafter
for the roof, so they needed to be properly aligned with the rafters
on either side. |
|||
 After
repeating this process on the other side, we continued with the more
conventional straight logs across the middle portion of the
building, and managed to get 6 courses stacked by the end of the
day. It looked like one more day would see us to the top of
the wall, which would be the final step required before we could
continue installing the ceiling boards on the roof. After
repeating this process on the other side, we continued with the more
conventional straight logs across the middle portion of the
building, and managed to get 6 courses stacked by the end of the
day. It looked like one more day would see us to the top of
the wall, which would be the final step required before we could
continue installing the ceiling boards on the roof. |
|||
 The
weather forecast, as of this writing, was not appearing particularly
favorable through the weekend and into next week, but only time will
tell. The
weather forecast, as of this writing, was not appearing particularly
favorable through the weekend and into next week, but only time will
tell. |
|||
WEDNESDAY, JUNE 21, 2006 |
|||
 This was one of those rare, absolutely perfect summer days. A cold front overnight had ushered in drier air with dew points in the low 50s, and the skies were dark blue and clear with full sunshine and a few puffy clouds as the day wore on. The hot sun brought temperatures to about 80, with pleasant breezes. Just perfect, and a day to be savored. I wished I was cruising. Today wasn't much of a day for exciting visual progress. We started installing the pine boards on the roof of the shed dormer, but before we could do that we needed some staging on the back wall of the dormer. We installed Bob's wall brackets and some old planks--kind of rickety! This took a while. Next, there was a bit of fussiness as we prepared to install the soffit vents. I took several boards down to the shop so that I could rip them as needed to accommodate the metal vent strips, and made a cut on the wrong side of some of the boards, so I had to redo them. While I did this, Bob cut off the rafter tails to the proper length. |
|||
 With
the initial two boards cut appropriately, we installed them, nailing
them to the rafters. Then, with Bob on the roof and me below,
we started installing the boards going up. This was slower
than need be because Bob could nail so quickly, I couldn't begin to
keep up with cutting the boards and fetching them not only from the
pile outside, but then also up the stairs inside. But we
managed. With
the initial two boards cut appropriately, we installed them, nailing
them to the rafters. Then, with Bob on the roof and me below,
we started installing the boards going up. This was slower
than need be because Bob could nail so quickly, I couldn't begin to
keep up with cutting the boards and fetching them not only from the
pile outside, but then also up the stairs inside. But we
managed.
Bob had to leave at 11 for some appointments, but we managed to get half the shed dormer boards in place before then. I could have continued installing the board, but frankly the job would have required far too much of a need to be in 3 places at once--lugging boards into the house and upstairs, cutting, and then installing. While it would delay the completion of this section until tomorrow, the actual work would take 1/8 the time with both of us working. |
|||
|
|
|||
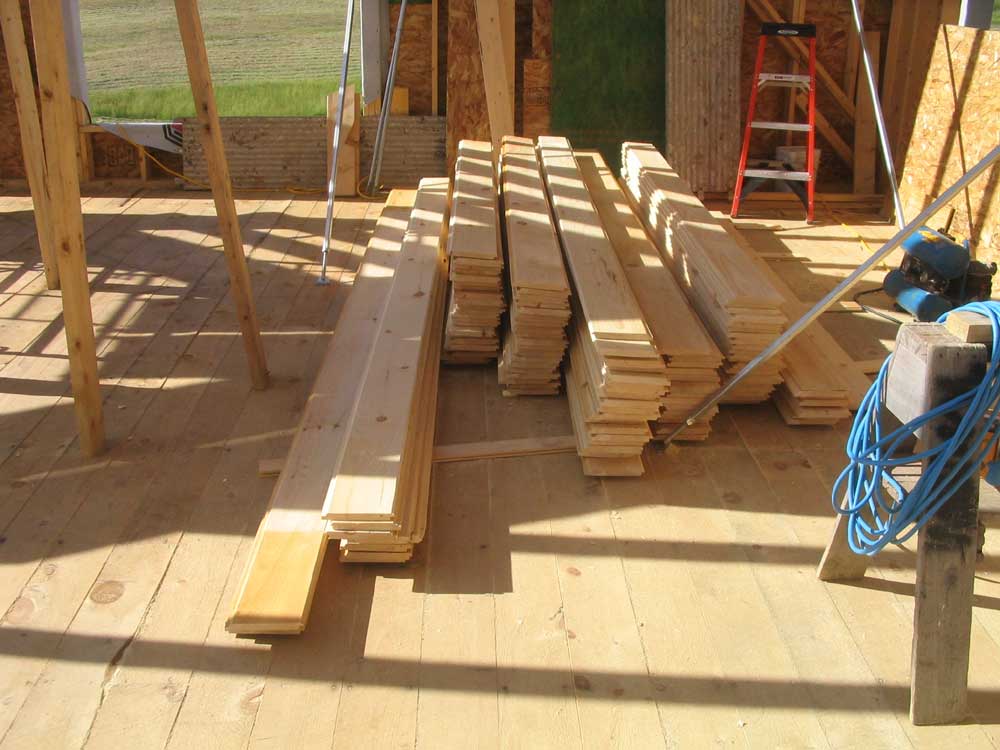 So
once Bob left, I spent the rest of the day hauling ceiling boards
and cutting them to length. (All the boards, in random
lengths, are slightly longer than their intended dimension of 4',
6', 8', 10', 12', 14', or 16'. So to fit properly on the 24"
rafter spacing, each must be cut to the intended dimension first.)
I amassed quite a pile by the end of the day. It was mindless
work, but enjoyable on such a gorgeous, perfect summer day. By
5:00, I had cut and sorted the first of two large piles that had
been stacked out front, stockpiling them for use on the roof. So
once Bob left, I spent the rest of the day hauling ceiling boards
and cutting them to length. (All the boards, in random
lengths, are slightly longer than their intended dimension of 4',
6', 8', 10', 12', 14', or 16'. So to fit properly on the 24"
rafter spacing, each must be cut to the intended dimension first.)
I amassed quite a pile by the end of the day. It was mindless
work, but enjoyable on such a gorgeous, perfect summer day. By
5:00, I had cut and sorted the first of two large piles that had
been stacked out front, stockpiling them for use on the roof. |
|||
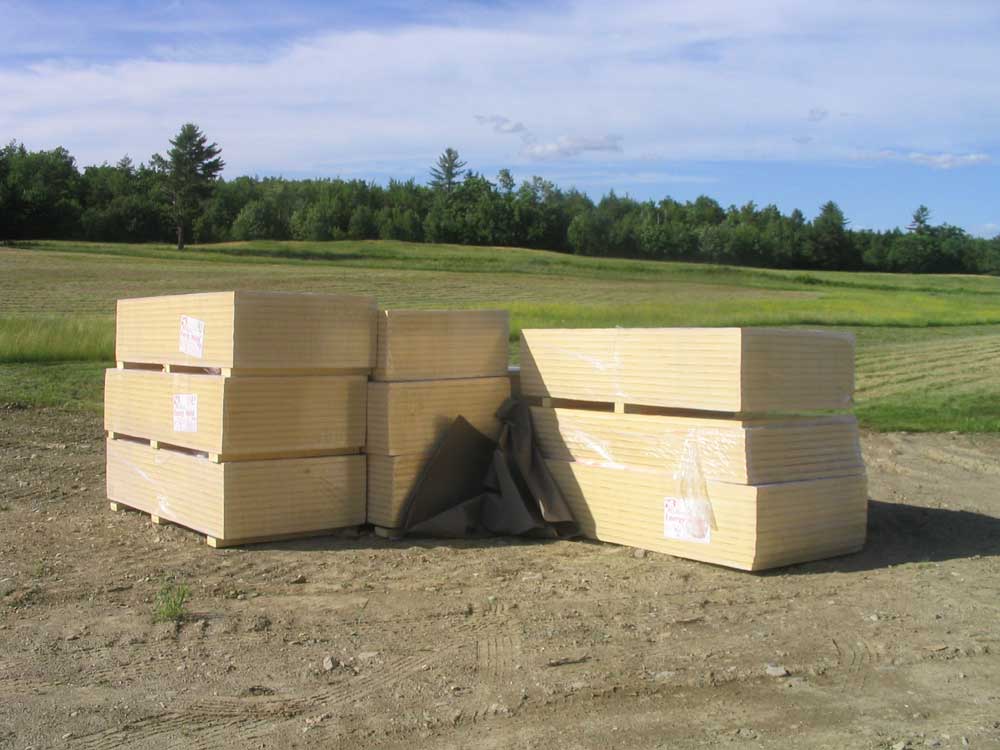 We
also received a large shipment of the polyisocyanurate foam
insulation board for the roof, which would go on following the
ceiling boards. More roofing materials would follow soon. We
also received a large shipment of the polyisocyanurate foam
insulation board for the roof, which would go on following the
ceiling boards. More roofing materials would follow soon. |
|||
TUESDAY, JUNE 20, 2006 |
|||
 First
thing, we cut the second valley rafter--a near opposite of the
first--and installed both. Then, it was on to figuring out the
complicated compound angle cuts on the various rafters that adjoined
the valleys--both from the main ridge at the top and from the side
rafters as well. The measurements were complicated, the cuts
more so, and I found myself standing mostly around with little to
do, as Bob, with his greater experience, was certainly the man for
the job here. First
thing, we cut the second valley rafter--a near opposite of the
first--and installed both. Then, it was on to figuring out the
complicated compound angle cuts on the various rafters that adjoined
the valleys--both from the main ridge at the top and from the side
rafters as well. The measurements were complicated, the cuts
more so, and I found myself standing mostly around with little to
do, as Bob, with his greater experience, was certainly the man for
the job here. |
|||
 There's
not much to tell, really. Completing the rafters for the front
dormer took the entire day; we wrapped up with the final ones
shortly after 4. It was clear to me why one sees so few of
these dormers in today's houses--the labor involved is significant,
and all the more so in our case since all the rafters--and therefore
the cuts--would be exposed in the final product. Typical
dimensional lumber rafters that would be covered with drywall or
interior finish would have been much easier, of course. But
then what fun is that? There's
not much to tell, really. Completing the rafters for the front
dormer took the entire day; we wrapped up with the final ones
shortly after 4. It was clear to me why one sees so few of
these dormers in today's houses--the labor involved is significant,
and all the more so in our case since all the rafters--and therefore
the cuts--would be exposed in the final product. Typical
dimensional lumber rafters that would be covered with drywall or
interior finish would have been much easier, of course. But
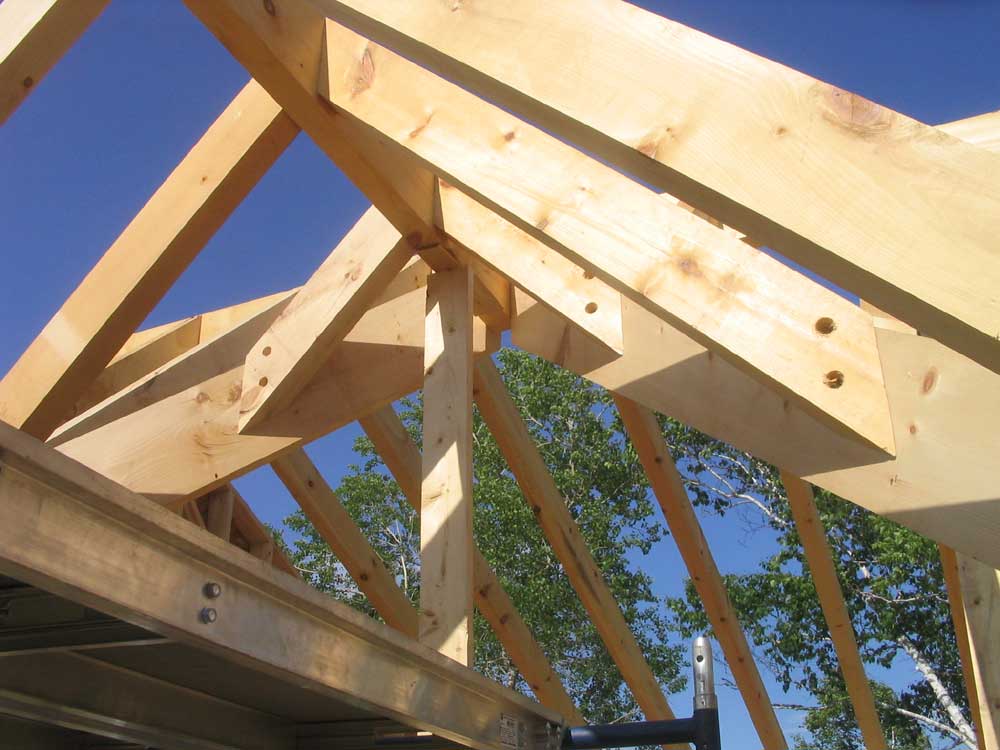
then what fun is that?Further complicating the process was the fact that the rafters butting into the valleys could not be nailed or screwed, since all sides would be exposed. So we drilled for 1-1/4" plugs, and installed the rafters with lags that would be covered with pine plugs later. |
|||
|
|
|||
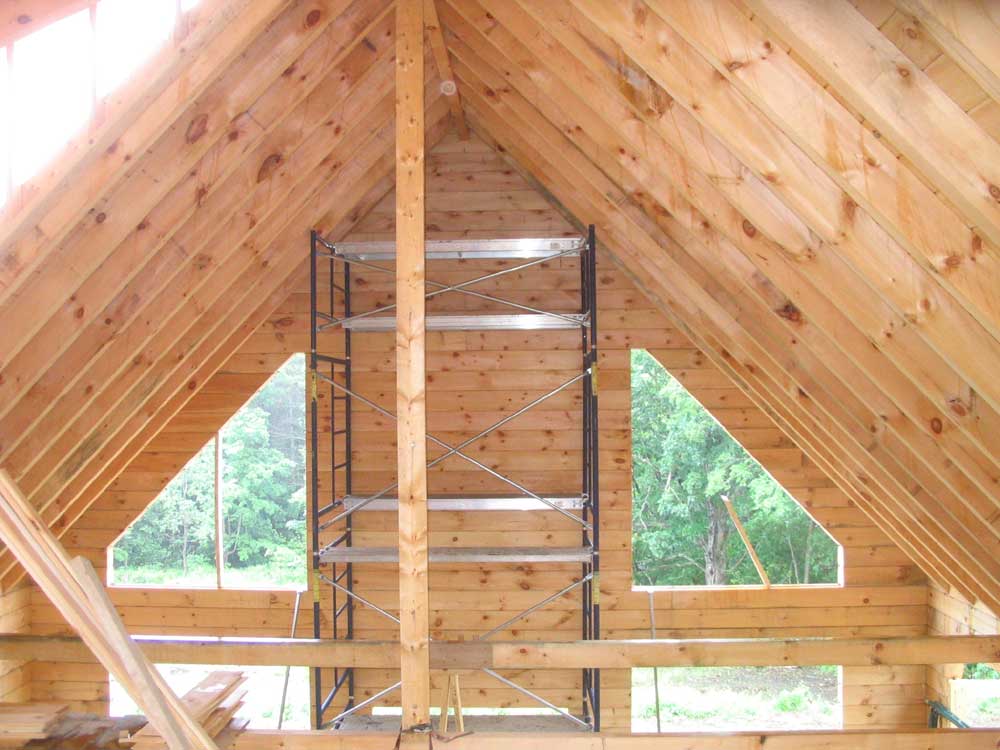
 The
intersection of ridge, rafter, and valleys inside the dormer created
an area that would take some creative thinking--and woodworking--to
cover and highlight in the final event. But that was for
later--and for me to play with at my leisure. It would be a
fun challenge. The
intersection of ridge, rafter, and valleys inside the dormer created
an area that would take some creative thinking--and woodworking--to
cover and highlight in the final event. But that was for
later--and for me to play with at my leisure. It would be a
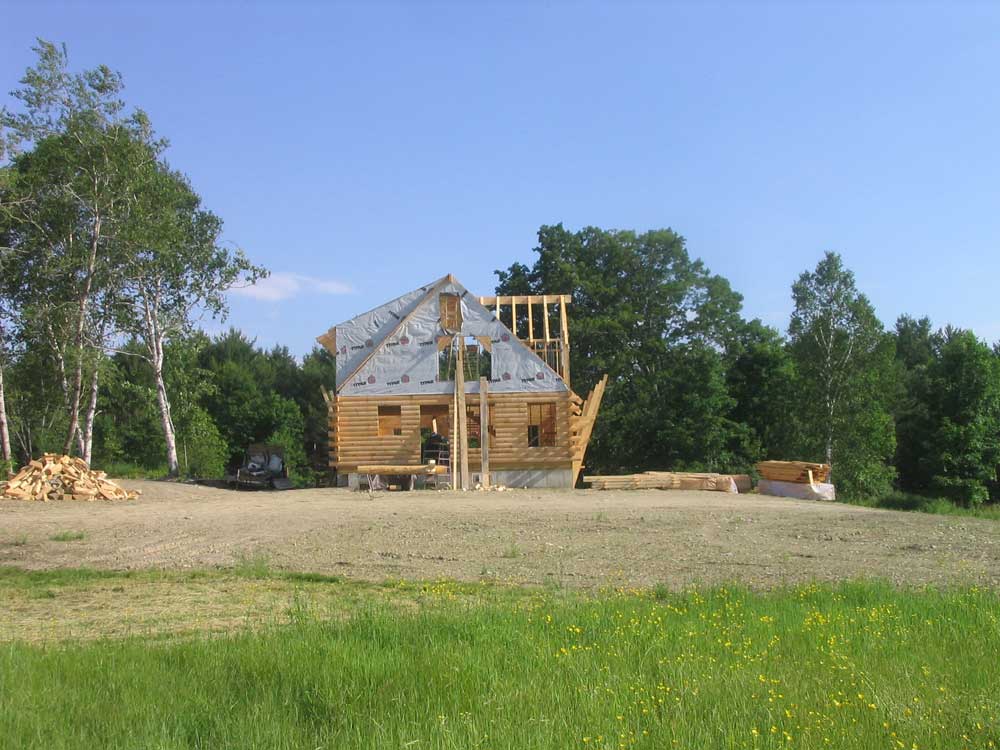
fun challenge.Having the rafters complete really defined, for the first time, the front dormer--and the entire look of the house. I loved it. Next: some roof boarding, and work on the solid log gable end. We are working hard towards the completion of the roof system, but it is very complex and involves many steps, so it won't happen overnight. |
|||
|
|
|||
MONDAY, JUNE 19, 2006 |
|||
 We started today by installing the
fly rafters on the south gable end of the house. The fly
rafters are the outermost set of rafters, set at the end of the roof
overhang. In this case, the fly rafters rest at the very end
of the log overhangs in the top course. We started today by installing the
fly rafters on the south gable end of the house. The fly
rafters are the outermost set of rafters, set at the end of the roof
overhang. In this case, the fly rafters rest at the very end
of the log overhangs in the top course.
We were actually two rafters short and were awaiting delivery of the needed pair sometime this week, but decided to install the pair we did have. Originally, we had hatched another plan, but upon further review it seemed like we ought to just put up these rafters the same way as the others, so we cut, raised, and installed them in a similar fashion. |
|||
Next, we worked on a few framing details upstairs. I installed a couple pieces of missing sheathing on one corner of the shed dormer and stapled the Typar around the corner, and then installed some 2x4 blocking inside the wall above the bottom plate to help support the small rafter tails required for a roof section along the base of the dormer. While I did this, Bob started framing up the southern cheek wall on the shed dormer, using 2x6 lumber. (I'll spare you photos of the blocking I installed. Not exciting at all.) |
|||
|
|
|||
 With that done, we moved on to the
front gable dormer and framed the
two cheek walls. Then, we moved on to the ridge, another
section of 4x12" pine. By now, these were old hat, and it
didn't take very long to cut the beam and put it in position,
supported by the gable end and a temporary post at the inside end.
Then, we started work on the complicated valley rafters. With
little guidance in the plans, it was up to us (mostly Bob) to
determine how they should be laid out, and how in the world they
were to meet up at the top--or not. With that done, we moved on to the
front gable dormer and framed the
two cheek walls. Then, we moved on to the ridge, another
section of 4x12" pine. By now, these were old hat, and it
didn't take very long to cut the beam and put it in position,
supported by the gable end and a temporary post at the inside end.
Then, we started work on the complicated valley rafters. With
little guidance in the plans, it was up to us (mostly Bob) to
determine how they should be laid out, and how in the world they
were to meet up at the top--or not. |
|||
 Eventually,
things fell into place. I won't begin to describe the process,
as I wasn't really that involved. We cut the first
valley rafter and tacked it temporarily in place. This
illustrated the need for a seat cut on the bottom corner, where the
rafter hung down below the adjoining straight rafters that defined
the sides of the dormer. We removed the rafter and made the
cut, but it was the end of the day, so we left the rafter down for
the night. Eventually,
things fell into place. I won't begin to describe the process,
as I wasn't really that involved. We cut the first
valley rafter and tacked it temporarily in place. This
illustrated the need for a seat cut on the bottom corner, where the
rafter hung down below the adjoining straight rafters that defined
the sides of the dormer. We removed the rafter and made the
cut, but it was the end of the day, so we left the rafter down for
the night. |
|||
|
|
|||
SATURDAY, JUNE 17, 2006 |
|||
 Today,
I worked alone to install short pieces of log between the roof
rafters--busywork that needed to be done. The spaces between
the rafters have to be filled, since this area is not only visible
from inside and out, but of course also is open to the air if not
filled. In our case, the entire front of the house would
eventually receive a porch roof that would bury the rafter tails;
similarly, 1/3 of the back of the house would be covered by a gable
screen porch. So I had an opportunity later to seal the
exterior surface of these log pieces with additional sealant or
expanding foam as needed, and the logs wouldn't be exposed to
moisture infiltration anyway. Of course, from inside the
house, the logs would be plainly visible. Today,
I worked alone to install short pieces of log between the roof
rafters--busywork that needed to be done. The spaces between
the rafters have to be filled, since this area is not only visible
from inside and out, but of course also is open to the air if not
filled. In our case, the entire front of the house would
eventually receive a porch roof that would bury the rafter tails;
similarly, 1/3 of the back of the house would be covered by a gable
screen porch. So I had an opportunity later to seal the
exterior surface of these log pieces with additional sealant or
expanding foam as needed, and the logs wouldn't be exposed to
moisture infiltration anyway. Of course, from inside the
house, the logs would be plainly visible. |
|||
 On
the surface, this seemed like a straightforward job. I
measured between each rafter, noting the measurements on a slip of
paper, and then cut pieces of log accordingly. It seemed a
simple task to screw the short pieces into place, but in actuality
it was an extremely fussy job that was complicated by the fact that
many of the rafters were somewhat twisted, causing the opening to be
a different measurement at the bottom (where I had measured and
where the log needed to fit) than at the top. On
the surface, this seemed like a straightforward job. I
measured between each rafter, noting the measurements on a slip of
paper, and then cut pieces of log accordingly. It seemed a
simple task to screw the short pieces into place, but in actuality
it was an extremely fussy job that was complicated by the fact that
many of the rafters were somewhat twisted, causing the opening to be
a different measurement at the bottom (where I had measured and
where the log needed to fit) than at the top. |
|||
 This
made fitting the logs in between very difficult in several places,
as the opening at the top was shorter than that at the bottom;
therefore, the log wouldn't fit in without a fight, and in some
cases the logs required an additional cut to shorten them. I
found that using a pipe clamp to pull the tops of the rafters one
way or another helped make some of the logs fit, but many of them
were difficult nonetheless. This
made fitting the logs in between very difficult in several places,
as the opening at the top was shorter than that at the bottom;
therefore, the log wouldn't fit in without a fight, and in some
cases the logs required an additional cut to shorten them. I
found that using a pipe clamp to pull the tops of the rafters one
way or another helped make some of the logs fit, but many of them
were difficult nonetheless.As a result, the job took far longer than I had expected--about 5 hours to cut and fit about 21 pieces of log. I installed each piece using the same techniques as during the log wall construction, with foam gasket tape and Sikaflex. I also had to use Sikaflex to seal the ends of the log pieces against the rafters; with the tight fit, this meant that most of the sealant ended up pushed down to the bottom of the log, where it squeezed out when I drove the log screws home--more mess to clean up later. |
|||
 Afterwards,
I spent some time cleaning up the work site, both inside the house
and out, to remove cut pieces of rafter, miscellaneous clutter, and
to sweep the finally-dry floor inside. I looked forward to
another busy week ahead, as we planned to press onward with the
tasks required for roofing. Afterwards,
I spent some time cleaning up the work site, both inside the house
and out, to remove cut pieces of rafter, miscellaneous clutter, and
to sweep the finally-dry floor inside. I looked forward to
another busy week ahead, as we planned to press onward with the
tasks required for roofing. |
|||
FRIDAY, JUNE 16, 2006 |
|||
| It
was another productive day: how could it not be, with sparkling blue
skies, pleasant breezes, low humidity, and temperatures in the low
80s? We had a change of plan first thing this morning. Originally, we had thought that we might work on the front gable dormer, but Bob suggested that we just go ahead and move the staging, get the last section of ridge up, and work on the roof rafters, since we were sort of in a groove. I agreed, since I looked forward to further reducing the big pile of long rafters on the ground. |
|||
 Moving
the staging and preparing took a good part of the morning. We
needed 3 full lifts of staging, plus a half lift (3') to reach the
same level as the other set of staging that was already set up in
the main part of the house, and with more and more obstructions in
the way, it took some time to work everything around, remove the
staging from the second floor, and set everything up again against
the south gable wall. Moving
the staging and preparing took a good part of the morning. We
needed 3 full lifts of staging, plus a half lift (3') to reach the
same level as the other set of staging that was already set up in
the main part of the house, and with more and more obstructions in
the way, it took some time to work everything around, remove the
staging from the second floor, and set everything up again against
the south gable wall. |
|||
 With
the staging up, our next move was to install the final ceiling tie
in the main room; this tie, eventually, would become part of a
job-fabricated truss, built in place between the rafters and the
tie. The truss was necessary because of the full width span,
and the vertical members would be required to essentially hold up
the ceiling tie. The ceiling ties--three of them in the living
room, the open part of the building--are required to help hold the
walls in place against the tendency for the rafters to spread the
tops of the walls outward. With
the staging up, our next move was to install the final ceiling tie
in the main room; this tie, eventually, would become part of a
job-fabricated truss, built in place between the rafters and the
tie. The truss was necessary because of the full width span,
and the vertical members would be required to essentially hold up
the ceiling tie. The ceiling ties--three of them in the living
room, the open part of the building--are required to help hold the
walls in place against the tendency for the rafters to spread the
tops of the walls outward.In any event, we built the tie of two 14' pieces of 4"x8" pine, and installed them using a temporary post in the center at the seam. We further reinforced the seam temporarily with plywood gussets on each side; later, once we finished the truss, I'd make templates of the joints and send out for some steel truss plates to bolt in place and secure the various members together. More on this later. |
|||
 Our
next move was to install the final portion of ridgepole. From
the ground, with no second floor to stand on, it seemed impossibly
high. However, we soon came up with a way to lift the
beam--first to the second floor, then onto a lower portion of the
pipe staging, then onto the top of the staging, and finally into
place. To support the outer (gable) end, we built a tall
T-shaped post from 2x6 lumber, which we strapped in place at the end
of the staging and ran all the way to the floor beneath. It
was lunchtime by the time we accomplished all of this, but now we
were ready to go. Our
next move was to install the final portion of ridgepole. From
the ground, with no second floor to stand on, it seemed impossibly
high. However, we soon came up with a way to lift the
beam--first to the second floor, then onto a lower portion of the
pipe staging, then onto the top of the staging, and finally into
place. To support the outer (gable) end, we built a tall
T-shaped post from 2x6 lumber, which we strapped in place at the end
of the staging and ran all the way to the floor beneath. It
was lunchtime by the time we accomplished all of this, but now we
were ready to go. |
|||
 After
lunch, we somehow managed to install the final 14 rafters--7 each
front and back. Since there was no second floor in this area,
we decided to build temporary platforms from 2x6 lumber and OSB
sheathing above the ceiling ties, allowing us to push the rafters up
onto the platforms from the ground, similar to the way we did
previously, and then up onto the staging from there. It was
definitely more work than yesterday, since the grade was a bit lower
at this end of the house, making the initial lift a foot or two
higher, and the temporary platforms were not as easy to work from as
the second floor had been. A couple of the rafters were
incredibly heavy, as well, with high water and pitch content.
Fortunately, these were the exception rather than the rule. After
lunch, we somehow managed to install the final 14 rafters--7 each
front and back. Since there was no second floor in this area,
we decided to build temporary platforms from 2x6 lumber and OSB
sheathing above the ceiling ties, allowing us to push the rafters up
onto the platforms from the ground, similar to the way we did
previously, and then up onto the staging from there. It was
definitely more work than yesterday, since the grade was a bit lower
at this end of the house, making the initial lift a foot or two
higher, and the temporary platforms were not as easy to work from as
the second floor had been. A couple of the rafters were
incredibly heavy, as well, with high water and pitch content.
Fortunately, these were the exception rather than the rule. |
|||
|
|
|||
 All
the rafters on each side required the ends to be cut off, since both
sides would eventually be buried beneath porch roof framing--the
full-length front porch, and the screen porch on the back.
Later, any exposed rafters remaining will be cut off square at the
ends as appropriate, but none of these remaining 14 would be exposed
in the final product. All
the rafters on each side required the ends to be cut off, since both
sides would eventually be buried beneath porch roof framing--the
full-length front porch, and the screen porch on the back.
Later, any exposed rafters remaining will be cut off square at the
ends as appropriate, but none of these remaining 14 would be exposed
in the final product. |
|||
 Using
the last of our reserves--which were well-drained from the getgo
thanks to Thursday's efforts--Bob and I managed to install all the
rafters, finishing up about 5:30. Our progress was no doubt
enhanced by Heidi's retrieval of a couple very nice milkshakes late
in the afternoon, which were just what was required to cool off and
re-energize for a final push. Using
the last of our reserves--which were well-drained from the getgo
thanks to Thursday's efforts--Bob and I managed to install all the
rafters, finishing up about 5:30. Our progress was no doubt
enhanced by Heidi's retrieval of a couple very nice milkshakes late
in the afternoon, which were just what was required to cool off and
re-energize for a final push. |
|||
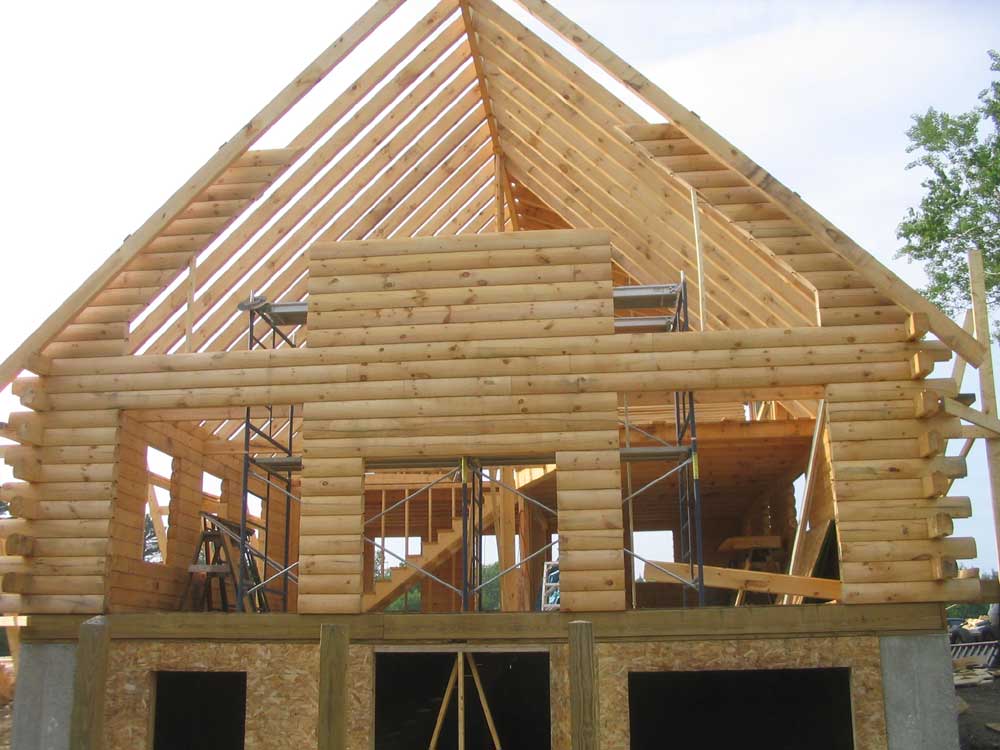
 Later,
we have four more rafters to install--2 on each of the gable ends,
at the end of the 12" overhangs. But now the bulk of the work
was done, and the final shape of the house was finally
revealed. Later,
we have four more rafters to install--2 on each of the gable ends,
at the end of the 12" overhangs. But now the bulk of the work
was done, and the final shape of the house was finally
revealed.Next week, look for the following: log gable wall, completion of front dormer framing and roof rafters, and installing the ceiling boards. Then, after a few final details, it should be on to the next steps in the roof system, which comprises 5 layers in the end. |
|||
|
|||