|
|||
|
|
~ The bLog Home ~ |
||
SATURDAY, SEPTEMBER 30, 2006 |
|||
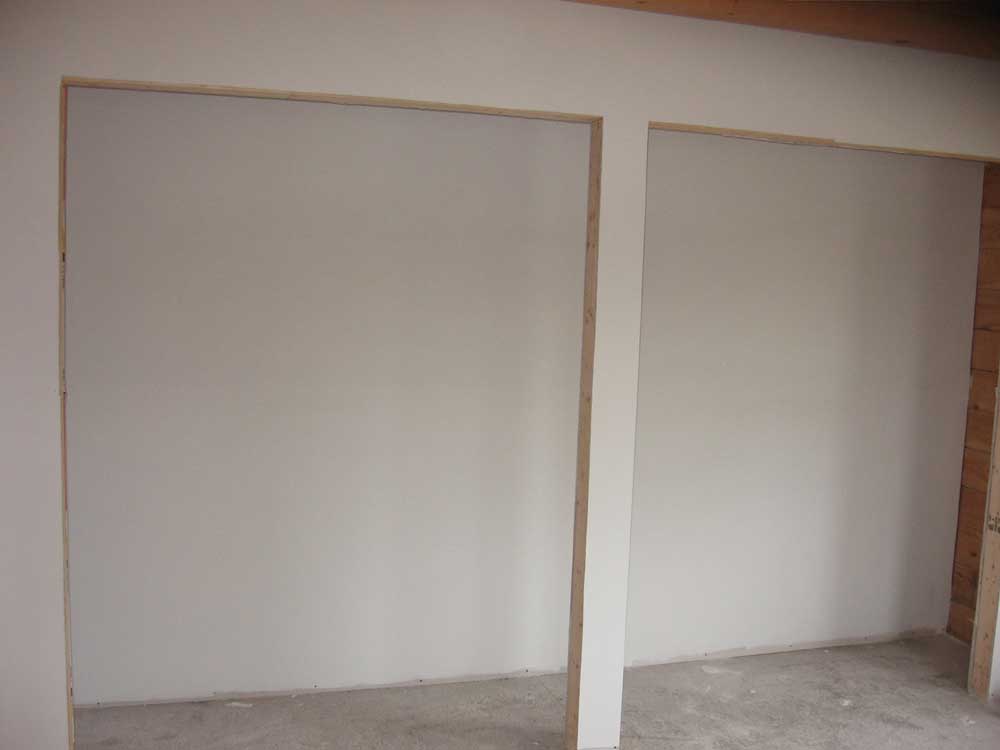
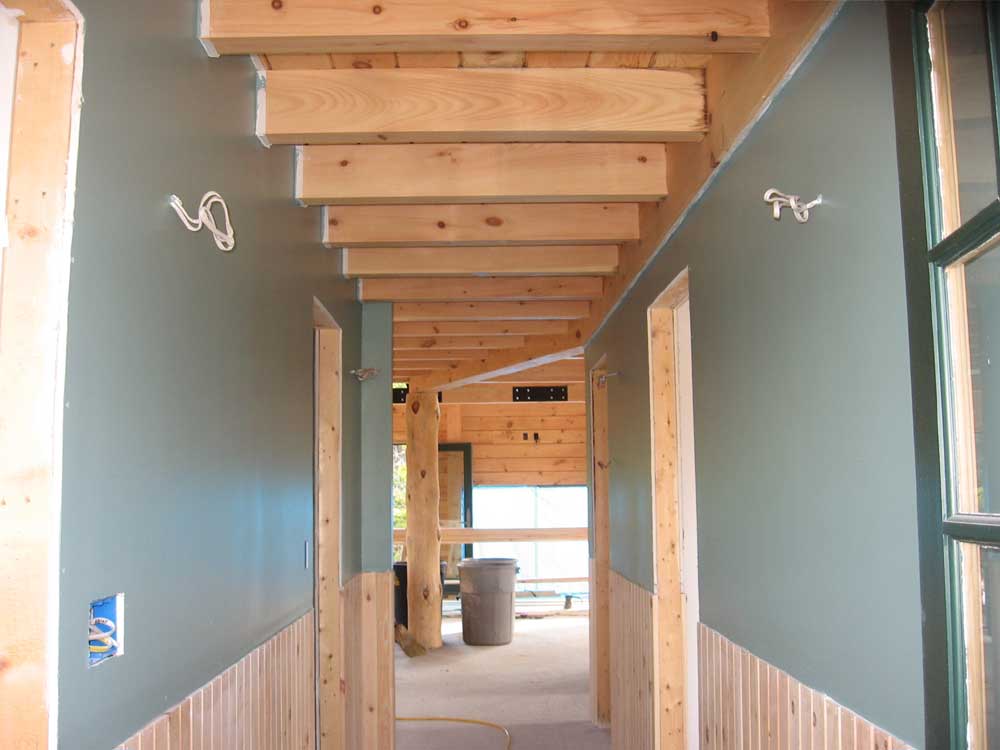
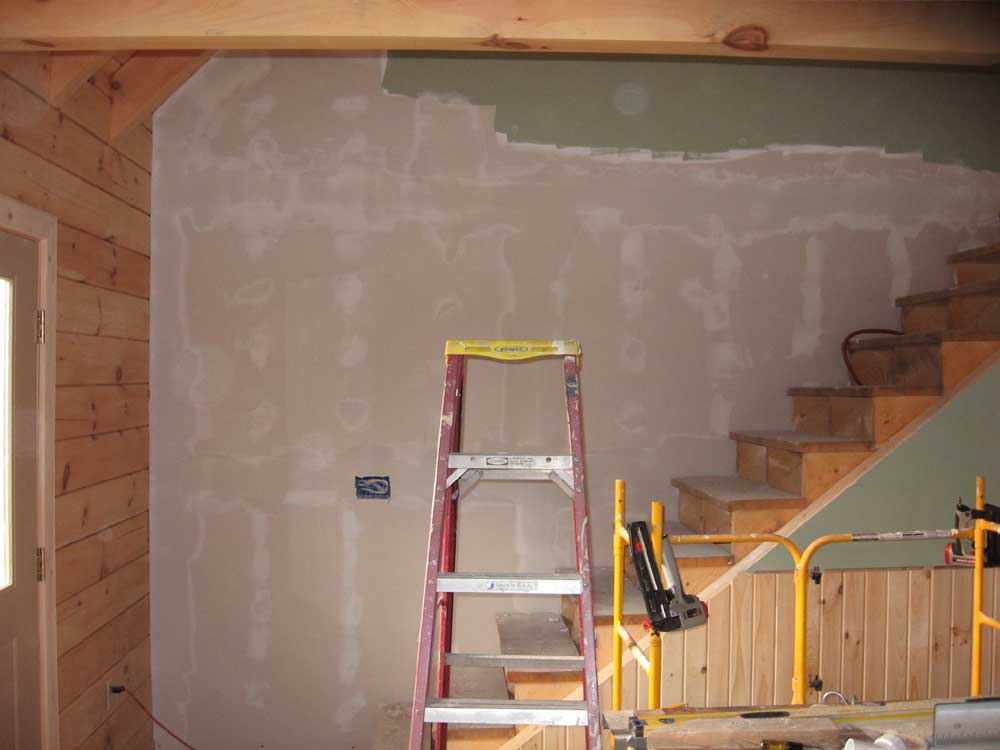
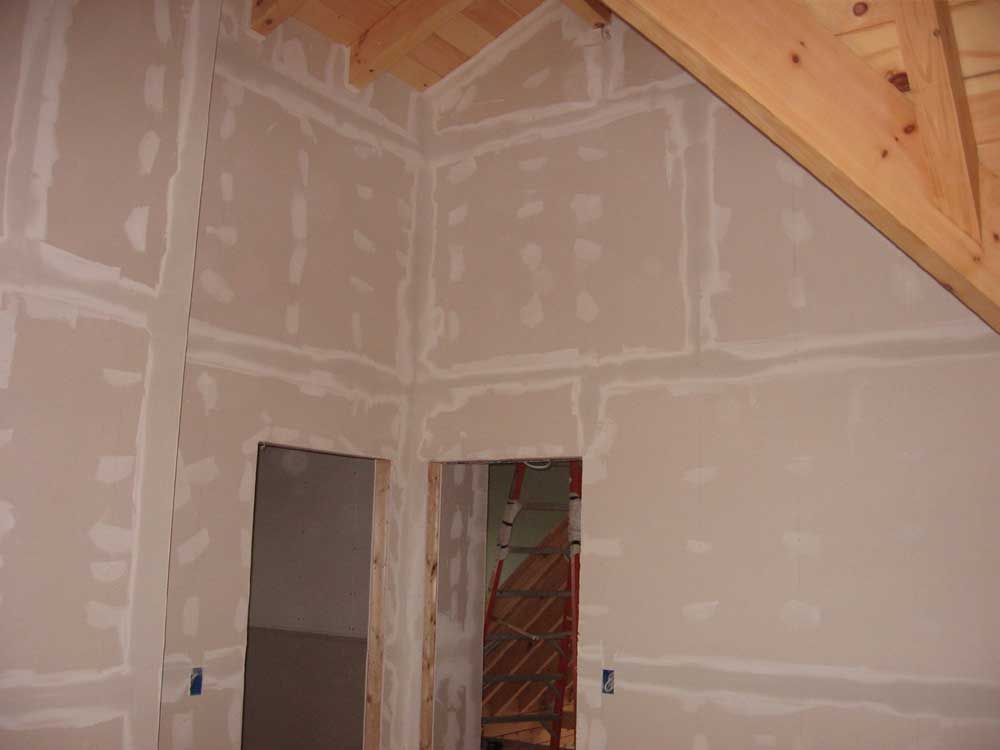
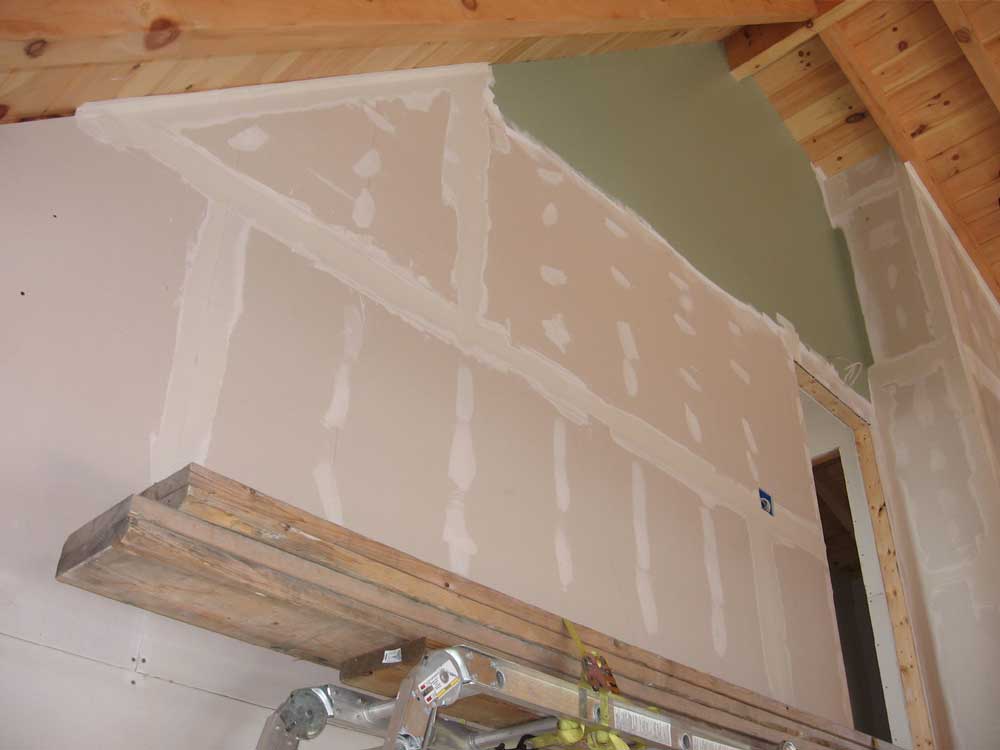
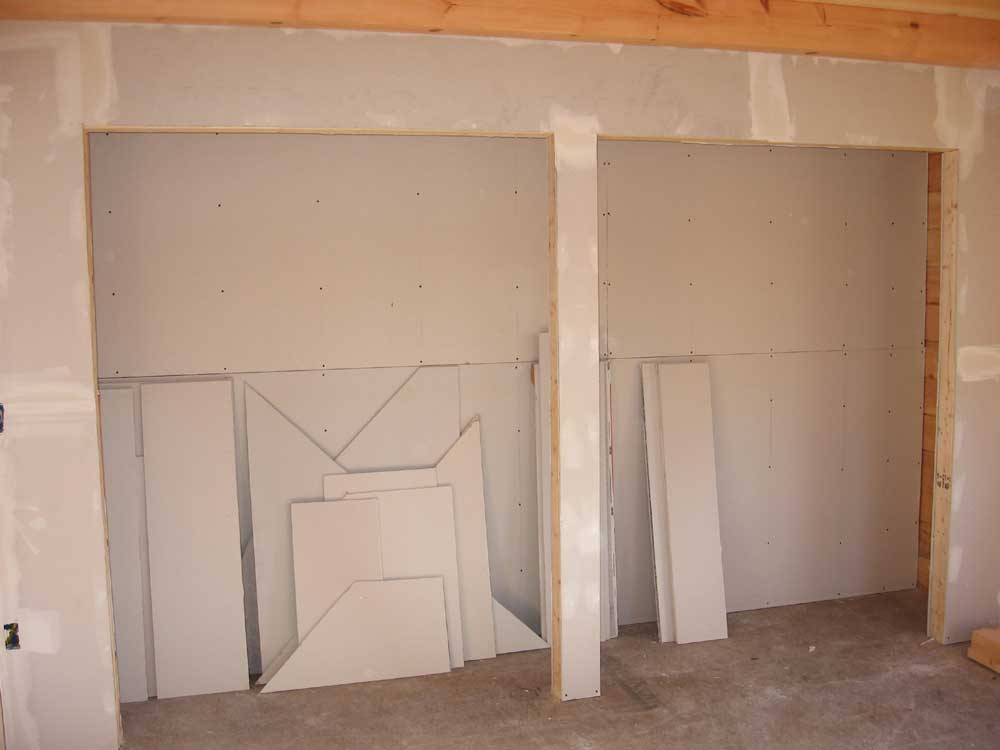
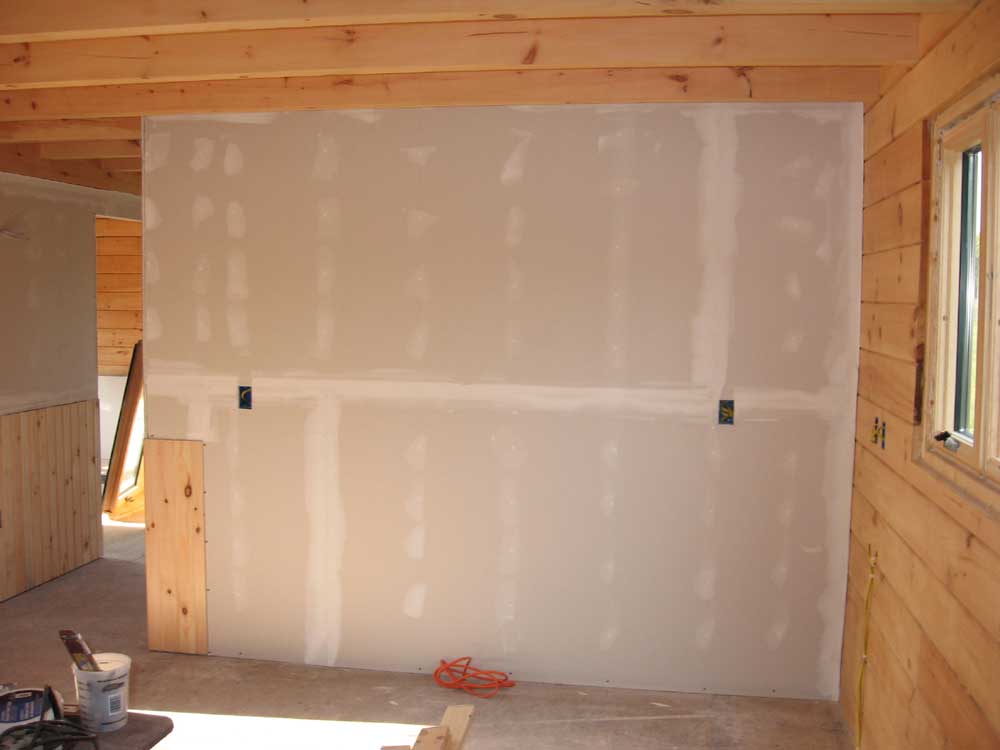
| September was a busy month, with a lot of changes at the house. We began the month with the final plumbing steps, and now, today, the house feels so different, with sheetrock, trim, and paint well underway. | |||
 While
I was fresh and sharp in the morning, I began by trimming off the
excess drywall tape in the hallway and stairway, now that these
areas were painted and otherwise complete. This work requires
care and patience, and I know better than to ever try this delicate
step at the end of a long day. I was pleased with how the
edges looked. While
I was fresh and sharp in the morning, I began by trimming off the
excess drywall tape in the hallway and stairway, now that these
areas were painted and otherwise complete. This work requires
care and patience, and I know better than to ever try this delicate
step at the end of a long day. I was pleased with how the
edges looked. |
|||
|
|
|||
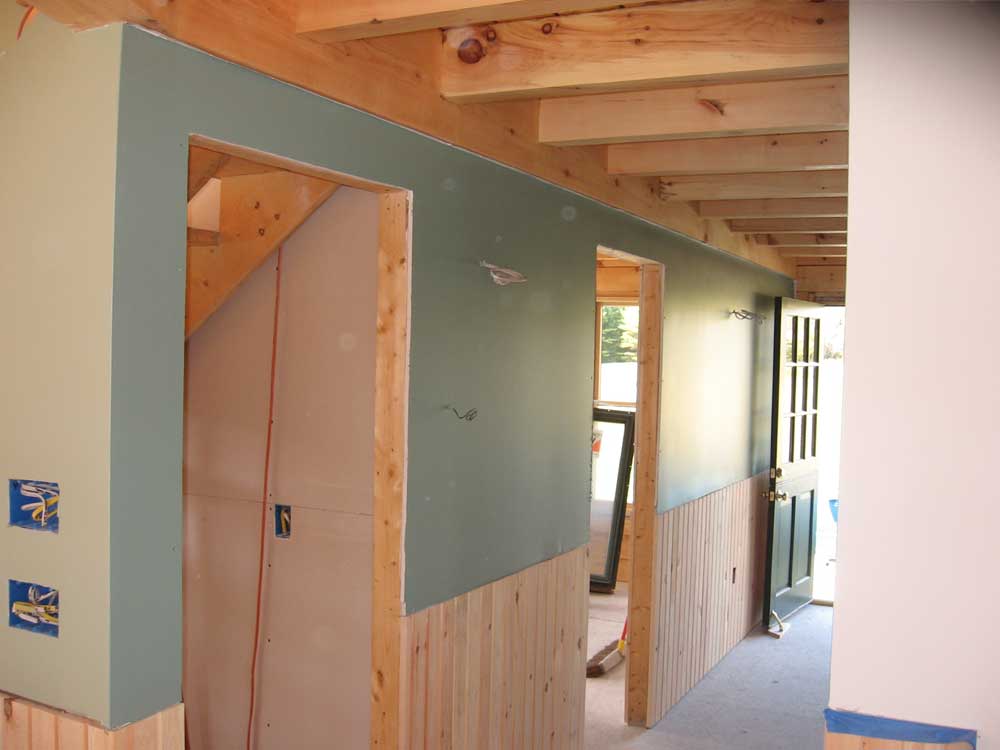
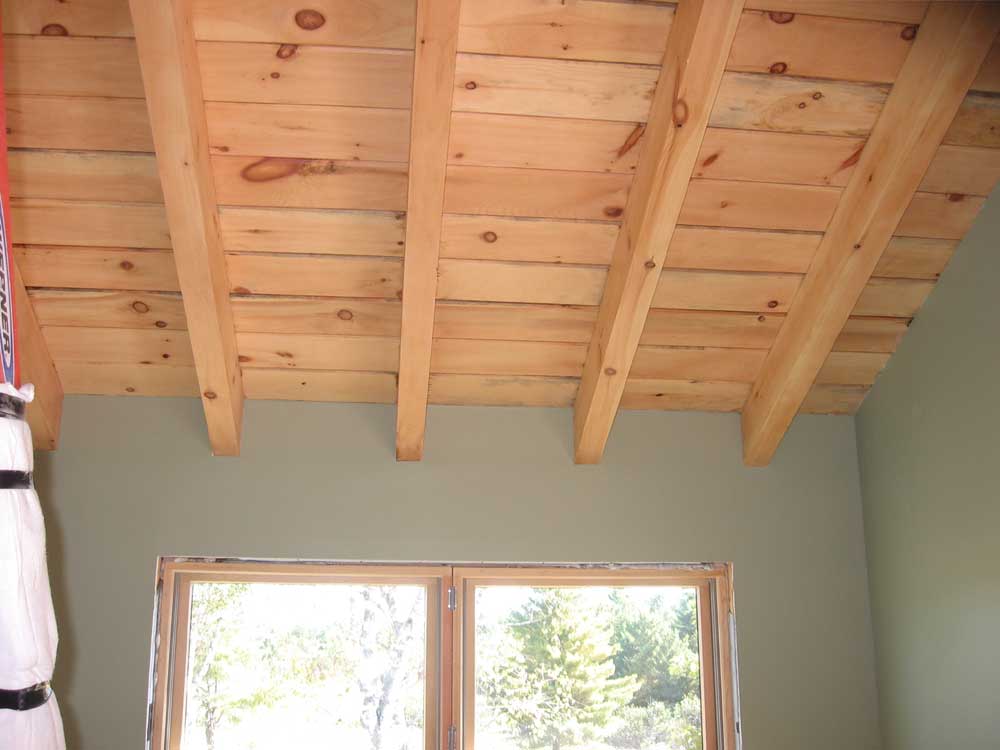
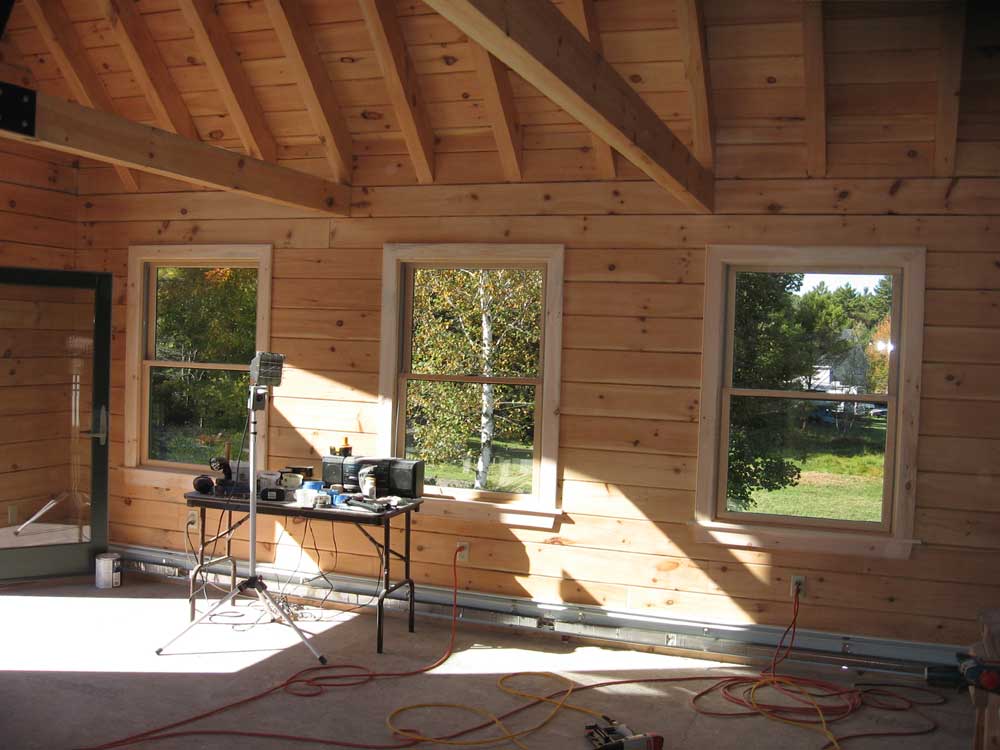 I
continued with a bit more trim work. I trimmed out the final
window in the great room, leaving only the French doors and the
trapezoid windows to complete. I
continued with a bit more trim work. I trimmed out the final
window in the great room, leaving only the French doors and the
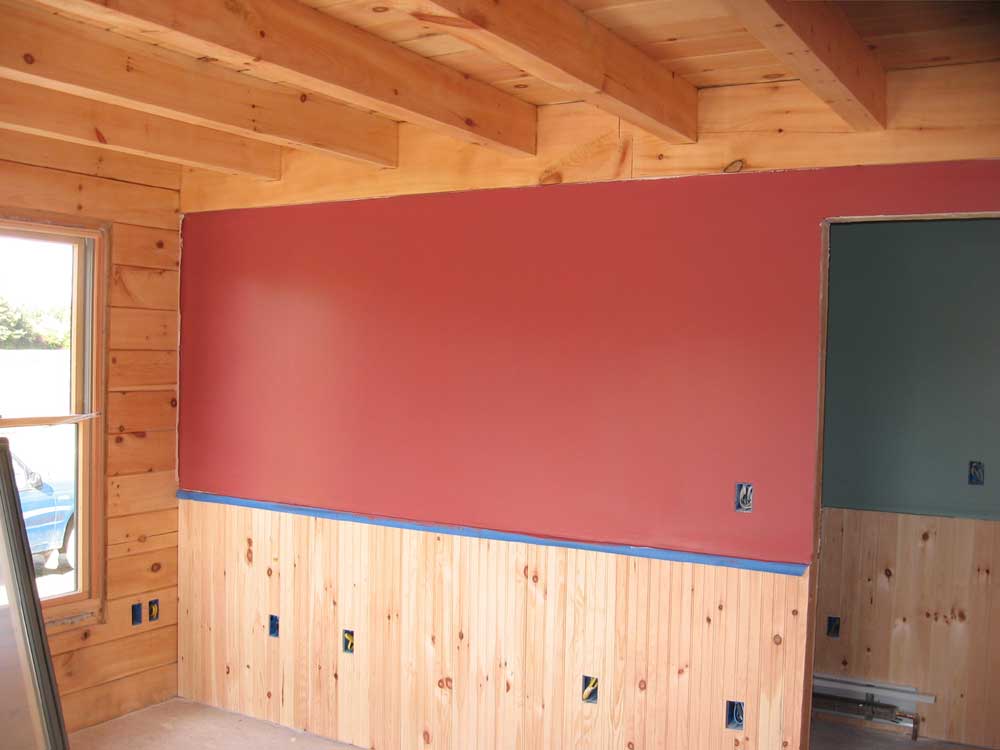
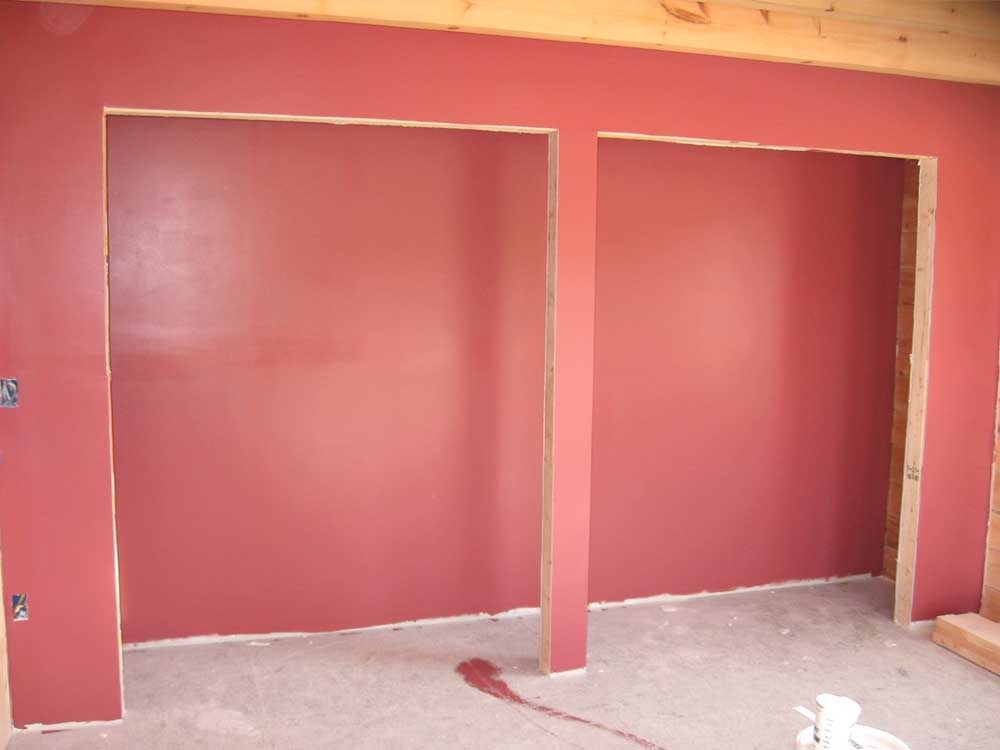
trapezoid windows to complete.Afterwards, I shifted into paint mode. I painted the ceilings in the pantry and downstairs bathroom with ceiling white, always an unsatisfying but ultimately necessary task. As white as the drywall primer seemed, it was clear to see that it actually contained quite a bit of gray, once compared with the stark whiteness of the ceiling paint. Heidi came up and wanted to paint the walls in her craft room, so I got her set up with that. The color she chose was the bold Rambling Rose, though it looked more maroon or burgandy to me. Though I might never have chosen it, I really liked how it looked against the natural wood walls and structure in the room. |
|||
|
|
|||
|
While she worked on that, I painted the pantry, downstairs bathroom, and kitchen wall with Dover White, a basic off white. After the bold colors used elsewhere, this seemed so boring. However, the pantry is a utilitarian room, and needs basic paint; the kitchen wall will be completely covered with cabinets, stove, and backsplash, and I probably didn't even need to paint it; and the bathroom, with two log walls and tile floor and shower, didn't necessarily cry out for a bold color, at least not yet. Finishing this up took till about lunchtime. After lunch, I put the second coats on all these spaces, including the craft room. |
|||
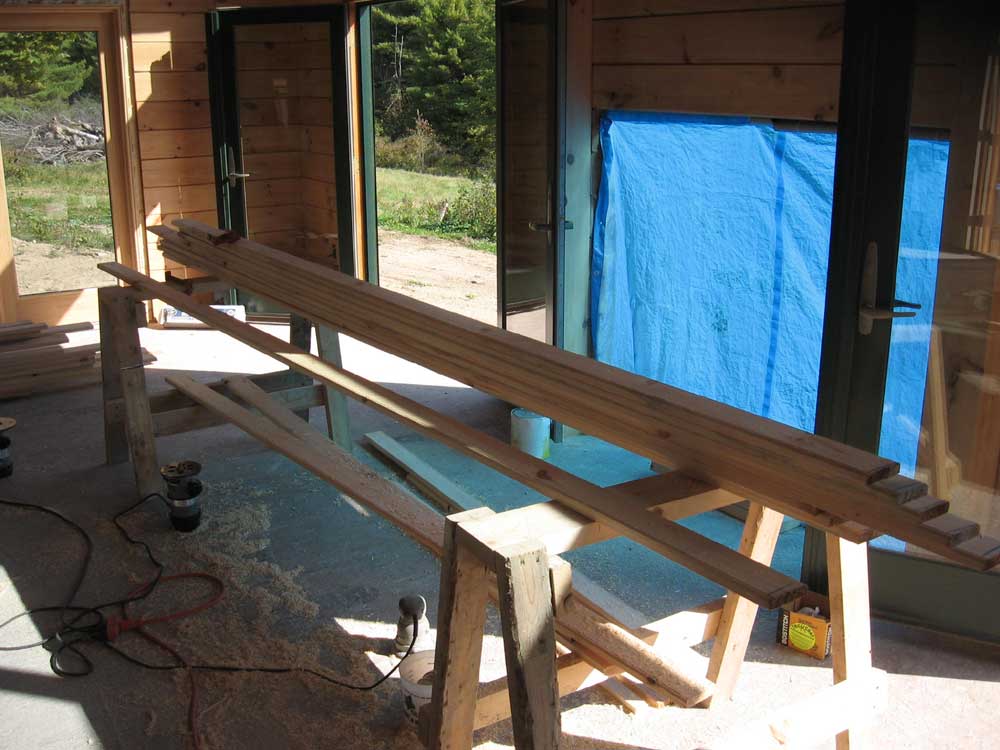
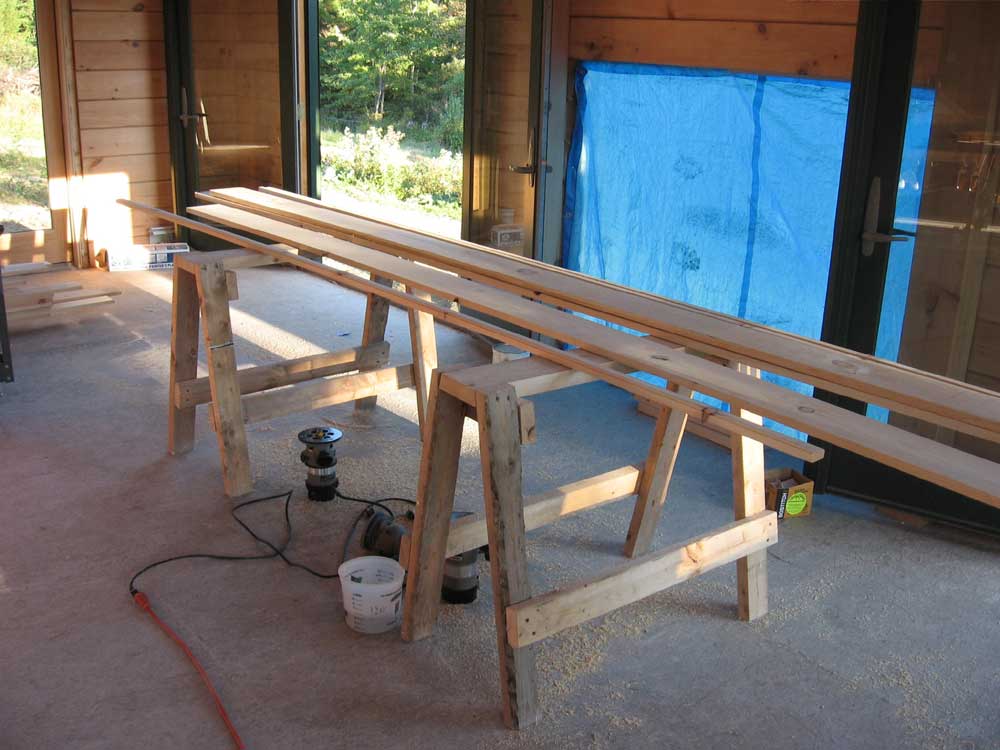
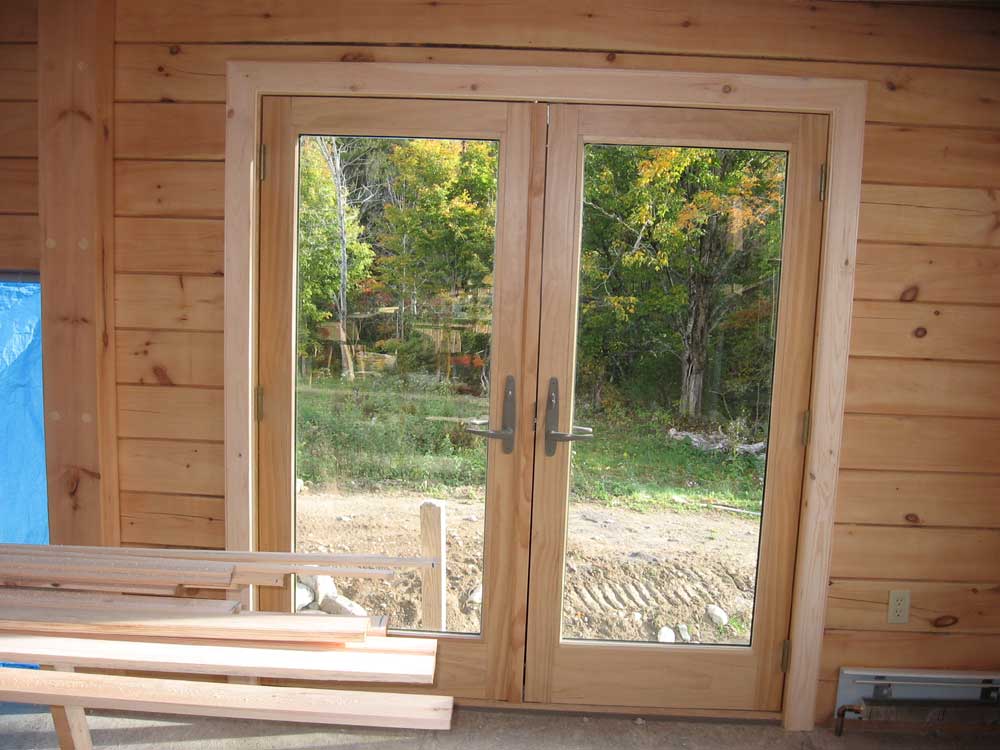 For
the remainder of the afternoon, I worked on trim. I had to
mill more of my trim stock, and also had to rip some pieces to 1/2"
and 3/4" width to use as extension jambs on the French doors, which
weren't quite flush with the inside of the log walls. Since
they were supposed to be flush, no extension jambs were provided. For
the remainder of the afternoon, I worked on trim. I had to
mill more of my trim stock, and also had to rip some pieces to 1/2"
and 3/4" width to use as extension jambs on the French doors, which
weren't quite flush with the inside of the log walls. Since
they were supposed to be flush, no extension jambs were provided. |
|||
 Once
I had the milling out of the way, I installed the trim on two of the
French doors, starting with the narrow extension jambs. I ran
out of time and couldn't complete the third door; in fact, it was
late enough, and I was tired enough, that just fitting the top and
final piece on the second door was a struggle. Once
I had the milling out of the way, I installed the trim on two of the
French doors, starting with the narrow extension jambs. I ran
out of time and couldn't complete the third door; in fact, it was
late enough, and I was tired enough, that just fitting the top and
final piece on the second door was a struggle. |
|||
|
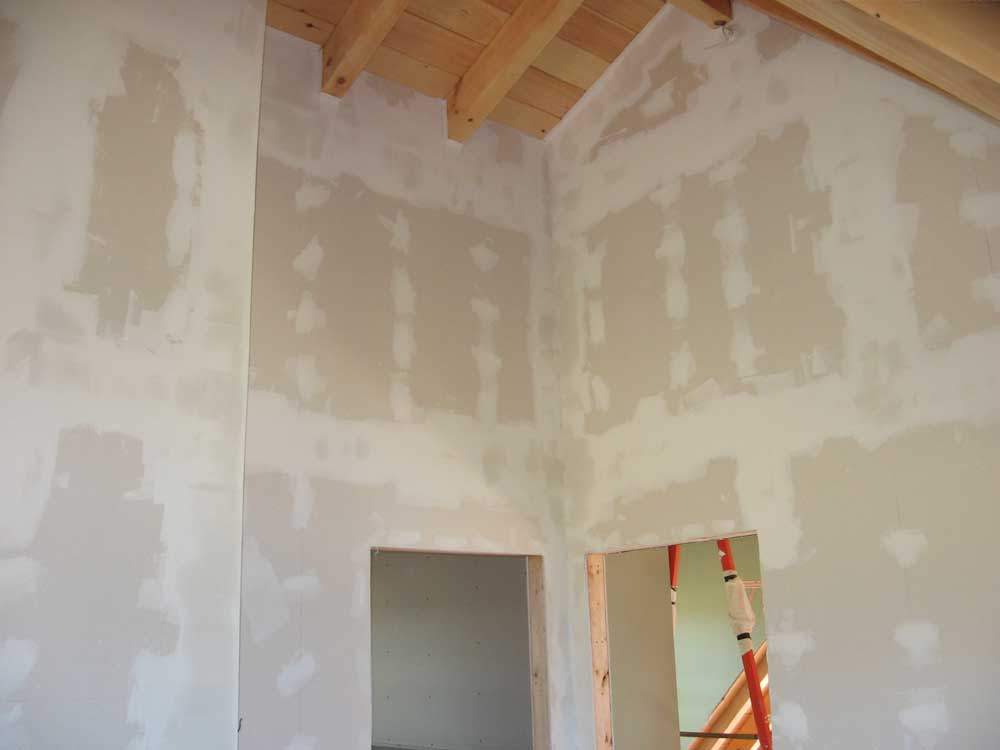
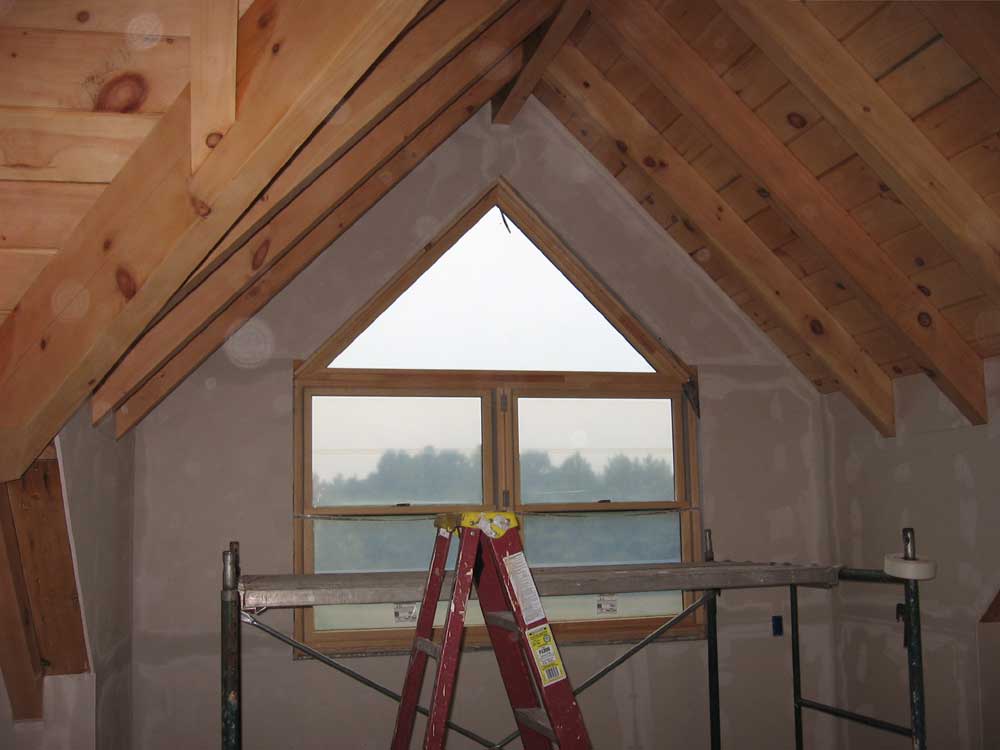
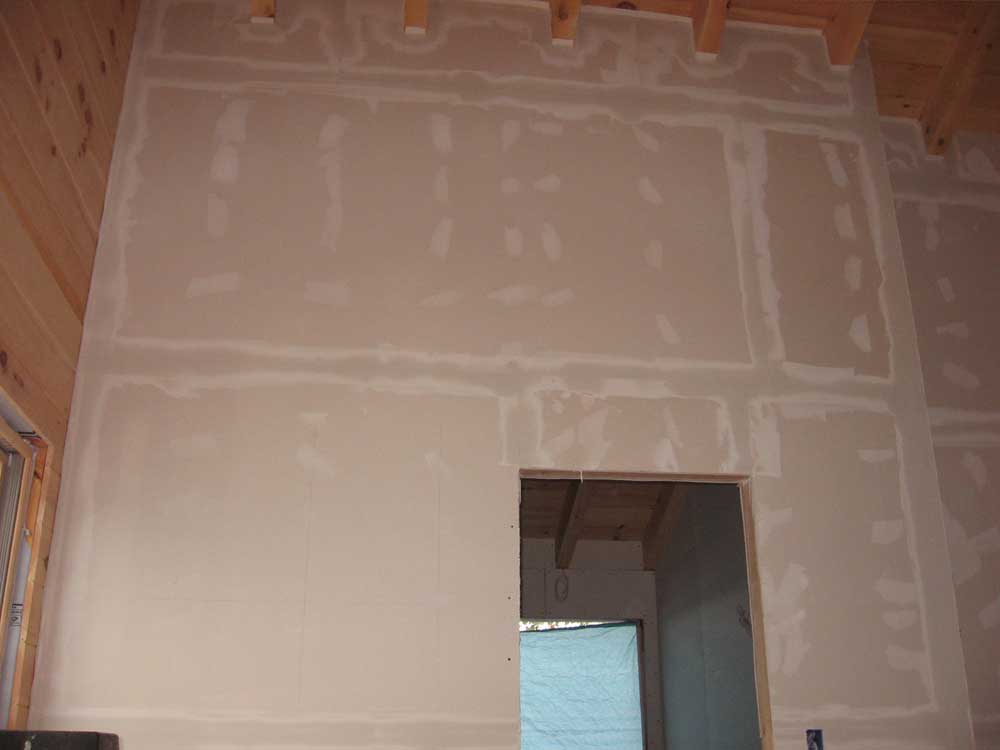
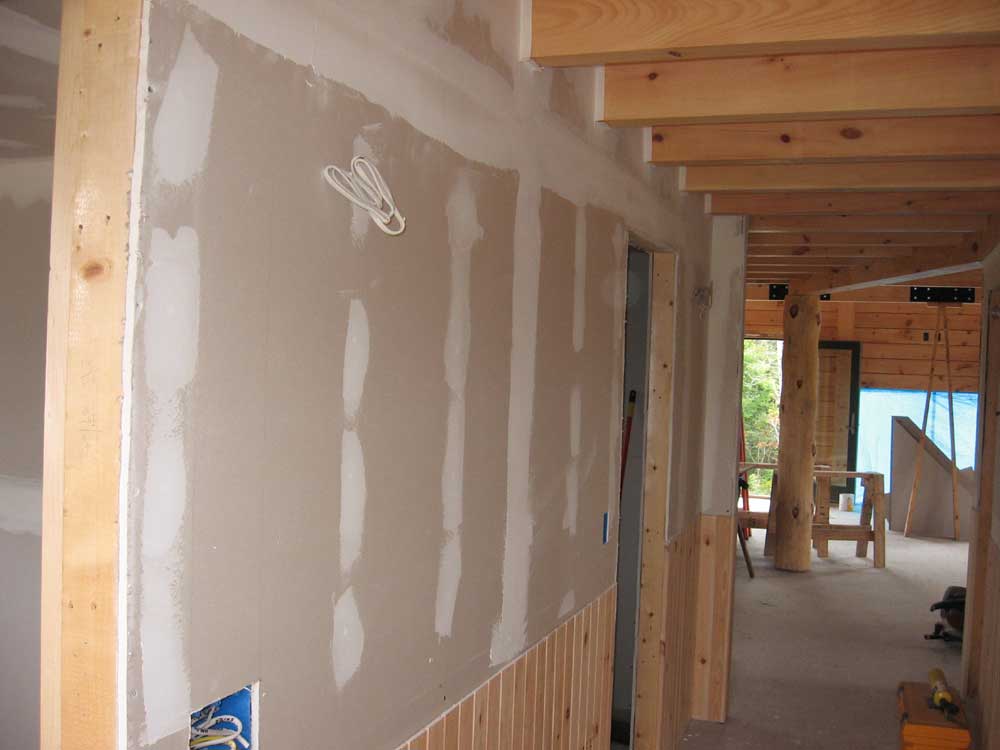
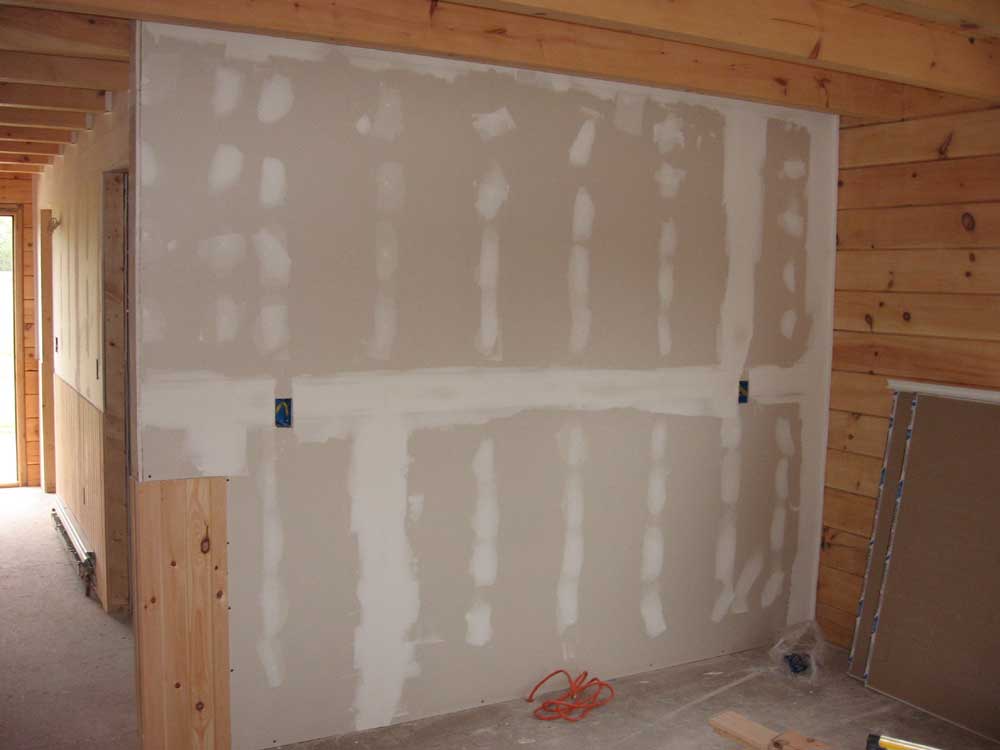
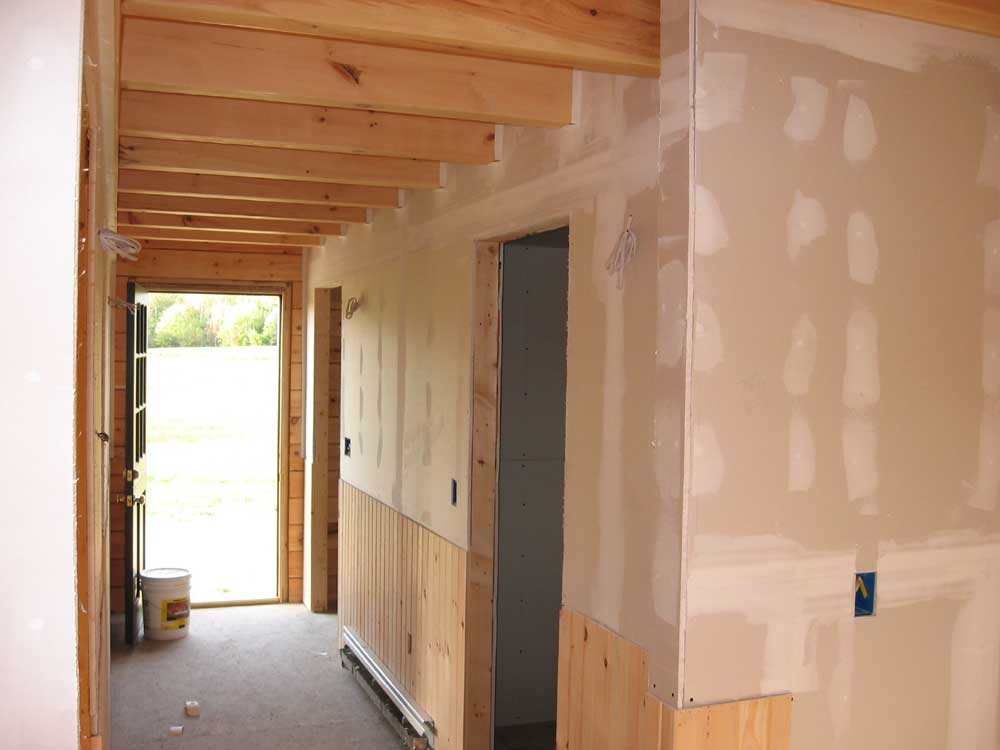
The first floor is feeling really close to completion. All the sheetrock walls are painted and complete, the trim is well underway, and all that remains is the continuation of the window trim in the other rooms, tile in the bathroom, and the wood flooring. Flooring and kitchen cabinets could be delivered just about any time now, so things will continue to move along. Upstairs, there is quite a bit more work ahead. The bedroom walls need to be sanded, primed, and painted; the sheetrock in the closet needs completion--just the little band up in between the rafters--and then requires mudding, taping, priming, and painting; and the master bathroom requires substantial work, with cement board, additional sheetrock (up at the rafters), mud bed in the shower, mudding and taping, tile, and additional plumbing. October will be a busy month, but if the flooring and cabinets arrive on time, the move-in completion of the house seems on schedule for sometime in November. In addition, work will begin sometime on the exterior porches and decks. That should be late this coming week, or the week after. |
|||
FRIDAY, SEPTEMBER 29, 2006 |
|||
|
I got started early down in the shop,
where I ripped some pieces of trim into 1-1/2" widths for use as
window stools, and milled rabbets on the backs of the trim pieces
slated for the hallway. Then, since it was raining outside, I
wrapped the pieces in plastic so that I could get them up to the
house without them getting wet. Up at the house, I began the day in the worst way possible: sanding drywall. Originally, I intended to just sand the bottom portion of the stair wall so that I could prime it, but once I got going I decided to continue and sand the interior of Heidi's craft room closet. |
|||
|
I meant for that to be it, but before long I found myself immersed in the pantry, sanding the walls and ceiling there. As much as I didn't want to do it, it seemed to just make sense to get it done, which would complete all the sanding on the first floor. It made a huge, dusty mess of everything, but once I was done I sure was glad that I had just gotten it done. Once I cleaned up, I applied drywall primer to all three areas. |
|||
|
|
|||
 Afterwards,
I applied the first coat of the sage green to the stairs.
After lunch, the paint was dry enough for the second coat, so I did
that, completing the area. Afterwards,
I applied the first coat of the sage green to the stairs.
After lunch, the paint was dry enough for the second coat, so I did
that, completing the area. |
|||
 For
the rest of the afternoon, I worked on trim. I trimmed out the
double window in the loft, which required the stock extension jambs,
using the same techniques employed on the other windows. Then,
I completed the trim on the edge of the dormer kneewall, finishing
up the area that I began last week from the staging. The
new section of trim did not yet have the polyurethane applied, which
accounts for the color difference. I expect to apply poly to
all the applied trim once I get a little more installed. For
the rest of the afternoon, I worked on trim. I trimmed out the
double window in the loft, which required the stock extension jambs,
using the same techniques employed on the other windows. Then,
I completed the trim on the edge of the dormer kneewall, finishing
up the area that I began last week from the staging. The
new section of trim did not yet have the polyurethane applied, which
accounts for the color difference. I expect to apply poly to
all the applied trim once I get a little more installed. |
|||
 I
finished up the day with one more window trim out down in the great
room. It was a full day, yet it seems so insignificant when I
put it to words! I
finished up the day with one more window trim out down in the great
room. It was a full day, yet it seems so insignificant when I
put it to words! |
|||
THURSDAY, SEPTEMBER 28, 2006 |
|||
|
I began with the second coat of mud on
the last section of the stairway wall, which went quickly.
First, I had to cut the pieces to length--38". Once I had all the pieces cut, I installed them as before, which was straightforward and didn't take too long. |
|||
|
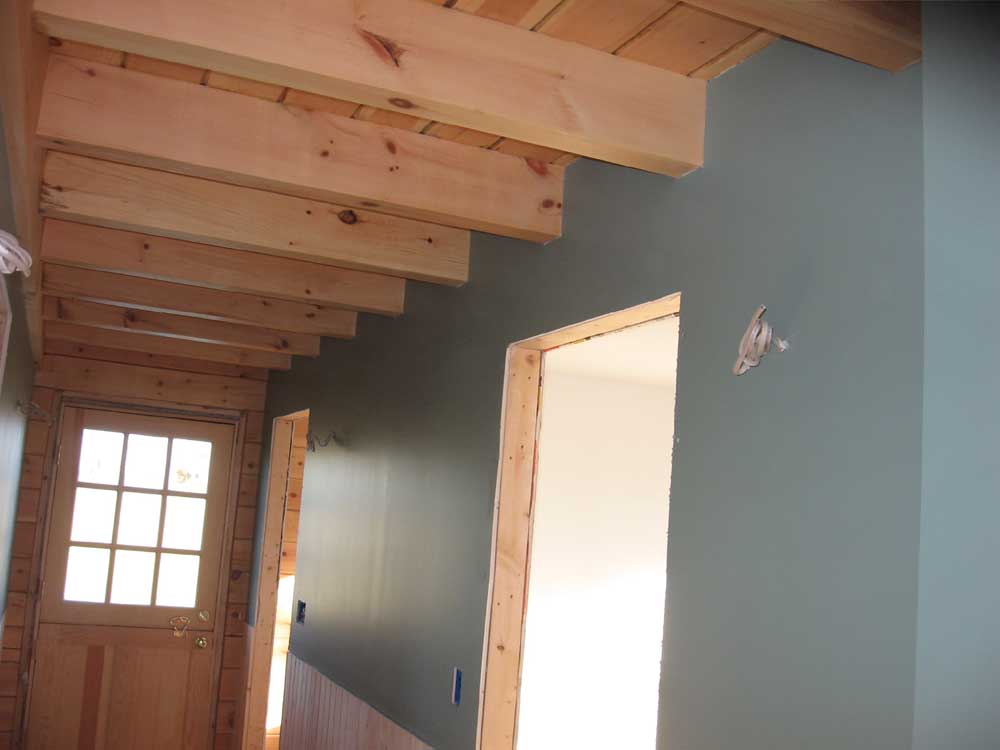
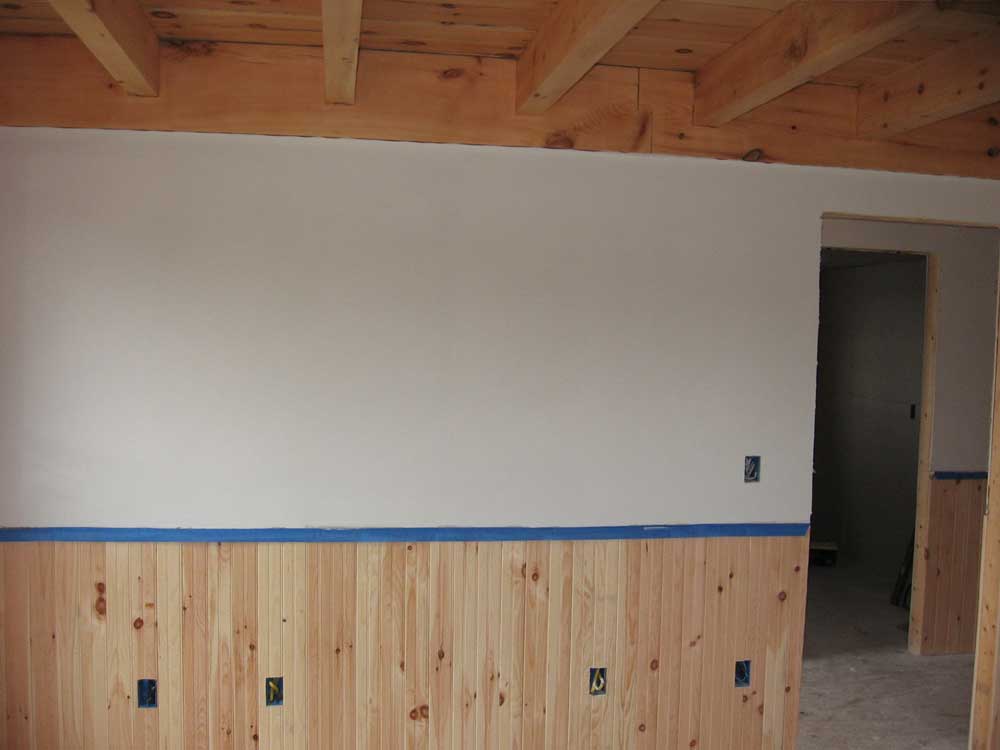
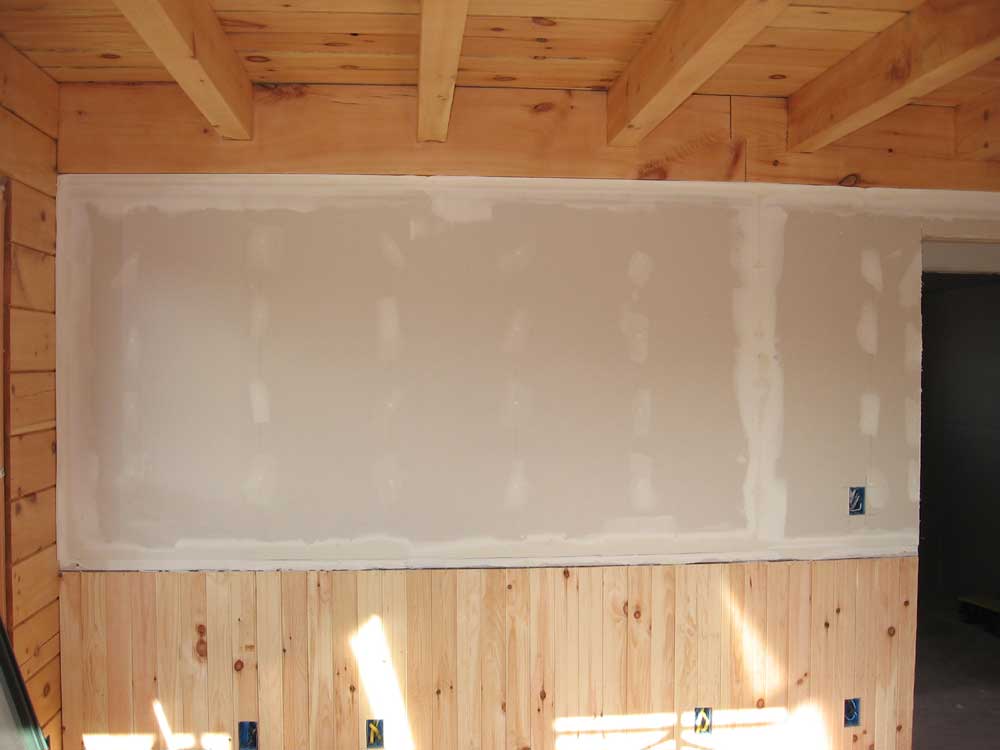
Heidi had picked up the paint colors for various rooms yesterday, so I continued with the paint in the downstairs hallway. We chose Sherwin Williams Calico for this space. I applied two coats, and we decided that we really liked the color. Later, the four wall sconce light fixtures planned for the hall should really highlight it. |
|||
|
|
|||
 In
the afternoon, I milled the edge detail on a sizeable pile of trim
stock. Each piece required two operations: first, with
one router, I milled the bead detail on one edge, clamping each
piece on edge to my sawhorses and running the router atop the narrow
edge. Then, with a second router, I milled a chamfer (45°
angle) detail on the opposite edge. In
the afternoon, I milled the edge detail on a sizeable pile of trim
stock. Each piece required two operations: first, with
one router, I milled the bead detail on one edge, clamping each
piece on edge to my sawhorses and running the router atop the narrow
edge. Then, with a second router, I milled a chamfer (45°
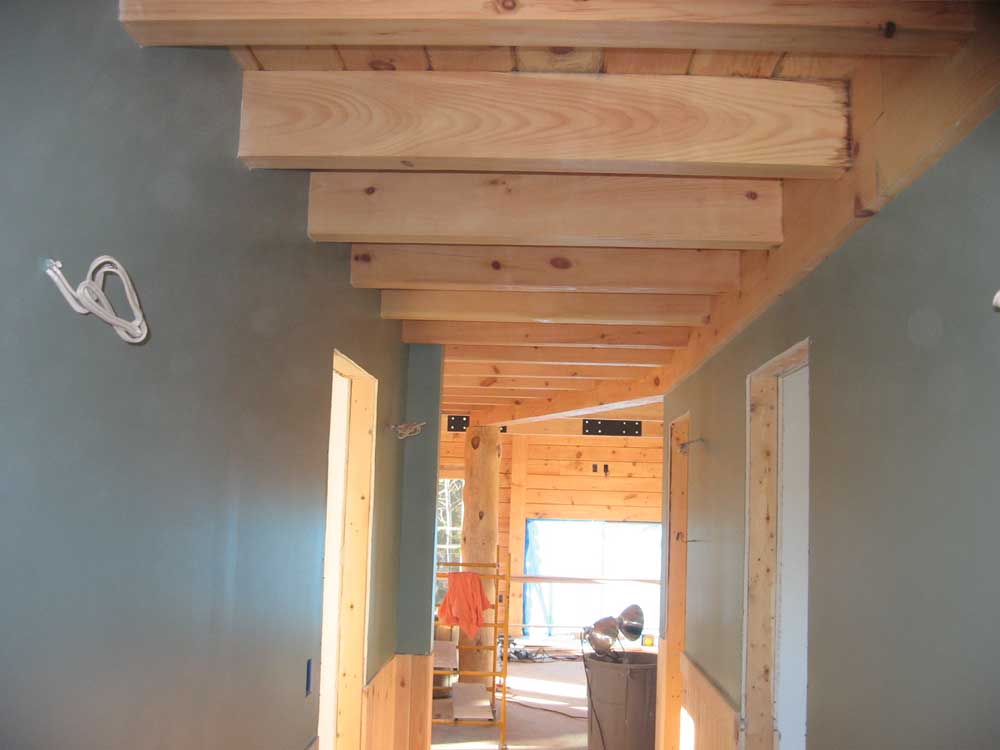
angle) detail on the opposite edge.I also milled some stock for the base trim on the windows, which requires only the bead detail with no chamfer, and set aside some pieces to take down to the shop for ripping into narrower widths for window stools, and some additional pieces--with edge details already milled--that required a rabbet in the back side for use as chair rail trim over the V-match in the hallway. |
|||
|
Once I had the trim milled, I turned to the trim installation, beginning with the inside of the front door. Afterwards, I trimmed out one window in the great room, which took most of the remainder of the day. I do expect that trimming each window will start to take less time as things go forward. |
|||
|
|
|||
 The
mud I applied to the stair wall was dry by this time, a bonus that
would put me a little ahead tomorrow, so for the last thing I
applied the third coat of mud here. I must not have been
paying attention, because I apparently allowed my hawk (the flat
platform with handle beneath on which I place the mud) to tilt, and
I was suddenly surprised by a large "plop" and an immediate
lightening of my burden. On the stairs below was a lovely
flattened pile of mud. Oops. The
mud I applied to the stair wall was dry by this time, a bonus that
would put me a little ahead tomorrow, so for the last thing I
applied the third coat of mud here. I must not have been
paying attention, because I apparently allowed my hawk (the flat
platform with handle beneath on which I place the mud) to tilt, and
I was suddenly surprised by a large "plop" and an immediate
lightening of my burden. On the stairs below was a lovely
flattened pile of mud. Oops. |
|||
|
|
|||
WEDNESDAY, SEPTEMBER 27, 2006 |
|||
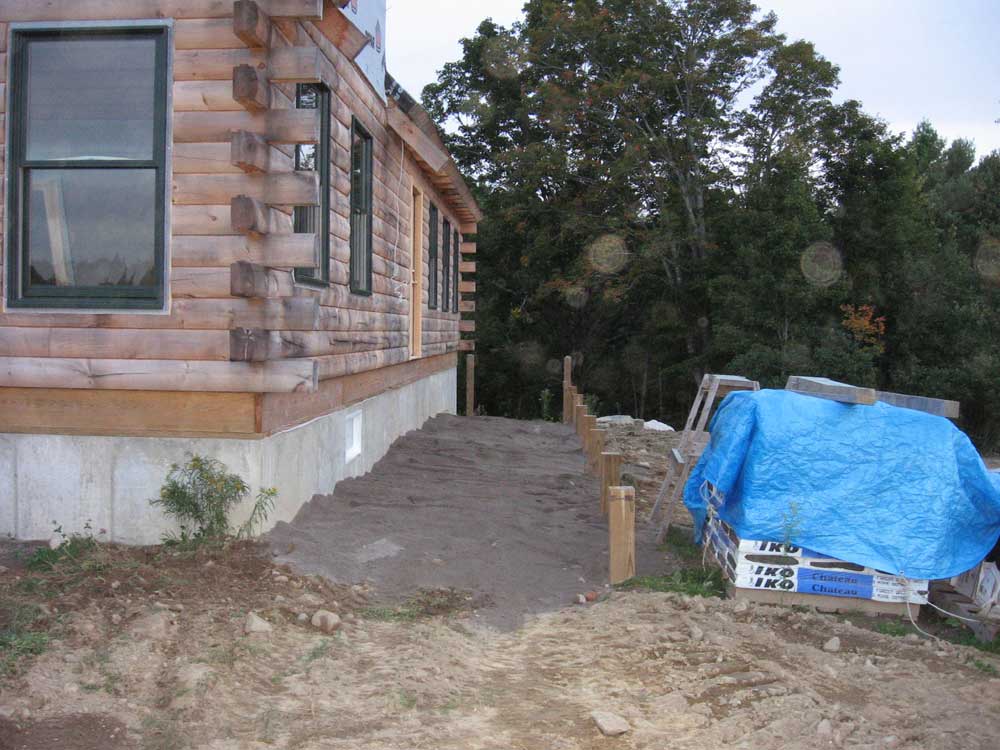
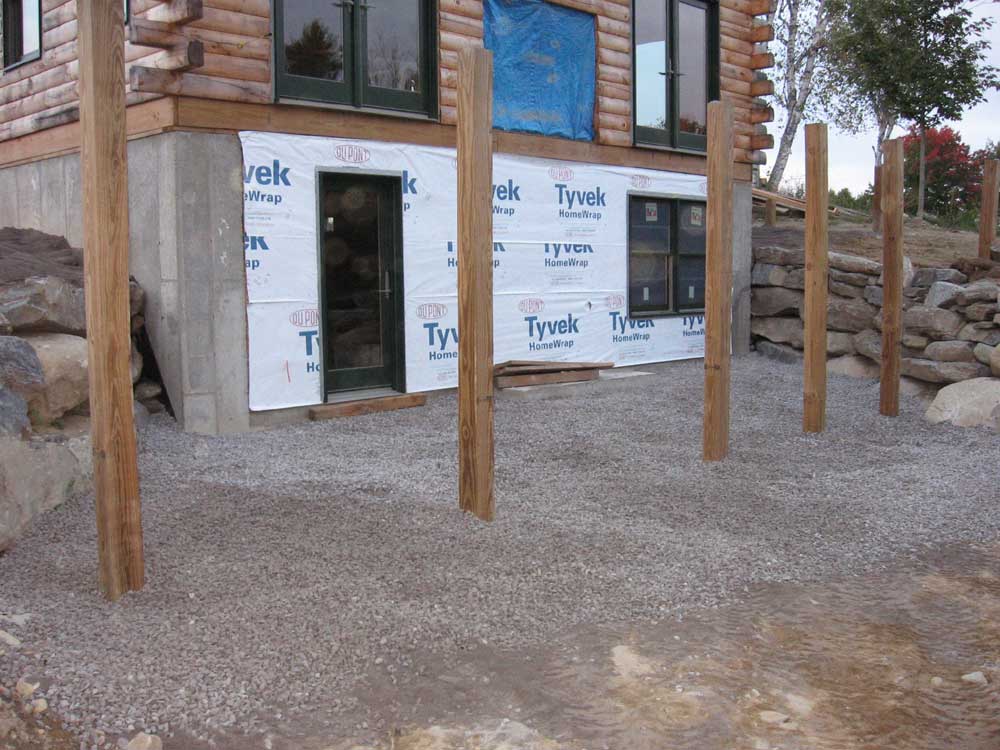
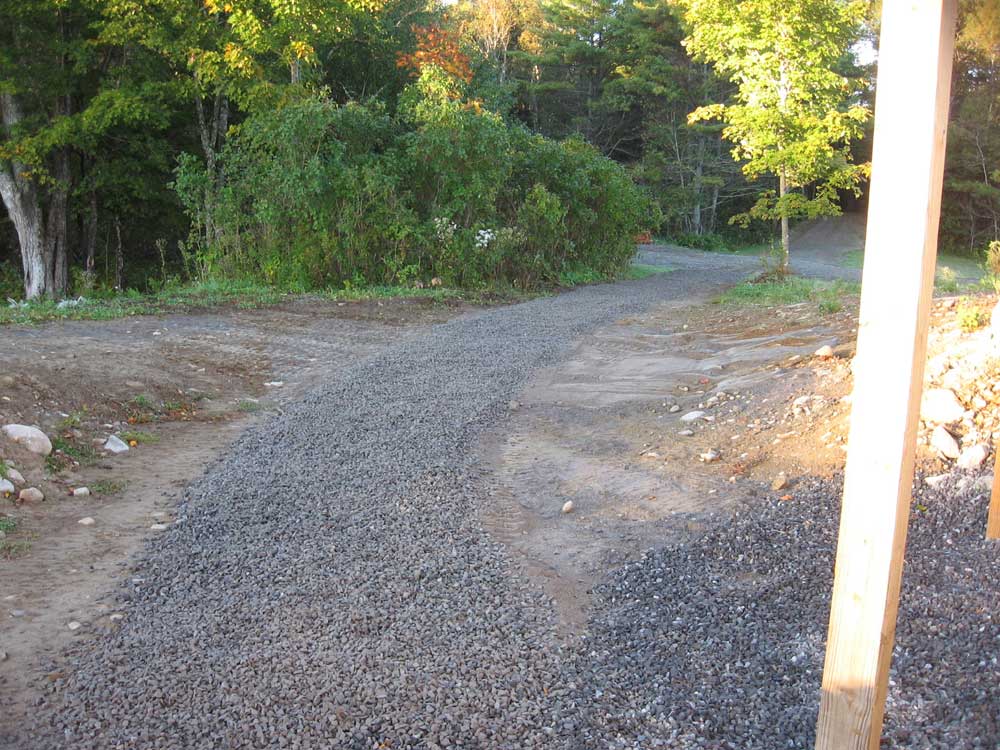 Late
last evening, after work, I built a simple walkway from the driveway
to the entrance in the basement, using leftover stone dust and
crushed stone. Sometime in the future, we expect to build a
nice walkway using flagstone or something along those lines, but for
the immediate future the crushed s tone will do the job and keep us
out of the mud during the winter and spring. Late
last evening, after work, I built a simple walkway from the driveway
to the entrance in the basement, using leftover stone dust and
crushed stone. Sometime in the future, we expect to build a
nice walkway using flagstone or something along those lines, but for
the immediate future the crushed s tone will do the job and keep us
out of the mud during the winter and spring. |
|||
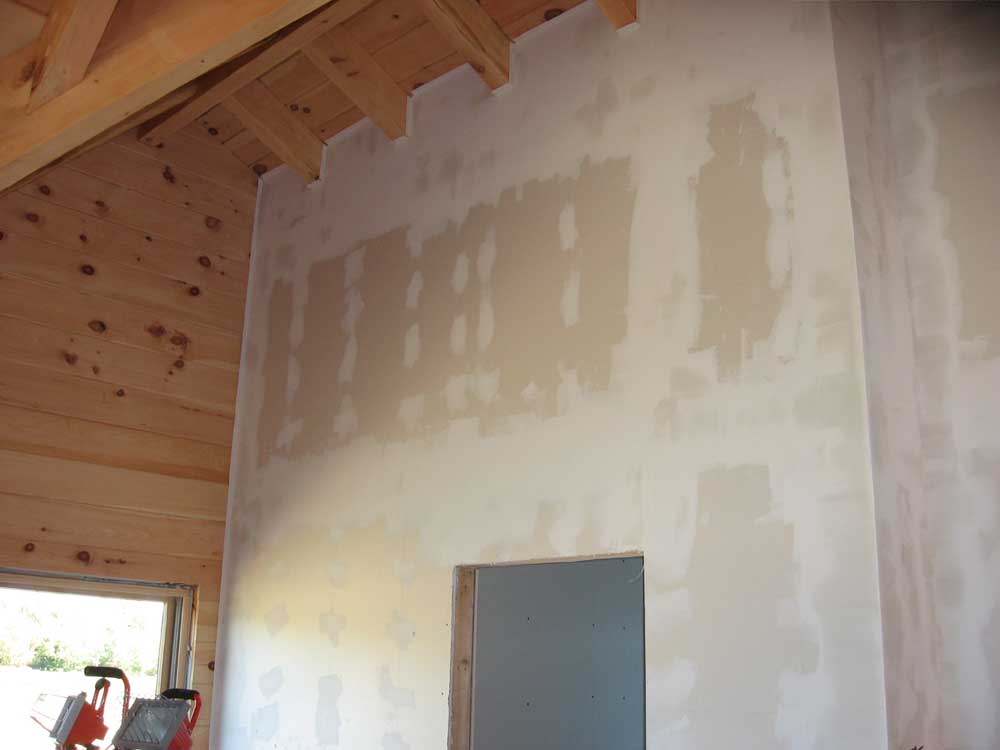
|
I began today with a third mudding marathon in the master bedroom. Wow, there are a lot of seams and corners here! The third coat went fairly quickly, however, taking about 2 hours to complete. |
|||
|
|
|||
 Next,
I continued out in the stairway and loft, and removed the masking
tape (where applied) and the overlapping drywall tape from the
edges, now that the area was painted and complete. Using a
sharp utility knife, I carefully cut away the overlapping tape,
revealing nice clean edges. IN a few areas, some excess joint
compound had seeped beneath the tape, but it was easy to remove with
a putty knife and a damp rag. Next,
I continued out in the stairway and loft, and removed the masking
tape (where applied) and the overlapping drywall tape from the
edges, now that the area was painted and complete. Using a
sharp utility knife, I carefully cut away the overlapping tape,
revealing nice clean edges. IN a few areas, some excess joint
compound had seeped beneath the tape, but it was easy to remove with
a putty knife and a damp rag. |
|||
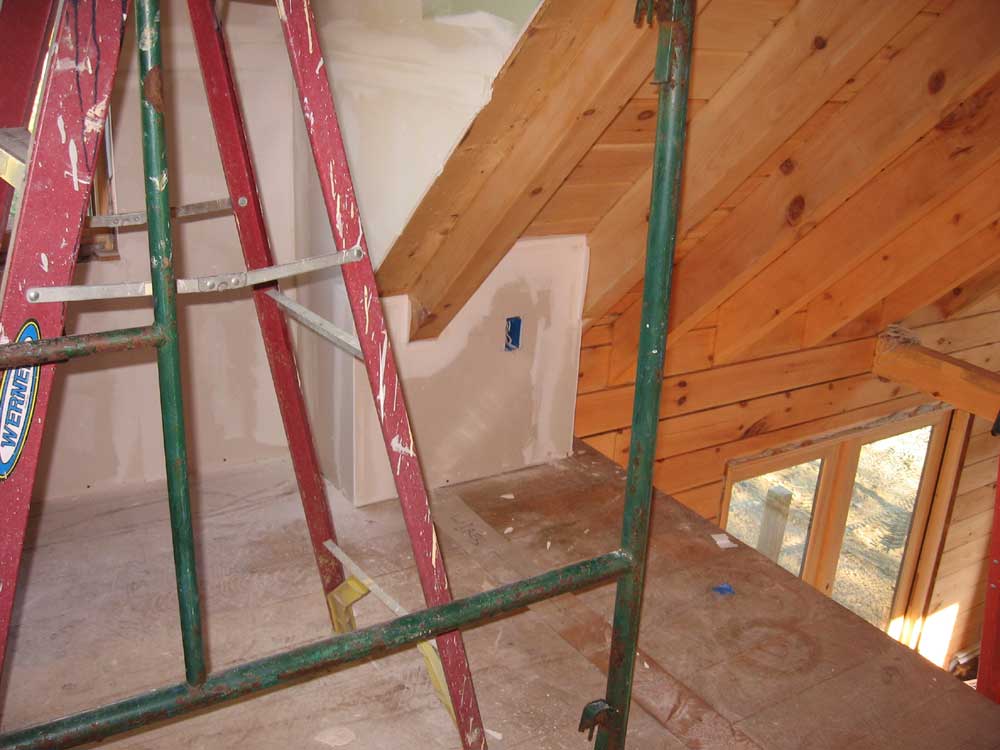
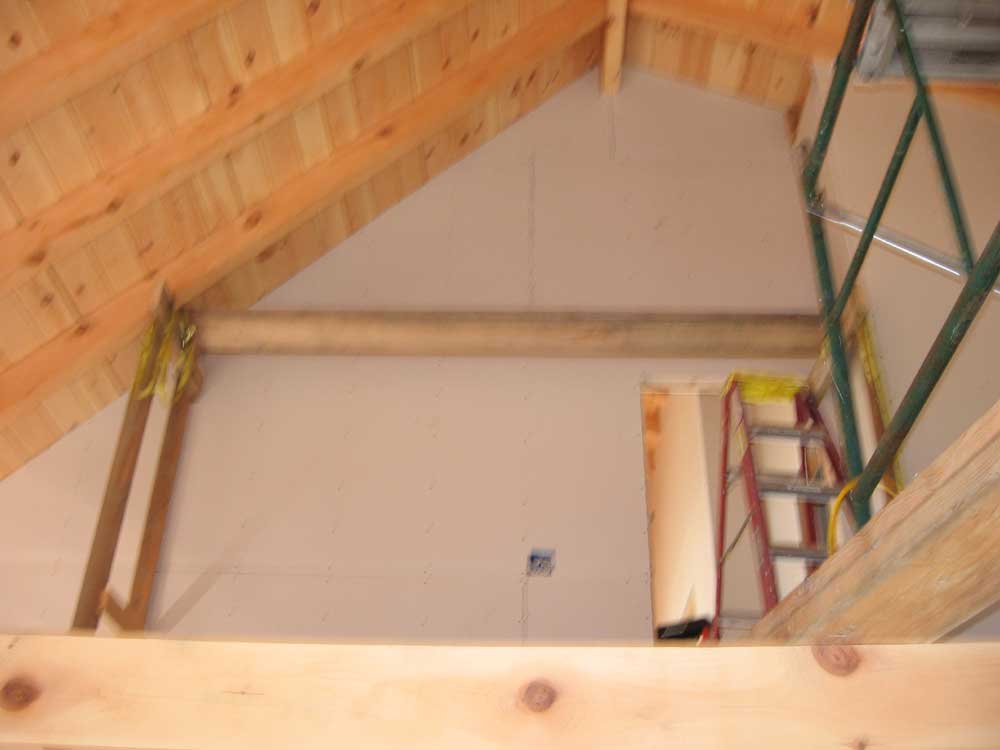
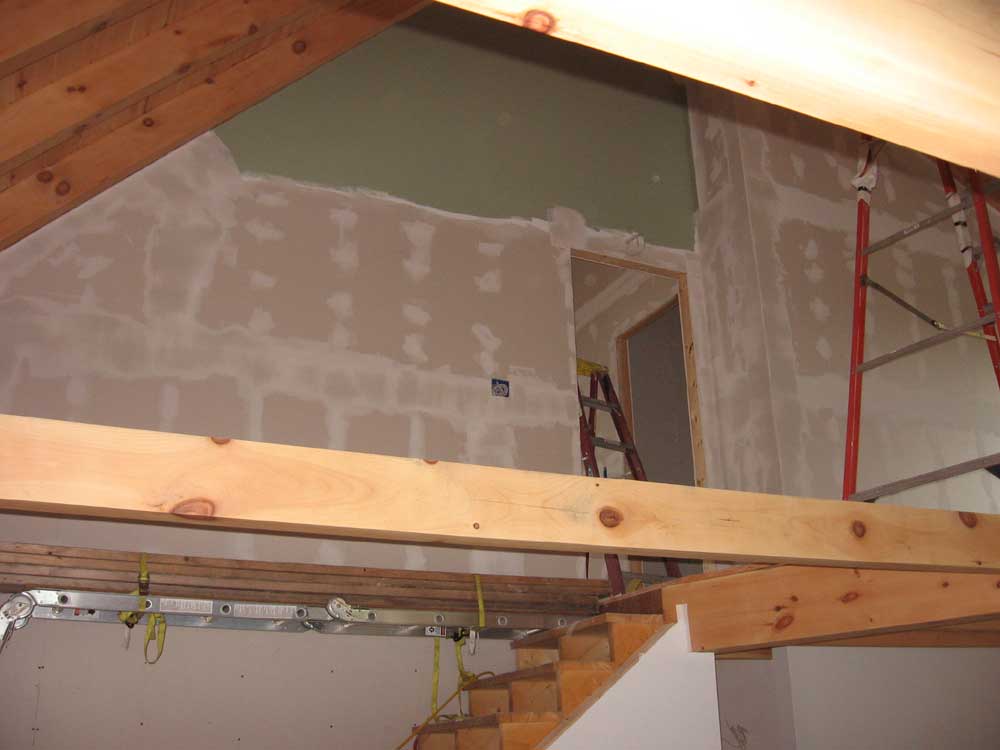
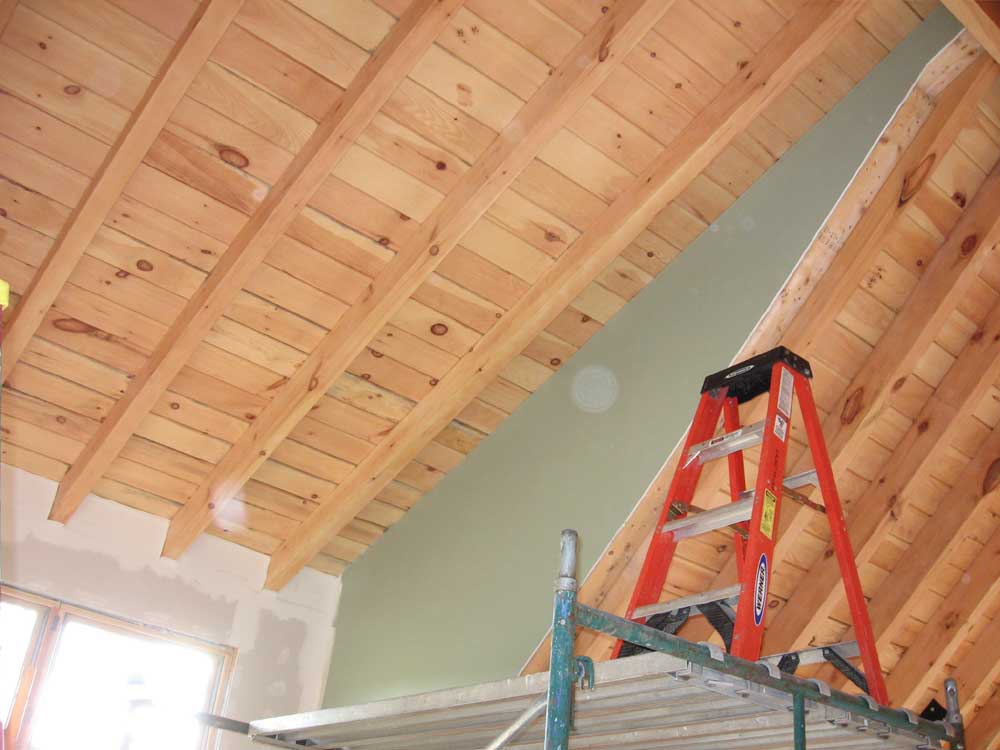
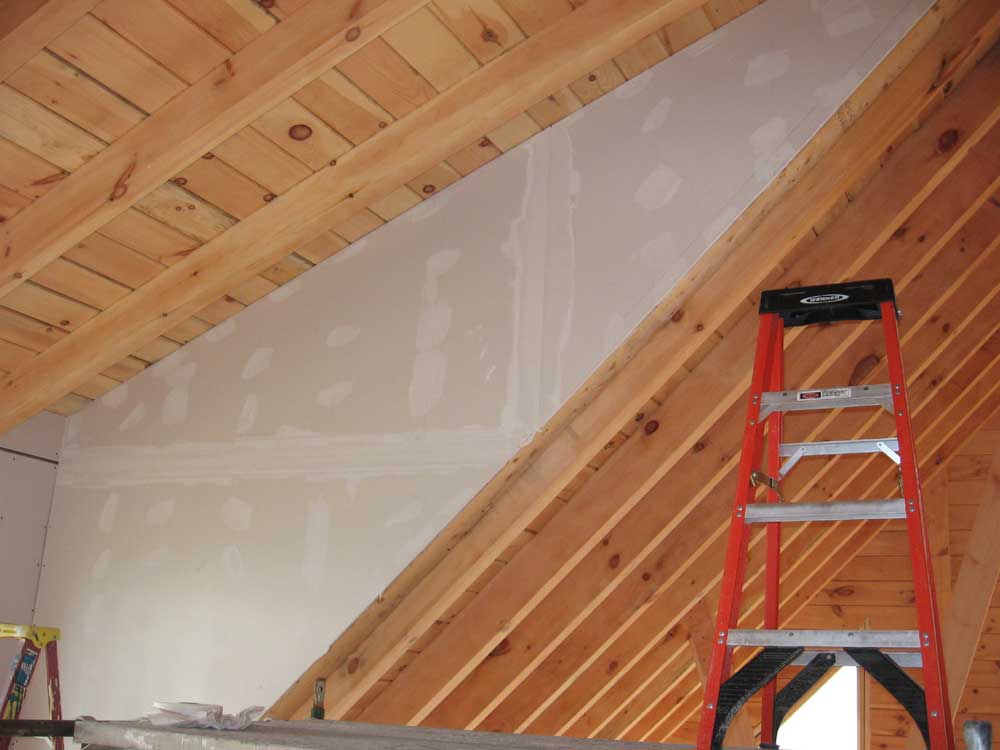
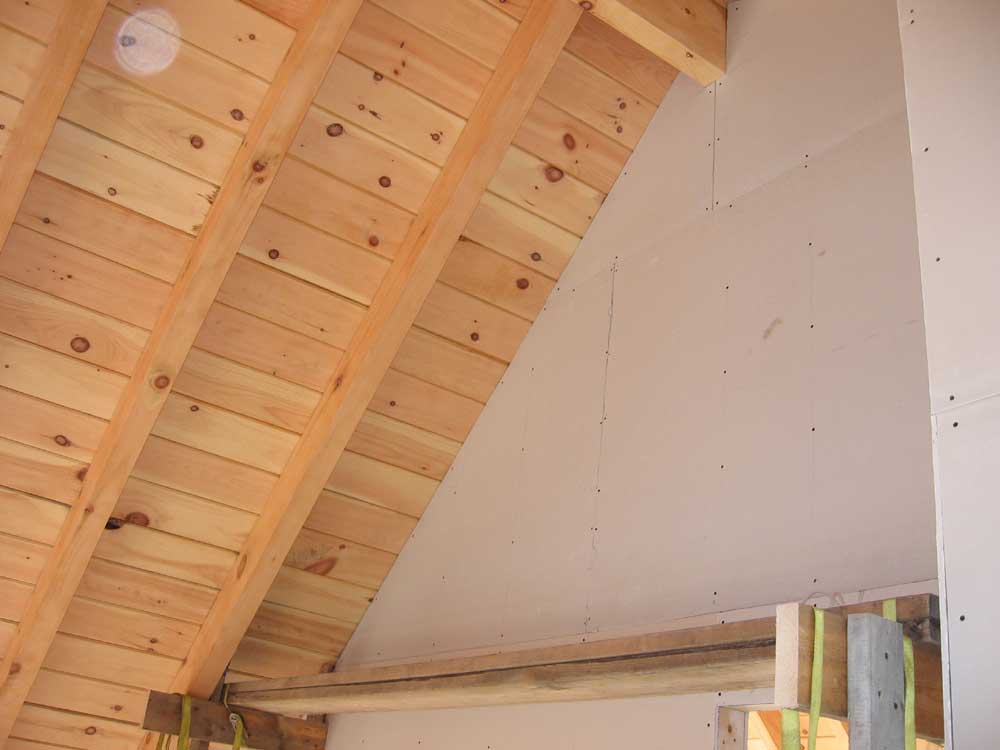
 I
was really pleased with how the sheetrock turned out around the roof
rafters in the loft. This was the first area that I completed,
and it was with bated breath that I began to cut away the tape, not
knowing how well the edge taping technique would work here.
But it worked very well, leaving behind clean edges that looked much
better than a whole host of trim pieces might have. I liked
the way the rafters simply disappeared into the sheetrock. I
was really pleased with how the sheetrock turned out around the roof
rafters in the loft. This was the first area that I completed,
and it was with bated breath that I began to cut away the tape, not
knowing how well the edge taping technique would work here.
But it worked very well, leaving behind clean edges that looked much
better than a whole host of trim pieces might have. I liked
the way the rafters simply disappeared into the sheetrock. |
|||
|
|
|||
|
With that done, I removed the staging and prepared to mud and tape the final section of the stairway wall. This relatively small area, with few seams, took only a short time to complete. |
|||
 Then,
I continued with the third coat of mud in the pantry and craft room
closet, wrapping up these tedious areas. I worked deeply into
lunchtime to finish this work. Then, after lunch, I took a
short break from house chores to wash my boat in the midday sun, as
I hoped to get the cover on later in the day, but wanted her to be
as clean as possible first. I was startled to discover that
she was covered in a gross blackish film-virtually invisible till
the soap started to loosen it. Poor boat. This year off
has been stunningly hard on her. Then,
I continued with the third coat of mud in the pantry and craft room
closet, wrapping up these tedious areas. I worked deeply into
lunchtime to finish this work. Then, after lunch, I took a
short break from house chores to wash my boat in the midday sun, as
I hoped to get the cover on later in the day, but wanted her to be
as clean as possible first. I was startled to discover that
she was covered in a gross blackish film-virtually invisible till
the soap started to loosen it. Poor boat. This year off
has been stunningly hard on her. |
|||
 With
the boat done for the moment, I returned to work at the house, where
I turned my attention to the window trim. I started on the
kitchen window, since I knew that I wanted that trimmed out before I
installed the cabinets. Since the kitchen window is a
casement, it had a short jamb that required extension jambs.
It took quite some time in the basement to sort through the supply
of extension jambs that came with the windows in order to find the
right pieces; it was a trial and error process. Eventually, I
found the right pieces, and installed the extension jambs on all
four sides. With
the boat done for the moment, I returned to work at the house, where
I turned my attention to the window trim. I started on the
kitchen window, since I knew that I wanted that trimmed out before I
installed the cabinets. Since the kitchen window is a
casement, it had a short jamb that required extension jambs.
It took quite some time in the basement to sort through the supply
of extension jambs that came with the windows in order to find the
right pieces; it was a trial and error process. Eventually, I
found the right pieces, and installed the extension jambs on all
four sides. |
|||
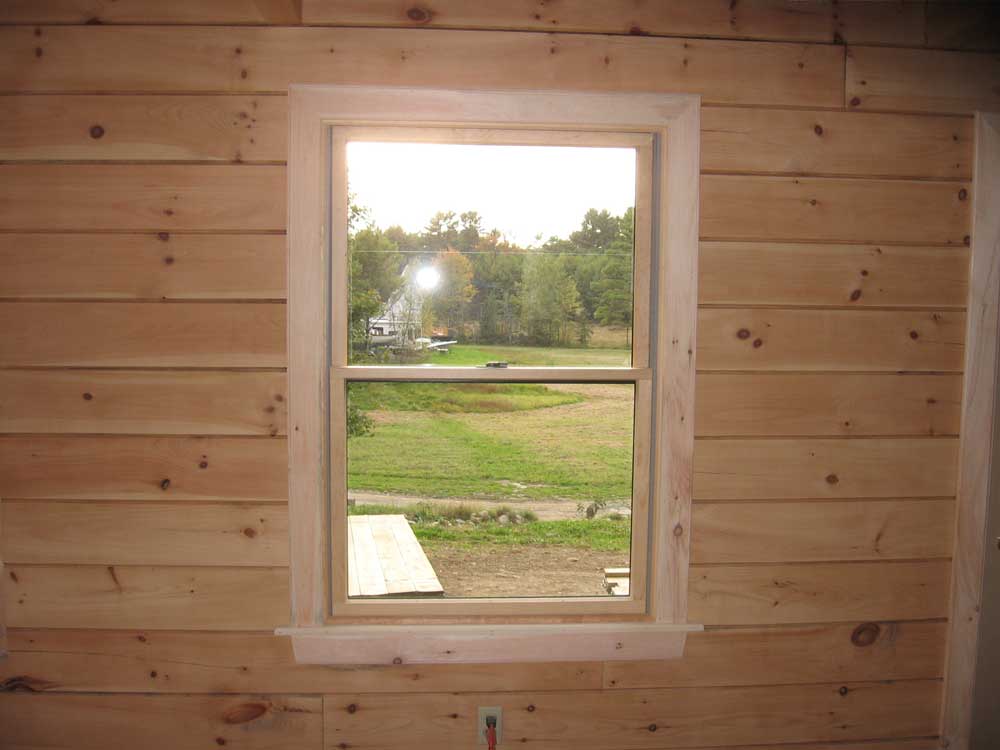
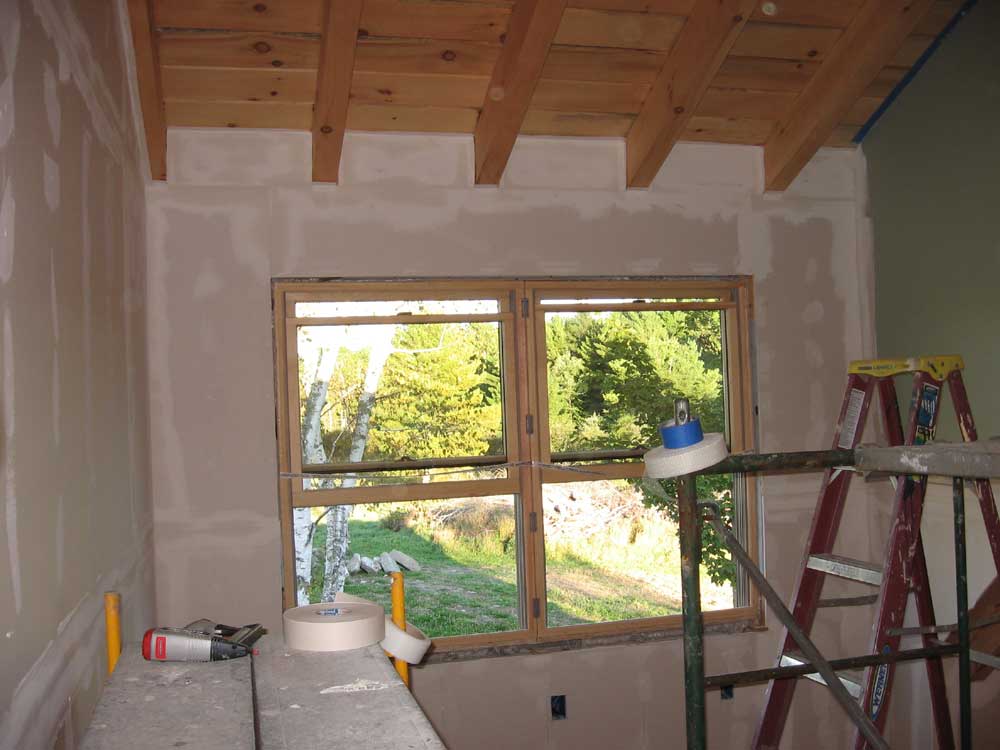
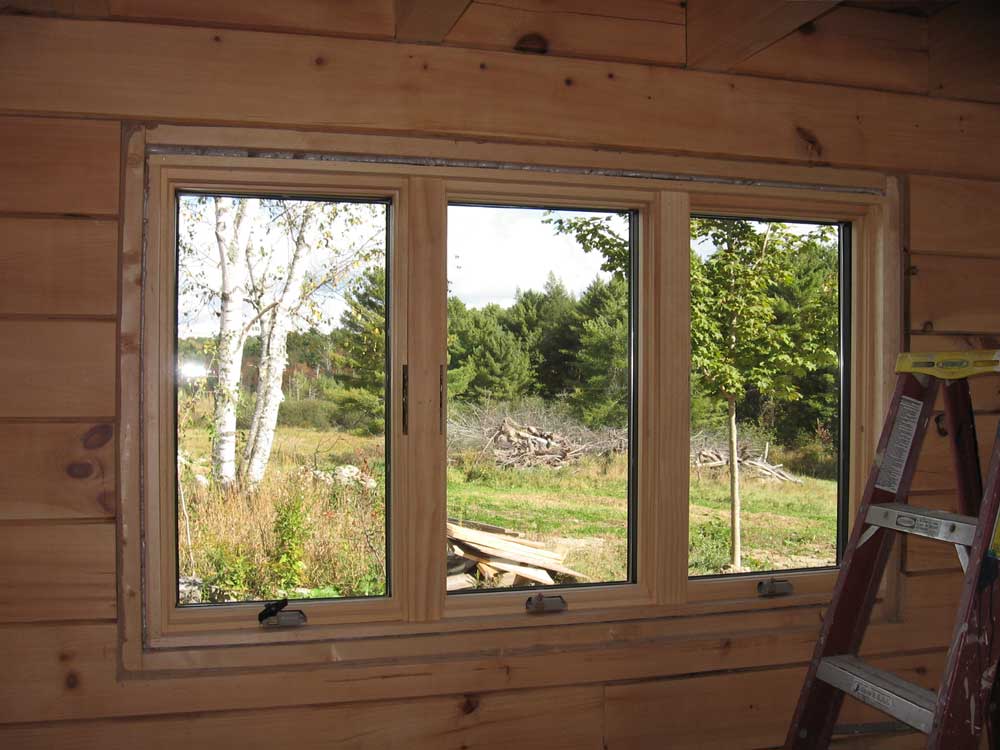
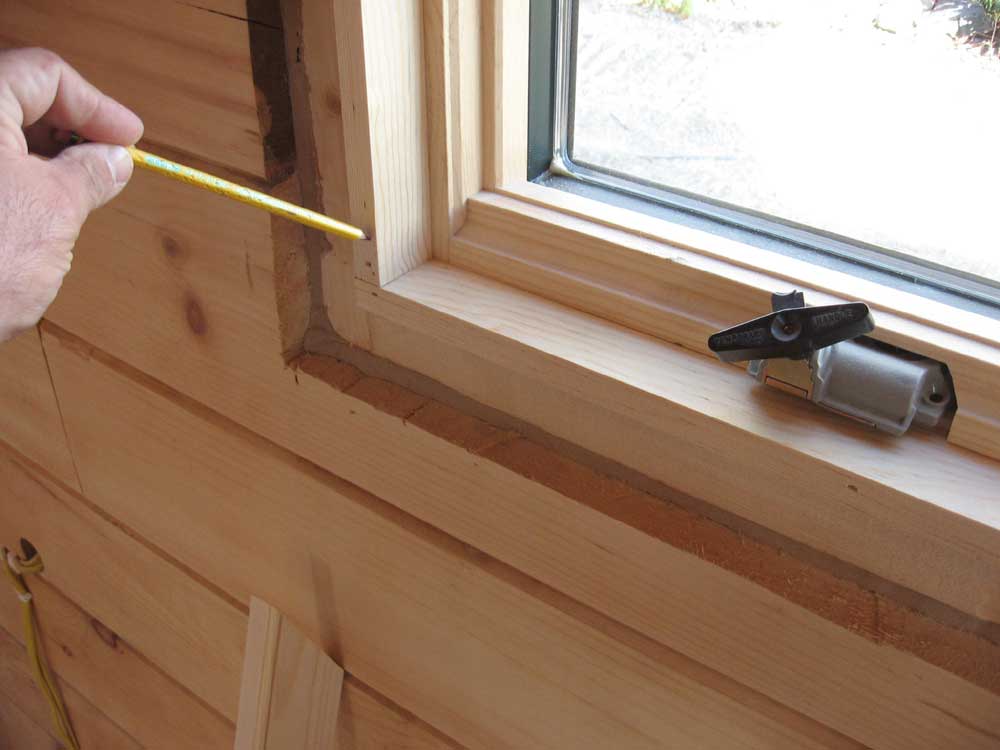
 Next,
I considered the window sill, or stool--the horizontal piece that
extends out past the window trim. These aren't strictly
required--I could have simply picture-framed the window with
trim--but I think they look good and are one of those important
details. After some thought, I ripped a piece of the 3-1/2"
flat trim down to 1-1/2" wide, taking the long journey down to the
shop and back to do so, and used that to create the stool. I
let the stool extend past the proposed end of the casing by 1" on
each side. Next,
I considered the window sill, or stool--the horizontal piece that
extends out past the window trim. These aren't strictly
required--I could have simply picture-framed the window with
trim--but I think they look good and are one of those important
details. After some thought, I ripped a piece of the 3-1/2"
flat trim down to 1-1/2" wide, taking the long journey down to the
shop and back to do so, and used that to create the stool. I
let the stool extend past the proposed end of the casing by 1" on
each side. |
|||
 I
had earlier milled the bead and chamfer details on a couple long
lengths of the trim stock, and also sanded them with 120 to prepare
for installation. Then, I cut the side pieces to length,
leaving a 1/2" reveal on the extension jamb, and nailed them in
place. Next, I cut and installed the top piece of casing. I
had earlier milled the bead and chamfer details on a couple long
lengths of the trim stock, and also sanded them with 120 to prepare
for installation. Then, I cut the side pieces to length,
leaving a 1/2" reveal on the extension jamb, and nailed them in
place. Next, I cut and installed the top piece of casing. |
|||
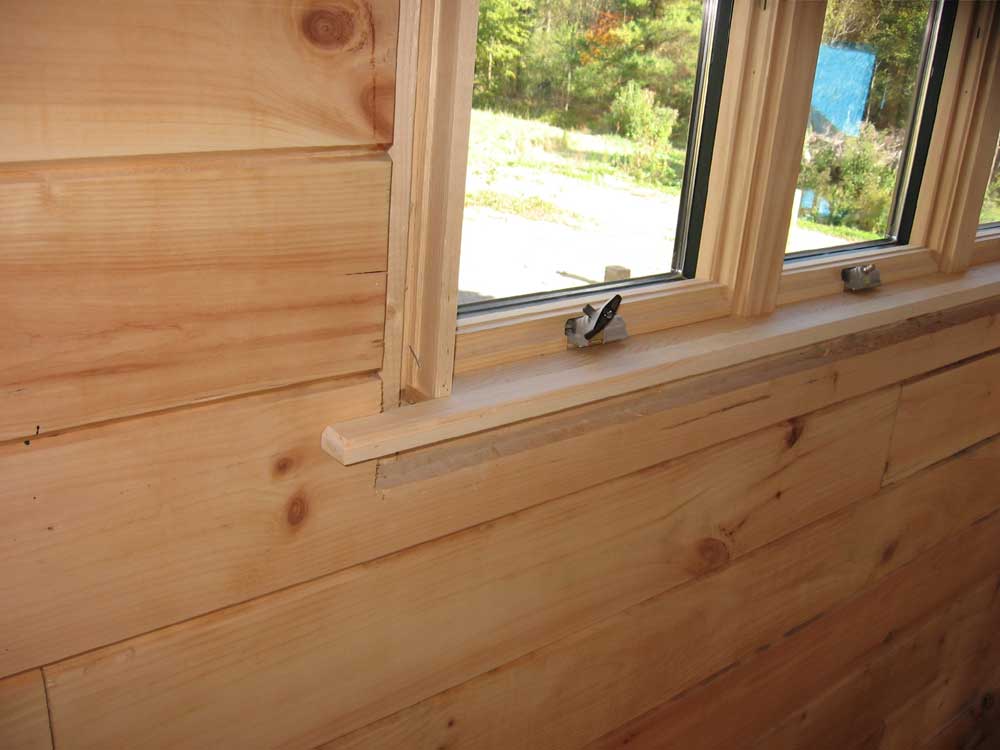
 Finally,
I installed a trim piece beneath the stool. I milled a bead on
the edge of another piece of stock, but didn't mill the chamfer on
the other side, since that side would butt up against the bottom of
the stool. I cut 10° angles on the ends of the piece, keeping
the overall length the same as that of the outside of the window
casing, and nailed it in place beneath the stool. I was really
pleased with how the window trim came out--simple, yet elegant, and
it made such a visual difference after months of looking at the raw
opening. Finally,
I installed a trim piece beneath the stool. I milled a bead on
the edge of another piece of stock, but didn't mill the chamfer on
the other side, since that side would butt up against the bottom of
the stool. I cut 10° angles on the ends of the piece, keeping
the overall length the same as that of the outside of the window
casing, and nailed it in place beneath the stool. I was really
pleased with how the window trim came out--simple, yet elegant, and
it made such a visual difference after months of looking at the raw
opening.Being the first window, the trim took a long time, between preparing the stock, thinking through the overall look and methodology, and finding the right extension jambs. The remaining windows in the log walls ought to go more quickly, partly since I had now done one, and partly because they don't require extension jambs. I'll continue whittling away at the trim in between other, more important, jobs in the next several weeks. Obviously, I'd like all the trim to be done before we move in, but if it's not it's not the end of the world, either. |
|||
 The
day ended with a large materials delivery: all of the framing
and decking material for the front porch, main deck, and screen
porch. Bob Emery and I plan to begin work on those as soon as
he finishes up the boiler chimney next week. The
day ended with a large materials delivery: all of the framing
and decking material for the front porch, main deck, and screen
porch. Bob Emery and I plan to begin work on those as soon as
he finishes up the boiler chimney next week. |
|||
TUESDAY, SEPTEMBER 26, 2006 |
|||
 The
mud upstairs in the bedroom was finally dry, so I started there, and
applied the second coat of mud to the entire room. This went
much more quickly than the first coat, but still represented a lot
of area and time. The
mud upstairs in the bedroom was finally dry, so I started there, and
applied the second coat of mud to the entire room. This went
much more quickly than the first coat, but still represented a lot
of area and time. |
|||
|
|
|||
|
When I was done with that, I washed up my tools and moved on to the loft and stairway. I sanded all the mud in these areas, which went fairly quickly given the amount of space at hand. Then, I cleaned up the dust and mess, swept and blew down the walls, and applied the drywall primer to the entire area. This took till 12:30. Sorry--no primer pictures. |
|||
 After
lunch, I worked in the pantry and craft room closet, and applied the
second coats of mud in each room. The closet went quickly, but
the pantry took a long time, thanks to all the corner seams; it took
as much time as a larger room might take, since most of the work in
mudding is in the corners. After
lunch, I worked in the pantry and craft room closet, and applied the
second coats of mud in each room. The closet went quickly, but
the pantry took a long time, thanks to all the corner seams; it took
as much time as a larger room might take, since most of the work in
mudding is in the corners. |
|||
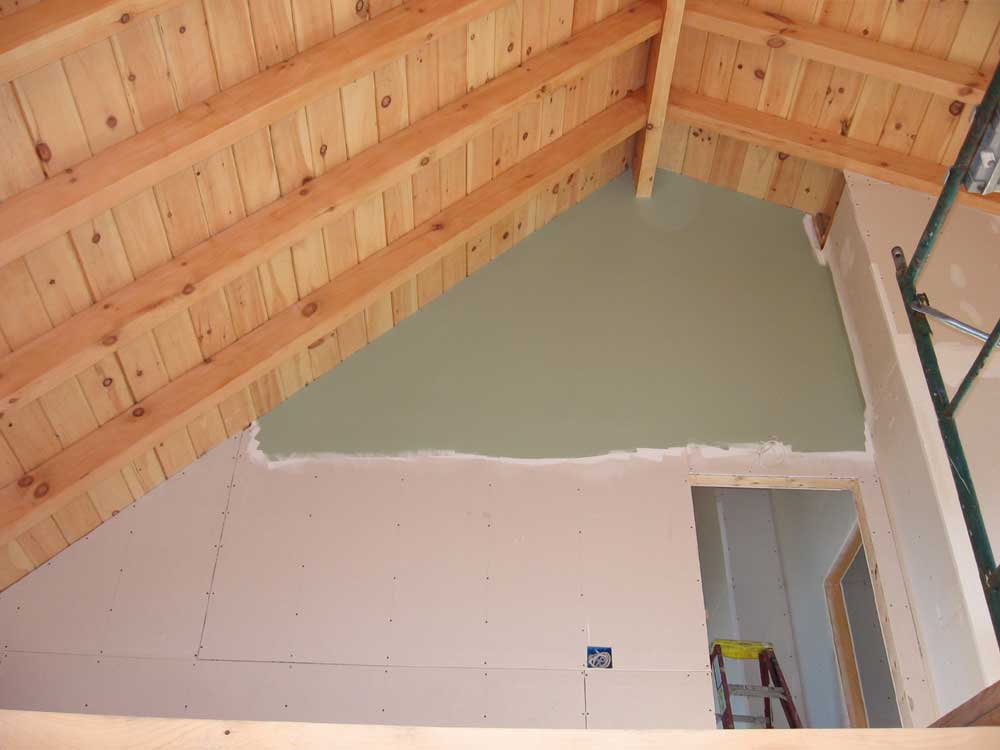
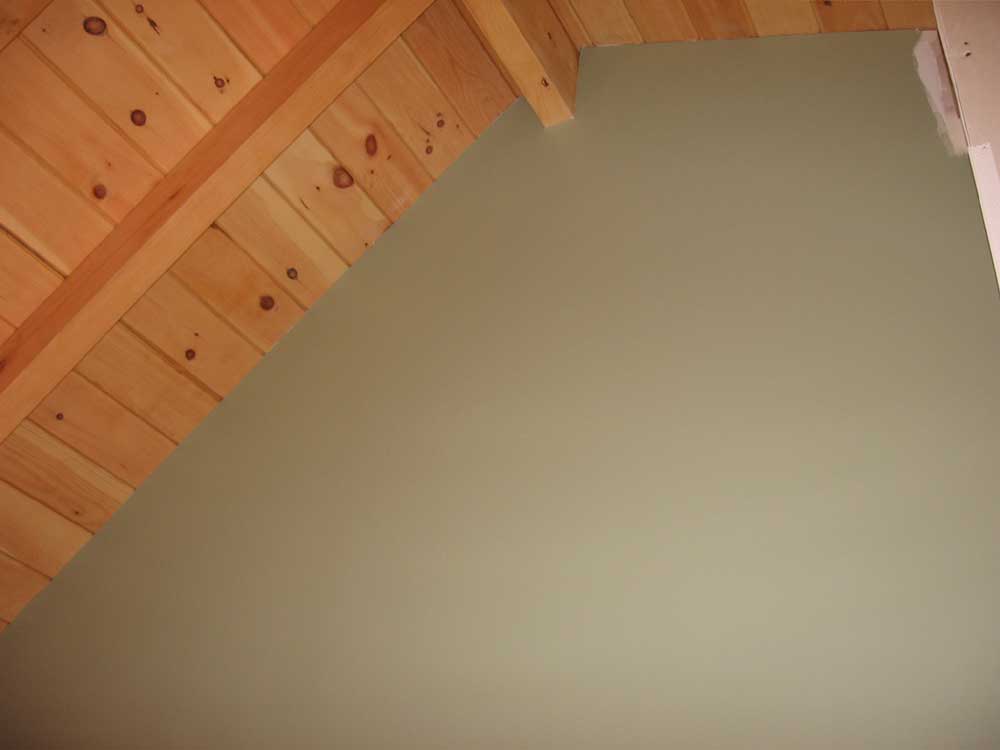
 Afterwards,
I applied two coats of the Clary sage finish paint to the loft and
stairway, completing these areas. This wrapped up the day's
work, and also really transformed the feel of the house. I
loved it. Afterwards,
I applied two coats of the Clary sage finish paint to the loft and
stairway, completing these areas. This wrapped up the day's
work, and also really transformed the feel of the house. I
loved it.
|
|||
MONDAY, SEPTEMBER 25, 2006 |
|||
| I had an abbreviated day today, since I had the opportunity to take one last sail; with nice fall weather, coupled with the fact that I had been mentally preparing to take the day all weekend, I jumped at the chance, and finished up work at about 10:30. | |||
|
The mud in the bedroom was still soft in some areas, thanks to the chilly weather and the fact that the mud was too thick in some places. It should be dry tomorrow. A few areas of the loft still contained drying mud too, so I decided to work downstairs again. |
|||
 I
taped and mudded the pantry and the closet in Heidi's craft room,
two lower-priority areas that nonetheless would be nice to have
done. Once the first coat of mud, with its time-consuming
taping, is done, the remaining work goes quickly, so completing
these rooms will be a breeze over the next couple days. I
taped and mudded the pantry and the closet in Heidi's craft room,
two lower-priority areas that nonetheless would be nice to have
done. Once the first coat of mud, with its time-consuming
taping, is done, the remaining work goes quickly, so completing
these rooms will be a breeze over the next couple days. |
|||
 With
the mud complete for now, I turned my attention to some window trim.
First, though, I milled some additional pieces of trim to match the
trim that I installed in the loft the other day, so that they'd be
ready to complete the area later. But since I wanted to
slightly change my router setup for the window trim, it made sense
to finish up the trim using the existing setup first. With
the mud complete for now, I turned my attention to some window trim.
First, though, I milled some additional pieces of trim to match the
trim that I installed in the loft the other day, so that they'd be
ready to complete the area later. But since I wanted to
slightly change my router setup for the window trim, it made sense
to finish up the trim using the existing setup first. |
|||
|
I used a test piece of wood--actually the less-than-good end of one of the trim boards--to practice my setup. I wanted the outer edge of the trim boards to contain a nice bead that was nearly at the corner, but set in just a touch for a bit more elegance. The bead I had run on the loft trim was set in a bit further, and while it was fine for that application, it wasn't what I wanted elsewhere. |
|||
|
I played with the router adjustment until I got the bead just where I wanted it. By this point, it was time to think about packing up and leaving for my sail on Dasein, though, so I called it a day. |
|||
SUNDAY, SEPTEMBER 24, 2006 |
|||
 The
mud in the bedroom upstairs had not cured fully this morning, given
its thickness in places and the high humidity outside. I
expected this, so I worked on other areas. The
mud in the bedroom upstairs had not cured fully this morning, given
its thickness in places and the high humidity outside. I
expected this, so I worked on other areas.I had limited material left, but I had enough mud to do the third coat on the stairway, and also on the remaining areas of the loft as needed. This pretty much used up my supply of mud, so I decided to prime the finished walls downstairs. |
|||
 First,
though, I sanded the downstairs bathroom walls and ceiling, which
had still contained drying mud yesterday when I sanded the other
downstairs areas. Once that was done, I brushed off the walls
and ceiling, and prepared for primer. First,
though, I sanded the downstairs bathroom walls and ceiling, which
had still contained drying mud yesterday when I sanded the other
downstairs areas. Once that was done, I brushed off the walls
and ceiling, and prepared for primer. |
|||
 I
applied the primer to the hallway, kitchen, Heidi's craft room, and
the bathroom. It feels like such a positive step to apply
paint to these walls, and despite being only primer, the paint gave
the walls a suddenly finished look. We have chosen final paint
colors for all the walls, so before long I'll apply the finish
coats. I
applied the primer to the hallway, kitchen, Heidi's craft room, and
the bathroom. It feels like such a positive step to apply
paint to these walls, and despite being only primer, the paint gave
the walls a suddenly finished look. We have chosen final paint
colors for all the walls, so before long I'll apply the finish
coats. |
|||
 This
wrapped up the day for me, since I decided to go ahead and run some
errands in the afternoon, as I was out of material and thought it
would be just as well to get the errands out of the way now, rather
than first thing in the morning or some other time. I picked
up two more buckets of mud, a host of electrical supplies (outlets,
switches, and the like), and some other things from my ever-present
list. We also looked at dishwashers, area rugs, and some other
finish materials. This
wrapped up the day for me, since I decided to go ahead and run some
errands in the afternoon, as I was out of material and thought it
would be just as well to get the errands out of the way now, rather
than first thing in the morning or some other time. I picked
up two more buckets of mud, a host of electrical supplies (outlets,
switches, and the like), and some other things from my ever-present
list. We also looked at dishwashers, area rugs, and some other
finish materials. |
|||
SATURDAY, SEPTEMBER 23, 2006 |
|||
| Today was a serious day of mud. No, not because it was raining outside, but because I spent the entire day applying mud to the upstairs walls. | |||
|
I began with a third coat on the loft walls, and also applied the second coat to portions of the stairwell. Moving briefly downstairs, I did the third coat of mud in the downstairs bathroom, on the shower wall. |
|||
 Next,
I moved into the master bedroom where, over the course of most of
the remains of the day, I applied the joint tape and mud to the
entire room. With over 12' tall walls on two sides, plus 7 or
8 rafters to tape around, as well as the front gable dormer, this
was quite a task, and used an extraordinary amount of joint
compound: a full bucket. Consider that to this point in
the job, I had used just under 2 buckets total and it puts the
amount of mudding in the bedroom into perspective. A large amount of
the mud went into the three outside corners in the room,
particularly the 12' tall corner, which wasn't the squarest corner
in the world. Mudding in corner bead can use a huge amount of
compound. Next,
I moved into the master bedroom where, over the course of most of
the remains of the day, I applied the joint tape and mud to the
entire room. With over 12' tall walls on two sides, plus 7 or
8 rafters to tape around, as well as the front gable dormer, this
was quite a task, and used an extraordinary amount of joint
compound: a full bucket. Consider that to this point in
the job, I had used just under 2 buckets total and it puts the
amount of mudding in the bedroom into perspective. A large amount of
the mud went into the three outside corners in the room,
particularly the 12' tall corner, which wasn't the squarest corner
in the world. Mudding in corner bead can use a huge amount of
compound.To reach the highest areas, I used one section of pipe staging, with my 4' stepladder on top. I moved this arrangement around as necessary to reach the various areas. The good news was that the cuts I had made in some of the sheetrock around the rafters were so good that I saw no reason to edge tape many of them, saving some work. |
|||
|
|
|||
 Once
I finished the mud in the bedroom, which left me virtually out of
product, I moved downstairs and sanded the kitchen, hallway, and
Heidi's craft room to prepare the walls for primer. This was a
good way to wrap up the day, as sanding makes such a mess of both
house and the person sanding. Once
I finished the mud in the bedroom, which left me virtually out of
product, I moved downstairs and sanded the kitchen, hallway, and
Heidi's craft room to prepare the walls for primer. This was a
good way to wrap up the day, as sanding makes such a mess of both
house and the person sanding.I didn't take any pictures of the sanded downstairs walls since the dust in the air would have ruined the shots, as the flash always highlights the dust particles in the air. |
|||
FRIDAY, SEPTEMBER 22, 2006 |
|||
 Today,
after first applying a second coat of poly to the trim pieces I
started late yesterday, I began once more--but for the final
time--up on the staging. This time, I removed the masking tape
and the overlapping edge joint taping, using a utility knife
with a new blade to cut the paper tape right at the corner. Today,
after first applying a second coat of poly to the trim pieces I
started late yesterday, I began once more--but for the final
time--up on the staging. This time, I removed the masking tape
and the overlapping edge joint taping, using a utility knife
with a new blade to cut the paper tape right at the corner.I was really pleased with how well the edge taping worked, at least in this area. Time will tell how well it works elsewhere in the house, but up here, there were only a couple small areas where excess joint compound had seeped beneath the tape, but it was easy to clean this up with a putty knife and a bit of water on a rag. |
|||
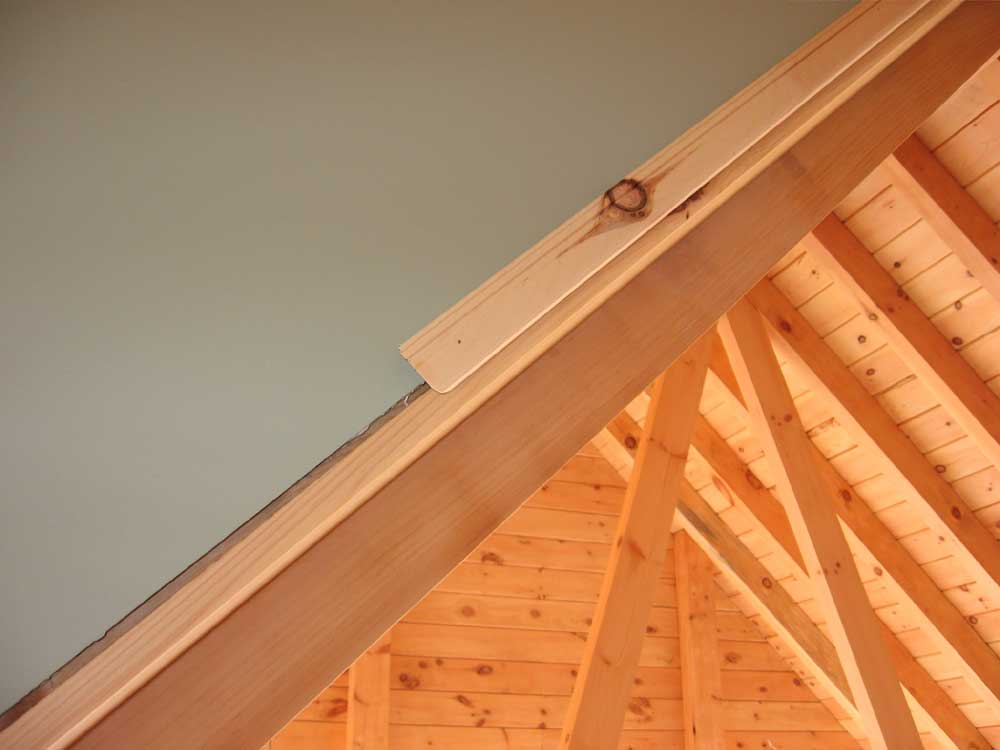
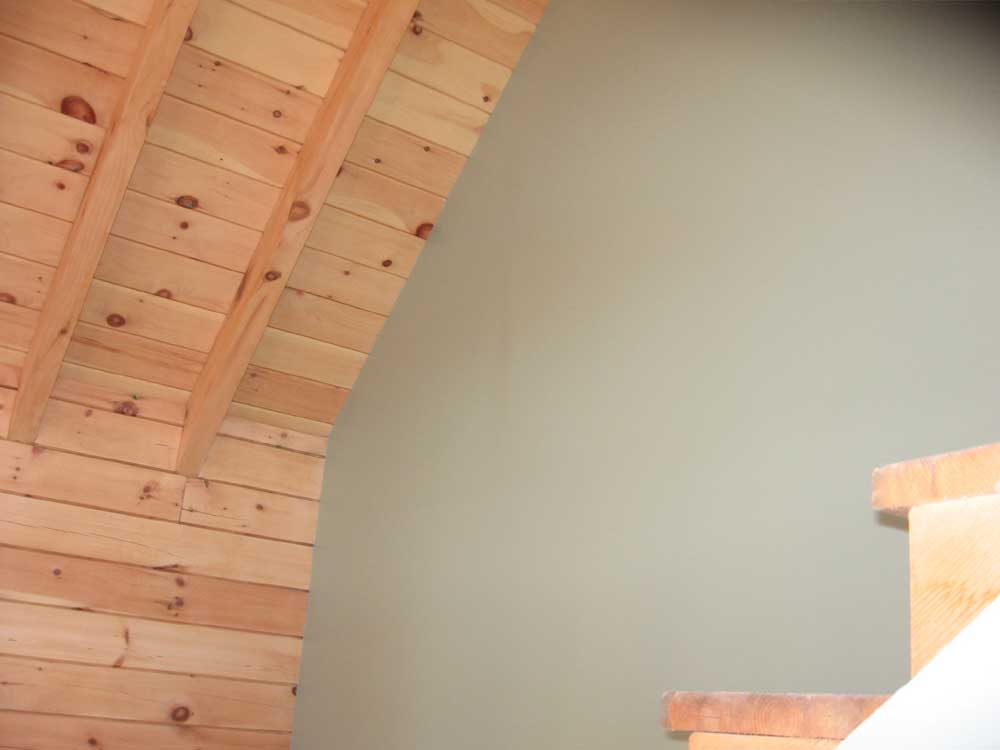
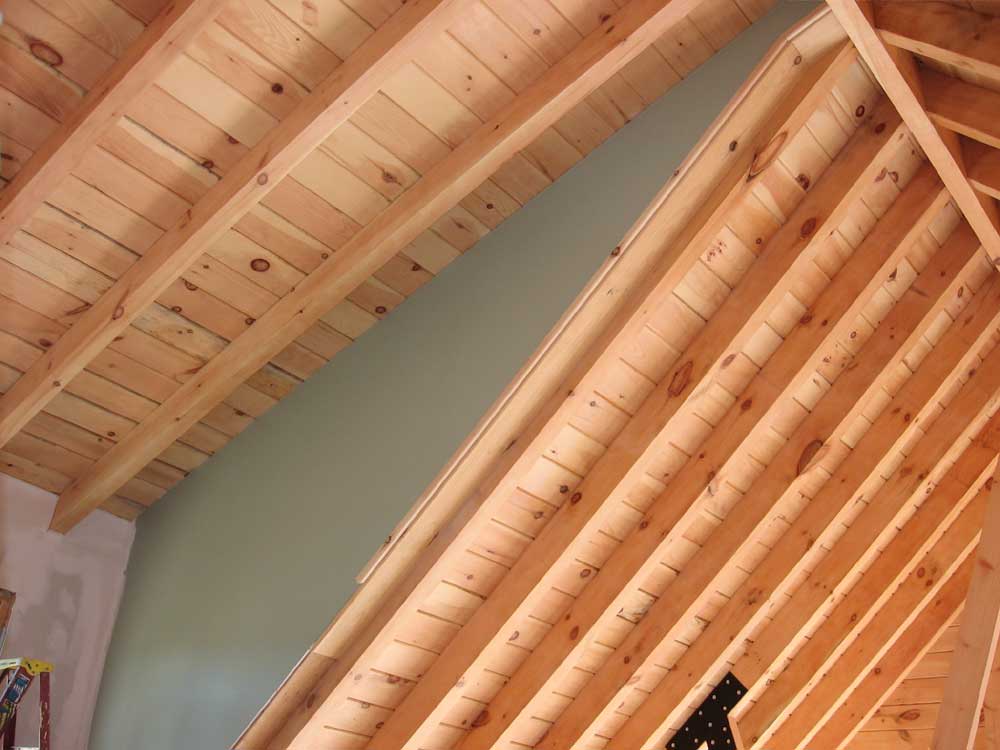
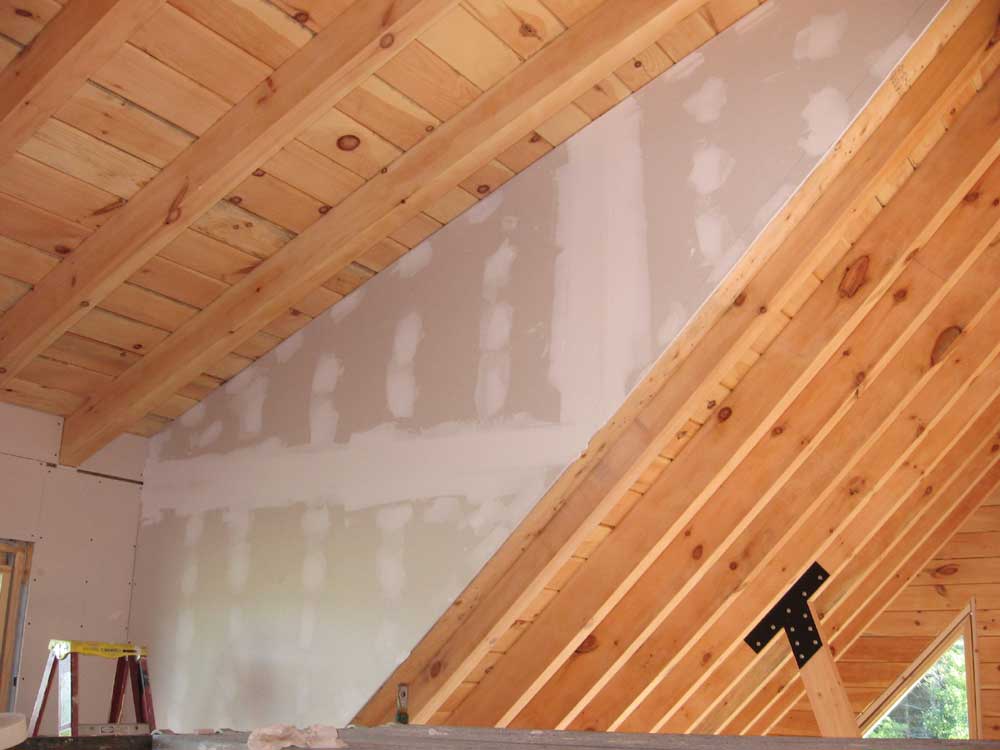
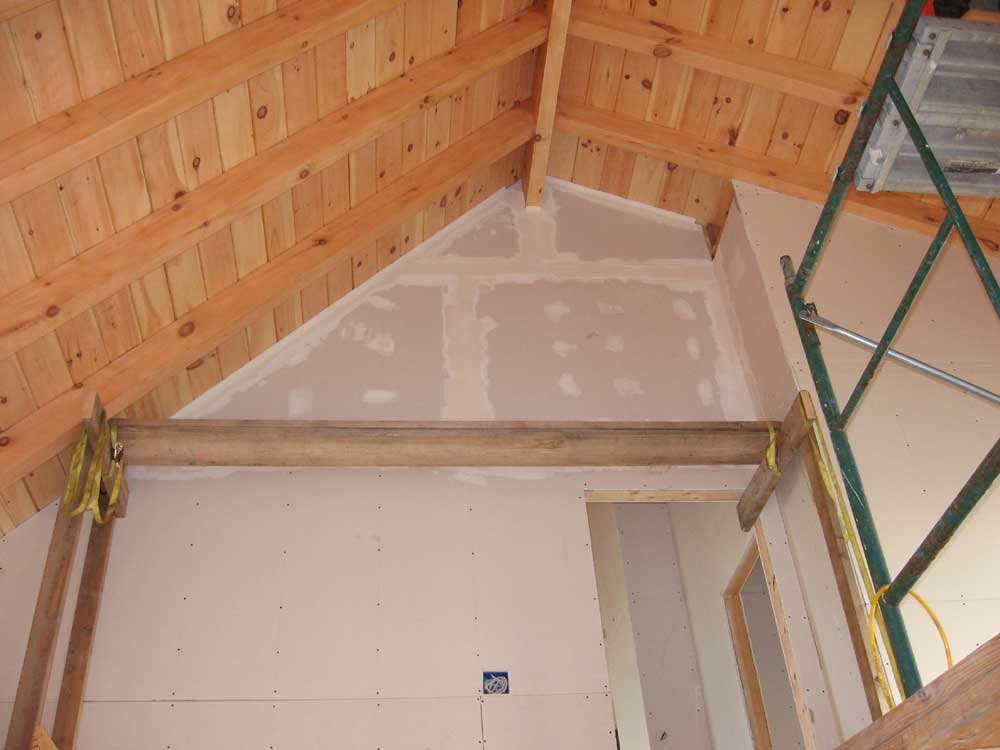
 The
seam between sheetrock and the wood ceiling looked clean and crisp,
and much nicer than it would have if I'd had to install wooden trim
to cover the joint. I much preferred the cleaner look without
trim, and figure that it saved quite a bit of time and effort. The
seam between sheetrock and the wood ceiling looked clean and crisp,
and much nicer than it would have if I'd had to install wooden trim
to cover the joint. I much preferred the cleaner look without
trim, and figure that it saved quite a bit of time and effort.With that out of the way, and after double checking myself to ensure that I really was done, I dismantled the staging over the stairway, leaving only the horizontal ladder and a plank so that I could continue work on the lower sections of the wall. |
|||
 While
I waited for the poly to dry on the trim pieces, I applied the
second coat of mud to the loft walls that I began yesterday, and
then moved downstairs to apply the third coat to Heidi's craft room
and the hallway corners, as well as the second coat on the bathroom
shower wall. While
I waited for the poly to dry on the trim pieces, I applied the
second coat of mud to the loft walls that I began yesterday, and
then moved downstairs to apply the third coat to Heidi's craft room
and the hallway corners, as well as the second coat on the bathroom
shower wall. |
|||
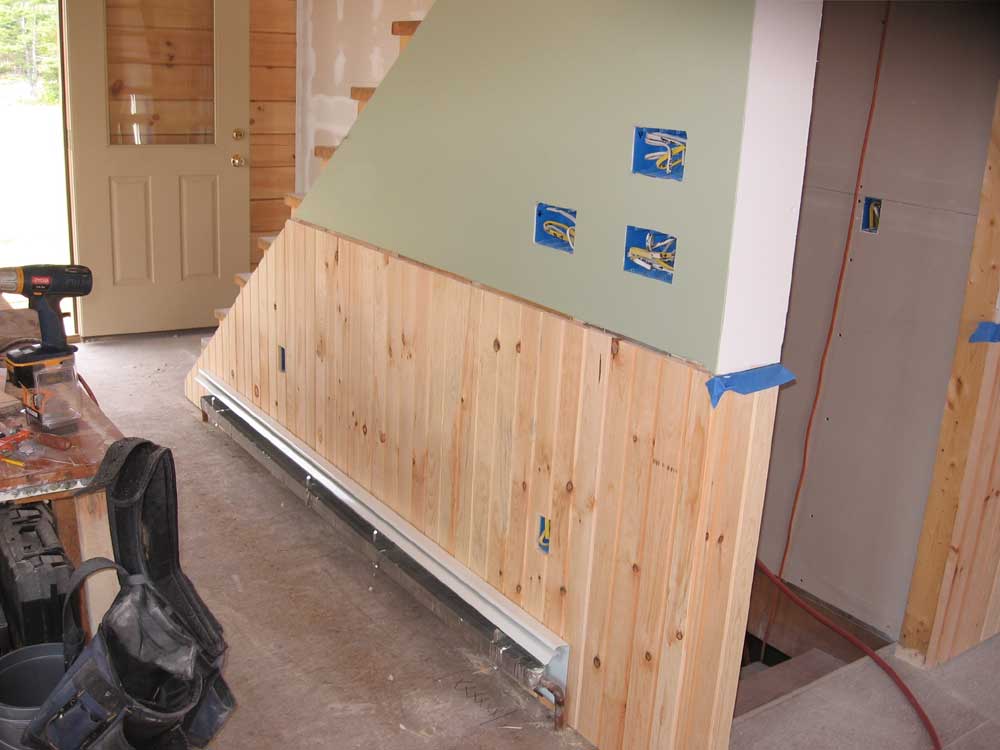
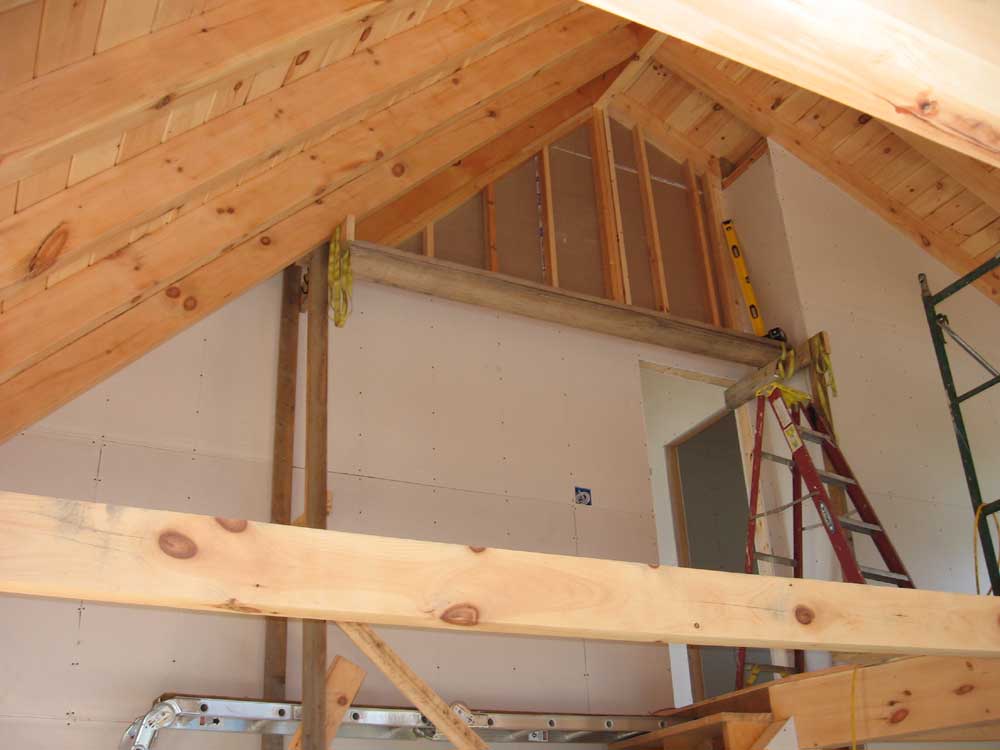
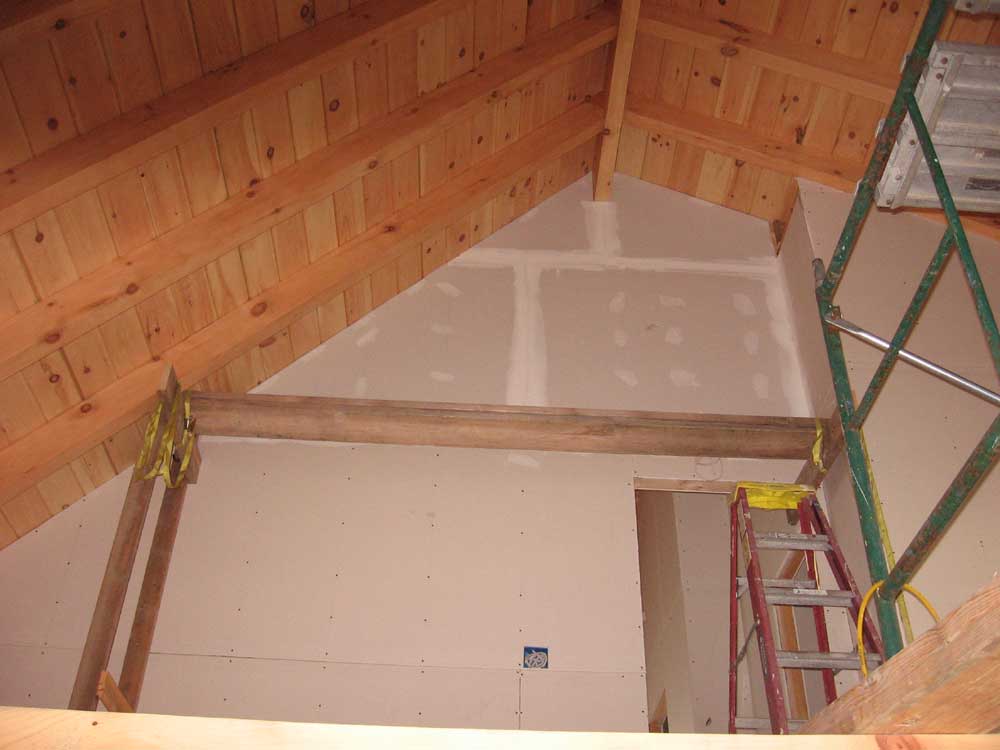
 The
trim was dry now, so I prepared to install it on the bottom of the
loft dormer knee wall, which would wrap up my work there and enable
me to move the pipe staging elsewhere so that I could continue with
the drywall mudding. I began with the flat piece on the bottom
of the framing, which covered the 2x6 framing and the drywall edge.
At the extent of my reach from the ladder on top of the staging
platform, I managed to install the short top piece, and then a
longer piece that ran down the angled wall far enough that I would
be able to continue working on it from the loft deck later. The
trim was dry now, so I prepared to install it on the bottom of the
loft dormer knee wall, which would wrap up my work there and enable
me to move the pipe staging elsewhere so that I could continue with
the drywall mudding. I began with the flat piece on the bottom
of the framing, which covered the 2x6 framing and the drywall edge.
At the extent of my reach from the ladder on top of the staging
platform, I managed to install the short top piece, and then a
longer piece that ran down the angled wall far enough that I would
be able to continue working on it from the loft deck later. |
|||
 Next,
I installed the smaller edge piece. The two pieces required
miter cuts where they joined near the ridge, since the kneewall
incorporates both the 12:12 main roof pitch as well as the 5:12
dormer pitch. The miter joint was at the transition of the two
pitches, and each piece needed to be cut at, it turned out, about
13.5° to make up the 27° angle required. Next,
I installed the smaller edge piece. The two pieces required
miter cuts where they joined near the ridge, since the kneewall
incorporates both the 12:12 main roof pitch as well as the 5:12
dormer pitch. The miter joint was at the transition of the two
pitches, and each piece needed to be cut at, it turned out, about
13.5° to make up the 27° angle required. |
|||
|
|
|||
 The
trim turned out well, and I happily moved the pipe staging into the
bedroom. Then, I set up my big stepladder at the top of the
stairs so that I could fill in a small piece of sheetrock at the top
of a short wall between the loft and stairway. I had left this
piece out while I was working on my high staging because I found
that I really needed the opening so that I had a handhold to grip
while ascending or descending the staging. As much as I wanted
to fill it in, there was simply nothing else to hold onto, so I left
it for later. Later turned into now, and since I had pre-cut
the piece earlier, installation was a snap. I finished up the
corner bead to the top, and applied the first coat of mud to the new
piece and the seams below. The
trim turned out well, and I happily moved the pipe staging into the
bedroom. Then, I set up my big stepladder at the top of the
stairs so that I could fill in a small piece of sheetrock at the top
of a short wall between the loft and stairway. I had left this
piece out while I was working on my high staging because I found
that I really needed the opening so that I had a handhold to grip
while ascending or descending the staging. As much as I wanted
to fill it in, there was simply nothing else to hold onto, so I left
it for later. Later turned into now, and since I had pre-cut
the piece earlier, installation was a snap. I finished up the
corner bead to the top, and applied the first coat of mud to the new
piece and the seams below.Then, I continued with the large stair wall, and applied the mud and tape to the next area beneath the newly-painted section at the top. |
|||
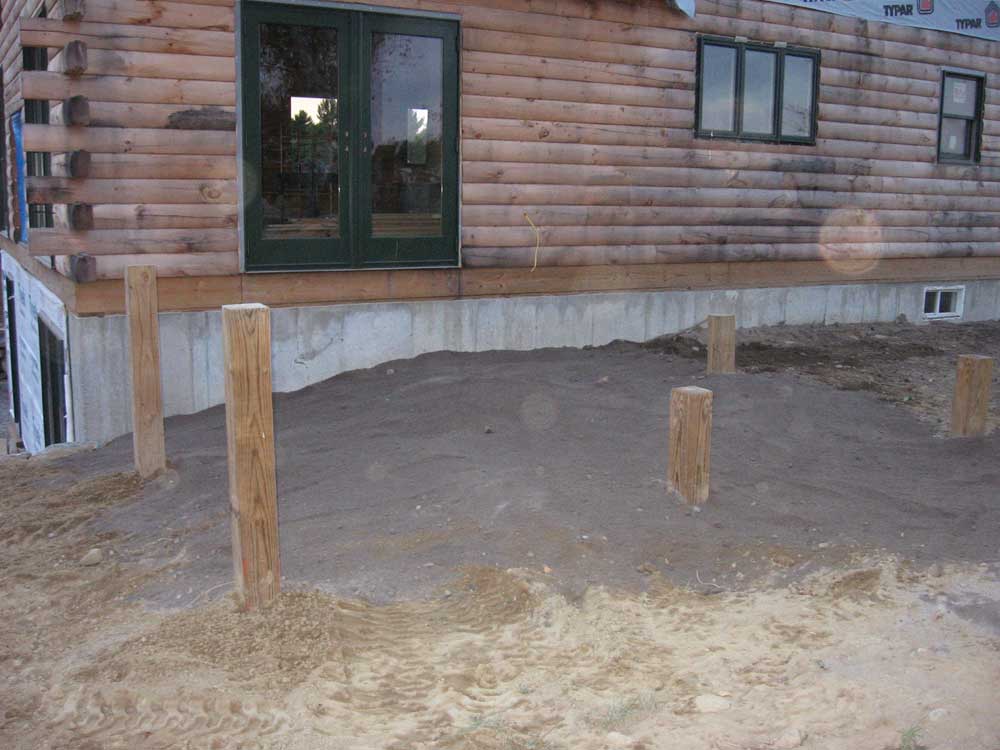
 During
the later part of the afternoon, I decided to shift gears for a few
hours. After the minor regrading the other day, I needed to
finish the backfilling under the front and screen porch with the new
material delivered a day ago, and to lay some stone dust under both
deck areas to prevent weed and plant growth there. I also
needed to lay stone dust and then crushed stone under the big deck
by the daylight basement wall; since there was such a height
difference between the ground and the desired level, we decided that
that much crushed stone would be too "cushy" underfoot; beginning
with the compactable stone dust would hopefully be more solid in the
end. During
the later part of the afternoon, I decided to shift gears for a few
hours. After the minor regrading the other day, I needed to
finish the backfilling under the front and screen porch with the new
material delivered a day ago, and to lay some stone dust under both
deck areas to prevent weed and plant growth there. I also
needed to lay stone dust and then crushed stone under the big deck
by the daylight basement wall; since there was such a height
difference between the ground and the desired level, we decided that
that much crushed stone would be too "cushy" underfoot; beginning
with the compactable stone dust would hopefully be more solid in the
end. |
|||
|
Even though there was no immediate need for these jobs to be done, as it would be a couple weeks till Bob and I began the deck construction, with some rain predicted over the weekend I thought it made sense to take advantage of the nice weather of the moment and get these chores done. Besides, I was a bit tired of mudding, and didn't feel like getting into the area around the bedroom ceiling rafters. I finished up as it began to get dark in the evening, feeling surprisingly tired after shoveling and raking the material around. |
|||
|
|
|||
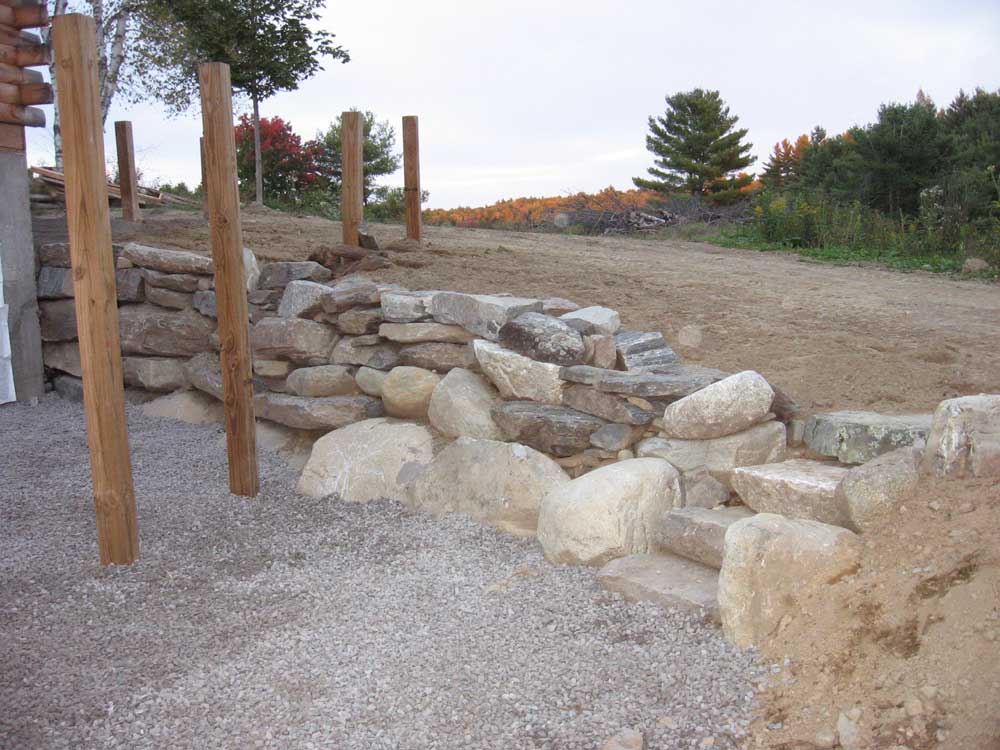 I
need to take this opportunity to highlight the excellent work that
Bill Hubbell has
done on the retaining walls around the daylight basement. I
asked him if he'd enjoy playing around with some of our rock walls
and other outdoor work, as he enjoys this greatly and hasn't had as
much opportunity lately. I thought that he might just move a
few rocks into place, which is what I would have done and called it
good...but he took the wall to a whole new level of appearance and
quality, one that I couldn't have hoped to expect from what was
really a down-and-dirty, hastily-placed, large-rock wall. Over
several days during the past few weeks, and working only with the
random and eclectic supply of rocks on site, he built up the top of
the wall to make it more effective at holding back the grade, but
also greatly enhanced the basic, rough walls that the excavator
placed back in April, including this lovely set of steps, and we
cannot thank him enough. I
need to take this opportunity to highlight the excellent work that
Bill Hubbell has
done on the retaining walls around the daylight basement. I
asked him if he'd enjoy playing around with some of our rock walls
and other outdoor work, as he enjoys this greatly and hasn't had as
much opportunity lately. I thought that he might just move a
few rocks into place, which is what I would have done and called it
good...but he took the wall to a whole new level of appearance and
quality, one that I couldn't have hoped to expect from what was
really a down-and-dirty, hastily-placed, large-rock wall. Over
several days during the past few weeks, and working only with the
random and eclectic supply of rocks on site, he built up the top of
the wall to make it more effective at holding back the grade, but
also greatly enhanced the basic, rough walls that the excavator
placed back in April, including this lovely set of steps, and we
cannot thank him enough. |
|||
THURSDAY, SEPTEMBER 21, 2006 |
|||
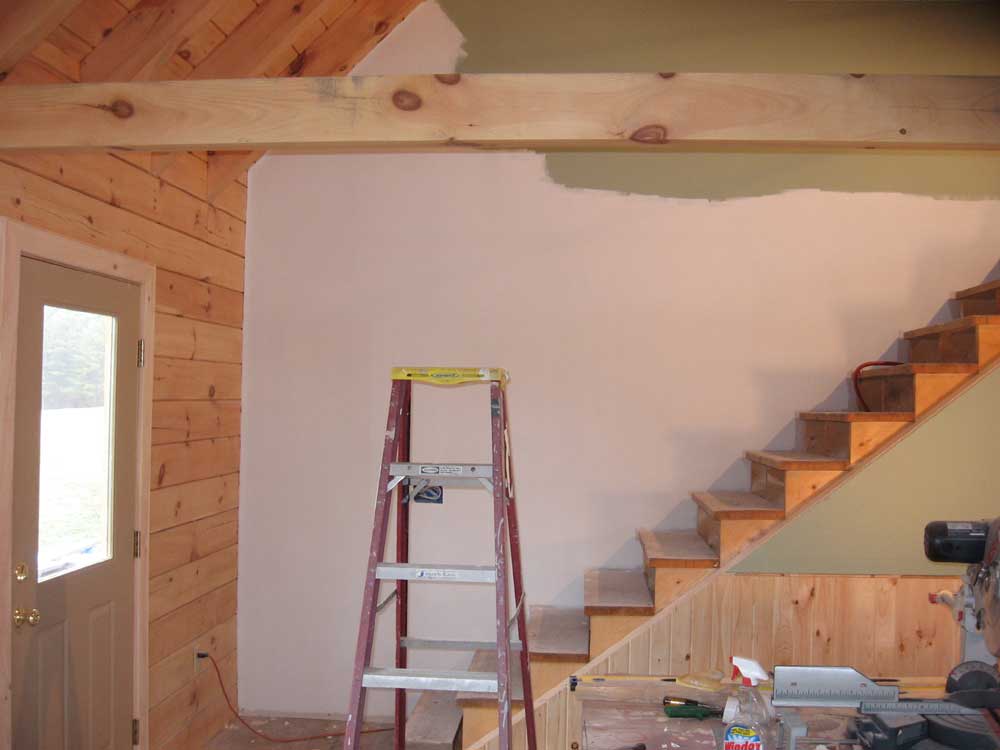
| First thing this morning, I got up on the staging and sanded the mud on the top portion of the stairwall, where I had been concentrating my finishing efforts all week. Sanding joint compound is perhaps one of the dustiest chores known to man, but the material sands extremely easily, and the job didn't take long. I was pleased with how the seams turned out. I continued in this vein and sanded the shed dormer kneewall in the loft, the other awkwardly high area that I have been working to finish this week. | |||
 With
that done, I blew down the dust, and prepared to apply drywall
primer. This seals the paper surface and the mud, and evens
out the varying texture between the two materials. I applied
one coat, which covered nicely and looked better than most drywall
primers I have used. With
that done, I blew down the dust, and prepared to apply drywall
primer. This seals the paper surface and the mud, and evens
out the varying texture between the two materials. I applied
one coat, which covered nicely and looked better than most drywall
primers I have used. |
|||
|
Next, I continued with the second coat of mud on some of the areas downstairs, including Heidi's craft room and the corner beads in the hallway. I also mudded and taped the new sheetrock I had installed yesterday in the downstairs bathroom. |
|||
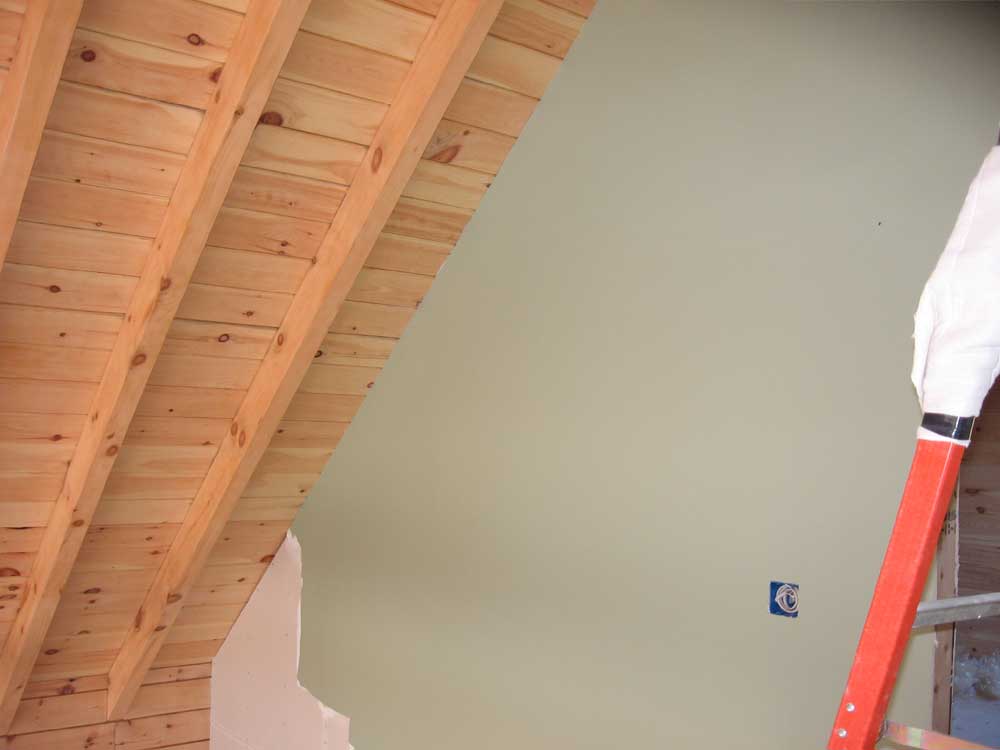
 By
now, it was late morning, and the drywall primer was dry. I
decided to continue and apply the first coat of finish paint to
these areas, so that I'd have time to do the second coat today,
meaning that these areas would be dry and complete by tomorrow
morning. We chose Sherwin Williams Clary Sage for the loft and
stairway. It's always a pleasure applying SW paint--the stuff
is amazing. I love it. By
now, it was late morning, and the drywall primer was dry. I
decided to continue and apply the first coat of finish paint to
these areas, so that I'd have time to do the second coat today,
meaning that these areas would be dry and complete by tomorrow
morning. We chose Sherwin Williams Clary Sage for the loft and
stairway. It's always a pleasure applying SW paint--the stuff
is amazing. I love it.It was great to apply a finished paint color, even to only small parts of a couple walls, as it seemed to signal some real progress. I left the first coat to dry for a couple hours while I did some other things. Later in the day, I applied the second coat, completing these areas. In the morning, I'll carefully trim away the overlapping paper tape at the edges of the wall, hopefully revealing a clean and complete edge. |
|||
 During
the remaining parts of the day, in and between some of the jobs
listed above, I taped and mudded the remainder of the loft area, or
at least as much as I could reach without moving the 5' section of
staging. (Tomorrow, I will be able to move this and use it
elsewhere.) Because of the roof rafters intersecting the
outside wall, this job took a fair bit of time, with significant
edge taping. I installed some of the corner bead upstairs, and
mudded it where appropriate. During
the remaining parts of the day, in and between some of the jobs
listed above, I taped and mudded the remainder of the loft area, or
at least as much as I could reach without moving the 5' section of
staging. (Tomorrow, I will be able to move this and use it
elsewhere.) Because of the roof rafters intersecting the
outside wall, this job took a fair bit of time, with significant
edge taping. I installed some of the corner bead upstairs, and
mudded it where appropriate. |
|||
|
|
|||
 Late
in the day, and in a hurry because I wanted them done in time for
the morning's work, I milled some pine boards into the appropriate
dimensions to use as trim on the bottom side of the shed dormer
kneewall, to cover the exposed 2x6 framing in that area. I
planned a board on the bottom of the overhang, covering the
sheetrock edge and the 2x6, and then a second, narrower board to
cover the seam between the lower board and the sheetrock on the
side. Late
in the day, and in a hurry because I wanted them done in time for
the morning's work, I milled some pine boards into the appropriate
dimensions to use as trim on the bottom side of the shed dormer
kneewall, to cover the exposed 2x6 framing in that area. I
planned a board on the bottom of the overhang, covering the
sheetrock edge and the 2x6, and then a second, narrower board to
cover the seam between the lower board and the sheetrock on the
side.
I cut the boards to width on my tablesaw in the shop, and then milled some edge details with my router, including a chamfer and a bead detail on the smaller piece. Rapidly running out of time, I applied a coat of polyurethane to the boards and left them overnight. In the morning, I planned to apply the second coat of poly, and then install the finished boards from the staging as soon as I could. Only then could I remove the staging from the loft; I badly needed it elsewhere. |
|||
WEDNESDAY, SEPTEMBER 20, 2006 |
|||
 I
began with more mudding, as usual. I spot-applied a 4th coat
of mud to the top section of the stair wall, as there were a couple
low spots that would be easier to fill than to try and sand out.
Then, I continued with the third coat on the dormer knee wall in the
loft, and the kitchen, hallway, and bathroom downstairs. I
began with more mudding, as usual. I spot-applied a 4th coat
of mud to the top section of the stair wall, as there were a couple
low spots that would be easier to fill than to try and sand out.
Then, I continued with the third coat on the dormer knee wall in the
loft, and the kitchen, hallway, and bathroom downstairs. |
|||
|
|
|||
 I
installed some plastic corner bead on the three outside corners in
the hallway downstairs, and mudded them in. I used a narrow
crown air stapler to secure the beads, which worked very well and
didn't distort the beads at all. I
installed some plastic corner bead on the three outside corners in
the hallway downstairs, and mudded them in. I used a narrow
crown air stapler to secure the beads, which worked very well and
didn't distort the beads at all. |
|||
 I
continued with some more sheetrock hanging, and completed the large
sheets on the inside wall of Heidi's craft room closet. Then,
I moved upstairs and rocked the top section of the shower stall,
starting at 48" from the floor as with the other walls.
(Later, I'll install cement board on the lower sections.) I
continued with some more sheetrock hanging, and completed the large
sheets on the inside wall of Heidi's craft room closet. Then,
I moved upstairs and rocked the top section of the shower stall,
starting at 48" from the floor as with the other walls.
(Later, I'll install cement board on the lower sections.) |
|||
|
Bob Emery has been on site for a few days working on the small chimney on the north side of the house, for the boiler. He was in a bit of a chatty mood today, and who was I to decline. This might have slowed my progress during the morning, but that's OK. |
|||
 After
lunch, I took some time to move some scrap lumber and ladders that I
had stored behind the house, as it seemed that McGee construction
was due back later this afternoon to regrade around the house to
take care of some settling and poor water runoff that had occurred
since the foundation was backfilled. I needed to move the
materials to provide room for the bulldozer to work. Again,
Bob was chatty and I spent far too much time enjoying the beautiful
day outside and talking. After
lunch, I took some time to move some scrap lumber and ladders that I
had stored behind the house, as it seemed that McGee construction
was due back later this afternoon to regrade around the house to
take care of some settling and poor water runoff that had occurred
since the foundation was backfilled. I needed to move the
materials to provide room for the bulldozer to work. Again,
Bob was chatty and I spent far too much time enjoying the beautiful
day outside and talking. |
|||
 Finally,
I got back to work and applied the first coat of mud to Heidi's
craft room, excepting the inside of the closet, which I'll do later.
As I finished up, the boys from McGee arrived, so I spent some more
time outside watching and consulting on the backfilling and grading. Finally,
I got back to work and applied the first coat of mud to Heidi's
craft room, excepting the inside of the closet, which I'll do later.
As I finished up, the boys from McGee arrived, so I spent some more
time outside watching and consulting on the backfilling and grading. |
|||
|
Later in the afternoon, I installed sheetrock on the short wall that I built yesterday in the downstairs bathroom, and also around the inside of the door opening. I cleaned up inside, as it was getting a bit dirty, and then knocked off a bit early so that I could finish mowing the field. |
|||
|
|
|||
TUESDAY, SEPTEMBER 19, 2006 |
|||
 This
morning, I picked up 8 sheets of sheetrock--enough to finish the job
plus some extra, I hoped--and some additional supplies that I
needed, including some plumbing supplies for the two showers, some
drywall primer, and assorted other things. I was back at the
house by 7:30 and ready to get going. In a happy coincidence
of timing, I had received notice late yesterday that the shower pan
I had ordered for the downstairs bathroom had arrived, so I was able
to pick that up as well. This
morning, I picked up 8 sheets of sheetrock--enough to finish the job
plus some extra, I hoped--and some additional supplies that I
needed, including some plumbing supplies for the two showers, some
drywall primer, and assorted other things. I was back at the
house by 7:30 and ready to get going. In a happy coincidence
of timing, I had received notice late yesterday that the shower pan
I had ordered for the downstairs bathroom had arrived, so I was able
to pick that up as well.Again, I began up on the staging, and applied the third coat of mud to the area at the top of the stairwell. This should be the final coat, unless I discover a large void or other major flaw tomorrow. |
|||
 I
continued with a second coat on the loft wall, and then on the
kitchen, hallway, and bathroom walls downstairs, continuing the
process that I began yesterday. Obviously there are many more
walls and rooms in the house requiring tape and mud, but by breaking
it up in this way I keep my sanity, and my concentration, intact.
I can only mud for 2-3 hours at a time before my arms get tired from
holding the hawk and the putty knife. I
continued with a second coat on the loft wall, and then on the
kitchen, hallway, and bathroom walls downstairs, continuing the
process that I began yesterday. Obviously there are many more
walls and rooms in the house requiring tape and mud, but by breaking
it up in this way I keep my sanity, and my concentration, intact.
I can only mud for 2-3 hours at a time before my arms get tired from
holding the hawk and the putty knife. |
|||
 With
the day's mudding over with, I moved on to other jobs--a side
benefit of my process that I hadn't necessarily anticipated in my
planning, but which was a happy surprise. I decided to attack
the shower valve plumbing in both bathroom showers, so that the
walls in those areas would be ready to be completely closed in. With
the day's mudding over with, I moved on to other jobs--a side
benefit of my process that I hadn't necessarily anticipated in my
planning, but which was a happy surprise. I decided to attack
the shower valve plumbing in both bathroom showers, so that the
walls in those areas would be ready to be completely closed in.I began upstairs, and found that I needed almost every tool in the house, somehow...quite a few trips up and down the stairs to retrieve those forgotten items! I had to install some blocking in the short wall of the shower to allow me to secure the shower valve and nipple for the shower head. |
|||
 Originally,
I had thought I would use copper piping to finish off these areas,
which is why I stubbed out the PEX supply lines with copper
everywhere. Upon further review, however, I decided that it
made sense to continue using the easy-to-use PEX, so I had to solder
a conversion fitting to the stubouts to begin. Originally,
I had thought I would use copper piping to finish off these areas,
which is why I stubbed out the PEX supply lines with copper
everywhere. Upon further review, however, I decided that it
made sense to continue using the easy-to-use PEX, so I had to solder
a conversion fitting to the stubouts to begin.I also discovered, to my annoyance, that I had blindly picked up the wrong nipple fittings for the shower heads--I had purchased tees with a threaded connection, rather than a simple elbow with a threaded connection. Since I didn't have plans to go out for more supplies anytime soon, I decided to make do with what I had, which meant that I needed to solder a short length of copper pipe with an end cap into the open, unnecessary, end of the tee. One makes do with what one has. |
|||
 I
finished up the installation with the PEX piping, and then went to
the basement to turn on the water. Fortunately, all the
connections seemed to be watertight, so I moved all my tools and
supplies downstairs to the other bathroom. I
finished up the installation with the PEX piping, and then went to
the basement to turn on the water. Fortunately, all the
connections seemed to be watertight, so I moved all my tools and
supplies downstairs to the other bathroom.I repeated the process in the downstairs bathroom, though it went a bit quicker since I was doing the same thing over again and knew what was what. Again, the plumbing tested watertight, so it looked like I was all set. |
|||
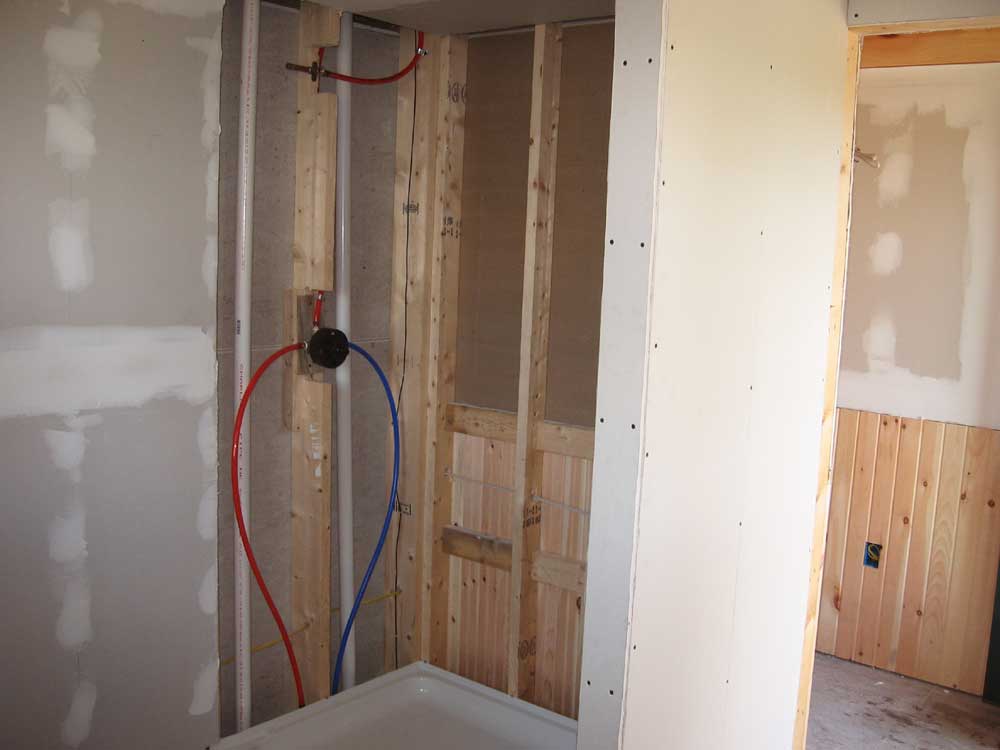
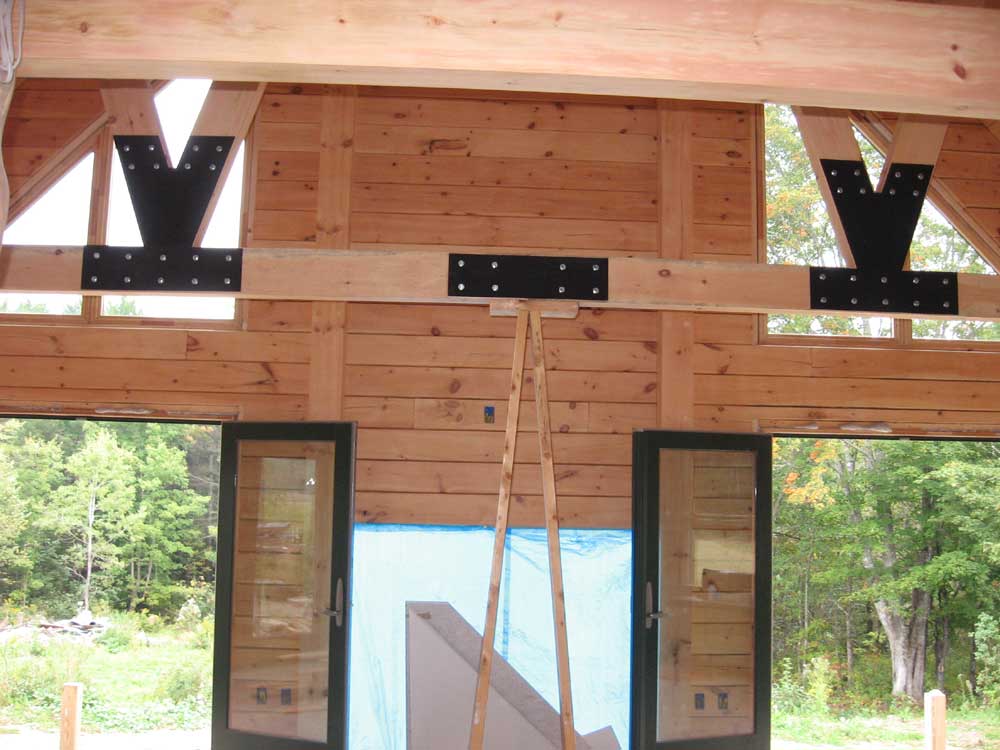
|
I moved on to something completely different: installing the truss plates. I could use my big stepladder to reach all but the very top plate, so I thought I'd get this done, and worry about the top ones later when there was enough pipe staging available to do the job.
|
|||
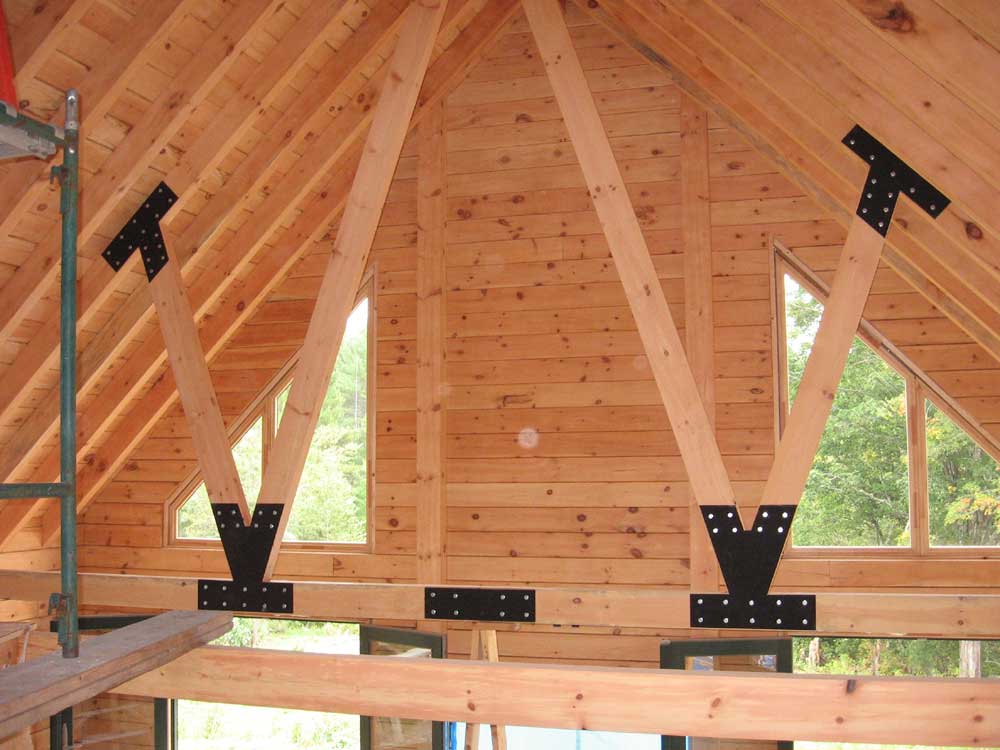 I
decided to try another plate with natural silver bolts, and liked
the look. Not only did I think it looked better, but it saved
me a lot of work. Once I made this decision, I took down the
first plate that I installed and replaced it with a flat black one
and regular zinc-plated silver lag bolts; I could turn the plate
around and use it on the other side of the truss with the flat side
out. I
decided to try another plate with natural silver bolts, and liked
the look. Not only did I think it looked better, but it saved
me a lot of work. Once I made this decision, I took down the
first plate that I installed and replaced it with a flat black one
and regular zinc-plated silver lag bolts; I could turn the plate
around and use it on the other side of the truss with the flat side
out. |
|||
|
It took a surprisingly long time to install the 10 plates that I could reach, as each had to be clamped in place first, and the bolts then installed. I used my electric impact gun to quickly spin the lags in, but with up to 16 lags in each plate, it still took a while. I was really pleased with the overall look, though, and couldn't wait to get the final ones installed up at the top. For the moment, I left the a-frame support in beneath the truss where it had been since May, but I thought I could probably remove it at this point. |
|||
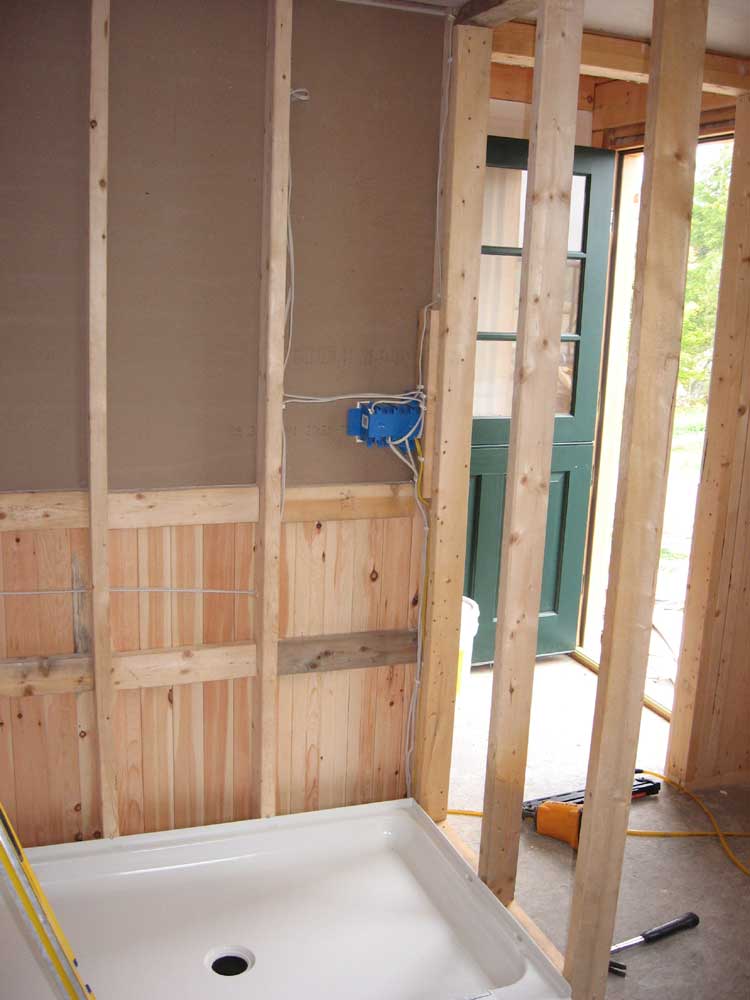
 I
finished up the afternoon in the downstairs bathroom, where I framed
up the short wall at the back side the new shower pan, and installed
the shower pan. I
finished up the afternoon in the downstairs bathroom, where I framed
up the short wall at the back side the new shower pan, and installed
the shower pan.First, I had to slightly enlarge the hole in the floor for the drain, as it had been cut anticipating a 36" wide pan, while the actual pan was only 34". Then, I installed a felt pad that came with the pan, ostensibly to prevent squeaking from friction, and placed the pan in place in the corner. I used some roofing nails to secure the upturned flange to the studs, nailing just above the flange so that only the head of the nail contacted it, holding it in place. |
|||
 Next,
I framed up the wall at the other end; I had previously cut the
studs for this, as I was running out of material a couple weeks ago
and wanted to make sure I had the studs for this wall set aside
before I cut up any remaining framing lumber for other uses.
It was a simple matter to frame this very small wall, though the
studs were pretty twisted and bowed. Next,
I framed up the wall at the other end; I had previously cut the
studs for this, as I was running out of material a couple weeks ago
and wanted to make sure I had the studs for this wall set aside
before I cut up any remaining framing lumber for other uses.
It was a simple matter to frame this very small wall, though the
studs were pretty twisted and bowed.The interior of this shower will receive cement board and ceramic tile as a finishing material, so the work was complete for the moment. |
|||
|
|
|||
MONDAY, SEPTEMBER 18, 2006 |
|||
 First
thing, I applied the second coat of mud to the top part of the wall
in the stairwell. I also used this opportunity to try out an
idea for finishing the edges of the sheets: edge taping.
Using standard paper sheetrock tape, I folded it in half along the
crease and applied it to the edges of the sheets, allowing the other
side of the tape to fold onto the ceiling. By mudding over the
tape on the sheets, I should be able to create a smooth, even edge
against the ceiling (or walls, depending on the location); the
overlapping edge of the tape on the ceiling helps protect the
finished wood from mud. First
thing, I applied the second coat of mud to the top part of the wall
in the stairwell. I also used this opportunity to try out an
idea for finishing the edges of the sheets: edge taping.
Using standard paper sheetrock tape, I folded it in half along the
crease and applied it to the edges of the sheets, allowing the other
side of the tape to fold onto the ceiling. By mudding over the
tape on the sheets, I should be able to create a smooth, even edge
against the ceiling (or walls, depending on the location); the
overlapping edge of the tape on the ceiling helps protect the
finished wood from mud.Later, I'll carefully trim off this excess flap, hopefully revealing a clean edge. |
|||
|
|
|||
 I
continued up in the loft and applied the mesh tape and first coat of
mud to the sheetrock on the dormer knee wall, working off the
staging and a ladder on top. I did the first coat on this
entire wall, but left the other two loft walls for a little later. I
continued up in the loft and applied the mesh tape and first coat of
mud to the sheetrock on the dormer knee wall, working off the
staging and a ladder on top. I did the first coat on this
entire wall, but left the other two loft walls for a little later. |
|||
 Next,
I decided to continue hanging sheetrock, so that I could use up
whatever I had remaining and get an accurate count for a final
number of sheets required to finish the job. I worked mostly
in Heidi's craft room, and used scraps to cover the inside and
outside of the closet door wall. I had one full sheet
remaining, and I installed that on the inside back wall of the
closet. With all the cutting, this took most of the remainder
of the morning, but all that remained was the large sheets required
to complete the back wall. Next,
I decided to continue hanging sheetrock, so that I could use up
whatever I had remaining and get an accurate count for a final
number of sheets required to finish the job. I worked mostly
in Heidi's craft room, and used scraps to cover the inside and
outside of the closet door wall. I had one full sheet
remaining, and I installed that on the inside back wall of the
closet. With all the cutting, this took most of the remainder
of the morning, but all that remained was the large sheets required
to complete the back wall. |
|||
 In
the afternoon, I applied tape and the first coat of mud to the
kitchen wall, both walls in the hallway, the downstairs bathroom,
and the small wall beneath the staircase. The hallway required
a lot of edge taping around the floor joists; otherwise, the job was
straightforward. In
the afternoon, I applied tape and the first coat of mud to the
kitchen wall, both walls in the hallway, the downstairs bathroom,
and the small wall beneath the staircase. The hallway required
a lot of edge taping around the floor joists; otherwise, the job was
straightforward. |
|||
 Finally,
I made a list of some supplies to pick up tomorrow morning--8 sheets
of sheetrock, some more joint compound, and a few plumbing supplies.
I quit a bit earlier than I normally would since I am taking a
couple hours at the end of each day this week, as needed--from about
5 till it gets dark at 7--to mow my fields. Finally,
I made a list of some supplies to pick up tomorrow morning--8 sheets
of sheetrock, some more joint compound, and a few plumbing supplies.
I quit a bit earlier than I normally would since I am taking a
couple hours at the end of each day this week, as needed--from about
5 till it gets dark at 7--to mow my fields. |
|||
SUNDAY, SEPTEMBER 17, 2006 |
|||
 I
got started this morning in the upstairs bathroom, where I installed
the remaining large sheets of sheetrock on the walls. There
was a piece on the outside wall above the toilet location, another
piece at the end of the tub, and two larger pieces in the inside
corner above the shower stall. I
got started this morning in the upstairs bathroom, where I installed
the remaining large sheets of sheetrock on the walls. There
was a piece on the outside wall above the toilet location, another
piece at the end of the tub, and two larger pieces in the inside
corner above the shower stall.The large pieces above the stall proved to be a pain to install, given the relatively tight quarters and the protruding roof rafters. Sheetrocking time is fun time. The installation of these final large pieces left only small strips at the very top, where I'd have to cut around the rafters. I'll do this in a day or two, but for now I wanted to move on to other areas. |
|||
 I
continued with the shower ceiling in the master bath. The
walls and floor will be tiled, but I never saw a reason to tile
ceilings. I probably should have used the so-called "greenboard"
(green-colored water-resistant sheetrock) for the ceiling, but I
didn't have any, and I've never had a problem with regular sheetrock
on a ceiling. So I used regular sheetrock. All in all,
cutting and installing this small ceiling went relatively well, at
least as far as the finished product was concerned. There was
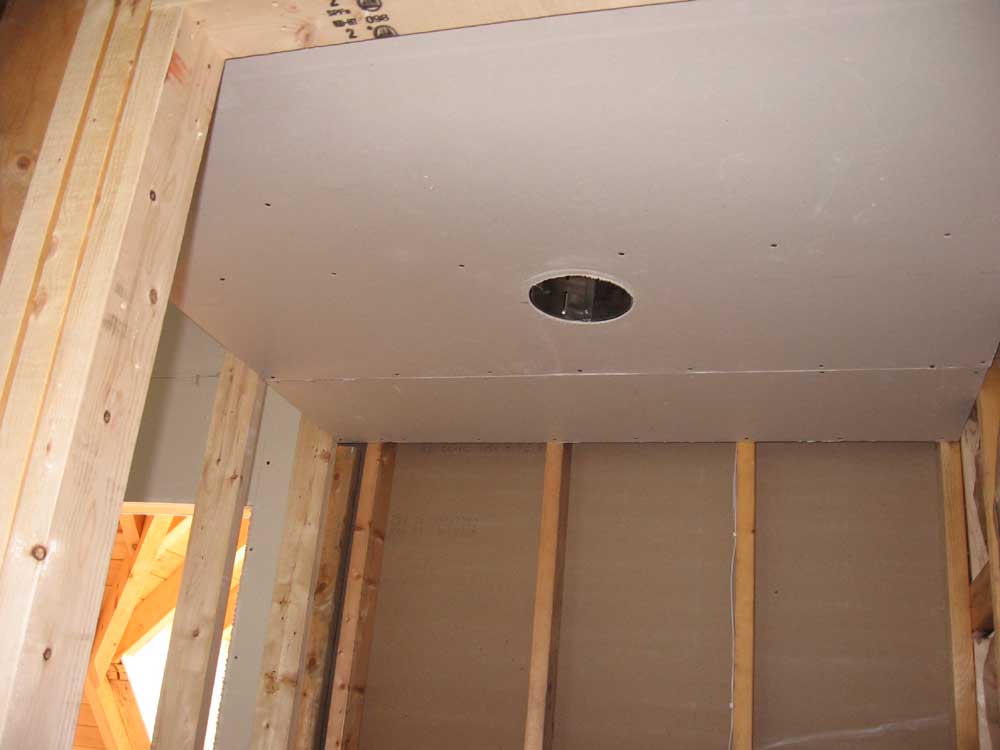
one recessed can to cut around, which fortunately went well with no
problems. I packed the Roto-Zip back into its case with
pleasure, knowing that I had no need for it again on this project. I
continued with the shower ceiling in the master bath. The
walls and floor will be tiled, but I never saw a reason to tile
ceilings. I probably should have used the so-called "greenboard"
(green-colored water-resistant sheetrock) for the ceiling, but I
didn't have any, and I've never had a problem with regular sheetrock
on a ceiling. So I used regular sheetrock. All in all,
cutting and installing this small ceiling went relatively well, at
least as far as the finished product was concerned. There was
one recessed can to cut around, which fortunately went well with no
problems. I packed the Roto-Zip back into its case with
pleasure, knowing that I had no need for it again on this project. |
|||
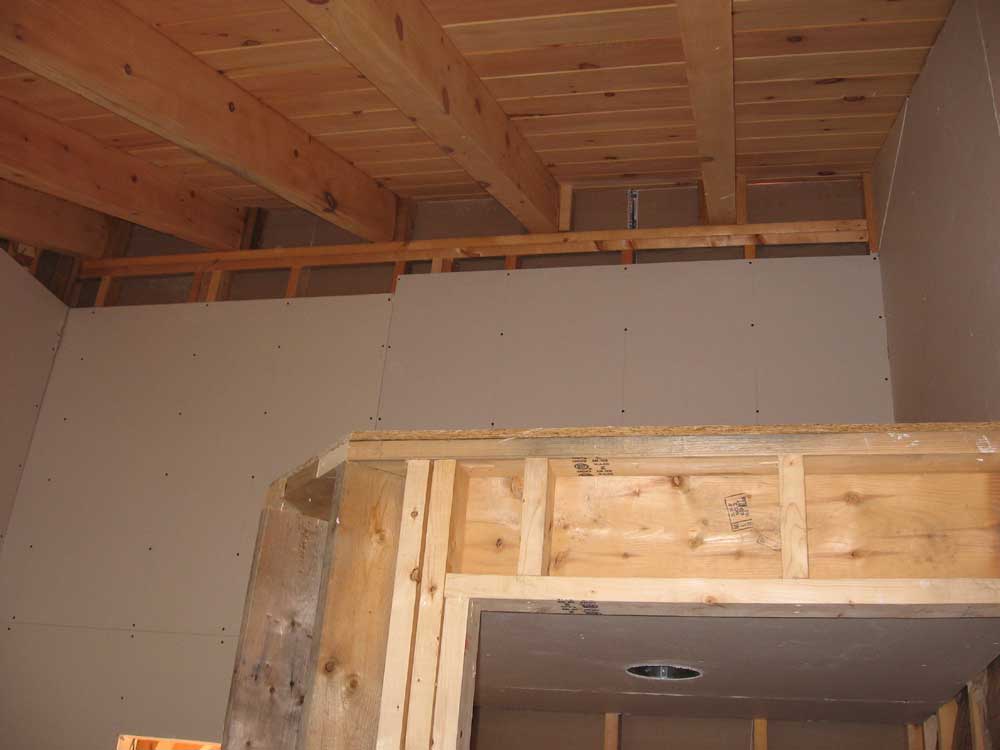
|
With the bathroom done, and all the major sheetrocking done, except for the closet in Heidi's craft room/office, I turned my attention to the area I had been dreading: the highest level of the stairway wall. All week, I had been contemplating how, exactly, I was going to reach the area. Now, it was time to actually figure it out and get it done. |
|||
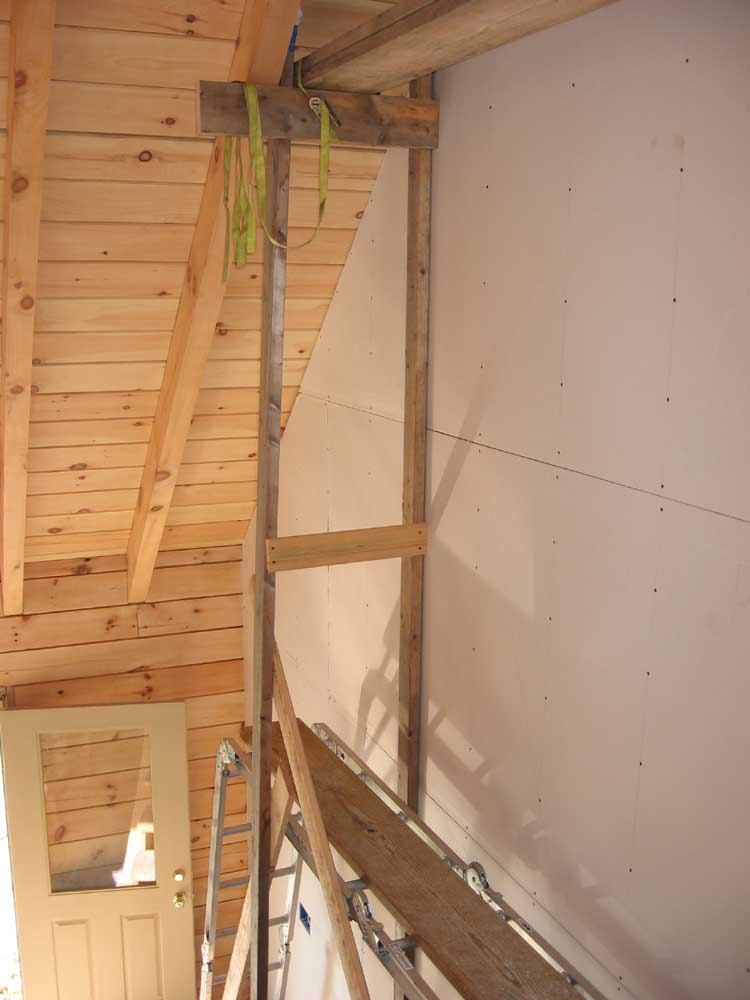 I
had thought of leaning an extension ladder between the stair risers
and the ceiling across the way, and using this to support one end of
a plank, but there was no way to make this work and get the plank
high enough. I needed the plank to be at about the top of the
last existing row of sheetrock in order to be able to reach the
peak. I
had thought of leaning an extension ladder between the stair risers
and the ceiling across the way, and using this to support one end of
a plank, but there was no way to make this work and get the plank
high enough. I needed the plank to be at about the top of the
last existing row of sheetrock in order to be able to reach the
peak.Eventually, I came up with a plan to use a couple long 2x4s for vertical support, one of which I could screw directly to a stud in the wall beneath, and built a well-braced support with the top ends cut at an angle to meet the ceiling boards. I screwed one piece to the wall, and braced the other piece as needed to hold it in place. Then, I installed a cross brace at the top to support a plank. |
|||
 At
the other end, I nailed and screwed a 2x6 to the inside of the
master bedroom door opening, and added a vertical support at the
outer end, which I screwed through the floor into the top of the
joists below. I put one of my double 2x10 planks on top, and
used ratchet straps to hold it in place and tighten everything up.
The end result was very stable and solid, but took a couple hours to
conceive and build. It was a one-time affair: I planned
to use the staging to complete the area, and then remove it for
good. At
the other end, I nailed and screwed a 2x6 to the inside of the
master bedroom door opening, and added a vertical support at the
outer end, which I screwed through the floor into the top of the
joists below. I put one of my double 2x10 planks on top, and
used ratchet straps to hold it in place and tighten everything up.
The end result was very stable and solid, but took a couple hours to
conceive and build. It was a one-time affair: I planned
to use the staging to complete the area, and then remove it for
good. |
|||
 It
wasn't fun up on the plank, as it was a bit too close to the wall
(limited by the roof rafter spacing and the need to continue to use
the staircase), and there was not much to hold onto, all the more so
as I installed the remaining pieces of sheetrock. But it was
adequate, and I got all the remaining pieces installed with little
problem. I didn't even try to use longer pieces than
necessary; I'd rather mud and tape an additional seam than try to
wrestle a large piece up on that minimal staging. It
wasn't fun up on the plank, as it was a bit too close to the wall
(limited by the roof rafter spacing and the need to continue to use
the staircase), and there was not much to hold onto, all the more so
as I installed the remaining pieces of sheetrock. But it was
adequate, and I got all the remaining pieces installed with little
problem. I didn't even try to use longer pieces than
necessary; I'd rather mud and tape an additional seam than try to
wrestle a large piece up on that minimal staging. |
|||
|
|
|||
 With
the sheets hung, I wasted no time getting the tape and first coat of
mud on. My plan is to complete the taping in this area, then
sand, prime, paint, and trim as necessary, so that I can remove the
staging once and for all. . With
the sheets hung, I wasted no time getting the tape and first coat of
mud on. My plan is to complete the taping in this area, then
sand, prime, paint, and trim as necessary, so that I can remove the
staging once and for all. . |
|||
|
At the end of the day, I had one full piece of sheetrock remaining. Since rocking the inside of Heidi's closet will require most of four full sheets just for the back (plus lots of smaller pieces to fill in around the door openings on the inside and outside of the door wall), it seemed that I would need at least three more pieces. I thought I had more than enough decent-sized scrap to finish the remaining areas, but I'll probably buy four sheets just to be safe, and since they come bundled in packs of two. That will bring the total to 84 sheets used. Next: mudding, and finishing up the final areas of sheetrock. All coming in the next week! |
|||
SATURDAY, SEPTEMBER 16, 2006 |
|||
|
Today was a "mental health" day of
sorts. I didn't do any work on the house, but the entire day
was dedicated to house-related errands, fact finding, and meetings. We began with a trip to the tile store, where we ordered the tile for the downstairs bathroom. I decided that I would concentrate first on this bathroom, as it would be easier to complete sooner, with a less complicated shower construction, less tiling, and no bathtub. My goal, after all, is to get the house "liveable" by early November so that at least we can move in, even if all aspects are not complete. We might have to use the downstairs bathroom for a couple weeks, though of course I hope to complete the other bathroom before move-in time anyway. I just like contingency plans--it keeps the workload somehow more sane, knowing that maybe, just maybe, I don't have to finish things 100% before moving in. I'll still try, though. We will soon figure out the tile patterns and amounts needed for the upstairs bathroom, and place that order as well. Next, we picked up a variety of plumbing fixtures, most notably the shower heads and valves for both bathrooms. I needed these on hand so that I could complete the plumbing inside the walls and then sheathe over the top. We found some that we liked for both baths, and also bought bath and kitchen faucets. On to the lighting store, where we had an appointment to discuss our options, get some pricing, etc. The choices are mind-boggling, and the track lighting, which we need to use in many locations, is confusing. We figured out some options, but didn't place any orders just yet, as we needed to talk about a few things. Finally, we went to an appliance store and bought the range and hood for the kitchen. Ouch. I was bemused to discover that even with expensive commercial ranges, the manufacturer nickel-and-dimes the consumer to death at the time of purchase with required "options", such as a so-called "island trim kit" that's required even for traditional against-the-wall installations. They price this "option" so high that it only makes sense to spend a little more and get the trim kit that includes the stainless steel backer and high shelf. So the method to their madness becomes clear. I figure we would have spent at least that much on the tile we had planned as a backer for the area, though, so we came out even or ahead. (At least that's what I tell myself.) Of course, there's no saying we had to buy a commercial range in the first place. But I've wanted one for years, it'll look great in our open kitchen, and this is probably the only "scratch" house we're going to build in our life. So now is the time. (That's kind of the story for this entire project...) Even though the day was long and busy, it was like a vacation after last week's sheetrocking extravaganza. I looked forward to returning to real work tomorrow with renewed vigor. |
|||
| Please click here to go back to the logs from September 1 to September 15. | |||
|
|||