|
|||
|
|
~ The bLog Home ~ |
||
TUESDAY, OCTOBER 31, 2006 |
|||
|
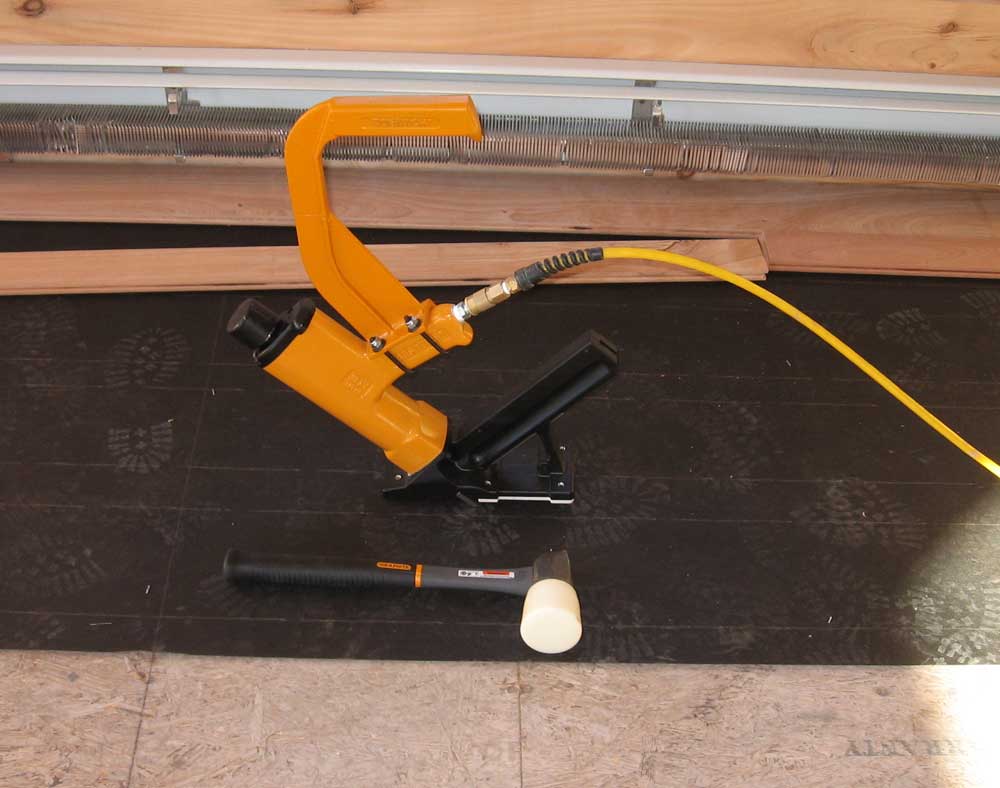
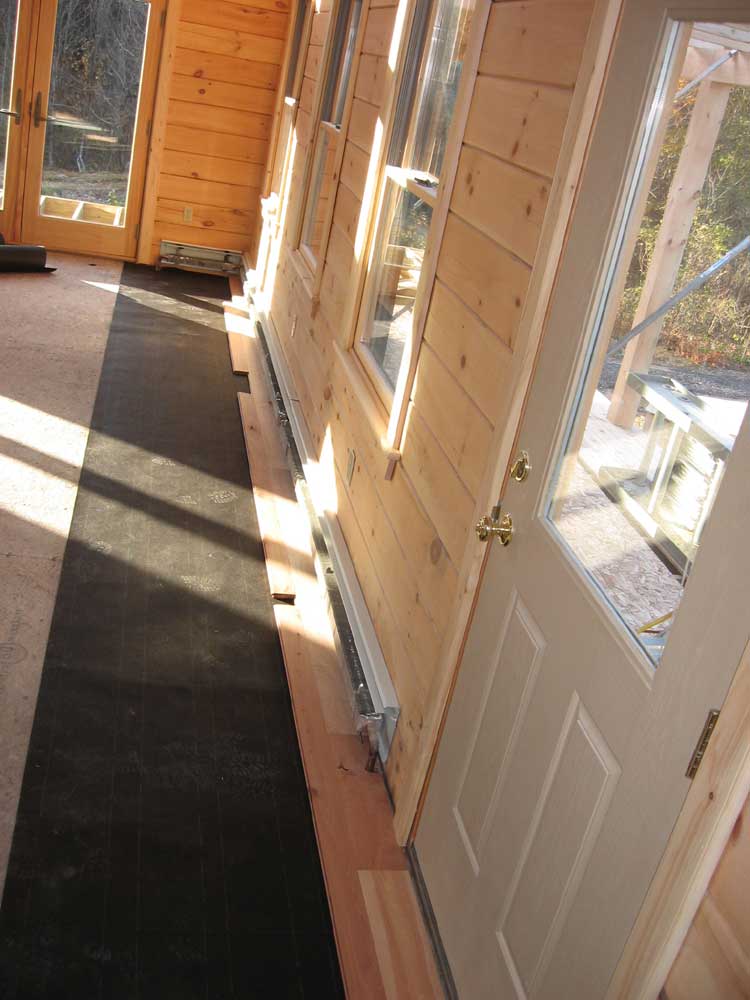
Boo! I began with my habitual trip to Lowe's to pick up lots of little items needed for the work ahead, and also to pick up a dishwasher. I had tried an experiment; I ordered the dishwasher online for store pickup. I knew from the getgo that the process hadn't worked right, as I never received the proper email confirmation. But it seemed the order had gone through; my credit card had certainly been charged, and I had a printed confirmation. Still, I arrived at the store fully expecting that my dishwasher would not be ready. And I was not disappointed (as it were). First they couldn't find the order in the store computer; the store manager scrambled to find the order between the computer and the main office somewhere. While they searched for this, I did the rest of my shopping, and returned to the desk for an update. They had found the order, but now they couldn't find the dishwasher, though the inventory said they had three in stock. A loading ticket had been pulled, meaning supposedly that the dishwasher had been set aside, but the DW was nowhere to be found. I waited with amazing patience, perhaps because such efforts were being made on my behalf; there were probably 6 different people looking for the answer to the problem. Eventually, they never found the dishwasher, but they offered me the next higher model for the same cost. I checked it out and thought it looked good, and decided to take this model. I arrived home later than expected, about 8:15, and it was 8:30 before I got up to work. Since the house was all prepared for the floor finish after yesterday, I could get right to work applying the first coat, starting in the loft. |
|||
|
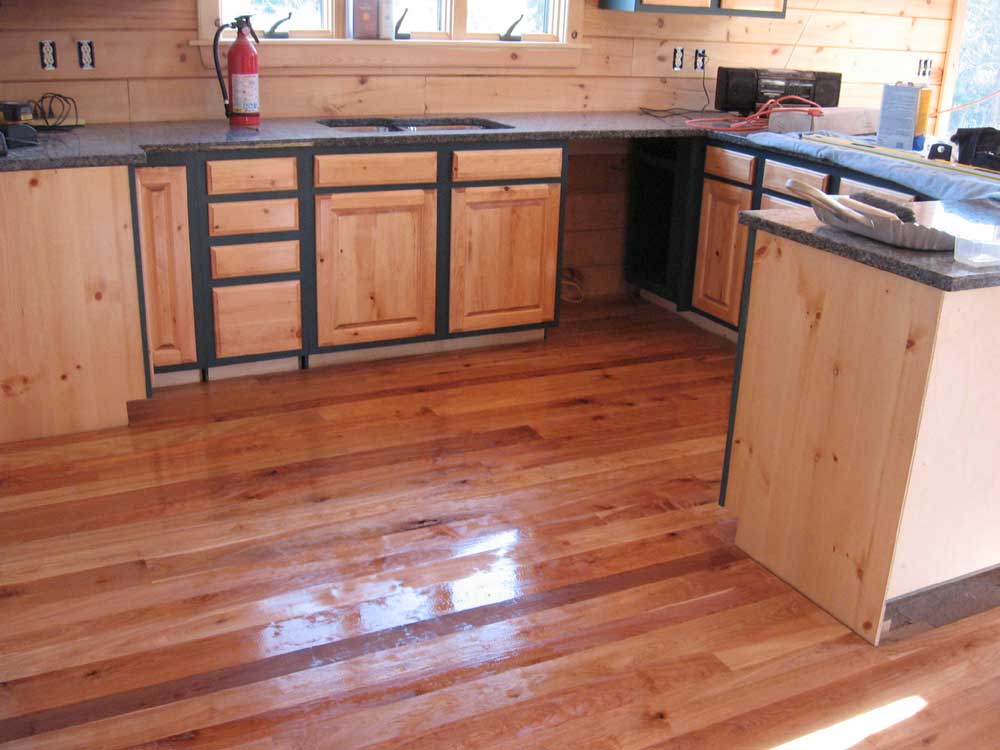
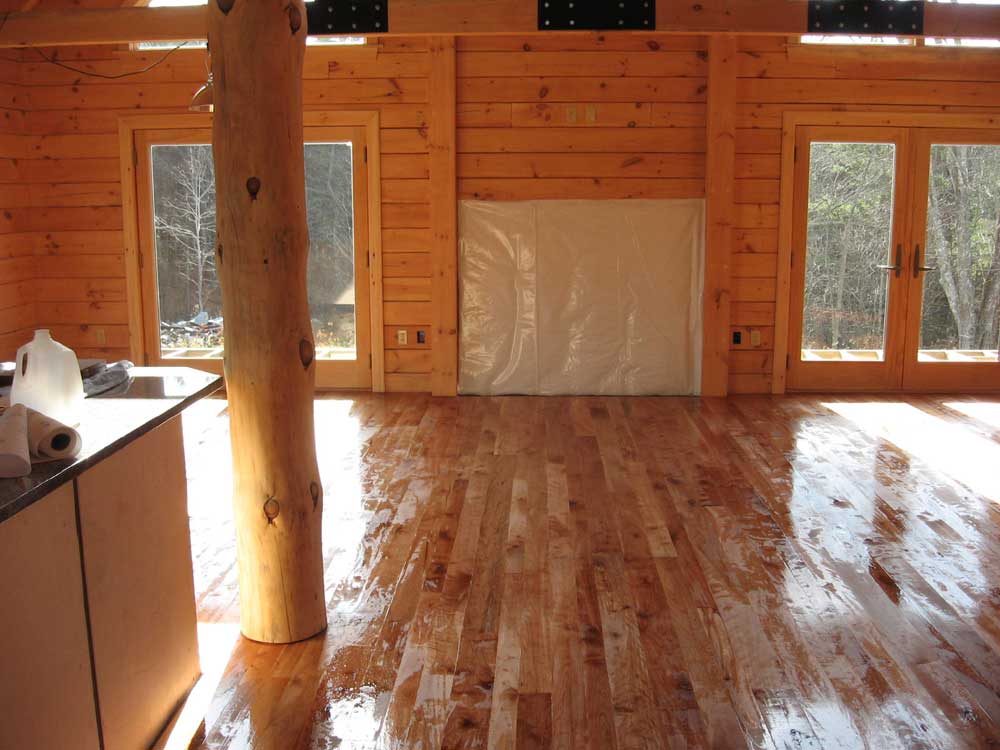
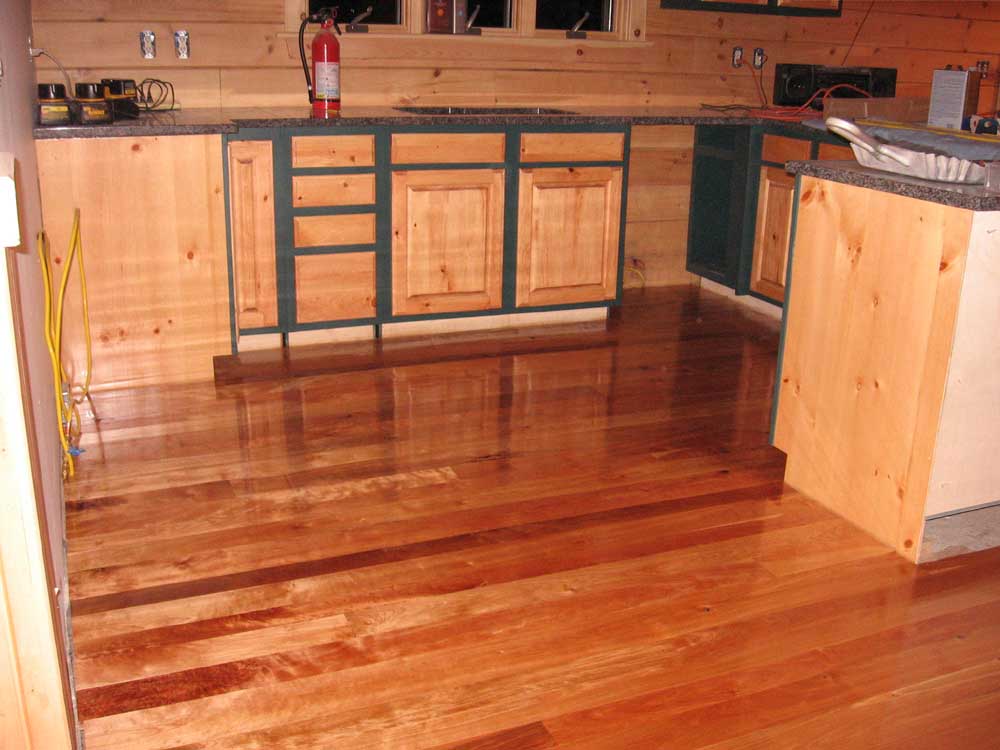
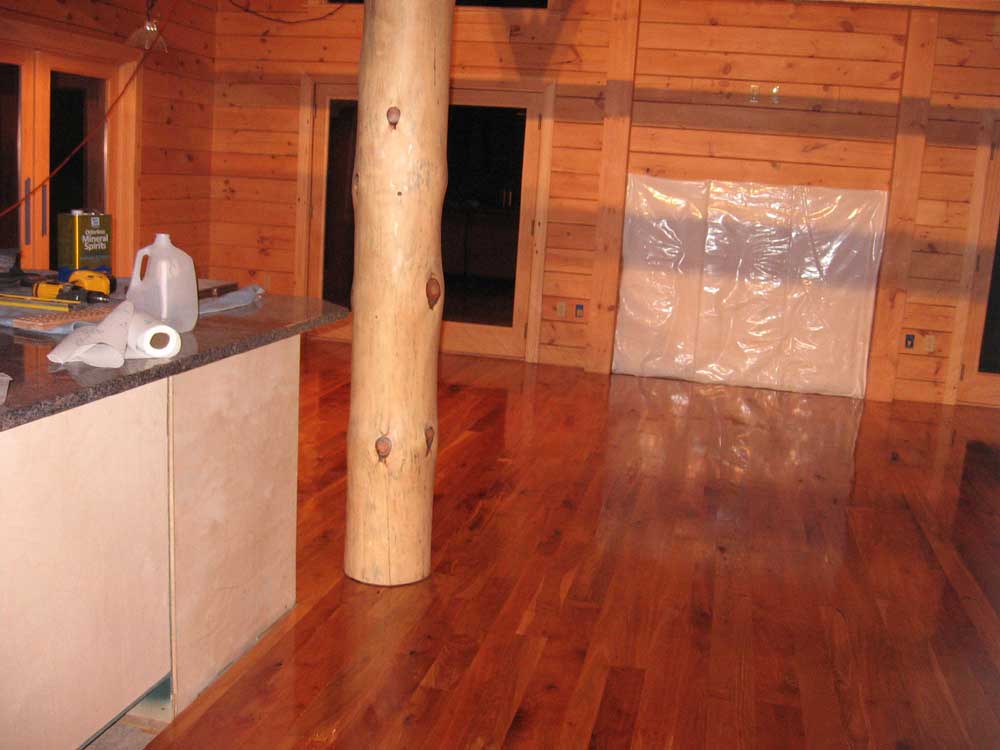
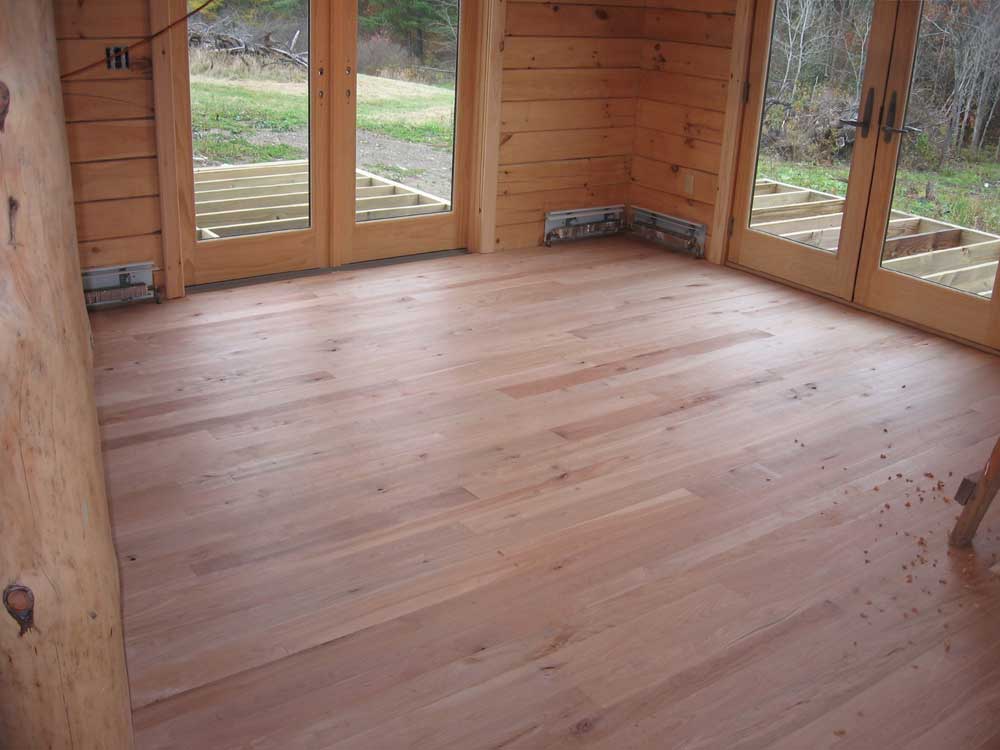
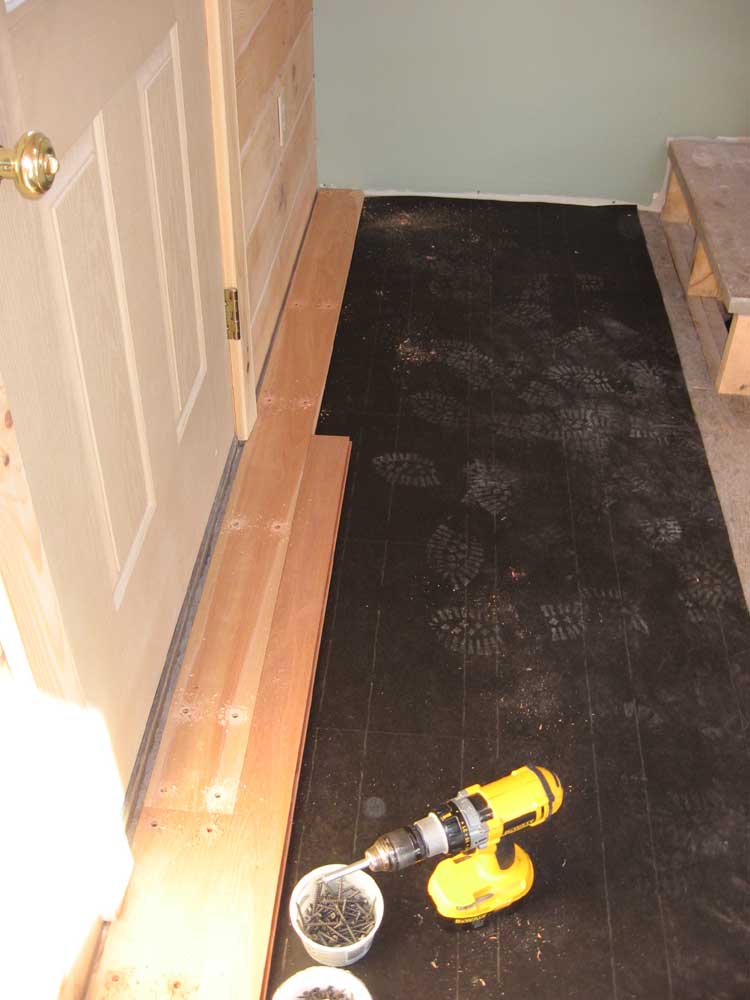
I used an oil-based floor polyurethane--gloss for the first two coats--, which was purportedly a quick-dry formula that would be ready for recoat in 3-4 hours. I applied it with a brush around the edges, and with a 10" lambswool applicator over the larger areas. This worked pretty well, though the applicator might have applied the finish a little too heavily. After the loft, I moved on to the craft room and pantry, working out towards a board seam in the doorways of each room, and then attacked the large living room, dining room, and kitchen. I finished these areas back to the basement door area, then finished the hallway so that I could exit through the basement door. The first coat took me about 2 hours to apply, and used about 3 gallons of product. |
|||
|
|
|||
|
It took longer for the first coat to dry than I had hoped; by early afternoon, it was still tacky. I was worried because the later it became, the tougher it would be for me to do the second coat today, as it was getting dark so early and I didn't have any of the permanent lights installed in the house yet. I had placed 2PM as my deadline to begin the second coat, but this time came and went with the finish still curing. I had turned the heat up to 80 to accelerate the process. Finally, around 3:30 I decided I could begin. I set up what lights I could, but it was difficult since the lights need to stand on the floor. It had become cloudy, and the light was dim to begin with, but I was determined to get the second coat on today so that it could cure nicely overnight. I couldn't face another whole day of not being able to get into the house to continue the work that needed to be done. Fortunately, the light was good enough that I managed to finish, though not without some difficulty. I didn't worry that much since this was only the second of three coats, and while I wanted complete coverage, the coat didn't need to be perfect. I'd attack the final coat only first thing in the morning when the time came, to ensure that I had good lighting. |
|||
|
The fumes from the product didn't bother me much on the first coat, but this time around they became overwhelming--probably because of a continuing outgassing of the first coat coupled with the open second coat. Eventually, with my eyes watering and barely able to breathe, I had to put on my respirator to finish the job. The color was just what I had hoped, and the finish really enhanced the grain and color variation in the wood--perfect. It would probably be Thursday before I would apply the final coat, which will be satin rather than gloss. With my range arriving Thursday morning, I didn't think it would be smart to try to rush the final coat before then, as the final coat would need more substantial cure time to prevent damage. |
|||
|
|
|||
|
Bob was here all day, and installed the cedar decking on the screen porch frame--a necessary first step, since the roof posts sit on top of the decking. I helped out for a couple hours in the afternoon while I waited for the floor finish to cure. It was too dark to take pictures of the deck by the time I got around to it, but I'll add these later. |
|||
MONDAY, OCTOBER 30, 2006 |
|||
|
My day started very early today.
I was up at the house a little after 5:30, since the carpet guys
were supposed to be there at 6. They actually arrived at 6:30
because of some undetermined snafu with their not being properly
notified by the flooring store, or something. If that were the
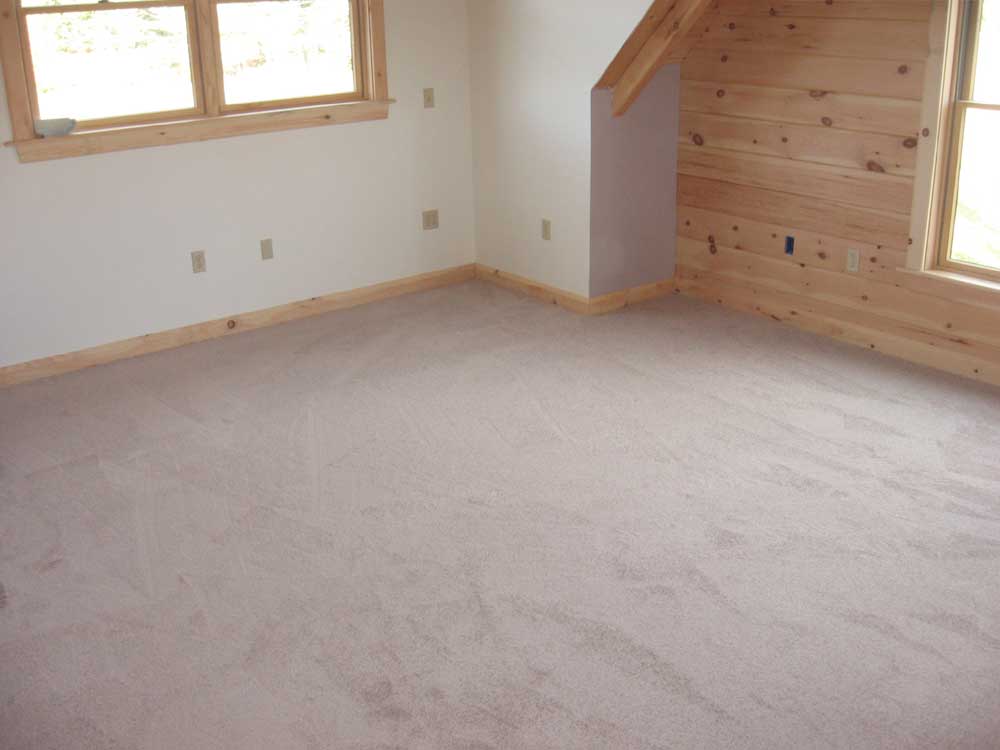
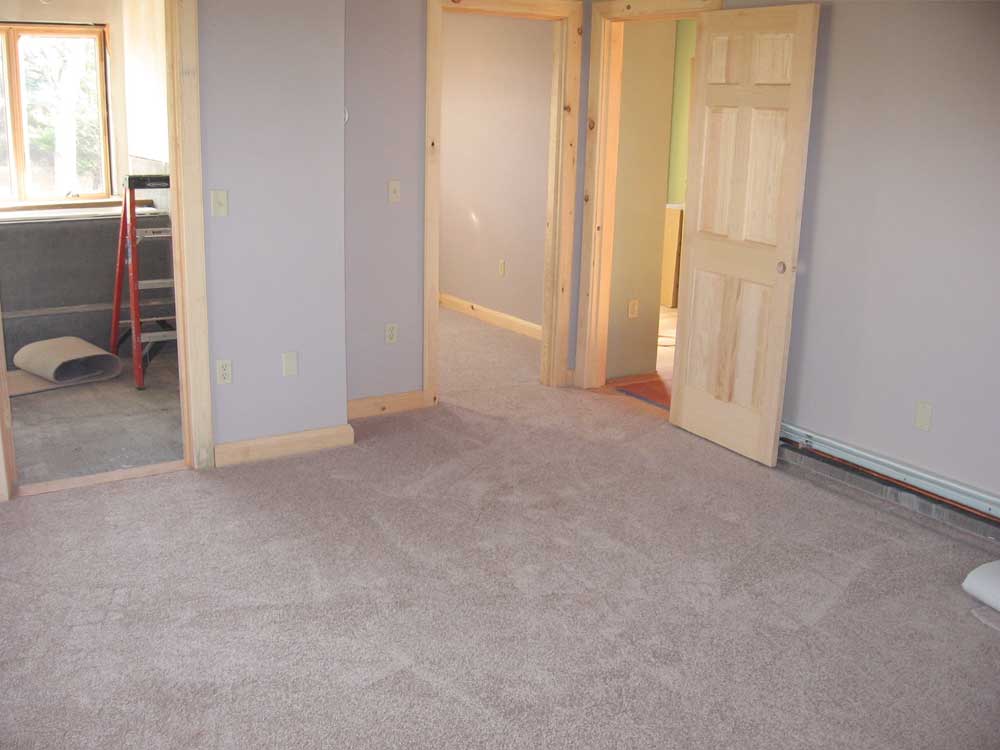
case, I'd say that being only 30 minutes late is pretty good. The father and son installation team didn't waste any time. They were all done and gone by 7:45. With that, the bedroom and closet were done. |
|||
|
|
|||
|
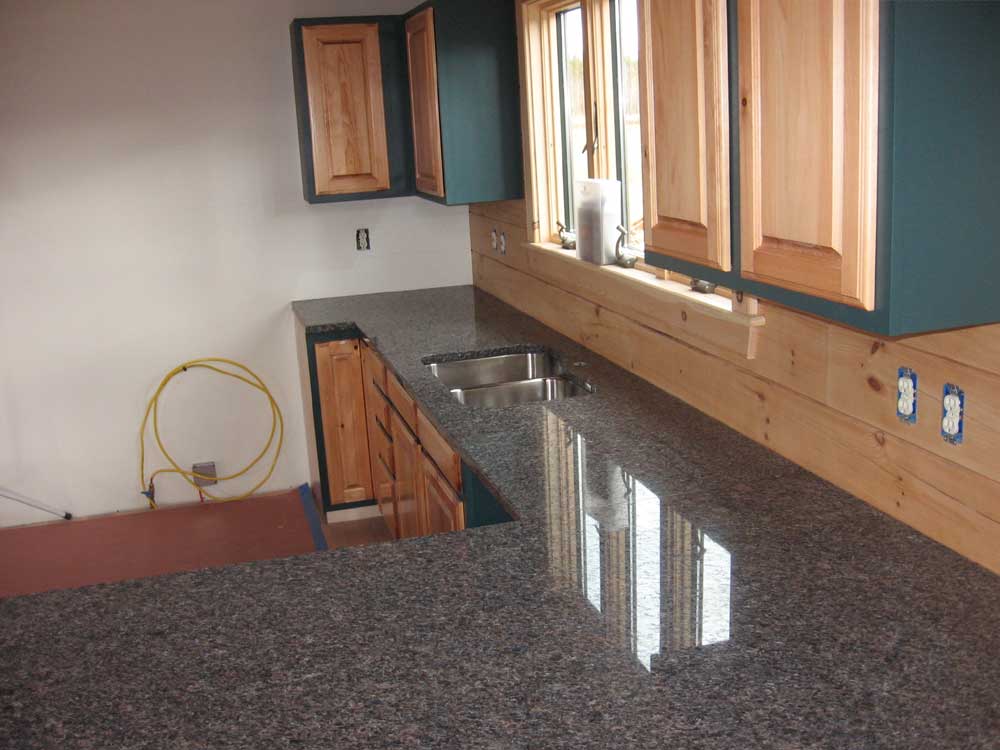
While the carpet guys worked, I finished up the electrical trimout in Heidi's craft room, installing the remaining outlets. Then, I cleared off the remaining stuff from the kitchen countertop in preparation for the granite guys. I also cleaned out the excess stuff from the craft room--some insulation for the basement, excess tools, and the closet bifold doors--and considered getting started on the interior doors downstairs. Since I expected the granite at any time, though, I was reluctant to get going, as I'd be in the way. So I sort of stood around, not sure what to do next. Fortunately, the granite got here pretty soon. |
|||
|
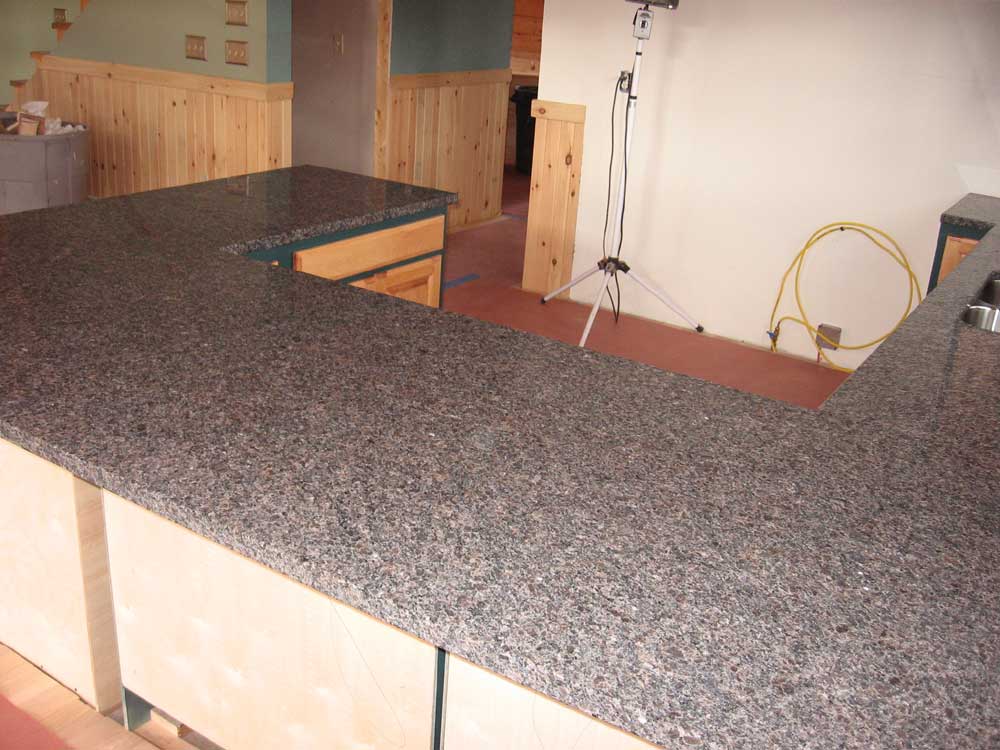
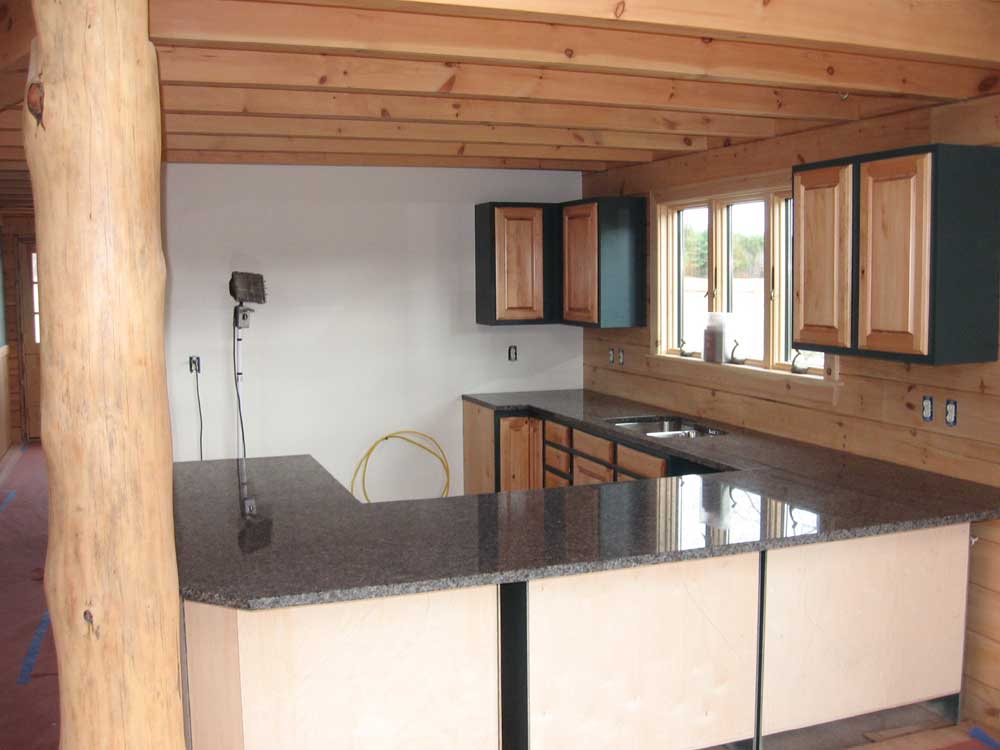
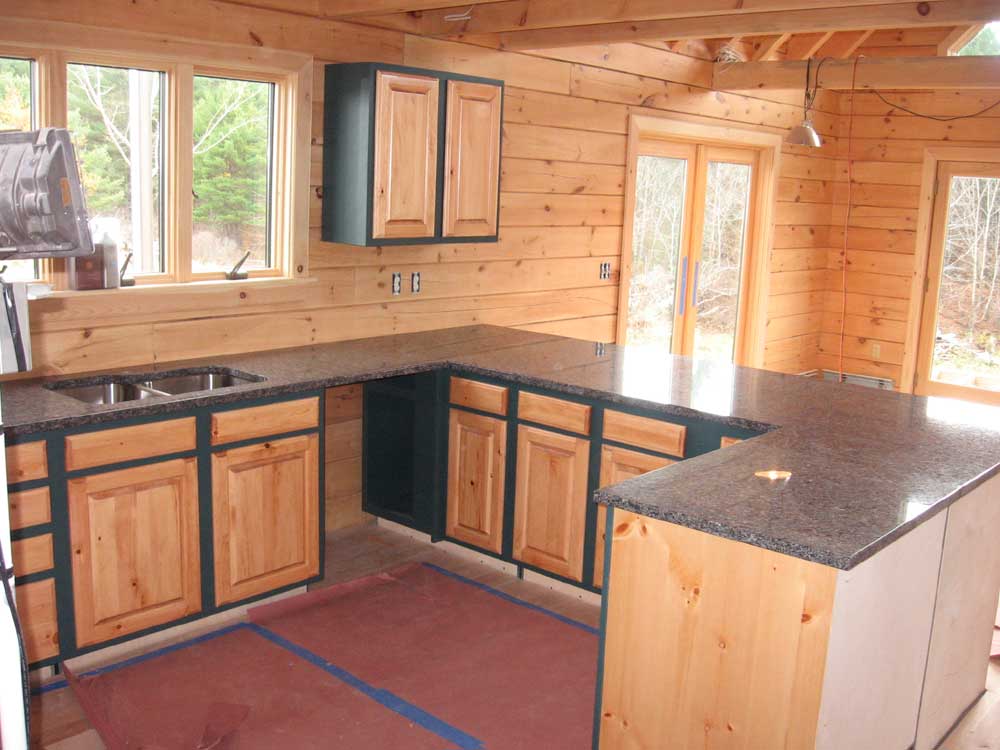
Over a couple hours, the team of 4 people installed the granite countertops in the kitchen. It looked great. I love the color. It looked like it was pretty heavy when they carried in the two larger pieces. |
|||
|
|
|||
|
In between watching the granite folks, I fooled with some of the track lighting that Heidi had picked up on Friday. I installed some of the end feed connectors on some of the tracks, since it had to be done sometime and I wasn't doing anything else. Once the granite was done, I got right to work on the remaining interior doors, which I wanted hung and out of the way before I started finishing the floor. I had to cut a bit off each door jamb before they doors would fit into the rough openings; one one side of the hall (the center wall, which Bob framed way back in May), the ROs were very tight all around, and the doors barely fit. In fact, the door to the basement ended up a bit tight since I couldn't push the jamb any further away from the door itself. I figured I could trim the door if necessary. The doors on this side also ended up with little clearance to the floor; later, I'll trim 1/2" or so off the bottoms of the doors. I finished up the last door in time for a late lunch. After lunch, I began the task of preparing the wood flooring for finishing, which I planned to start tomorrow. I picked up the protective rosin paper, removed trash cans and other obstructions, and then installed plugs on all the screw holes I had drilled in some of the boards. This took longer than I had expected because the only plug cutter I could find was apparently an older one, and was extremely dull. It burned, more than cut, its way into the scrap flooring as I cut the 50 plugs I needed (I thought). This was very slow as well as annoying. Then, while installing the plugs, I ran short and had to go back down and cut 10 more. |
|||
|
When the glue on the plugs had dried, I cut off the excess with a chisel and dressed them with some sandpaper. Then, I swept all the floors, opened the doors to let the wind blow some of the dust out, and then vacuumed all the floors. Finally, I washed the wood with paint thinner, using about a gallon to wash the entire floor. This was tough on the knees by the end, but the paint thinner gave a sneak preview of what the floor would look like with finish. I finished up this final task at about 4:30, and called it a day. Tomorrow: 2 coats of gloss oil-based polyurethane; according to the package, it dries for recoat in 3 hours. Then, I'll do one coat of satin over the top the next day. Outside, Bob finished up the roof on the front porch. He arrived around 11 after doing something else earlier in the day, and left once the roof and trim were complete. Good enough. |
|||
|
|
|||
SUNDAY, OCTOBER 29, 2006 |
|||
|
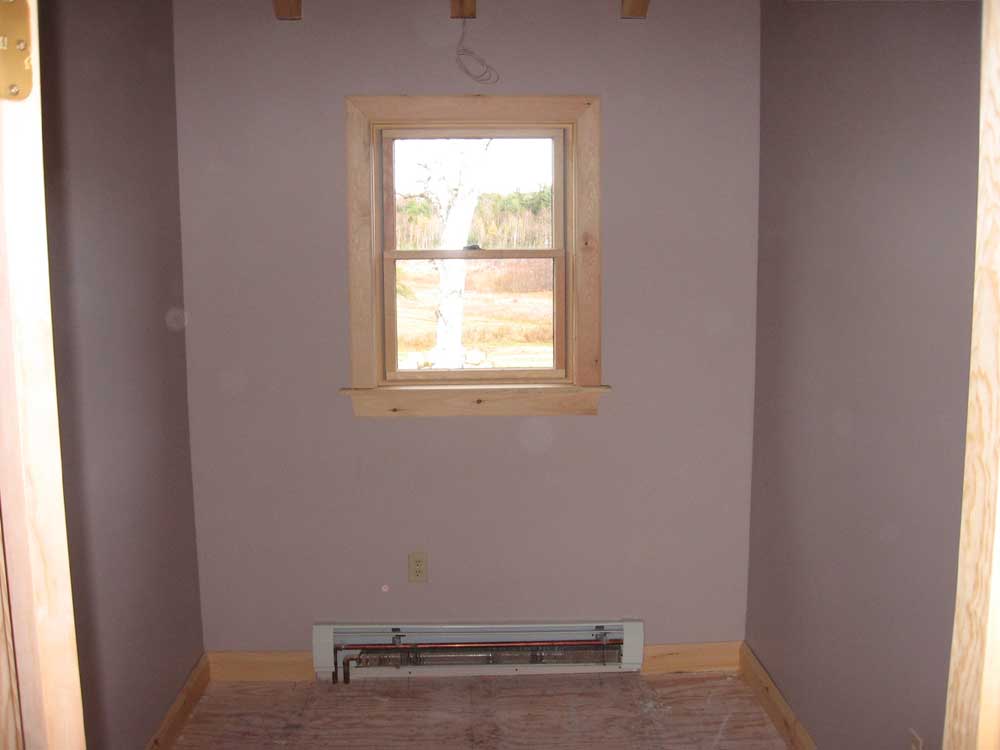
Today's first order of business was to install the baseboard in the bedroom and closet upstairs--the final critical task to complete before tomorrow's carpet installation. I really don't like installing baseboard. It just seems to be an unsatisfying piece of trim somehow, and is more difficult to install than it ought to be. The problem comes from the fact that wall corners are rarely square and true, particularly with drywall, and this complicates the miter joints between pieces of baseboard.
Since I had moved my saw and raw materials to the basement, it took many trips up and down the two sets of stairs to get all the pieces cut and installed in both rooms, but I got it done--thankfully. |
|||
 Since
I was in trim mode, I decided to trim out the window in the closet;
while this wasn't critical, it would be nice to have all the
trimwork truly done upstairs. Now, trimming windows is much
more fun than baseboard; you actually end up with something that is
interesting and looks nice. Since
I was in trim mode, I decided to trim out the window in the closet;
while this wasn't critical, it would be nice to have all the
trimwork truly done upstairs. Now, trimming windows is much
more fun than baseboard; you actually end up with something that is
interesting and looks nice. |
|||
 Next,
I masked off the windows in the bedroom, closet, and loft in
preparation for polyurethane--another task that would be best done
before carpeting was installed. I used Scotch #2080
safe-release tape for delicate surfaces, which wouldn't pull the
paint off the drywall the way the other blue tape I used downstairs
did. Then, I vacuumed the trim to remove dust and any debris
(like fly bodies) and applied two coats of poly to these windows. Next,
I masked off the windows in the bedroom, closet, and loft in
preparation for polyurethane--another task that would be best done
before carpeting was installed. I used Scotch #2080
safe-release tape for delicate surfaces, which wouldn't pull the
paint off the drywall the way the other blue tape I used downstairs
did. Then, I vacuumed the trim to remove dust and any debris
(like fly bodies) and applied two coats of poly to these windows.Now, the only trim remaining unfinished is that in Heidi's craft room (as well as on the interior doors downstairs, which haven't been hung yet...). |
|||
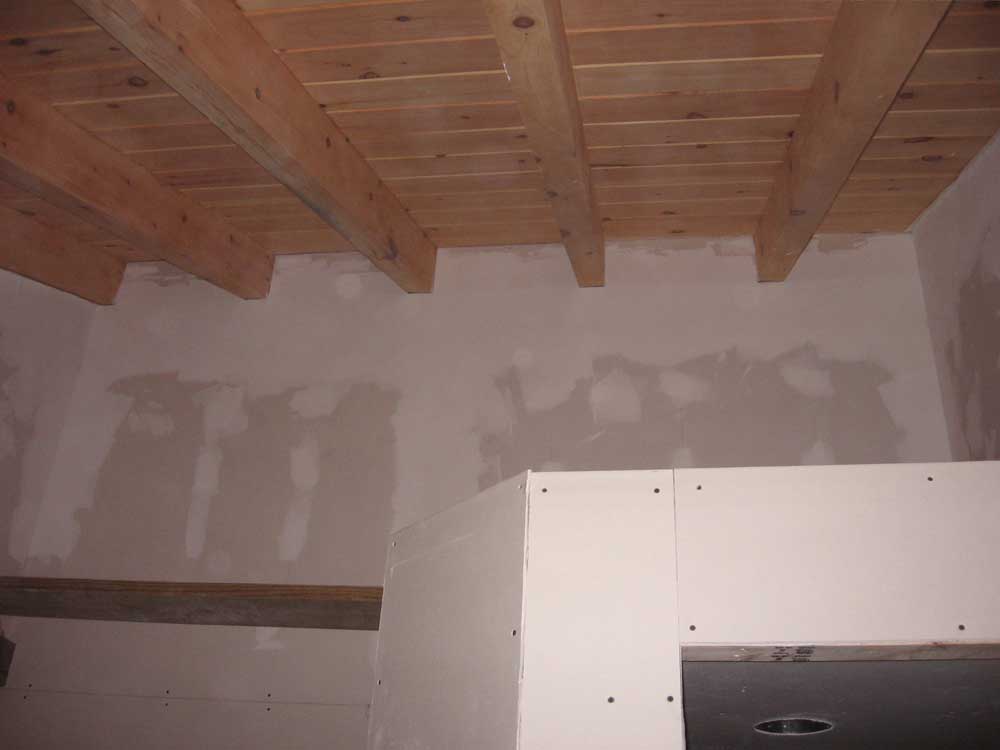
 It
was time to face the drywall in the bathroom: I had to sand
the mud. The only thing that inspired me to proceed at all was
the fact that once this was done, I wouldn't have to do any more, as
this was the final stage of sheetrock in the house. Phew.
So I sanded it, which wasn't too bad. I was able to confine
the dusty mess more thanks to the interior doors, which I kept
closed. Afterwards, I vacuumed up the dust in the bathroom,
and also vacuumed the bedroom and closet floors to remove the final
bits of dust that sweeping never seems to pick up. Then, I
removed any remaining tools and the like from the bedroom, leaving
it empty for tomorrow's early morning carpet. It
was time to face the drywall in the bathroom: I had to sand
the mud. The only thing that inspired me to proceed at all was
the fact that once this was done, I wouldn't have to do any more, as
this was the final stage of sheetrock in the house. Phew.
So I sanded it, which wasn't too bad. I was able to confine
the dusty mess more thanks to the interior doors, which I kept
closed. Afterwards, I vacuumed up the dust in the bathroom,
and also vacuumed the bedroom and closet floors to remove the final
bits of dust that sweeping never seems to pick up. Then, I
removed any remaining tools and the like from the bedroom, leaving
it empty for tomorrow's early morning carpet. |
|||
|
I was kind of hoping to start installing the doors downstairs, but I discovered that the rough openings were a bit shorter than they should have been, and I'd need to cut 1.2" - 3/4" off door jambs before I could install them in the openings. I just didn't have it in me to do this right now, so instead I changed out the almond outlet in the bathroom for ivory, and installed a toilet paper holder. Then, I cleaned up a bit more, and called it a day a bit early so that I could do some cleanup outside and remove the pile of cement board scraps and the waste from the porch construction. I had to hurry because, with daylight savings time over, it was getting dark quickly--and early! |
|||
SATURDAY, OCTOBER 28, 2006 |
|||
|
It was a thoroughly miserable fall
day, with a strong southeast storm outside complete with driving
rain and very high wind gusts. The house was warm and cozy,
though, and well isolated from the fury outside. Heidi had picked up all our interior lighting fixtures last night--some wall sconces and a large amount of track lighting that we needed for the general lighting in many areas. It filled her car, and I unloaded all this stuff into the basement this morning. Inspection and installation would have to wait a bit, though, since I had more pressing projects to complete this weekend in order to be ready for carpeting and granite on Monday morning. I began, once again--but for the last time--in the upstairs bathroom, where I applied the third and final coat of mud to the remaining sheetrock. Now all I have to do is sand it tomorrow, and that messy, never-ending job will actually end. What a long road that has been; I began hanging sheetrock in early September. |
|||
|
Next, I installed the remaining two doors in the upstairs--into the closet and bathroom. I should have added yesterday that these doors have no casing applied, which is what made their installation so much more of a challenge alone. Normally, one can nail through the casing on the inside of the door to secure it before opening the door to nail it the rest of the way.
With the doors in place, I prepared the site-made casing for installation. I had previously milled my chamfer and bead details on a number of pieces of my pine trim stock, and from this material I cut pieces to fit the sides of the doors and sanded them, then applied two coats of poly before installation. This work took up until lunch time, and after lunch I installed the casing on both sides of all three doors, except for the bathroom, where I left the inside casing off since there was so much work ahead in the bathroom, and to install the casing would be premature. |
|||
 I
rounded out this work with some more electrical trimout in the
bedroom, and I also cleaned up downstairs, removing additional tools
and relocating my chopsaw and table to the basement for the
remainder of the project. The basement was a mess of tools
that I had, over the past few days, hurriedly and tiredly relocated
there from upstairs, along with stacks of wood for trim, excess
flooring, and other materials that had been there for some time.
I should have time over the next week or so to start cleaning some
of this out in preparation for our move, particularly when I am
waiting for the polyurethane to dry on the floors upstairs next
week, which will effectively shut down most interior work for a
couple days. I
rounded out this work with some more electrical trimout in the
bedroom, and I also cleaned up downstairs, removing additional tools
and relocating my chopsaw and table to the basement for the
remainder of the project. The basement was a mess of tools
that I had, over the past few days, hurriedly and tiredly relocated
there from upstairs, along with stacks of wood for trim, excess
flooring, and other materials that had been there for some time.
I should have time over the next week or so to start cleaning some
of this out in preparation for our move, particularly when I am
waiting for the polyurethane to dry on the floors upstairs next
week, which will effectively shut down most interior work for a
couple days. |
|||
FRIDAY, OCTOBER 27, 2006 |
|||
|
I began with the second coat of mud in
the upstairs bathroom. This took about an hour. Next, I continued by installing the interior door into the bedroom from the loft. I needed to install all the upstairs interior doors before Monday, when carpeting was scheduled to arrive, but I chose this one first because I also needed the door jamb in place before I began the flooring in the loft. Because of the transition to carpet, I wanted to install a threshold in the doorway, and I wanted the threshold to pass beneath the jambs. I'd have to cut the jambs either way, but I thought it would be easier to use the pull saw to cut them after installation, keeping them even with the top of the flooring, than to cut them beforehand. Installing an interior door by oneself can be a bit challenging, since one really needs access to both sides of the door to properly install--first the inside, to plumb the door using the hinges, and then the outside to secure it. With no way around it, I had to open the door to get through, which meant I needed to temporarily secure the jamb from inside so that the door would stay in place and in the proper position. Anyway, I got the door installed, and then cut the jambs at the bottom to make room for the threshold, which I made by cutting the tongue off a piece of 5" wide flooring. |
|||
|
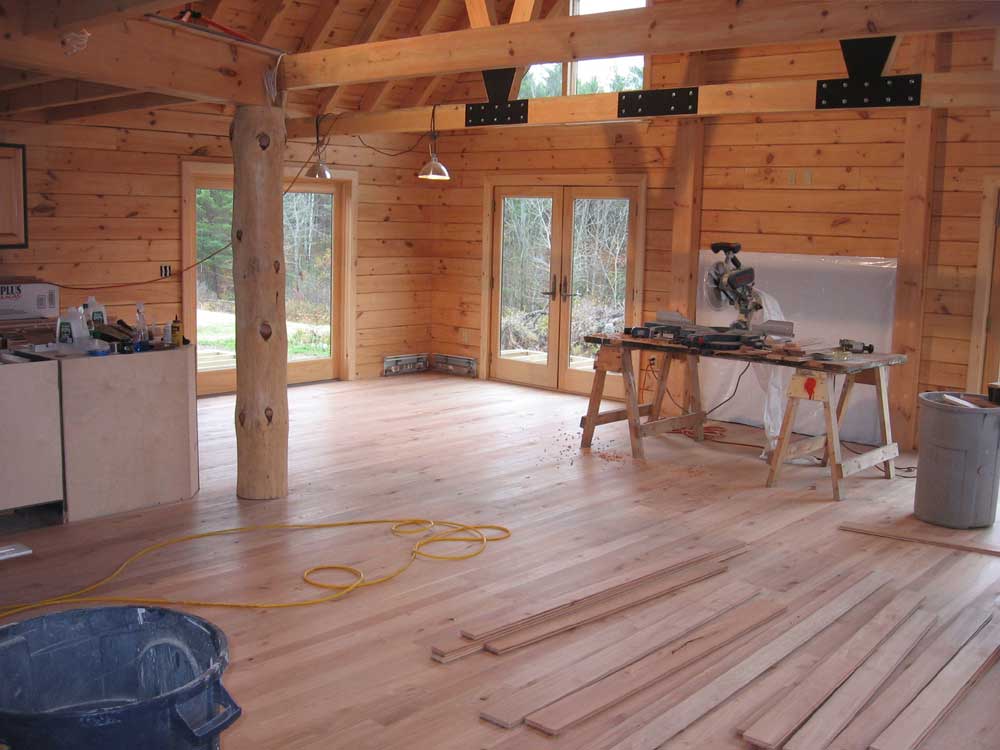
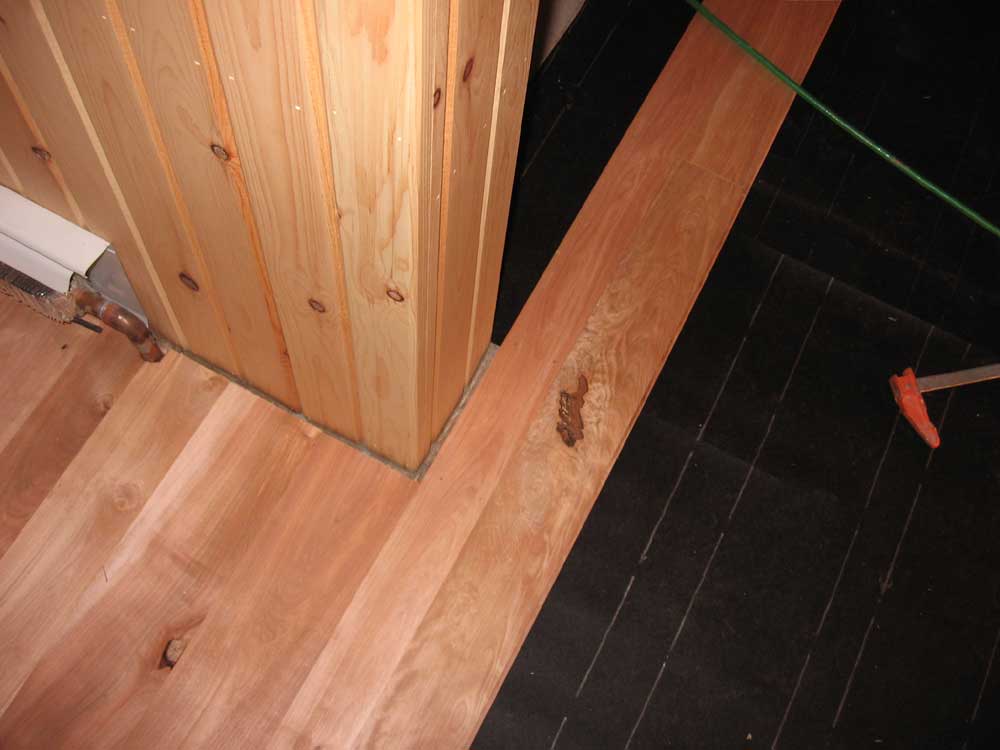
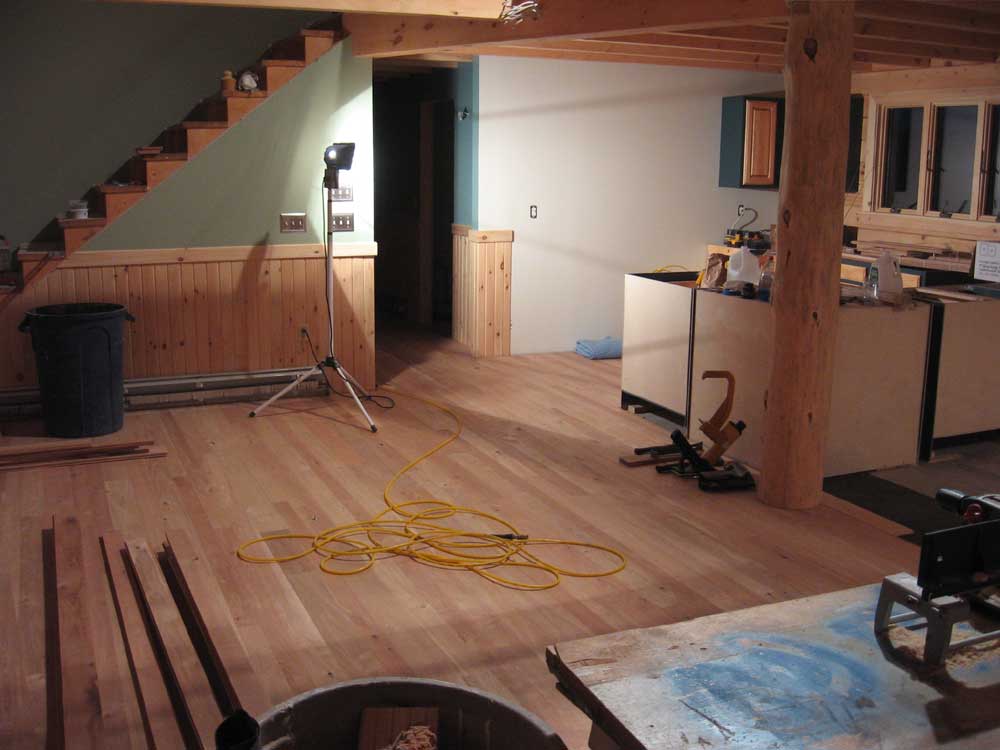
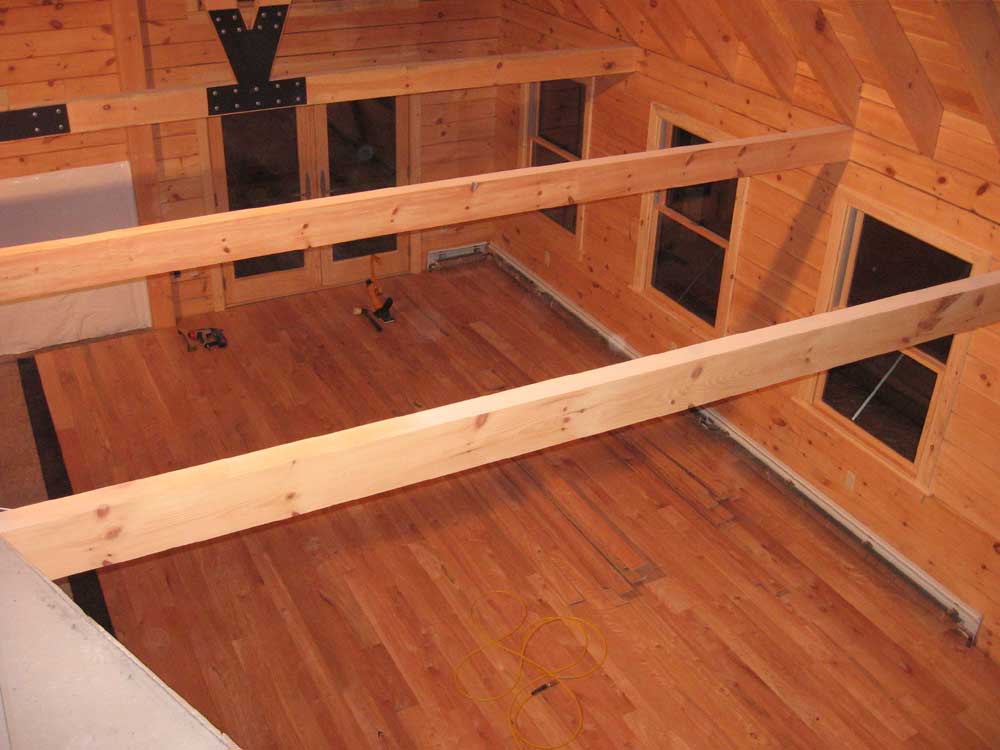
I moved on to the hardwood flooring in the loft. Because the edge of the loft flooring would be exposed, I chose to install a band or nosing around the exterior perimeter, which I made from more of the 5" wide flooring from which I removed the tongue; then, I milled a bullnose edge with a router. I laid out the banding first, beginning with the nosing at the top of the staircase. I let the nosing hang over the edge by a bit to provide a reveal when all the trim was complete later on. I figured and cut the miter joint at the angle adjacent to the staircase on both the stair nosing and the next piece of banding, but I didn't install either piece just yet, since I planned to let the floorboards run wild over the angled edge and cut them off later at the proper angle--rather than try to cut such an oblique angle on each individual piece. This layout took a lot of time. |
|||
 Eventually,
I began to install the flooring, and worked my way across the room.
I used screws at the angled ends of the planks to help secure them.
I had to be very careful of the wires buried in the floor, which I
had methodically marked during each step of the loft process.
When I had all the planks laid across the angled edge of the loft, I
cut them off using a straightedge as a guide, and then installed the
nosing with construction adhesive and nails. Eventually,
I began to install the flooring, and worked my way across the room.
I used screws at the angled ends of the planks to help secure them.
I had to be very careful of the wires buried in the floor, which I
had methodically marked during each step of the loft process.
When I had all the planks laid across the angled edge of the loft, I
cut them off using a straightedge as a guide, and then installed the
nosing with construction adhesive and nails. |
|||
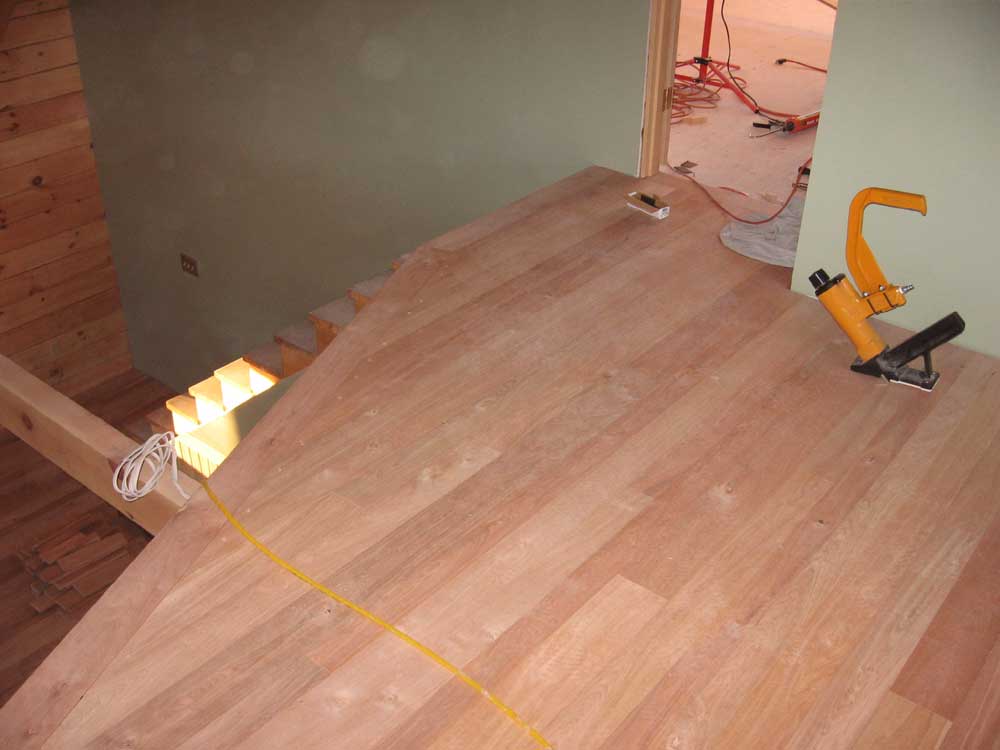 Completing
the loft flooring took the remainder of the day, a process
lengthened by the need to go up and down the stairs to cut each
plank to length as required. I took these pictures a bit
earlier, before it got too dark, but I managed to install the
several planks in the opening against the wall. I finished up
late in the afternoon, leaving only a small piece against the wall
incomplete, as I needed to rip a plank to 2" width to fit. Completing
the loft flooring took the remainder of the day, a process
lengthened by the need to go up and down the stairs to cut each
plank to length as required. I took these pictures a bit
earlier, before it got too dark, but I managed to install the
several planks in the opening against the wall. I finished up
late in the afternoon, leaving only a small piece against the wall
incomplete, as I needed to rip a plank to 2" width to fit.
|
|||
 Outdoors,
Bob made some good progress on the porch roof, finishing up the trim
and getting most of the shingling done. He left about a 4'
wide strip at the top edge of the roof. Now, I understand that
roofing is hard, heavy work, and tiring. And he worked a full
8-hour day; it would have taken another 1 or more hours to finish
the roof, working alone. But it would still drive me
absolutely nuts to leave just that small amount undone, particularly
over a full weekend. I would have soldiered on and gotten it
done just to have it off my mind. But Bob is different that
way, and doesn't seem to mind having these small bits of project
undone. In any event, it didn't really matter, since the roof
was weathertight to the house and the lack of these few rows of
shingles wouldn't adversely affect anything...it's just knowing that
it's virtually complete, yet not done. I guess I'm weird that
way. Outdoors,
Bob made some good progress on the porch roof, finishing up the trim
and getting most of the shingling done. He left about a 4'
wide strip at the top edge of the roof. Now, I understand that
roofing is hard, heavy work, and tiring. And he worked a full
8-hour day; it would have taken another 1 or more hours to finish
the roof, working alone. But it would still drive me
absolutely nuts to leave just that small amount undone, particularly
over a full weekend. I would have soldiered on and gotten it
done just to have it off my mind. But Bob is different that
way, and doesn't seem to mind having these small bits of project
undone. In any event, it didn't really matter, since the roof
was weathertight to the house and the lack of these few rows of
shingles wouldn't adversely affect anything...it's just knowing that
it's virtually complete, yet not done. I guess I'm weird that
way.The roof looks great, though, and it was nice to see it begin to truly blend in with the house. He's done a great job on the details, and mostly alone--though I've offered to help a number of times. He feels it's better that I keep working to finish my work inside, which is fine with me, but somehow I feel guilty that I'm not out there helping to the extent possible. So I'm not complaining--just pointing out a difference in our approaches! |
|||
|
|
|||
THURSDAY, OCTOBER 26, 2006 |
|||
 After
a morning errand run to pick up a variety of small items and some
polyurethane for the wood floors, I got to work around 8. My
first order of business was to paint the upper portion of the
bathroom walls upstairs. I needed to get this done so that I
could remove my staging, which was screwed to the wall and in the
way of the mudding progress I needed to make. With carpeting
in the bedroom arriving Monday, I wanted to have all the sheetrock
mud and sanding done by then. After
a morning errand run to pick up a variety of small items and some
polyurethane for the wood floors, I got to work around 8. My
first order of business was to paint the upper portion of the
bathroom walls upstairs. I needed to get this done so that I
could remove my staging, which was screwed to the wall and in the
way of the mudding progress I needed to make. With carpeting
in the bedroom arriving Monday, I wanted to have all the sheetrock
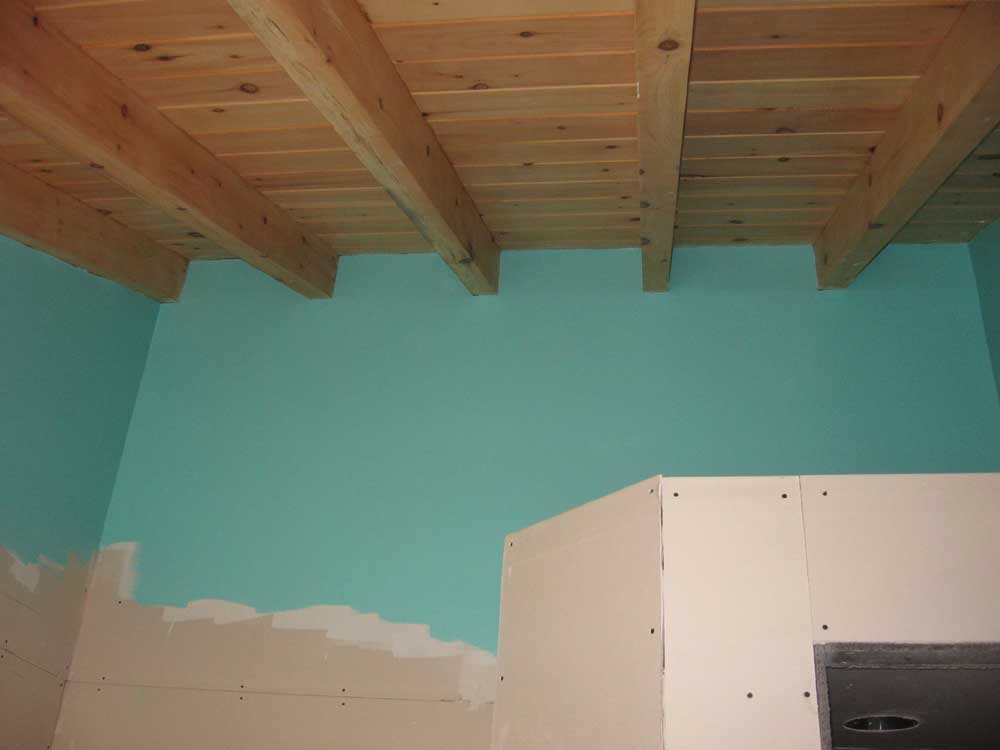
mud and sanding done by then.We chose a lively color called Tantalizing Teal--pretty bold stuff. No boring colors in this house. Over the course of the morning, I got the two coats applied, cut off the edge taping when the paint was dry enough, and removed the staging. |
|||
 In
the meantime, I continued work on the cement board. There were
a lot of small pieces to install in the shower, particularly around
the door opening, and these took a lot of time. It probably
took longer to cover the entire shower than it did to do most of the
rest of the room. In
the meantime, I continued work on the cement board. There were
a lot of small pieces to install in the shower, particularly around
the door opening, and these took a lot of time. It probably
took longer to cover the entire shower than it did to do most of the
rest of the room. |
|||
 I
finally finished the last pieces of cement board in the mid
afternoon, wrapping up the job by covering the area around the tub.
It was a relief to finally be done with this project, which was
messy, heavy, and difficult. I cleaned up the enormous mess in
the bedroom and moved on. I
finally finished the last pieces of cement board in the mid
afternoon, wrapping up the job by covering the area around the tub.
It was a relief to finally be done with this project, which was
messy, heavy, and difficult. I cleaned up the enormous mess in
the bedroom and moved on. |
|||
|
I applied the fiberglass mesh tape and first coat of mud to the remaining drywall areas in the bathroom, which went well and without incident. Then, to use up the last hour or so of the day, I continued some electrical trimout work in the bedroom. I had to return to Sherwin Williams late in the day to pick up some additional polyurethane that hadn't been in stock this morning, but which had been brought up from another store. |
|||
 Outdoors,
Bob made progress on the porch roof, completing the southern gable
end and trim, and working his way back along the front fascia,
installing the soffit and trim along the way. All the trim
needs to be installed before the shingling can begin. Slowly
but surely, it's getting done. As with everything else in this
house, there are more fine details to be dealt with that slow the
progress sometimes. Outdoors,
Bob made progress on the porch roof, completing the southern gable
end and trim, and working his way back along the front fascia,
installing the soffit and trim along the way. All the trim
needs to be installed before the shingling can begin. Slowly
but surely, it's getting done. As with everything else in this
house, there are more fine details to be dealt with that slow the
progress sometimes. |
|||
WEDNESDAY, OCTOBER 25, 2006 |
|||
 I
spent part of the morning finishing up the flooring downstairs, in
the pantry. Since this is a utility room, I used up the few
boards I had found during the process that weren't quite good enough
for the main living areas, and also used a lot of the shorter
boards, since I was trying to save a good selection of boards for
the loft upstairs--the final area to be covered in the red birch
flooring. I
spent part of the morning finishing up the flooring downstairs, in
the pantry. Since this is a utility room, I used up the few
boards I had found during the process that weren't quite good enough
for the main living areas, and also used a lot of the shorter
boards, since I was trying to save a good selection of boards for
the loft upstairs--the final area to be covered in the red birch
flooring. |
|||
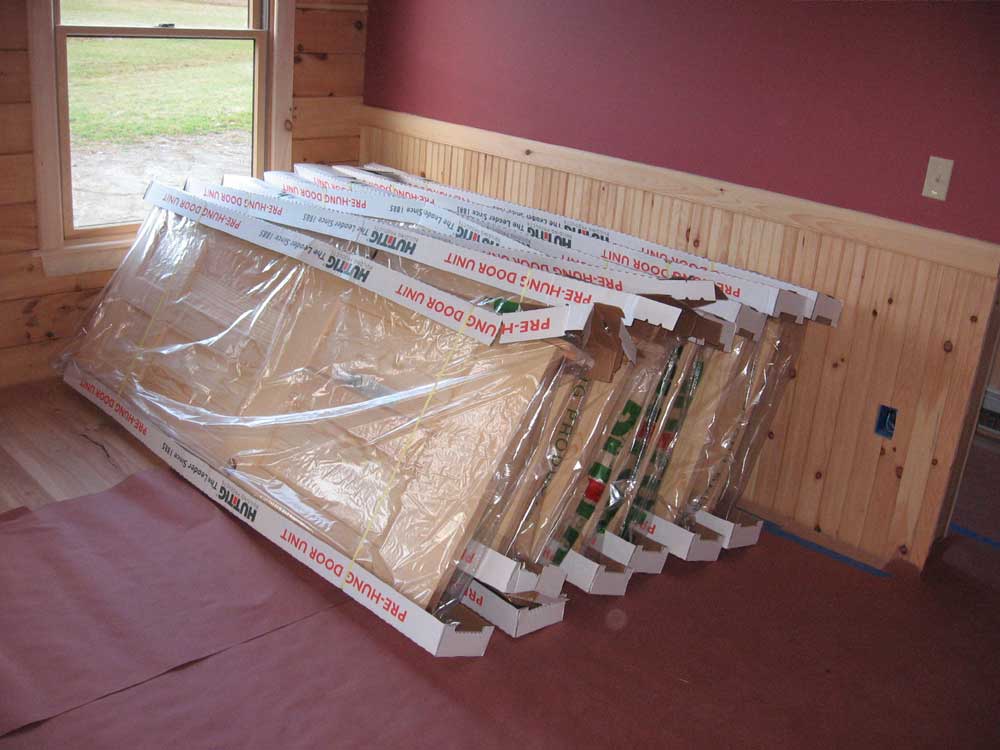 I
also received, finally, my interior doors--6-panel pine. After
several delays and lack of decent delivery information from Moose
Creek, I eventually ordered these through Bob and his lumber company
last week, since time was getting critical. They arrived as
expected this morning, and I stacked them inside for later
installation. I
also received, finally, my interior doors--6-panel pine. After
several delays and lack of decent delivery information from Moose
Creek, I eventually ordered these through Bob and his lumber company
last week, since time was getting critical. They arrived as
expected this morning, and I stacked them inside for later
installation.I finished up
the floor in mid-morning and then shifted gears for a change of
pace. I couldn't begin the loft flooring just yet because I
needed some 1-1/2" L-nails instead of the 2" I had used downstairs.
I thought the shorter nails might be necessary to avoid the
possibility of any of the nails showing through the exposed ceiling
boards. |
|||
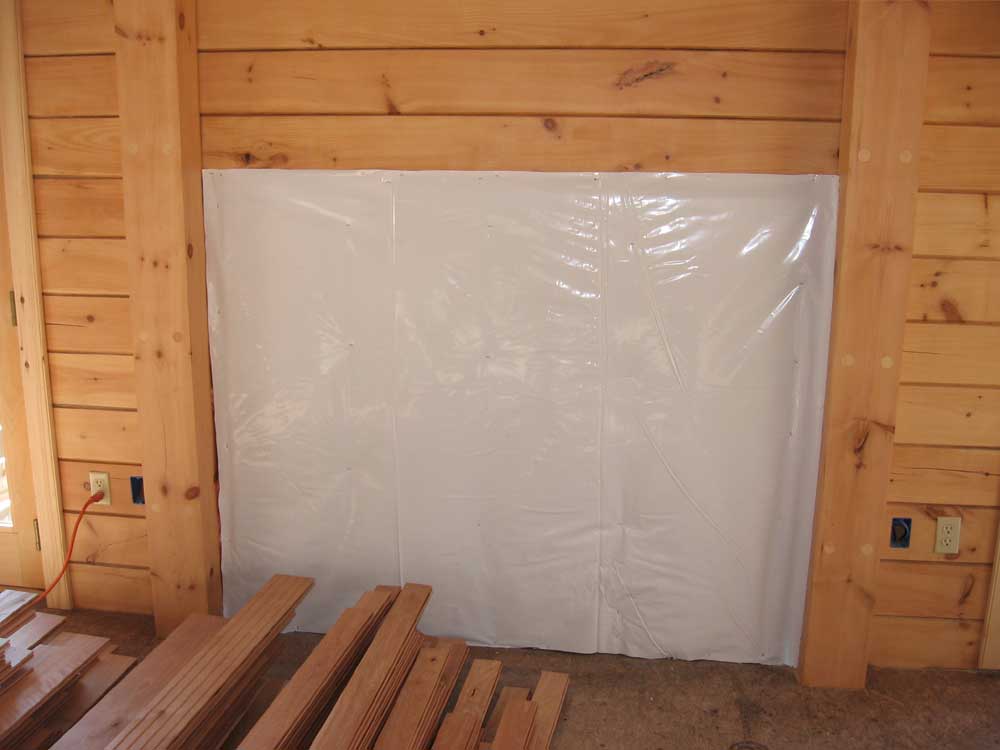
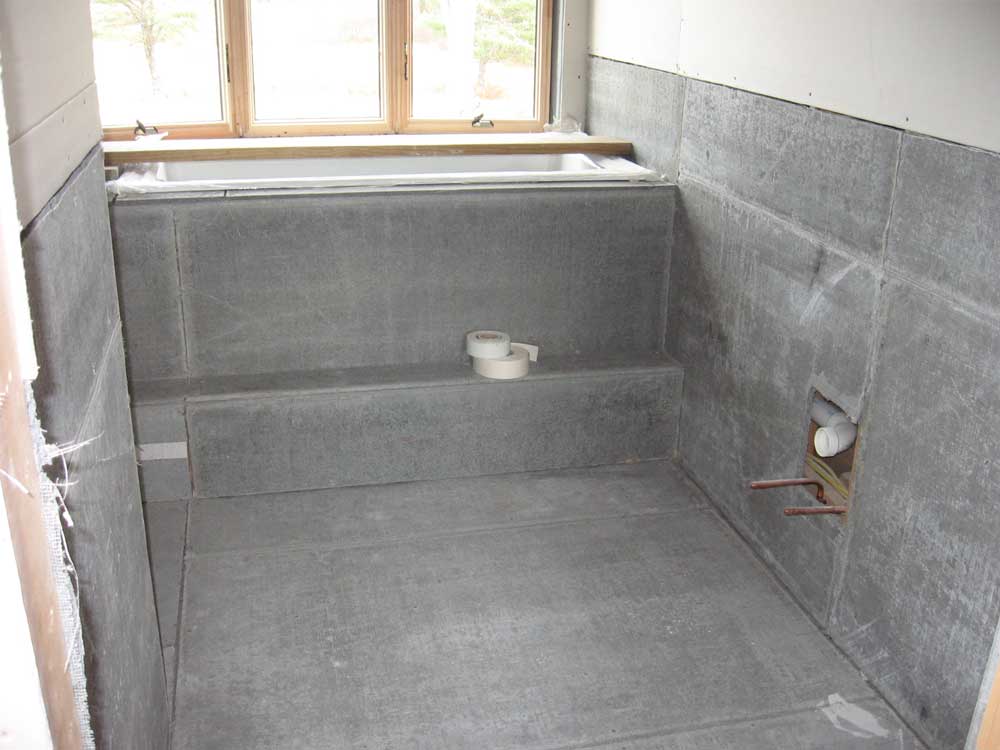
| Instead, I moved on to the dreaded chore of finishing the cement board in the upstairs bathroom. Now was as good a time as any, since I needed to have this done before Monday. I worked on this for the remainder of the day and got most of the large pieces installed. All that remained was a number of small strips and pieces, which in many ways are more difficult because it's so hard to get a decent cut with this material. I hoped to finish up tomorrow. Sorry--no pictures of this, since you've seen it all already and it's almost impossible to take pictures inside the odd-shaped bathroom. | |||
|
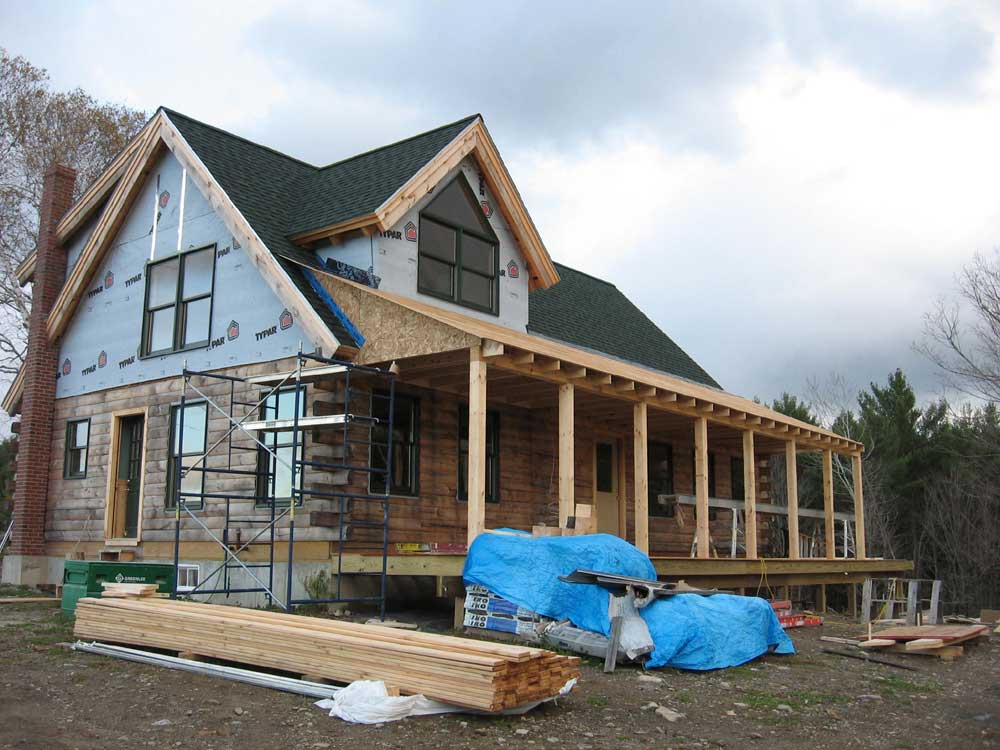
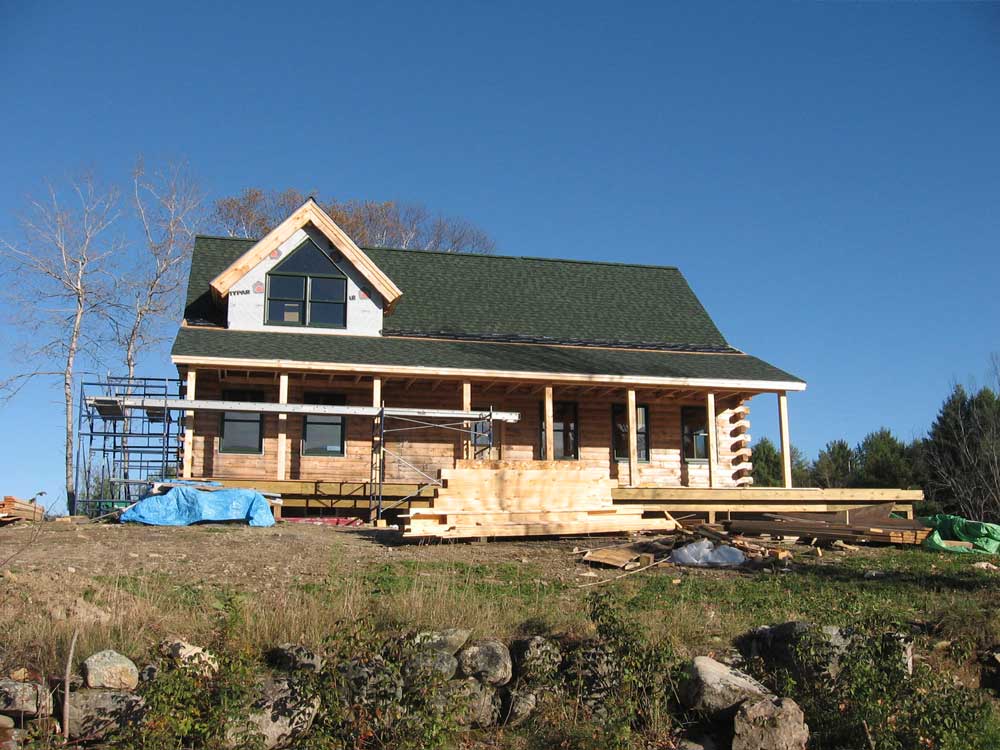
Meanwhile, outside, Bob and Rod were here to work on the porch roof. They managed to install all the roof rafters, one gable end, and all the sheathing save for a bit at the south end, which they didn't get to because it required the more time-consuming work of building the gable end wall, gable rafter, and some shingling on the main roof. But the bulk of the roof was done, and it drastically changed--and improved--the appearance of the house, as expected. Bob said he'd finish the remaining end tomorrow, and get ready to shingle the roof. |
|||
|
|
|||
TUESDAY, OCTOBER 24, 2006 |
|||
|
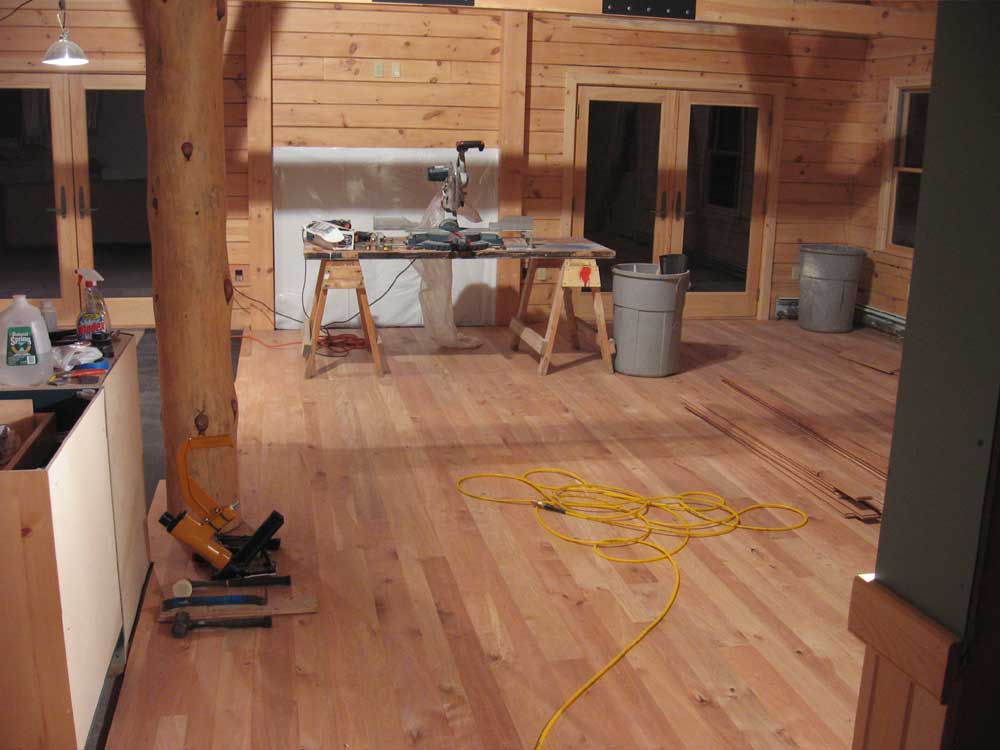
I worked on the flooring all day again today. I began with the dining area, and spent most of the morning completing this area--a surprisingly long time, I thought, to complete a smallish area. The subfloor had a good bow in it in this area, which complicated the installation since it was harder to engage the full lengths of the tongues on the floorboards. |
|||
|
|
|||
|
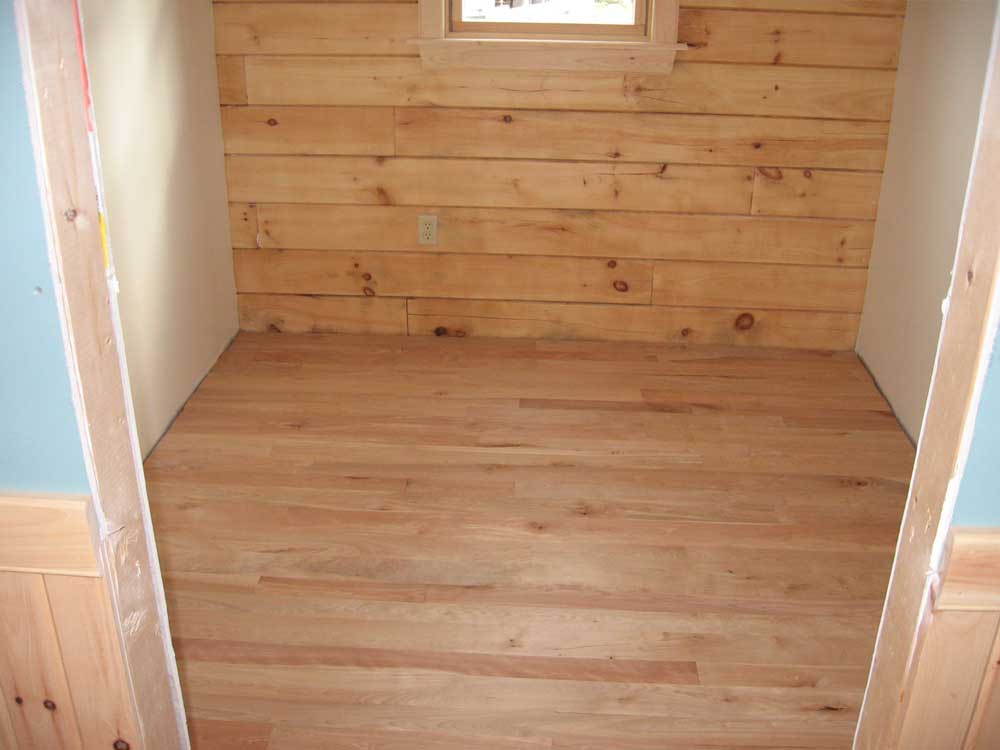
I finished up late in the morning, and shifted my operations towards the craft room. Before I broke for lunch, I installed floor boards through the door openings from the hallway into the craft room and pantry, and then moved all the excess stored stuff out of the craft room--boxes of tile, a kitchen cabinet that I hadn't installed yet, the refrigerator end panel, and some other things. I also moved part of the pile of remaining flooring out to the living room near the saw, so that I'd have room to work in the craft room. My final step before leaving for a short break was to install the felt paper on the floor for the first rows of flooring. After lunch, I worked on the flooring in the craft room. With the short pieces through the door opening, I had reversed the direction of the floor tongue so that I could work from the inside wall towards the outside, and I continued in this manner. Flooring this room took the rest of the day. It went pretty well. I had a few cuts to make around the center post of the double closet openings, but these went smoothly. I got nearly to the far wall, but I wasn't as lucky today and found that I needed to rip a 2" strip to fill in the last opening against the wall and beneath the heat register. I bundled up a few pieces of the flooring to bring down to the shop overnight so that I could rip them on the table saw, and finish up their installation in the morning. I could hardly wait to get the pantry floor covered in the morning. It would be the last vestige of that nasty subfloor to disappear. Ugh. |
|||
|
|
|||
MONDAY, OCTOBER 23, 2006 |
|||
Well, today we did it: we
scheduled the movers. The date is Friday, November 10.
Now I really have something to work towards. It's at
once exciting and scary! I hope I can get enough done in time.
Even though we'll be able to move in, I know that the house won't be
complete; there will be several jobs remaining to be done,
including, but not limited to:
I continued work on the hardwood flooring today. I began where I left off: at the corner of the living room extending into the hallway. Fortunately, the spacing of the flooring had ended up being perfect in that I could run a full width of flooring for the first run down the hallway, leaving the ideal 1/2" space next to the wall. It was just a fluke that it turned out this way, and saved me the chore of ripping a piece to fit. It took a while to lay out the felt paper in the hallway and get the first couple rows installed. I installed these rows much as I did the first row yesterday, though I didn't see a need for screws here. As before, I used another row of flooring outside of the first to help align things properly. It was dreary and dismal outside when I took these photos; it looks like night, but it was actually about 8AM when I took these two photos. |
|||
|
|
|||
|
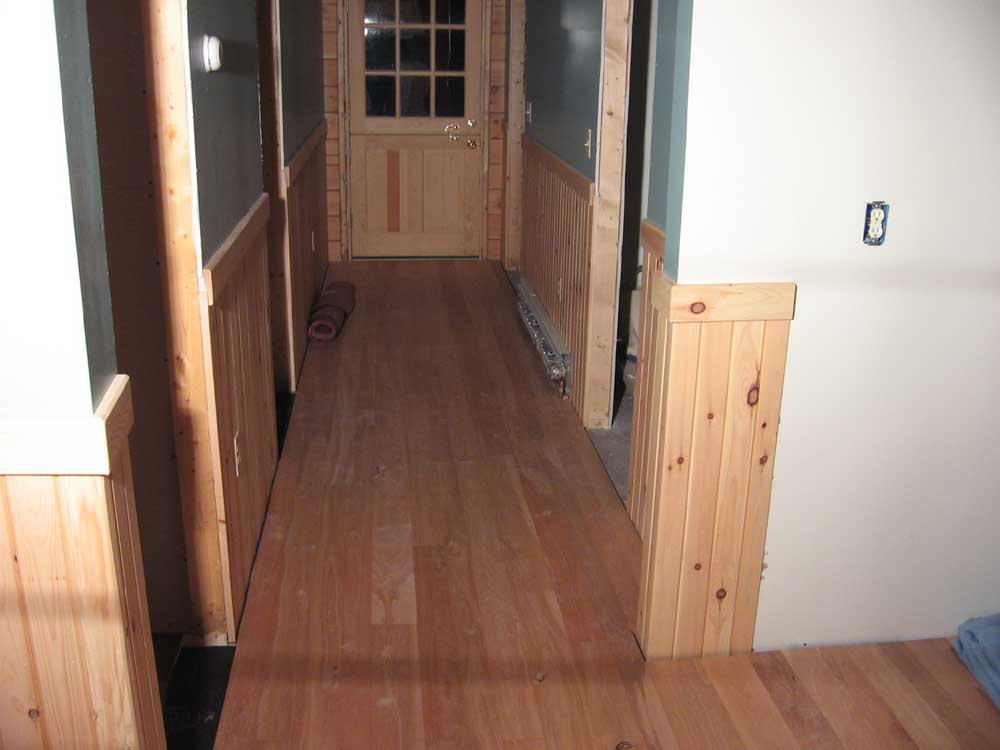
Once the first two rows were in, I continued laying the flooring up and down the full length of the hallway and living room, spanning the entire 44' length of the house. This took a while, compounded by the need to cut and fit the flooring around a heat register on the other side of the hallway. However, I was fortunate once again in that I did not need to rip flooring to fit--a full width for the final row was just right. Considering the random placement of the various width boards in this floor, I think it was pretty amazing how nicely the hallway worked out. The remaining photos in today's log were all taken late in the day at the end of work hours. I didn't use a flash because there was a lot of dust in the air from my sweepdown. I'll try and get some better ones in the daylight later. |
|||
|
|
|||
| Eventually, I finished up the hallway--and corresponding width of the living room--and then made it to the log post outside the corner of the kitchen. Faithful and detail-oriented readers may remember way back in June when I cut the bottom of the log post to incorporate a built-in rabbet so that I could slide the flooring cleanly beneath. Now it was time to put this to the test. I cut and fit pieces around the post as needed, using relatively short pieces to make the task easier. I think it turned out well. | |||
|
|
|||
|
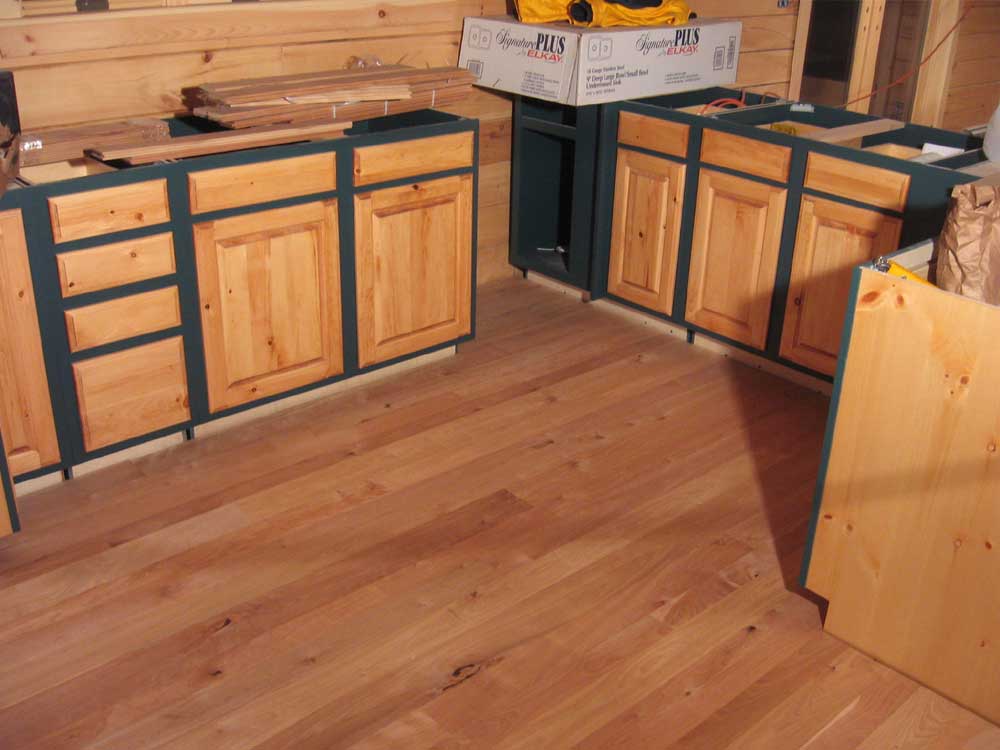
Once I made it to the edge of the kitchen cabinets and slightly into the dining area, I shifted focus and worked in the kitchen--for the rest of the day, as it turned out. I floored the entire kitchen, which took a surprisingly long time because of so many cuts required. |
|||
|
|
|||
| I had hoped to get the dining area also floored today, but I had to be satisfied with what I accomplished. I spent the last hour or so of the day moving my saw table out of the dining area and cleaning off and removing a portable table covered with tools and supplies, moving these to the basement for storage. I needed to clear the area so that I could continue the flooring in the morning, and all this excess stuff just seemed out of place suddenly in a house that, with the addition of the flooring, seemed to be nearing completion. Plus, I don't want to install the hardwood too fast, since I need to ease myself away from the beautiful Advantech subfloor that I've been staring at, lying on, kneeling on, dewatering, sweeping, and generally loving for the past 6 months. I'm really going to miss it...NOT! |
|||
|
|
|||
SUNDAY, OCTOBER 22, 2006 |
|||
|
Today, I began the installation of the
hardwood flooring throughout the downstairs. We chose
traditional 25/32" thick "rustic red birch" flooring in 3", 4", and
5" face widths, purchased from and milled by a local company.
|
|||
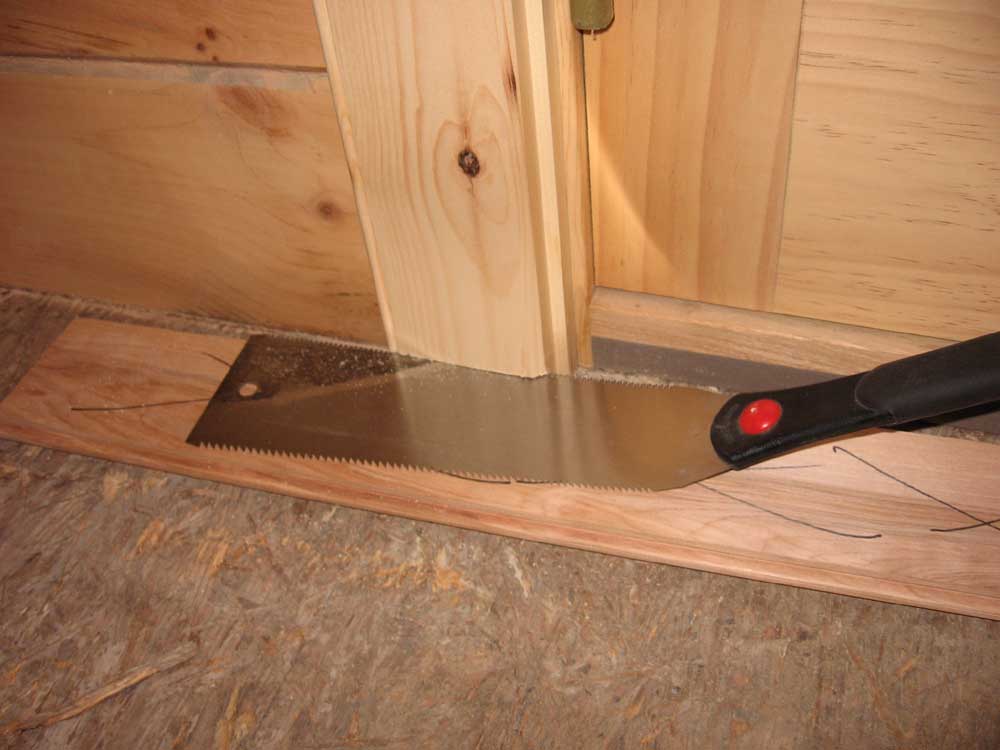 To
begin the installation, I first trimmed the bottoms of the door
casing to allow the flooring to slide beneath. To do this, I
used a scrap of flooring as a guide, and sawed the casing with my
Japanese pull saw. To
begin the installation, I first trimmed the bottoms of the door
casing to allow the flooring to slide beneath. To do this, I
used a scrap of flooring as a guide, and sawed the casing with my
Japanese pull saw. |
|||
 The
first row took the longest, as it needed to be properly aligned,
straight, and true to ensure that the remaining floor came out
properly. I began by striking a chalk line 1/2" from the
exterior wall; a space is needed on all edges of a wood floor to
allow for expansion and contraction. Later, the gap will be
covered with baseboard and molding as required. The
first row took the longest, as it needed to be properly aligned,
straight, and true to ensure that the remaining floor came out
properly. I began by striking a chalk line 1/2" from the
exterior wall; a space is needed on all edges of a wood floor to
allow for expansion and contraction. Later, the gap will be
covered with baseboard and molding as required.Once I had the line snapped, I laid a strip of roofing felt on the floor, aligning one edge with the chalk line. I could have used red rosin paper beneath the floor also, but I had lots of the felt paper on hand from the roofing job, and it's also a good material to use beneath wood flooring. The paper simply serves to provide a modicum of moisture barrier, and also to isolate the strip planks from the subfloor, reducing the chance of squeaking later. |
|||
 Next,
I laid out the first row. I chose 5" width for the first row
to get me away from the wall as quickly as possible. I
carefully laid the full length of the first row along the wall,
aligning the edge with the edge of the felt paper. To ensure
that the inside edge was straight and aligned, I installed some
additional strips of floor spanning each butt joint. When I
was satisfied with the layout, I attached the first row with screws,
drilling each location to allow for insertion of a wood plug later.
I used screws to ensure a tight, secure fit, as the remaining
flooring would be nailed against the first row, and I didn't want to
risk any movement. Next,
I laid out the first row. I chose 5" width for the first row
to get me away from the wall as quickly as possible. I
carefully laid the full length of the first row along the wall,
aligning the edge with the edge of the felt paper. To ensure
that the inside edge was straight and aligned, I installed some
additional strips of floor spanning each butt joint. When I
was satisfied with the layout, I attached the first row with screws,
drilling each location to allow for insertion of a wood plug later.
I used screws to ensure a tight, secure fit, as the remaining
flooring would be nailed against the first row, and I didn't want to
risk any movement. |
|||
 Once
the first row was secured, I was ready to truly get going. The
wide first row had extended the floor far enough from the wall to
allow me to use the flooring nailer for the next row, which was nice
as it avoided the need for face nailing the flooring or driving more
screws. I laid out the flooring, ensuring that the end joints
between board were staggered appropriately (I like these to be as
random as possible, and about 1' minimum apart in adjoining rows).
One row at a time, the floor progressed outward, and by about 1030 I
had 2-3' complete. Once
the first row was secured, I was ready to truly get going. The
wide first row had extended the floor far enough from the wall to
allow me to use the flooring nailer for the next row, which was nice
as it avoided the need for face nailing the flooring or driving more
screws. I laid out the flooring, ensuring that the end joints
between board were staggered appropriately (I like these to be as
random as possible, and about 1' minimum apart in adjoining rows).
One row at a time, the floor progressed outward, and by about 1030 I
had 2-3' complete. |
|||
 I
continued in this manner throughout the day, keeping the three face
widths as random as possible and avoiding any repeating pattern.
I loved the floor: great color, interesting grain, and
generally nice and clear, but with the occasional tight knot,
spalted-type grain, or other "flaws" that, in my opinion, added
interest and character and fit the style of the house very well.
This floor will look excellent with a nice varnish finish, which
will darken it slightly and add richness. I
continued in this manner throughout the day, keeping the three face
widths as random as possible and avoiding any repeating pattern.
I loved the floor: great color, interesting grain, and
generally nice and clear, but with the occasional tight knot,
spalted-type grain, or other "flaws" that, in my opinion, added
interest and character and fit the style of the house very well.
This floor will look excellent with a nice varnish finish, which
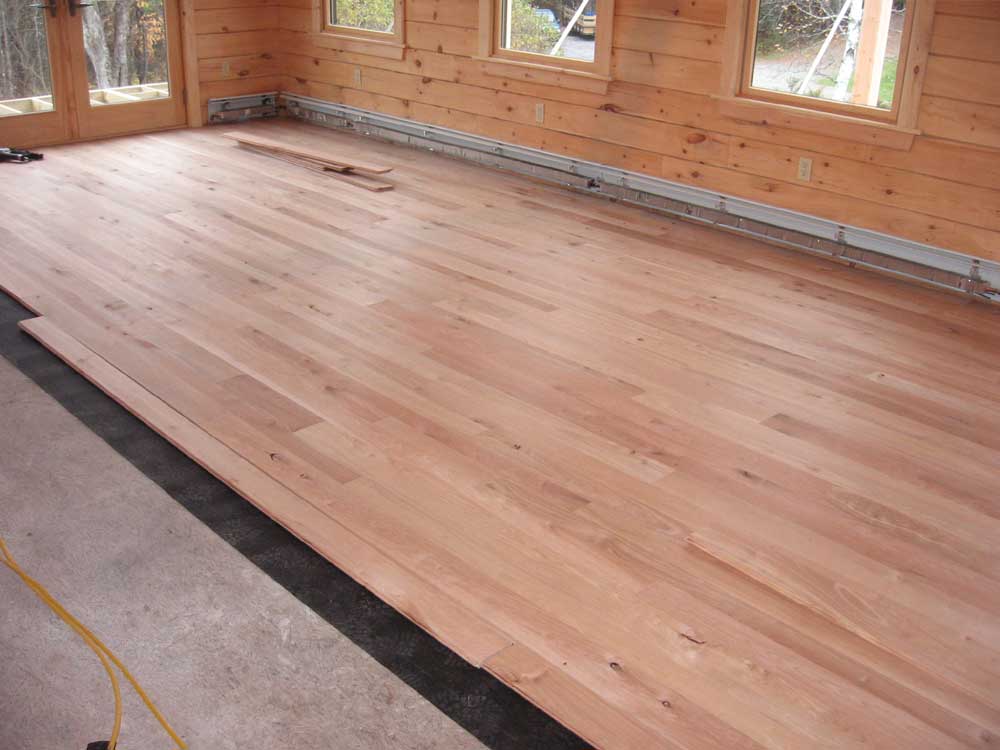
will darken it slightly and add richness.I didn't find any unusable pieces at all, and the milling quality was excellent; the flooring fit tightly and evenly together. I was thrilled with the choice. |
|||
 By
late in the day, I had reached the corner of the living room leading
to the hallway, a worthy stopping point. At the fireplace
opening, I continued the flooring out into the area where the hearth
would eventually occupy, since I didn't know exactly what the
dimensions of the hearth would be. Later, I'll cut out any
excess when the time comes to install the hearth. By
late in the day, I had reached the corner of the living room leading
to the hallway, a worthy stopping point. At the fireplace
opening, I continued the flooring out into the area where the hearth
would eventually occupy, since I didn't know exactly what the
dimensions of the hearth would be. Later, I'll cut out any
excess when the time comes to install the hearth.This picture makes things look darker than they are, since it was (duh) dark outside, but I actually think that the floor will end up being close to this color when the finish is applied. By reaching this corner, I had completed the largest single section of flooring in the house. The remainder ought to cover a bit faster, particularly once I complete the 4' wide and 17' long hallway. |
|||
SATURDAY, OCTOBER 21, 2006 |
|||
|
I began the day early with a trip to
the Augusta Home Despot to pick up the remaining cement board that I
needed to complete the upstairs bathroom (19 sheets). I also
picked up a few other smaller items that I needed. Going to
Augusta means that I can leave the house much later than I would
have to if I went to Brunswick and Lowe's, and still get to the
store early, before the unwashed masses start showing up for their
weekend projects. I wash every day, so obviously I don't fit
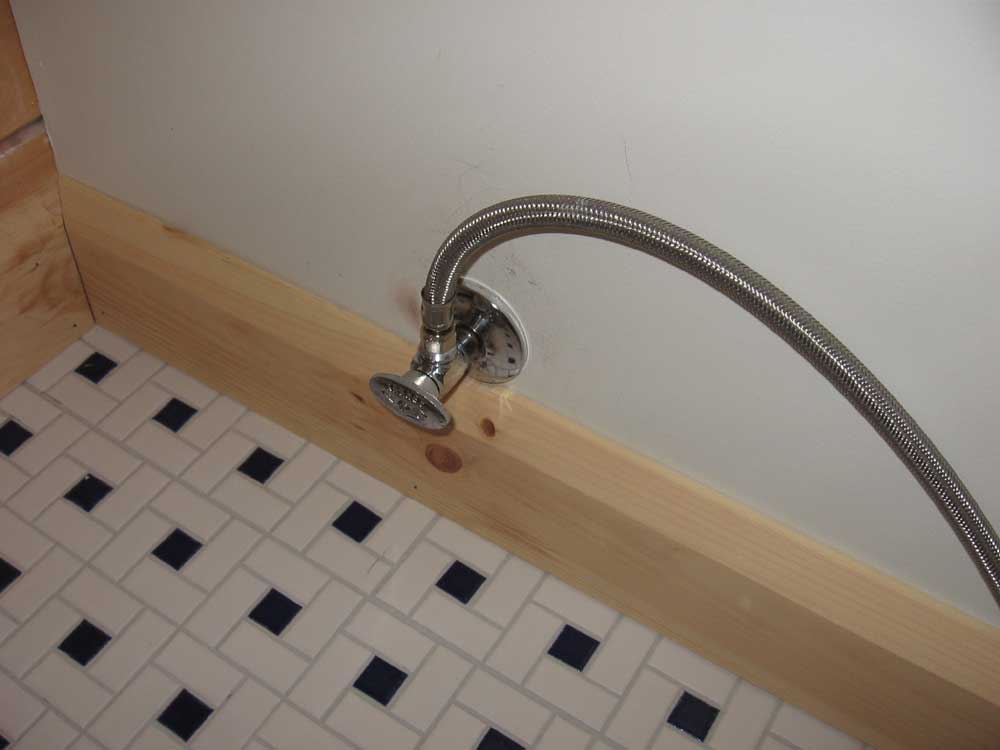
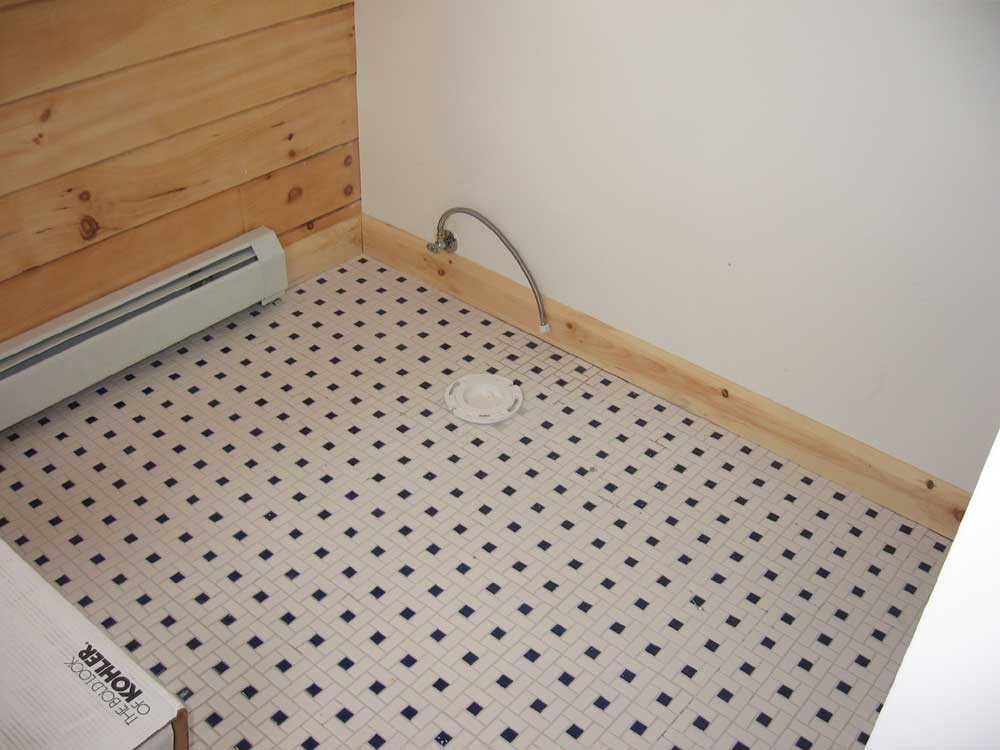
in with that crowd. I was back home by 7:30, and carried all the sheets up to the bedroom for storage and eventual use. I love cement board and I wish I needed more. I need to have all these sheets all cut and installed by a week from Monday, when our bedroom carpeting arrives; it'll take about a full day to finish this up, so I'll address that a bit later. I didn't feel like attacking the board right then, so I worked on a few smaller projects downstairs. I attached the shower head in the bathroom, and then wired up the bathroom outlets. To my disgust, I discovered that a "Decora" outlet (the square, boxy type), which I had purchased this very morning and that I needed to match the GFCI outlet in a double gang box, was (wait for it) almond instead of ivory! How annoying. You'd think I'd learn. Again, though: they all look the same in the store. A new outlet went on the ever-present shopping list for next time.
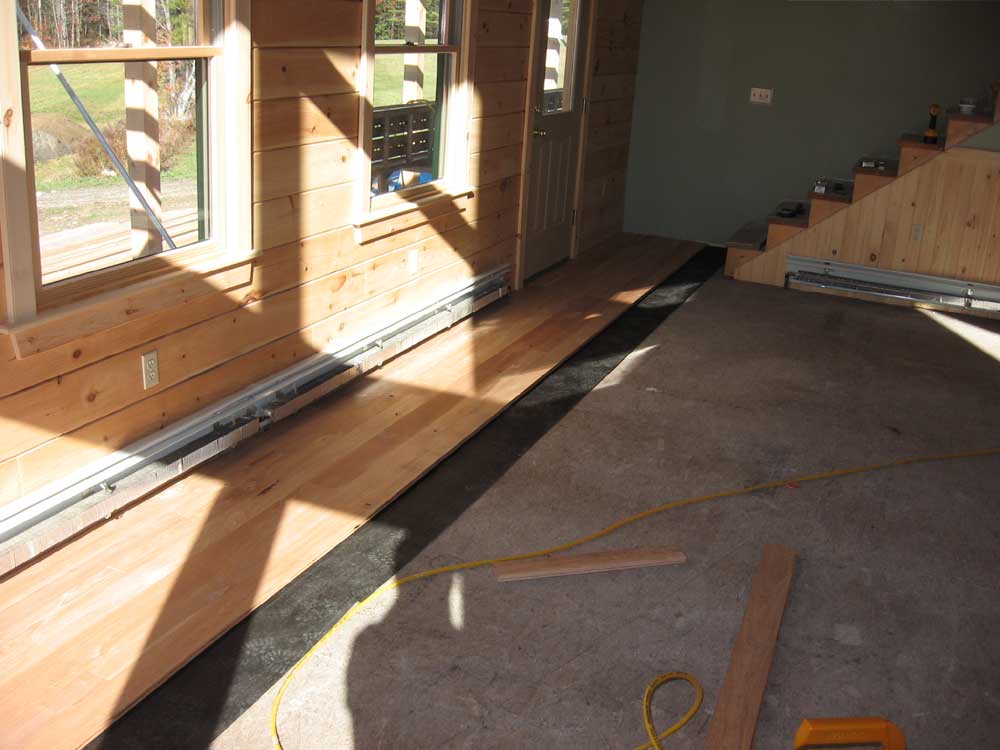
I forgot my camera this morning, and since I didn't even go down for lunch I never picked it up. It doesn't matter much, since most of today's progress was not of the visually exciting type. (I did add a picture that I took of the fireplace opening the next day.) I spent most of the rest of the day working on electrical trimout, installing switches and outlets through the rest of the downstairs (except Heidi's craft room, which was too full of wood flooring at the moment), and part of the upstairs. I gave in and started using the backwire terminals on the outlets that I had in stock, having decided that with the screw-down clamps, they were acceptable for use versus side wiring--and it was too much of a pain to sidewire these, since the side screws flop around in this design. Tugging on the wires, I didn't see any contact problem, so backwire it was. I'd still choose sidewire outlets in the future, but with the materials on hand I saw no reason not to press on rather than wait to exchange the outlets I had in stock. Late in the day, I cleaned up downstairs, and vacuumed the floor; then, I brought some of the hardwood flooring out of its storage room and laid it in piles in the living room in preparation for tomorrow, when I planned to begin laying the flooring. The look of the house will really begin to change tomorrow! I'll bring my camera--I promise. |
|||
FRIDAY, OCTOBER 20, 2006 |
|||
|
It wasn't really an exciting day here
today, but I got a few smaller jobs done and knocked off the list.
It rained on and off all day, so there was no opportunity for
outdoor work on the porch.
After I cleaned up, I primed the walls, another job for which I had little enthusiasm. Then, I painted the walls in the closet with the final coats of paint--the same taupe color as in the bedroom. I was thrilled to be done with this. Each step in this process today just seemed like pulling teeth for some reason. |
|||
 Next,
I mixed up the grout for the downstairs shower , and then applied
it. The grout was a bit looser than it should have been,
and made a real mess, but all came out well in the end. A
couple hours later, I installed the hardware for the shower, though
I left the shower head off for now because I needed to install a
trim plate over the shower nipple; the one that came with the
hardware didn't fit properly because apparently I had installed
fitting a bit too deeply in the wall. Next,
I mixed up the grout for the downstairs shower , and then applied
it. The grout was a bit looser than it should have been,
and made a real mess, but all came out well in the end. A
couple hours later, I installed the hardware for the shower, though
I left the shower head off for now because I needed to install a
trim plate over the shower nipple; the one that came with the
hardware didn't fit properly because apparently I had installed
fitting a bit too deeply in the wall.Later, I'll skim coat the exposed cement board at the top of the shower, and paint it to match the room. |
|||
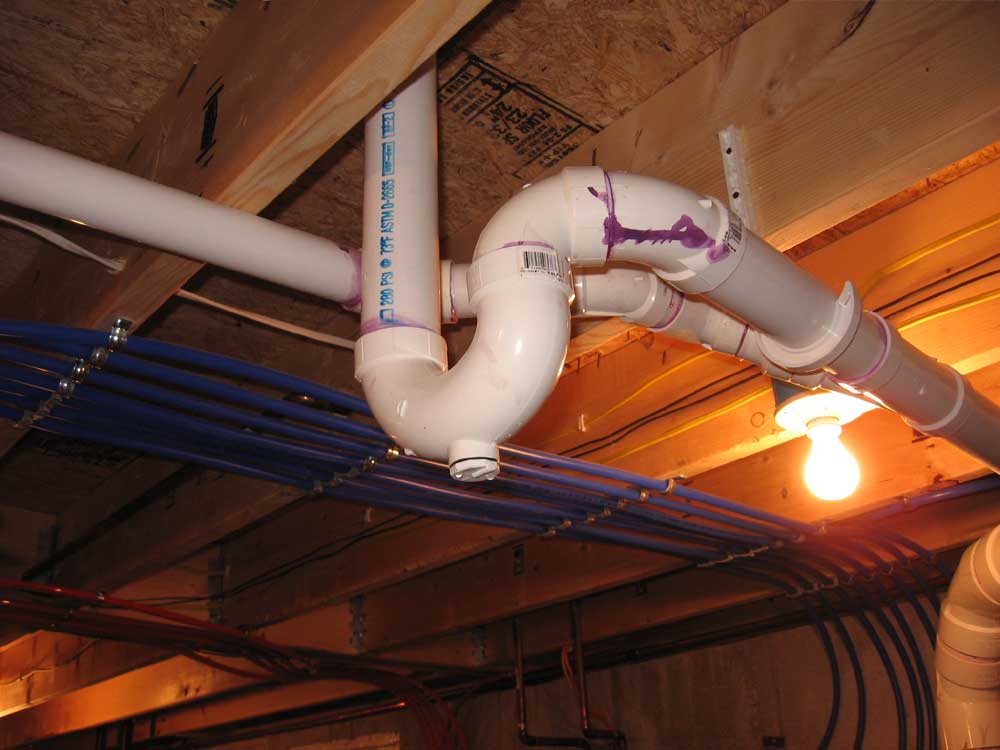 I
finished up the PVC drain for the shower, which was relatively
simple, fortunately. I ran the water briefly to check
everything out, though it made a huge mess without a curtain or
door. I
finished up the PVC drain for the shower, which was relatively
simple, fortunately. I ran the water briefly to check
everything out, though it made a huge mess without a curtain or
door.I spent some time late in the afternoon cleaning out much of the excess tools, boxes of nails, and so forth from the main floor of the house. I stored these in the basement for now. I also moved my saw table to the other side of the room, all this in preparation for my anticipated commencement of the wood flooring within the next couple days. Some milestones to come in the next couple weeks: -October 23: LPG tankage and
piping for the range to be installed |
|||
THURSDAY, OCTOBER 19, 2006 |
|||
 While
I waited for Bob, I worked on some of the electrical trimout.
I started with the main bank of switches under the stairs.
Partway through, I realized that I had meant to install dimmers on
most switches, which I hadn't purchased, but I continued anyway,
figuring I could install them later on. While
I waited for Bob, I worked on some of the electrical trimout.
I started with the main bank of switches under the stairs.
Partway through, I realized that I had meant to install dimmers on
most switches, which I hadn't purchased, but I continued anyway,
figuring I could install them later on.When Bob arrived, we worked outside to raise the porch posts (6x6 pine) and header beams (6x8 pine) for the front porch. We secured these from beneath the deck with a couple nails and then some 10" log screws. Once these pieces were up, Bob didn't need me anymore, so I continued my work inside. |
|||
 During
the rest of the day, Bob cut and installed all the 2x6 porch ceiling
joists, which sit on top of the header beam, and then cut all the
rafters for the roof, though he didn't install these because rain
was forecast for tomorrow and, since it was too late in the day to
sheathe and cover the roof, it didn't make sense to nail the rafters
into the now-watertight main roof just before a rainstorm. During
the rest of the day, Bob cut and installed all the 2x6 porch ceiling
joists, which sit on top of the header beam, and then cut all the
rafters for the roof, though he didn't install these because rain
was forecast for tomorrow and, since it was too late in the day to
sheathe and cover the roof, it didn't make sense to nail the rafters
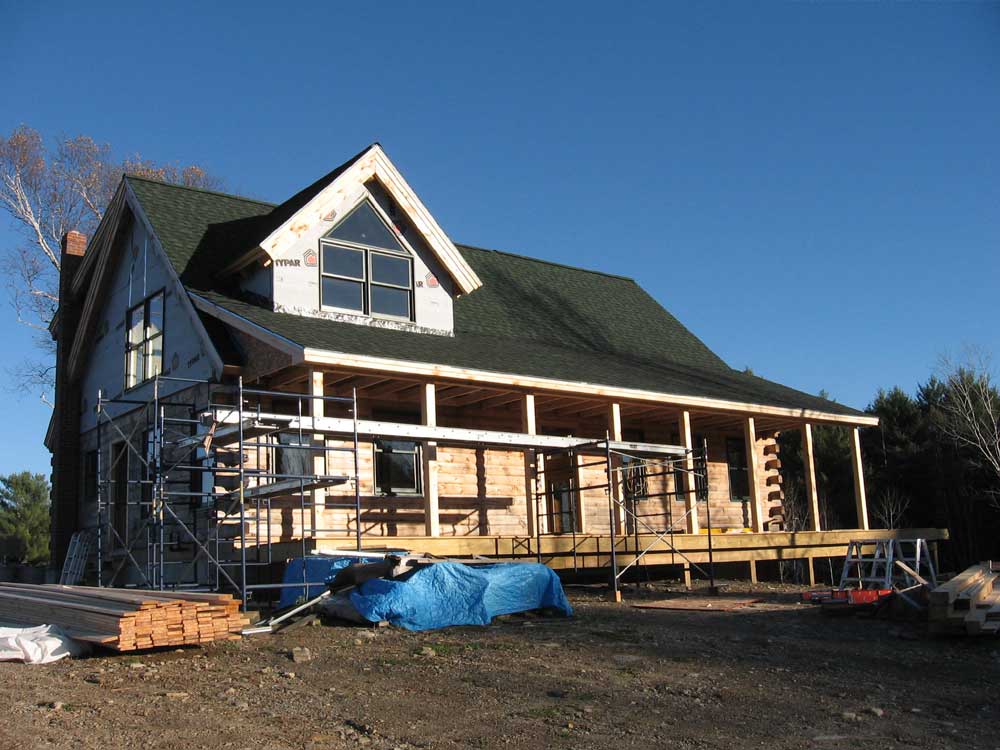
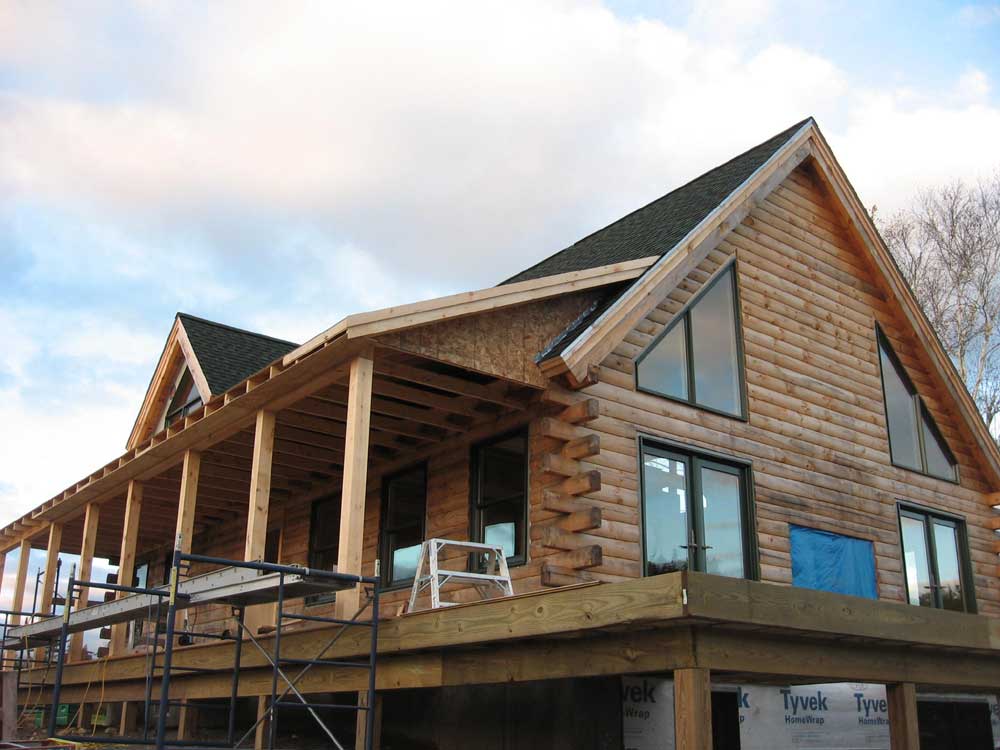
into the now-watertight main roof just before a rainstorm.Even with just the most basic parts of the porch in place, the appearance of the house changed drastically. I've been looking forward to this forever; the house has been missing this important visual feature, but even with just the posts in place, it began to soften and lower the front facade of the house. Excellent! |
|||
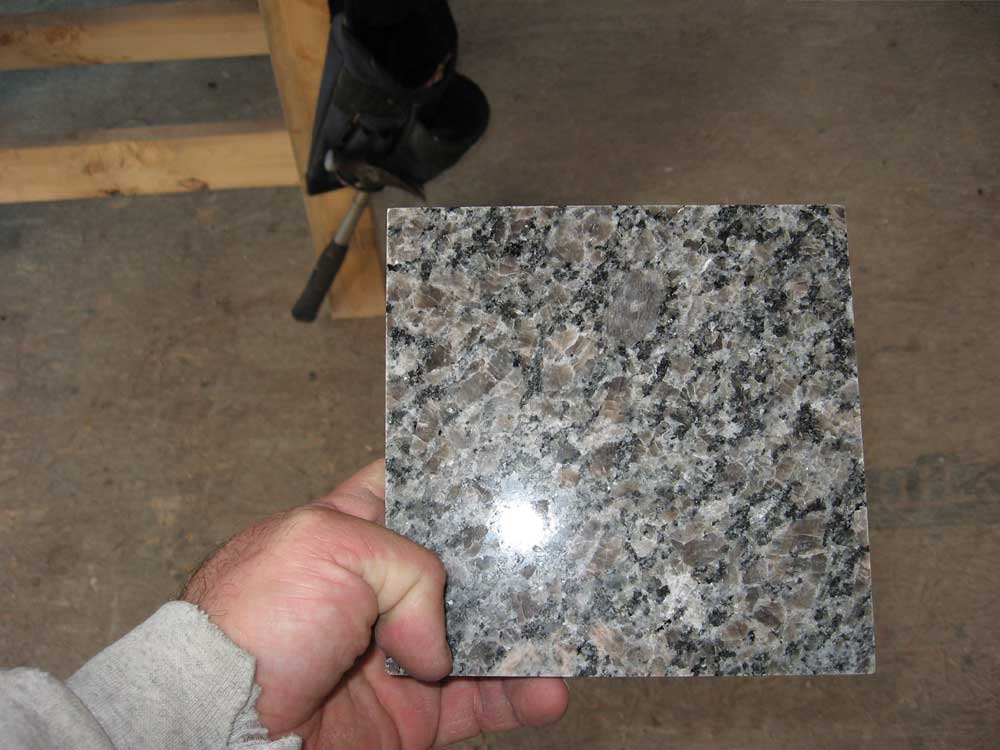 It
was pretty uneventful inside today. At 8:30, a guy from the
granite place arrived to build the template for the kitchen
countertop. This took about an hour, and he left promising the
completed granite in two weeks or so. We chose "Deer Brown"
for the countertop; the photo shows a sample. It
was pretty uneventful inside today. At 8:30, a guy from the
granite place arrived to build the template for the kitchen
countertop. This took about an hour, and he left promising the
completed granite in two weeks or so. We chose "Deer Brown"
for the countertop; the photo shows a sample. |
|||
 I
trimmed out a lot of the outlets and switches, including all the
complicated 3-way switches. One of my triple gang switch boxes
ended up extraordinarily full of wire, thanks to the need for
multiple pigtails to jump the single circuit feed to three different
switches and fixtures. I
trimmed out a lot of the outlets and switches, including all the
complicated 3-way switches. One of my triple gang switch boxes
ended up extraordinarily full of wire, thanks to the need for
multiple pigtails to jump the single circuit feed to three different
switches and fixtures.Electrical trimout takes time, with little in the way of visual result. Here are some fancy switch plates we bought for the main switch center under the stairs; we used these plates in this area only since it seemed so front and center to the living room, and I hated to use the cheesy plastic plates here. |
|||
 During
the afternoon, I applied two coats of poly to the window and door
trim in the living room and kitchen area--4 windows and 4 doors.
It was good to get this done; it took over an hour for the first
coat, and a bit under an hour for the second. You can't tell
anything from the picture, but here is a picture nonetheless. During
the afternoon, I applied two coats of poly to the window and door
trim in the living room and kitchen area--4 windows and 4 doors.
It was good to get this done; it took over an hour for the first
coat, and a bit under an hour for the second. You can't tell
anything from the picture, but here is a picture nonetheless.There's more rain forecast for tomorrow, so it's unlikely that anymore work will occur on the front porch this week. I'm very anxious to see the roof! |
|||
WEDNESDAY, OCTOBER 18, 2006 |
|||
 It
was raining this morning, making my first task all the more useful:
finishing up the basement lighting. Over the past couple days,
I had installed all 11 of the cheap porcelain fixtures and bulbs,
and this morning I finished up wiring the 3-way switches, one
located at the top of the basement stairs and the other at the
entrance in the basement wall beneath the deck, which will be our
main entrance and mudroom once we move in. It
was raining this morning, making my first task all the more useful:
finishing up the basement lighting. Over the past couple days,
I had installed all 11 of the cheap porcelain fixtures and bulbs,
and this morning I finished up wiring the 3-way switches, one
located at the top of the basement stairs and the other at the
entrance in the basement wall beneath the deck, which will be our
main entrance and mudroom once we move in.3-way switches are always confusing, and it had been a while since I wired one up. Late yesterday, I wired them the way I thought I remembered, but they were wrong; the circuit breaker tripped immediately when I turned it on. Obviously, I had something wrong. I did a little research overnight and found out what I had done wrong, so I rewired the switches successfully this morning. These are the first "real" lights to become operable in the house, making this a milestone, if an insignificant one. |
|||
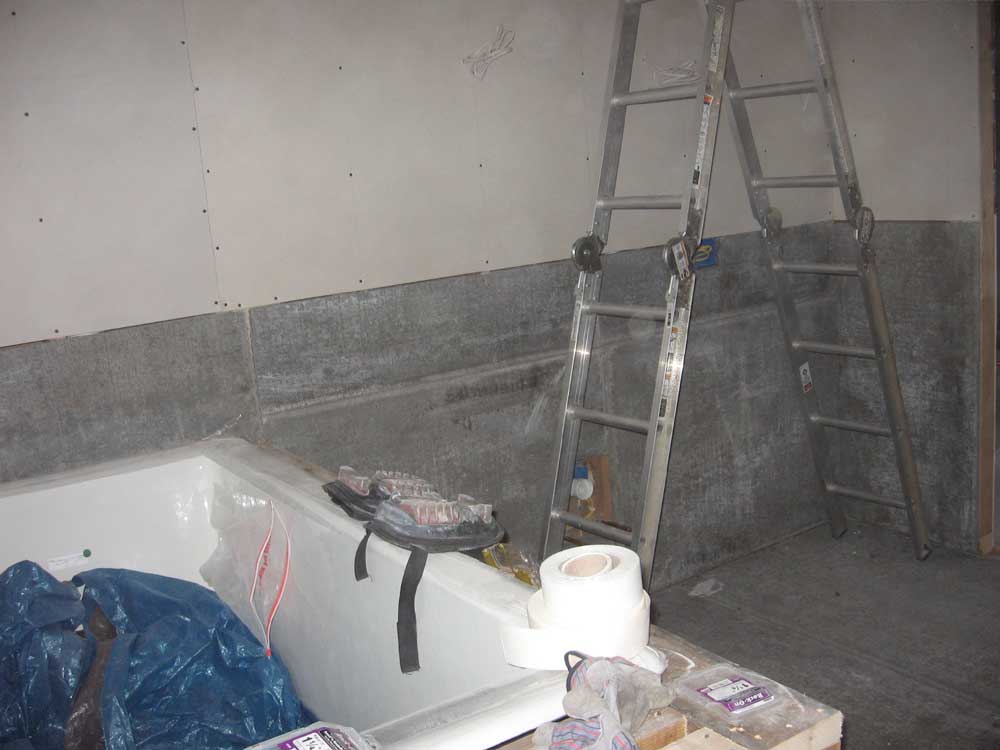
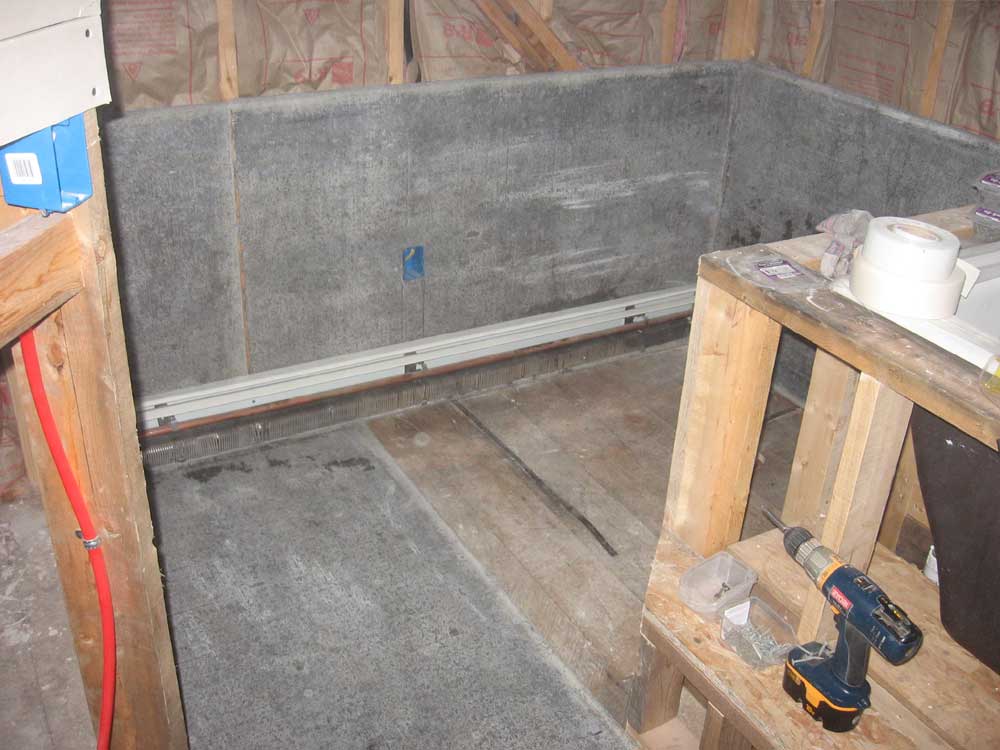
|
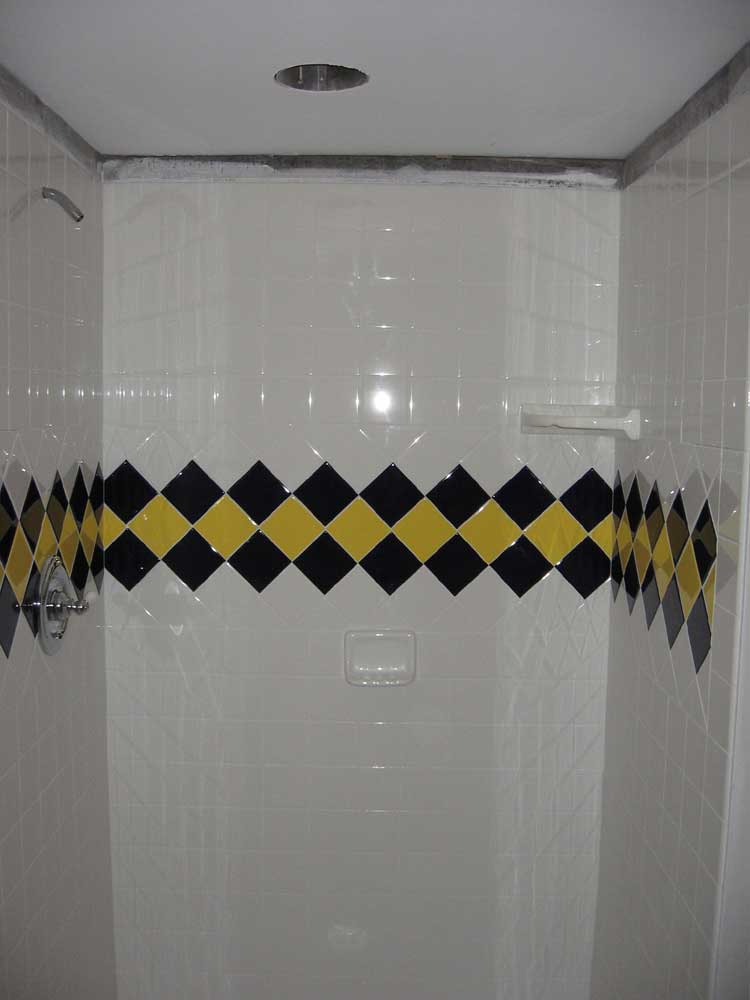
I spent most of the rest of the day working on the tile in the downstairs bathroom shower. I was surprised how long it took, but to be fair I did take an hour and a half off for a visit and lunch with my mom. I began with some layout. We chose 4-1/2" square tiles for the shower, mostly white with a bold color pattern partway up. But everything hinged on the first row of tiles, so I laid two in place on each wall of the shower at the top of the shower pan, and checked for level. Choosing the high point, I struck a level line all the way around that represented the top edge of the first row. I mocked up the colored tile band on the floor to check its appearance and determine its overall width, and then figured approximately where it should be located on the walls of the shower. We wanted it a little above halfway up the walls, or about chest level. This turned out to be 9 tiles above the base, or about 38-1/4". The tile band would be about 18" wide. Then, I laid a full row in each wall, so that I could check how much tile would remain at the corners. Fortunately, relatively large pieces (between 1/3 and 1/2 tile) would finish out each row, so there was no need to adjust the spacing. One hopes to avoid tiny slivers of tile, and by laying things out in advance adjustments can be made beforehand that avoid the tiny pieces. I installed the first row all the way around, cutting tiles as necessary to finish at the corners. I started with the back wall, and then installed the two sidewalls; in this way, the cut tiles from the side wall covered the cut tiles in the back wall, making the seam less visible. I used a simple tile scorer to cut the tiles. I worked my way up 9 rows, which brought me to the base of the colored accent band. This took till about 1130. |
|||
 After
my longish lunch break, I got back to work on the tile accent band
around 1. We chose to turn the accent tiles on their tips,
creating a diamond-like shape. This necessitated plenty of
cutting, both at the top and bottom of the rows and also at the
corners. I used the tile scorer, tile nippers, and an
inexpensive and basic borrowed electric tile saw to make the cuts as
required. After
my longish lunch break, I got back to work on the tile accent band
around 1. We chose to turn the accent tiles on their tips,
creating a diamond-like shape. This necessitated plenty of
cutting, both at the top and bottom of the rows and also at the
corners. I used the tile scorer, tile nippers, and an
inexpensive and basic borrowed electric tile saw to make the cuts as
required.
The accent band turned out to be rather involved and challenging, but it looked great when complete. At the front edges of the side walls, I began the accent one tile back from the front, since I needed to use bullnose tile at the outer finished edge. |
|||
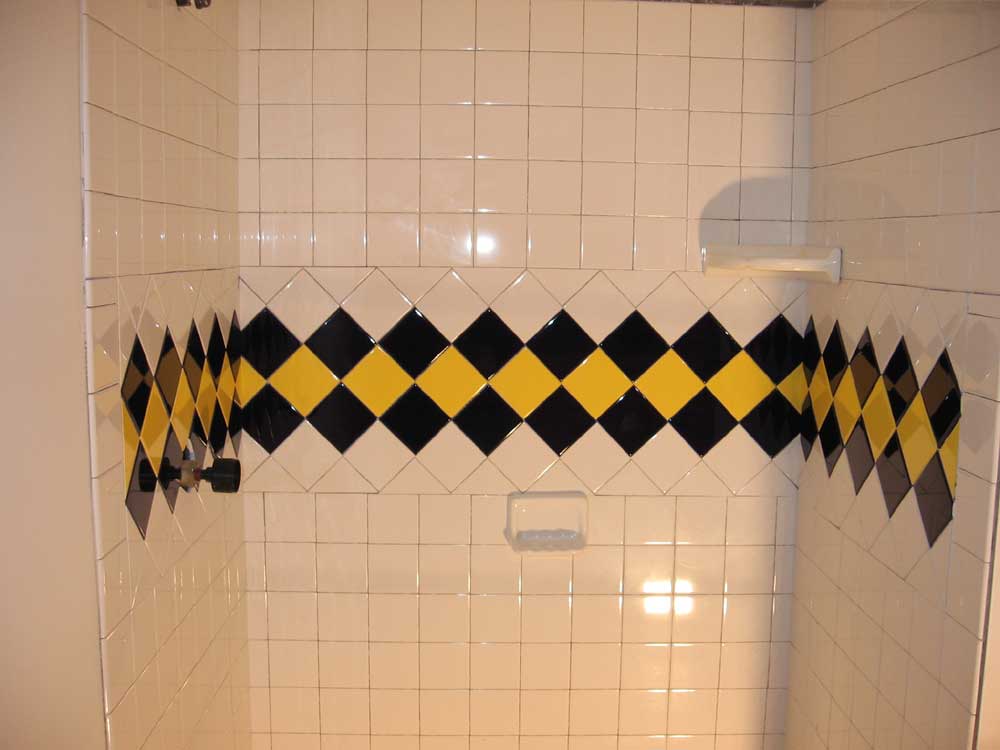 Above
the accent stripe, I continued with the tiles in a conventional
manner to match the lower section. I stopped the tiles short
of the ceiling, choosing instead to use bullnose tile at the top
edge rather than attempt to cut tiles to fit cleanly against the
ceiling--a difficult and time-consuming process that never turns out
that well and always requires trim. Above
the accent stripe, I continued with the tiles in a conventional
manner to match the lower section. I stopped the tiles short
of the ceiling, choosing instead to use bullnose tile at the top
edge rather than attempt to cut tiles to fit cleanly against the
ceiling--a difficult and time-consuming process that never turns out
that well and always requires trim.I should have mudded and taped the top section of the wall before tiling, but of course I didn't; later, I'll have to smooth and paint the small area between the top tiles and the ceiling to finish the job. There was no outdoor work today because of the morning's rain. |
|||
TUESDAY, OCTOBER 17, 2006 |
|||
 It
was deja vu all over again. I returned my erroneous
purchases from yesterday and then collected the right things--new
outlets and cover plates, elongated toilet, and a variety of other
items that I had either thought of since yesterday's visit, or were
otherwise required. Even the lady at checkout remarked on
remembering doing the same thing yesterday! It
was deja vu all over again. I returned my erroneous
purchases from yesterday and then collected the right things--new
outlets and cover plates, elongated toilet, and a variety of other
items that I had either thought of since yesterday's visit, or were
otherwise required. Even the lady at checkout remarked on
remembering doing the same thing yesterday!Anyway, with the correct purchases in hand, I was back home before 8, and got right to work in the bathroom on toilet preparations. I soldered a chrome-plated valve on the copper pipe supply stub extending from the wall, and installed a trim plate to cover the raw hole in the sheetrock. Then, I installed a braided stainless steel supply line. |
|||
 I
had left the wax ring for the toilet in the house overnight, and
since it was rather cold in the house I decided not to try
installing the toilet right then, since the wax likes to be at room
temperature (around 68°) to flow properly. So I brought the
wax down to my office at the shop and left it on the heated floor to
warm up for a while. I
had left the wax ring for the toilet in the house overnight, and
since it was rather cold in the house I decided not to try
installing the toilet right then, since the wax likes to be at room
temperature (around 68°) to flow properly. So I brought the
wax down to my office at the shop and left it on the heated floor to
warm up for a while.In the meantime, I cut and installed as much of the baseboard as I could in the bathroom, leaving only a couple pieces near the doorway, which I couldn't install until the interior door and trim was installed. |
|||
|
Next, I applied the final coat of mud to the closet upstairs, thankfully drawing yet ever closer to the end of the drywall project. Once this room, and the upper portion of the bathroom, are sanded, all that will remain will be the lower portions of the sheetrock in the bathroom upstairs. |
|||
|
|
|||
| I began to install some of the trim rings and bulbs on the overhead recessed light fixtures, but I quickly discovered that the bulbs I had purchased were the wrong ones--too long, so they extended past the trim rings. Boy, I was really batting .000 with my Monday purchases. Later, I discovered that the 4th and final trim ring that I had purchased was missing one of the springs required to hold it in place, lowering my purchase average to negative levels. I dutifully added these items to my already shockingly long list and pressed onwards. | |||
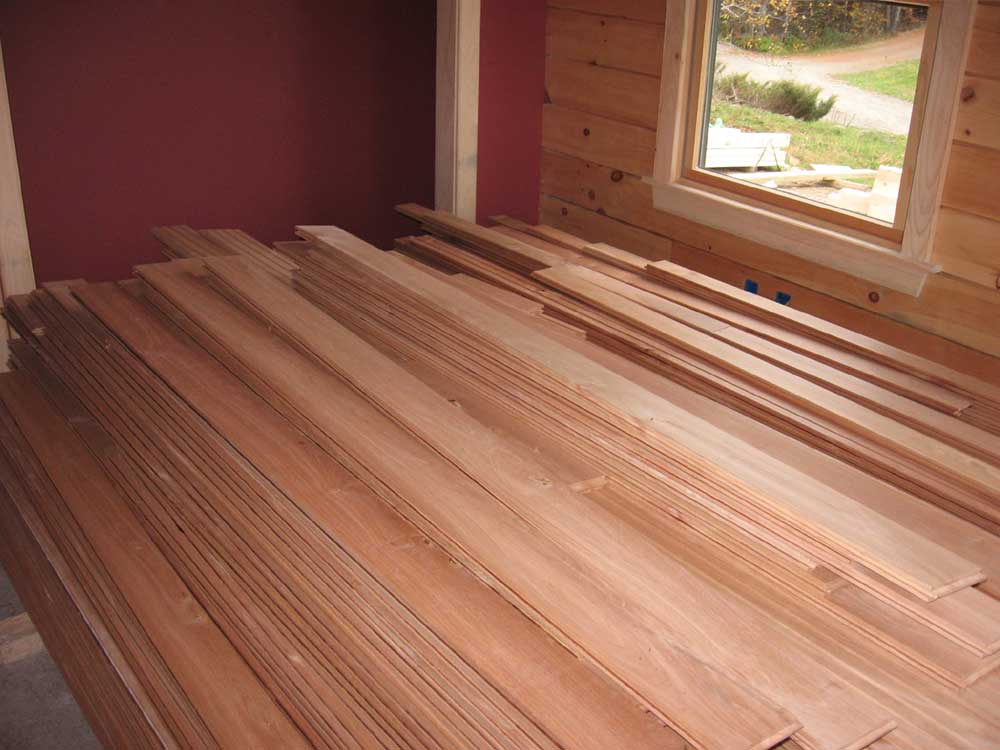 Shortly
before noontime, the truck bearing the wood flooring arrived, and
the driver and I spent quite a bit of time unloading the "rustic"
red birch flooring, which we stacked in the craft room to keep it
out of the way for the moment. The flooring was gorgeous:
very reminiscent of cherry in appearance, with variegated coloration
from reddish to light, and with the smell of cedar. Shortly
before noontime, the truck bearing the wood flooring arrived, and
the driver and I spent quite a bit of time unloading the "rustic"
red birch flooring, which we stacked in the craft room to keep it
out of the way for the moment. The flooring was gorgeous:
very reminiscent of cherry in appearance, with variegated coloration
from reddish to light, and with the smell of cedar. |
|||
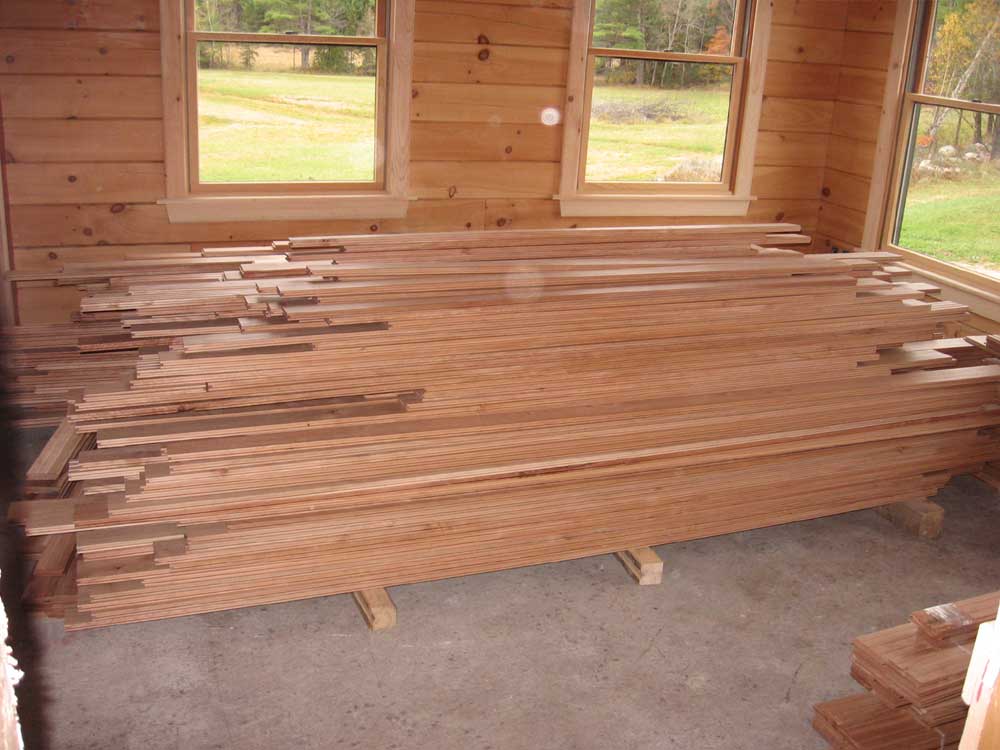 The
flooring came in 3", 4", and 5" widths, and what I could see of the
face grain looked very interesting, with occasional tight knots,
minor flaws (hence the "rustic" moniker), and the occasional spalted
grain. 1310 square feet of flooring created a pile about 4'
deep and 6' or more wide...looks like plenty of work ahead for me!
I planned to let the floor acclimate to the house for several days
or a week before beginning installation. The
flooring came in 3", 4", and 5" widths, and what I could see of the
face grain looked very interesting, with occasional tight knots,
minor flaws (hence the "rustic" moniker), and the occasional spalted
grain. 1310 square feet of flooring created a pile about 4'
deep and 6' or more wide...looks like plenty of work ahead for me!
I planned to let the floor acclimate to the house for several days
or a week before beginning installation. |
|||
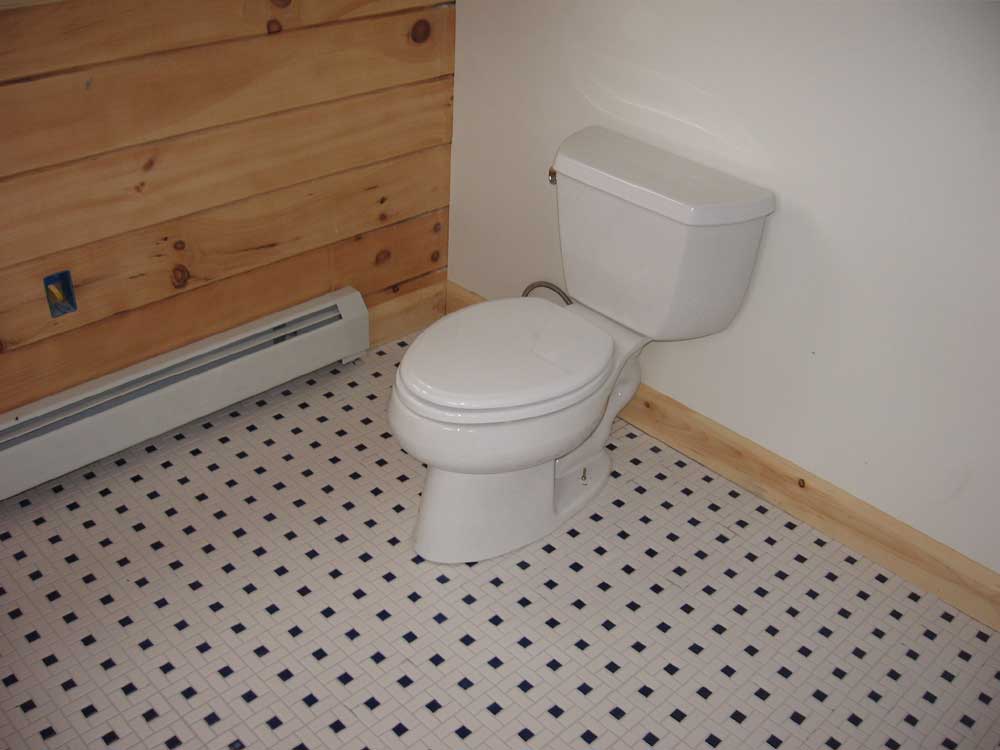 After
lunch, I installed the toilet. Fortunately, I had remembered
to buy closet flange bolts, which never come with the toilet itself
for some strange reason. Toilet installation is a snap,
particularly with so much room on both sides as in this
installation. After
lunch, I installed the toilet. Fortunately, I had remembered
to buy closet flange bolts, which never come with the toilet itself
for some strange reason. Toilet installation is a snap,
particularly with so much room on both sides as in this
installation. |
|||
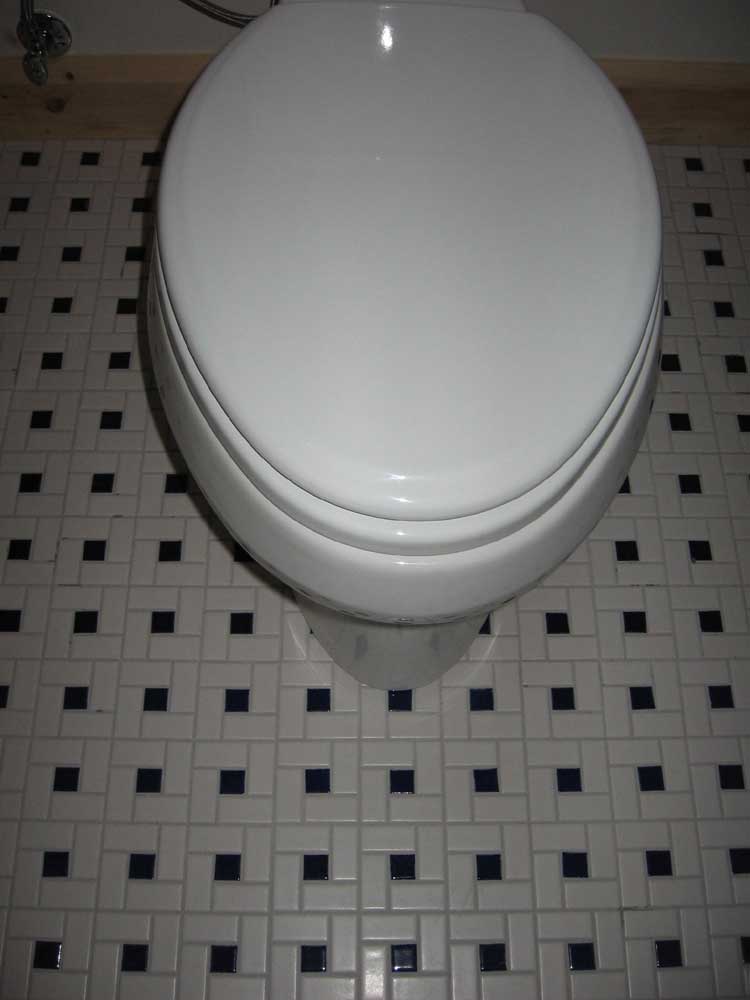 Of
course I had carefully planned, measured, and arranged the tile
pattern so that the tiles were perfectly centered on the front face
of the toilet base. It's these details that count. Of
course I had carefully planned, measured, and arranged the tile
pattern so that the tiles were perfectly centered on the front face
of the toilet base. It's these details that count.
(Actually, this was pure dumb luck!) |
|||
| Finally, I could put it off no longer. I had to go upstairs and start installing the remaining cement board in the bathroom. I had bought a scoring tool to help cut the board, as utility knives didn't work that well and dulled very quickly. For the rest of the afternoon, I installed what was left in my pile of new boards, finishing up one wall and making good progress on another, including the area behind the heat register. I used the last full sheet on the floor, and figured out how many more sheets I would need to finish up the remaining areas. I planned to get this over with by next week, probably during the weekend. I need the cement board to be completed before October 30, when the carpeting is coming for the bedroom. | |||
|
|
|||
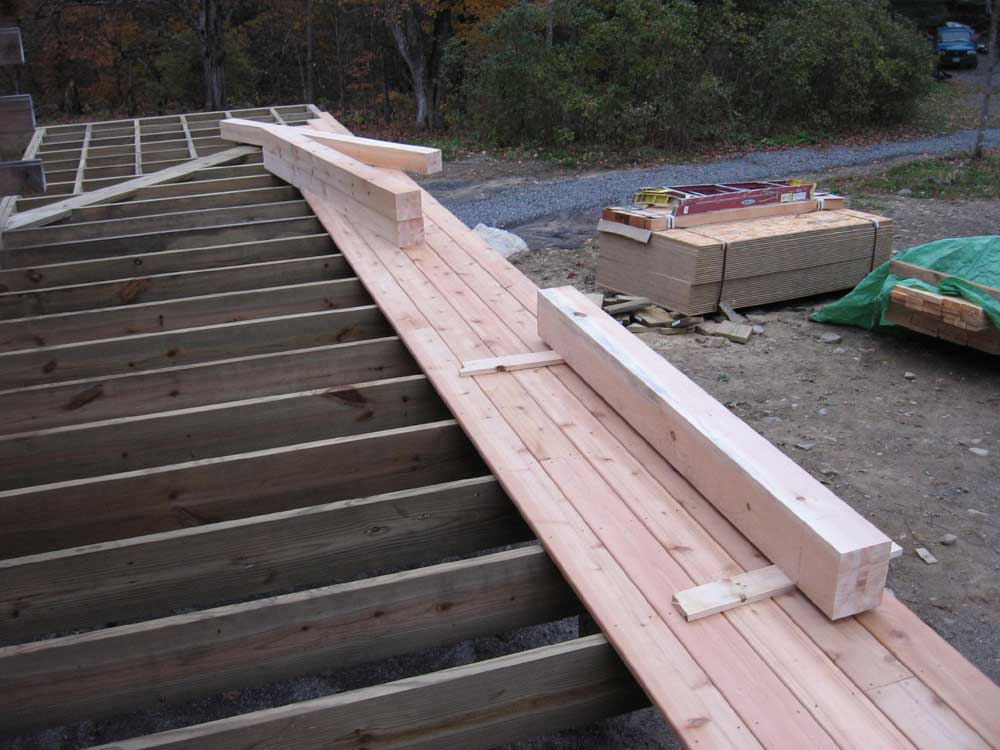
| Meanwhile, Bob was around today working on the front porch. He didn't need me today, so he worked alone, figuring out the roof details and then installing some decking at the outer edge of the porch so that the roof posts could be installed. Then, he cut all the 6x6 and 6x8 pine beams required for the posts and headers to length and laid them out in readiness for the next step: standing them upright. | |||
|
|
|||
MONDAY, OCTOBER 16, 2006 |
|||
|
After three days away from the
jobsite, I was anxious to get back to work. I began bright and
early with my habitual pre-dawn journey to Lowe's to pick up a wide
variety of items, from a toilet to outlet face plates, from drywall
mud to finish nails, and from tape measures to shower drain fitting. I arrived back home before 8, and unloaded my haul. It was at about this point that I noticed that my toilet box read "round front"...uh-oh. From the display at the store, it seemed like the Kohler Wellington--a unit we had used previously with good success--came only with the elongated bowl, which I wanted. I opened the box and confirmed by fears: this was the wrong thing. Grr. I was not pleased with this development. Will I ever learn to double check the things I pick up? And why wasn't it more clear that there was a choice, and that the stack from which I took my unit was round and not elongated in the first place, Mr. Lowe? I managed to get past this annoyance, and since I wasn't sure if Bob would want or need my help today, I sort of dubbed around on some smaller things while I waited for him to arrive. I thought I'd install the outlet face plates in the kitchen, to cover the outlets I installed a while back. I opened the first one and installed it, and noticed immediately that the color didn't match. I had installed tan outlets, and had picked up tan faceplates. What gives? It turns out I had actually (and without knowing so) installed almond outlets, while my faceplates were ivory. Come on, will you? They're both nearly the same color, but just incrementally different enough to be blatantly noticeable if compared directly. I thought there were three choices: white, tan, and brown. But almond and ivory? Isn't this placing too fine a point on an el-cheapo receptacle? I was extremely annoyed at this, which, on top of the toilet debacle, more or less negated my entire trip of the morning. I almost headed right back immediately, but logic prevailed and instead I made plans to return tomorrow morning--aggravating, but better to just go and get the exchanges done. Besides, I had been looking forward to an operating bathroom in the house, and didn't want to delay much longer. |
|||
|
When Bob arrived, we eventually decided that he could do most of the work alone, and that I would work inside as necessary, though of course I'd be available at any time to help out as needed outside. So I got to work on the mud in the upstairs, and applied a third coat to the upper part of the bathroom, and a second coat to the remaining areas of the closet with the new bucket that I had picked up. |
|||
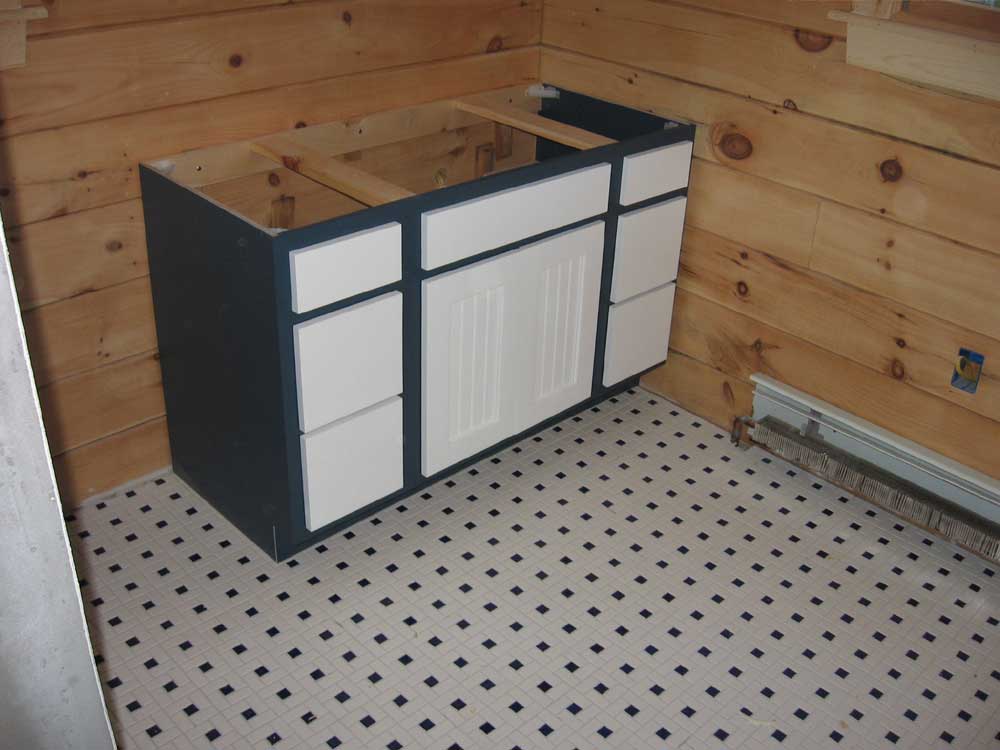
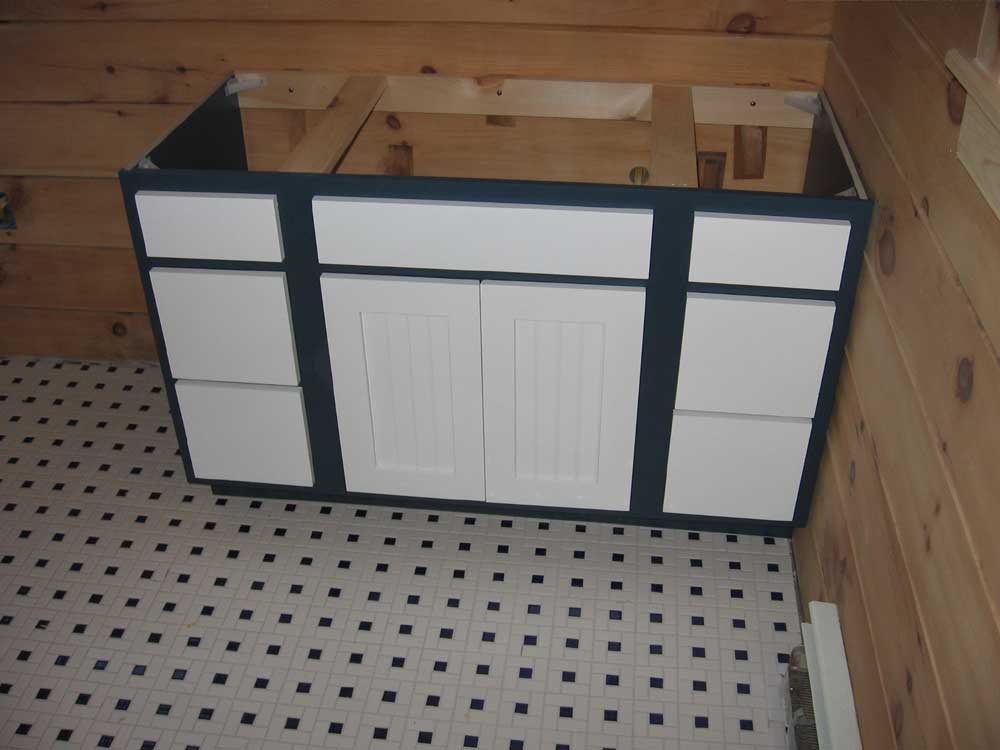
|
Next, I installed the vanity cabinet in the downstairs bathroom. This went smoothly, and I didn't even need to shim it for level. I did shim behind the solid pine back supports since I had to hold the cabinet slightly away from the wall to clear the electrical wiring running to the outlet box above the cabinet. For this cabinet, we chose a maple frame painted Jamestown blue, with white maple drawer fronts and doors with a Shaker bead. The drawer fronts ended up a bit more blank than I had expected, but since we had yet to choose our hardware it seemed that some good hardware could liven things up. Otherwise, I liked the cabinet. Later (soon), I'll build and install a standard Formica countertop. |
|||
|
|
|||
|
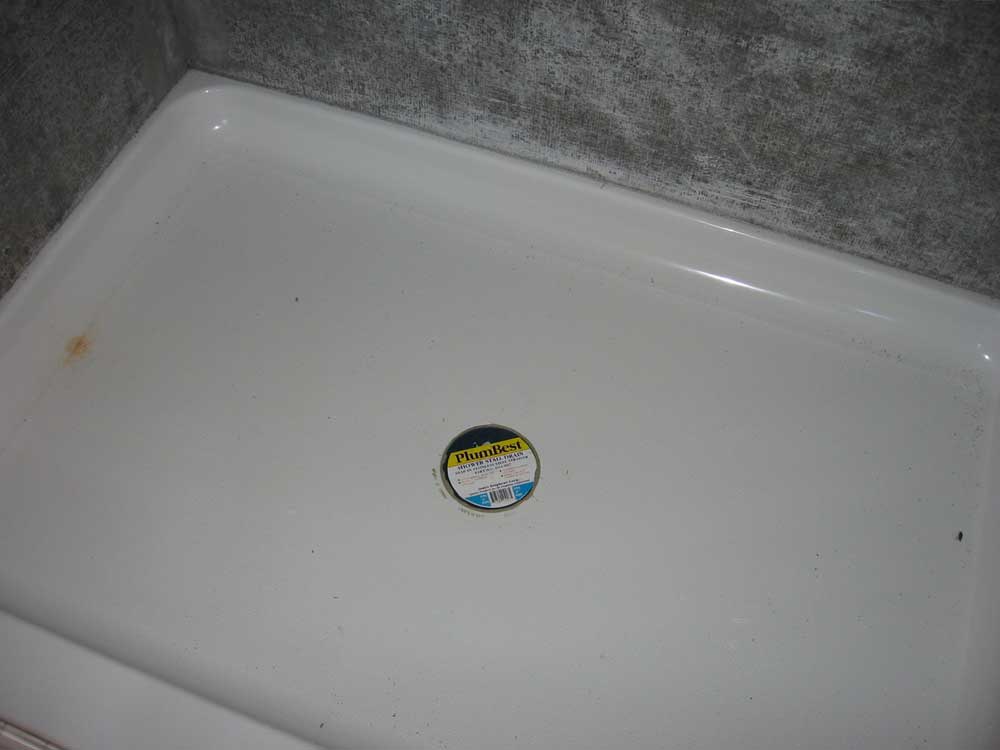
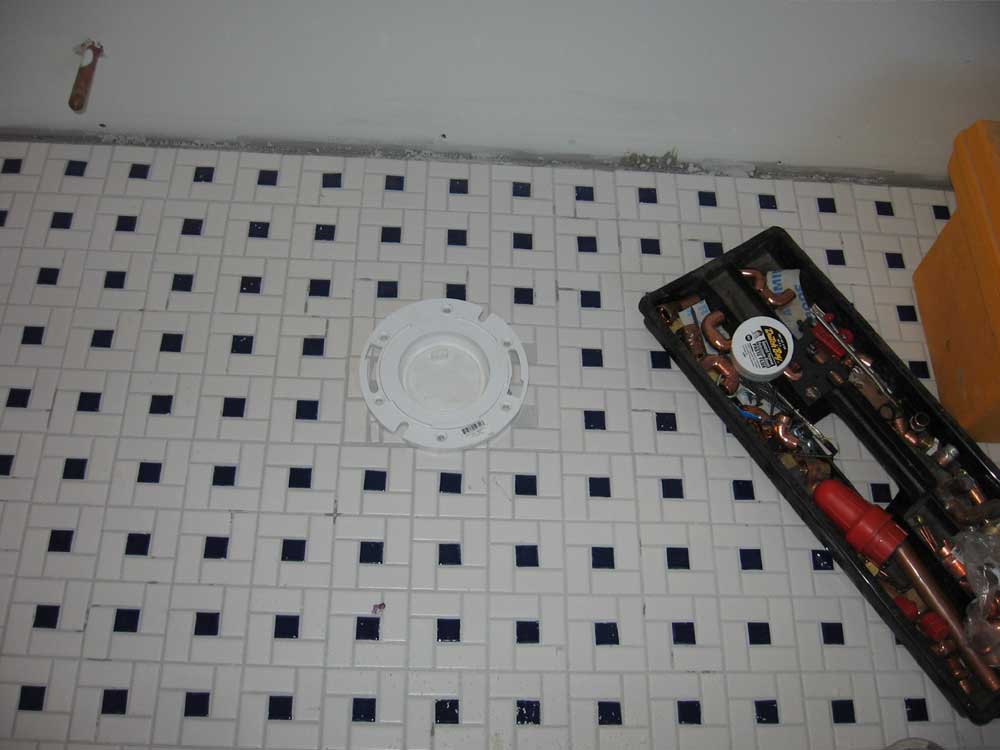
I installed a drain fitting in the downstairs shower pan in preparation for the final connection in the basement. I bedded the fitting in lots of plumber's putty and tightened the nut from the basement beneath. I also installed the closet flange in the floor. |
|||
|
|
|||
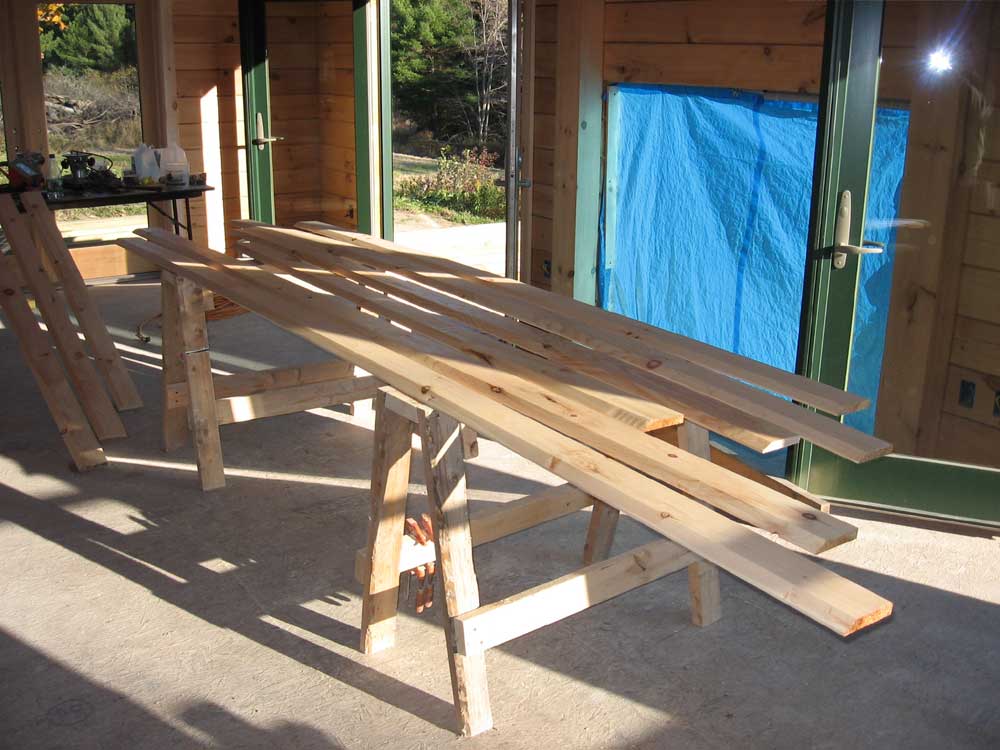 With
a large quantity of wood flooring due here tomorrow afternoon, I
decided to move the pile of blank trim stock and my pre-milled stack
from the horses in the living room down to the basement for now.
Once I cleaned up that pile, I brought up several pieces of
baseboard trim, which incorporates a beveled top edge, and sanded
them all before applying two coats of polyurethane during the
afternoon. I also poly'd the two window frames in the
downstairs bath. I'm going to try and poly a few windows every
day or two to break up the process, but to also get it done in
plenty of time to move in, and before finished floors go down. With
a large quantity of wood flooring due here tomorrow afternoon, I
decided to move the pile of blank trim stock and my pre-milled stack
from the horses in the living room down to the basement for now.
Once I cleaned up that pile, I brought up several pieces of
baseboard trim, which incorporates a beveled top edge, and sanded
them all before applying two coats of polyurethane during the
afternoon. I also poly'd the two window frames in the
downstairs bath. I'm going to try and poly a few windows every
day or two to break up the process, but to also get it done in
plenty of time to move in, and before finished floors go down. |
|||
|
I finished up the day by installing 5 or 6 of the cheap porcelain light fixtures in the basement. I had installed 11 boxes some weeks ago, along with the wiring, and now I began to wire these up so that I'd have light in the basement; I figured my cutting station would probably move down here sooner than later, once the finish floor was installed upstairs. I hated installing these cheap fixtures. I just don't understand why the manufacturer couldn't leave more room around the screws for the wires; things were extremely tight, particularly for the 12 ga. wire I was using. Would it have killed them to leave 1/4" clearance around the screw, rather than to have it nearly butted directly against the molded contours of the back side of the fixture? Who designs these things? |
|||
|
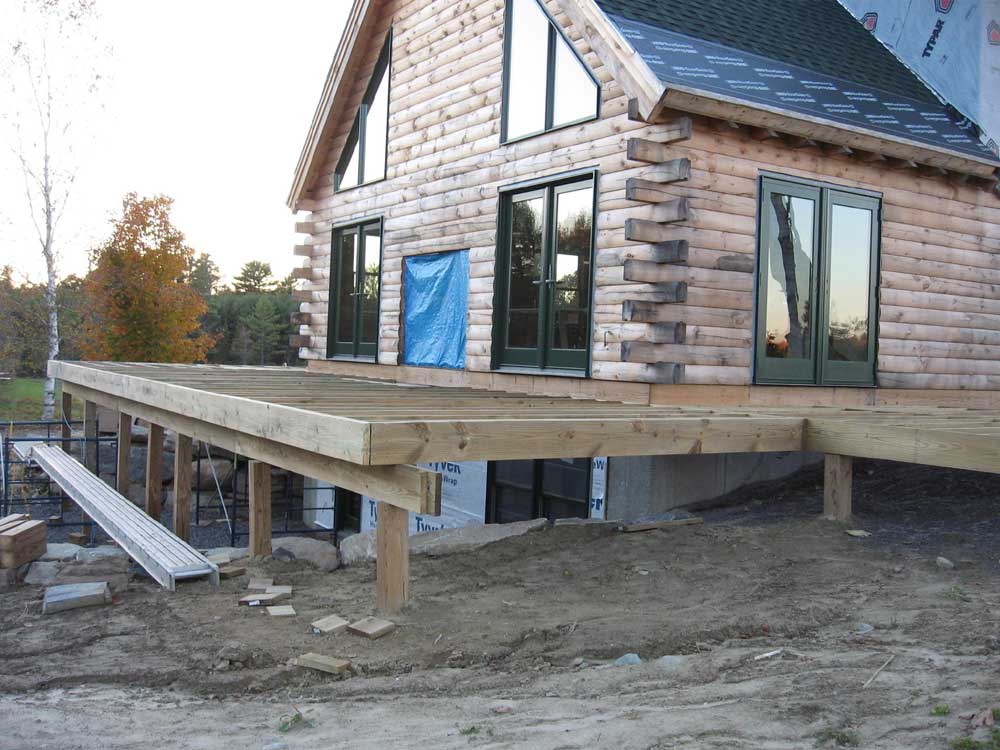
While I worked inside, Bob worked on the deck framing, picking up where we left off last Wednesday. New material had been delivered Friday, sometime after we left for the weekend, and he finished installing the joists, cut the ends to length, and installed the double box frame. I helped hold some of the larger pieces of the box frame, but that was about it. He also installed some blocking in the area where the front porch met the large deck off the south end, where we planned to miter cut the deck boards.
|
|||
|
|
|||
| Click here to go back to the logs from the first half of the month, if you missed them. | |||
|
|||