|
|||
|
|
~ The bLog Home ~ |
||
THURSDAY, AUGUST 31, 2006 |
|||
| I continued work on the plumbing this morning while I waited for Bob to arrive to help build the truss in the great room (built in place). I ran some additional supply lines until I ran out of clamps for securing the pipe. Then I busied myself with a few other things till Bob arrived at 8 or so. | |||
|
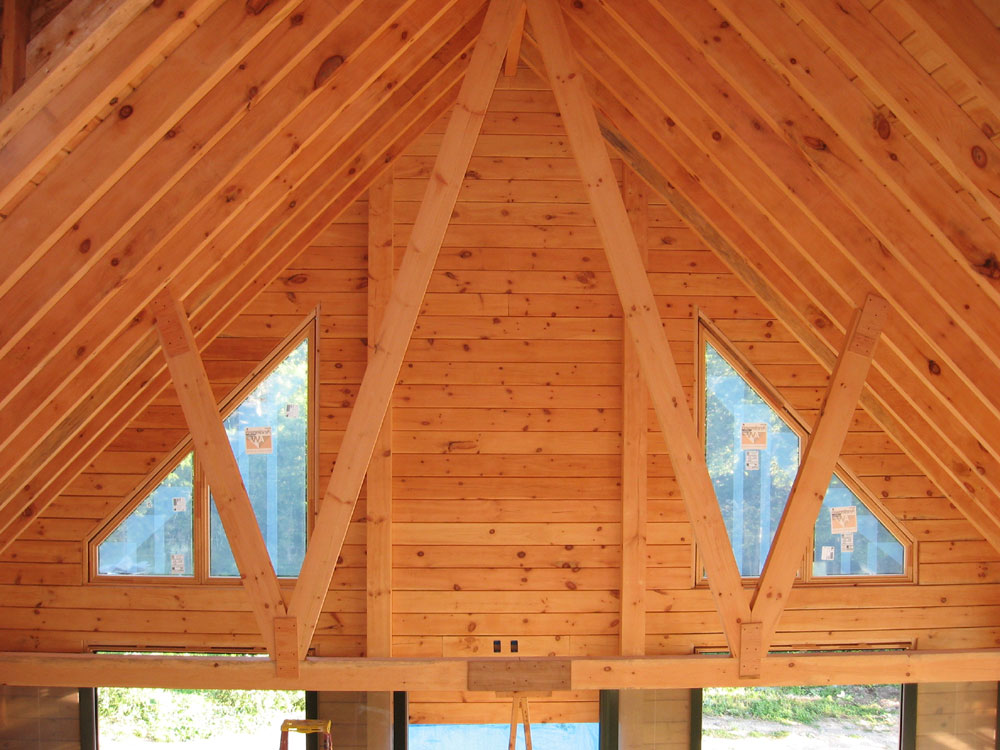
Our first order of business was to assemble pipe staging again so that we could reach the ridge--always a fun time. Then we turned our attention to the task at hand. The single truss in the great room serves only to support the longest ceiling tie--the one closest to the gable end--that helps prevent the house walls from spreading under the roof load. We were to build the truss in place; three of the truss members were already in place: the two roof rafters and the horizontal tie at the bottom. We needed to add four additional pieces to create a "W" shape in between the original three pieces. After consulting the drawing for the general design of the truss, we decided to loft the layout on the floor so that we could properly come up with the correct angle cuts at the ends of the truss members. We took a couple measurements up in the ceiling as necessary, and then transferred them to the floor. It's funny how small the layout looks when on the floor, as opposed to gazing up into the heights of the ceiling. |
|||
|
Once we had the layout, we cut the first piece. Getting it into place was fairly easy: we stood it up next to the staging, then I climbed partway up and held it while Bob went to the top. Then, we simply lifted the beam into its proper position. The first piece fit to within 3/8" of the mark on the horizontal tie piece, which was 1/3 of the total chord length (of the tie) to the wall. That was certainly within tolerances, and we used a couple log screws to secure the piece; the screws would be hidden by other parts of the truss later. |
|||
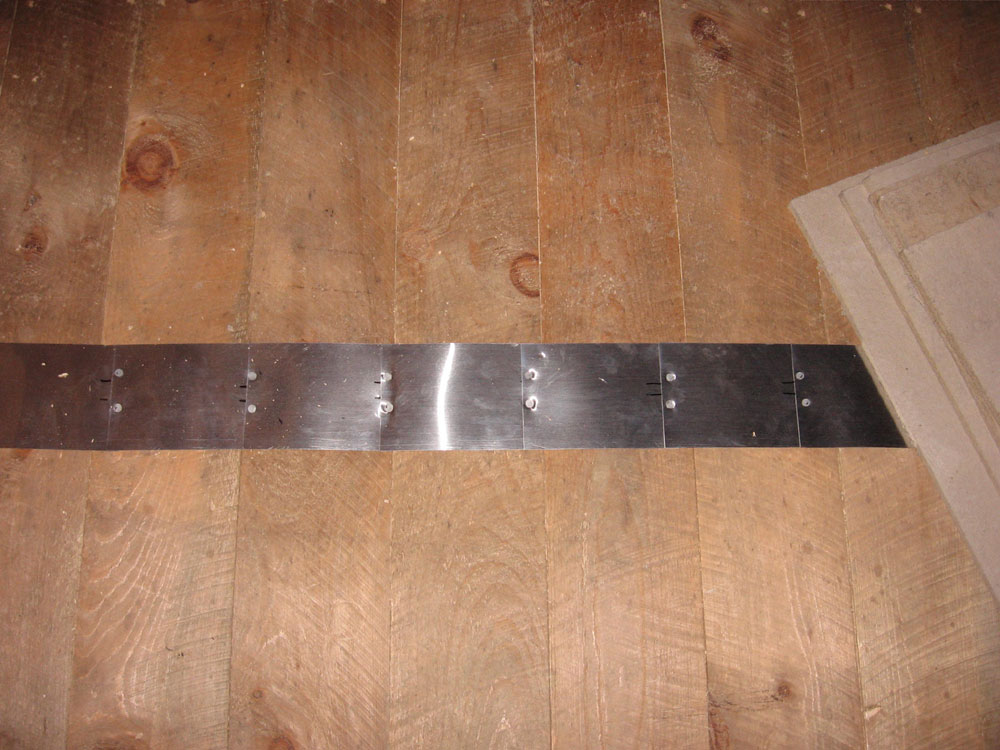
 We
installed the second long piece in a similar manner, and then
created a cardboard template of the top end, so that I could have
steel truss tie plates fabricated to fit the truss; the plates are
what actually hold the truss pieces in place. Then, we lowered
the staging by one level and installed the two shorter pieces.
Where there was no way to install screws that would be hidden by
plates or other truss members, we installed temporary plywood
gussets to secure the pieces while the steel plates were being
built. We
installed the second long piece in a similar manner, and then
created a cardboard template of the top end, so that I could have
steel truss tie plates fabricated to fit the truss; the plates are
what actually hold the truss pieces in place. Then, we lowered
the staging by one level and installed the two shorter pieces.
Where there was no way to install screws that would be hidden by
plates or other truss members, we installed temporary plywood
gussets to secure the pieces while the steel plates were being
built. |
|||
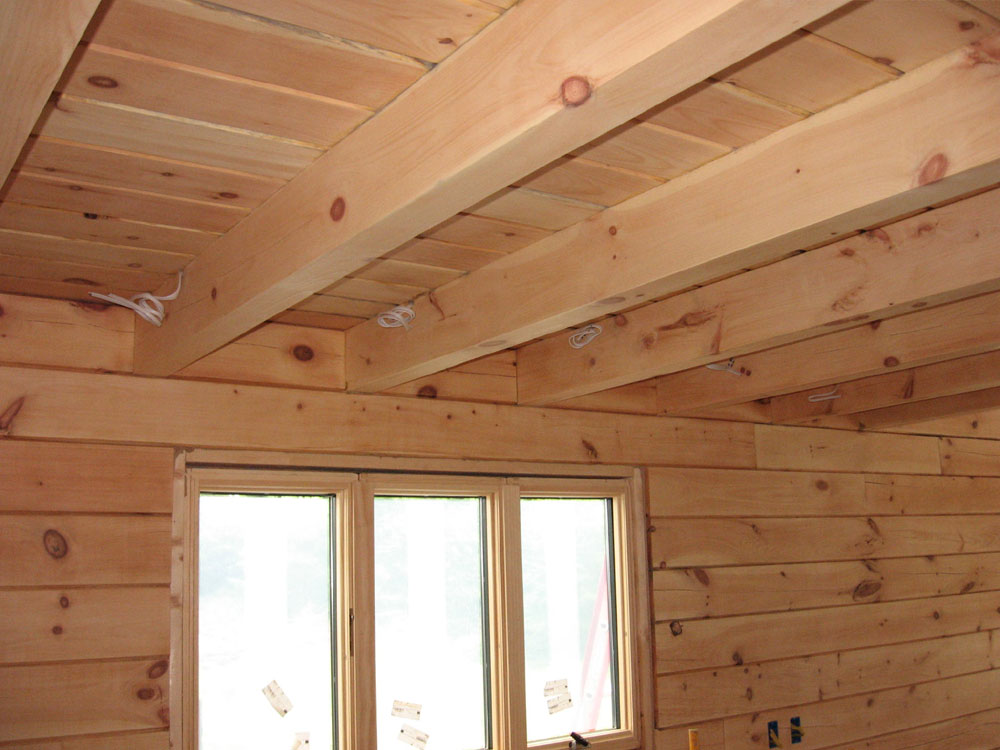
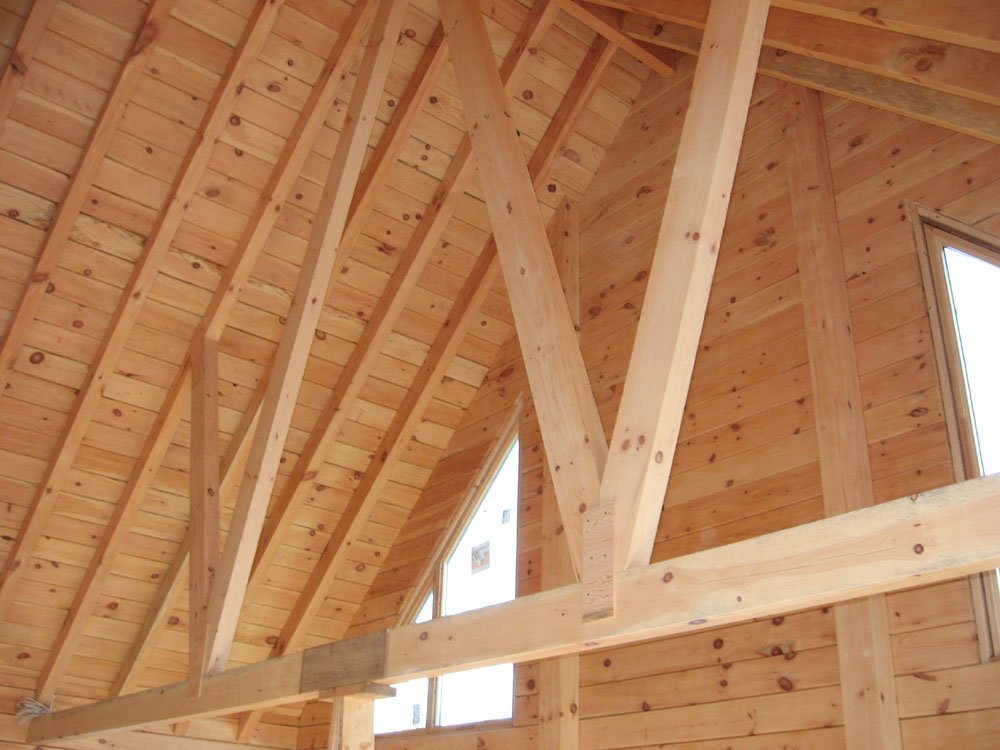 I
really liked how the truss looked. I had become to used to the
open feeling in the great room without the truss, and worried a bit
that the new pieces would look bulky or close off the view.
Fortunately, they nearly disappeared once installed, and enhanced,
rather than detracted from, the view in the great room. The
black truss plates will really dress up the structure as well. I
really liked how the truss looked. I had become to used to the
open feeling in the great room without the truss, and worried a bit
that the new pieces would look bulky or close off the view.
Fortunately, they nearly disappeared once installed, and enhanced,
rather than detracted from, the view in the great room. The
black truss plates will really dress up the structure as well. |
|||
In fact, the truss looked a lot like the "big W" from this classic comedy. You get bonus points if you can name the movie. |
|||
|
|
|||
 We
finished up before 1--not too bad. I made cardboard patters of
the remaining joints and laid out the boltholes, ensuring that
everything was symmetrical and looked appropriate. We
finished up before 1--not too bad. I made cardboard patters of
the remaining joints and laid out the boltholes, ensuring that
everything was symmetrical and looked appropriate. |
|||
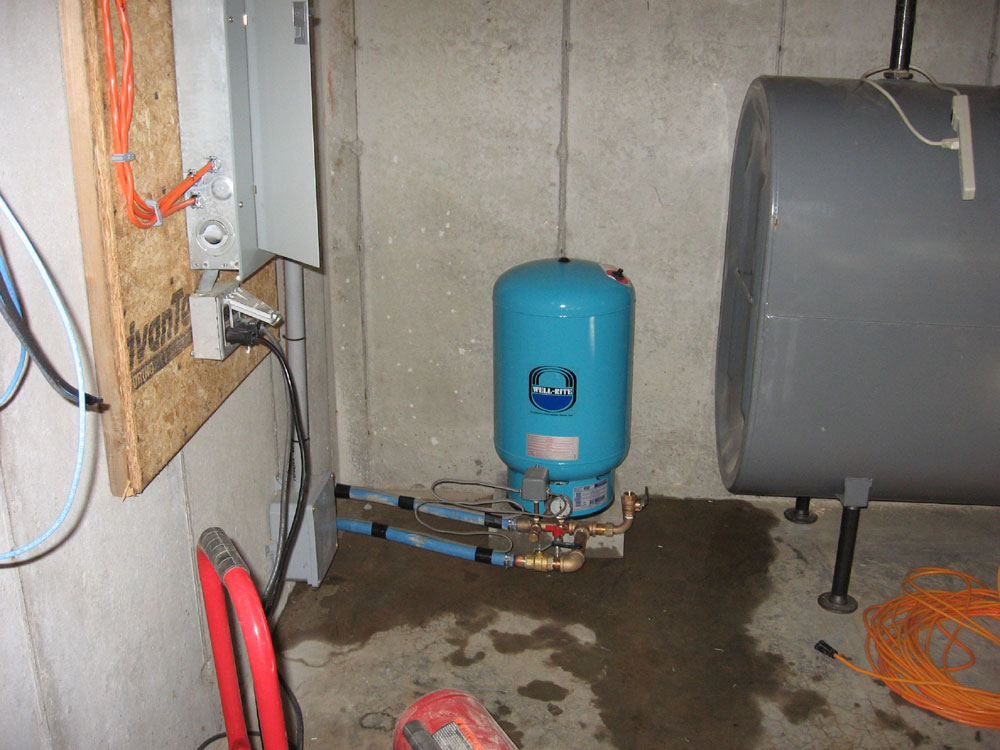 Meanwhile,
the well drilling company had arrived to install a new expansion
tank in the house, shift power for the well pump to the house, and
charge the water line to the house. They had to dig up the ground
next to the wellhead to access the water connection and then switch
the pipes over. I won't go into the details, but this
work completed the tasks begun about a year ago when we installed
the piping for the well to the shop location. Now, water
flowed into the house, then back down an additional pipe to the
shop, rather than directly to the shop. Meanwhile,
the well drilling company had arrived to install a new expansion
tank in the house, shift power for the well pump to the house, and
charge the water line to the house. They had to dig up the ground
next to the wellhead to access the water connection and then switch
the pipes over. I won't go into the details, but this
work completed the tasks begun about a year ago when we installed
the piping for the well to the shop location. Now, water
flowed into the house, then back down an additional pipe to the
shop, rather than directly to the shop. |
|||
 After
Bob left, I cleaned up the mess from the morning's construction and
then worked on some framing. Since I needed materials to
continue plumbing, it seemed like a good time to get some other
chores out of the way. I installed 2x6 strapping (on edge) in
the downstairs bathroom and pantry ceilings, which dropped the
ceiling low enough so that drywall would cover all the plumbing pipe
and wiring. Installing the strapping was pretty
straightforward. After
Bob left, I cleaned up the mess from the morning's construction and
then worked on some framing. Since I needed materials to
continue plumbing, it seemed like a good time to get some other
chores out of the way. I installed 2x6 strapping (on edge) in
the downstairs bathroom and pantry ceilings, which dropped the
ceiling low enough so that drywall would cover all the plumbing pipe
and wiring. Installing the strapping was pretty
straightforward. |
|||
|
With what time remained in the day, I started to build the shower enclosure in the upstairs bathroom, now that the tub was inside and I didn't need the open space. I had previously laid out the floor with the shadow of the shower walls, so building a couple small walls was straightforward. I built the two side walls, but didn't get to the very short angled wall before the end of the day. I had accumulated a healthy list of plumbing supplies needed in order to continue my plumbing tomorrow and over the long weekend, and I certainly didn't plan on heading to Lowes or Home Despot on labor day weekend, so I planned to make the trek to Lowes first thing in the morning, as usual. I had some expensive items to return--those silly plastic manifolds, for example--so I decided to drive all the way to Lowes instead of to the closer Home Despot. |
|||
WEDNESDAY, AUGUST 30, 2006 |
|||
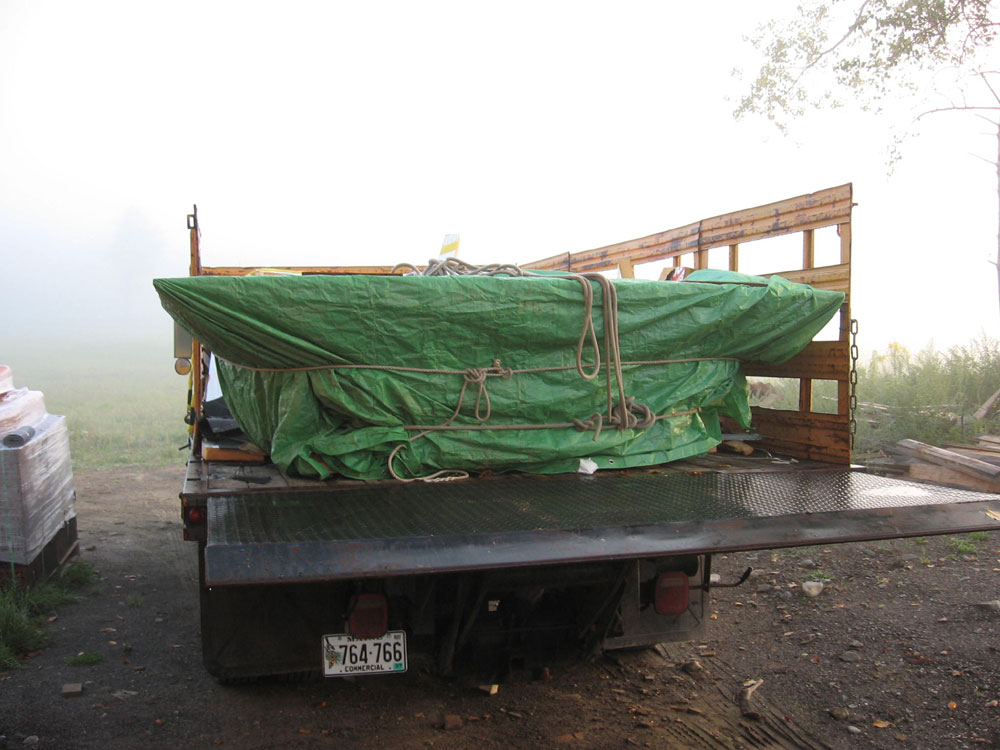 I
was up at the site very early this morning to get the tub ready for
lifting into the house. I removed the tarp and plywood that
had been protecting it on the truck for the past few weeks, and then
lowered it to the ground, where I placed it on the plywood.
Then, I moved the truck out of the way. While I waited for the
boom truck, I continued work on the electrical panel. I
was up at the site very early this morning to get the tub ready for
lifting into the house. I removed the tarp and plywood that
had been protecting it on the truck for the past few weeks, and then
lowered it to the ground, where I placed it on the plywood.
Then, I moved the truck out of the way. While I waited for the
boom truck, I continued work on the electrical panel. |
|||
 The
guy I hired with the boom truck arrived somewhere between 7:30 and
8, after first calling me around 7 to ask the dimensions of the tub
since he had a metal-framed box that he sometimes used to help make
lifting things easier. Once he had the truck positioned, we
loaded the tub into the box, which looked like he had just dug it
out from beneath 10 years of pine needles, and we were on our way. The
guy I hired with the boom truck arrived somewhere between 7:30 and
8, after first calling me around 7 to ask the dimensions of the tub
since he had a metal-framed box that he sometimes used to help make
lifting things easier. Once he had the truck positioned, we
loaded the tub into the box, which looked like he had just dug it
out from beneath 10 years of pine needles, and we were on our way.Once the box was lifted, though, a problem became apparent: there was a steel projection at one end of the box (the open end) that wanted to hit the roof overhang before he could get the box high and close enough to the window opening. Plan B was to remove the plywood from the opposite end of the box, which didn't have the extra metal, which fortunately was pretty easy to do as well as ultimately effective. |
|||
 Getting
the tub from the box to the window was a little interesting.
Of course, as we pulled the tub towards us (standing inside the
second floor window), the box began to tilt towards the house.
Eventually, we managed to get the edge of the tub's wooden
skid platform onto the window sill, after which it wasn't too
terrible to pull it in the rest of the way to the balance point.
Then, we slid it down the ramp I had built before, though I had to
add some plywood since the tub skids were not wide enough when
presented end-on rather than sideways. Getting
the tub from the box to the window was a little interesting.
Of course, as we pulled the tub towards us (standing inside the
second floor window), the box began to tilt towards the house.
Eventually, we managed to get the edge of the tub's wooden
skid platform onto the window sill, after which it wasn't too
terrible to pull it in the rest of the way to the balance point.
Then, we slid it down the ramp I had built before, though I had to
add some plywood since the tub skids were not wide enough when
presented end-on rather than sideways. |
|||
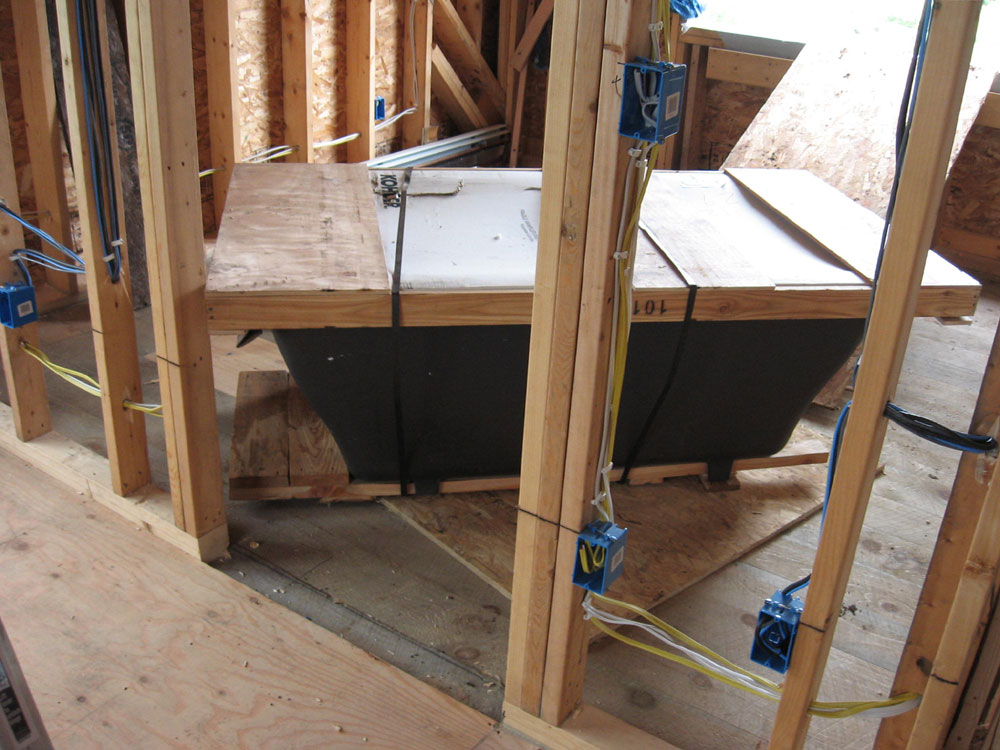
 With
the tub inside, I was instantly happier. There was still much
work to be done to place it and build a platform, but the worst was
over. Money well spent. With
the tub inside, I was instantly happier. There was still much
work to be done to place it and build a platform, but the worst was
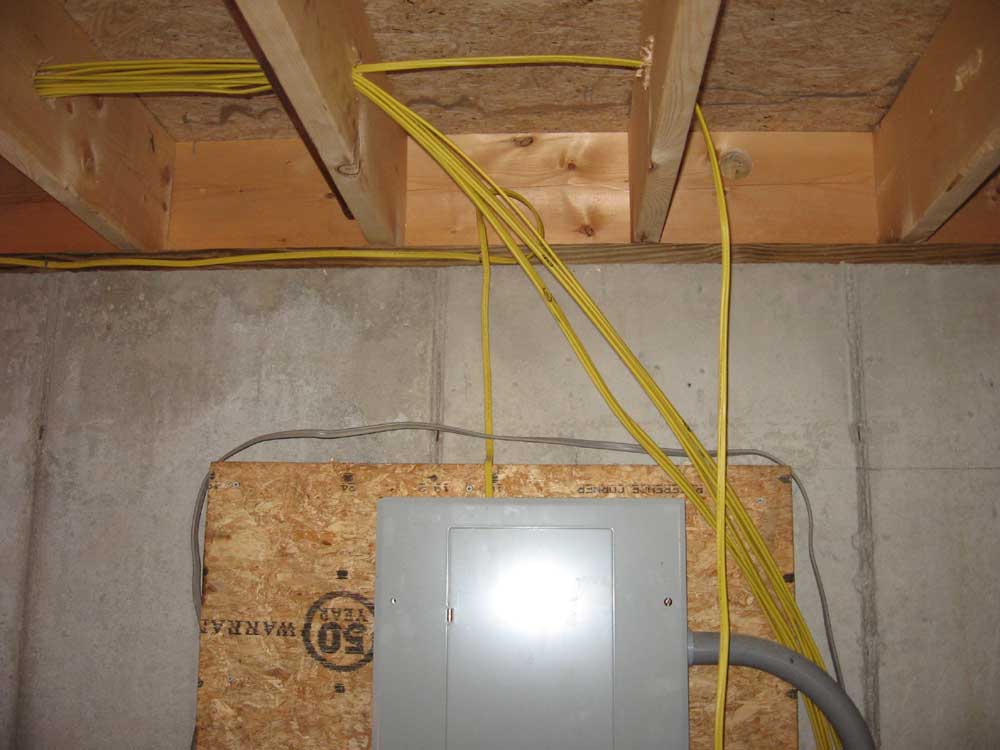
over. Money well spent.Afterwards, I got back to work and finished up the electrical panel. I ended up with one too many circuits, interestingly enough. It took me several minutes to figure out what had happened. I had originally wired for some lights to be mounted on the wall on either side of the bed in the bedroom, but we decided that table lamps would be the way to go instead. So I abandoned these wires, which had ended up alone on the circuit when I had to reconfigure the lighting circuit with Heidi's office lights (I described this process last week). "Circuit 15" therefore became available once again, and later on in the process I chose that designation for, as it turned out, two separate circuits, failing to properly mark this down on my sheet. Fortunately, GE makes 1/2" wide breakers as well as the standard 1". This means that I can buy two of the 1/2" size and install them in the space normally required by one breaker, which will allow me to wire both circuits properly. For now, I left one of the "15" circuits unattached. |
|||
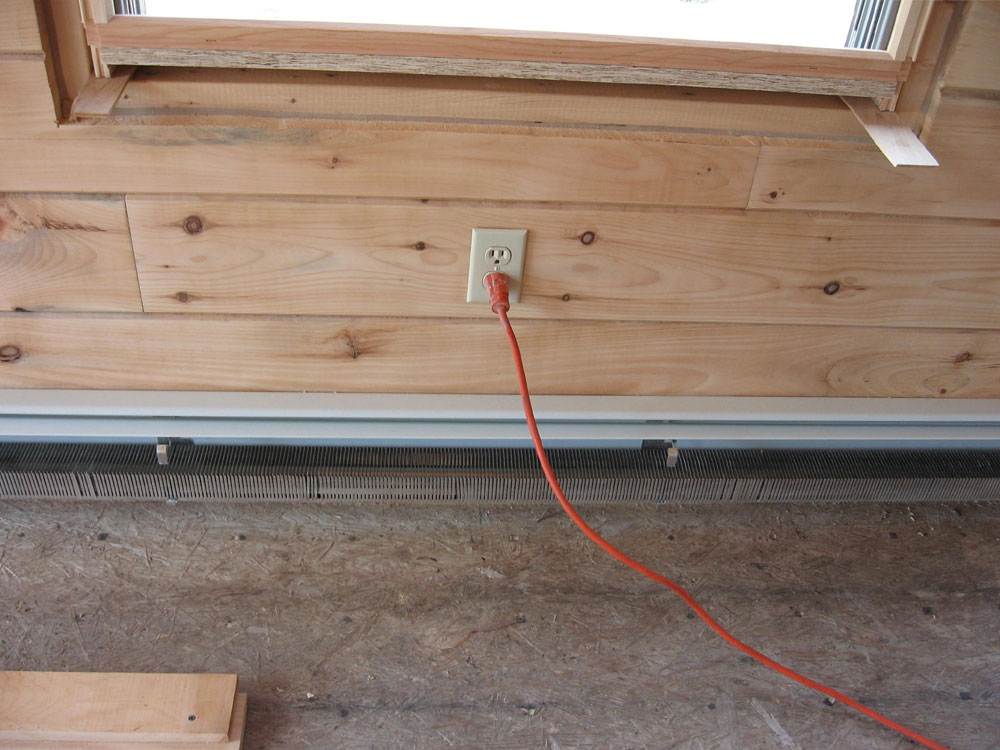 I
decided that I was sick of extension cords running to the basement
for power, so with the panel up and running I thought I would wire
up the receptacle circuit in the front log wall, since there was no
reason not to trim this out now, as the wall was finished. I
hooked up 5 outlets and installed the cover plates, then switched on
the circuit (#1). No power! I checked several of the
outlets to no avail. Hmm. This had never happened
before. I
decided that I was sick of extension cords running to the basement
for power, so with the panel up and running I thought I would wire
up the receptacle circuit in the front log wall, since there was no
reason not to trim this out now, as the wall was finished. I
hooked up 5 outlets and installed the cover plates, then switched on
the circuit (#1). No power! I checked several of the
outlets to no avail. Hmm. This had never happened
before.I headed to the basement to check, and that's when it clicked: during panel wiring, I had switched the circuit I had called #1 with #11, as the wire for #11 ended up too short to reach that far into the box. (This was one of the wires I had damaged with the drill the other day; repairing the wire with a junction box had shortened the wire some.) I switched on circuit 11 and all was well. |
|||
|
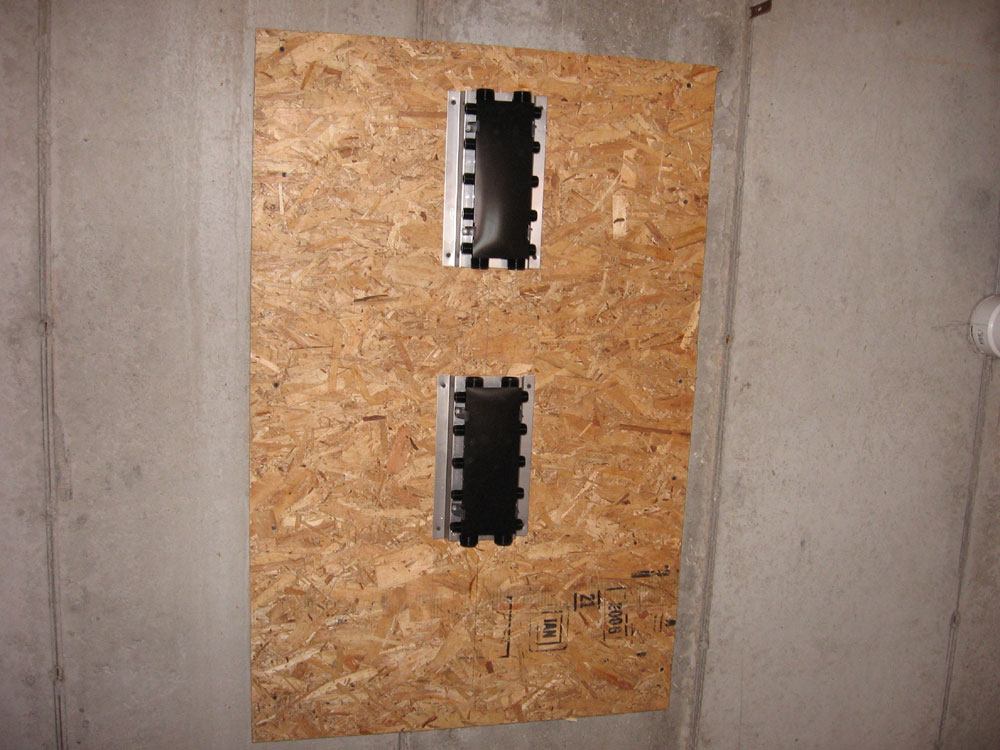
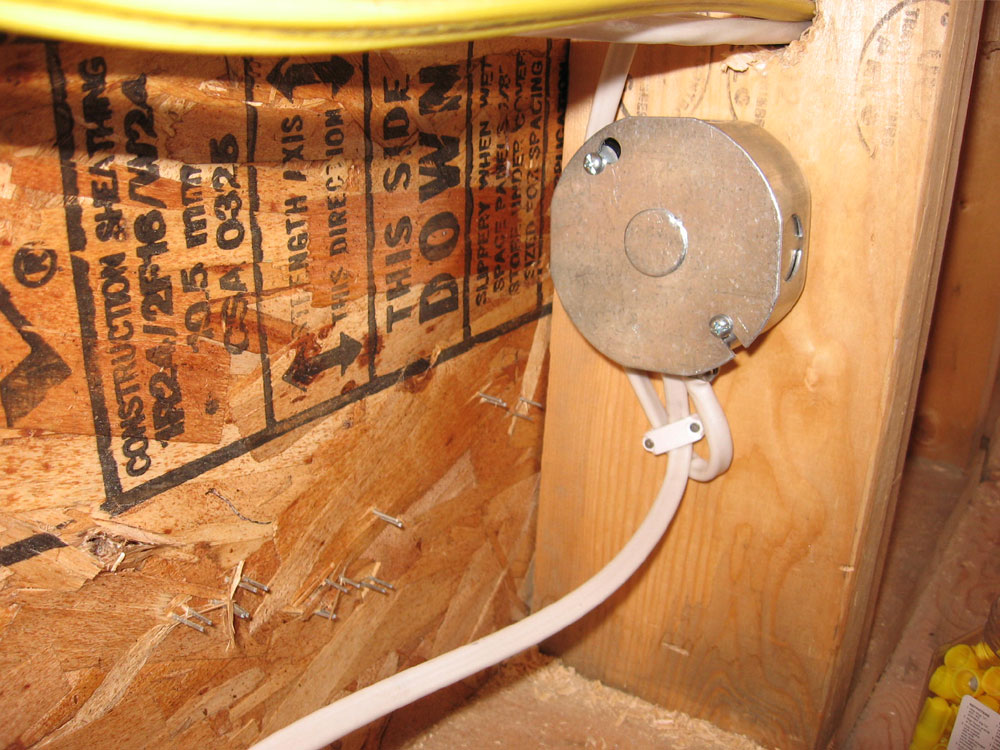
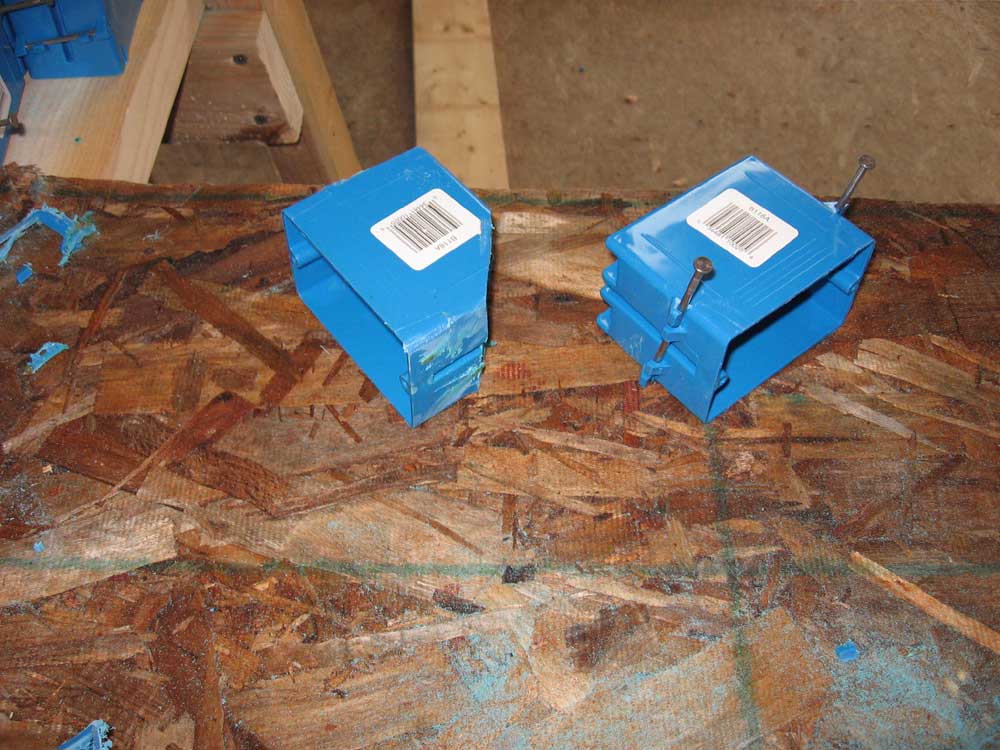
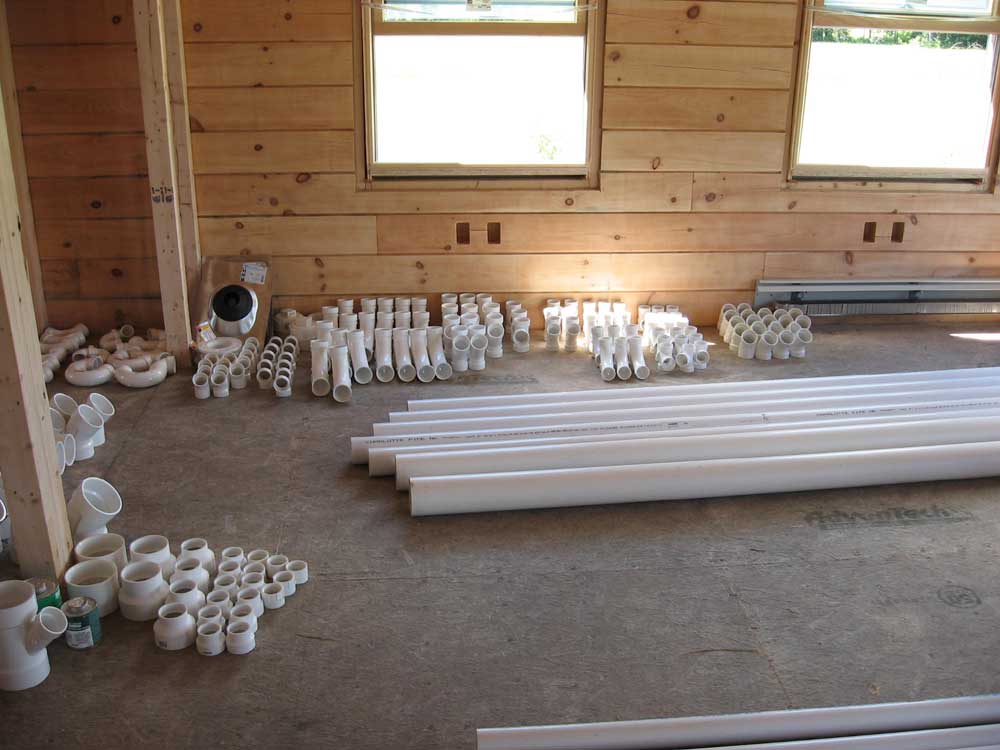
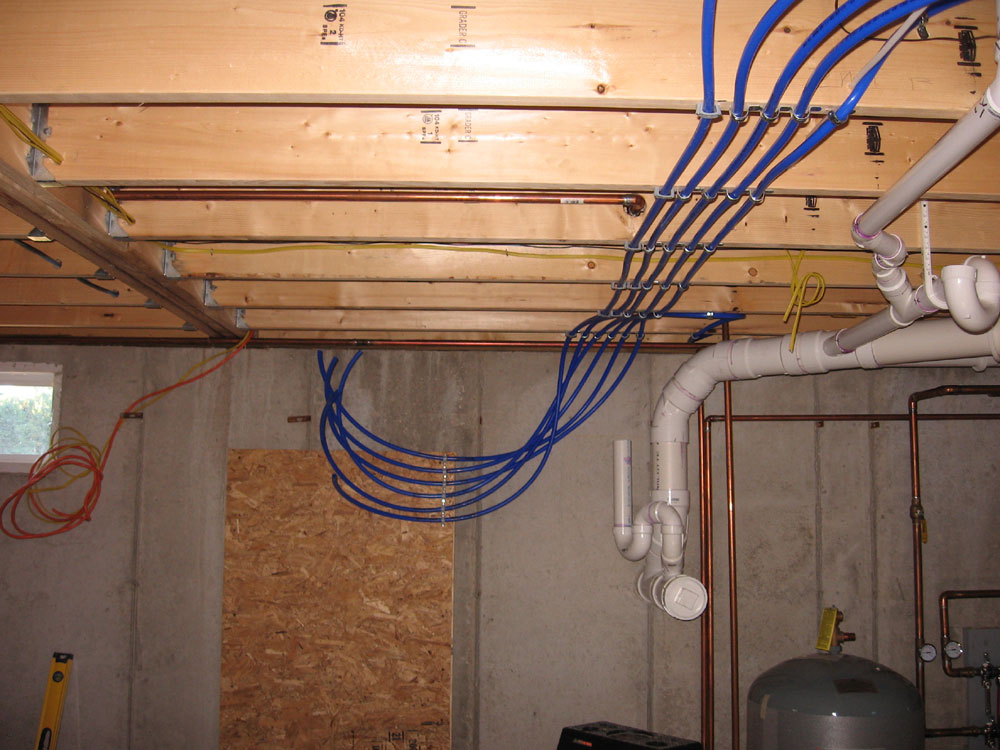
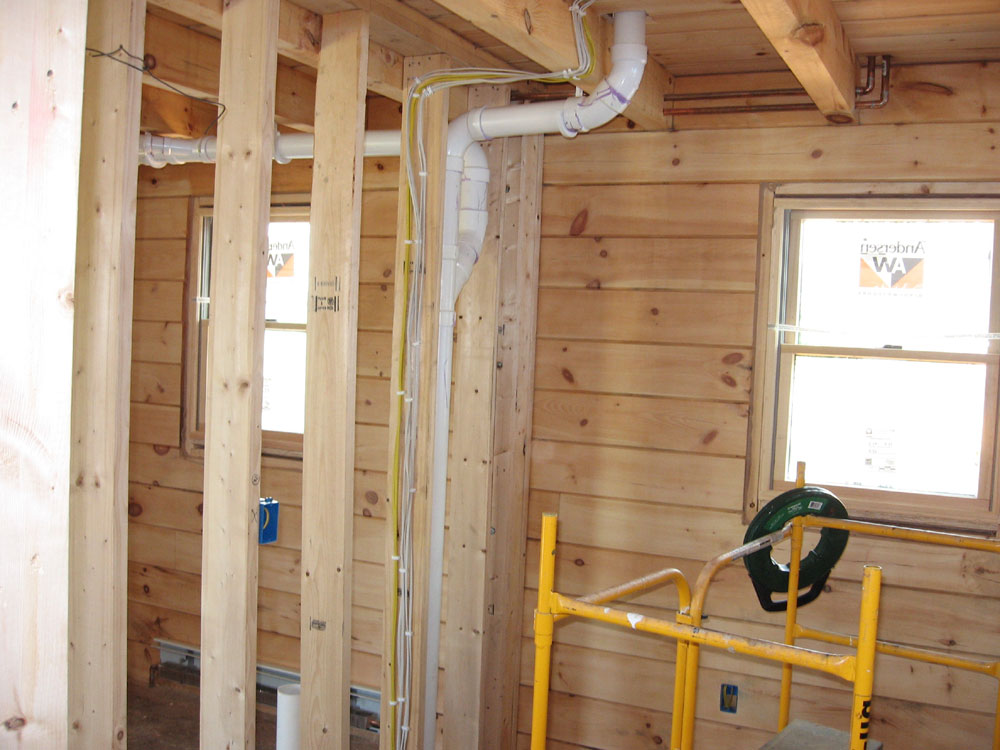
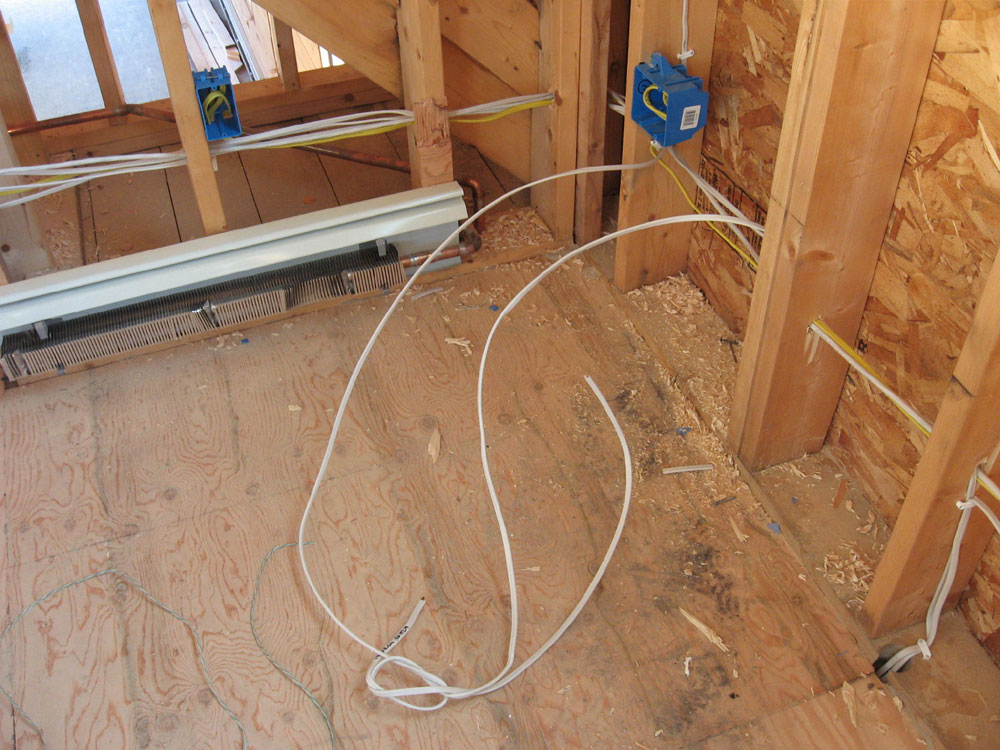
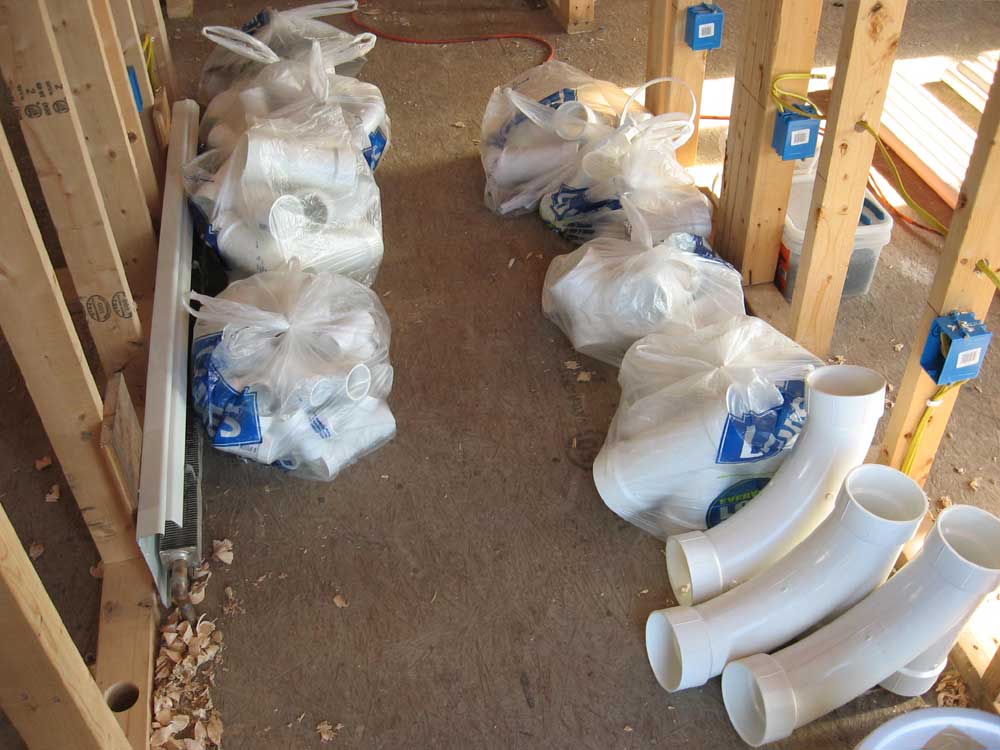
I spent the rest of the day on plumbing. I chose PEX tubing for my supply lines, mainly because the cost of copper had risen so high of late. PEX, the trade name for cross-liked polyethylene tubing, is the same material used in radiant heat floors, and is becoming increasingly common for plumbing systems, replacing copper and sweat joints. PEX has the added benefit of fewer connections that might leak, as I planned to run each fixture's supply back to a master manifold in one continuous run, versus copper where various lines are teed off each other and so forth.
Before long, I decided to build my own manifold using copper pipe. I had to use copper to run the main supplies to the PEX in the first place, and decided that it would make a much better installation if I built my own system of piping and valves. I removed the cheesy manifolds and replaced them in their boxes for return. |
|||
 It
was time to work with the PEX tubing, finally. Now I know what
the manufacturer of hula-hoops did when the craze died off.
The material was hard, unforgiving, and unpleasant to work with.
I didn't care much for it at first, and almost packed it in to go
with traditional copper. However, as I worked with it, I began
to reach a sullen truce. It was nasty to work with, as it
retained the shape of the shipping coil and didn't bend all that
easily, but it was very quick to install entire runs. I
secured the tubing to the studs with some metal clamps, but
eventually switched to plastic service entrance cable clamps, which
I remembered I had bought with this in mind. These worked much
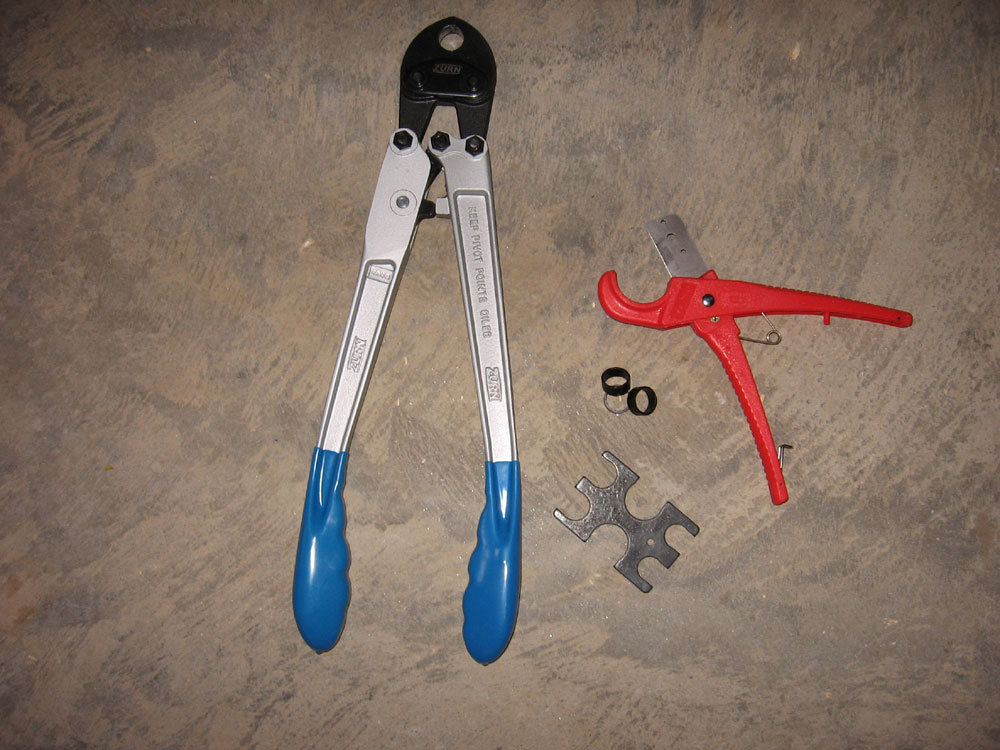
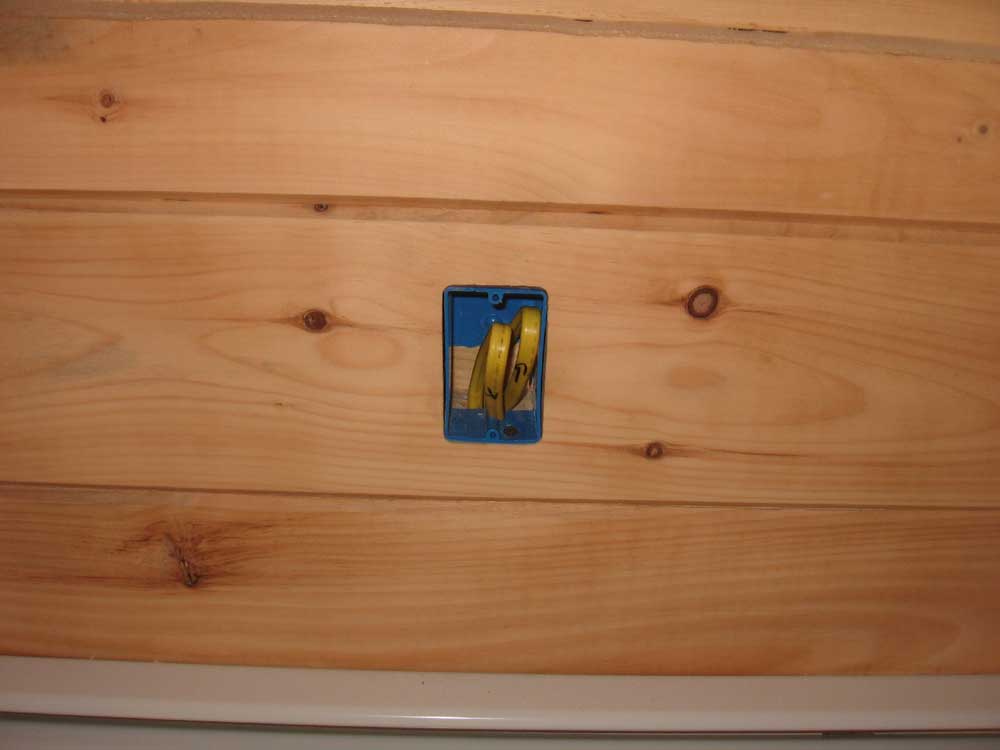
better, and were easier to install to boot. It
was time to work with the PEX tubing, finally. Now I know what
the manufacturer of hula-hoops did when the craze died off.
The material was hard, unforgiving, and unpleasant to work with.
I didn't care much for it at first, and almost packed it in to go
with traditional copper. However, as I worked with it, I began
to reach a sullen truce. It was nasty to work with, as it
retained the shape of the shipping coil and didn't bend all that
easily, but it was very quick to install entire runs. I
secured the tubing to the studs with some metal clamps, but
eventually switched to plastic service entrance cable clamps, which
I remembered I had bought with this in mind. These worked much
better, and were easier to install to boot.PEX requires a few specific tools: a crimp tool (for the little black crimp rings), a test device (the little gauge shown here) to determine if the rings are crimped correctly, and a pair of cutters. |
|||
 I
ran 5 or 6 of the cold water lines, adding transition fittings and
short lengths of copper to the ends of the tubing where they entered
the area where the fixtures would be installed, as I thought that,
based on my observations of the PEX supplies, it would be easier to
terminate all the lines with copper fittings. By the end of
the afternoon, I thought I had this newfangled stuff worked out.
Of course, I had also prepared a long list of additional supplies
needed, so there would have to be another trip to the store in the
near future--but probably not tomorrow, as Bob Emery was due over to
help put the truss beams up in place in the great room. I
ran 5 or 6 of the cold water lines, adding transition fittings and
short lengths of copper to the ends of the tubing where they entered
the area where the fixtures would be installed, as I thought that,
based on my observations of the PEX supplies, it would be easier to
terminate all the lines with copper fittings. By the end of
the afternoon, I thought I had this newfangled stuff worked out.
Of course, I had also prepared a long list of additional supplies
needed, so there would have to be another trip to the store in the
near future--but probably not tomorrow, as Bob Emery was due over to
help put the truss beams up in place in the great room. |
|||
TUESDAY, AUGUST 29, 2006 |
|||
| I began with an early morning trip to Home Despot to pick up some additional wiring supplies and to also pick up more PEX plumbing supplies. I had been having a tough time finding all the parts I needed for the PEX tubing and was anxious to get going on the water supply lines. I found enough stuff that I thought would do what I needed, but undoubtedly there will be things I don't have. | |||
|
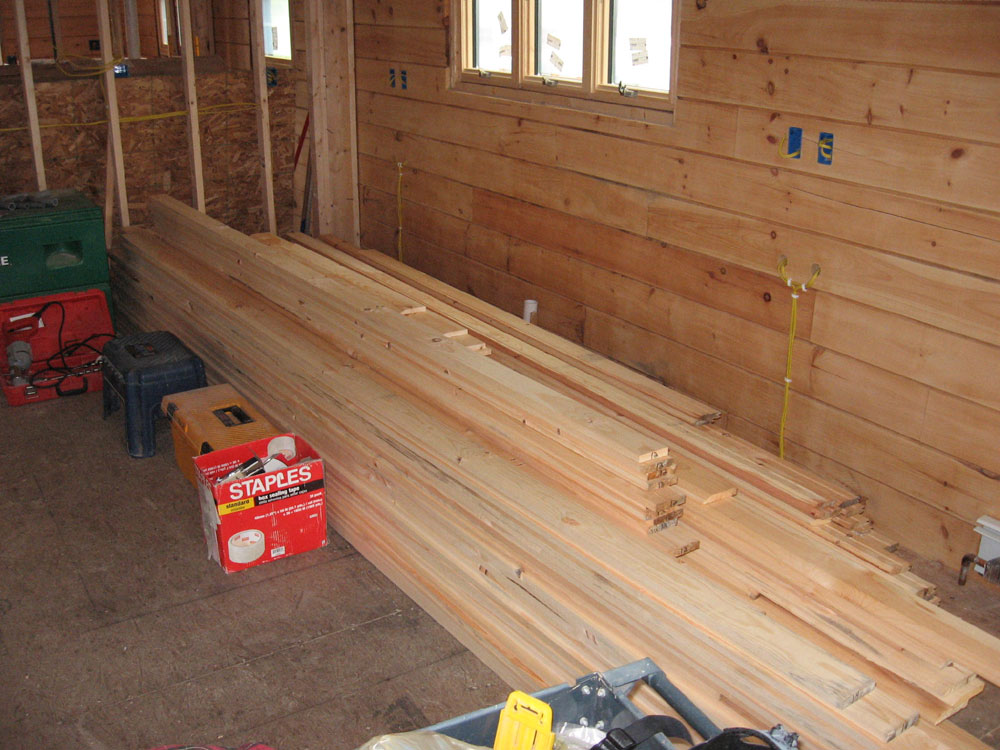
Back home, I had only just arrived when the truck from Moose Creek arrived--perhaps the earliest delivery on record. I had ordered the interior V-match pine boards for the areas we intended to use pine, and also had ordered all my interior trim material (pine), as I could begin putting trim on the windows and doors in the log walls immediately. I had hoped that the boom truck would bring the load, and that maybe I could get the driver to help me load the bathtub upstairs. Alas, it was the small, boomless truck.
Once the delivery truck left, I headed for the yellow pages to seek out an alternative to get the tub into the house. Earlier reconnaissance had pointed me to a local construction company that advertised boom truck service, and I called and left a message. Late in the afternoon, I received a call back and set up an appointment to boom the tub in tomorrow morning first thing--excellent! |
|||
 I
needed to finish the electrical today, as it had taken longer than
expected to pull all the wires. I finished up a couple
lighting circuits on the first floor, and then pulled the nasty 10/3
wire for the high amperage appliances--range, clothes dryer, and a
30 amp RV plug. Finally, I double checked the wires run to the
panel to ensure that all the circuits were there, and also that I
didn't somehow have more wires than spaces in the panel (32).
I also finished up the repair from yesterday's amusing wire/drill
debacle by installing a pair of newly-purchased junction boxes, and
making up the wiring connections inside to splice the wire ends back
together. (This time, I bought a couple extra junction boxes
too...just in case.) I
needed to finish the electrical today, as it had taken longer than
expected to pull all the wires. I finished up a couple
lighting circuits on the first floor, and then pulled the nasty 10/3
wire for the high amperage appliances--range, clothes dryer, and a
30 amp RV plug. Finally, I double checked the wires run to the
panel to ensure that all the circuits were there, and also that I
didn't somehow have more wires than spaces in the panel (32).
I also finished up the repair from yesterday's amusing wire/drill
debacle by installing a pair of newly-purchased junction boxes, and
making up the wiring connections inside to splice the wire ends back
together. (This time, I bought a couple extra junction boxes
too...just in case.) |
|||
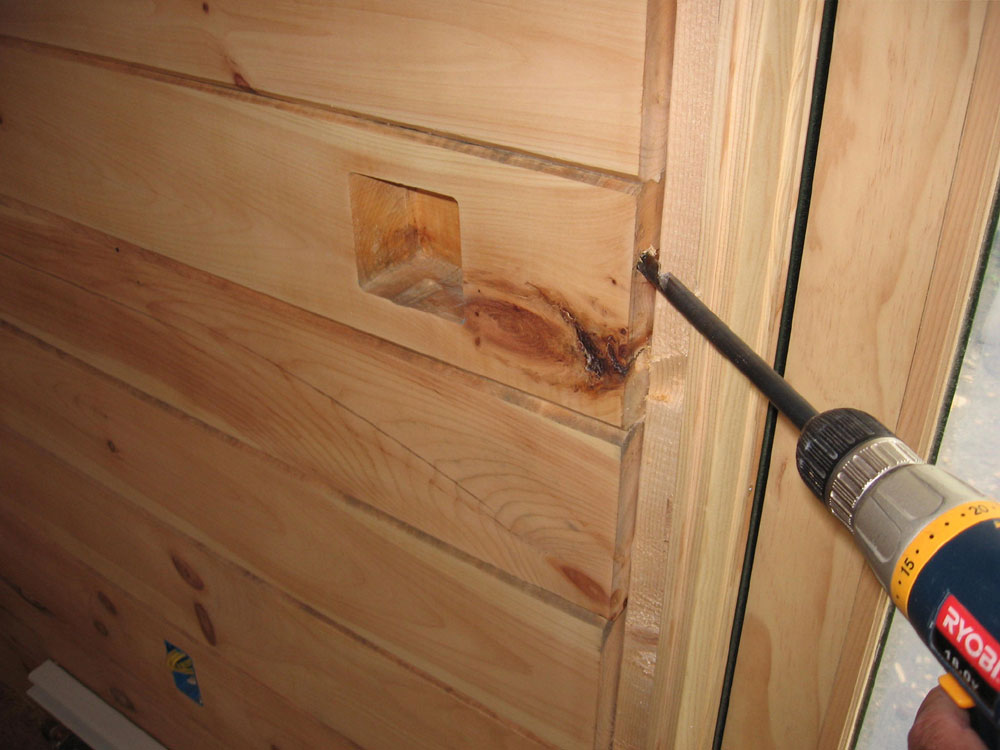 I
also addressed the double switch box located in the log wall by the
door out to the screen porch in back. I had drilled holes from
the inside of the door opening into this switch box earlier, to
allow running wires into the box, but when I installed the 2x4 door
bucks I covered over the holes. I had the forethought to mark the
hole locations, though, which made the next steps easy. However,
there was enough room inside the buck to drill a 3/8" hole with a
long bit, which intersected the original hole inside. I
also addressed the double switch box located in the log wall by the
door out to the screen porch in back. I had drilled holes from
the inside of the door opening into this switch box earlier, to
allow running wires into the box, but when I installed the 2x4 door
bucks I covered over the holes. I had the forethought to mark the
hole locations, though, which made the next steps easy. However,
there was enough room inside the buck to drill a 3/8" hole with a
long bit, which intersected the original hole inside. |
|||
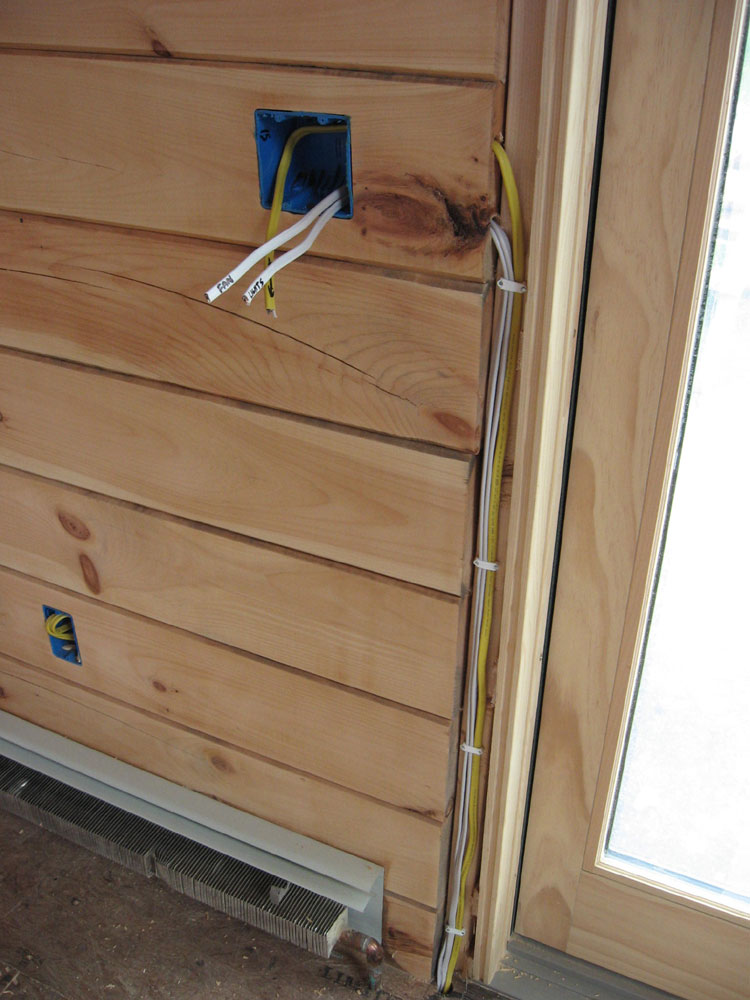 After
drilling two holes to mate up with the two existing holes, I ran
wiring into the box from the panel, coming up through a hole in the
floor that would be covered by door trim later, and then running the
wires along the door buck, which would also be covered with trim.
Then, I ran two feed wires back out of the box for two switched
circuits that would eventually power screen porch lights and fan. After
drilling two holes to mate up with the two existing holes, I ran
wiring into the box from the panel, coming up through a hole in the
floor that would be covered by door trim later, and then running the
wires along the door buck, which would also be covered with trim.
Then, I ran two feed wires back out of the box for two switched
circuits that would eventually power screen porch lights and fan. |
|||
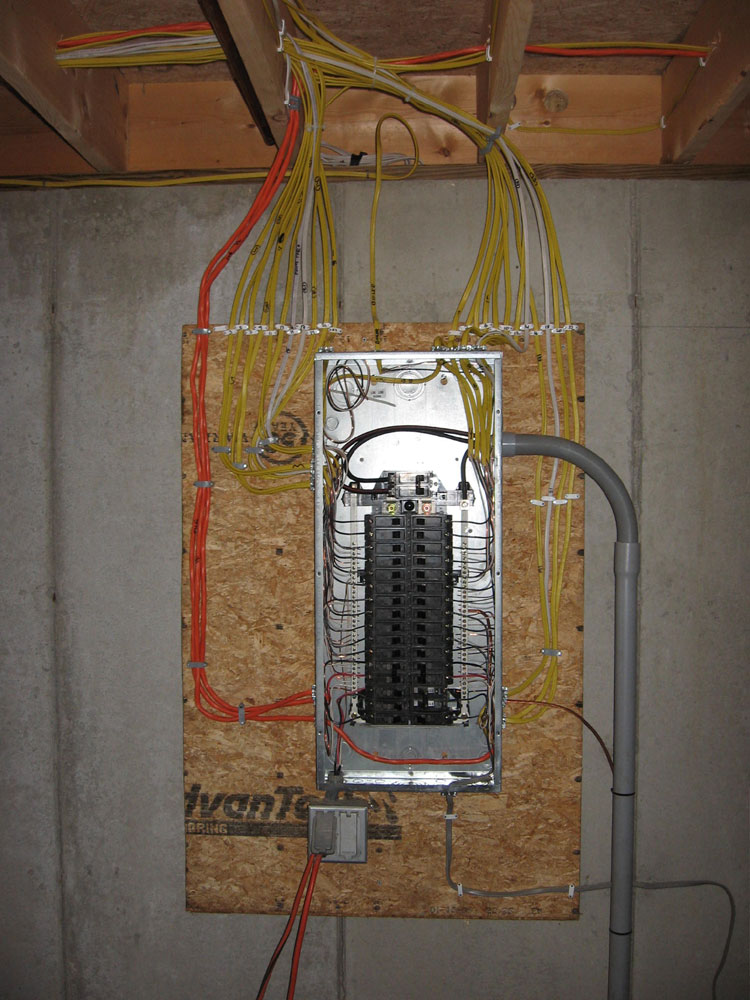
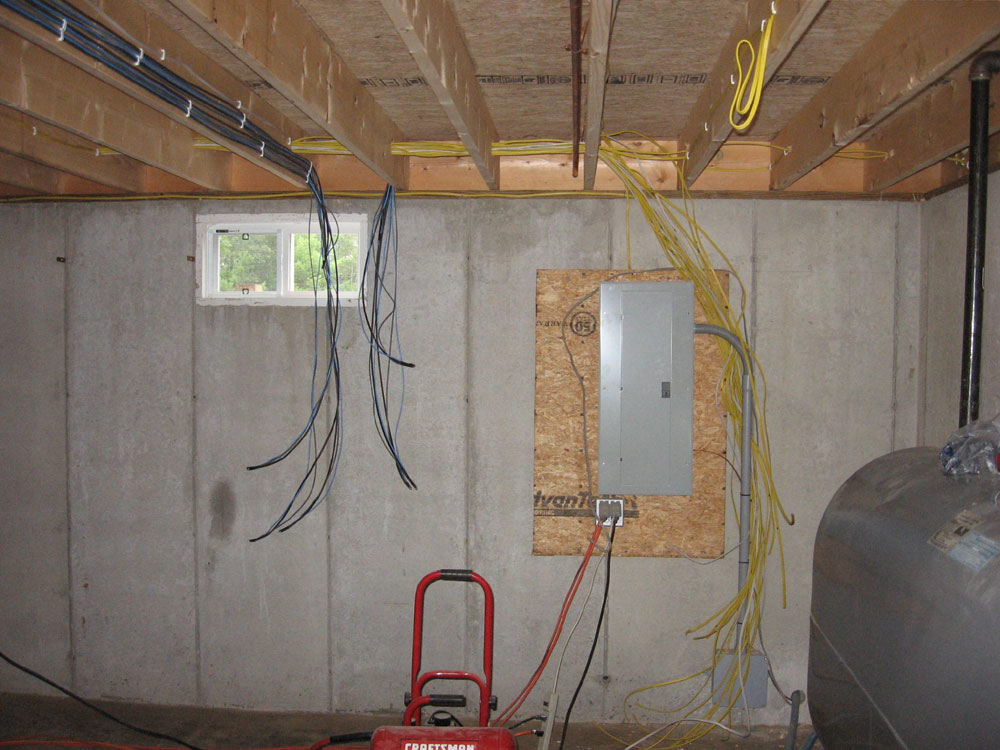
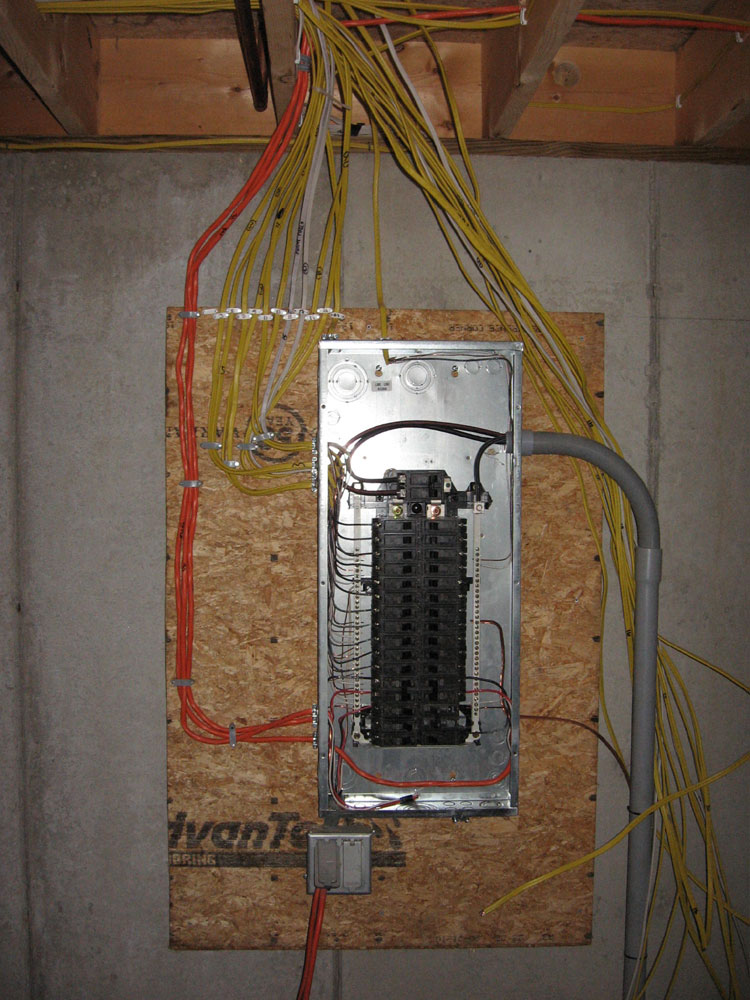 With
the bulk wiring finally done, I set to work on the master service
panel. I didn't plan to energize most of the circuits for some
time, but felt it was best to get this job done now, so that it
would be all ready later on. I spent some time sorting wires
and getting organized, then installed all the appropriate
breakers--15 amp for lighting circuits, 20 amp for receptacles, a 40
amp double pole for the 220V range, a 30 amp double pole for the
220V dryer, a 20 amp double pole for the well pump, and a 30 amp
single for the RV outlet. Finally, I began to attach the
circuit wires to the appropriate circuit breaker in the panel,
taking care to run the wires neatly and in an organized fashion.
(That's half the fun, after all!) With
the bulk wiring finally done, I set to work on the master service
panel. I didn't plan to energize most of the circuits for some
time, but felt it was best to get this job done now, so that it
would be all ready later on. I spent some time sorting wires
and getting organized, then installed all the appropriate
breakers--15 amp for lighting circuits, 20 amp for receptacles, a 40
amp double pole for the 220V range, a 30 amp double pole for the
220V dryer, a 20 amp double pole for the well pump, and a 30 amp
single for the RV outlet. Finally, I began to attach the
circuit wires to the appropriate circuit breaker in the panel,
taking care to run the wires neatly and in an organized fashion.
(That's half the fun, after all!)In several hours during the afternoon, I completed one side of the panel. With the bulk of organization and preparing out of the way, I expected to be able to easily finish the panel wiring in a short time in the morning. Then, I planned to get going on the plumbing supply lines. I really wanted to meet my goal of having all the systems roughed in before September 1. |
|||
MONDAY, AUGUST 28, 2006 |
|||
 I
worked on the wiring all day again today. I had thought I
might finish up today, but at the end of the day there were still
several circuits remaining to be run. However, I did have all
the wiring inside the stud walls on both floors complete, except for
one wire (I ran out of 14/2 wire). I
worked on the wiring all day again today. I had thought I
might finish up today, but at the end of the day there were still
several circuits remaining to be run. However, I did have all
the wiring inside the stud walls on both floors complete, except for
one wire (I ran out of 14/2 wire). |
|||
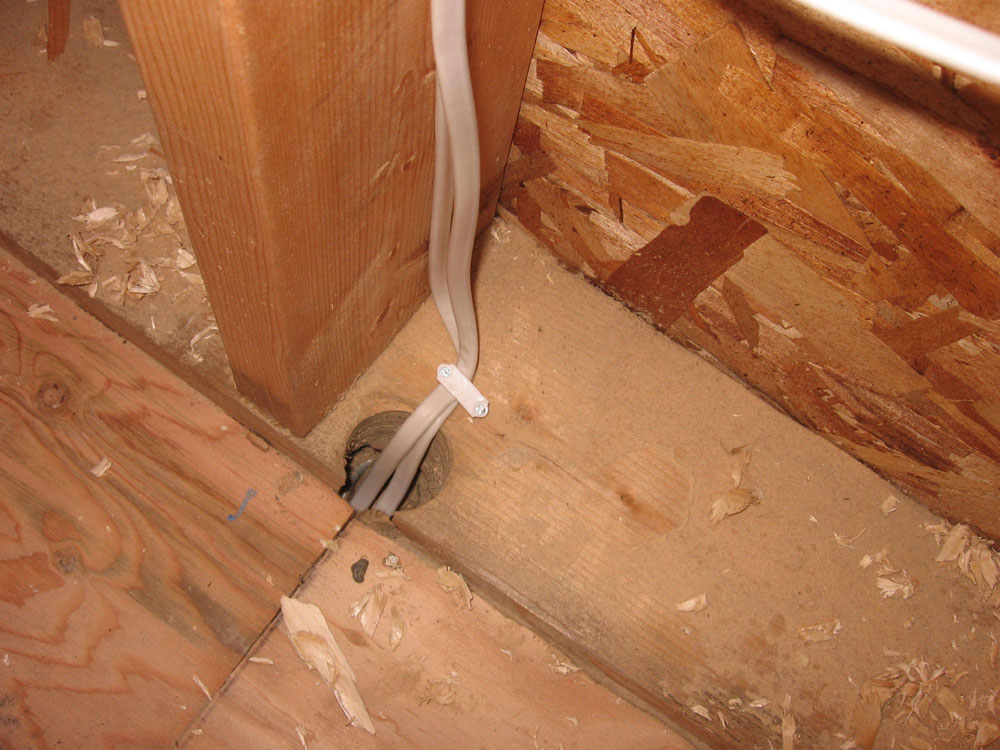
 I
thought the day had begun well, but it wasn't too long before I
managed to drill through some of the wires I had installed a few
days ago. I was drilling an additional hole since I couldn't
fit any more wires in the original hole next to it, and despite my
supposed care in trying to avoid the wires, the drill bit came out
lower than I expected and went right through one wire, and nicked a
second. Fortunately, I was able to cheerfully laugh off this
silly inconvenience and wasn't in the least bit upset. I
thought the day had begun well, but it wasn't too long before I
managed to drill through some of the wires I had installed a few
days ago. I was drilling an additional hole since I couldn't
fit any more wires in the original hole next to it, and despite my
supposed care in trying to avoid the wires, the drill bit came out
lower than I expected and went right through one wire, and nicked a
second. Fortunately, I was able to cheerfully laugh off this
silly inconvenience and wasn't in the least bit upset. |
|||
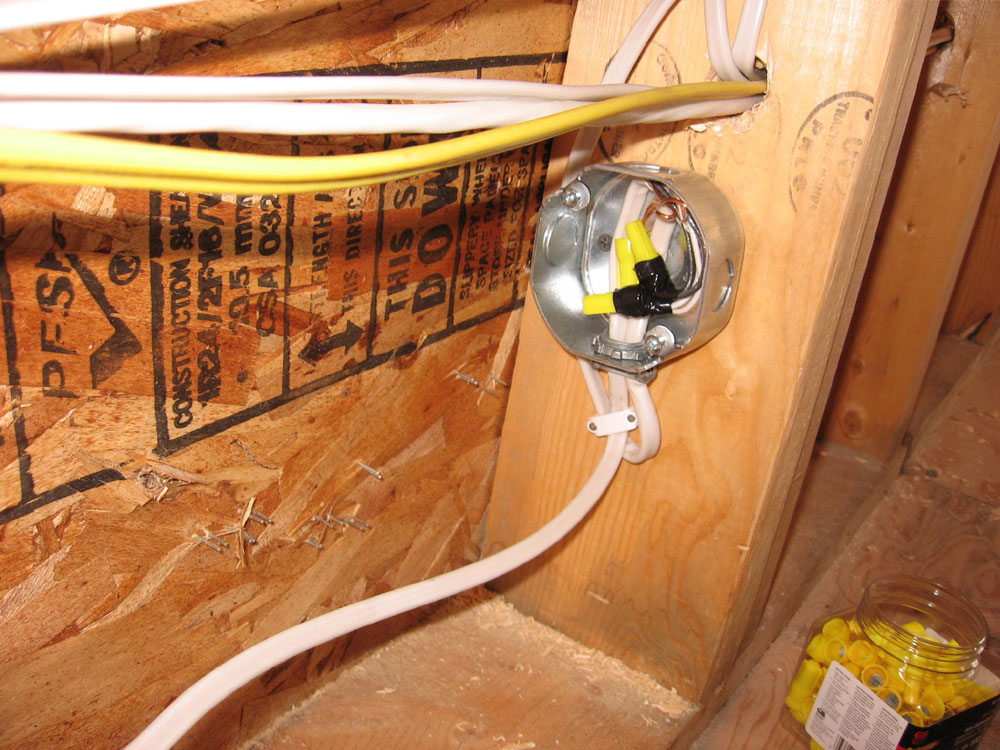
|
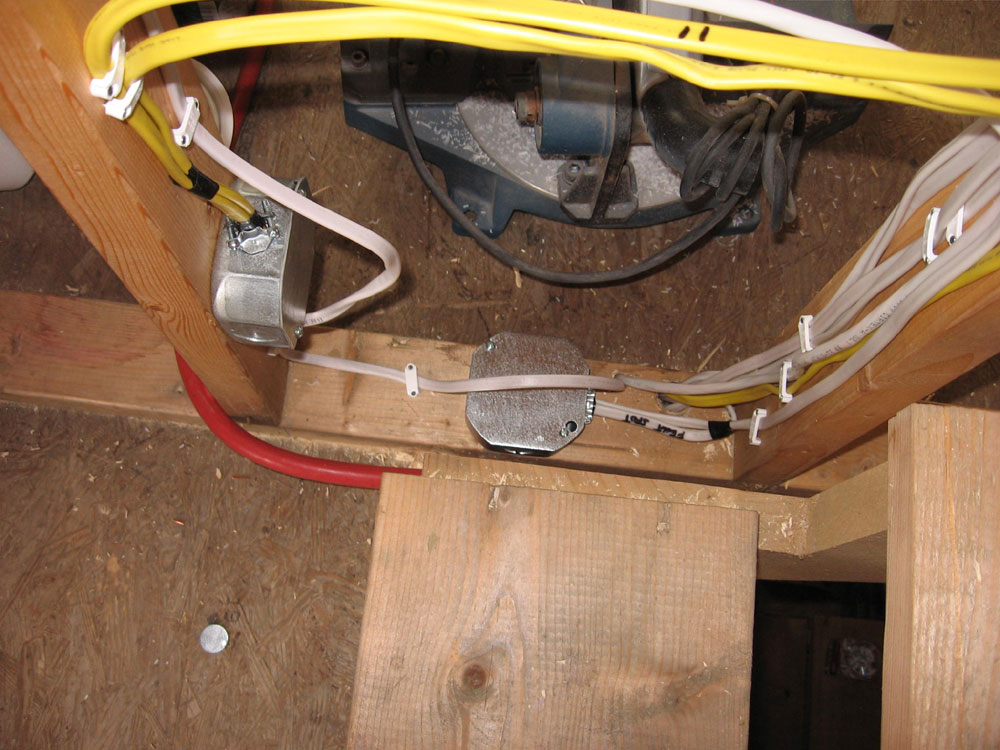
It took some time to repair the damage caused by an idiotic tool operator; I had to replace one wire and still needed to install two junction boxes, since I wasn't about to pull all the wires out of the wall to replace the full lengths. I was furious with myself, of course. |
|||
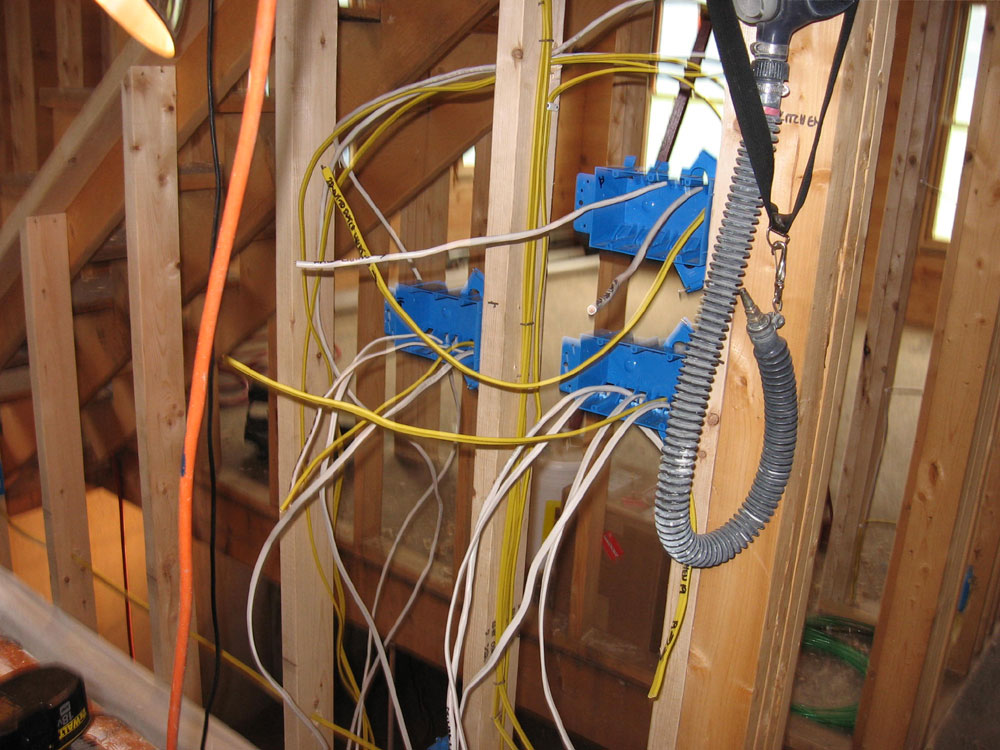
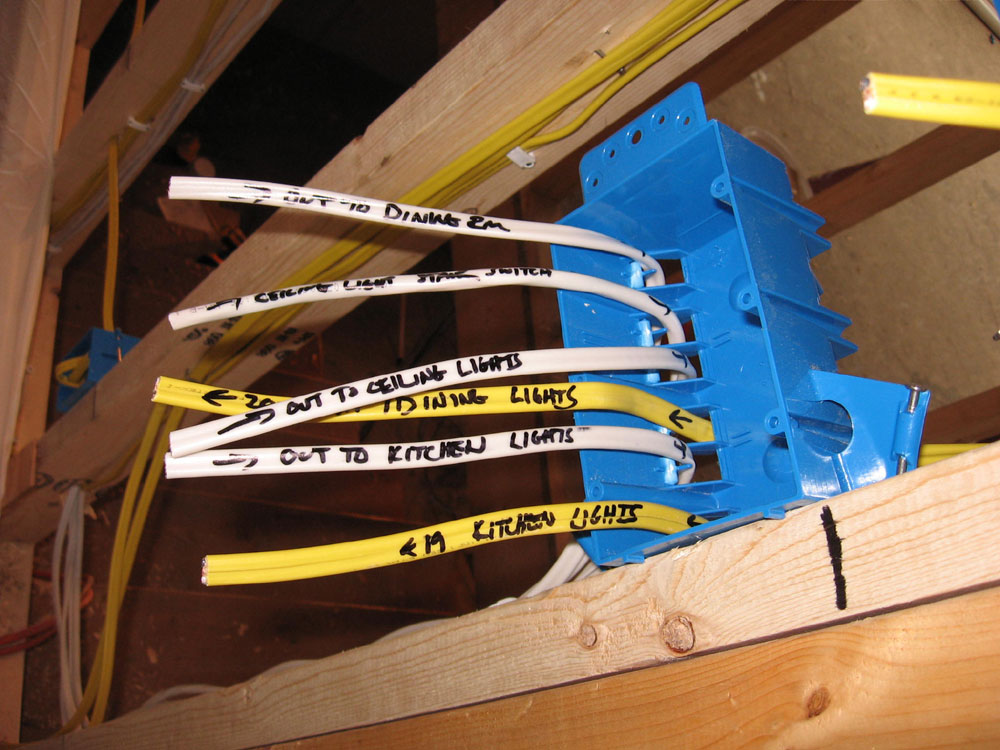
 During
the remainder of the day, I avoided any more problems of this nature
and ran multiple circuits, as well as additional wiring to the
"switch center" in the wall beneath the stairs, and also additional
Internet, phone, and coax cable. Most of the wiring work was
done by the end of the day, but I still needed to run the 10/3 cable
for the range, dryer, and an RV outlet, as well as additional data
wiring. I needed materials, though, so I planned another trip
to the store in the morning. During
the remainder of the day, I avoided any more problems of this nature
and ran multiple circuits, as well as additional wiring to the
"switch center" in the wall beneath the stairs, and also additional
Internet, phone, and coax cable. Most of the wiring work was
done by the end of the day, but I still needed to run the 10/3 cable
for the range, dryer, and an RV outlet, as well as additional data
wiring. I needed materials, though, so I planned another trip
to the store in the morning. |
|||
SUNDAY, AUGUST 27, 2006 |
|||
| It was another full day of wiring. I continued my work on the second floor and pulled any remaining wires through the walls as needed. I began by installing junction boxes and splicing the wires for Heidi's office lighting that I made a mistake in on Friday. | |||
|
|
|||
|
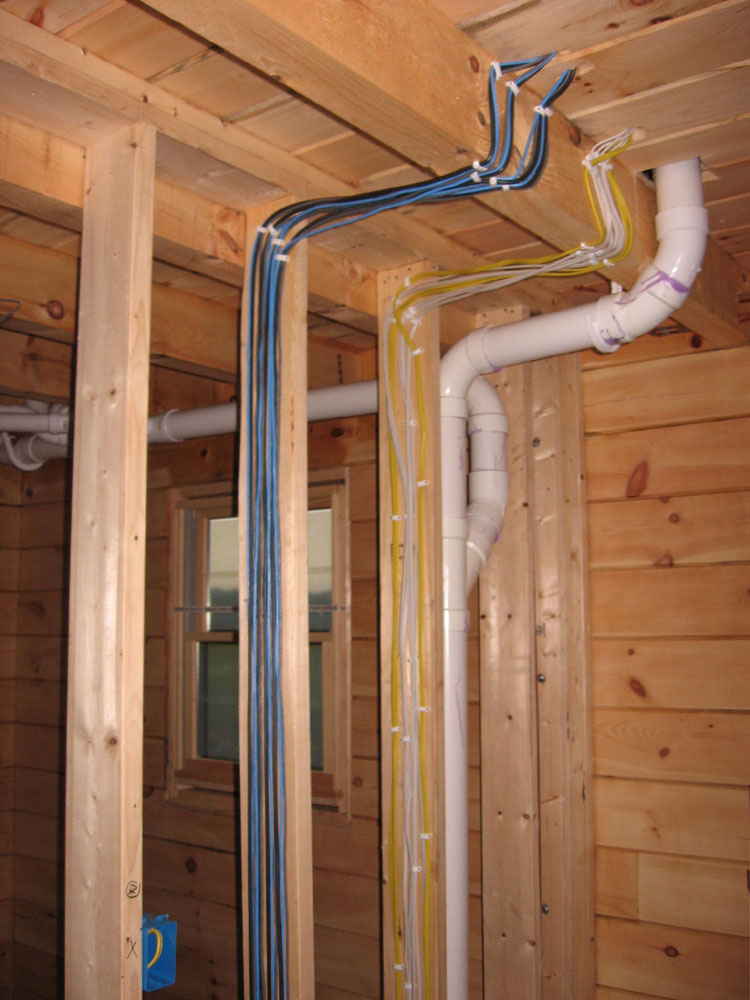
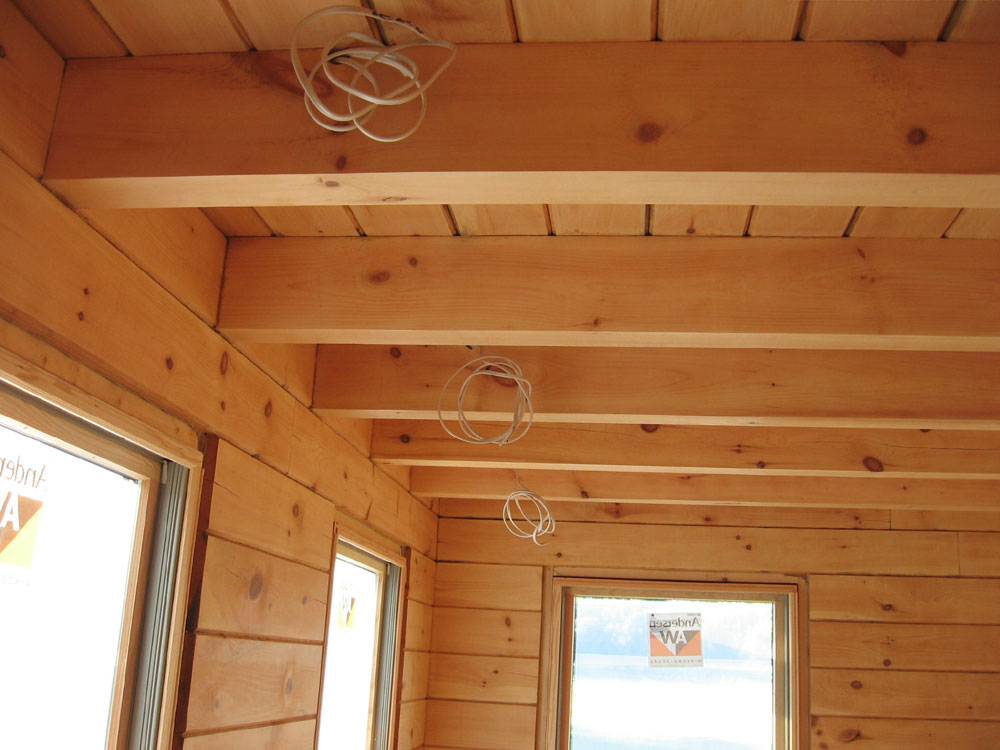
Then, I concentrated on completing a couple of the more difficult runs, including getting the wires I ran yesterday from the back wall out to the edge of the loft, where they'd run onto the ceiling ties for lighting there, and around to the final ceiling tie in the great room, the one closest to the gable end, which required two wires: one for the dining room chandelier and one for the other lights. |
|||
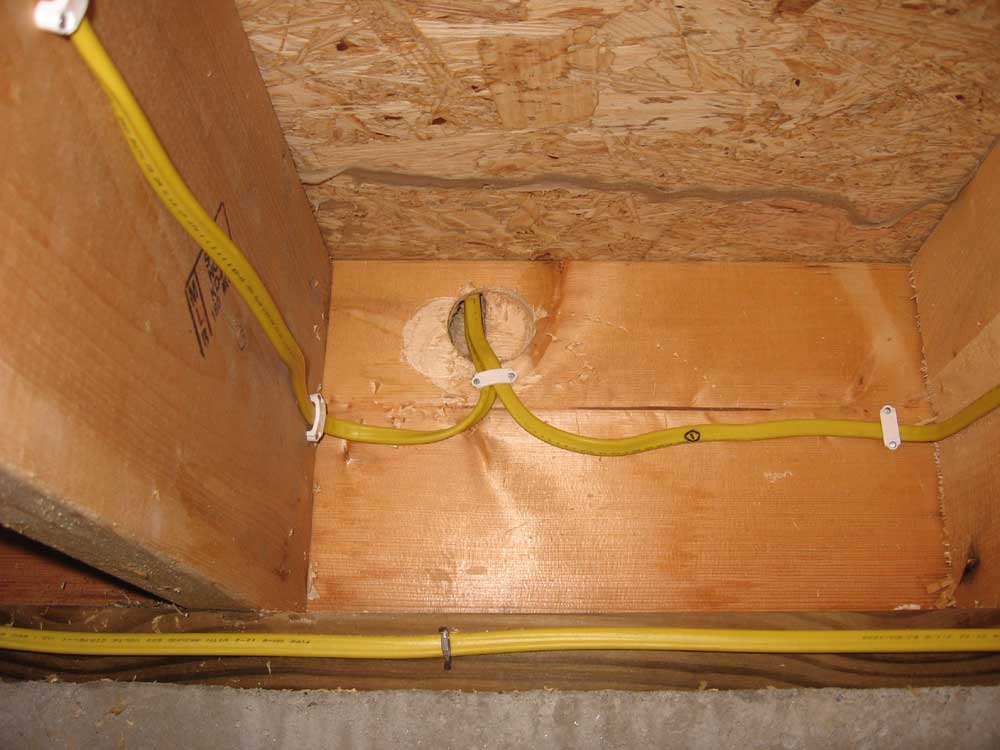
|
Since this final tie was of course surrounded by log walls and finished, exposed ceilings, I probably should have run some wires somehow during initial construction of the roof. But I didn't, and now needed to figure out how to get them there. Fortunately, there was a handy open, unfinished soffit out back that might provide me the access and wire chase I needed. |
|||
 After
studying the logs and rafters from inside and out, I determined a
likely height at which to drill a hole, and then drilled a sample
hole from the inside at the edge of the loft, where the wires would
run out through the wall and into the soffit area. The hole
came out exactly where I wanted it, so I proceeded to drill a 1"
hole through at the same location. Then, I moved out to the
ceiling tie and drilled a corresponding hole on the "back" side of
the roof rafter, where it would be hidden from the bulk of the views
in the house. There was no avoiding having the hole and wires
somewhat exposed, though I planned to build a wooden cover for the
wiring later. After
studying the logs and rafters from inside and out, I determined a
likely height at which to drill a hole, and then drilled a sample
hole from the inside at the edge of the loft, where the wires would
run out through the wall and into the soffit area. The hole
came out exactly where I wanted it, so I proceeded to drill a 1"
hole through at the same location. Then, I moved out to the
ceiling tie and drilled a corresponding hole on the "back" side of
the roof rafter, where it would be hidden from the bulk of the views
in the house. There was no avoiding having the hole and wires
somewhat exposed, though I planned to build a wooden cover for the
wiring later. |
|||
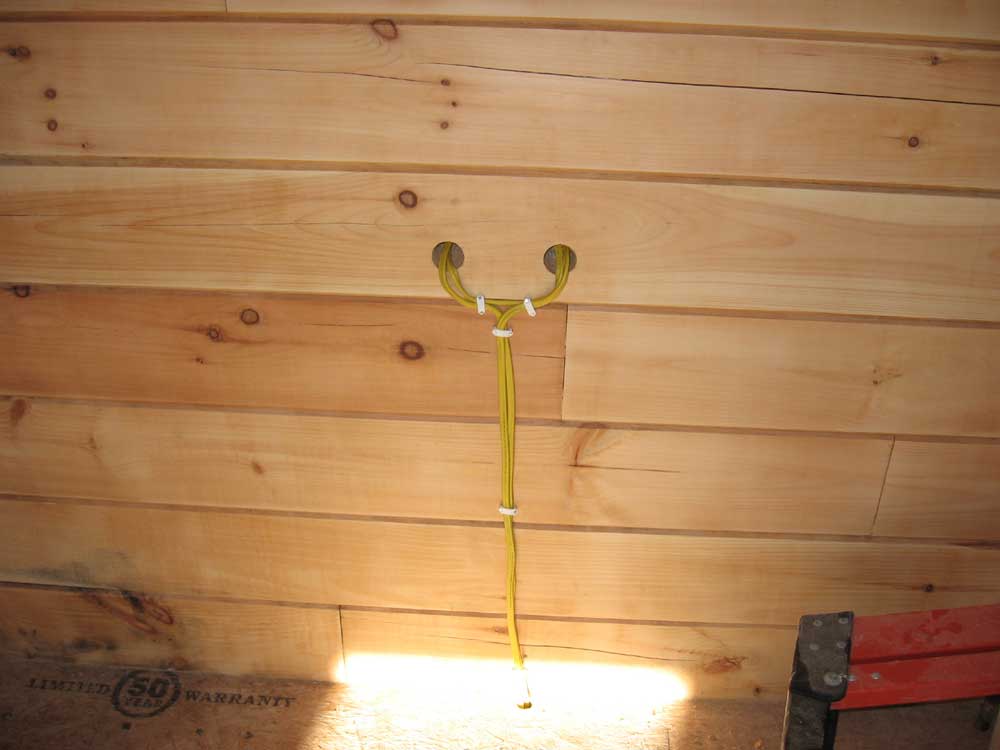
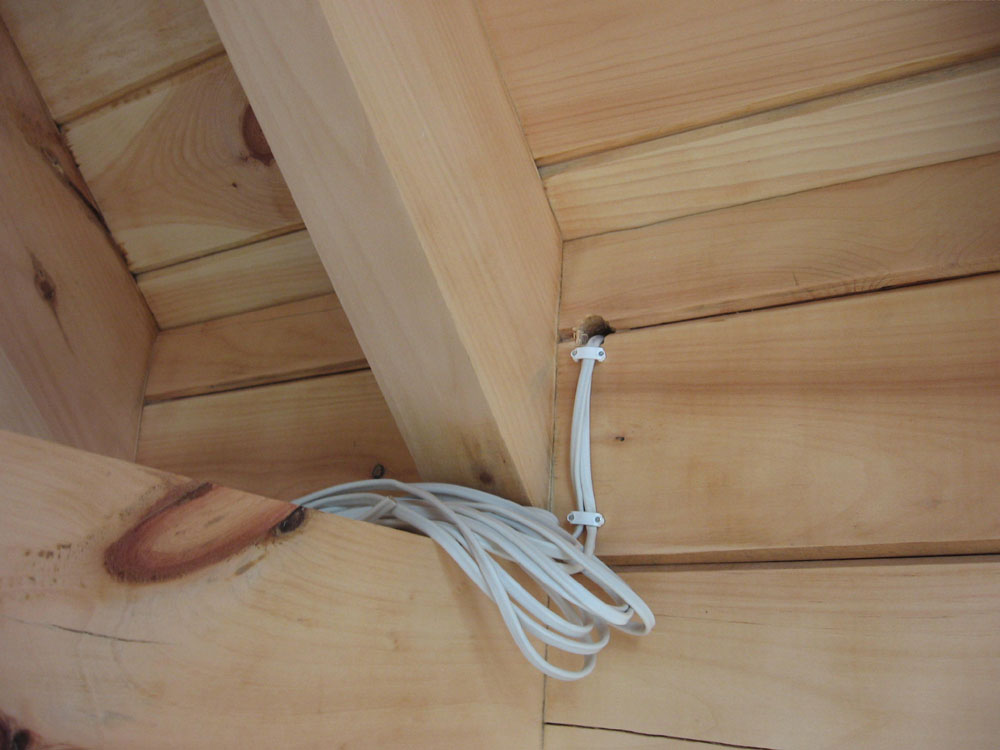 Next,
I took my wire snake and fed it out through the hole at the ceiling
tie and back towards the open, unfinished end of the soffit, where
my loft-based hole was located. I pushed the pair of wires
needed through the hole (one for the dining room light, one for the
other lights) and taped them to the snake and pulled them around.
This worked quite well, but I couldn't have done it if the soffit
had been complete all the way across the back of the house, the way
it eventually will be. I coiled up enough excess wire at the
end for use later, and then secured the wires where they entered the
log wall at the loft. Next,
I took my wire snake and fed it out through the hole at the ceiling
tie and back towards the open, unfinished end of the soffit, where
my loft-based hole was located. I pushed the pair of wires
needed through the hole (one for the dining room light, one for the
other lights) and taped them to the snake and pulled them around.
This worked quite well, but I couldn't have done it if the soffit
had been complete all the way across the back of the house, the way
it eventually will be. I coiled up enough excess wire at the
end for use later, and then secured the wires where they entered the
log wall at the loft. |
|||
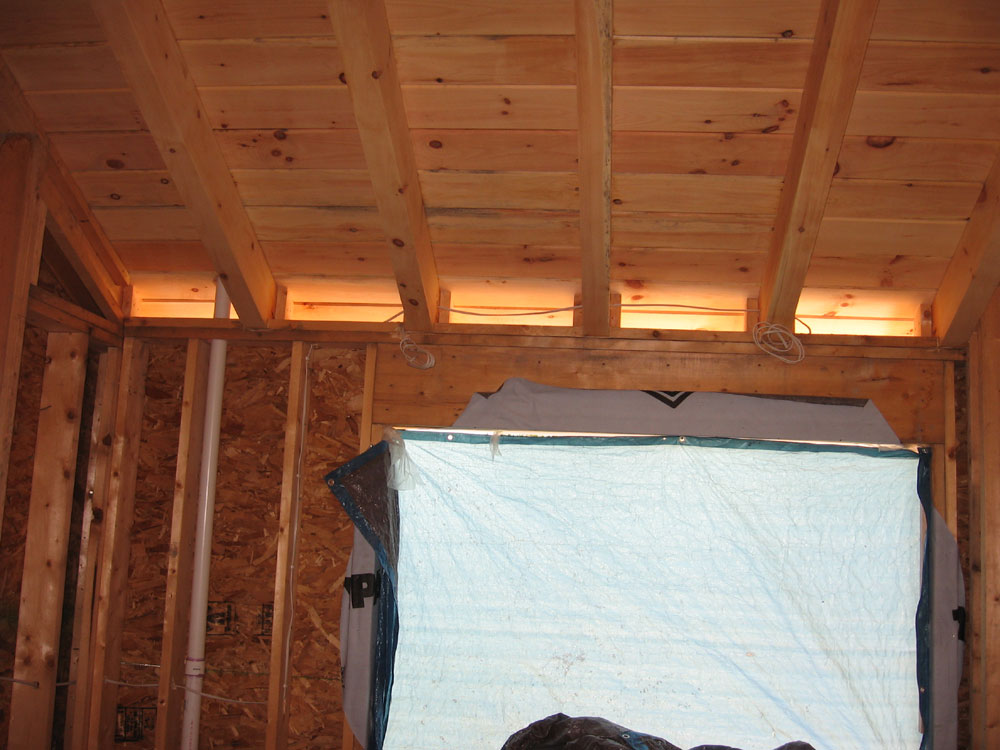
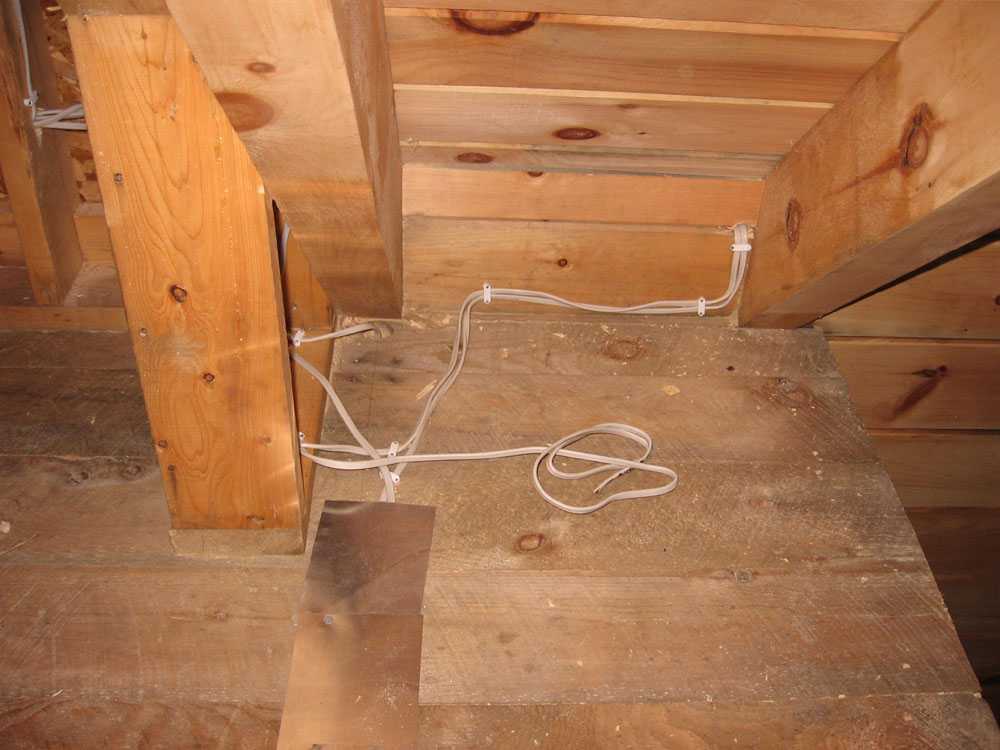
 To
get the wiring out to the ceiling ties next to the loft deck, I used
my door-trim router jig to rout a straight groove, 1/2" wide, from
the eventual knee wall in the loft out to near the edge, and then
roughly perpendicular to each of the ceiling ties (two). I
finished off the groove as necessary with a chisel. I ran a
pair of wires out through the groove--one for the power out, the
second to tie the fixtures together into a single circuit with the
third ceiling tie (described above). I covered the groove and
wires with some excess step flashing material, which won't keep
nails out during later construction steps, of course, but worked
well to hold the wires in place and provide a significant visual
reminder of their presence. I would have taken a better
picture, but some bozo laid all the Homosote for the second floor
right on top of this new wiring before I had a chance to snap a
picture. To
get the wiring out to the ceiling ties next to the loft deck, I used
my door-trim router jig to rout a straight groove, 1/2" wide, from
the eventual knee wall in the loft out to near the edge, and then
roughly perpendicular to each of the ceiling ties (two). I
finished off the groove as necessary with a chisel. I ran a
pair of wires out through the groove--one for the power out, the
second to tie the fixtures together into a single circuit with the
third ceiling tie (described above). I covered the groove and
wires with some excess step flashing material, which won't keep
nails out during later construction steps, of course, but worked
well to hold the wires in place and provide a significant visual
reminder of their presence. I would have taken a better
picture, but some bozo laid all the Homosote for the second floor
right on top of this new wiring before I had a chance to snap a
picture. |
|||
 Repeating
the process described a day or two ago, I pulled the wiring into the
ceiling joists for the kitchen lights, which went smoothly. Repeating
the process described a day or two ago, I pulled the wiring into the
ceiling joists for the kitchen lights, which went smoothly.By early evening, I finished up all the wiring on the second floor during the remainder of the afternoon, including pulling all the coax cable, phone, and Internet cables to each of six locations, and then cleaned up the wood chips and so forth. It looked like I could probably finish up the wiring tomorrow. |
|||
|
|
|||
|
|
|||
SATURDAY, AUGUST 26, 2006 |
|||
| I worked on the wiring from about 7 to noon, pulling many of the lighting circuits up to the second floor. This included many of the longest wires, which I had to run from the switch center (in the stud wall beneath the stairs) through the basement, over to the main wet wall (where I was running most of the wiring upstairs), and then across the studs at the back wall of the house to their ultimate destination. I also ran circuits to the bathroom and vanity lighting, as well as the closet light. | |||
|
|
|||
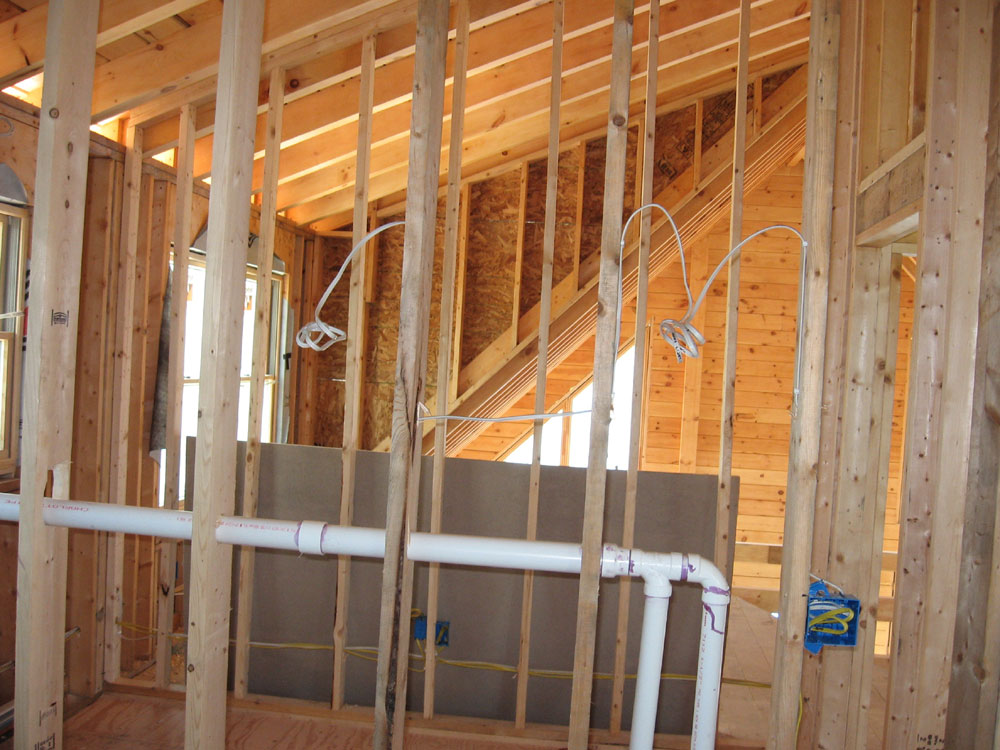
 I
ran wires for the lights I planned on the ceiling ties in the great
room, a dining room chandelier, and a switched outlet in the loft.
These were the longest runs and ate up substantial amounts of wire.
I left extra wire at the ends of these runs since I didn't know
exactly how long they needed to be, as running each to its final
location would require additional work that I would take care of
later. More on this tomorrow. I
ran wires for the lights I planned on the ceiling ties in the great
room, a dining room chandelier, and a switched outlet in the loft.
These were the longest runs and ate up substantial amounts of wire.
I left extra wire at the ends of these runs since I didn't know
exactly how long they needed to be, as running each to its final
location would require additional work that I would take care of
later. More on this tomorrow. |
|||
 Somehow,
there ended up being more wires through this back wall than I had
envisioned, and the 1" holes in the studs were getting stuffed,
which made pulling the wires that much more difficult thanks to the
friction. By noon, I was actually happy to stop. Somehow,
there ended up being more wires through this back wall than I had
envisioned, and the 1" holes in the studs were getting stuffed,
which made pulling the wires that much more difficult thanks to the
friction. By noon, I was actually happy to stop.We had some house-related errands planned for the afternoon, centered around a trip to the tile store to work out what we needed for the two bathrooms. It was time to choose and order these finish materials, and as much as I hated to take any time away from working on the house, it had to be done. I couldn't find the hours for the tile store on their website early in the morning before I went to work, but figured they'd be open all day, as is the norm. |
|||
|
We departed here about12:45, and after a trip to the home center for more wiring supplies, headed to Portland to the tile store. As we approached, I didn't see any cars in the lot. Uh-oh. It turned out they closed at 2. (It was 3 PM now.) What an idiot! We salvaged the afternoon by going to the lighting store instead. |
|||
FRIDAY, AUGUST 25, 2006 |
|||
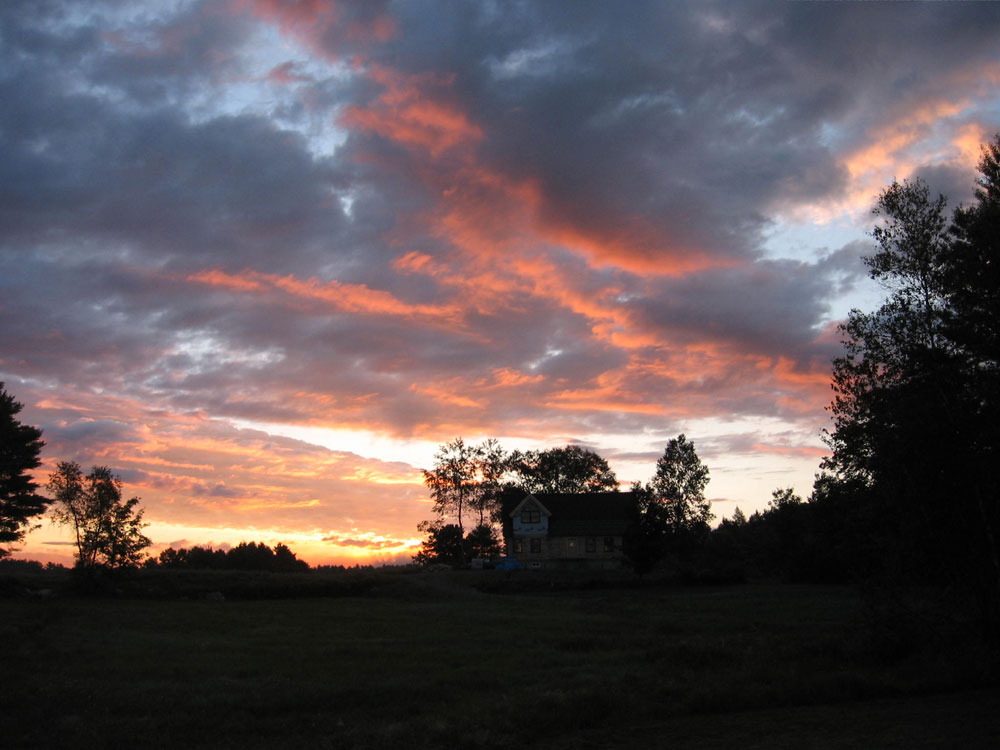 Nice
sunrise today. Nice
sunrise today. |
|||
| I began the day running 12/2 wiring to the receptacle boxes upstairs. I believe I ended up with 3, or perhaps 4, circuits. Three, I think, which was fewer than I had expected for some reason. In any event, I ran a couple of the circuits through the interior plumbing wet wall at the back of the house, and then ran the additional one through the interior stud walls next to the staircase. | |||
 With
all the receptacles wires throughout the house, it was time for me
to move on to the lighting circuits. I didn't have a firm
lighting plan, but had made a general list--both on paper and in my
head--and now I needed to bring it together somehow, and try not to
forget anything. For lighting circuits, I chose the slightly
smaller 14/2 wiring size, which is much easier to work with than the
12/2. With
all the receptacles wires throughout the house, it was time for me
to move on to the lighting circuits. I didn't have a firm
lighting plan, but had made a general list--both on paper and in my
head--and now I needed to bring it together somehow, and try not to
forget anything. For lighting circuits, I chose the slightly
smaller 14/2 wiring size, which is much easier to work with than the
12/2.Lighting circuits are complicated by the need for switches. In a log cabin, with the solid exterior walls and exposed beam ceilings, providing switches for all the lighting becomes even more challenging. During log construction, I had decided against installing most of the switches in any of the log walls, planning instead on a sort of "control center" on the interior stair wall. Despite the extra long runs required to bring most of the lighting circuits through this wall, I figured it would be more convenient than having to run so many wires into the log walls, particularly at switch height. |
|||
 I
ran wires to several of the planned fixtures in the master bedroom
upstairs, including wires to the lights in the ceiling of Heidi's
office below. These required pulling wires through the wire
chases that I routed in the tops of the floor joists during
construction several months ago, using the pull strings that I left
in place. Since these lights were on a single circuit, each
location required two wires--one for power in, one to lead power to
the next fixture in the line. I
ran wires to several of the planned fixtures in the master bedroom
upstairs, including wires to the lights in the ceiling of Heidi's
office below. These required pulling wires through the wire
chases that I routed in the tops of the floor joists during
construction several months ago, using the pull strings that I left
in place. Since these lights were on a single circuit, each
location required two wires--one for power in, one to lead power to
the next fixture in the line. |
|||
 Pulling
a pair of wires through the tight chase was a bit of a chore and
required many trips up and down the stairs, as I had to both pull
the messenger line from beneath and also push the wires from the
top, lest I overtax the string and possibly break it (not likely,
given the strength of the string) or, more likely, pull it from the
tape securing it to the wires. Eventually, I succeeded, but it
was a long process. Pulling
a pair of wires through the tight chase was a bit of a chore and
required many trips up and down the stairs, as I had to both pull
the messenger line from beneath and also push the wires from the
top, lest I overtax the string and possibly break it (not likely,
given the strength of the string) or, more likely, pull it from the
tape securing it to the wires. Eventually, I succeeded, but it
was a long process. |
|||
 However,
I discovered later in the afternoon that I had managed a bonehead
move: I had daisy-chained the wires to the craft room lights
with some of the other lights in the master bedroom...which I
couldn't do, since the lights in the room below needed to be
switched on and off from that room, of course. I must have
still been in "receptacle mode". Oops. However,
I discovered later in the afternoon that I had managed a bonehead
move: I had daisy-chained the wires to the craft room lights
with some of the other lights in the master bedroom...which I
couldn't do, since the lights in the room below needed to be
switched on and off from that room, of course. I must have
still been in "receptacle mode". Oops.
By the time I noticed this blatant error, I had of course already secured all the wires that I had run with multiple wire clamps, and besides: I was certainly not about to pull those wires out of their hard-one chases. Still, I needed these wires to run through a switch box in Heidi's office. Therefore, I had no choice but to run a new wire to the craft room lights through a switch box in the craft room below, which meant I would need to create a splice in a junction box in the master bedroom above. I prefer to avoid splicing and junction boxes, but there was no other choice here. Of course, I had no junction boxes on hand, so I put them on the list for my next trip out into the world. No real harm done...but I kicked myself for this idiotic and avoidable error. Fortunately, I had plenty of extra wire already in the circuit right nearby, as I had planned a wall fixture above and had left a small coil of wire there, not knowing exactly where it would end up. I pulled this wire out of the wall and left it on the floor so that I'd remember to create the junction box later. I'd also need to run a short length of new wire to connect the other lighting fixtures. Running the new circuit and additional wire took up the last part of the afternoon. By now, after 11 hours, I had been up and down the two sets of stairs in the house dozens of times, and between that and the constant kneeling and up and down, I felt like I'd biked the Tour de France. I figured I'd recover by the morning, though. |
|||
THURSDAY, AUGUST 24, 2006 |
|||
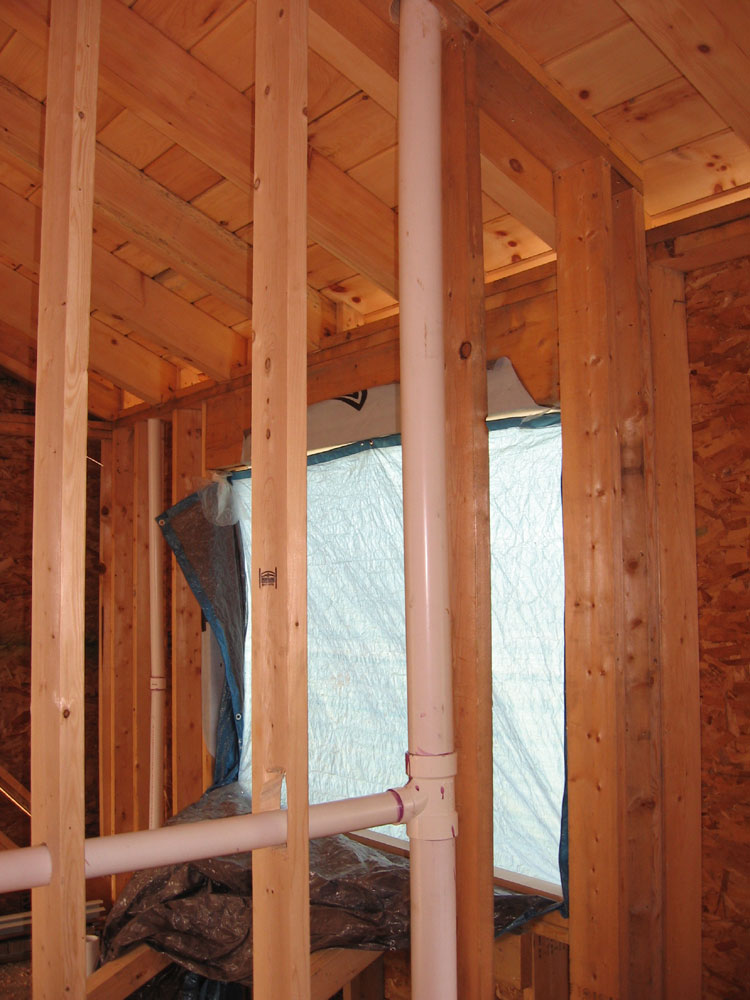
 The
white pipe is done! The
white pipe is done!It took me much of the morning to finish laying out the remaining vents and drains for the upstairs bath fixtures. Working from the downstairs bathroom, I continued where I left off yesterday and managed to get everything fit together dry. Then, I had to mark everything and dismantle the pipes so that I could glue all the joints. |
|||
 Afterwards,
I continued work on the vents upstairs, and bored holes through the
inside of the roof for the two vent pipes. This was my
favorite part of the whole plumbing job, I think. The duller
the hole saw, the dustier and nastier the sawdust, and the heavier
and more awkward the drill, the better, as far as I'm concerned.
Drilling these two large holes took considerable effort. When
the bits reached the roof, finally (through a double top plate--3",
1" ceiling board, 4" of insulation, and 5/8" of Advantech, I found
the ice and water shield and roofing to be a melted mess that coated
the bit. Seeing this, I decided to postpone completing the
vents until later, when the sun was off the roof. Afterwards,
I continued work on the vents upstairs, and bored holes through the
inside of the roof for the two vent pipes. This was my
favorite part of the whole plumbing job, I think. The duller
the hole saw, the dustier and nastier the sawdust, and the heavier
and more awkward the drill, the better, as far as I'm concerned.
Drilling these two large holes took considerable effort. When
the bits reached the roof, finally (through a double top plate--3",
1" ceiling board, 4" of insulation, and 5/8" of Advantech, I found
the ice and water shield and roofing to be a melted mess that coated
the bit. Seeing this, I decided to postpone completing the
vents until later, when the sun was off the roof. |
|||
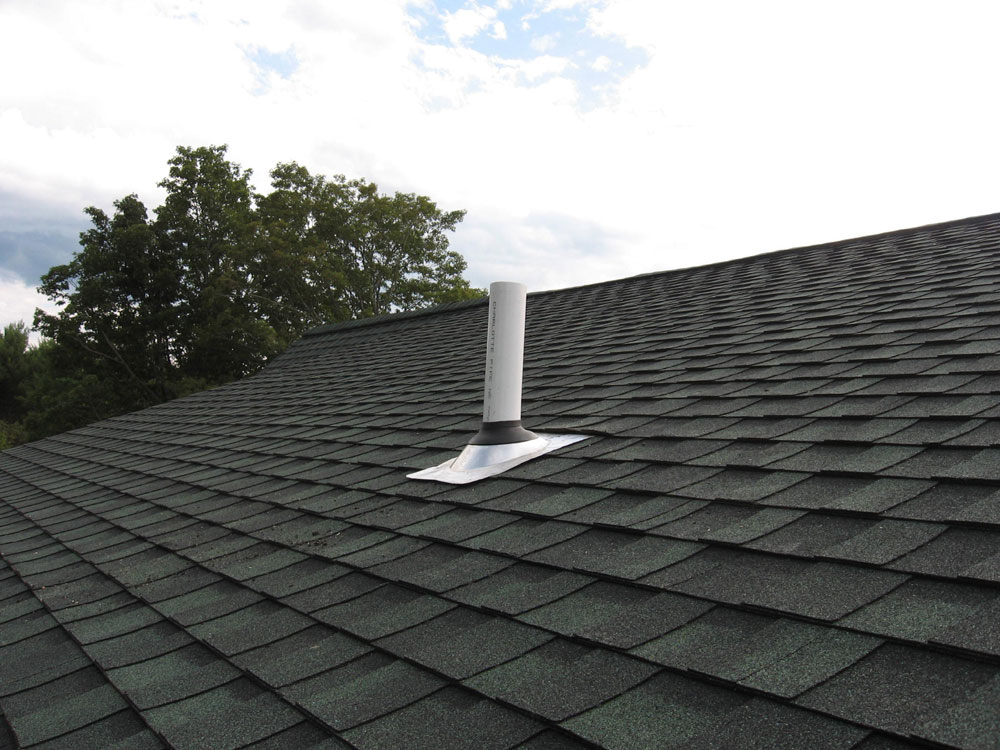 Fortunately,
it became mostly overcast in the afternoon, and I took the
opportunity to go up to the roof and finish cutting the holes from
above. After cutting the two holes, I installed the final
lengths of PVC pipe, connecting each to its respective vent fitting
below, and installed the aluminum and rubber flashing material over
the pipes. It was quite a chore to loosen the grip of the
adhesive on the backs of the roof shingles so that I could get the
pipe flashing beneath the upper row of shingles, but I got it done. Fortunately,
it became mostly overcast in the afternoon, and I took the
opportunity to go up to the roof and finish cutting the holes from
above. After cutting the two holes, I installed the final
lengths of PVC pipe, connecting each to its respective vent fitting
below, and installed the aluminum and rubber flashing material over
the pipes. It was quite a chore to loosen the grip of the
adhesive on the backs of the roof shingles so that I could get the
pipe flashing beneath the upper row of shingles, but I got it done.Now all I need is my plumbing inspection, and the job will truly be done. I planned to call the inspector on Friday. I don't think he cares about potable water piping, but I'll find out. |
|||
 In
between various plumbing jobs, I continued work on the electrical,
completing the outlet wiring on the first floor. Then, I began
drilling holes through the studs on the second floor, and also some
holes through the floor and stud walls so that I could run wiring
from the basement up to the second floor. I completed all the
drilling--at least all that I could anticipate--late in the day,
leaving things ready for some wire pulling in the morning. In
between various plumbing jobs, I continued work on the electrical,
completing the outlet wiring on the first floor. Then, I began
drilling holes through the studs on the second floor, and also some
holes through the floor and stud walls so that I could run wiring
from the basement up to the second floor. I completed all the
drilling--at least all that I could anticipate--late in the day,
leaving things ready for some wire pulling in the morning.Finally, I measured for some of the V-match pine paneling that we planned to install in a few areas inside the house. Many of the interior walls, minimal as they are, will be drywall, or some combination of pine and drywall, but anticipating a materials order very soon--like tomorrow--I decided to figure out roughly what I might need. Once the potable water plumbing and rough electrical are complete, I can start covering the walls! I expected to have most of this done by the end of the weekend, or early next week. Things were looking encouraging for me to meet my goal of having all the systems work done by the end of the month. |
|||
WEDNESDAY, AUGUST 23, 2006 |
|||
| I drove down to Lowes again with my truck full of plumbing fittings to return. I figured it was better to just get it done. I wasn't looking forward to the process, but couldn't wait to rid myself of the fittings and get a hefty refund to boot. I was at the door when the manager opened it at 6, and spent about 40 minutes at returns getting the stuff credited. Then I went and bought all kinds of stuff, including more wire--14/2, 14/3, 12/2, and 10/3. I was happy to see that the price had dropped significantly since my last purchase, though it was still pricey. I also bought some select plumbing fittings that I now knew I would need, and some fittings for the PEX potable water pipe. | |||
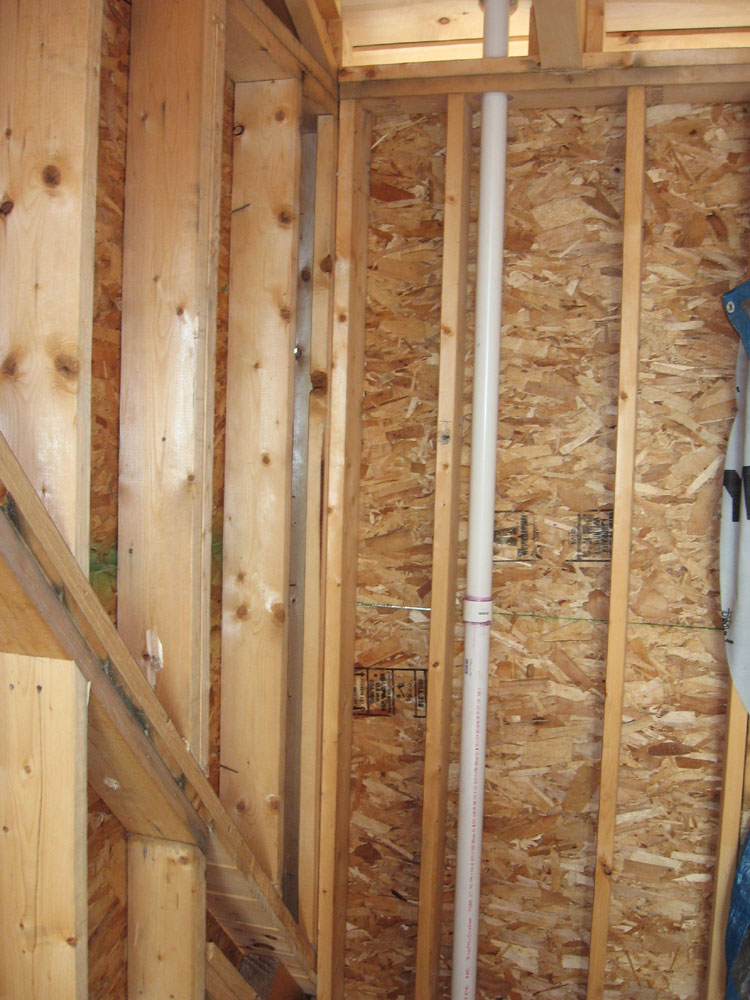
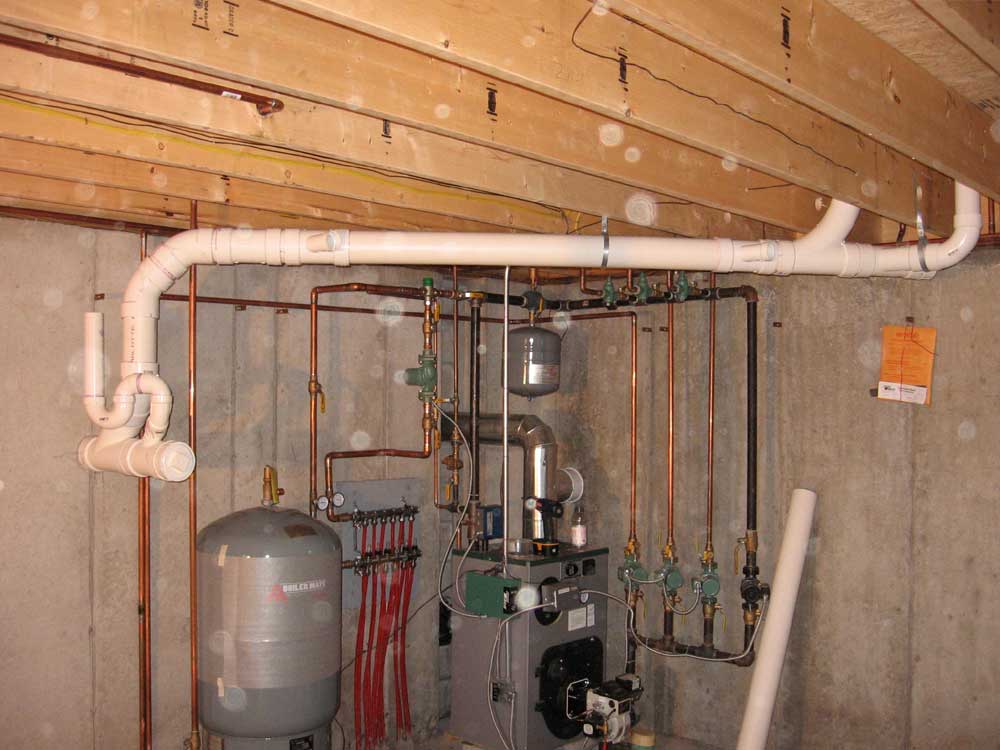
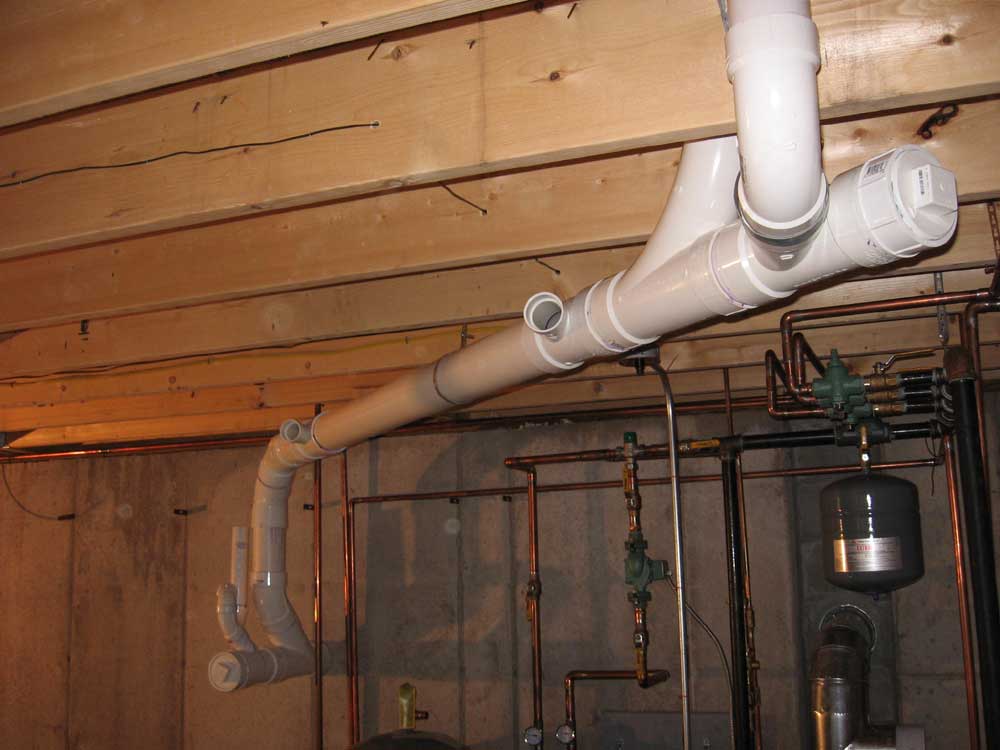
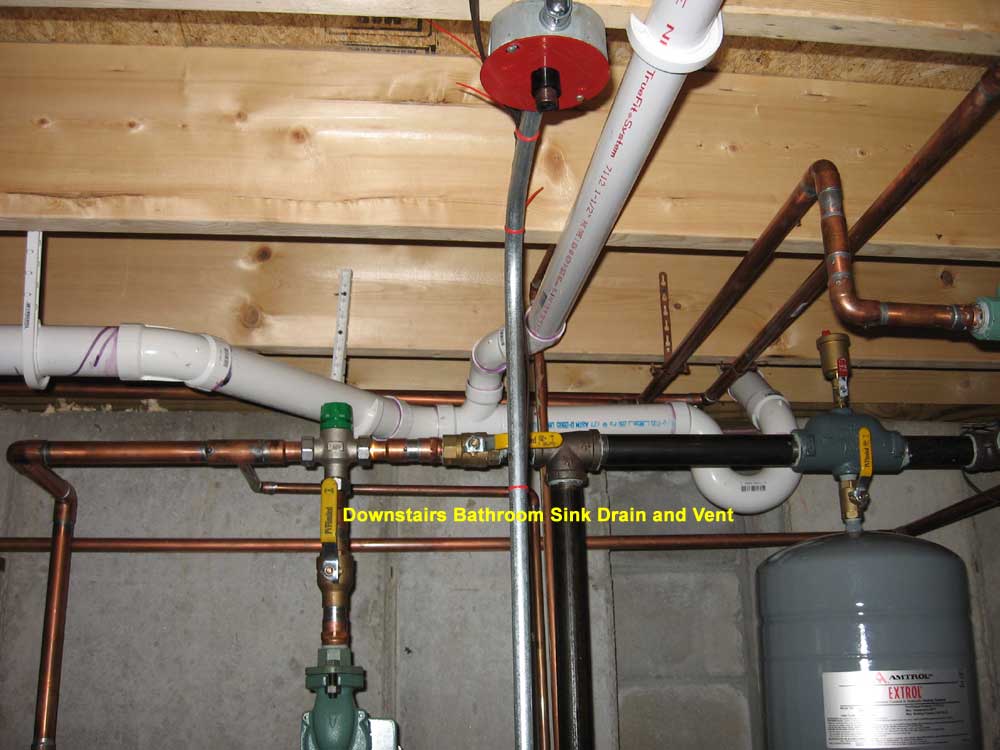 Back
at the house around 8:30, I got to work in the basement, and tackled
the most difficult drain--the downstairs bathroom sink, which meant
that I had to work around the boiler and piping in the corner
beneath. At first, I wondered how I was going to do it at all,
but eventually I put together an amalgamation of pipes. I
hoped I was venting the lines properly. Back
at the house around 8:30, I got to work in the basement, and tackled
the most difficult drain--the downstairs bathroom sink, which meant
that I had to work around the boiler and piping in the corner
beneath. At first, I wondered how I was going to do it at all,
but eventually I put together an amalgamation of pipes. I
hoped I was venting the lines properly.
With the unconventional construction of the house, venting each fixture is more of a challenge, but I thought I understood. The thing is, I knew the system would work fine. What I didn't know was what sorts of things our plumbing inspector might look for, or if he would be a stickler for some detail or another. Past experience would not seem to indicate that he'll be a pain, but nonetheless I worried a bit since I didn't really know what was required. I had a little reference book that wasn't that much help, but I tried to keep things in order based on that convention. |
|||
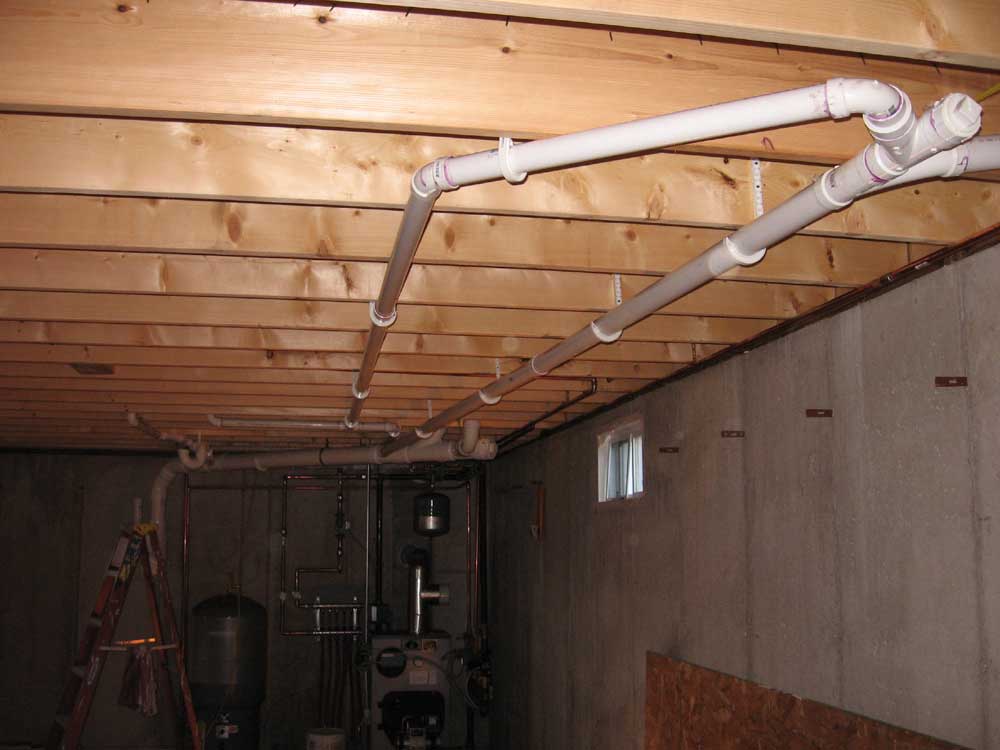
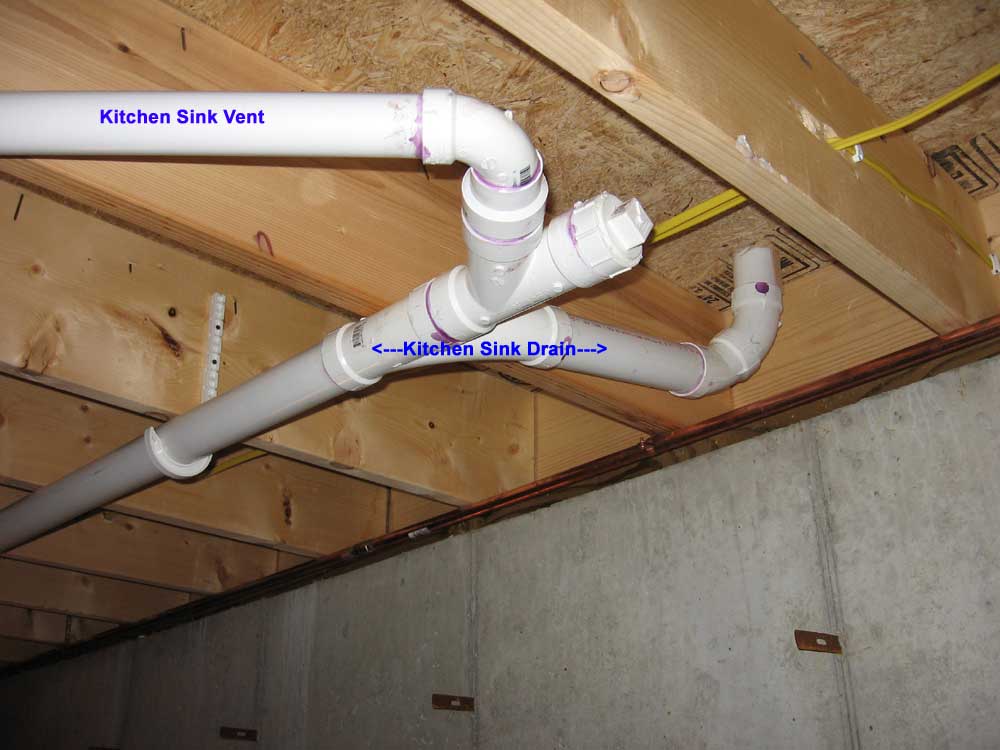
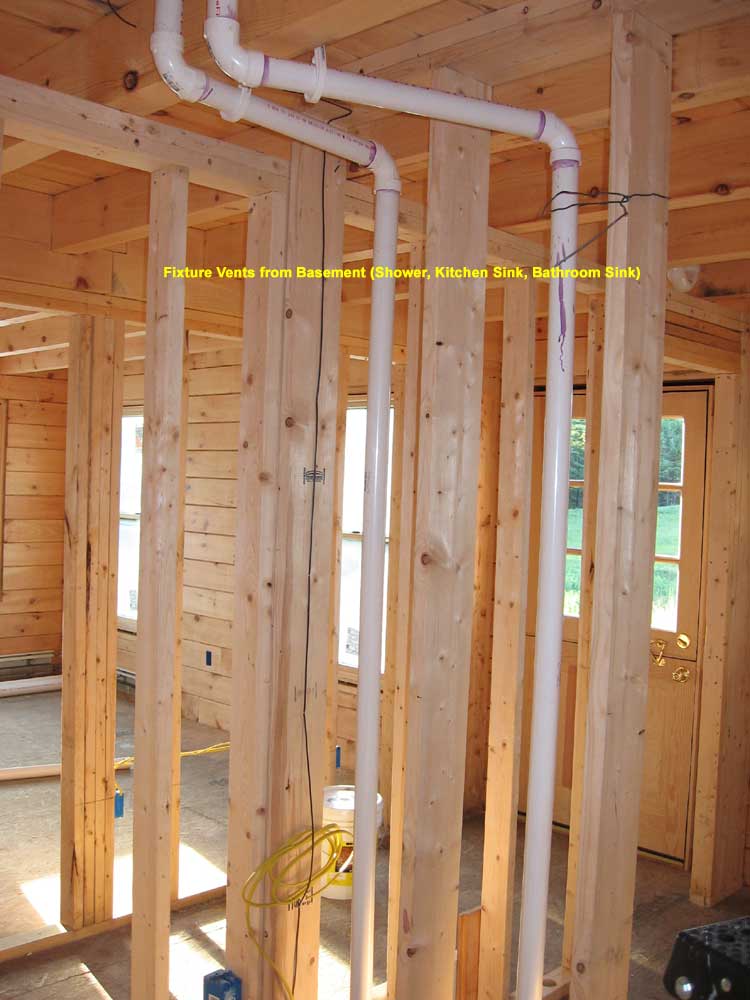
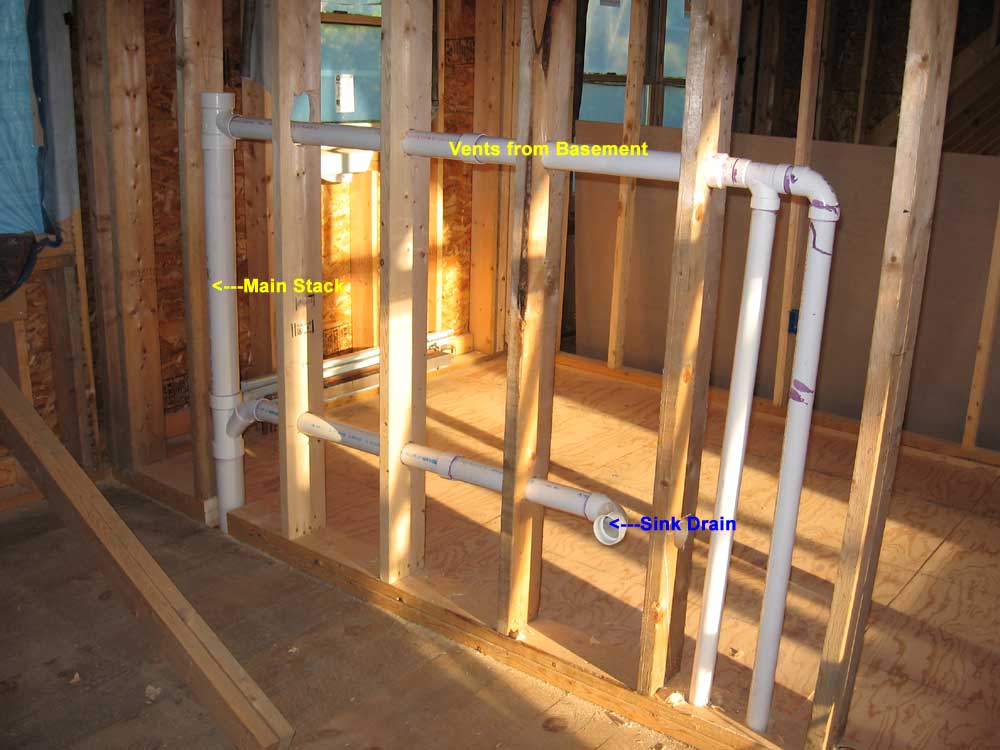
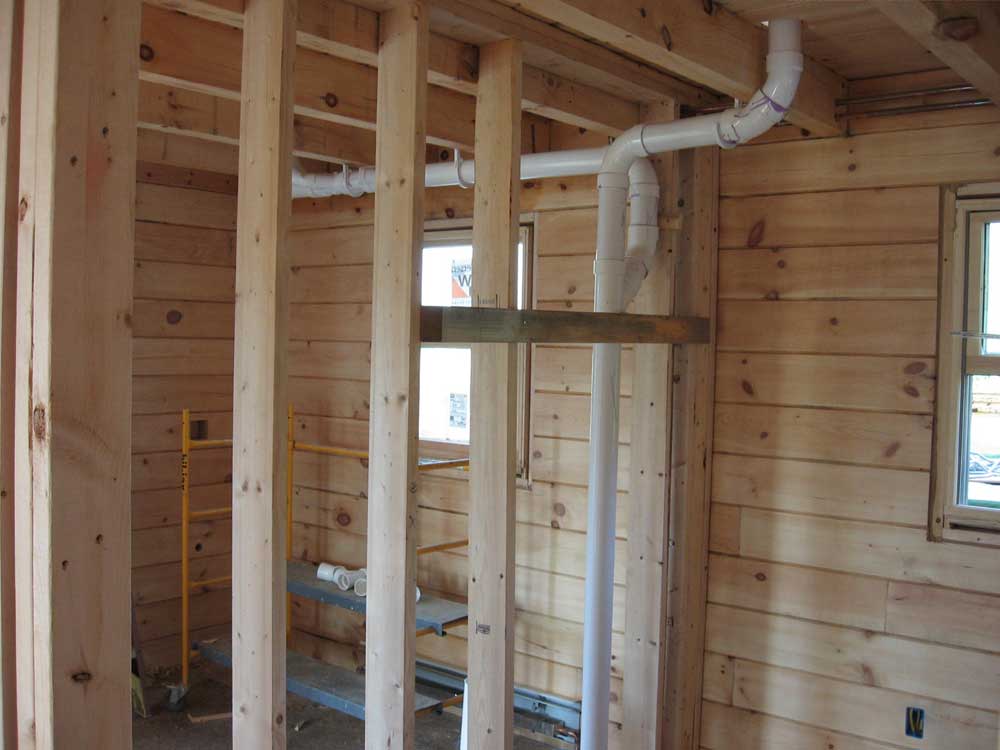
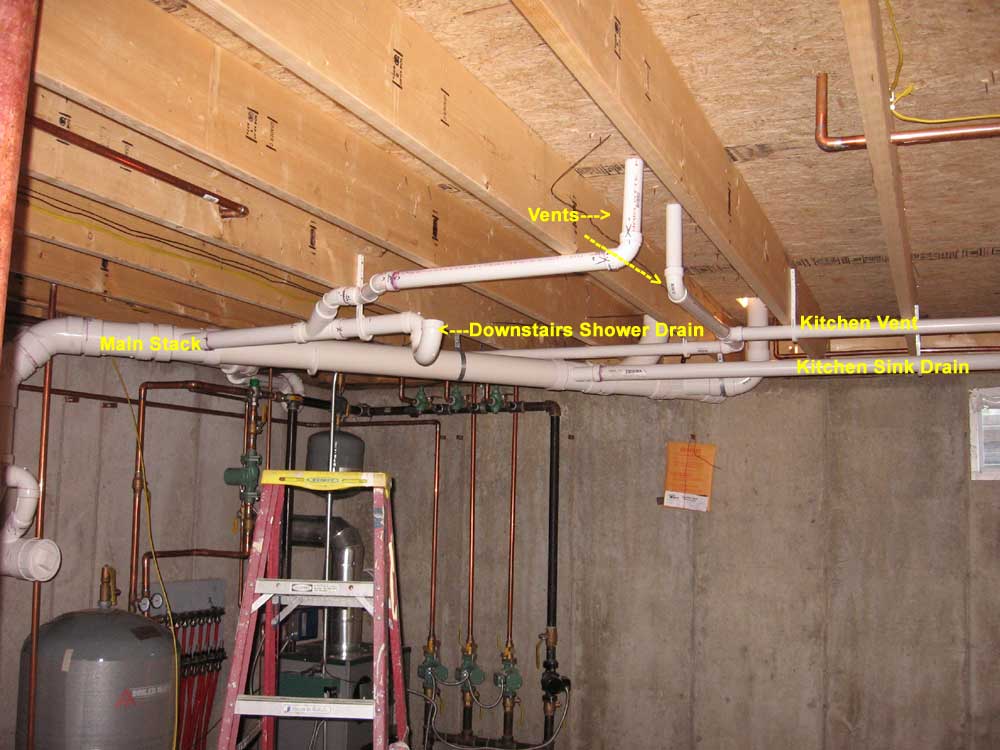 I
worked all day and managed to finish all the basement plumbing,
including the downstairs shower drain, sink drain, kitchen sink
drain, and all the vents for these fixtures all the way to the main
stack on the second floor, where I tied everything in. Later,
I'd run the vent stack up through the roof--tomorrow, probably. I
worked all day and managed to finish all the basement plumbing,
including the downstairs shower drain, sink drain, kitchen sink
drain, and all the vents for these fixtures all the way to the main
stack on the second floor, where I tied everything in. Later,
I'd run the vent stack up through the roof--tomorrow, probably. |
|||
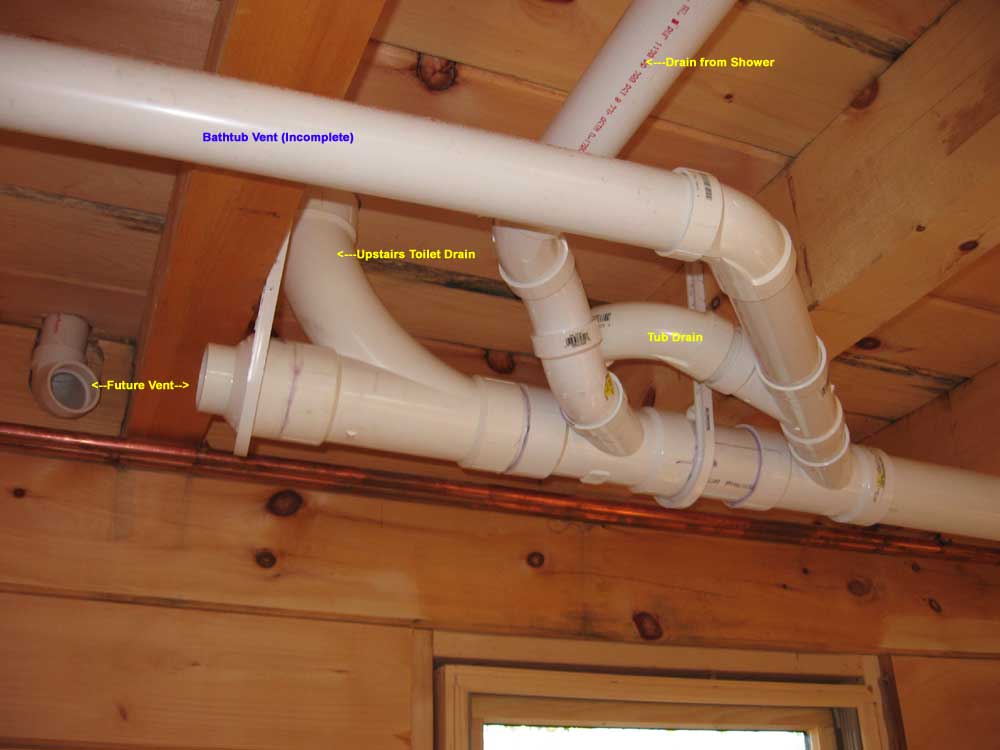 With
what time was left in the day, I started to lay out the upstairs
shower drain, working from inside the downstairs bathroom, which is
directly beneath. The drains and vents in this area represent
the most complex grouping of pipes in the building, I think, as the
toilet, soaking tub, and shower all end up joining in a confined
area in the back corner. These fixtures required their own
vent, which I ran through the outside wall. I had to notch out
the top log to allow a 90° fitting to fit in for the vent. With
what time was left in the day, I started to lay out the upstairs
shower drain, working from inside the downstairs bathroom, which is
directly beneath. The drains and vents in this area represent
the most complex grouping of pipes in the building, I think, as the
toilet, soaking tub, and shower all end up joining in a confined
area in the back corner. These fixtures required their own
vent, which I ran through the outside wall. I had to notch out
the top log to allow a 90° fitting to fit in for the vent. |
|||
 I
didn't glue up anything in this area today, as more layout work
remained to figure out the vents. But, assuming that I hadn't
made any horrible errors, it looked like the remaining work,
including running the vents through the roof, would be easy enough
to take care of in the morning. I
didn't glue up anything in this area today, as more layout work
remained to figure out the vents. But, assuming that I hadn't
made any horrible errors, it looked like the remaining work,
including running the vents through the roof, would be easy enough
to take care of in the morning. |
|||
|
|
|||
TUESDAY, AUGUST 22, 2006 |
|||
 Today
was the first day of plumbing--drain, waste, and vent system (DWV,
or the "white pipe"). Bunny Brann, my ringer for the day,
arrived at about 8 with his grandson Paul in tow. Paul
was probably 18 or 20 (or who knows...I'm a terrible judge of age)
and was there to drill holes, cut pipe, and be the gopher. Today
was the first day of plumbing--drain, waste, and vent system (DWV,
or the "white pipe"). Bunny Brann, my ringer for the day,
arrived at about 8 with his grandson Paul in tow. Paul
was probably 18 or 20 (or who knows...I'm a terrible judge of age)
and was there to drill holes, cut pipe, and be the gopher.As it turned out, I pretty much stood around and watched, and advised as needed on the locations of the various fixtures, what could be cut, etc. I was very glad I hired someone who knew what they were doing, because I really hadn't know where to start. |
|||
 I'll
spare you the details of the work. They worked all day, and by
the end of the day the piping was largely done, with the main stack
all the way to the second floor, and the locations for the showers
and sink drains mapped out. I'll
spare you the details of the work. They worked all day, and by
the end of the day the piping was largely done, with the main stack
all the way to the second floor, and the locations for the showers
and sink drains mapped out. |
|||
 With
the hardest part over with, and some tutoring from Bunny on the
basic configuration needed for the remainder, I figured I could
handle the rest. The system as it eventually evolved
turned out to be rather more simple than we had anticipated, and I
had many plumbing parts left over and unnecessary. I had also
bought a number of wrong pieces, not understanding entirely Bunny's
shorthand (apparently). With
the hardest part over with, and some tutoring from Bunny on the
basic configuration needed for the remainder, I figured I could
handle the rest. The system as it eventually evolved
turned out to be rather more simple than we had anticipated, and I
had many plumbing parts left over and unnecessary. I had also
bought a number of wrong pieces, not understanding entirely Bunny's
shorthand (apparently). |
|||
 So,
with a clearer idea of what remained to be done, I packed up the
excess fittings for return in the morning, and made a list of some
other things that I would need. I hoped I could figure it all
out when I got to work tomorrow. So,
with a clearer idea of what remained to be done, I packed up the
excess fittings for return in the morning, and made a list of some
other things that I would need. I hoped I could figure it all
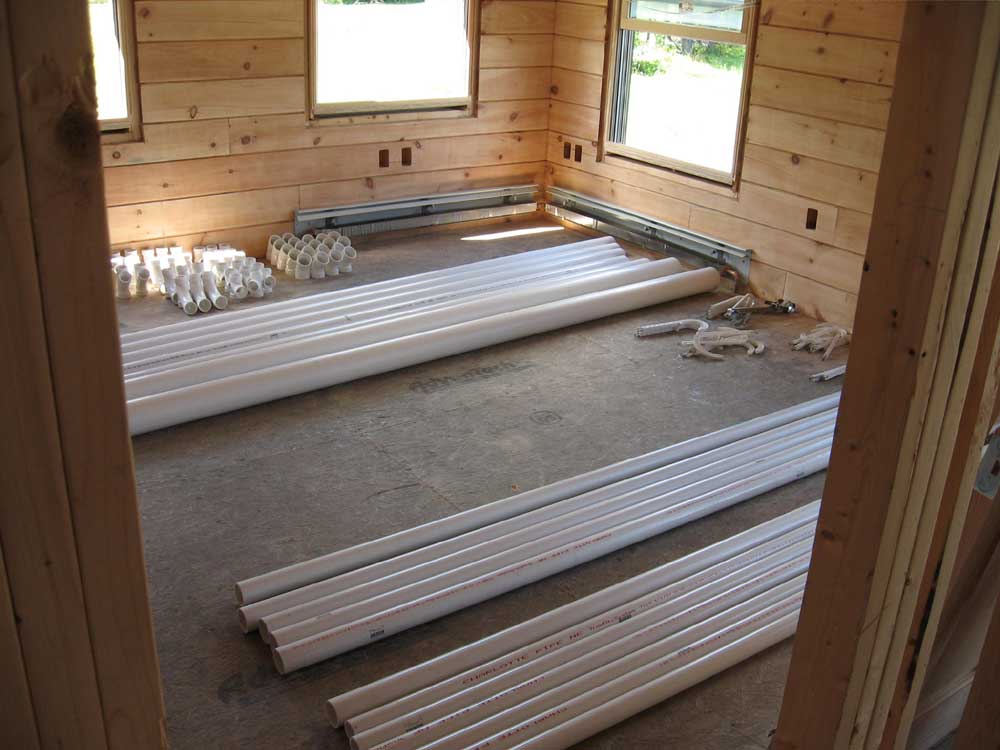
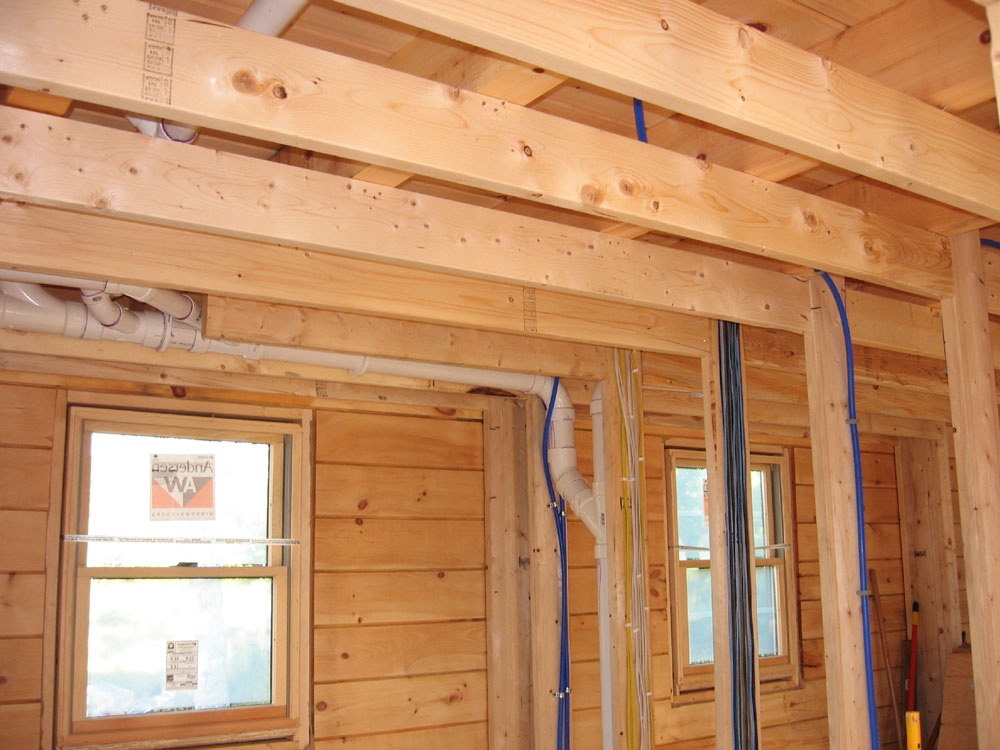
out when I got to work tomorrow.Because it was impossible to run the piping for the second floor without being exposed, we had always planned to install closed ceilings in the pantry and downstairs bath. To hide the piping you see here, and the remainder of the drain pipes coming tomorrow and beyond, I'll strap the ceiling with 2x6 on edge, which will hide all the pipe once drywall is installed. This is deeper than I had anticipated, but it will work nonetheless. You'll see this step fairly soon. I also managed to get a little more wiring done, before and after Bunny's time on site, but it hardly bears mentioning. |
|||
MONDAY, AUGUST 21, 2006 |
|||
|
I got a call from Bunny at 6:15 saying
that he'd have to come tomorrow rather than today because of some
other business. Sigh. Oh well. I decided to just
press on with the wiring today and make some good progress. I worked all day on the electrical, and made good progress on the first floor, including running all of the longest circuits (to the southern end of the house, the opposite end from the electrical service panel) and most of the circuits in the log walls--the most difficult part. |
|||
 I
do enjoy wiring, but pulling the wires into the holes drilled
through the logs was a pain. On the first hole, I found that
one wire would fit up just by pushing it from beneath, but two wires
would not go without binding partway. Of course, two wires (by
wire I mean a piece of 12/2 Romex) were required at each box, as the
power runs in, and then back out to the next outlet. I
do enjoy wiring, but pulling the wires into the holes drilled
through the logs was a pain. On the first hole, I found that
one wire would fit up just by pushing it from beneath, but two wires
would not go without binding partway. Of course, two wires (by
wire I mean a piece of 12/2 Romex) were required at each box, as the
power runs in, and then back out to the next outlet. |
|||
 To
get around this problem, I was forced to run a wire snake down
through the hole from above, tape the two wires to the snake, and
then pull them up from above. This required many trips up and
down the basement stairs, and involved several more steps that
slowed the whole process down. As if I should be surprised... To
get around this problem, I was forced to run a wire snake down
through the hole from above, tape the two wires to the snake, and
then pull them up from above. This required many trips up and
down the basement stairs, and involved several more steps that
slowed the whole process down. As if I should be surprised...I was just glad that I didn't have to pay an electrician to do this work. It would be an expensive wiring job, just for the time involved and some of the other considerations specific to the log construction. |
|||
 I
also had to drill many more holes in the basement joists,
complementing the ones I began drilling yesterday. I worked my
way along the front of the house, installing the outlet circuits for
the living room, and then continued at the back of the house with
kitchen and dining room circuits. In the kitchen, where the
outlets are located 48" above the floor so as to be above countertop
level, the wires had to run outside the logs, starting at a point
below the countertop. (Careful and dedicated readers will of
course remember the additional drilling steps explained back in May
during the log construction.) Since I had a pair of single
outlet boxes at each location, I ended up with an interesting array
of wires outside the walls. Later, the cabinets will cover all
this. I
also had to drill many more holes in the basement joists,
complementing the ones I began drilling yesterday. I worked my
way along the front of the house, installing the outlet circuits for
the living room, and then continued at the back of the house with
kitchen and dining room circuits. In the kitchen, where the
outlets are located 48" above the floor so as to be above countertop
level, the wires had to run outside the logs, starting at a point
below the countertop. (Careful and dedicated readers will of
course remember the additional drilling steps explained back in May
during the log construction.) Since I had a pair of single
outlet boxes at each location, I ended up with an interesting array
of wires outside the walls. Later, the cabinets will cover all
this.(The outlet boxes themselves are just out of frame in the picture above. Sorry for the bad composition and lack of context.) |
|||
|
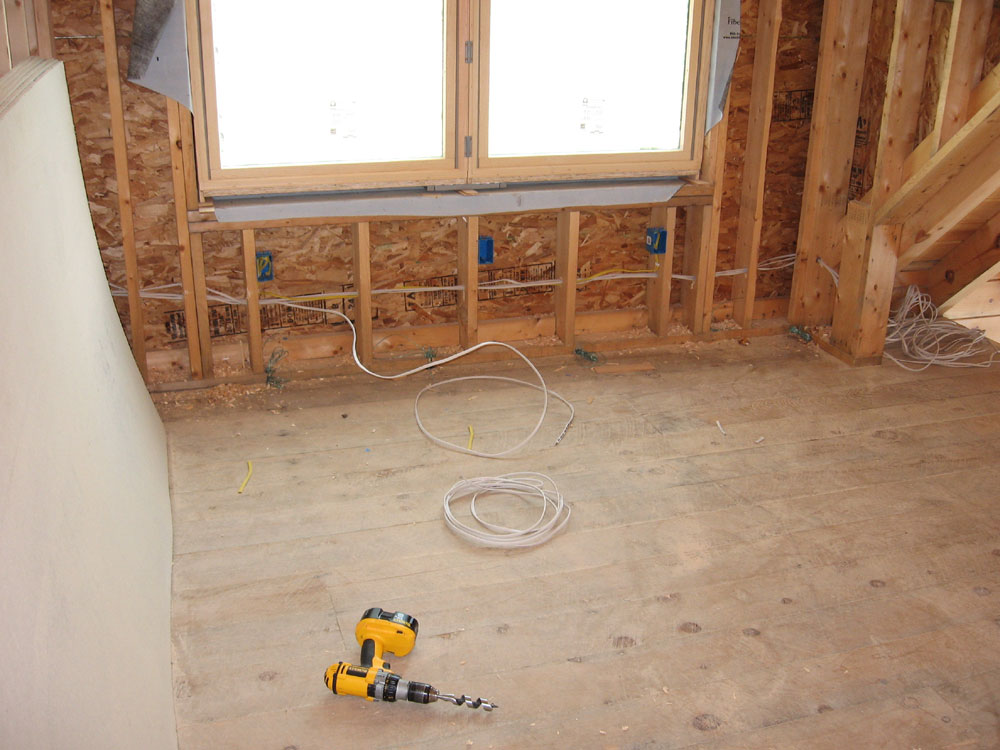
I ran some of the wiring into the stud walls on the first floor as well, though I avoided walls where plumbing would be installed so that I could later run the wires around the plumbing, rather than the other way around. Similarly, I did not run any wires to the second floor, choosing to wait until the plumbing was installed so that I could decide on the best wiring route. This should all be clear after tomorrow. I chose some convoluted paths for my wires for some of these interior walls, as I wanted logical outlets to be attached together, rather than just the closest ones. For example, I wanted all three boxes in the hallway to be on one circuit--but they were on opposite sides of the hall, with an exposed pine ceiling and beams above, so connecting these boxes required running the wire back through the floor and then over to the other side as required. I've always hated wiring in some of the houses I've experienced, where the most random things are connected on the same circuit. My old house in North Yarmouth was the poster child for this--absolutely terrible. It would take me 20 minutes to just find the right circuit to shut off to change out a light fixture or something, as one light in the kitchen might be on the same circuit with the upstairs bath, while the other was on the living room. Plus the box was marked poorly and inaccurately. Therefore, despite the extra time and extra wire required, I had the opportunity to build an electrical system that I liked, so I planned my routes carefully, and kept the wiring neat and securely fastened to the framing as needed. At the same time, I didn't want to end up with a ridiculous number of circuits, so I banded together things like the hallway and pantry outlets, most of which will never see use and certainly not at the same time. Again, this made for a more complicated installation, but better in the long run. |
|||
 In
all, I ran the wiring for 8 separate circuits, all outlets.
I'd guess I used over half my 1000' reel and made what seemed like
100 trips up and down the basement stairs. I didn't hook
anything up; I left excess wire hanging at the master panel, where
later I would run it into the panel and hook it up. Since I
never know how I plan to arrange the wires until I begin, I leave
lots of extra wire. In
all, I ran the wiring for 8 separate circuits, all outlets.
I'd guess I used over half my 1000' reel and made what seemed like
100 trips up and down the basement stairs. I didn't hook
anything up; I left excess wire hanging at the master panel, where
later I would run it into the panel and hook it up. Since I
never know how I plan to arrange the wires until I begin, I leave
lots of extra wire.
By the end of the day, all the wiring was run in the log walls, except for three outlets in Heidi's office. It was nice to have that done. The rest of the wiring should be easy by comparison. |
|||
SUNDAY, AUGUST 20, 2006 |
|||
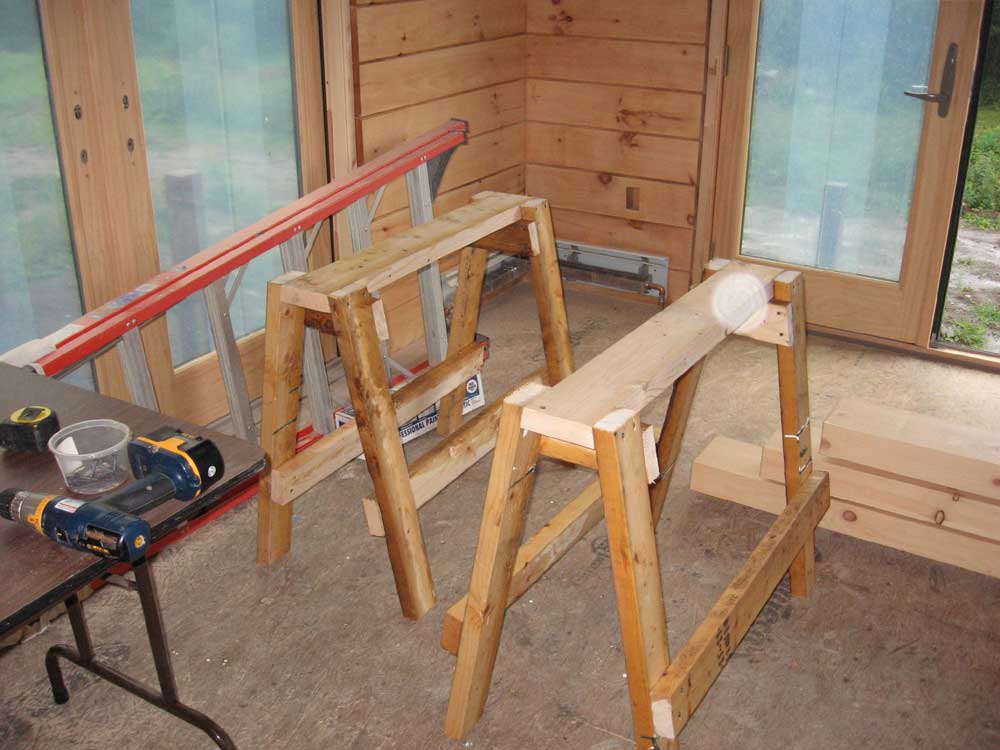 I
began this rainy Sunday by building a pair of sawhorses. I
have one good set, which has been stuck beneath my "old door" work
table for years, and a couple marginal sets that were in use
elsewhere. I've been meaning to build at least one set for
ages, but it's the sort of thing I tend to put off because it seems
to be taking me away from more productive tasks. During the bulk of
framing and major construction, I had used Bob's old sawhorses which
had been on site, but those had been gone for several weeks now.
I knew I'd be needing sawhorses again, so I decided to just build a
set; it didn't take that long. I used scrap 2x4 lumber, with
2x6 for the top. I
began this rainy Sunday by building a pair of sawhorses. I
have one good set, which has been stuck beneath my "old door" work
table for years, and a couple marginal sets that were in use
elsewhere. I've been meaning to build at least one set for
ages, but it's the sort of thing I tend to put off because it seems
to be taking me away from more productive tasks. During the bulk of
framing and major construction, I had used Bob's old sawhorses which
had been on site, but those had been gone for several weeks now.
I knew I'd be needing sawhorses again, so I decided to just build a
set; it didn't take that long. I used scrap 2x4 lumber, with
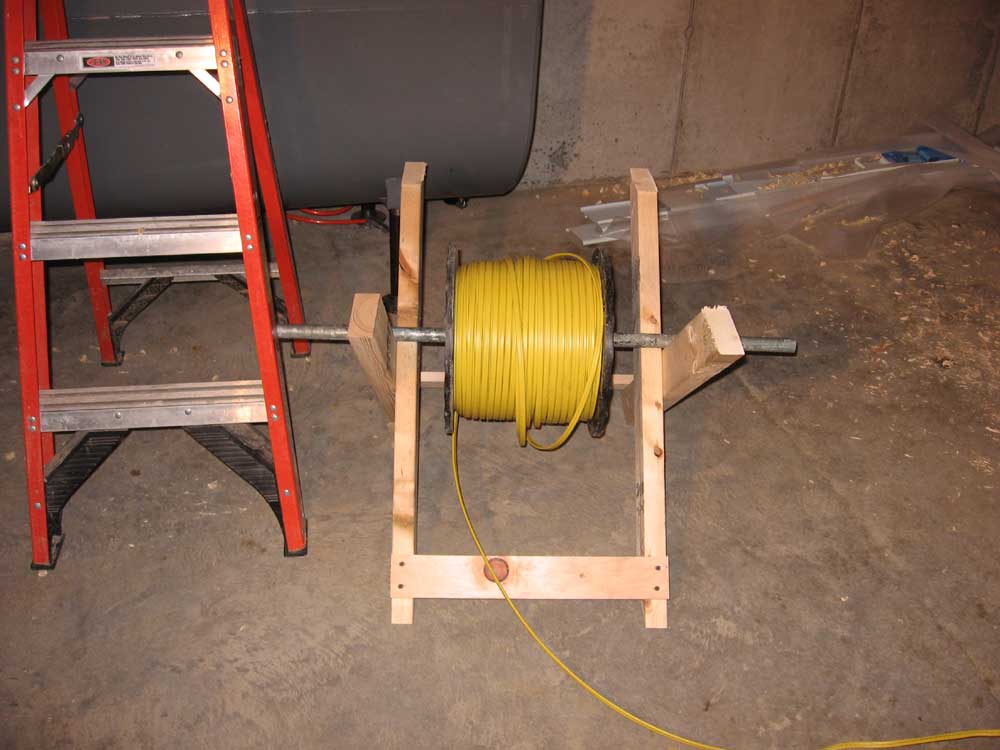
2x6 for the top.I reversed the lower cross braces on the second sawhorse so that the two would stack neatly. While I was at it, I built a simple X-brace support that I'd use to hold my 1000' reels of wire during installation, allowing for easy dispensing. |
|||
 I worked more on the initial electrical preparations today. I
finished drilling the holes into the box sill to mate up with the
vertical holes through the logs, using my big right angle drill to
reach into the tighter confines around the two end walls. I
found all the holes except one: despite drilling three 2"
holes well into the outer box sill in the marked area, I still
couldn't locate the vertical hole. Hmm. As of this
writing, I was still unsure what I was going to do about this. I worked more on the initial electrical preparations today. I
finished drilling the holes into the box sill to mate up with the
vertical holes through the logs, using my big right angle drill to
reach into the tighter confines around the two end walls. I
found all the holes except one: despite drilling three 2"
holes well into the outer box sill in the marked area, I still
couldn't locate the vertical hole. Hmm. As of this
writing, I was still unsure what I was going to do about this.I also began drilling some holes through the floor joists in the basement. I began with some 2" holes (since I had the bit chucked into the drill) nearest the panel and through all the joists to the stairwell, where I thought I would end up running many wires. I also drilled the 2" holes on the other side of the house, through several joists leading to the first interior wall leading upstairs, where I'd run many of the second floor wires.
|
|||
|
Then, I changed to my 1" auger bit and drilled pairs of holes through the remaining joists on the front of the house, and also several holes through the carrying beam in the center of the house to the other side. I got tired of drilling holes at this point, and moved on to other things.
|
|||
|
I spent some time marking a level line and then installing most of the outlet boxes on the stud walls on both floors. I didn't install switch boxes at this point since I still had to figure out what lights were needed and where the switches might go. Plus, a box I thought was full of double-gang boxes turned out to contain only one or two, the rest being triples. In any event, I planned to run all the outlet wiring first, and then the lighting and switch wires, since I didn't intend to share circuits between the two (this always ends up being overly complicated, in my experience, and I'd rather run the extra wire). I installed lots of outlet boxes, including additional boxes for Internet, phone, and TV.
|
|||
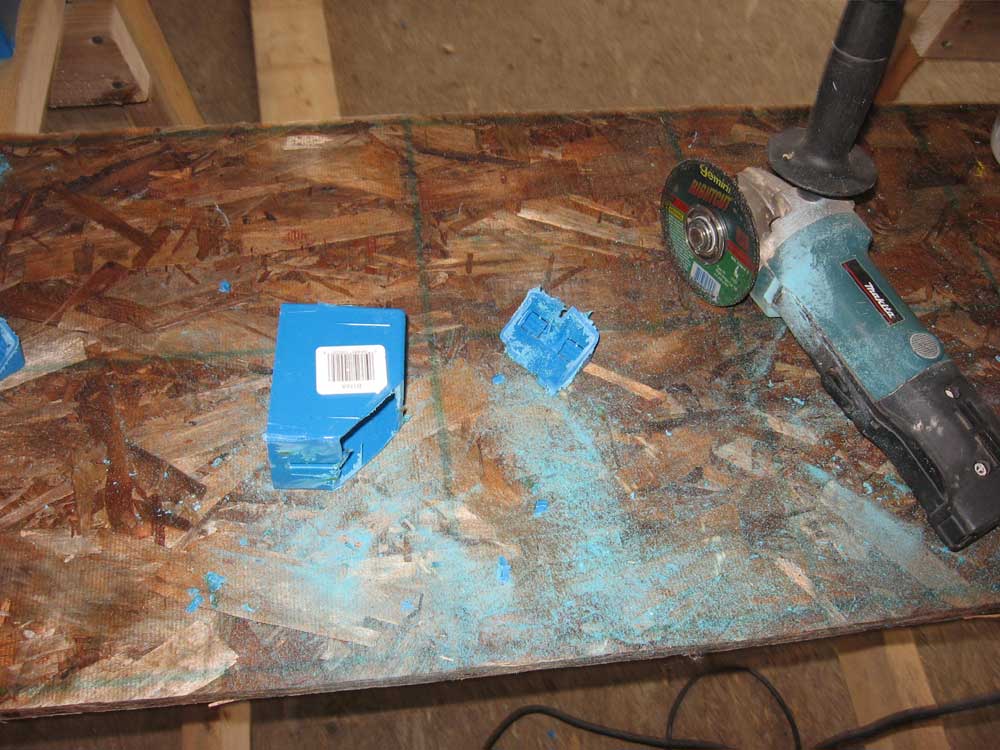 Since
the holes for the wiring in the logs were at the bottom of the box,
and since their location varied slightly from box to box, I decided
to just cut off part of the back and bottom of the box to allow the
wires to easily enter. I cut this off with the angle grinder
as well. Since
the holes for the wiring in the logs were at the bottom of the box,
and since their location varied slightly from box to box, I decided
to just cut off part of the back and bottom of the box to allow the
wires to easily enter. I cut this off with the angle grinder
as well.
Each box took a minute or two to modify and install; once modified, the boxes fit easily into the openings in the walls, and I secured them with a drywall screw. At this time, I knocked off for the day. My phone had died, so I had no way of telling the time, but as I had worked straight through lunch, I figured it was about 3:00--a good enough day for a Sunday. When I got back down to the shop, though, I discovered it was 4:30. |
|||
SATURDAY, AUGUST 19, 2006 |
|||
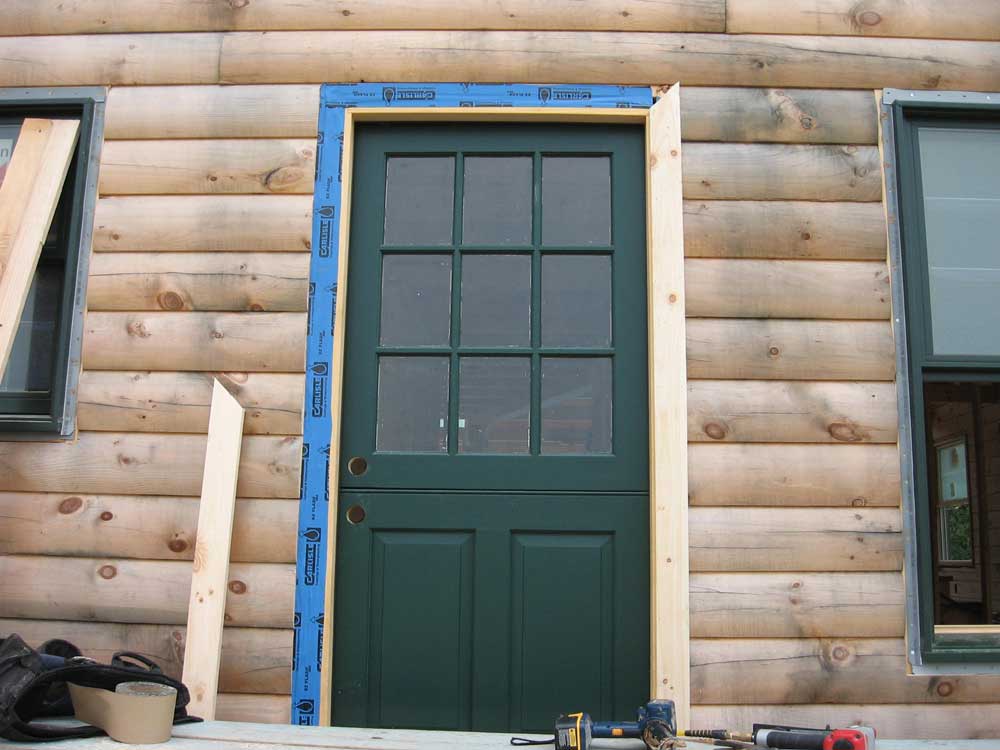
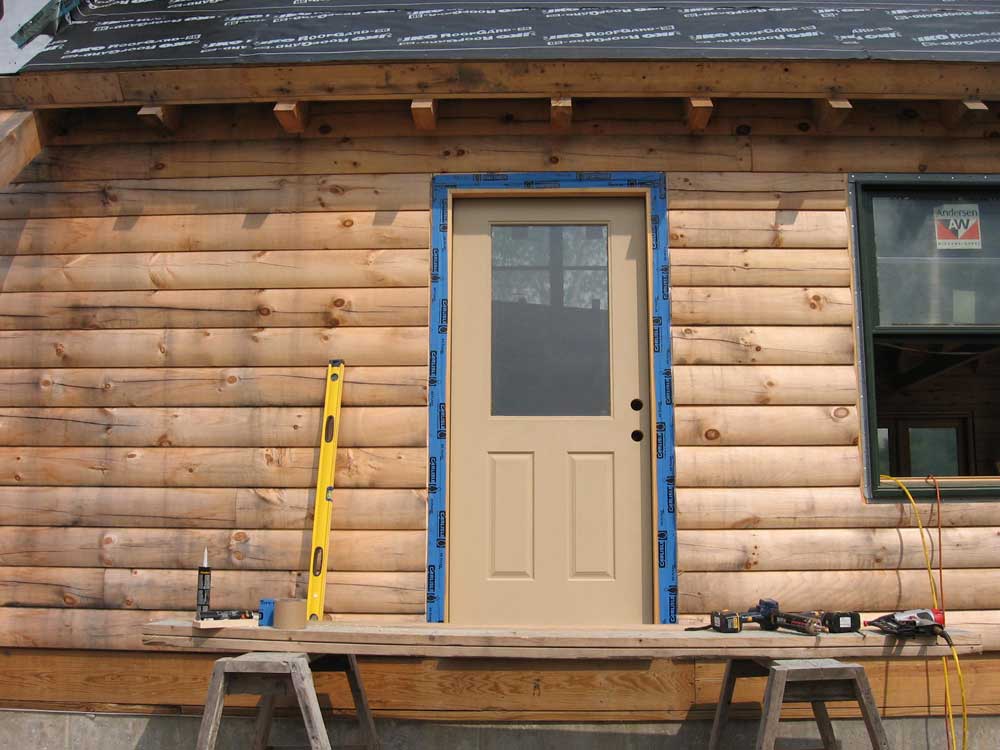
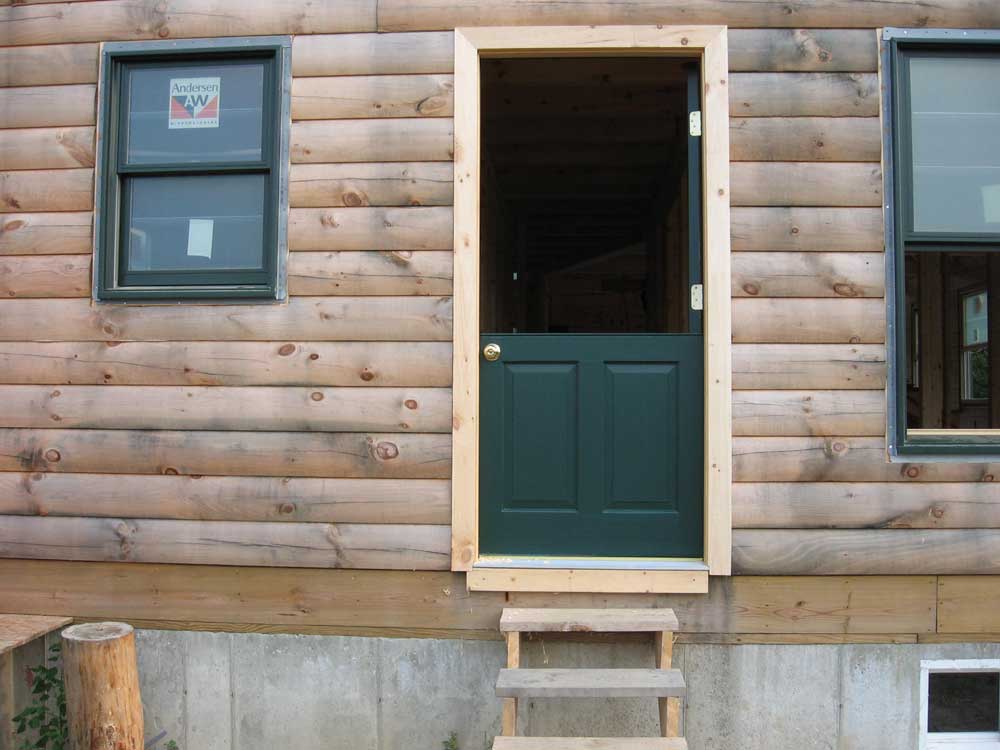
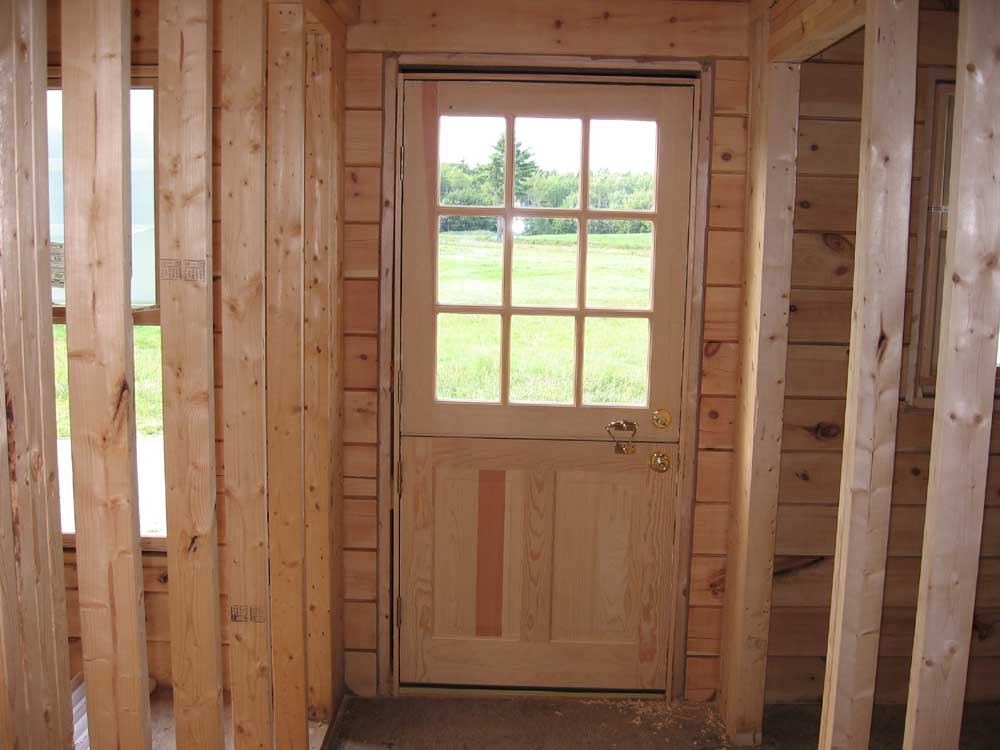
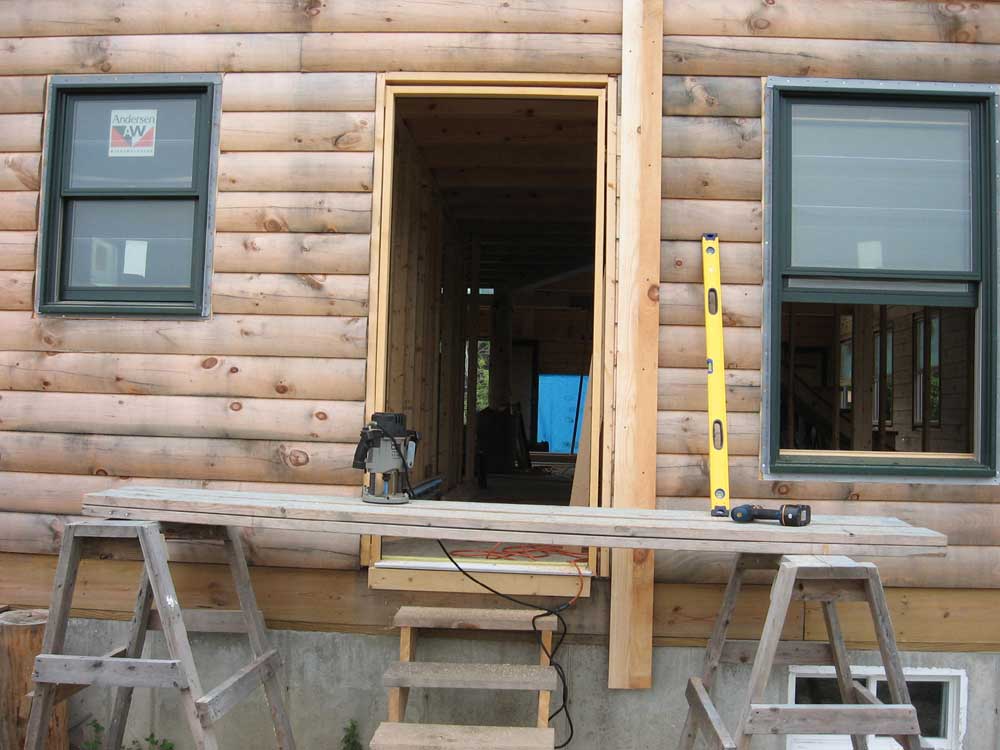
| Now that I had the Dutch door all painted and sealed, I decided it was time to install it, and to seal up both door openings. Since the two doors required the exterior trim in order to fully install them, I had postponed this work for several weeks, deeming it less important than other tasks. During rain showers since that time, water had still come in the Dutch door entrance, which didn't harm anything, but it was time to seal the opening off properly. The fact that Sunday was predicted to be a rainy day was also a factor in my decision. | |||
|
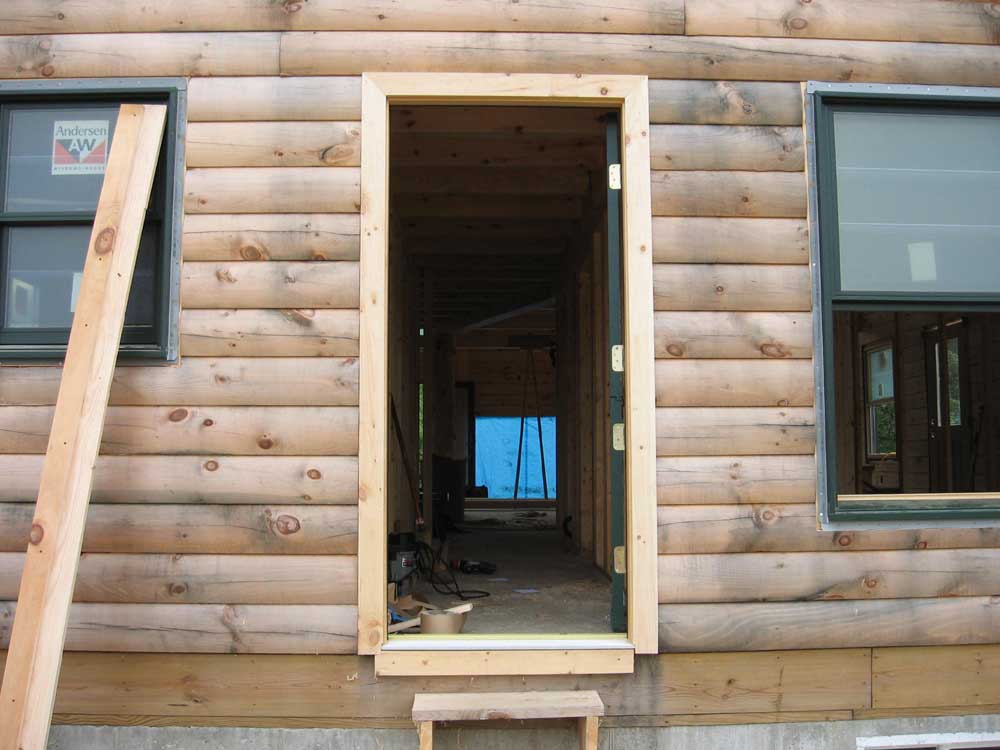
The first order of business was to notch out the exterior logs for the trim. During the installation of the window and door bucks, I had chosen to ignore the recommendation to make a saw cut into the ends of the logs at the outer edge of the bucks; if I had done this, then theoretically I was supposed to use a skilsaw to make a second cut on the outside of the logs, which would intersect perpendicular with the first cut. The waste material could then be chiseled out. I thought it would be better to use a router to notch the logs, however, and would provide a cleaner cut. So I didn't make the saw cuts, and now I had to figure out some sort of a router jig to use to make the cuts. After setting up some staging outside the Dutch door, I puzzled over the jig. I wanted to build a jig that didn't require any sort of fasteners to be driven into exposed areas of the logs, and eventually came up with a plan that I thought would work. I had to make a couple trips down to my shop to rip some wood on the table saw, so between this and the thought process, it took quite some time to build the jig. My jig included narrow strips of pine that I screwed into the window bucks right next to the door opening, and then cross braces to hold a straightedge out on the log surface. This eliminated the need to nail or screw into the logs where it might be visible. Unfortunately, once the jig was built, I realized that it just wasn't going to work very well, partly because each window and door opening was a little different and the jig probably wouldn't work as a universal thing. So despite the time invested, I trashed it, and went in a different direction. |
|||
 A
test screw driven into a scrap log showed that the resulting hole
was barely noticeable, if at all, so I decided to build a simple jig
that I would, after all, screw to the exterior face of the logs
outside of the opening. I used a wide piece of the ceiling
boards as a base, and to this attached a narrower straight edge
against which the router could ride, maintaining a straight cut.
I planned it so that the inside edge of the base board would align
with my measured pencil mark the correct distance away from the
door, making installation a snap. I needed only two drywall
screws to securely fasten it to the wall, minimizing any damage. A
test screw driven into a scrap log showed that the resulting hole
was barely noticeable, if at all, so I decided to build a simple jig
that I would, after all, screw to the exterior face of the logs
outside of the opening. I used a wide piece of the ceiling
boards as a base, and to this attached a narrower straight edge
against which the router could ride, maintaining a straight cut.
I planned it so that the inside edge of the base board would align
with my measured pencil mark the correct distance away from the
door, making installation a snap. I needed only two drywall
screws to securely fasten it to the wall, minimizing any damage. |
|||
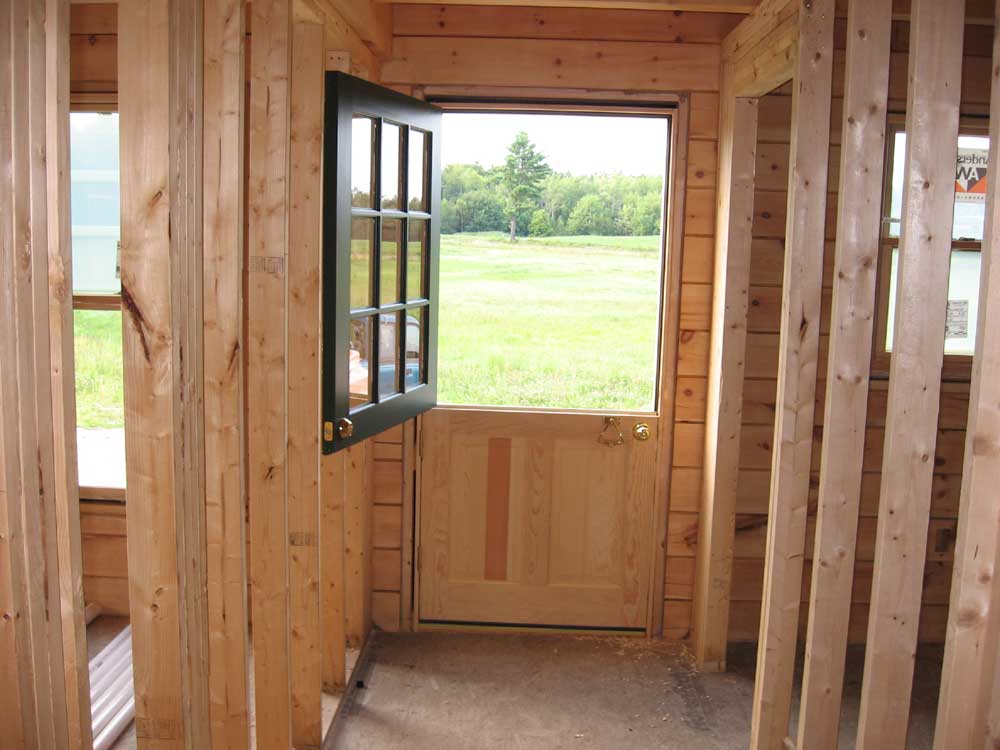
 With
the jig complete, I now rehung the two door panels on their hinges
and closed the door, and added shims from the inside to hold the
door jambs in the correct position, and to ensure that the door fit
properly. This took a little fussing, but eventually I was
happy with the fit. Of course, having the door in place--and
not operable at this time--complicated my means of going from the
inside of the house to the outside. With the front door also
inoperable at this time, I had to go through the basement.
Eventually, I used one of the large windows adjacent to the Dutch
door. With
the jig complete, I now rehung the two door panels on their hinges
and closed the door, and added shims from the inside to hold the
door jambs in the correct position, and to ensure that the door fit
properly. This took a little fussing, but eventually I was
happy with the fit. Of course, having the door in place--and
not operable at this time--complicated my means of going from the
inside of the house to the outside. With the front door also
inoperable at this time, I had to go through the basement.
Eventually, I used one of the large windows adjacent to the Dutch
door. |
|||
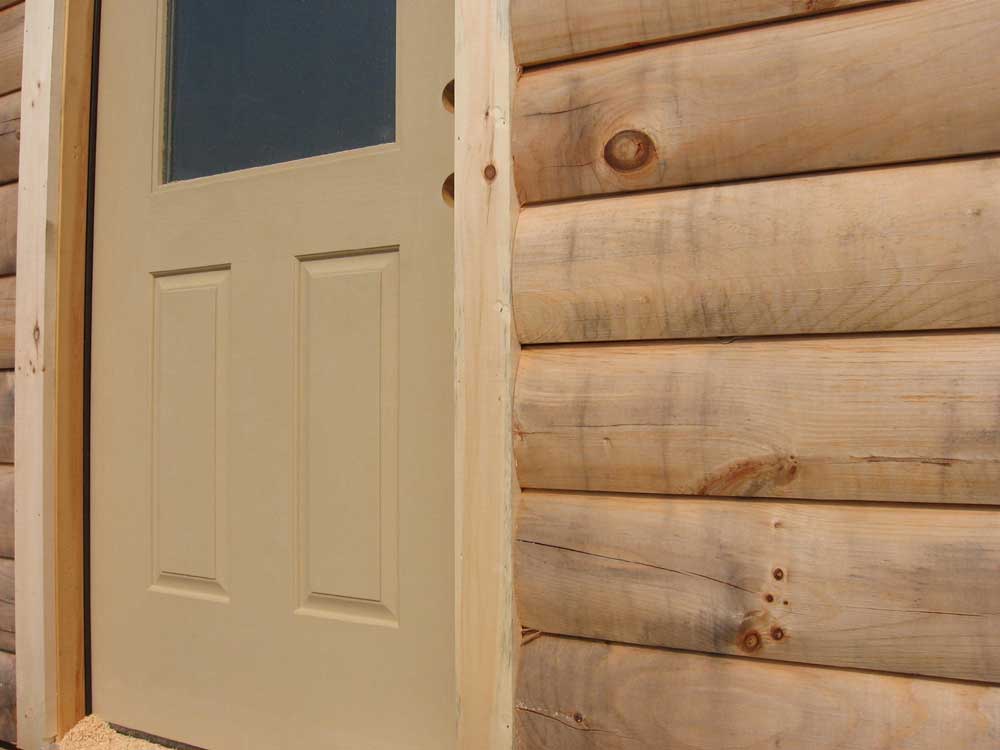
 Finally,
it was time to make a cut. I attached the jig to one side of
the door opening and ran the router through, plunging the bit deeper
each pass till I had reached the required depth (equal with the
window buck). The cut was clean and accurate, and now that I
had figured out the jig and the process, each remaining application
would go much more quickly. Finally,
it was time to make a cut. I attached the jig to one side of
the door opening and ran the router through, plunging the bit deeper
each pass till I had reached the required depth (equal with the
window buck). The cut was clean and accurate, and now that I
had figured out the jig and the process, each remaining application
would go much more quickly. |
|||
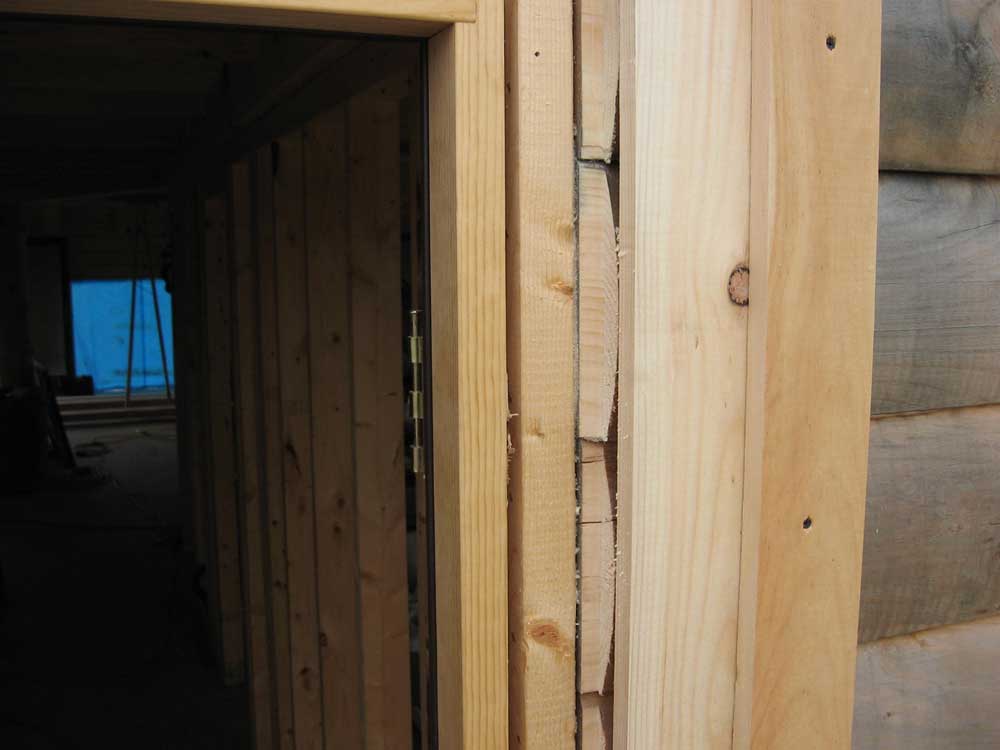
|
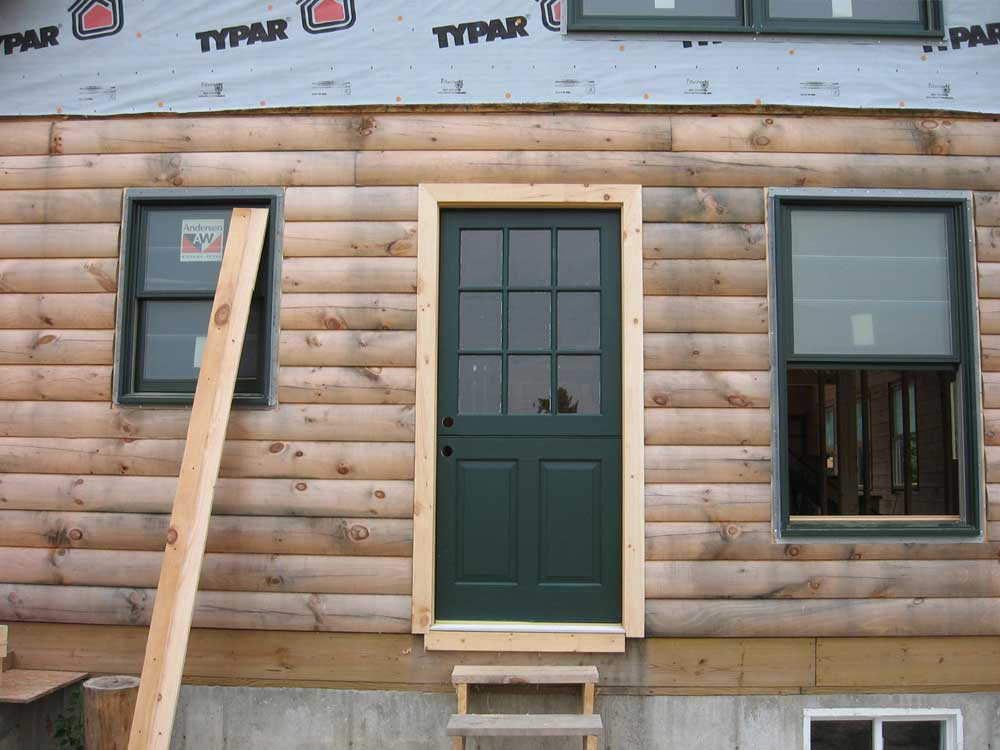
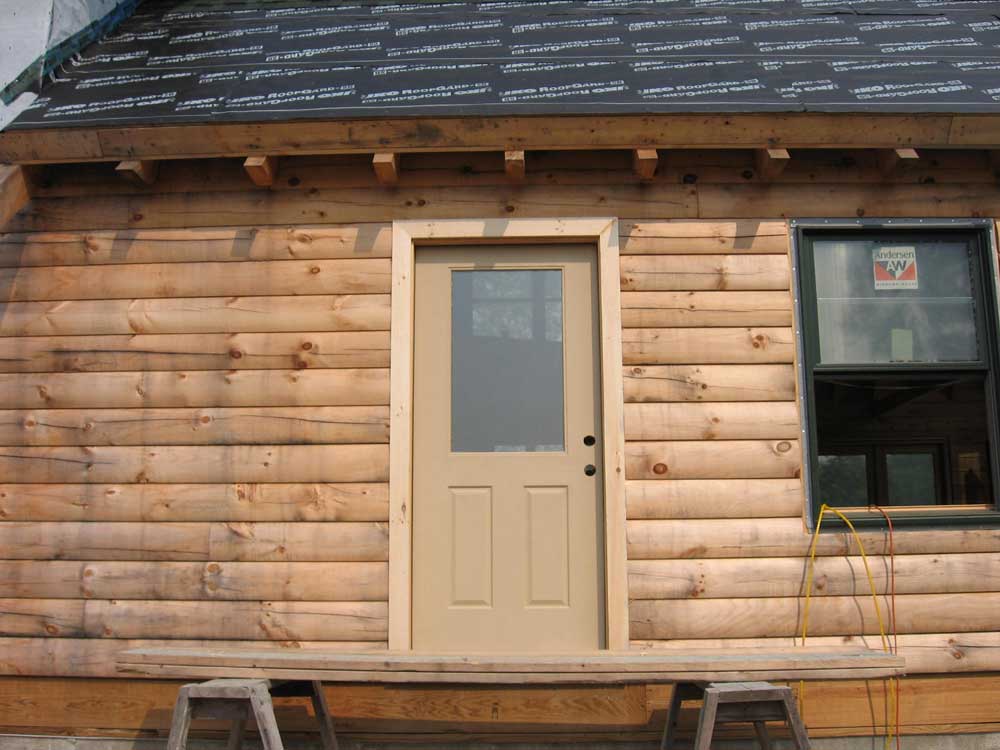
With the cuts made on all sides (I didn't have to rout the top, since the large gap above the door was, thankfully, just the right height for the 3-1/2" trim), I applied a bead of Sikaflex to the exterior seam of the door buck, and then installed rubberized flashing tape over the opening, keeping the edge inside of area that the trim would cover. This required cutting about an inch off the material. Then, I measured, cut, and installed the 5/4 x 3-1/2" flat pine trim, using more Sikaflex behind and securing it with 2-1/2" galvanized finish nails into the door casing and bucks. |
|||
|
|
|||
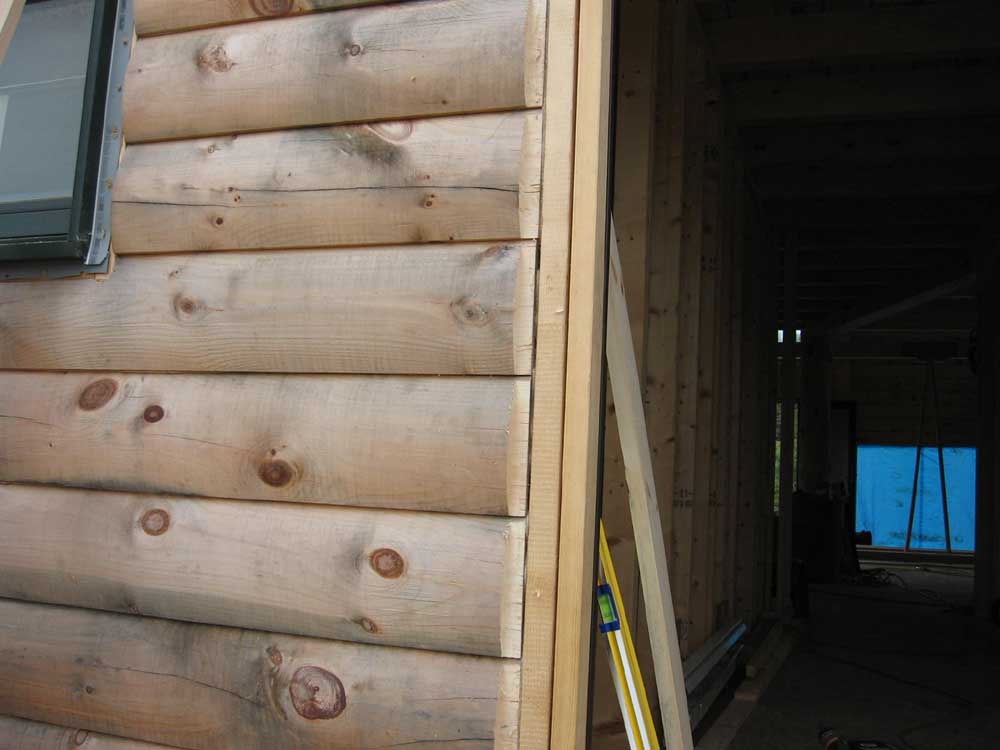
|
It had taken all morning to complete the first door. But now I had a system that worked, and I knew that the front door would go much more quickly, and that the windows, when I got to them, would also go quickly. I spent more time fine tuning the door fit from inside and getting it operating properly. |
|||
 After
a late lunch, I got to work on the front door, repeating the process
described above. As expected, I completed this door in no time
at all, relative to the Dutch door. In short order, I had the
sealant, flashing, and trim installed, despite the need for repeated
cuts on the top casing in order to make it fit; I always start with
the piece a little long, and shave it down to fit. This time,
it took three trips to get it right, though. After
a late lunch, I got to work on the front door, repeating the process
described above. As expected, I completed this door in no time
at all, relative to the Dutch door. In short order, I had the
sealant, flashing, and trim installed, despite the need for repeated
cuts on the top casing in order to make it fit; I always start with
the piece a little long, and shave it down to fit. This time,
it took three trips to get it right, though. |
|||
|
|
|||
|
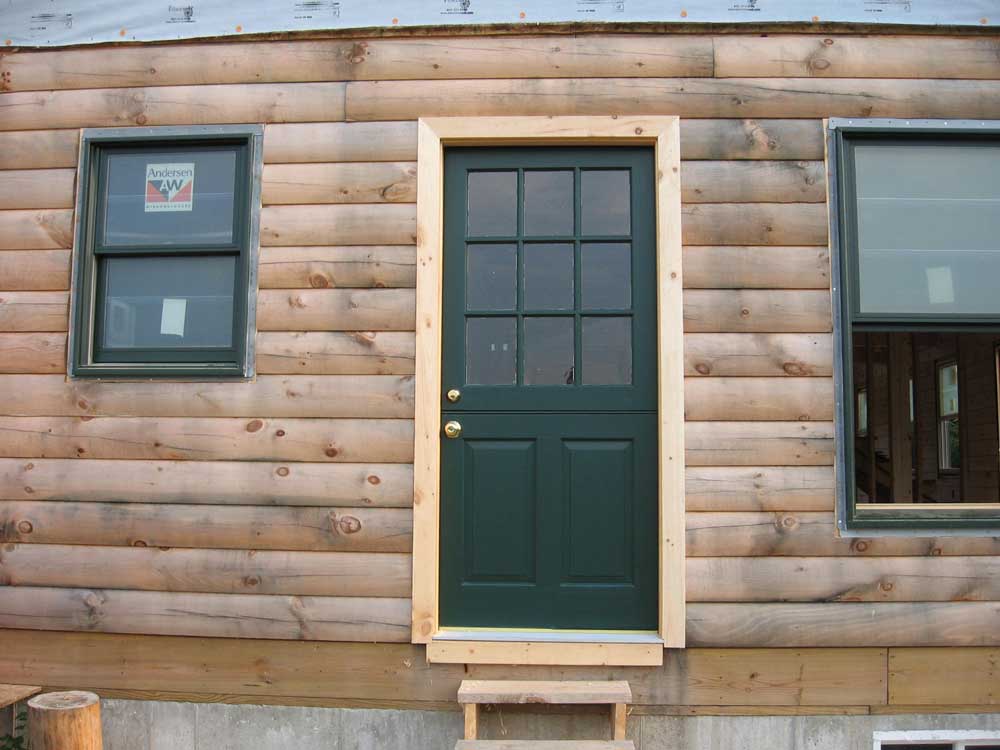
During the remainder of the afternoon, I finished securing the front door from the inside, allowing me to finally operate it normally, and then installed the door hardware and locksets on both doors to allow for convenient operation and securing against wind. I couldn't believe this process had taken all day, but sometimes that's just how it is. Note that the 2x4 at the bottom of the Dutch door is not part of the trim, and is only temporary to support the overhanging edge of the door threshold. I don't want you to think that somehow I wasn't aware of the horrible gaps on the ends. |
|||
|
|
|||
FRIDAY, AUGUST 18, 2006 |
|||
|
The morning began on an auspicious
note when I successfully reached Bunny at 7:00, and set up the work
to begin on Monday. Phew. Heidi and I spent the morning on house-related errands, beginning with a trip out to Moose Creek to meet with Wendy, the kitchen designer, etc. It was time to nail down our kitchen and bath cabinet choices and designs. The meeting was surprisingly short, at an hour or so, and she promised us an initial design later in the day. On the way home, we stopped in to Home Despot in Augusta for some pipe fittings that I had somehow forgotten yesterday, leaving me short on a few items. This was partly thanks to the fact that some of the items in the bins yesterday had been in the wrong spot, and I hadn't noticed until I got home. I also picked up some electrical supplies that I might need over the weekend. Next, it was on to Sherwin Williams, where I had them color match the Andersen forest green paint that covers our windows and doors, so that I could paint the Dutch door and the front door. The color match seemed to come out very nicely. We arrived home after lunch, and after I reviewed and commented on our initial kitchen design--which was waiting in my email--I went up to do some simple projects. I applied the two coats of poly to the final side of the truss beams, and two coats of the new green paint to the Dutch door. This was pretty much it for the afternoon. No pictures...sorry! I do have this to say: true divided light windows (with the individual panes) are great--attractive and classy--but I sure am glad I only have the one door to paint that contains these! The add-on grills on the remaining doors and windows may not look quite as nice, but they sure are easier! |
|||
THURSDAY, AUGUST 17, 2006 |
|||
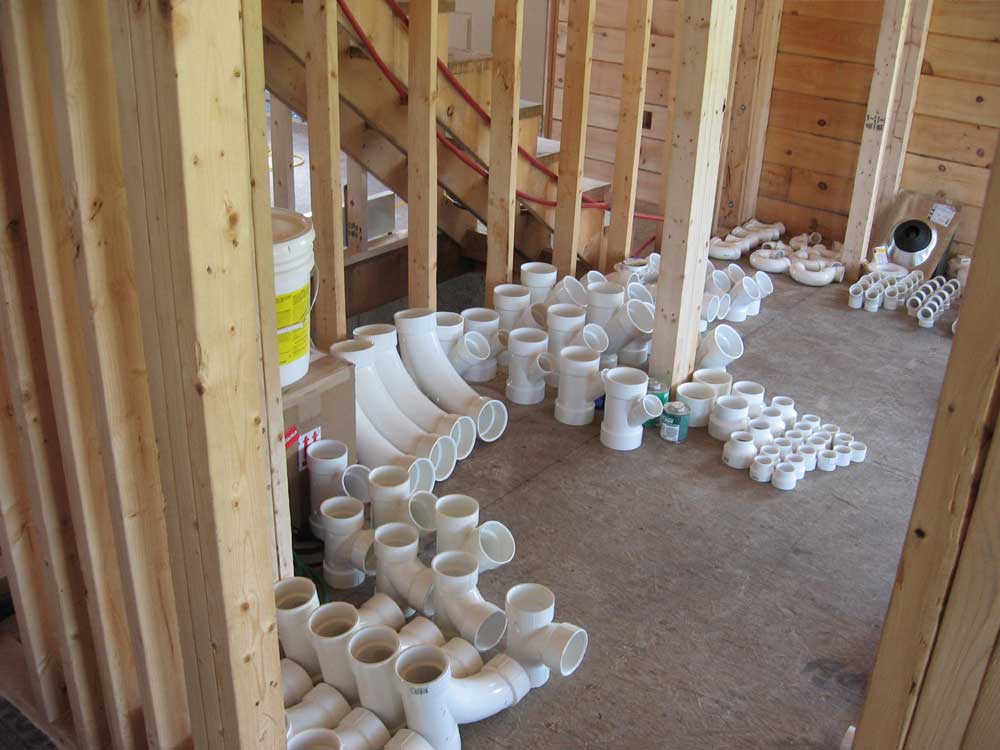 I
began the day with another trek to buy plumbing parts--but first I
had to return many of the parts I bought the other day. Then,
I collected the 200+ pieces on my list, and spent a tedious 45
minutes at checkout. I hate white pipe already. Plus, I
was frustrated a bit at having trouble getting hold of Bunny Brann,
my hopeful white pipe savior; a couple messages I left had not been
returned, and calls to both his cell and home numbers were
unanswered despite several tries to each. I
began the day with another trek to buy plumbing parts--but first I
had to return many of the parts I bought the other day. Then,
I collected the 200+ pieces on my list, and spent a tedious 45
minutes at checkout. I hate white pipe already. Plus, I
was frustrated a bit at having trouble getting hold of Bunny Brann,
my hopeful white pipe savior; a couple messages I left had not been
returned, and calls to both his cell and home numbers were
unanswered despite several tries to each.Despite my early start, it was 9:30 before I got back to the house. Then, I spent an hour unloading and organizing the plumbing parts. This seemed overwhelming. I was very much looking forward to getting this portion of the job over with! |
|||
|
|
|||
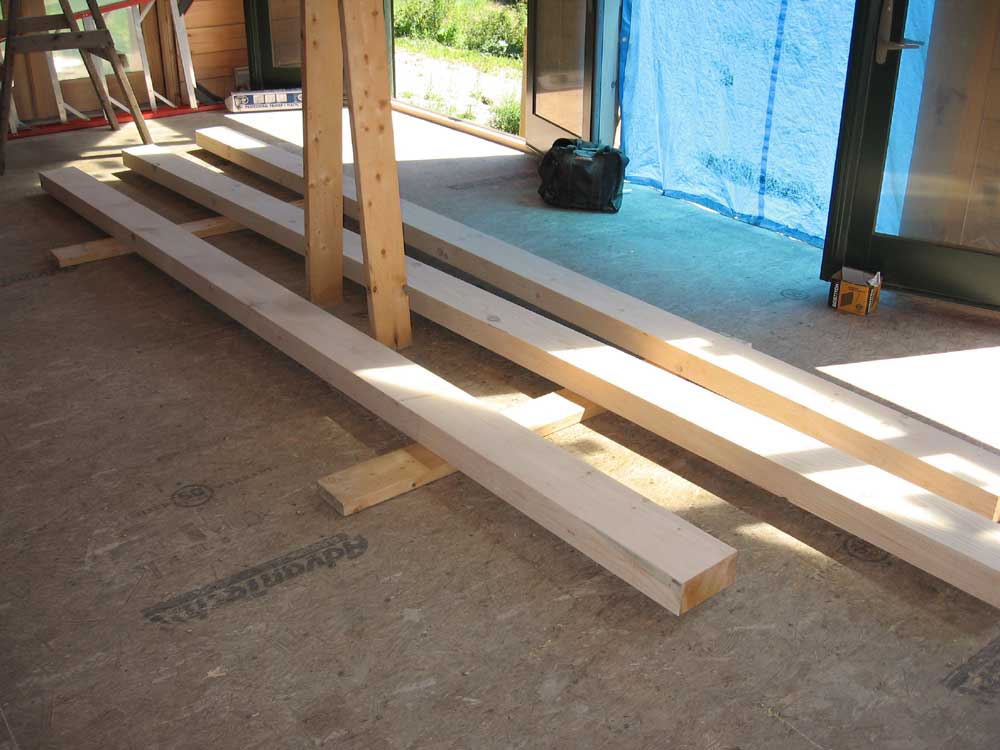 Once
that was done, I attacked the three 4x8 pine beams for the
fink truss. They were still fresh from the planer and
generally pretty smooth, but I sanded them with my finish sander and
80 grit to further smooth the surface and planer marks, and clean
them in a manner similar to the rest of the building. Then, I
applied two coats of the polyurethane to three of the sides, leaving
the 4th side (face down) for tomorrow. Once
that was done, I attacked the three 4x8 pine beams for the
fink truss. They were still fresh from the planer and
generally pretty smooth, but I sanded them with my finish sander and
80 grit to further smooth the surface and planer marks, and clean
them in a manner similar to the rest of the building. Then, I
applied two coats of the polyurethane to three of the sides, leaving
the 4th side (face down) for tomorrow. |
|||
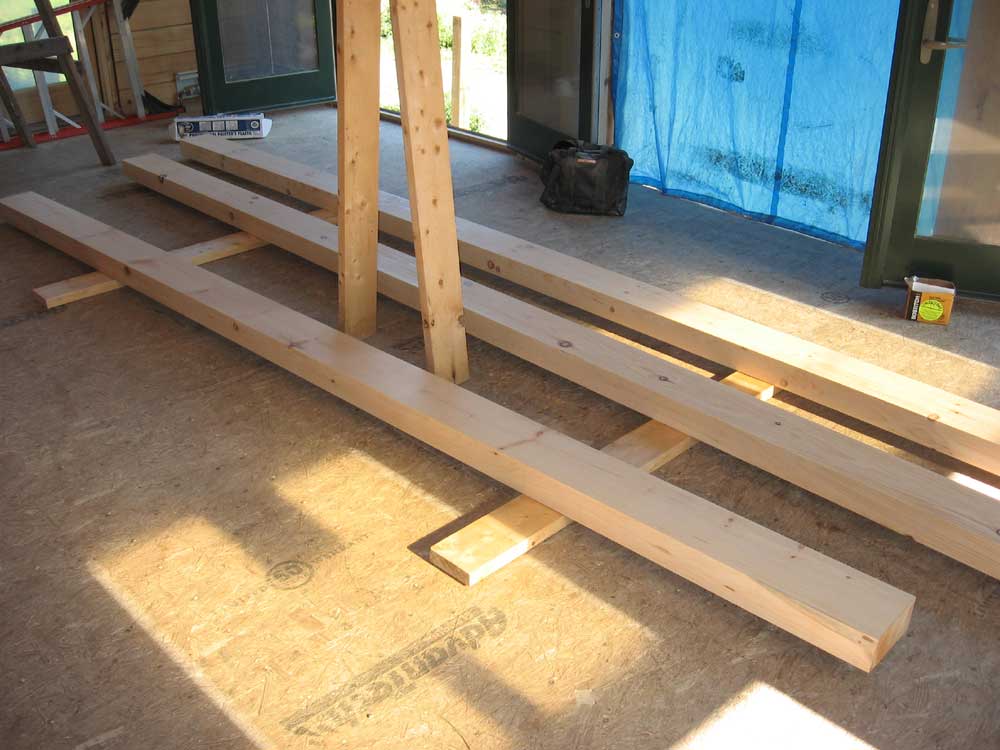 Next,
I worked on the Dutch door, and applied a coat of oil base primer to
the exterior. I used a marine primer since I had it on hand.
The mullions on the true divided light top panel contained some
glazing/caulking squeezeout, and after some consideration I decided
to not mask off the glass, as it wasn't possible to get a clean line
anyway with the squeezeout. It's easy enough to scrape dried
paint off glass, so I proceeded without taping, which saved some
time. Next,
I worked on the Dutch door, and applied a coat of oil base primer to
the exterior. I used a marine primer since I had it on hand.
The mullions on the true divided light top panel contained some
glazing/caulking squeezeout, and after some consideration I decided
to not mask off the glass, as it wasn't possible to get a clean line
anyway with the squeezeout. It's easy enough to scrape dried
paint off glass, so I proceeded without taping, which saved some
time. |
|||
 With
the time remaining in the day, I began some preliminary work on the
electrical system. During log construction, we had drilled
through the logs, but the bit came out inside the double box sill in
the basement. Now, I needed to access the hidden hole so that
I could run wires through. With
the time remaining in the day, I began some preliminary work on the
electrical system. During log construction, we had drilled
through the logs, but the bit came out inside the double box sill in
the basement. Now, I needed to access the hidden hole so that
I could run wires through. |
|||
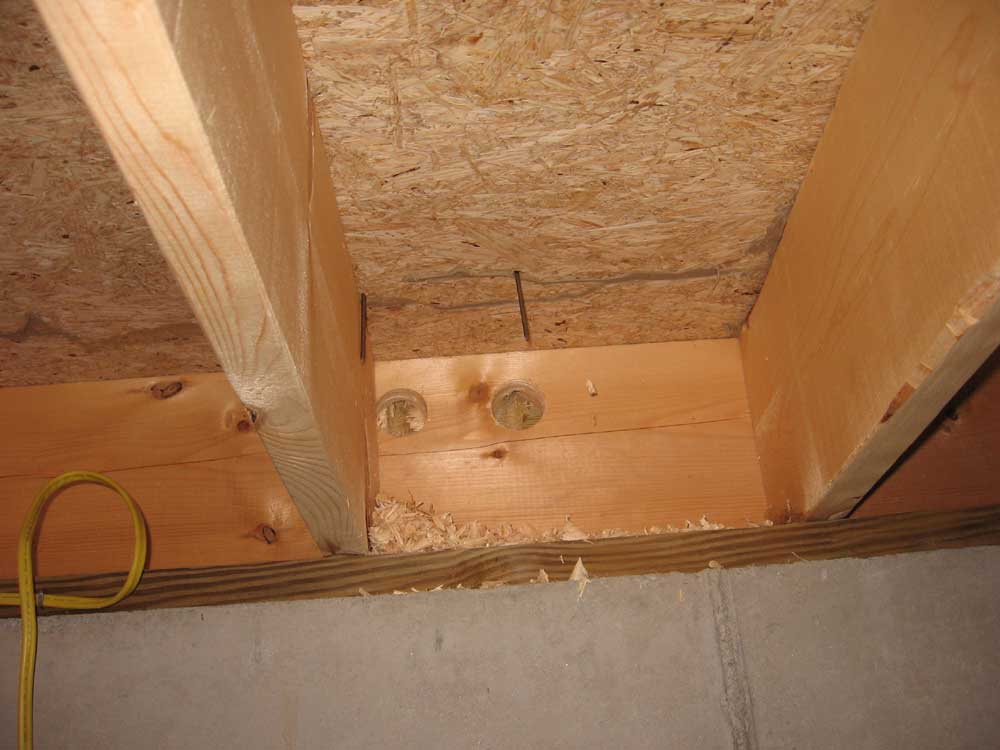 At
each box location, I drilled a 1/4" hole through the subfloor, and
dropped in a 16 penny spike. From the basement, these spikes
were easy to see, and marked the location of the box above.
Next, I used a 2" Forstner bit to drill into the box sill in way of
the marked areas, hoping to hit the hole inside. The large bit
virtually guaranteed that I'd find at least the edge of the vertical
hole, even if it was at an angle or my marking was off. It
worked! In this manner, I found all the holes for the log
electrical boxes, except for those on the two gable end walls, as
the space between the joists there was too tight for my drill.
As the day was getting short, I decided to wait till another day to
use my big right angle drill to locate those holes. At
each box location, I drilled a 1/4" hole through the subfloor, and
dropped in a 16 penny spike. From the basement, these spikes
were easy to see, and marked the location of the box above.
Next, I used a 2" Forstner bit to drill into the box sill in way of
the marked areas, hoping to hit the hole inside. The large bit
virtually guaranteed that I'd find at least the edge of the vertical
hole, even if it was at an angle or my marking was off. It
worked! In this manner, I found all the holes for the log
electrical boxes, except for those on the two gable end walls, as
the space between the joists there was too tight for my drill.
As the day was getting short, I decided to wait till another day to
use my big right angle drill to locate those holes.I tried to reach Bunny several more times during the day and into the evening, but to no avail. |
|||
WEDNESDAY, AUGUST 16, 2006 |
|||
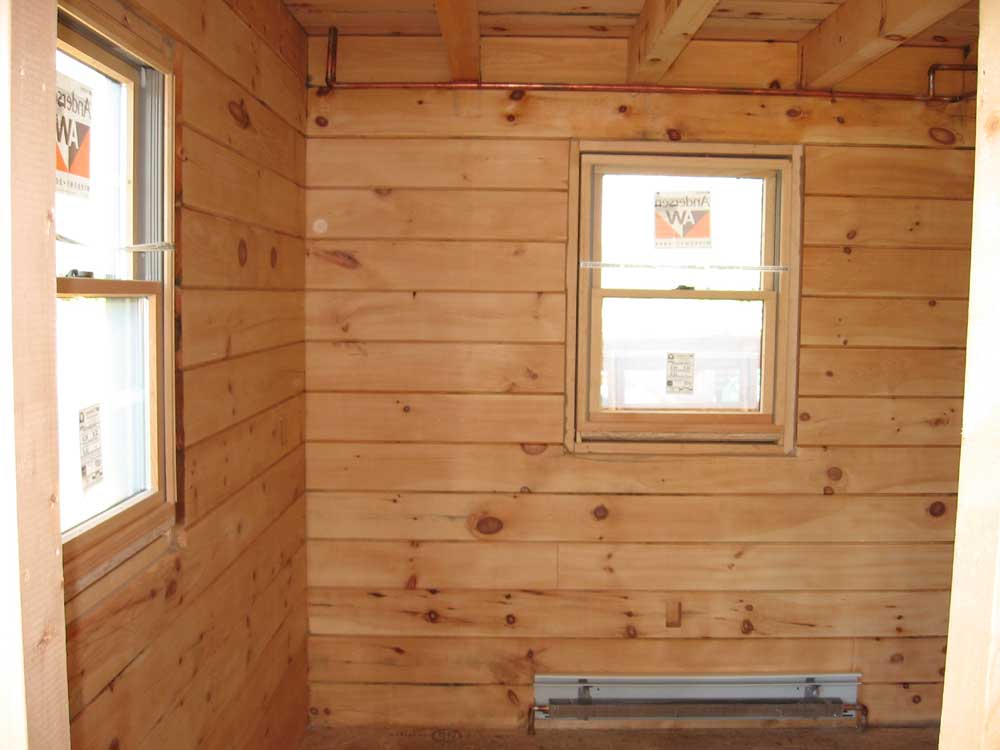 Today,
I completed the sanding and finishing! While I have no doubt I
will find myself piloting the sander again before this project is
over, the large scale job of preparing all the interior wood ended
today with no fanfare. Today,
I completed the sanding and finishing! While I have no doubt I
will find myself piloting the sander again before this project is
over, the large scale job of preparing all the interior wood ended
today with no fanfare.I began in the downstairs bathroom where I left off last night, completing the last wall down to floor level. Then, I sanded two very small sections of exposed log next to the Dutch door in the hallway before moving on to Heidi's office and craft room. |
|||
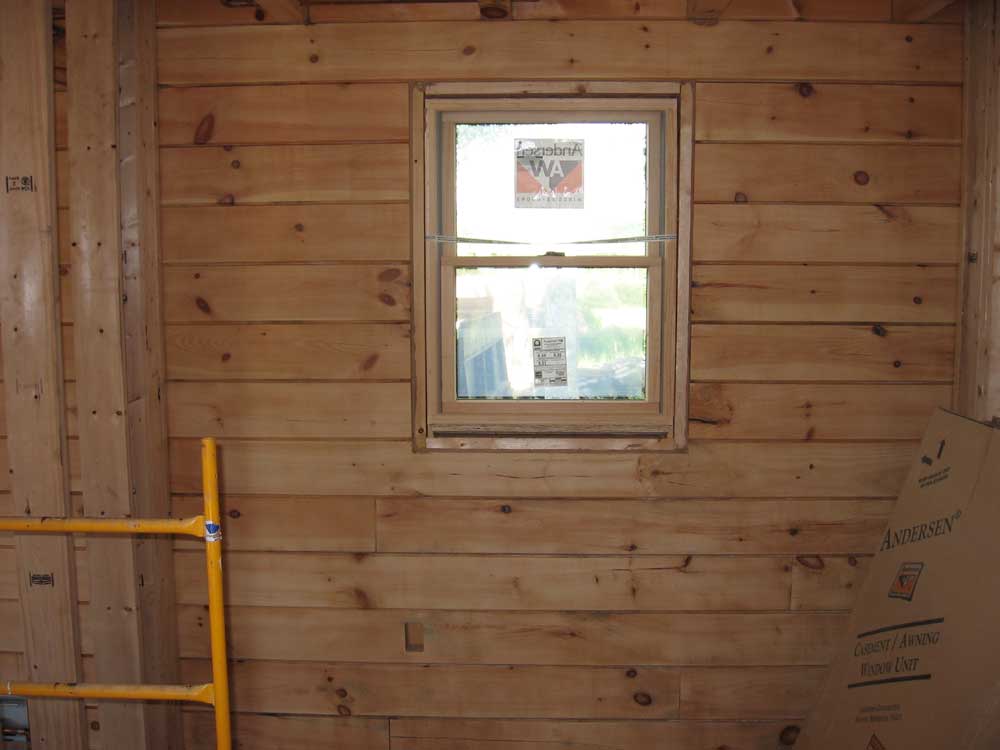 Work
went fairly quickly here, since with so many windows the actual
amount of log to sand was pretty minimal. Everything was hunky
dory until suddenly my sander decided to go funky on me. I had
been experiencing some irritating problems with the switch during
previous days of sanding, a known problem with these sanders.
Now, however, not only did the switch not want to work, but when I
finally got the sander going, it lacked its normal speed and
power--an ominous sign. Work
went fairly quickly here, since with so many windows the actual
amount of log to sand was pretty minimal. Everything was hunky
dory until suddenly my sander decided to go funky on me. I had
been experiencing some irritating problems with the switch during
previous days of sanding, a known problem with these sanders.
Now, however, not only did the switch not want to work, but when I
finally got the sander going, it lacked its normal speed and
power--an ominous sign. |
|||
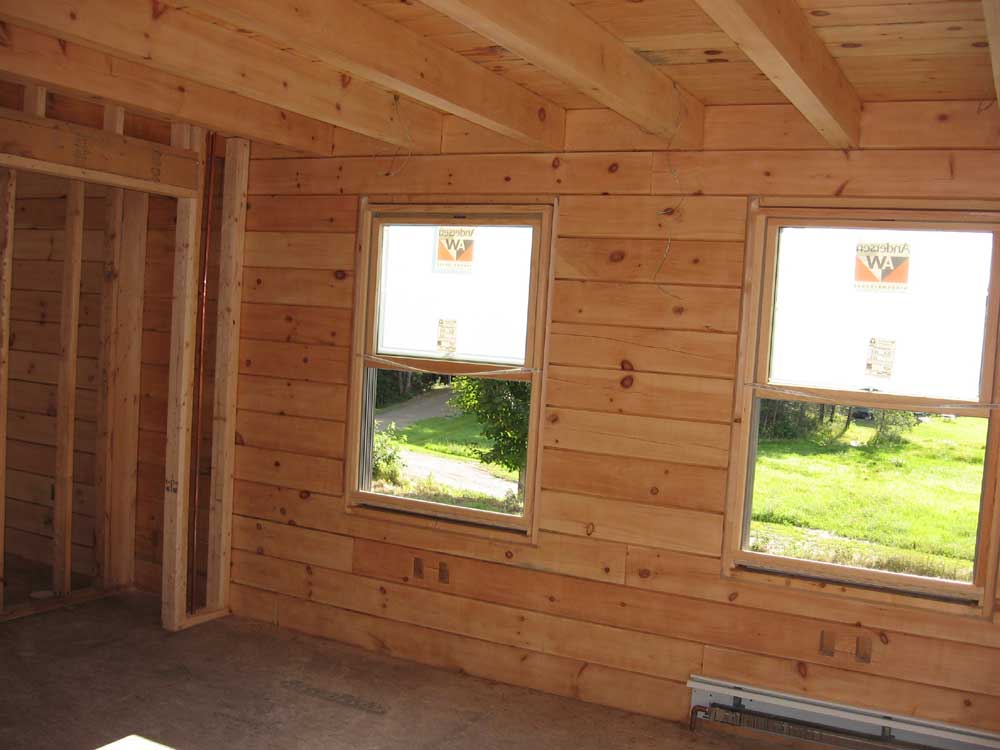 At
this point, I was so close to being finished that the thought of
losing my sander was not very pleasant. There was little
enough area remaining so that I could have used my finishing
sander--the one that I use for the cleaning pass with 120 grit--to
finish up, though it would have been slower, Instead, I
pressed on with the sander, which was still working, though
decidedly slower than normal. Since I was worried about
stopping it, I carried on with each sanding disc just as long as I
could before stopping the sander to change discs. Fortunately,
the sander made it through to the end of the project, barely.
I suppose after the thousands of square footage it had sanded over
the past several weeks that I shouldn't knock it. At
this point, I was so close to being finished that the thought of
losing my sander was not very pleasant. There was little
enough area remaining so that I could have used my finishing
sander--the one that I use for the cleaning pass with 120 grit--to
finish up, though it would have been slower, Instead, I
pressed on with the sander, which was still working, though
decidedly slower than normal. Since I was worried about
stopping it, I carried on with each sanding disc just as long as I
could before stopping the sander to change discs. Fortunately,
the sander made it through to the end of the project, barely.
I suppose after the thousands of square footage it had sanded over
the past several weeks that I shouldn't knock it. |
|||
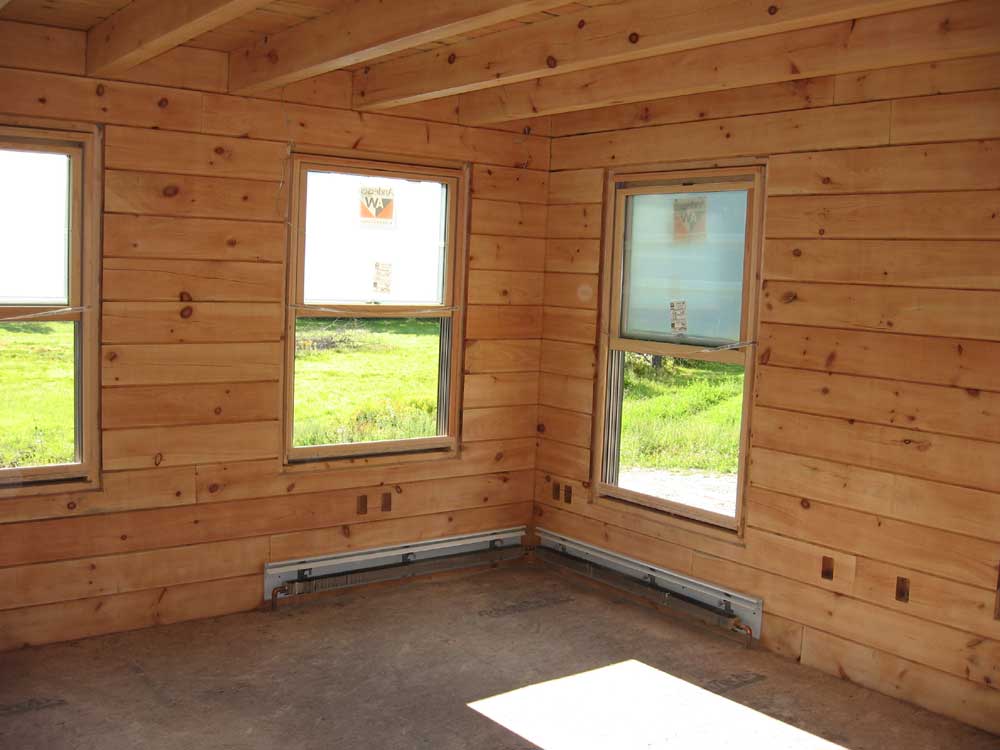 After
going over the final three rooms with the 120 grit, I was officially
done sanding. I cleaned up the dust and blew down the walls,
and cleaned up excess dust throughout the house so that the breeze
wouldn't blow it into the new finish later on. By now, it was
lunchtime, so I took a little break. After
going over the final three rooms with the 120 grit, I was officially
done sanding. I cleaned up the dust and blew down the walls,
and cleaned up excess dust throughout the house so that the breeze
wouldn't blow it into the new finish later on. By now, it was
lunchtime, so I took a little break. |
|||
|
After lunch, I applied two coats of poly to the office, bathroom, and pantry, which went smoothly without issue. It felt great to be covering the final section with poly. I received a plumbing materials list from Bunny Brann, and spent some time late in the day going through the pieces I had purchased earlier in the week and checking them off against the list. There were a lot of pieces that I didn't need, and many more pieces that I would need, so I planned another pre-dawn trip in the morning to pick up the remainder. I had hoped to get the tub lifted into the house today, but the 4x8 truss beams I had been waiting for arrived on a small truck with no boom and a different driver--rats! That will have to wait for another day. I immediately put the fresh, white, clean beams inside the house for safekeeping; I planned to lightly sand them and apply the poly tomorrow, before their installation. Not only would this mean that once installed the truss would be complete, without a need to climb to the ridge to finish it, but pre-finishing would also protect the wood during whatever time period should elapse before I can get them installed. I'll have to see what Bob's schedule will allow, as I'll need his assistance. |
|||
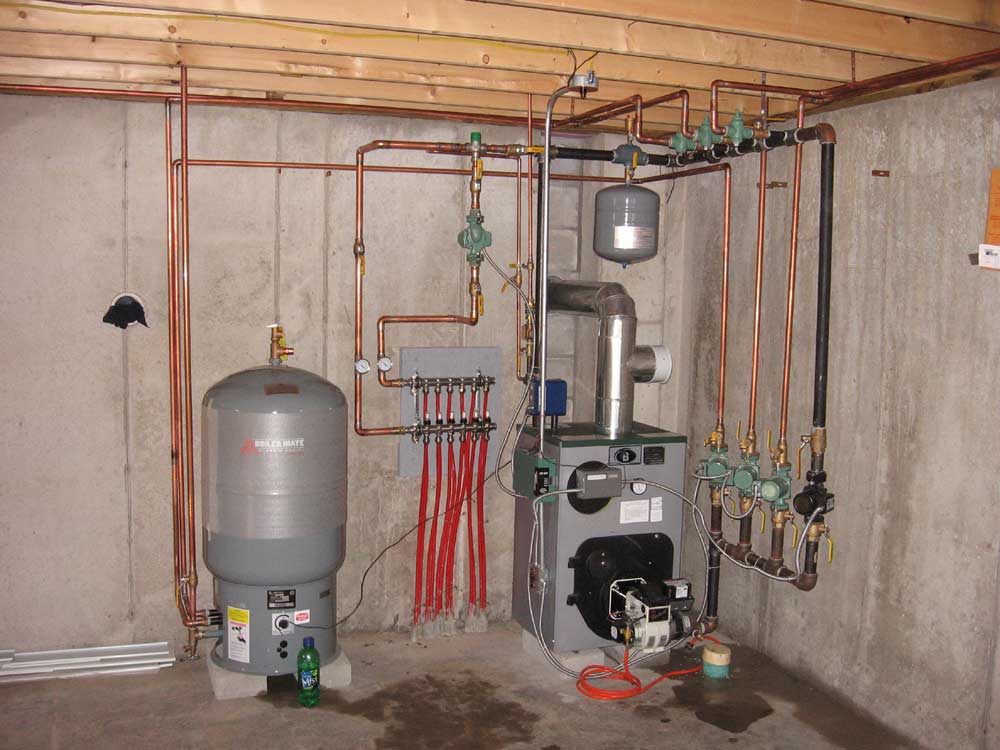 I
filled in the last vestiges of the afternoon by reinstalling the
window latch hardware that I had removed a couple weeks ago in order
to finish the window sashes. This was an easy yet tedious job
that was not critical, but it's best to take a few spare minutes
when they present themselves. I
filled in the last vestiges of the afternoon by reinstalling the
window latch hardware that I had removed a couple weeks ago in order
to finish the window sashes. This was an easy yet tedious job
that was not critical, but it's best to take a few spare minutes
when they present themselves. |
|||
|
The heat guys finally finished up today, after another full (for them) day onsite. The end result looked excellent, though, and it was nice knowing that the heating system was ready to go as soon as necessary. |
|||
|
Click here to go to the logs from August 1 to August 15. |
|||
|
|||