|
| |
|
From a Bare
Hull: The Deck
|
|
Final Pre-Sheathing Punch List: Deck
Beam Finishing
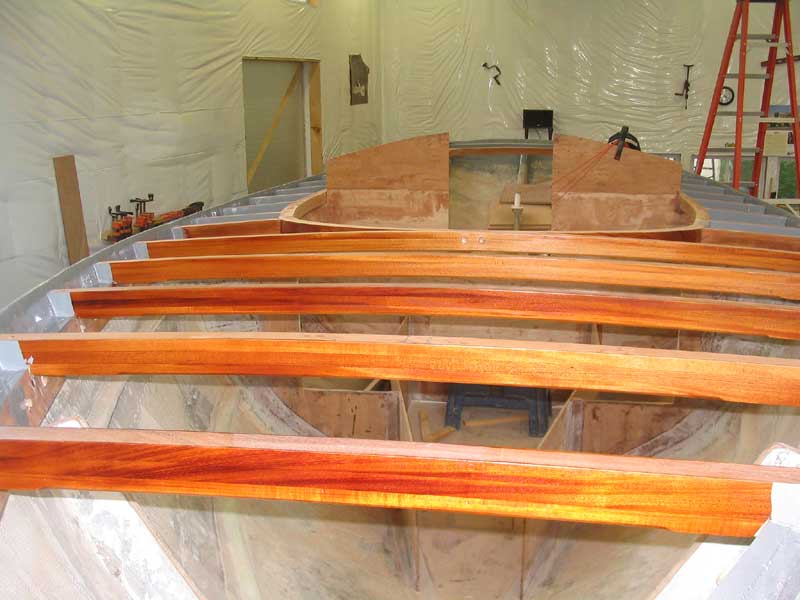
With all the deck beams and other deck
framing installed and complete, only a few smaller details remained before
it was time to install the plywood deck sheathing.
First
on the list was a final sanding of most of the beams and carlins. I
had sanded all the beams prior to installation, but there was some epoxy
residue here and there that I wanted to remove in order to make the beams
as nice as they could be. Even though most of the beams would never
be seen in the final product, I felt that it was important to ensure that
they looked almost good enough for full exposure. The devil is
in the details. 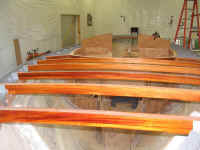 The
full-width beams forward of the cabin trunk area had already been sanded
and coated with some preliminary varnish (since these beams alone would be
fully exposed in the final construction), so I took a few moments to
lightly sand the varnish in preparation for an additional coat
later. I wanted to complete the base varnish buildup, at a minimum,
before the deck sheathing was installed. The
full-width beams forward of the cabin trunk area had already been sanded
and coated with some preliminary varnish (since these beams alone would be
fully exposed in the final construction), so I took a few moments to
lightly sand the varnish in preparation for an additional coat
later. I wanted to complete the base varnish buildup, at a minimum,
before the deck sheathing was installed.
|
|
 I sanded the remainder of the beams--all the
short beams from the aft side of the chainplate bulkhead to the
transom--with 120 grit paper to remove any roughness and excess
epoxy. I didn't worry about perfection, since these beams would all
be painted, but I was striving to achieve a smooth, clean
surface. I also sanded the carlins to the same
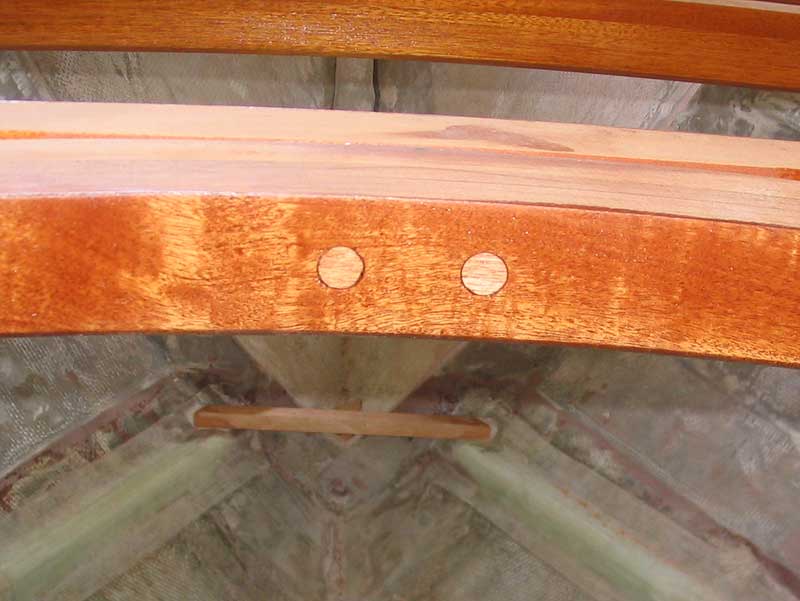
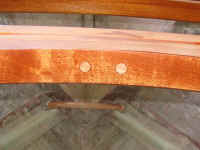
finish. The curved carlin at the forward end of the eventual cabin
trunk opening would be at least partially exposed in the final
interior--and would also be varnished--so I re-sanded that piece with 220
grit. I realized I didn't have a plug cutter large enough to cut
plugs to fill the boltholes securing this carlin to the deck beam ahead,
and made a mental note to obtain some properly-sized plugs or dowels
somewhere. I eventually just purchased some from a supplier, after
discovering that I needed two different sizes, since the counterbores on
the forward side of the beam were larger than those on the aft
side. I sanded the remainder of the beams--all the
short beams from the aft side of the chainplate bulkhead to the
transom--with 120 grit paper to remove any roughness and excess
epoxy. I didn't worry about perfection, since these beams would all
be painted, but I was striving to achieve a smooth, clean
surface. I also sanded the carlins to the same
finish. The curved carlin at the forward end of the eventual cabin
trunk opening would be at least partially exposed in the final
interior--and would also be varnished--so I re-sanded that piece with 220
grit. I realized I didn't have a plug cutter large enough to cut
plugs to fill the boltholes securing this carlin to the deck beam ahead,
and made a mental note to obtain some properly-sized plugs or dowels
somewhere. I eventually just purchased some from a supplier, after
discovering that I needed two different sizes, since the counterbores on
the forward side of the beam were larger than those on the aft
side.
|
|
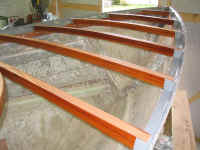 The
curved carlin also required a bit of sanding on the top surface to bring
it more closely into alignment with the deck camber determined by the
surrounding beams. I used a belt sander to easily sand the top to an
appropriate shape--it needed little fairing. Judging by eye, the
remaining deck beams--nearly all of them short to begin with--looked to be
more or less fair, so I saw no need to perform any final fairing. The
curved carlin also required a bit of sanding on the top surface to bring
it more closely into alignment with the deck camber determined by the
surrounding beams. I used a belt sander to easily sand the top to an
appropriate shape--it needed little fairing. Judging by eye, the
remaining deck beams--nearly all of them short to begin with--looked to be
more or less fair, so I saw no need to perform any final fairing.
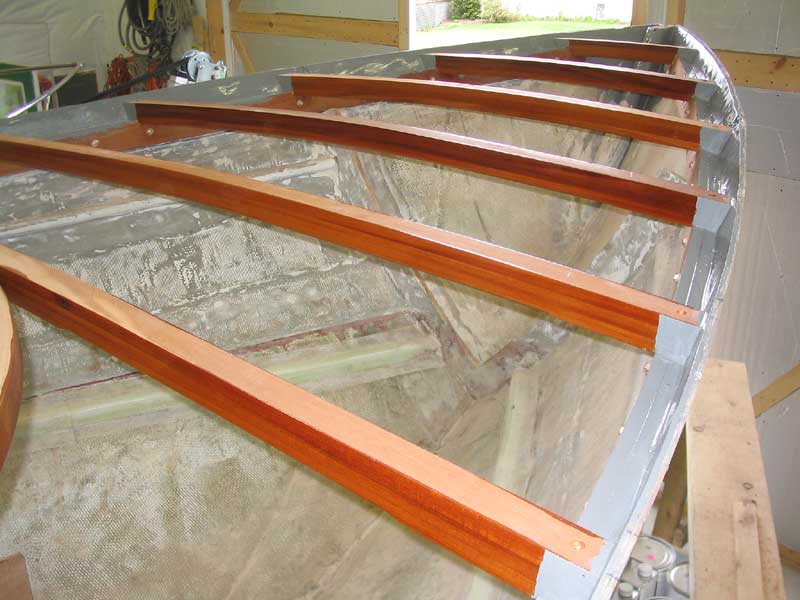
With
all the beams sanded to my satisfaction, I vacuumed off the dust and
cleaned the beams with thinner. Then, I applied more varnish to the
forward beams. The ultimate goal was to apply enough of the
gloss varnish to smooth out the texture of the wood (without hiding the
character and grain the way paste fillers would--yuck!), after which I
applied several coats of interior rubbed-effect varnish for a smooth,
satin, hand-rubbed appearance. |
|
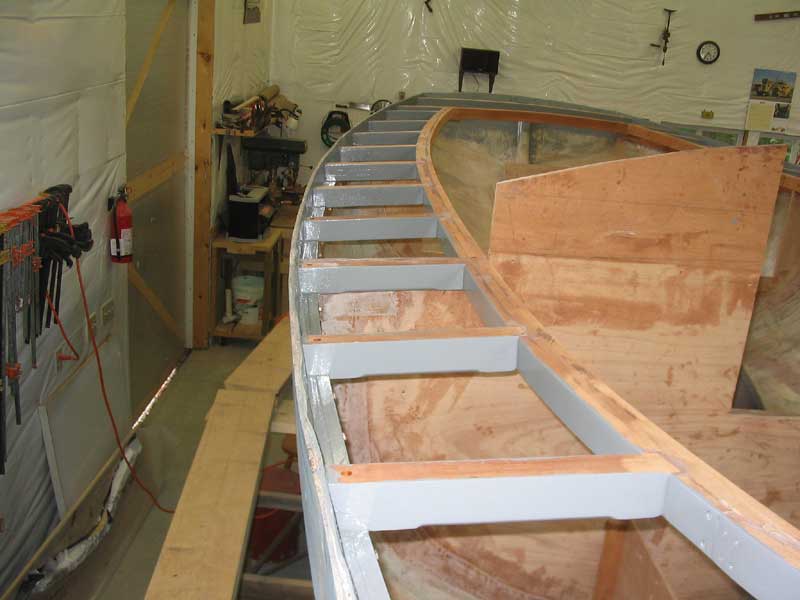
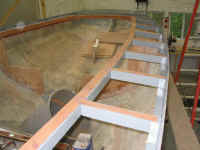
 Next,
working from my staging, I painted all the areas that would be difficult
or impossible to reach easily once the deck sheathing was applied:
notably, at the top of the hull, top edge of the sheer clamps, and insides
of the deck beams and carlins. Later, I planned to paint the
undersides of the beams and other areas inside the hull, but for now I was
only concerned with the areas that would be tough to do once the decks
were installed. I used gray Interlux Bilgekote to coat all the
surfaces in question. Later, I applied a second coat for good
measure. I didn't paint or varnish the tops of the beams, since I
wanted raw wood there for good bonding with the deck sheathing adhesive
later. Next,
working from my staging, I painted all the areas that would be difficult
or impossible to reach easily once the deck sheathing was applied:
notably, at the top of the hull, top edge of the sheer clamps, and insides
of the deck beams and carlins. Later, I planned to paint the
undersides of the beams and other areas inside the hull, but for now I was
only concerned with the areas that would be tough to do once the decks
were installed. I used gray Interlux Bilgekote to coat all the
surfaces in question. Later, I applied a second coat for good
measure. I didn't paint or varnish the tops of the beams, since I
wanted raw wood there for good bonding with the deck sheathing adhesive
later.
|
|
 As
with some previous paint application in the bilge, I found this job
immensely satisfying. Later throughout the project, I planned to
coat all "unfinished" surfaces--that is, raw fiberglass sections
of the interior, bilges, and lockers--with the same paint. Any
normally visible areas in the cabin, of course, will eventually receive
finer finishes...but that's getting ahead of things. As
with some previous paint application in the bilge, I found this job
immensely satisfying. Later throughout the project, I planned to
coat all "unfinished" surfaces--that is, raw fiberglass sections
of the interior, bilges, and lockers--with the same paint. Any
normally visible areas in the cabin, of course, will eventually receive
finer finishes...but that's getting ahead of things.
|
Over the next couple weeks, I continued with
intermittent varnishing of the forward deck beams, sanding between each
coat. After I had built up a sufficient number of base coats of the
gloss varnish to fill the natural wood grain, I switched to interior
rubbed-effect varnish for the final coats. The rubbed-effect varnish
provides a satin, rich, hand-rubbed look to the wood. I applied
several coats of the satin varnish, stopping when I was pleased with the
overall look of the beams. |
|
Continue>
|
|