
|
|
~MENU~ |
| Home |
| The Concept |
| The Boat |
| Bringing Her Home |
|
Weekly Progress Log |
|
Daysailor Projects |
| The Boat Barn |
| Resources |
| Other Sites |
| Email Tim |
|
|
| From a Bare Hull: Cabin Trunk (Page 8) |
|
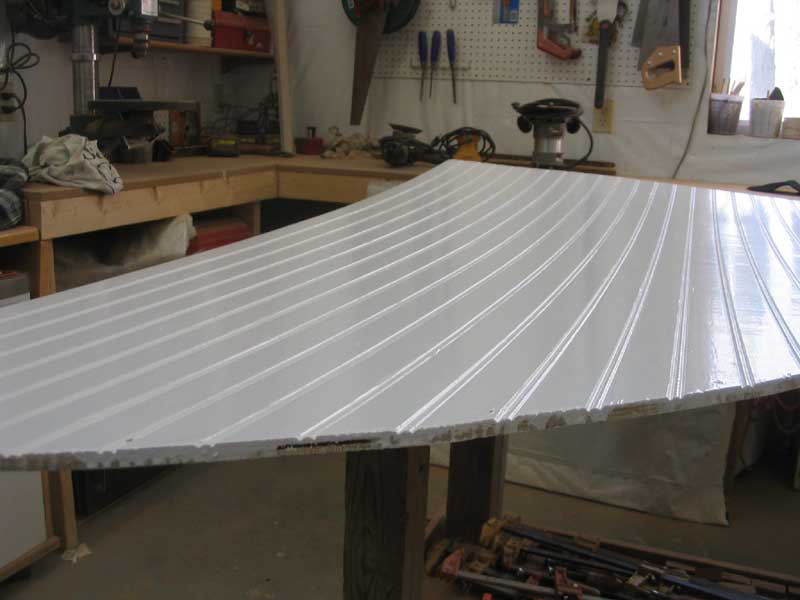
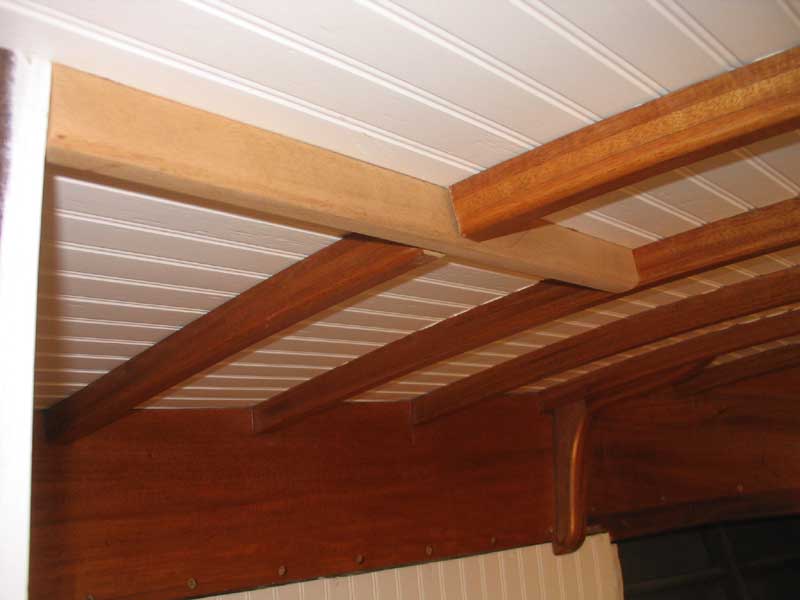
Installing the Overhead/Coachroof 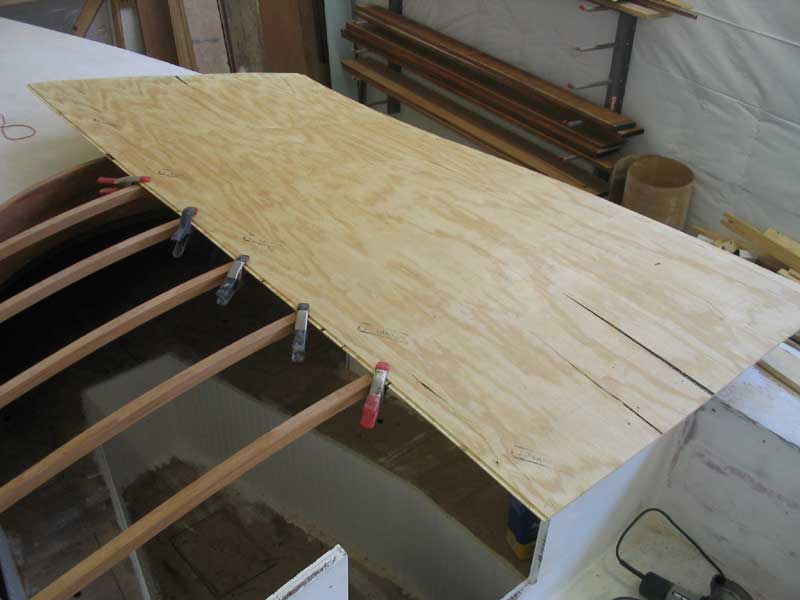 With
the beams permanently in place, my next step was to cut and fit the overhead.
As with the main deck, I planned to use a layer of down-facing beadboard
plywood, which would be visible through the beams, over which I'd laminate a
layer of structural Meranti plywood, all of which would be covered in fiberglass
later. With
the beams permanently in place, my next step was to cut and fit the overhead.
As with the main deck, I planned to use a layer of down-facing beadboard
plywood, which would be visible through the beams, over which I'd laminate a
layer of structural Meranti plywood, all of which would be covered in fiberglass
later. |
 To
begin, I laid out a sheet of the beaded plywood on one side of the cabin trunk,
aligned with a centerline that I marked on the beams. I clamped the sheet
in place as best as I could, and then, holding the sheet down to conform to the
curvature of the beams, marked the edge at the intersection with the cabin
trunk, from outside. I cut out the sheet with a jigsaw and fastened it
temporarily in place to assist with locating the second sheet; I repeated the
process and cut out the second piece, which I also tacked down temporarily so
that I could get a good visual look at how the coachroof would look. To
begin, I laid out a sheet of the beaded plywood on one side of the cabin trunk,
aligned with a centerline that I marked on the beams. I clamped the sheet
in place as best as I could, and then, holding the sheet down to conform to the
curvature of the beams, marked the edge at the intersection with the cabin
trunk, from outside. I cut out the sheet with a jigsaw and fastened it
temporarily in place to assist with locating the second sheet; I repeated the
process and cut out the second piece, which I also tacked down temporarily so
that I could get a good visual look at how the coachroof would look. |
 When
I was satisfied with the overall look, and sure that it was true to the concept,
I marked the deck beam locations from the inside, tracing their shapes on the
plywood, and removed the sheets. Down on the bench, I drilled a series of
small pilot holes inside the beam marks, to serve as reference points later when
I was doing the final installation. When
I was satisfied with the overall look, and sure that it was true to the concept,
I marked the deck beam locations from the inside, tracing their shapes on the
plywood, and removed the sheets. Down on the bench, I drilled a series of
small pilot holes inside the beam marks, to serve as reference points later when
I was doing the final installation. |
 I
prepared the two sheets for final installation with some finish sanding to
smooth the surface as much as possible and then, over the course of 4 days,
applied one coat of primer and three finish coats of bright white semi-gloss
enamel, sanding between each coat to ensure the smoothest final surface
possible. I
prepared the two sheets for final installation with some finish sanding to
smooth the surface as much as possible and then, over the course of 4 days,
applied one coat of primer and three finish coats of bright white semi-gloss
enamel, sanding between each coat to ensure the smoothest final surface
possible. |
 With
the paint done, I set the panels aside for several days while I completed work
on the cabin trunk beams and some decorative knees in way of the mast partner
beams. Over a few days, I applied several coats of gloss varnish to the
beams and inside of the cabin trunk, finally finishing up with a coat of rubbed
effect varnish to tone down the shine and give the parts a rich look. With
the paint done, I set the panels aside for several days while I completed work
on the cabin trunk beams and some decorative knees in way of the mast partner
beams. Over a few days, I applied several coats of gloss varnish to the
beams and inside of the cabin trunk, finally finishing up with a coat of rubbed
effect varnish to tone down the shine and give the parts a rich look. |
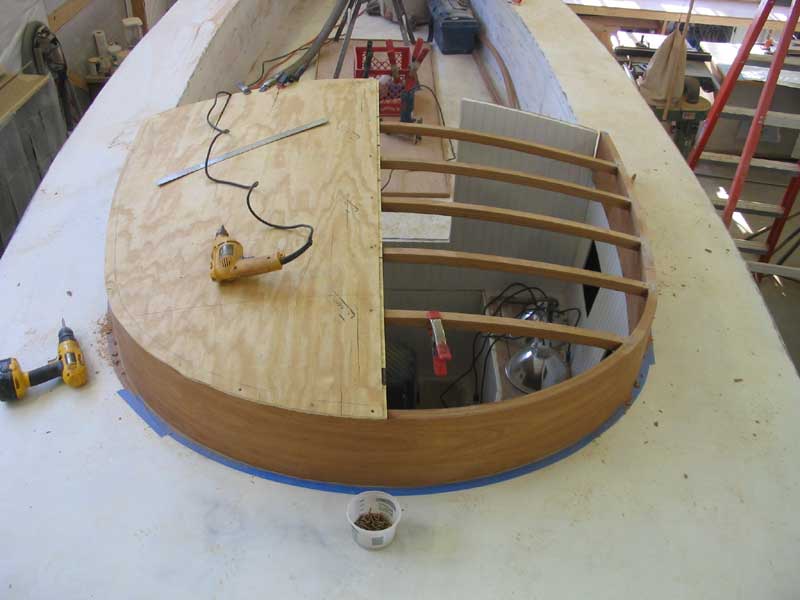
 When
I deemed the varnish to be satisfactory, I moved ahead with the final overhead
installation. I installed the beadboard panels, bead side down, of course,
onto the beams in a small bead of 5200 adhesive, and then screwed the panels in
with bronze screws. Even though the panels had bent a bit in some recent
humidity, installation was quite straightforward, all things considered. When
I deemed the varnish to be satisfactory, I moved ahead with the final overhead
installation. I installed the beadboard panels, bead side down, of course,
onto the beams in a small bead of 5200 adhesive, and then screwed the panels in
with bronze screws. Even though the panels had bent a bit in some recent
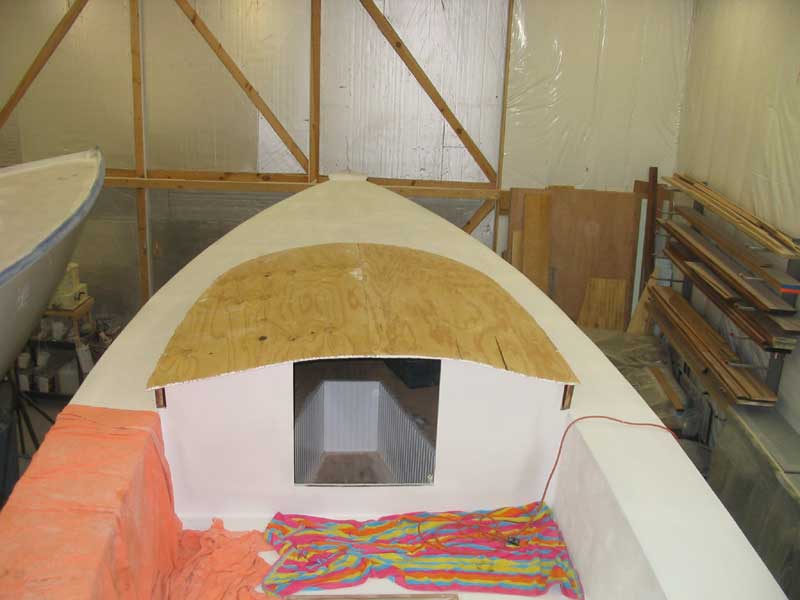
humidity, installation was quite straightforward, all things considered.I let the aft end run wild for the time being. Later, after the second and final layer of plywood was installed, I planned to trim the end properly and cut the companionway opening. |
 Mostly,
I wanted to get the panels installed because I needed to move on to some other
projects, like spraying the final topcoats on the hull, and wanted the panels
out of the way and safe. Once they were installed and any spilled 5200
cleaned up, I left them alone before making any attempts to install the outer
layer of plywood. Mostly,
I wanted to get the panels installed because I needed to move on to some other
projects, like spraying the final topcoats on the hull, and wanted the panels
out of the way and safe. Once they were installed and any spilled 5200
cleaned up, I left them alone before making any attempts to install the outer
layer of plywood.
|
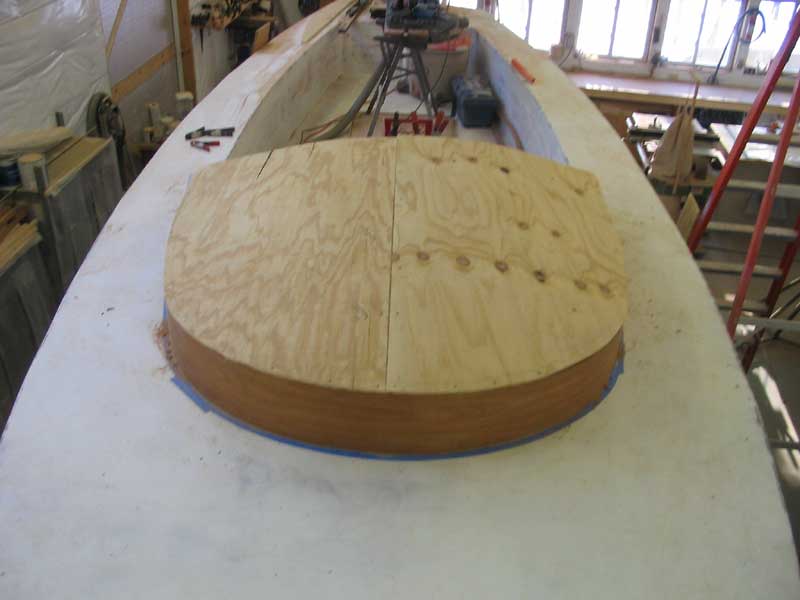
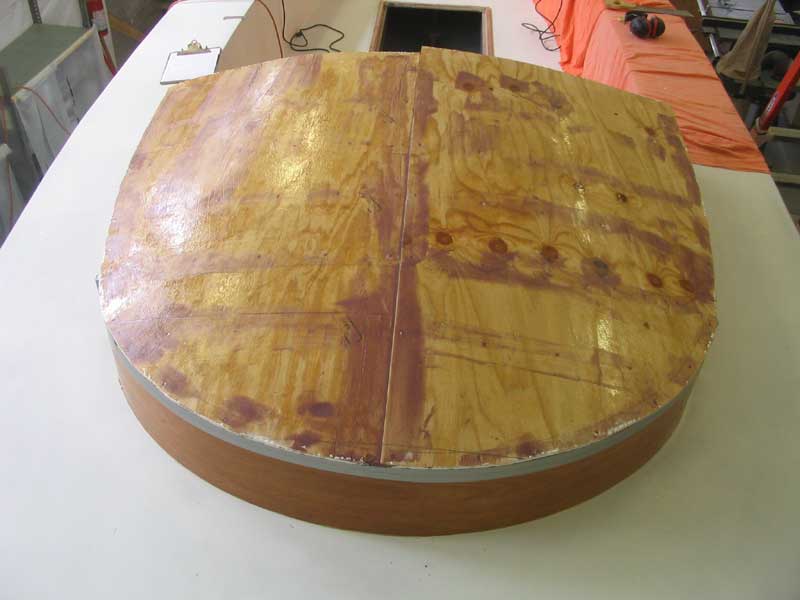
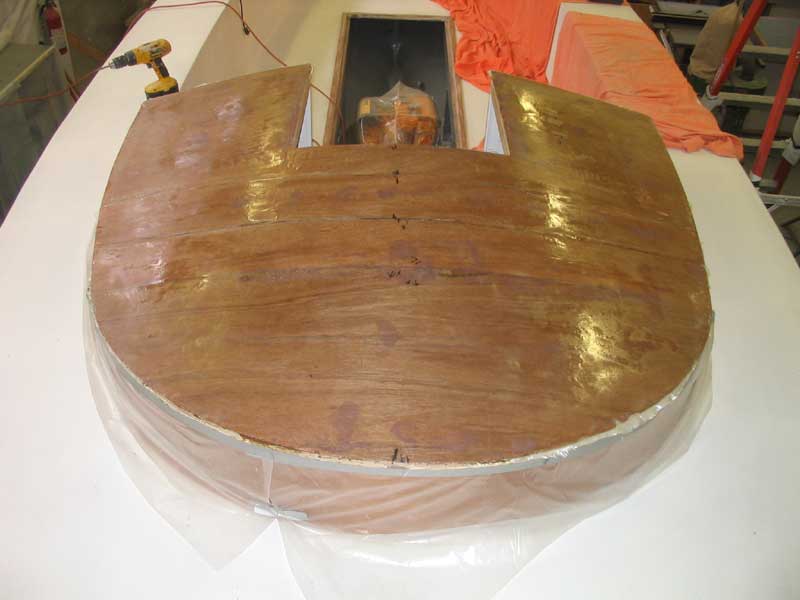
 A
bit later, I continued with the second--and final--layer of plywood for the
overhead. I began with a sheet and a half of 7mm Meranti plywood, and,
with the plywood laid directly over the existing cabin trunk, I marked a cutline
on the edges and cut the pieces to shape as required. then, I set the
pieces aside for the moment. A
bit later, I continued with the second--and final--layer of plywood for the
overhead. I began with a sheet and a half of 7mm Meranti plywood, and,
with the plywood laid directly over the existing cabin trunk, I marked a cutline
on the edges and cut the pieces to shape as required. then, I set the
pieces aside for the moment. |
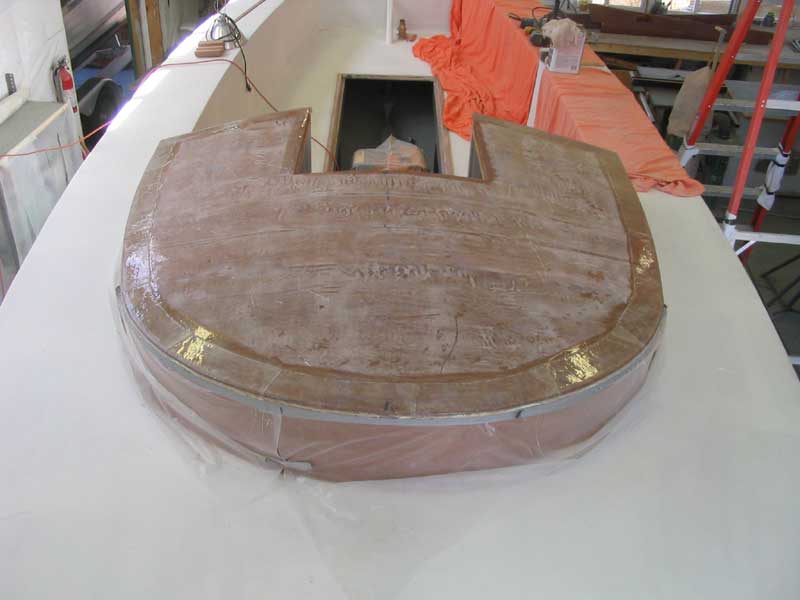
 I
continued by rolling a coat of unmodified epoxy resin over the entire first
layer, to seal the surface and prepare it for the adhesive and second layer, and
also rolled epoxy over the bottom side of the new Meranti layer. I also
mixed some thickened epoxy that I used to fill in a few cracks, knots, and seams
in the bottom layer. I
continued by rolling a coat of unmodified epoxy resin over the entire first
layer, to seal the surface and prepare it for the adhesive and second layer, and
also rolled epoxy over the bottom side of the new Meranti layer. I also
mixed some thickened epoxy that I used to fill in a few cracks, knots, and seams
in the bottom layer. |
 After
allowing the epoxy to cure most of the workday, I used a notched trowel to apply
an even layer of thickened epoxy adhesive to the deck, and then installed the
Meranti layer in the epoxy, using 1-1/4" bronze screws to secure it through the
first layer and into the deck beams below. Once the pieces required were
secured, I filled the seams and screwheads with thickened epoxy. After
allowing the epoxy to cure most of the workday, I used a notched trowel to apply
an even layer of thickened epoxy adhesive to the deck, and then installed the
Meranti layer in the epoxy, using 1-1/4" bronze screws to secure it through the
first layer and into the deck beams below. Once the pieces required were
secured, I filled the seams and screwheads with thickened epoxy. |
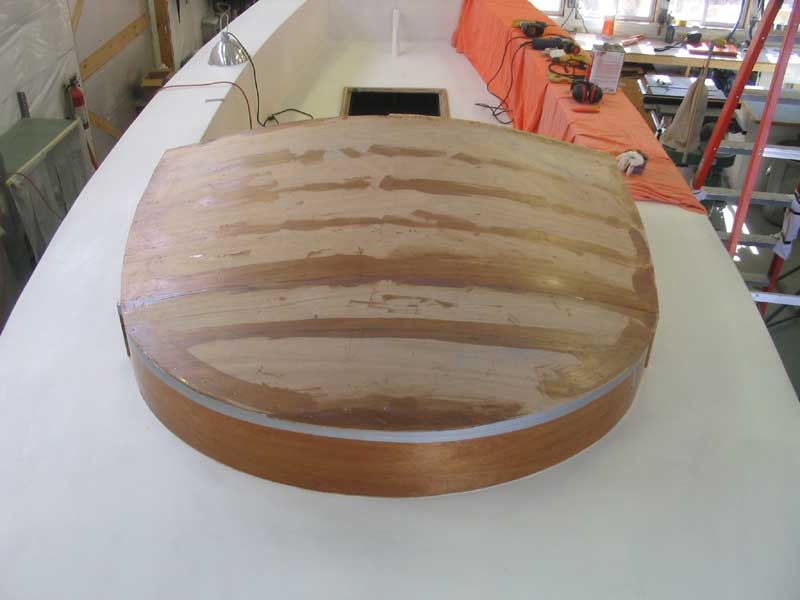
 When
the epoxy cured, I sanded the areas smooth, and prepared to lay out and cut the
opening for the companionway. First, though, there was the matter of the
overhanging plywood along the edges of the cabin trunk. To trim this, I
planned to use a router and straight cutting bit with bottom bearing. The
cut was complicated, however, by the crown of the cabin trunk, which would
prevent the router from removing material correctly. When
the epoxy cured, I sanded the areas smooth, and prepared to lay out and cut the
opening for the companionway. First, though, there was the matter of the
overhanging plywood along the edges of the cabin trunk. To trim this, I
planned to use a router and straight cutting bit with bottom bearing. The
cut was complicated, however, by the crown of the cabin trunk, which would
prevent the router from removing material correctly. |
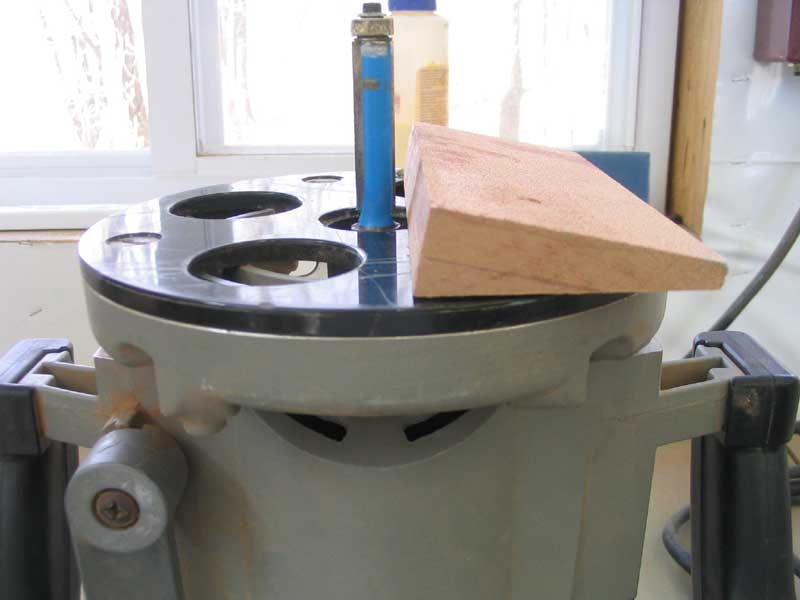
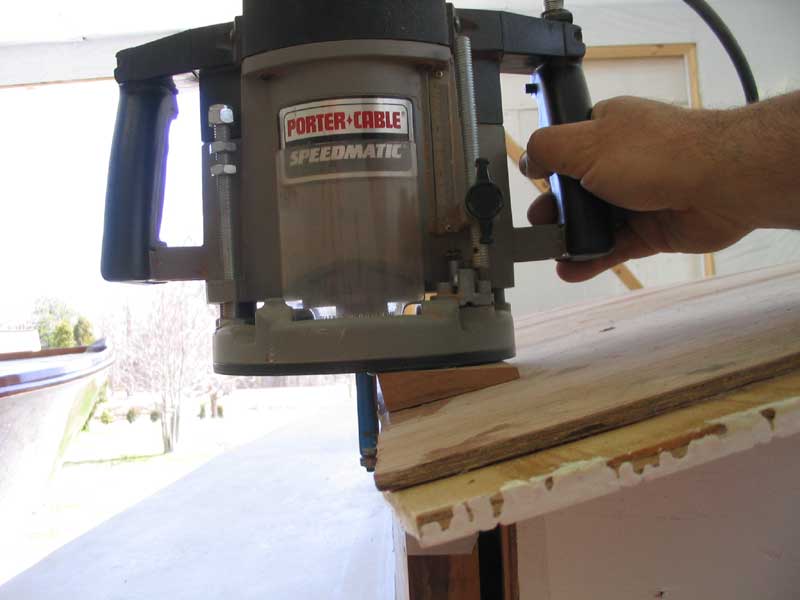 To
compensate, I cut a simple wedge to the same angle as the cabin trunk crown, and
hot-glued it to the baseplate of my router. This allowed the router to
ride with the bit in a vertical position. With that, I trimmed the edges
without incident. To
compensate, I cut a simple wedge to the same angle as the cabin trunk crown, and
hot-glued it to the baseplate of my router. This allowed the router to
ride with the bit in a vertical position. With that, I trimmed the edges
without incident. |
|
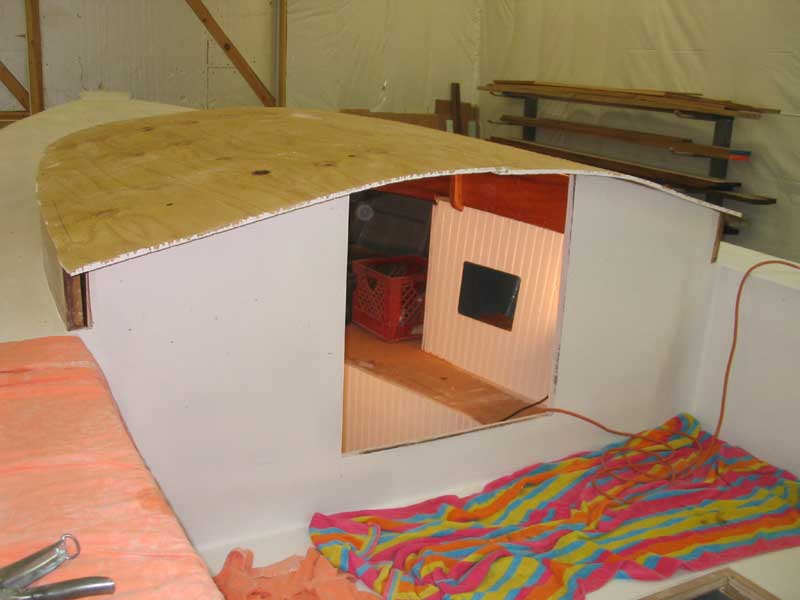
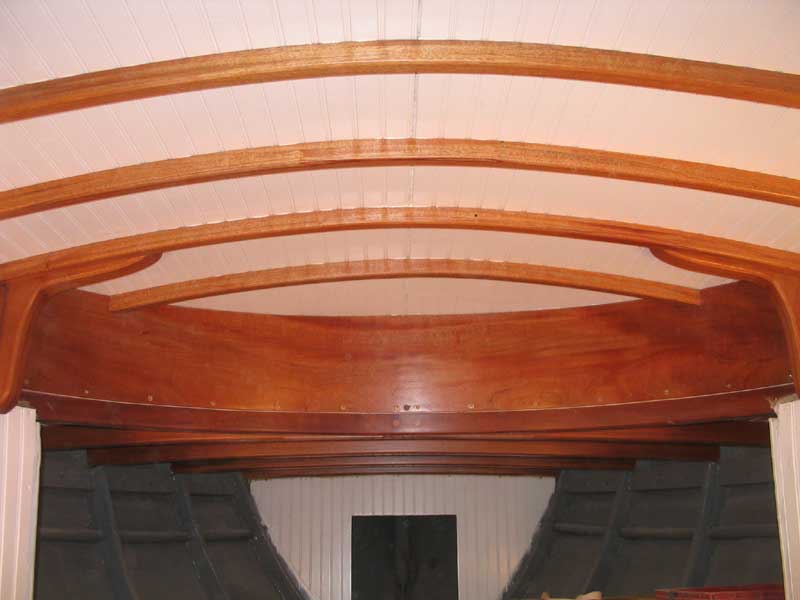
The width of the opening had been determined sometime earlier, when I cut the opening in the bulkhead; I determined the length based on the cabin trunk beam spacing inside, since the opening needed to end just aft of an existing beam. With a beam spacing of about 9-10, the second beam forward of the bulkhead was the perfect place to end--about 18-20". |
 With
that measurement determined, I continued by installing two side pieces, under
the overhead, that would define the hatch opening and also serve as sort of
"headers" for the after two beams, which would be cut off in way of the opening
during installation. With a framing square, I marked lines on the beams
from inside the cabin, holding the square tightly against the bulkhead and
running the long leg forward. Then, I cut two pieces of mahogany to fit
these spaces. With
that measurement determined, I continued by installing two side pieces, under
the overhead, that would define the hatch opening and also serve as sort of
"headers" for the after two beams, which would be cut off in way of the opening
during installation. With a framing square, I marked lines on the beams
from inside the cabin, holding the square tightly against the bulkhead and
running the long leg forward. Then, I cut two pieces of mahogany to fit
these spaces.Before continuing, I marked a slight arc on the aft end of the overhanging plywood, and cut it out with a jigsaw. I wanted the overhead to extend a bit past the bulkhead, but to also have a pleasing curve towards the centerline. |
|
In order to install the mahogany, I needed to cut slots out of the existing beams, so that the new pieces could be inserted. After carefully marking the cut lines--only the outboard line was critical, as everything inside the future opening was waste--I cut out the notches with a pull saw. Then, I installed the new beams with 5200 and screws driven through the overhead from above. |
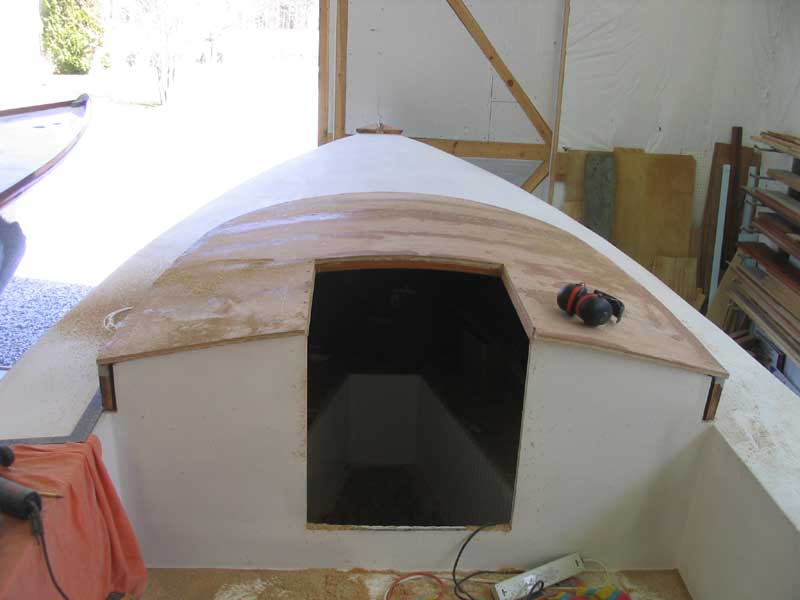 Now
that the opening was defined and framed out, I cut the plywood using a big
router and a straight cutting bit with bottom bearing. The bearing
self-destructed a few inches before the end of the last cut, allowing the bit to
cut further in than intended, but the damage was minor, and the area would be
later covered with trim anyway. Now
that the opening was defined and framed out, I cut the plywood using a big
router and a straight cutting bit with bottom bearing. The bearing
self-destructed a few inches before the end of the last cut, allowing the bit to
cut further in than intended, but the damage was minor, and the area would be
later covered with trim anyway.It was nice to descend into the cabin without beams or overhead in the way. Much more work on the companionway, including the hatch, trim, and slides, is still to come. |
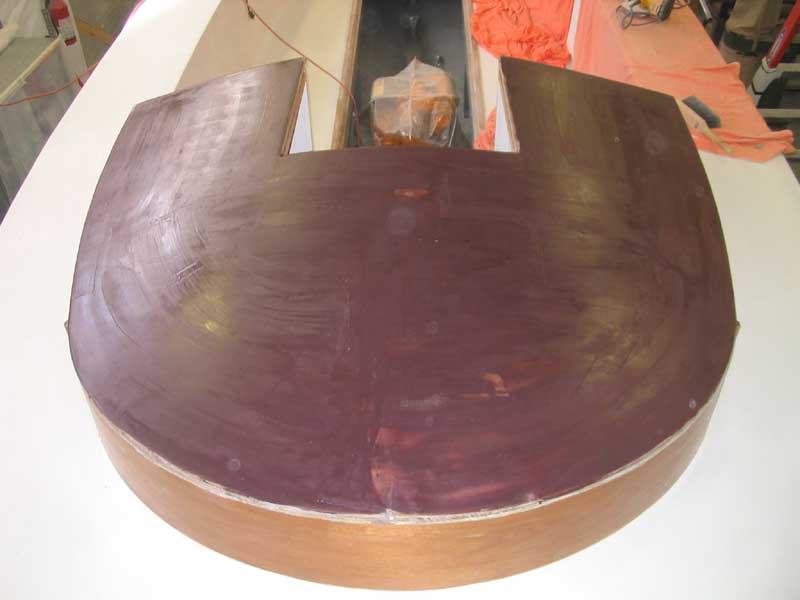
 Next,
I prepared for fiberglass on the coachroof to cover the plywood for a
weather-tight surface. I laid out and cut two overlapping layers of 10 oz.
fiberglass cloth for the job; then, after setting the material aside, I wet out
the plywood with epoxy resin, allowing it to soak in for a time. Then,
working quickly because of warm temperatures and short cure time, I laminated
the two layers onto the plywood, rolling out the air and excess resin. I
offset the seam on the second layer by several inches, and held the edge of the
material slightly back from the cabin trunk edge. Next,
I prepared for fiberglass on the coachroof to cover the plywood for a
weather-tight surface. I laid out and cut two overlapping layers of 10 oz.
fiberglass cloth for the job; then, after setting the material aside, I wet out
the plywood with epoxy resin, allowing it to soak in for a time. Then,
working quickly because of warm temperatures and short cure time, I laminated
the two layers onto the plywood, rolling out the air and excess resin. I
offset the seam on the second layer by several inches, and held the edge of the
material slightly back from the cabin trunk edge. |
 When
the first layers had cured, I washed the surface with water, then sanded it
smooth to remove any rough edges and high spots. Then, I installed a layer
of fiberglass all the way around the edge, covering the slight gap left from
before and overlapping the material over the edge of the plywood (which I had
rounded slightly with a sander), covering the end grain along the edges. When
the first layers had cured, I washed the surface with water, then sanded it
smooth to remove any rough edges and high spots. Then, I installed a layer
of fiberglass all the way around the edge, covering the slight gap left from
before and overlapping the material over the edge of the plywood (which I had
rounded slightly with a sander), covering the end grain along the edges. |
 When
the new material cured, I repeated the washing and sanding process, and then
applied the first coat of fairing filler. I used System Three Quik-Fair
for this, a product to which I have warmed my opinion after some use and
practice. With a plastic squeegee, I troweled on a thin skim layer,
filling any low spots and pressing the material into the weave of the cloth to
fill it. Later, when the filler had cured, I sanded it smooth, revealing a
few low spots that would require a second application. When
the new material cured, I repeated the washing and sanding process, and then
applied the first coat of fairing filler. I used System Three Quik-Fair
for this, a product to which I have warmed my opinion after some use and
practice. With a plastic squeegee, I troweled on a thin skim layer,
filling any low spots and pressing the material into the weave of the cloth to
fill it. Later, when the filler had cured, I sanded it smooth, revealing a
few low spots that would require a second application.
|
 Following
a second application of filler, I sanded the coachroof smooth, and left it for
several weeks while I worked on other parts of the boat. More work was
required to complete the cabin trunk, and when the time was right I continued
with this aspect of the job. Following
a second application of filler, I sanded the coachroof smooth, and left it for
several weeks while I worked on other parts of the boat. More work was
required to complete the cabin trunk, and when the time was right I continued
with this aspect of the job. |
|
Return to Main Menu> |