|
|||
|
|
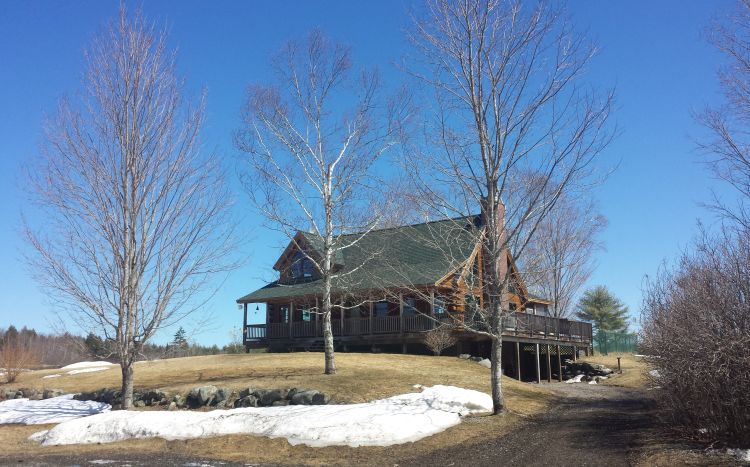
~ The bLog Home ~ |
||
| Click here to continue with the logs from September 16 to September 30. | |||
FRIDAY, SEPTEMBER 15, 2006 |
|||
 I
got home by about 9:15 after my truck appointment and a stop to pick
up an additional 20 sheets of sheetrock. By the time I
unloaded, it was probably 10. I
got home by about 9:15 after my truck appointment and a stop to pick
up an additional 20 sheets of sheetrock. By the time I
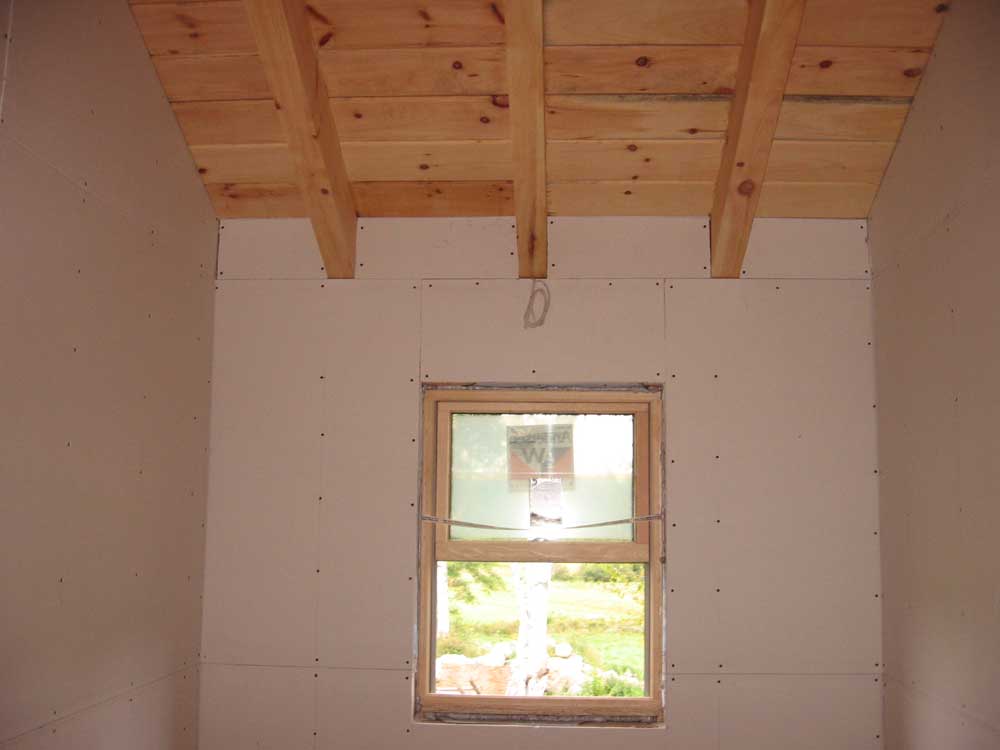
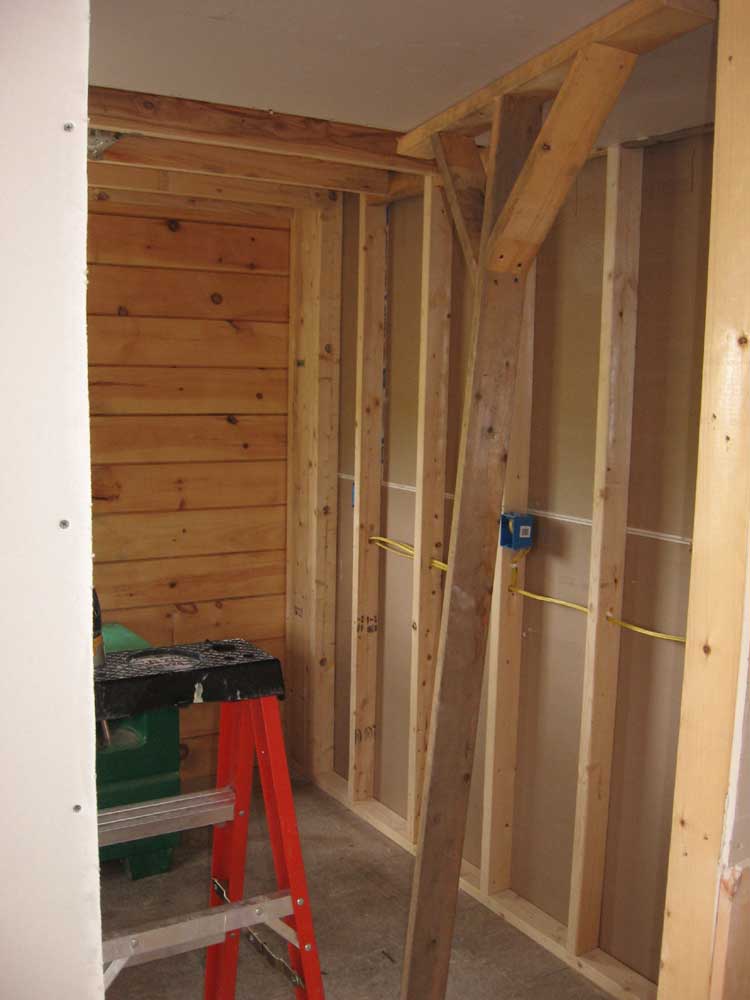
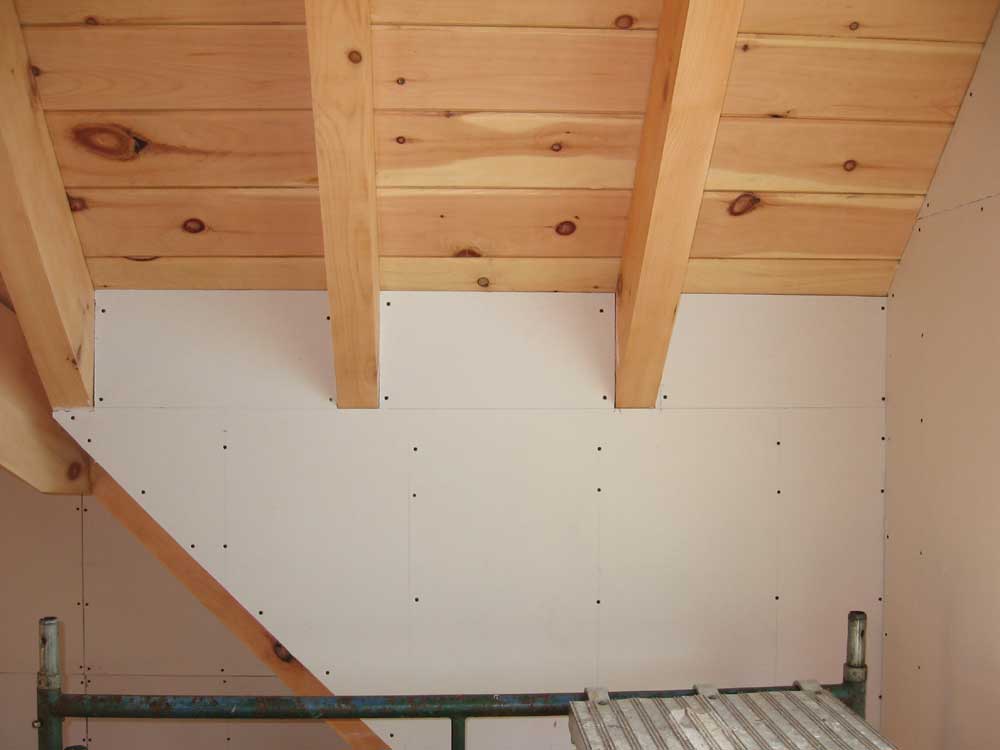
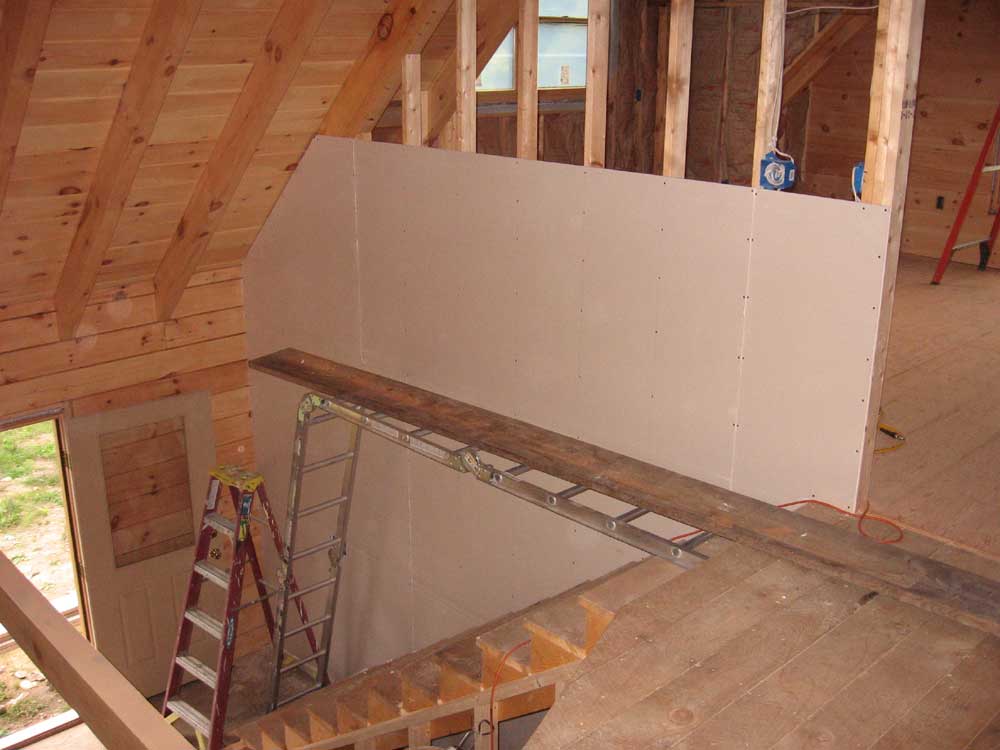
unloaded, it was probably 10.I got right to work downstairs in the pantry. I started with the ceiling, which promised to be a challenge by myself. But I had a couple ways to make it possible. First, I screwed a 2x4 to the stud wall on one side, holding the top edge about 3/4" down from the ceiling strapping. This small ledge would hold one edge of the 1/2" sheetrock. |
|||
 That
alone would not be enough to hold the floppy sheets, though.
Since the room was nearly 8' wide, I'd be using close to full
sheets, so I needed more help. I built a "dead man" out of
scrap 2x4s; this t-shaped brace would hold the sheetrock tightly to
the ceiling once I lifted it up. That
alone would not be enough to hold the floppy sheets, though.
Since the room was nearly 8' wide, I'd be using close to full
sheets, so I needed more help. I built a "dead man" out of
scrap 2x4s; this t-shaped brace would hold the sheetrock tightly to
the ceiling once I lifted it up.I cut the first sheet as needed, and got it up into place without too much trouble. My helpers were invaluable, if a bit wooden. |
|||
|
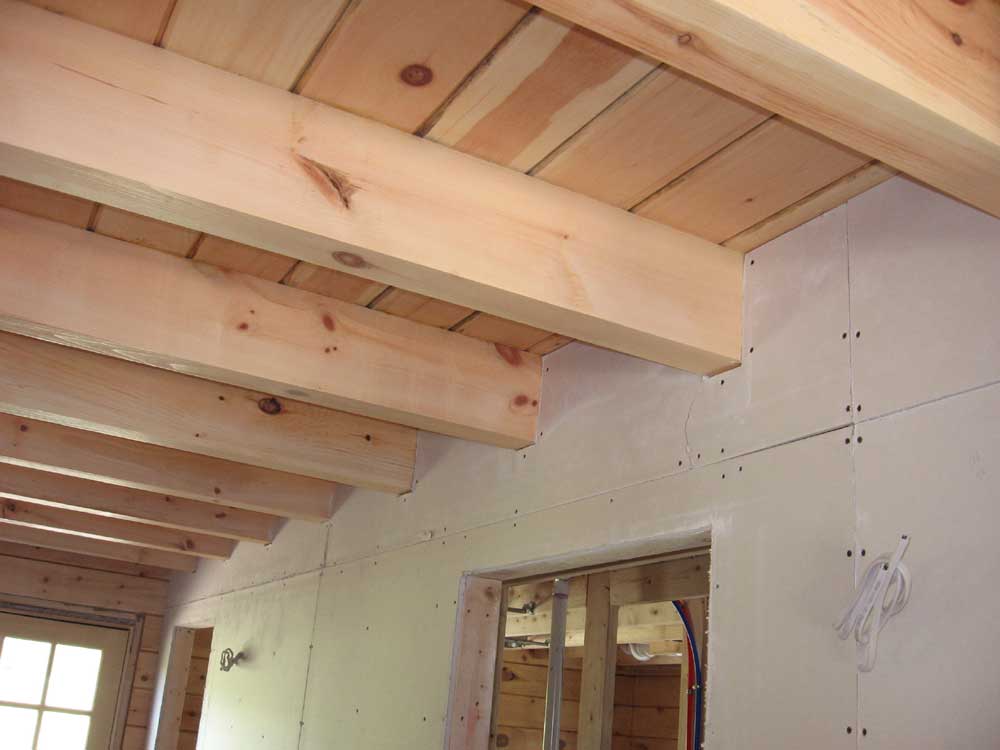
I discovered, though, that my strapping was not properly spaced. I hadn't bothered to measure before installing the sheet because I thought that I had installed the strapping to accommodate the 48" wide sheets with 16" centers, as normal. It was close, but the edge of the sheet extended all the way to the edge of the stud, leaving nowhere for the adjacent sheet to secure. The solution was simple: nail a second stud alongside the first before I moved onto the next sheet. |
|||
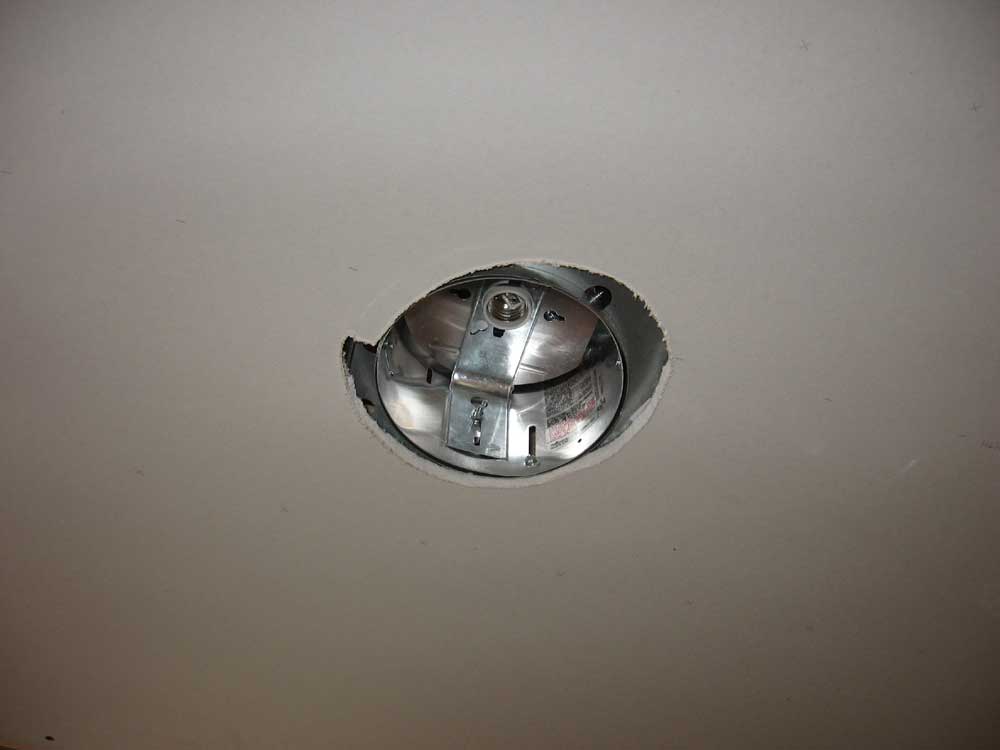 The
ceiling contained a couple recessed light cans, and I used my
Roto-Zip to cut out the opening, having laid the sheet directly over
the light. I hate these things. I thought it went so
well: I had carefully measured to the center of the can before
beginning, and I knew where to cut. To cut these out, one must
plunge the tool into the center, run it to an edge, and then jump it
over the thin can lip so that the bit cuts on the outside of the
opening, rather than the inside. All well and good, and I did
this. It seemed like the tool was following the can, but I
discovered to my horror at the end that it had not, and I had
created a terrible looking oblong opening. Rats. The
ceiling contained a couple recessed light cans, and I used my
Roto-Zip to cut out the opening, having laid the sheet directly over
the light. I hate these things. I thought it went so
well: I had carefully measured to the center of the can before
beginning, and I knew where to cut. To cut these out, one must
plunge the tool into the center, run it to an edge, and then jump it
over the thin can lip so that the bit cuts on the outside of the
opening, rather than the inside. All well and good, and I did
this. It seemed like the tool was following the can, but I
discovered to my horror at the end that it had not, and I had
created a terrible looking oblong opening. Rats. |
|||
|
I did better on the second can, located in the second sheet of ceiling sheetrock, having learned my lesson. I'll patch the other opening as needed so that the trim ring will hide the damage, and it's only the pantry, after all. Obviously I didn't bother replacing the whole sheet. |
|||
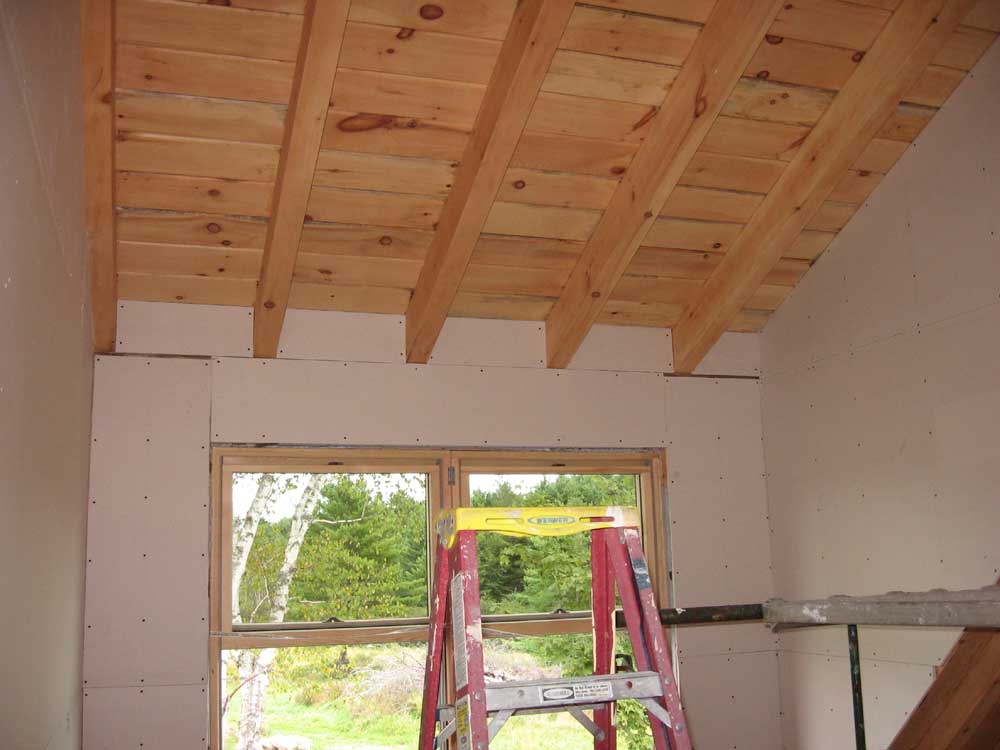
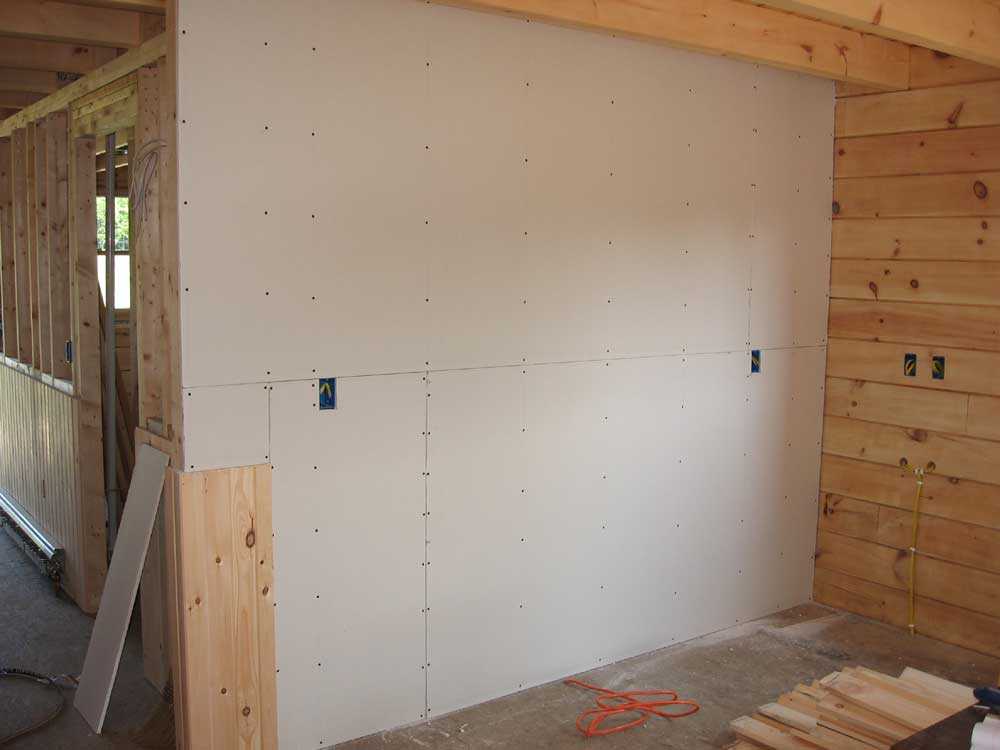
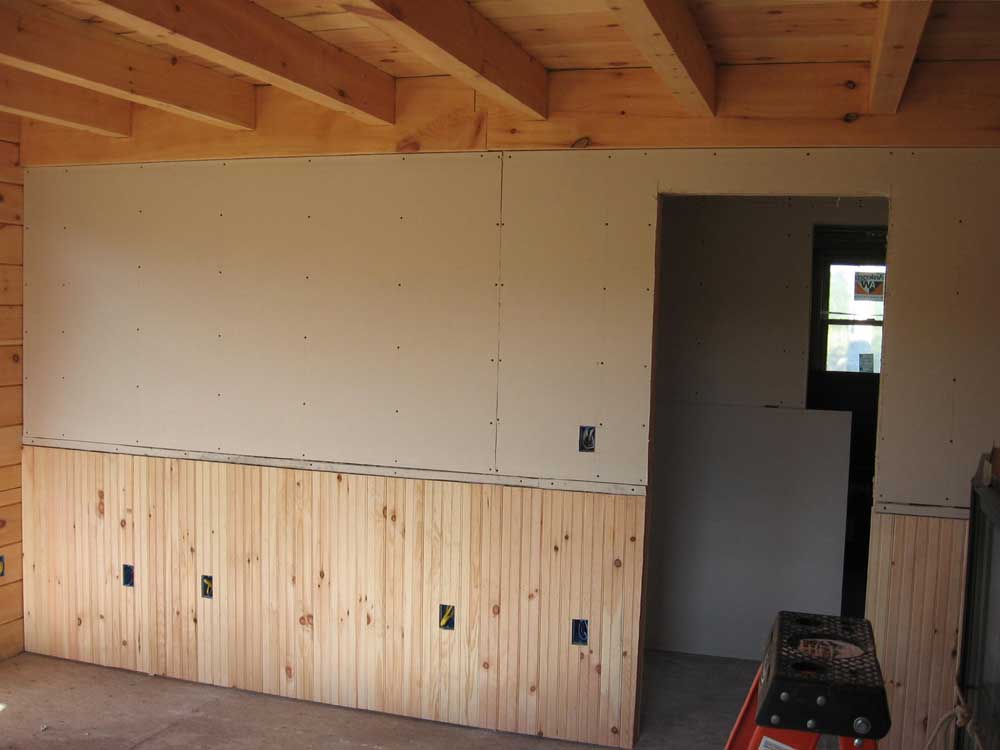
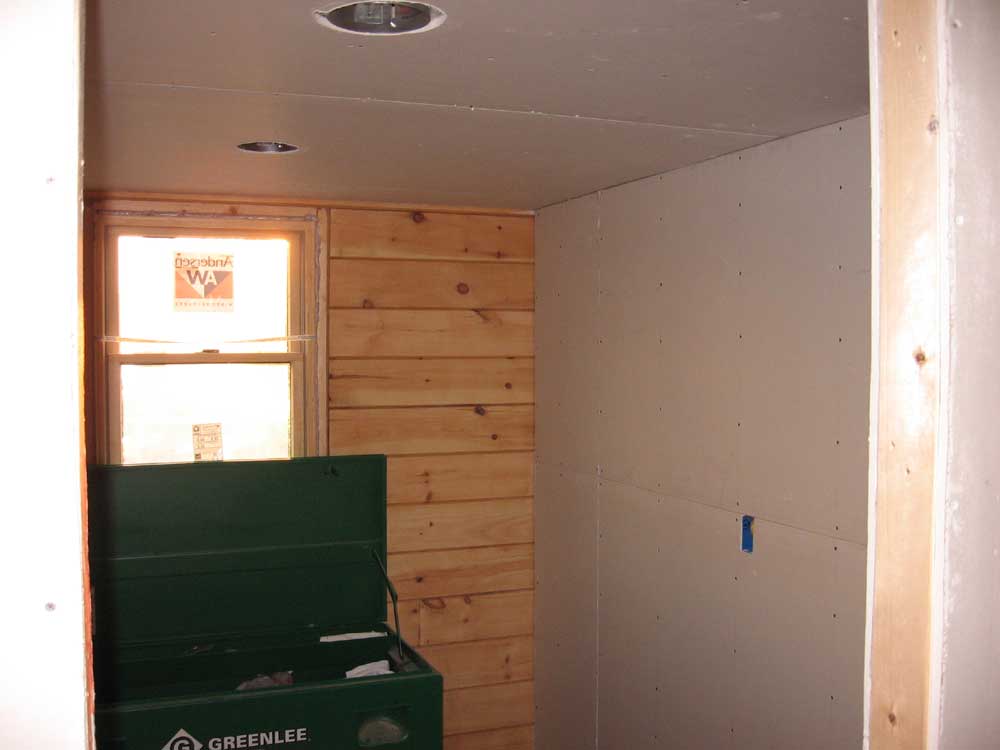 It took two full sheets, plus about a 12" piece, to cover the
ceiling. As soon as the ceiling was complete--with no major
issue, thankfully--I moved on to the walls, and covered them.
These went as quickly as could be expected, since there was only one
outlet in each wall, making for quick installation. The top
sheet needed to be cut lengthwise to fit the space up to the
ceiling, but otherwise covering the pantry walls went quickly and
without incident. I finished in time for a late (1PM) lunch.
Actually, I wouldn't let myself go to lunch till I had finished. It took two full sheets, plus about a 12" piece, to cover the
ceiling. As soon as the ceiling was complete--with no major
issue, thankfully--I moved on to the walls, and covered them.
These went as quickly as could be expected, since there was only one
outlet in each wall, making for quick installation. The top
sheet needed to be cut lengthwise to fit the space up to the
ceiling, but otherwise covering the pantry walls went quickly and
without incident. I finished in time for a late (1PM) lunch.
Actually, I wouldn't let myself go to lunch till I had finished.
|
|||
 After
lunch, I turned my attention to the downstairs bathroom. I
wanted to complete the sheetrock here today also. First,
though, I had to put on my plumber's hat once again, as I
needed to finish plumbing up the drain for the soaking tub upstairs. After
lunch, I turned my attention to the downstairs bathroom. I
wanted to complete the sheetrock here today also. First,
though, I had to put on my plumber's hat once again, as I
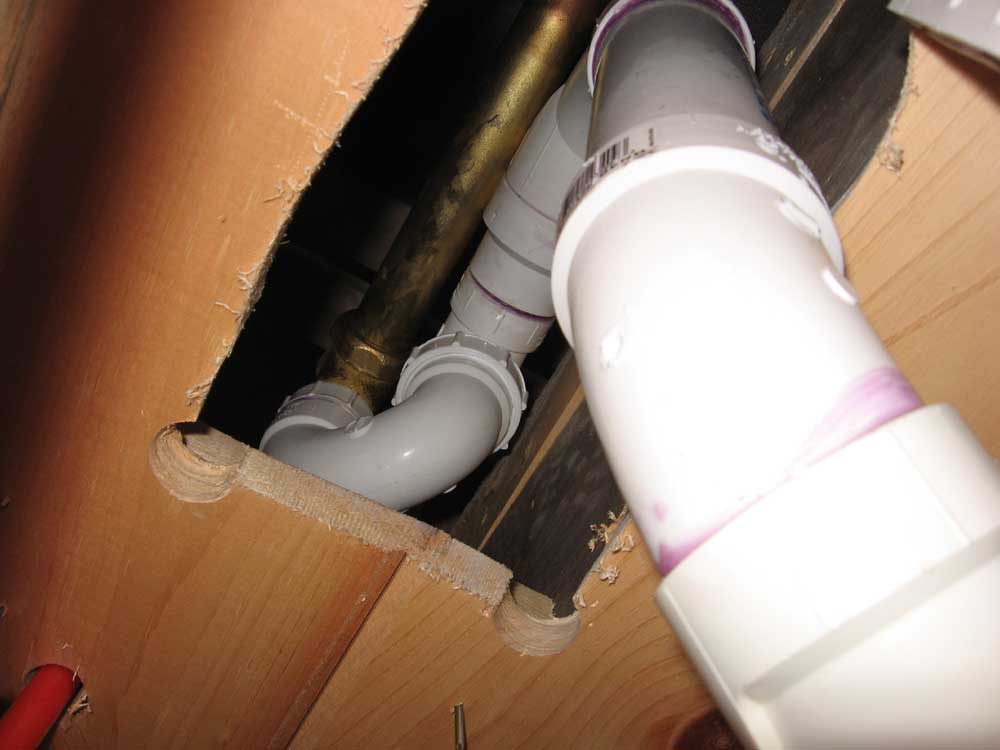
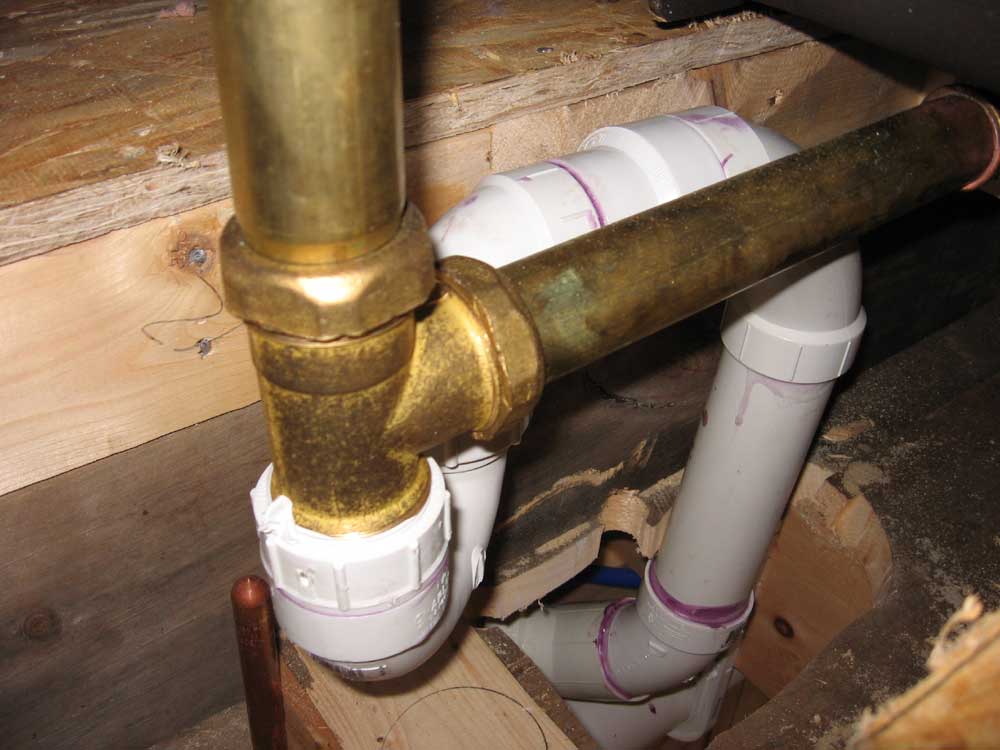
needed to finish plumbing up the drain for the soaking tub upstairs.First, I installed a trap on the brass tub train, which I then adapted to a 2" pipe size to allow it to conjoin with the 2" drain piping already in place in the ceiling beneath. I had to cut a largish hole in the floor to allow the pipe to come down into the bathroom ceiling below, where I needed to connect it to the stubbed out piping that I installed several weeks ago. |
|||
|
|
|||
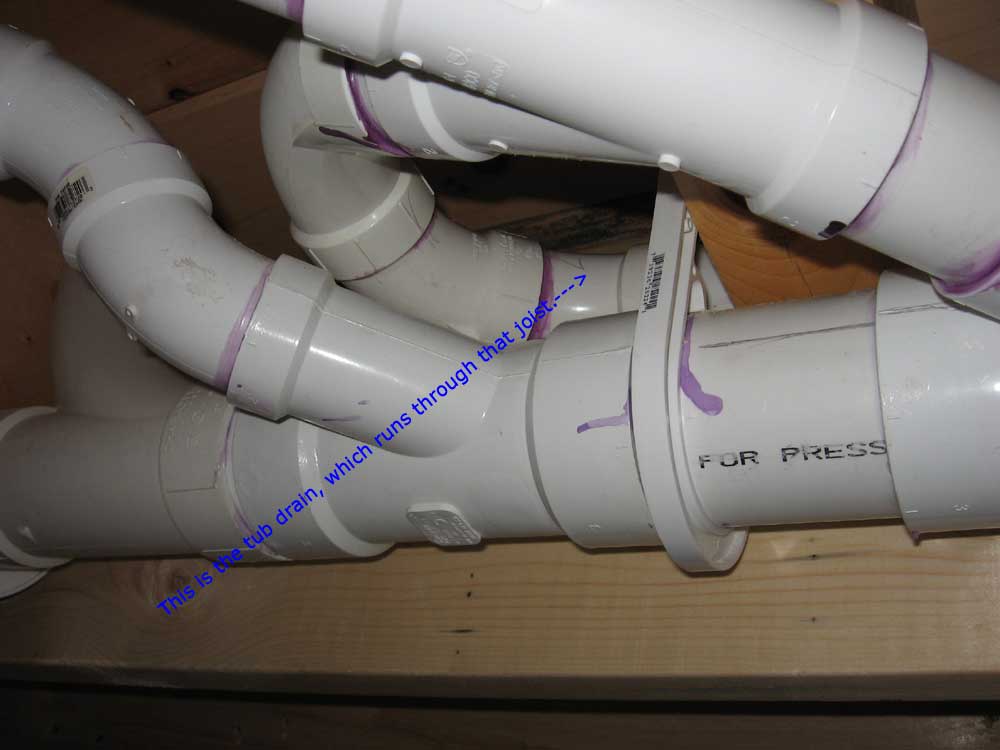 The
tub and drain didn't end up in the spot we anticipated, so I needed
to cut through one of the ceiling joists to mate with the stub out.
Given the poor access, thanks to the spider web of piping already in
place, this was a challenge, but I managed to butcher a hole using a
drill bit to create four rounded corners, and a Sazw-all to finish
it off. There was no way I could get a hole saw in there to do
the job; they cut too hard, and I really only had access from one
side (the hole saw needs to be run from both sides to pass through
the 3-1/2" beam). The
tub and drain didn't end up in the spot we anticipated, so I needed
to cut through one of the ceiling joists to mate with the stub out.
Given the poor access, thanks to the spider web of piping already in
place, this was a challenge, but I managed to butcher a hole using a
drill bit to create four rounded corners, and a Sazw-all to finish
it off. There was no way I could get a hole saw in there to do
the job; they cut too hard, and I really only had access from one
side (the hole saw needs to be run from both sides to pass through
the 3-1/2" beam). |
|||
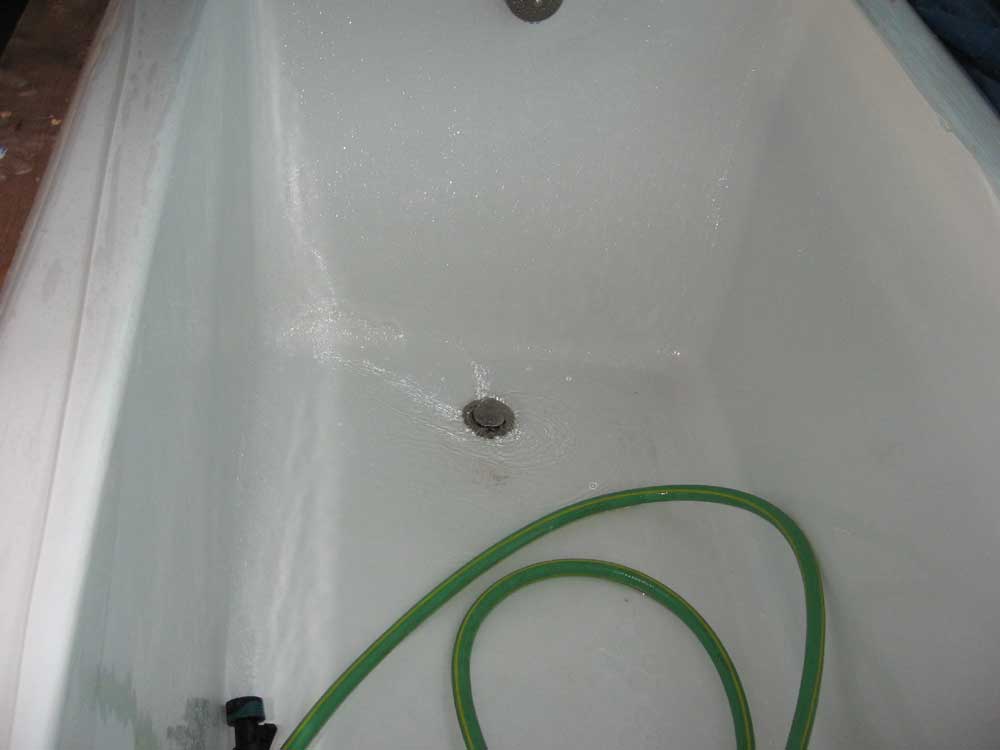 In
any event, I managed to get the drain connected, using several
fittings to coax the pipe into the proper orientation.
Afterwards, I ran a hose upstairs and tested all the drains to check
for leaks. Fortunately, none appeared, so it looked like I was
OK to cover the ceiling--and piping--beneath. This whole
process took a couple hours and ate up much of the remaining
afternoon. In
any event, I managed to get the drain connected, using several
fittings to coax the pipe into the proper orientation.
Afterwards, I ran a hose upstairs and tested all the drains to check
for leaks. Fortunately, none appeared, so it looked like I was
OK to cover the ceiling--and piping--beneath. This whole
process took a couple hours and ate up much of the remaining
afternoon. |
|||
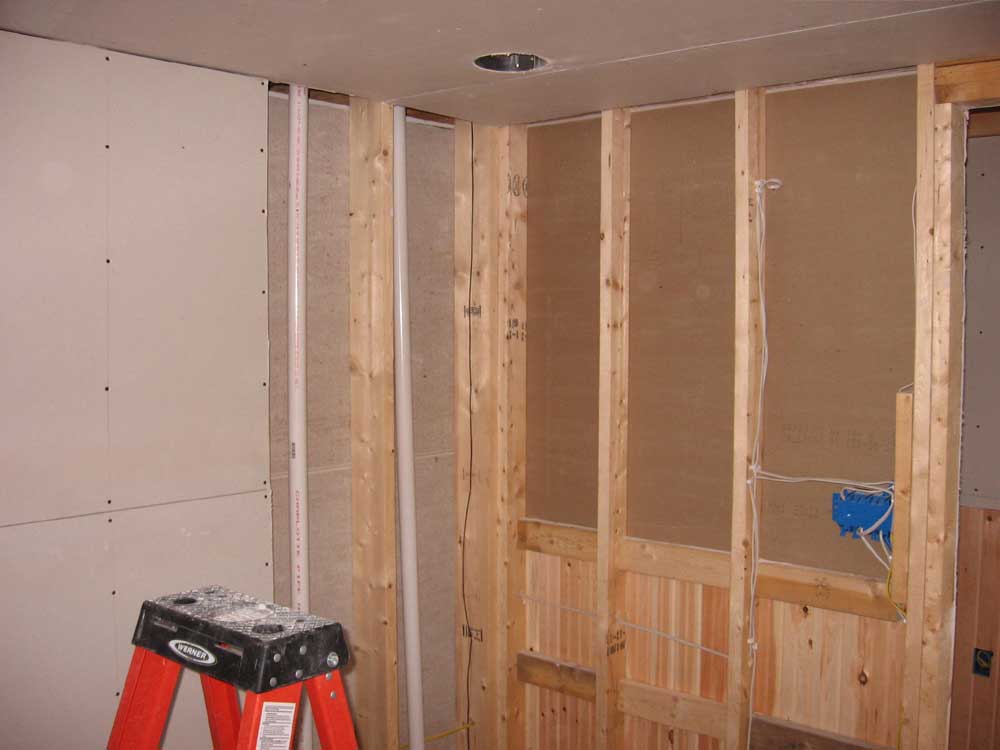
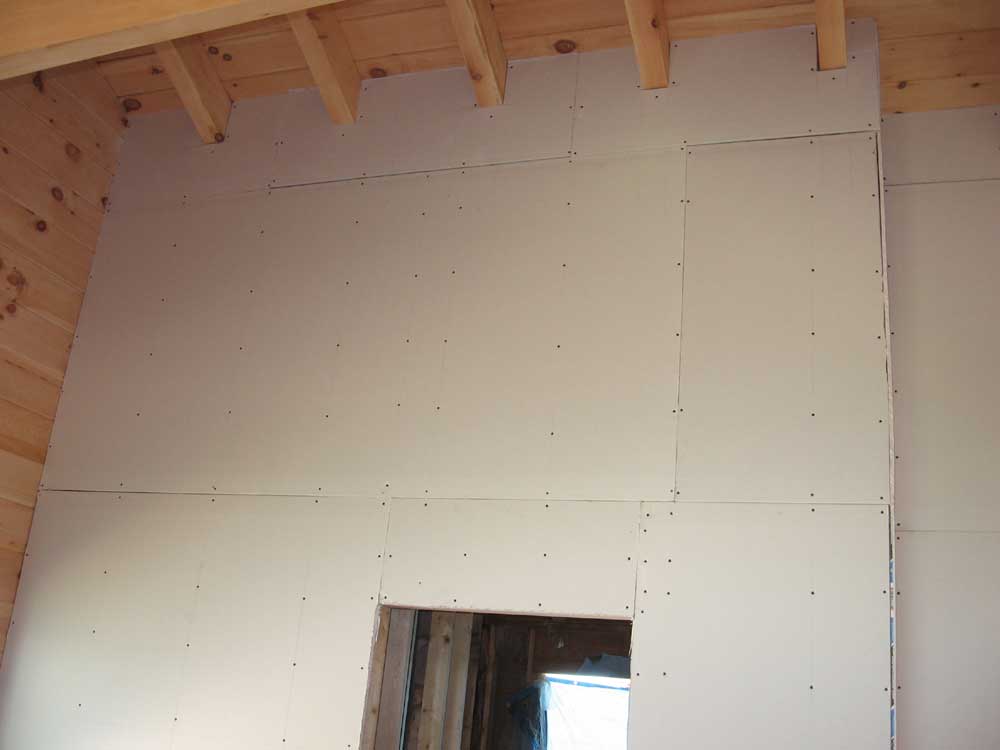
 I
spent the rest of the afternoon installing the sheetrock in the
bathroom, first on the ceiling and then on the one wall requiring
it. The ceiling fought me every step of the way; I had to cut
each sheet to fit the mis-spaced strapping, having learned my lesson
in the pantry. Then, the ceiling cans--three in this
room--proved to be a pain to cut out, once again. However, all
that aside I managed to complete the ceiling without any major
problems, though it just took longer and took more out of me than I
had intended. I
spent the rest of the afternoon installing the sheetrock in the
bathroom, first on the ceiling and then on the one wall requiring
it. The ceiling fought me every step of the way; I had to cut
each sheet to fit the mis-spaced strapping, having learned my lesson
in the pantry. Then, the ceiling cans--three in this
room--proved to be a pain to cut out, once again. However, all
that aside I managed to complete the ceiling without any major
problems, though it just took longer and took more out of me than I
had intended.I pressed on, though, and installed the two simple sheets of sheetrock on the wall. The inside corner of the room will eventually house a tiled shower, so I didn't run the sheetrock into that area; later, I'll install cement tile backer board here. Today's tally: 13 sheets hung. |
|||
|
|
|||
THURSDAY, SEPTEMBER 14, 2006 |
|||
| Today, I used up the remaining 7 full sheets of sheetrock, nearly completing the upstairs closet (except for some small pieces up between the rafters, out of reach for the moment). I used the remaining sheets in the upstairs bath, though there was still a lot of area to cover here. | |||
|
|
|||
|
I might have been out of large material, but hardly out of things to do, so I used scraps to fill in the spaces between the rafters in the loft, closet, and upstairs bathroom, and also filled in several smaller pieces elsewhere as needed. As usual, this ate up lots of time, but it had to be done. |
|||
|
|
|||
|
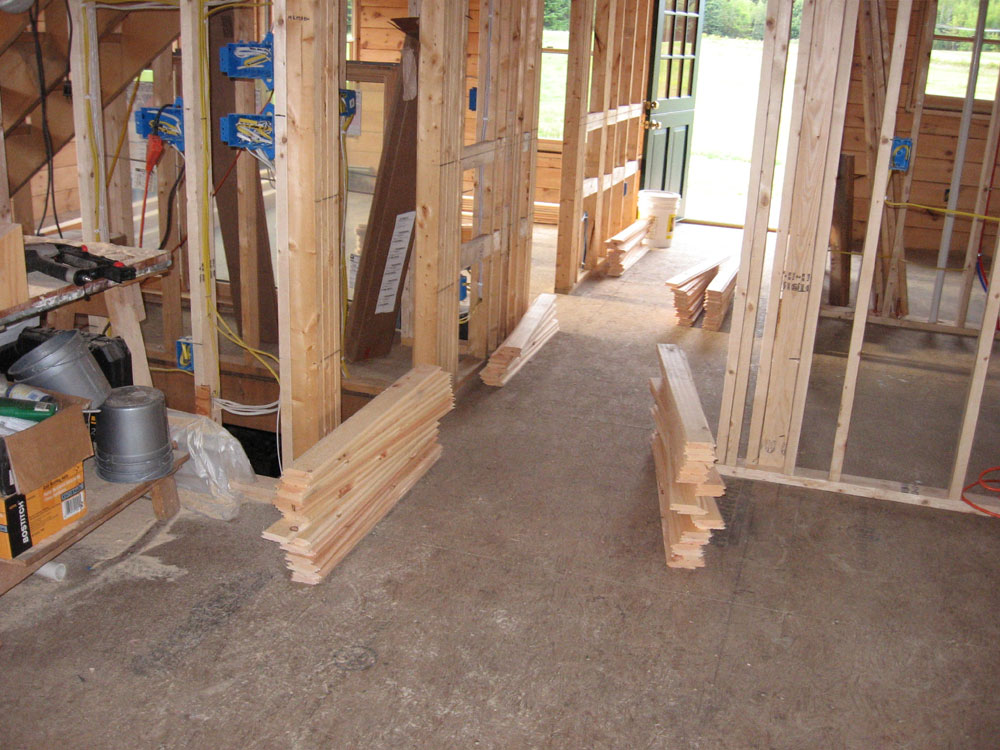
The end is in sight for hanging the sheetrock, but there is much work remaining. I took stock of what remained, and how many sheets more I would need to complete:
I figured that this work would require at least 20 more sheets. (Sigh.) Since I had an appointment for much-needed and -delayed service on my truck first thing in the morning (I hate to take the time, but there's no good time, as evidenced by the fact that my inspection sticker expired over 2 months ago...), I figured I could swing by and pick up the drywall on the way home, and then get back to work. I have left the top part of the stairwell for last, so that once I set up the staging for that section I can hang the rock, mud and tape it, prime, and paint it before taking the staging down. I only want to do it once. |
|||
|
My goal continues to be to finish hanging the rock by the end of Sunday. Friday will be shortened by a few hours, unfortunately, and I doubt I'll have any time on Saturday, since we have to run around dealing with house-related errands, like lighting and flooring and appliances all that good stuff. Again: there's no good time for this, so this is as good a time as any. |
|||
|
I expect a long day on Sunday. Time will tell if I meet my goal. What happened to this week? It can't be Friday tomorrow. I think someone short-changed me. |
|||
WEDNESDAY, SEPTEMBER 13, 2006 |
|||
|
It all happened in slow motion. One minute, I was holding a nearly perfectly fitting piece of drywall--one that had taken me half an hour to measure, cut, and fit--in my hand, trying to trim just a small amount off one edge that was hanging up and preventing it from fitting properly.
I hoped against hope that perhaps it had survived the fall, that it would be all right and we could continue the way it had been before. But drywall never survives a fall. Ever. Even as I hoped, I knew in my heart it was a lost cause, and that I would have to start over. |
|||
 That's
how the day began today--not necessarily an auspicious start.
There was no saving the piece that fell, which was rather
displeasing to me. This was the piece of sheetrock located on
the bedroom wall facing the stairway, up at the tippy top, with two
different roof angles to incorporate, plus the ridge beam. I
didn't have any odd scraps large enough to make a second piece
identical to the one that was ruined, so I decided to make it in two
pieces instead, as I was unwilling to cut into a full sheet at this
stage to create the piece. That's
how the day began today--not necessarily an auspicious start.
There was no saving the piece that fell, which was rather
displeasing to me. This was the piece of sheetrock located on
the bedroom wall facing the stairway, up at the tippy top, with two
different roof angles to incorporate, plus the ridge beam. I
didn't have any odd scraps large enough to make a second piece
identical to the one that was ruined, so I decided to make it in two
pieces instead, as I was unwilling to cut into a full sheet at this
stage to create the piece.In any event, the two pieces were easier to handle, and all it meant was one more butt joint to mud and tape. Big deal, right? |
|||
|
Upon my arrival this morning, I had decided to just finish up the annoying detail pieces at the top level of the bedroom walls, in and amongst the rafters and such. The staging was in place, and with a fresh outlook on the day it seemed the right move. So once I managed to install the replacement pieces for my ill-fated first section, I continued with the adjacent pieces. This took quite some time. |
|||
 After
building the three-rafter section over the closet in one piece of
sheetrock, and having a hard time fitting it without breaking,
thanks to the tight fit I was striving for at all the rafter
cutouts, I decided to limit my length to two rafter sections, or
about 4' effectively. This worked pretty well on the remaining
section in the bedroom, though I had one cut that was overly wide.
I decided to live with it, as there would have to be some trim or
other means of smoothing the joints anyway. After
building the three-rafter section over the closet in one piece of
sheetrock, and having a hard time fitting it without breaking,
thanks to the tight fit I was striving for at all the rafter
cutouts, I decided to limit my length to two rafter sections, or
about 4' effectively. This worked pretty well on the remaining
section in the bedroom, though I had one cut that was overly wide.
I decided to live with it, as there would have to be some trim or
other means of smoothing the joints anyway. |
|||
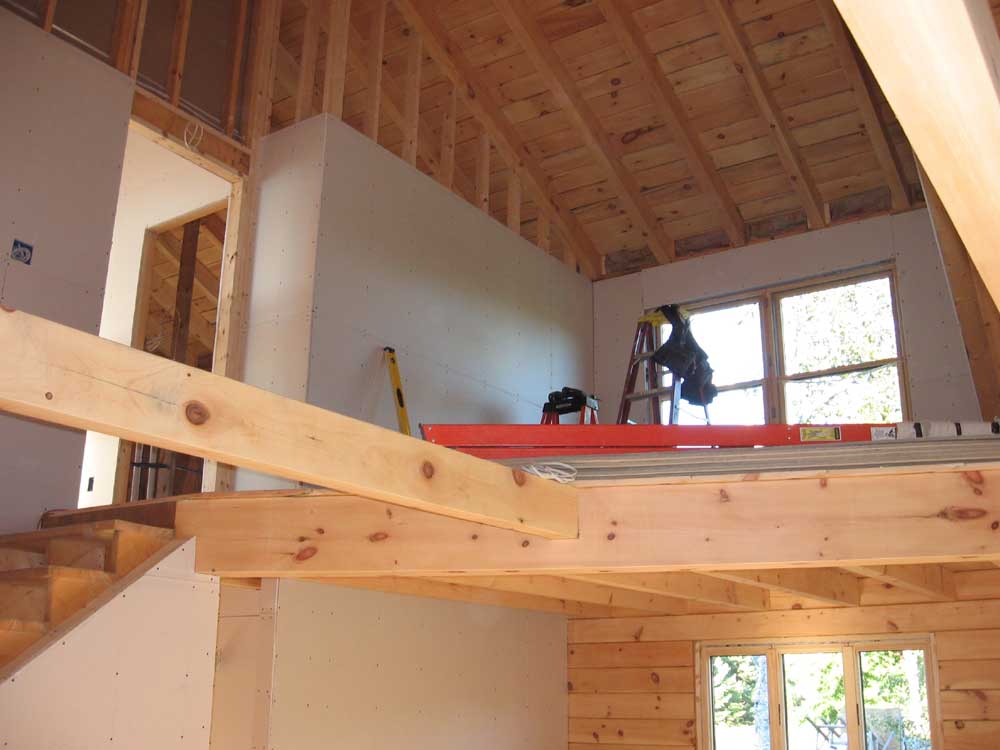
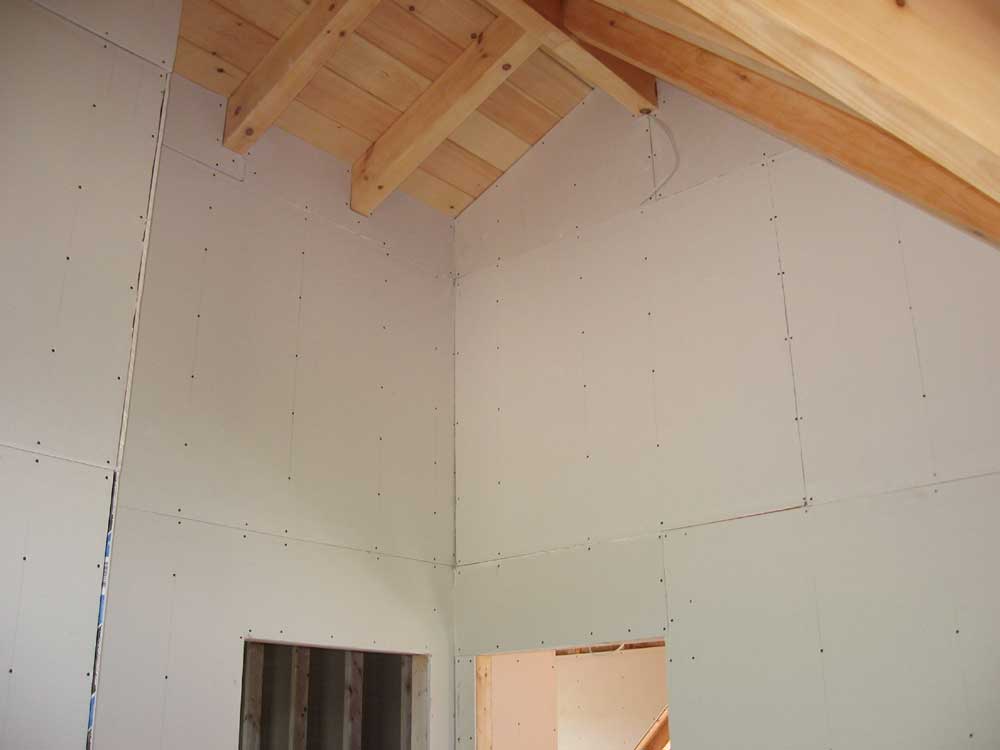
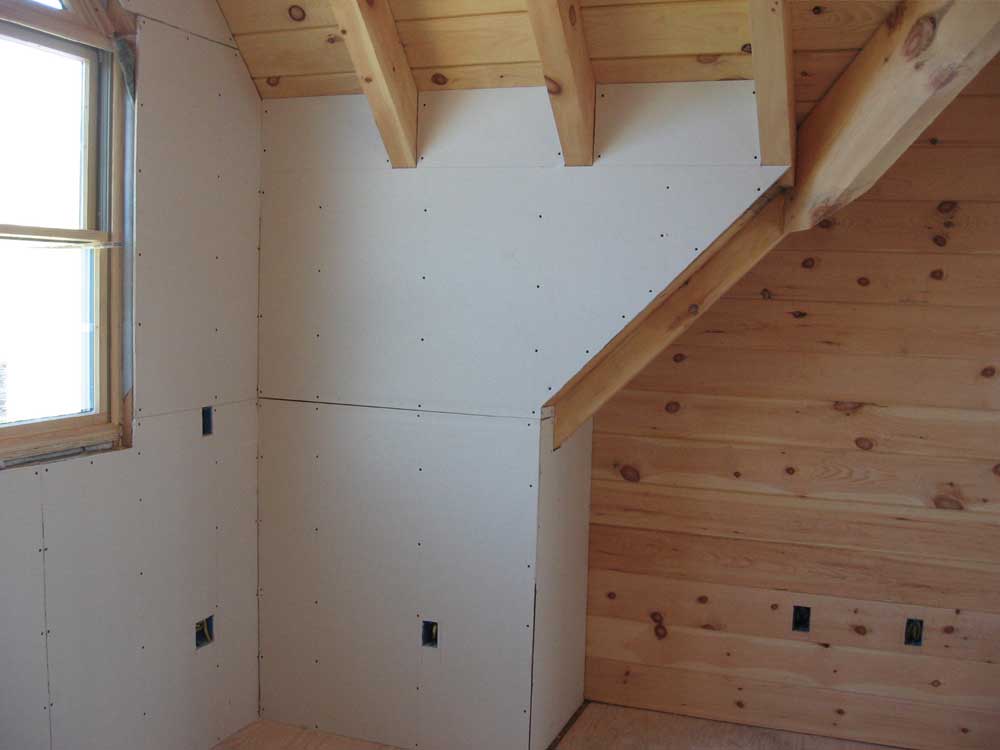
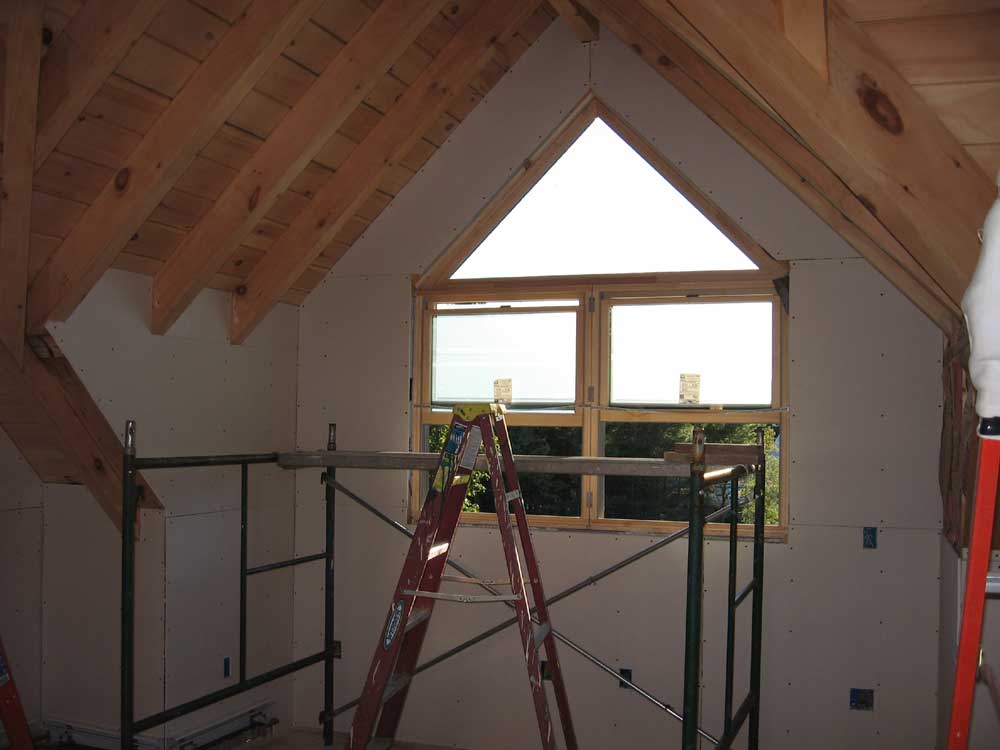
 With
that done, I moved out to the loft, bring the staging with me.
I completed the top pieces on the wall that I started yesterday,
achieving pleasing fits on all three (two small and one large)
pieces. I don't have a good picture of this--sorry This
picture is from the end of the day, replete with dust.) With
that done, I moved out to the loft, bring the staging with me.
I completed the top pieces on the wall that I started yesterday,
achieving pleasing fits on all three (two small and one large)
pieces. I don't have a good picture of this--sorry This
picture is from the end of the day, replete with dust.) |
|||
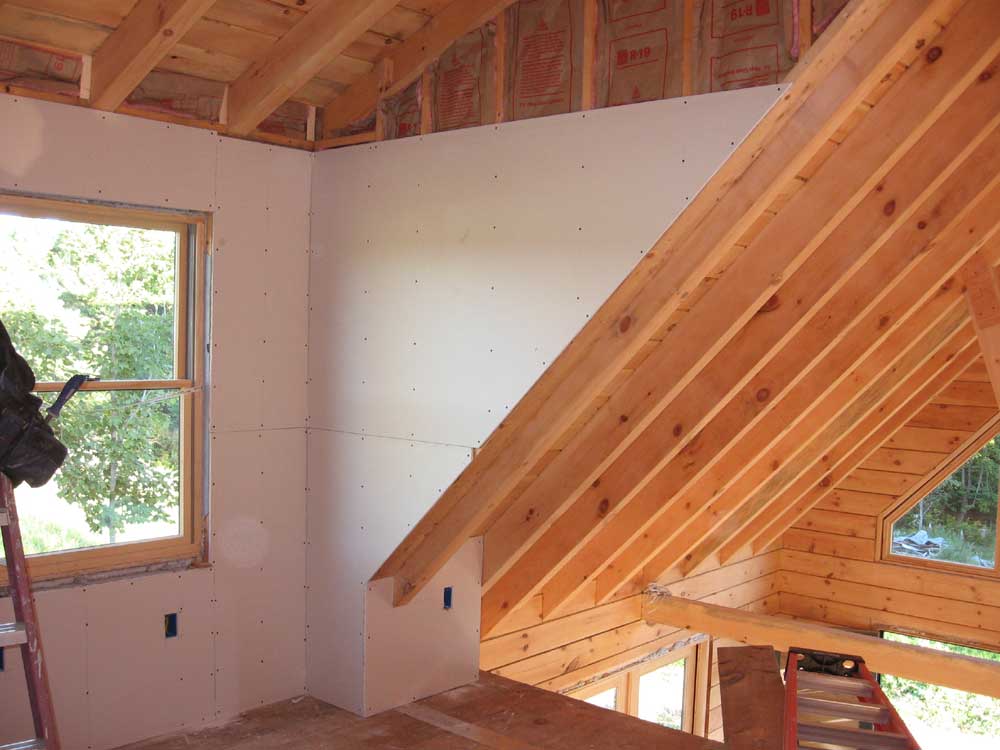
|
Then, I worked on the kneewall on the opposite side of the loft, the one forming the side of the shed dormer. I had done the easy part of this wall yesterday. Now, I had two relatively large pieces to cut and install, one of which extended to the centerline of the house at the ridge pole--which was extremely difficult to reach, since the loft deck doesn't extend to the center of the house. I had to place one of my double 2x10 staging planks over the ceiling ties beneath, and then support one leg of the pipe staging on the plank, levitating in mid air, seemingly. I loved it. |
|||
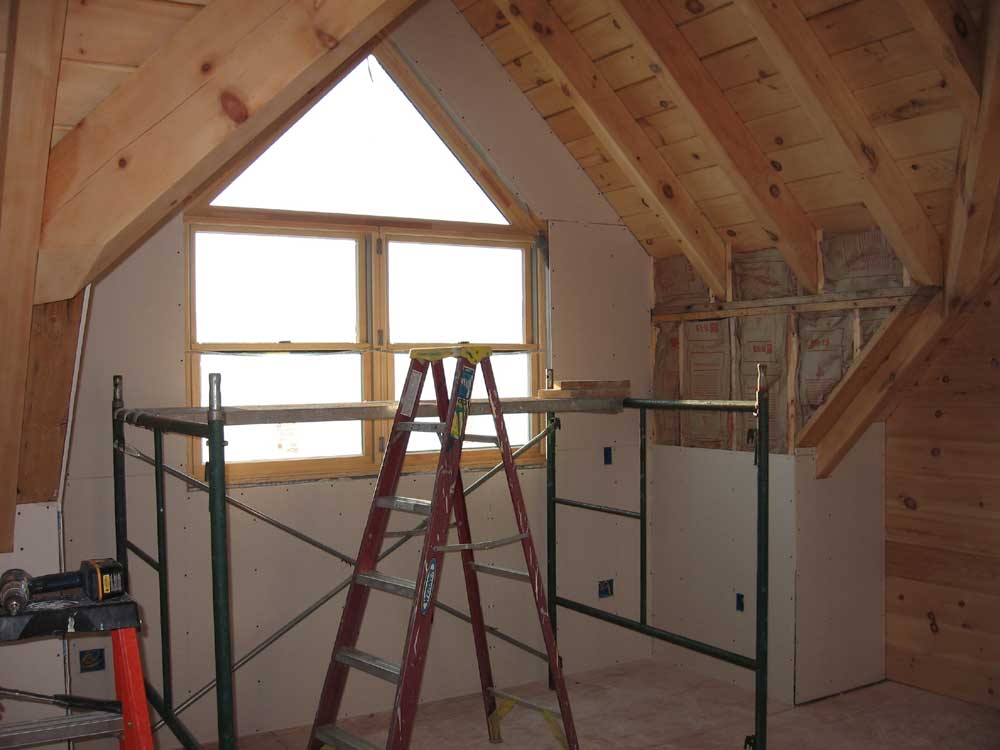
 I
measured the funky-shaped final piece as best as I could given the
poor access and my wimpiness, and spent a lot of time down on the
cutting floor with a full sheet, trying to figure out how to make
the oddly-shaped piece fit in a single sheet. There was a 22°
angle (that of the shed dormer roof) on the top edge, and a 45°
angle (corresponding to the main roof pitch) on most of the bottom
edge. Eventually, I managed to loft it out properly, and then
cut it. I
measured the funky-shaped final piece as best as I could given the
poor access and my wimpiness, and spent a lot of time down on the
cutting floor with a full sheet, trying to figure out how to make
the oddly-shaped piece fit in a single sheet. There was a 22°
angle (that of the shed dormer roof) on the top edge, and a 45°
angle (corresponding to the main roof pitch) on most of the bottom
edge. Eventually, I managed to loft it out properly, and then
cut it. |
|||
|
It fit pretty well, amazingly, though the bottom edge overhung by an inch or so, so I pulled it down to trim. I was pretty pleased with the fit, and decided to ignore the horrible misalignment of the vertical seam at the left edge of the board, which had not worked out right and left a large open area. I decided to leave it, though, and patch it with some scrap drywall, mesh tape, and mud. Good enough. It wasn't worth trying to recut this ridiculous piece again. |
|||
 This
silliness took a large part of the day, but I pressed on, determined
to see some real progress somehow. I installed two pieces of
sheetrock in the upstairs bathroom, mostly so that I could pass some
lighting wires through the sheet from the back side before I closed
in the closet next door. Note that I held the first sheet 48"
off the floor because we plan on tiling the wall to that point, so
the lower section will be sheathed in cement board. This
silliness took a large part of the day, but I pressed on, determined
to see some real progress somehow. I installed two pieces of
sheetrock in the upstairs bathroom, mostly so that I could pass some
lighting wires through the sheet from the back side before I closed
in the closet next door. Note that I held the first sheet 48"
off the floor because we plan on tiling the wall to that point, so
the lower section will be sheathed in cement board. |
|||
|
Then, I spent the rest of the afternoon in the bedroom closet, rocking the outside window wall first. The first piece I cut was a bit too long, despite my having cut it (I thought) 1/4" short because the adjacent wall was out of plumb. The fit was complicated by the section of heat register that didn't seem to want to let the sheetrock pass behind it, but mostly it didn't fit because it didn't fit. It was so close, though, and I tried to make it work.
My days are very long, and the work is very tiring and demanding. On occasion, it gets the better of me. |
|||
 Afterwards,
things went better, and I replaced the pummeled sheet with a new one
that I cut even shorter...and still was a tight fit. But it
fit, and I installed the piece above. Then, I installed four
more large pieces, two on each side wall. It was all I could
do to finish, but I did. Then I cleaned up the mess in the
house--sheetrocking makes a huge mess--and called it a day. 11
hours was enough. Perhaps too much. Afterwards,
things went better, and I replaced the pummeled sheet with a new one
that I cut even shorter...and still was a tight fit. But it
fit, and I installed the piece above. Then, I installed four
more large pieces, two on each side wall. It was all I could
do to finish, but I did. Then I cleaned up the mess in the
house--sheetrocking makes a huge mess--and called it a day. 11
hours was enough. Perhaps too much.At the end of the day, I had seven full sheets left in stock, plus a lot of scrap of various dimensions that would be useful. I'll need to make one more run for additional sheets on Friday. Tomorrow, I can use up what's left and get an accurate count of how many more I need to finish the job. |
|||
TUESDAY, SEPTEMBER 12, 2006 |
|||
 I
began right away this morning with the other complicated piece
beneath the rafters on the righthand side of the dormer. Start
to finish, this piece took 30 minutes to complete, but it came out
nicely. I
began right away this morning with the other complicated piece
beneath the rafters on the righthand side of the dormer. Start
to finish, this piece took 30 minutes to complete, but it came out
nicely. |
|||
|
I continued in the bedroom, and hung three rows of sheetrock on the remaining two walls. It sounds so insignificant when I boil it down to a single sentence, but this single sentence represents 5 hours' work. This got me almost to the ceiling, except for smallish pieces that required additional cuts around the ceiling and rafters--and which I couldn't reach from the set of staging that I erected to help with the third row. Later, I'll go back and fill in all these areas, which will probably take an entire day on its own. |
|||
|
|
|||
 In
the interest of gratifying progress, I decided to continue with the
"bulk" sheetrocking, and moved on to the loft area, where I hung two
rows on all three walls, leaving the topmost sections for tomorrow,
as I would need to move the staging in order to reach. In
the interest of gratifying progress, I decided to continue with the
"bulk" sheetrocking, and moved on to the loft area, where I hung two
rows on all three walls, leaving the topmost sections for tomorrow,
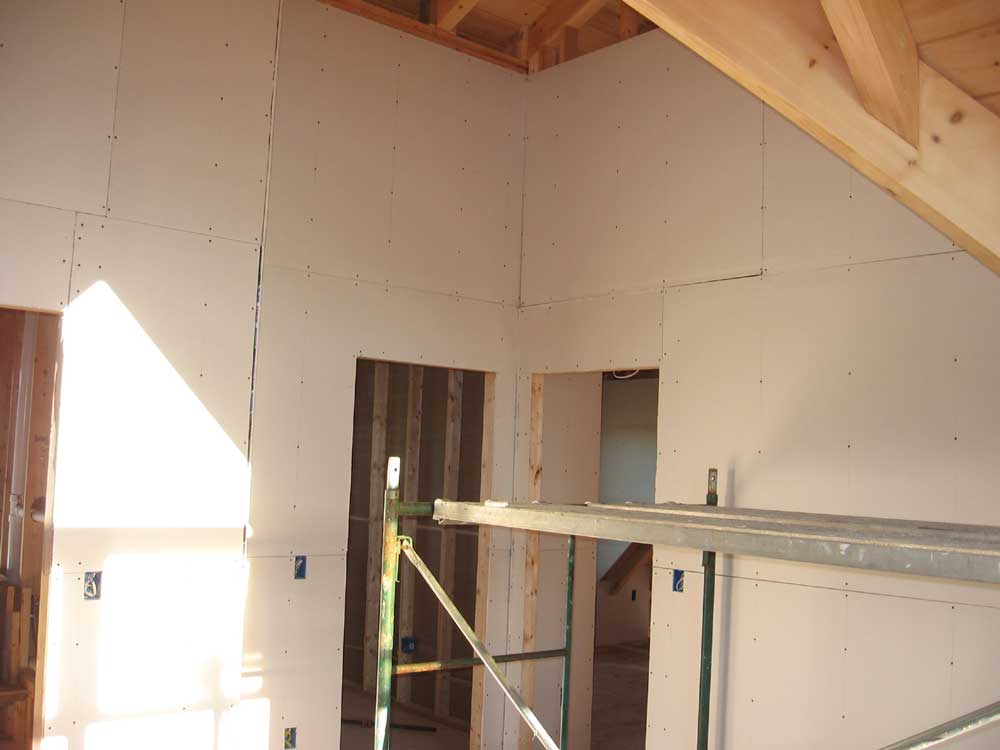
as I would need to move the staging in order to reach.There was little of particular interest in today's work, other than the large areas covered. Cut, lug, screw. So I'll let the pictures tell most of the story. I was pleased with the progress of the day. |
|||
|
|
|||
MONDAY, SEPTEMBER 11, 2006 |
|||
|
I went and picked up 40 more sheets of sheetrock this morning, and was back at the site by 7:30. It took a while to unload the sheets by myself, and when that was done I took a little break to measure for the hardwood flooring in the house, and then place the order. Delivery time: about mid-October. Yes, it's that time: lots of choices, decisions, purchasing, and ordering things, from hardwood to tile to stoves to lighting. It's hard to fit this stuff in along with actually building the house, but somehow I will make the time. I also called, again, the plumbing inspector, and left another message with his wife. She was apologetic and said she'd have him call later. |
|||
|
Back to work. I decided to hang the sheetrock in the bedroom before continuing with other upstairs locations. I hung two rows on the inside of the staircase wall; further rows will require staging, which I'll set up later. |
|||
|
|
|||
 Then,
I worked my way clockwise around the dormer in the front. The
pieces were small, but the section at the top of the kneewall,
incorporating angles and three rafters, took a lot of time to
measure, layout, and cut. I was about to cut the rafter
openings when I thought something didn't look quite right, so I went
up and remeasured; indeed, I had one of the measurements wrong, so I
made the correction and then cut the pieces. I even had to cut
a 45° bevel on the top of the sheet where it joined into the
ceiling. Then,
I worked my way clockwise around the dormer in the front. The
pieces were small, but the section at the top of the kneewall,
incorporating angles and three rafters, took a lot of time to
measure, layout, and cut. I was about to cut the rafter
openings when I thought something didn't look quite right, so I went
up and remeasured; indeed, I had one of the measurements wrong, so I
made the correction and then cut the pieces. I even had to cut
a 45° bevel on the top of the sheet where it joined into the
ceiling.My efforts were rewarded with a near-perfect fit, and I was pleased. But it had taken a long time. |
|||
At lunchtime, the plumbing inspector called, and said he'd be right out. I hurried down for a quick lunch, but he wasn't kidding...I had to abandon my lunch partway through to meet him when I saw him drive by. Of course, by the time I walked up to the house, he was about done; he might have spent 5 minutes here, total, from door slam to door slam. "Cursory" would be an apt term to describe his inspection. He looked at everything, quickly, but certainly there was no issue with determining whether everything was to code, or properly pitched, or what have you. Good enough. Now I can cover all the walls. |
|||
 I
set up one section of pipe staging to rock the angled part of the
dormer (the gable), and then continued around the other side.
By now, it was getting late in the afternoon, and I was tired.
I knew better than to even think of tackling the other side with the
rafters, so I left that piece for first thing in the morning.
But even on the last piece, I made some dumb measuring errors (that
I fortunately caught before cutting), and it was clear that I was
out of steam. I
set up one section of pipe staging to rock the angled part of the
dormer (the gable), and then continued around the other side.
By now, it was getting late in the afternoon, and I was tired.
I knew better than to even think of tackling the other side with the
rafters, so I left that piece for first thing in the morning.
But even on the last piece, I made some dumb measuring errors (that
I fortunately caught before cutting), and it was clear that I was
out of steam. |
|||
 I
didn't want to stop. It was only 5:30, but I just knew that
continuing would lead to issues. So I cleaned up the day's
mess, and called it quits. Tomorrow is another day. I'd
like to get the bedroom all done tomorrow, right to the ceiling.
We'll see. I
didn't want to stop. It was only 5:30, but I just knew that
continuing would lead to issues. So I cleaned up the day's
mess, and called it quits. Tomorrow is another day. I'd
like to get the bedroom all done tomorrow, right to the ceiling.
We'll see. |
|||
SUNDAY, SEPTEMBER 10, 2006 |
|||
 I
began this morning where I left off yesterday: the 4th row of
sheetrock above the staircase. I thought this would be the
last row I could install off my current staging. Installing
one full sheet and one cut piece (at the angled end) went fairly
smoothly, but I couldn't go any higher at the moment because I
needed to conceive of some staging that would help me reach. I
began this morning where I left off yesterday: the 4th row of
sheetrock above the staircase. I thought this would be the
last row I could install off my current staging. Installing
one full sheet and one cut piece (at the angled end) went fairly
smoothly, but I couldn't go any higher at the moment because I
needed to conceive of some staging that would help me reach. |
|||
|
|
|||
 I
continued in the hallway, and cut and fit the pieces on the bathroom
wall. These narrow (12" wide) sections filled in the space
above the full sheet beneath, and also extended past the joists up
to the ceiling, filling in those gaps. Creating these
pieces--three needed--was a time-consuming process, of course.
Later, I'll have to apply trim to all the seams where sheetrock
meets log or other wood. But I can worry about that later.
One thing at a time. This took me up to lunchtime. I
continued in the hallway, and cut and fit the pieces on the bathroom
wall. These narrow (12" wide) sections filled in the space
above the full sheet beneath, and also extended past the joists up
to the ceiling, filling in those gaps. Creating these
pieces--three needed--was a time-consuming process, of course.
Later, I'll have to apply trim to all the seams where sheetrock
meets log or other wood. But I can worry about that later.
One thing at a time. This took me up to lunchtime. |
|||
 After
lunch, I hung some drywall in Heidi's craft room, covering the
inside of the hallway wall. Then, I cut some narrow strips
from scrap and screwed them into the gaps between the wainscoting
and the drywall in the craft room and hall; I installed these only
so that the future trim would be evenly supported. I won't mud
or tape this seam. After
lunch, I hung some drywall in Heidi's craft room, covering the
inside of the hallway wall. Then, I cut some narrow strips
from scrap and screwed them into the gaps between the wainscoting
and the drywall in the craft room and hall; I installed these only
so that the future trim would be evenly supported. I won't mud
or tape this seam. |
|||
|
|
|||
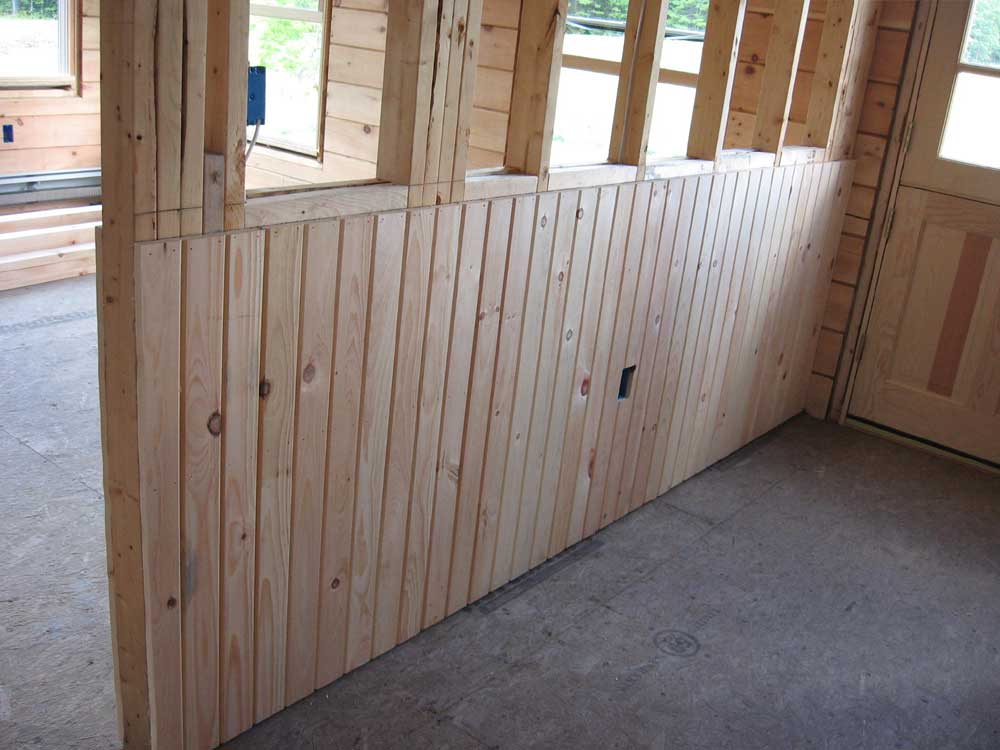
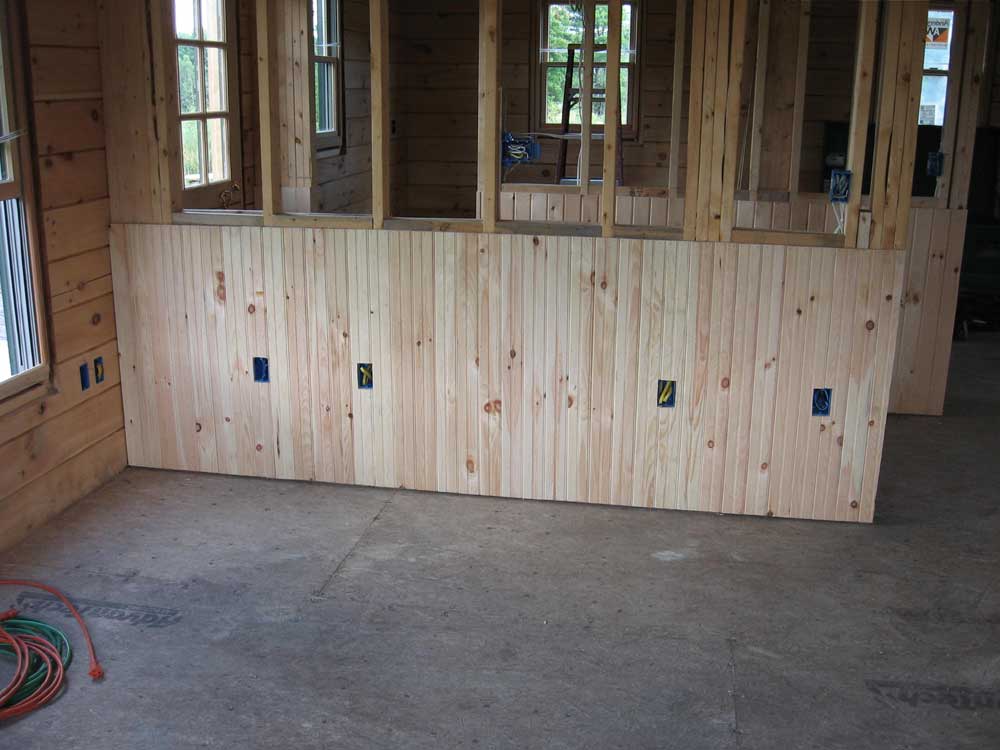
| After I installed the wainscoting in the hallway earlier in the week, we decided we wanted to continue it around the corner and down the short wall beneath the stairs. To that end, I installed more 2x4 blocking in this wall to support the boards, and then installed the sheetrock above this area. I didn't have enough of the v-match boards in stock to install the bottom section, though; that will come later. | |||
 This
pretty much wrapped up the day's work. Looking back, it
doesn't seem like I accomplished much, but it was a fairly short day
(9-4:30). This
pretty much wrapped up the day's work. Looking back, it
doesn't seem like I accomplished much, but it was a fairly short day
(9-4:30).I'll be getting more sheetrock in the morning. The fun continues then! |
|||
SATURDAY, SEPTEMBER 9, 2006 |
|||
|
Sheetrock! (Drywall, wall board,
whatever you wish to call it.)
I Any delays in the completion of this project will not be my fault. Unless they are. But they won't be. |
|||
 After
the kitchen wall, I continued in the hallway, and rocked both walls
above the wainscoting from the other day. The wall containing
the doors to the bathroom and pantry took a full height (4') sheet
above the wainscoting, leaving about 12" above (and in between
the exposed floor joists) to cover; for now, I left this alone. After
the kitchen wall, I continued in the hallway, and rocked both walls
above the wainscoting from the other day. The wall containing
the doors to the bathroom and pantry took a full height (4') sheet
above the wainscoting, leaving about 12" above (and in between
the exposed floor joists) to cover; for now, I left this alone.The other hall wall needed just one width of sheetrock, thanks to the carrying stick's protrusion at the top. By pressing the sheets tightly against this, I left about 2" at the bottom, which would eventually be covered by chair rail trim. |
|||
 I
continued on the big wall next to the stairs. By starting at
the bottom, I found I could continue installing the full sheets
relatively easily, using the sheet below for support. I added
a scrap 2x6 block, though, to help support one end of the sheet.
This technique continued to serve me well as I climbed this wall. I
continued on the big wall next to the stairs. By starting at
the bottom, I found I could continue installing the full sheets
relatively easily, using the sheet below for support. I added
a scrap 2x6 block, though, to help support one end of the sheet.
This technique continued to serve me well as I climbed this wall. |
|||
 For
the third row, I needed some staging, and used one of my
multi-position ladders braced on the stairs to create support
platform for a plank. With this, I managed to complete the
third full row to the wall, and called it a day at this point as it
was getting dark. I had hung 13 sheets' worth of drywall, not
accounting for scrap pieces. For
the third row, I needed some staging, and used one of my
multi-position ladders braced on the stairs to create support
platform for a plank. With this, I managed to complete the
third full row to the wall, and called it a day at this point as it
was getting dark. I had hung 13 sheets' worth of drywall, not
accounting for scrap pieces. |
|||
FRIDAY, SEPTEMBER 8, 2006 |
|||
 It
was a day of odds and ends, with no blazing visual progress; yet,
everything done was one more step in the right direction. I
was out of nails for my finish gun, which meant that I couldn't
install any trim; I also had no drywall on hand, so I couldn't begin
that chore. It
was a day of odds and ends, with no blazing visual progress; yet,
everything done was one more step in the right direction. I
was out of nails for my finish gun, which meant that I couldn't
install any trim; I also had no drywall on hand, so I couldn't begin
that chore.I began by finishing up the v-match in the bedroom upstairs. I cut and fit the three small pieces required to close off the top of the wall around the ridge pole and ceiling. If I had tried to measure for and make these cuts late yesterday, I surely would have made errors, but this morning it went smoothly and well, and the work took no time at all. |
|||
|
I nailed 11 ceiling boxes to the joists in the basement for the basement lighting--a menial task that wasn't all that necessary, but was one more thing to check off the list. I also installed the washing machine water valve in the basement at the proposed washing machine location. I had a small leak in the pipe threads that some tightening took care of.
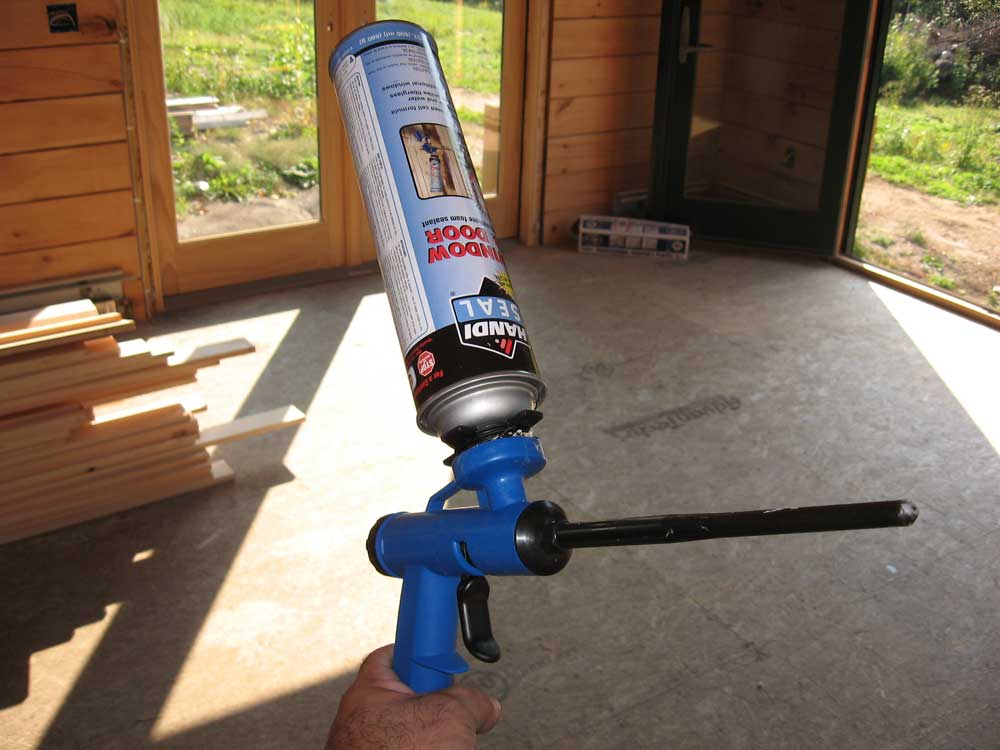
My Dad and his wife Ann were visiting from Texas, and I spent some time with them during the mid-day. Afterwards, I used cans of spray foam called Handi Seal to seal all the openings around the windows and doors. This was pretty interesting stuff, and came with a plastic application gun that worked quite well. This particular foam is designed to be low-expansion so that it won't bow out the windows at all. |
|||
 After
knocking this and a couple other small items off my list, I called
it a day a little early so we could get ready to drive south to the
big city (Portland, that is) for dinner that evening. After
knocking this and a couple other small items off my list, I called
it a day a little early so we could get ready to drive south to the
big city (Portland, that is) for dinner that evening. |
|||
THURSDAY, SEPTEMBER 7, 2006 |
|||
|
Happy birthday, Mom! (From your terrible son who forgot to call...)
Installing the wood was easy and straightforward, and went rather quickly. I face nailed the pieces with a finish gun; the nails at the top and bottom of each board would later be hidden by trim (chair rail and baseboard, respectively), so I'd only need to fill the holes in the middle of each board. |
|||
 I
had to rip a board to fit at each door opening, and at the ends of
the runs. As I worked, I left these boards out, and when I had
a collection of several I took them down to the shop and ripped them
on the table saw. Then I installed them. I
had to rip a board to fit at each door opening, and at the ends of
the runs. As I worked, I left these boards out, and when I had
a collection of several I took them down to the shop and ripped them
on the table saw. Then I installed them. |
|||
 At
the kitchen end of the hallway, the kitchen wall juts past the
hallway by 6"or so. I thought it would be nice to wrap this
projection in the v-match, and to carry the wood back behind where
the refrigerator would go before transitioning to drywall. I
butted the corners; I wanted to miter them, but on the first board
the miter would have failed to remove the edge chamfer, and wouldn't
have looked good. However, I routed a chamfer on the edge of
one of the boards that matched the shape of the v-groove in the
other boards, which I thought looked pretty good. At
the kitchen end of the hallway, the kitchen wall juts past the
hallway by 6"or so. I thought it would be nice to wrap this
projection in the v-match, and to carry the wood back behind where
the refrigerator would go before transitioning to drywall. I
butted the corners; I wanted to miter them, but on the first board
the miter would have failed to remove the edge chamfer, and wouldn't
have looked good. However, I routed a chamfer on the edge of
one of the boards that matched the shape of the v-groove in the
other boards, which I thought looked pretty good. |
|||
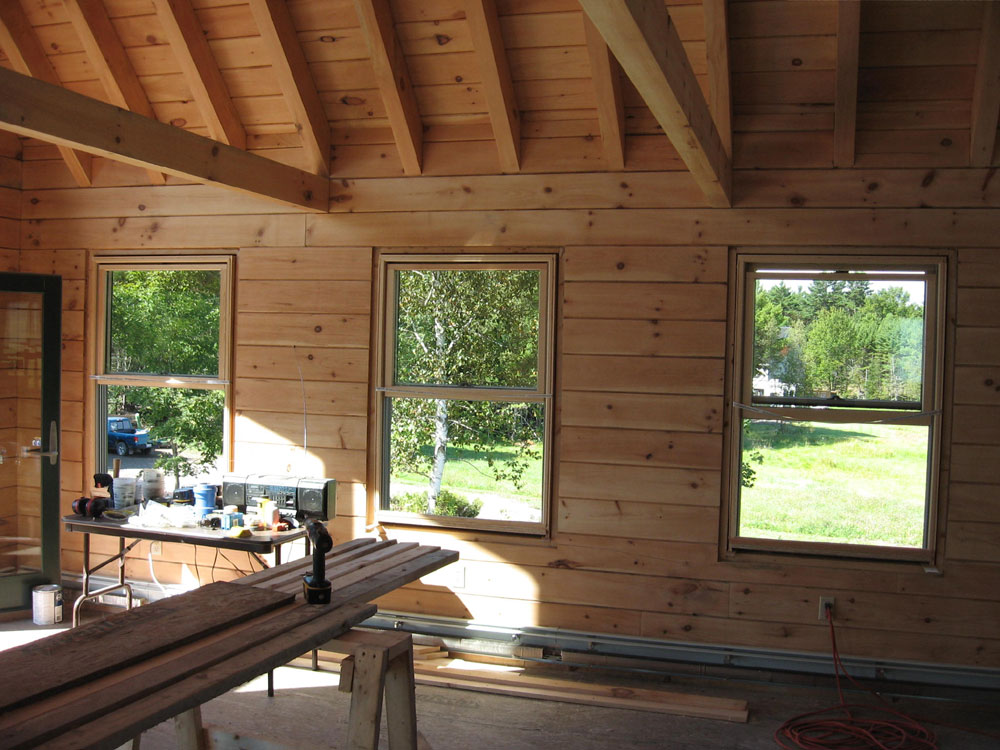
 I
loved the look of the 4" v-match wainscoting. For Heidi's
craft room, I turned the boards around, however. The 4"
material came to me with one flat side, with the V groove when
boards are butted together; however, on the back side was milled a
nice traditional beadboard profile, which we thought would be nice
to use somewhere. I finished installing the downstairs v-match
late in the morning, though I had to bring one last piece down with
me at lunchtime to rip it to the proper size on the tablesaw. I
loved the look of the 4" v-match wainscoting. For Heidi's
craft room, I turned the boards around, however. The 4"
material came to me with one flat side, with the V groove when
boards are butted together; however, on the back side was milled a
nice traditional beadboard profile, which we thought would be nice
to use somewhere. I finished installing the downstairs v-match
late in the morning, though I had to bring one last piece down with
me at lunchtime to rip it to the proper size on the tablesaw. |
|||
 After
lunch, I turned my attention to the 8" (7", really) v-match
upstairs. We planned only one wall of the wood--the gable end
wall in the bedroom. I spent the rest of the afternoon
covering this wall, stopping just short of the ridge pole, where
additional cuts would be required. I just barely made it with
my finish nails, too The 7" v-match material supplied by the
log home company was the worst material I had received to date,
looking as if it had sat neglected in a warehouse for months, along
with many shattered knots, boot prints, dirt, and cracks that caused
the boards to break on contact. Fortunately, I had enough extra that
I could be choosy with the boards and avoid the worst, but I still
found this irritating. After
lunch, I turned my attention to the 8" (7", really) v-match
upstairs. We planned only one wall of the wood--the gable end
wall in the bedroom. I spent the rest of the afternoon
covering this wall, stopping just short of the ridge pole, where
additional cuts would be required. I just barely made it with
my finish nails, too The 7" v-match material supplied by the
log home company was the worst material I had received to date,
looking as if it had sat neglected in a warehouse for months, along
with many shattered knots, boot prints, dirt, and cracks that caused
the boards to break on contact. Fortunately, I had enough extra that
I could be choosy with the boards and avoid the worst, but I still
found this irritating. |
|||
WEDNESDAY, SEPTEMBER 6, 2006 |
|||
|
I decided to start this morning with
the tub drain assembly. I couldn't build the tub surround
frame till the drain was installed, and I wanted to get the framing
done with so that everything would be ready for sheetrock and cement
board.
Eventually, I inserted blocking beneath the drain outside the tub and shimmed it up tightly. Then, with that held in place, I could turn the inside drain fitting into the threads. I used first a strip of shingle, then some pliers handles, to catch on the ears inside the assembly to turn the fitting. I sealed this fitting with a heavy roll of plumber's putty. |
|||
 I
continued following the instructions; I won't bore you with a
step-by-step. But it took a surprisingly long time to assemble
the drain and overflow, and to get it to work properly. It
didn't help that the instructions gave no indication of how the
various parts were supposed to interact, a simple thing that would
have been nice to know. I had trouble with the drain lever and
lift arm, but eventually figured it out (sans directions) and
got it to work. I
continued following the instructions; I won't bore you with a
step-by-step. But it took a surprisingly long time to assemble
the drain and overflow, and to get it to work properly. It
didn't help that the instructions gave no indication of how the
various parts were supposed to interact, a simple thing that would
have been nice to know. I had trouble with the drain lever and
lift arm, but eventually figured it out (sans directions) and
got it to work. |
|||
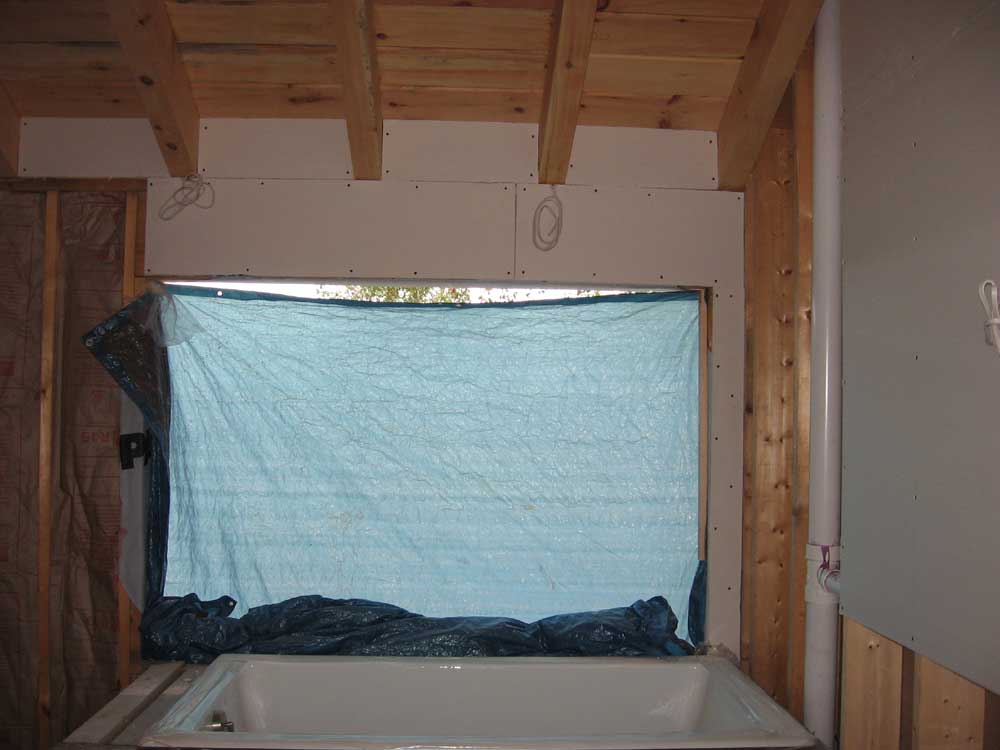
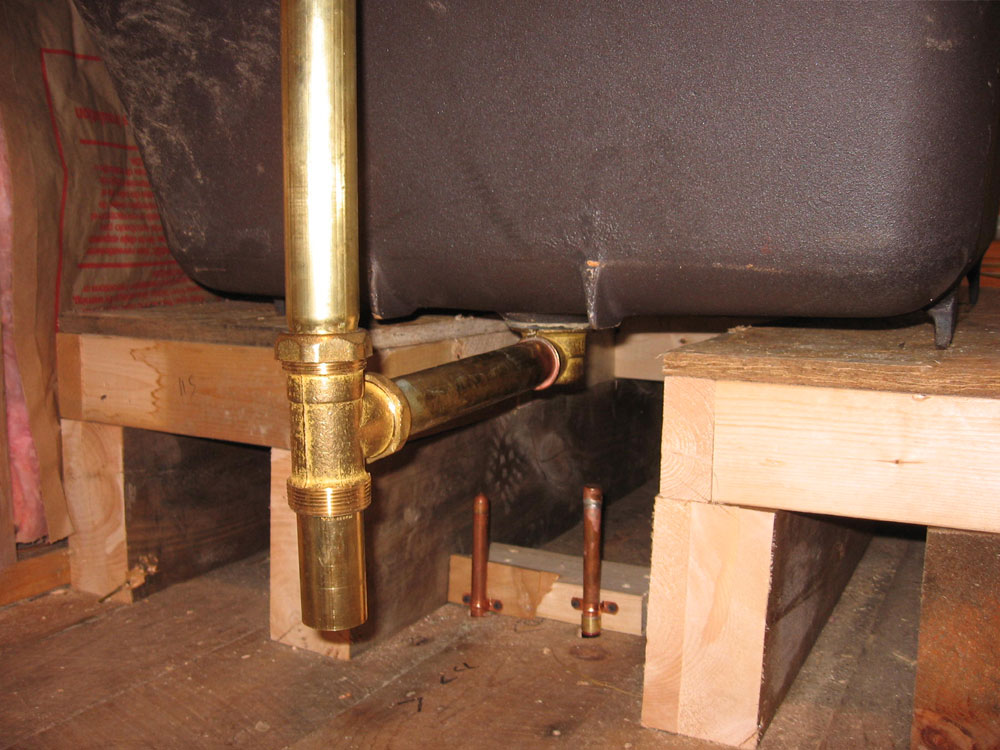 The
drain outlet tailpiece didn't end up where I expected, and I had to
spend quite a bit of time working through some potential options for
the drain trap (to be installed later) and making the drain line
connect with the stub in the white pipe in the ceiling beneath.
This required a number of trips up and down the stairs ad I
contemplated the ramifications of one move or another. In
addition, I was trying to figure out exactly how to place the tub
relative to the walls and the surround that I was going to build
next. The exact placement of the tub of course directly
affected the drain location as well. Note that in this
picture, the tub is hanging well over the edge of the platform and
is not in its proper position. The
drain outlet tailpiece didn't end up where I expected, and I had to
spend quite a bit of time working through some potential options for
the drain trap (to be installed later) and making the drain line
connect with the stub in the white pipe in the ceiling beneath.
This required a number of trips up and down the stairs ad I
contemplated the ramifications of one move or another. In
addition, I was trying to figure out exactly how to place the tub
relative to the walls and the surround that I was going to build
next. The exact placement of the tub of course directly
affected the drain location as well. Note that in this
picture, the tub is hanging well over the edge of the platform and
is not in its proper position. |
|||
 Eventually,
I figured out that my system would work, and I moved on to the tub
surround. I wanted to keep the tub flange a bit away from the
finished walls, so I installed some 2x blocking beneath the window
opening and along the other wall behind the tub. Then, I
determined how I wanted to build the remaining portions of the
surround and built it. Eventually,
I figured out that my system would work, and I moved on to the tub
surround. I wanted to keep the tub flange a bit away from the
finished walls, so I installed some 2x blocking beneath the window
opening and along the other wall behind the tub. Then, I
determined how I wanted to build the remaining portions of the
surround and built it. |
|||
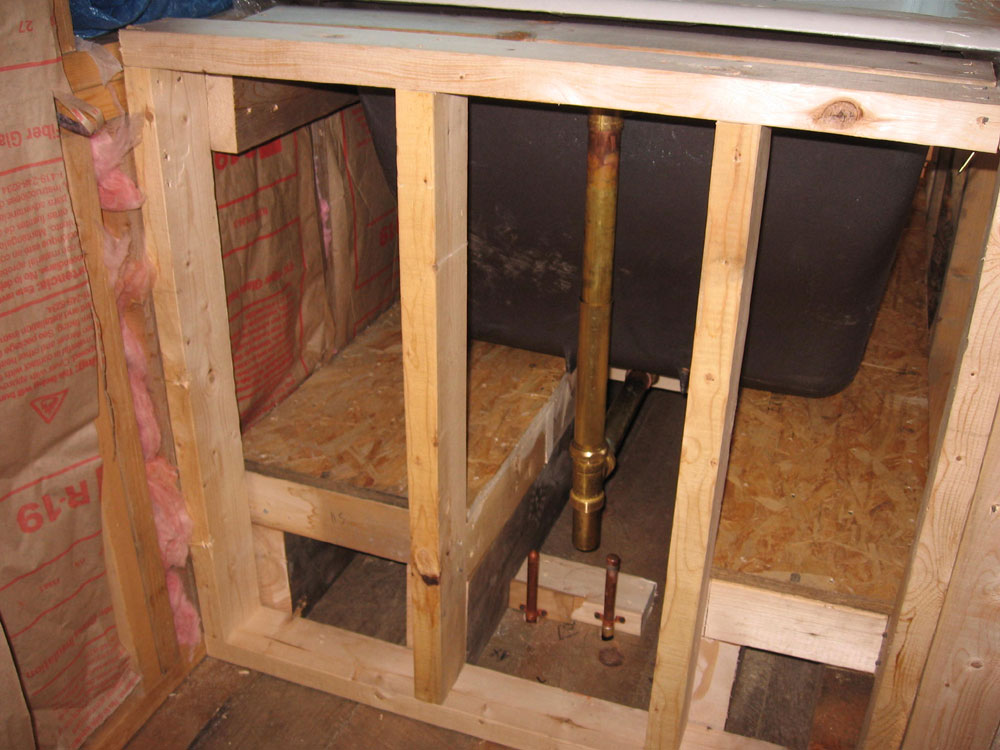 I
also had to build a step to allow for easy access into the tub,
which was now 12" higher than it would be if placed directly on the
floor. The step was complicated by the length of the vanity
cabinets, located on the adjacent wall (or will be, eventually), and
I didn't want to cut the tolerance too close and run into a cabinet
installation problem later. Eventually, I settled on a 7"
rough step width, which would grow to over 8" by the time the backer
board and tile was installed down the road. I
also had to build a step to allow for easy access into the tub,
which was now 12" higher than it would be if placed directly on the
floor. The step was complicated by the length of the vanity
cabinets, located on the adjacent wall (or will be, eventually), and
I didn't want to cut the tolerance too close and run into a cabinet
installation problem later. Eventually, I settled on a 7"
rough step width, which would grow to over 8" by the time the backer
board and tile was installed down the road.I left room in the framing for access to the drain assembly and supply lines, and later on I'll build a removable access panel for this area. Ridiculously, it took till 2PM (including lunch break) to finish this work. |
|||
|
During the remainder of the afternoon, I measured all the walls that would require drywall, and also measured for the needed cement tile backer board that I'd have to install on the bathroom floors, and in the showers--as well as partway up the walls in the upstairs bath, and around the entire tub surround. With this information, I could figure out how many sheets of each I needed to order, as I was ready to place this order forthwith. |
|||
 Finally,
I decided to get ready to install the 4" v-match pine downstairs.
After determining the correct length, I cut a large number of pieces
to length, using a fixed stop block to keep the cuts consistent with
my chop saw. I cut what looked like enough to do the job,
though I had some longer lengths in reserve if I needed them.
I didn't want to cut more than necessary, as I could return the
uncut pieces. I planned to attack the v-match in the
morning--a little tidbit of finish work that I thought I needed at
this point. Finally,
I decided to get ready to install the 4" v-match pine downstairs.
After determining the correct length, I cut a large number of pieces
to length, using a fixed stop block to keep the cuts consistent with
my chop saw. I cut what looked like enough to do the job,
though I had some longer lengths in reserve if I needed them.
I didn't want to cut more than necessary, as I could return the
uncut pieces. I planned to attack the v-match in the
morning--a little tidbit of finish work that I thought I needed at
this point. |
|||
TUESDAY, SEPTEMBER 5, 2006 |
|||
|
I spent part of the morning running
errands, including more returns and picking up some needed supplies.
Despite leaving at 5, it was about 10 before I could get back to
work. I started off by installing the newly purchased recessed light can in the downstairs bathroom, finishing up the wiring in that room. I also called the plumbing inspector and left a message with his wife that I was all set for my inspection now. |
|||
 It
was a nice day, and I decided that I was sick of the plastic film
covering the windows. Since all the finishing was complete on
all the log walls, I figured I might as well remove the plastic on
these windows, as there was really no reason to have the protection
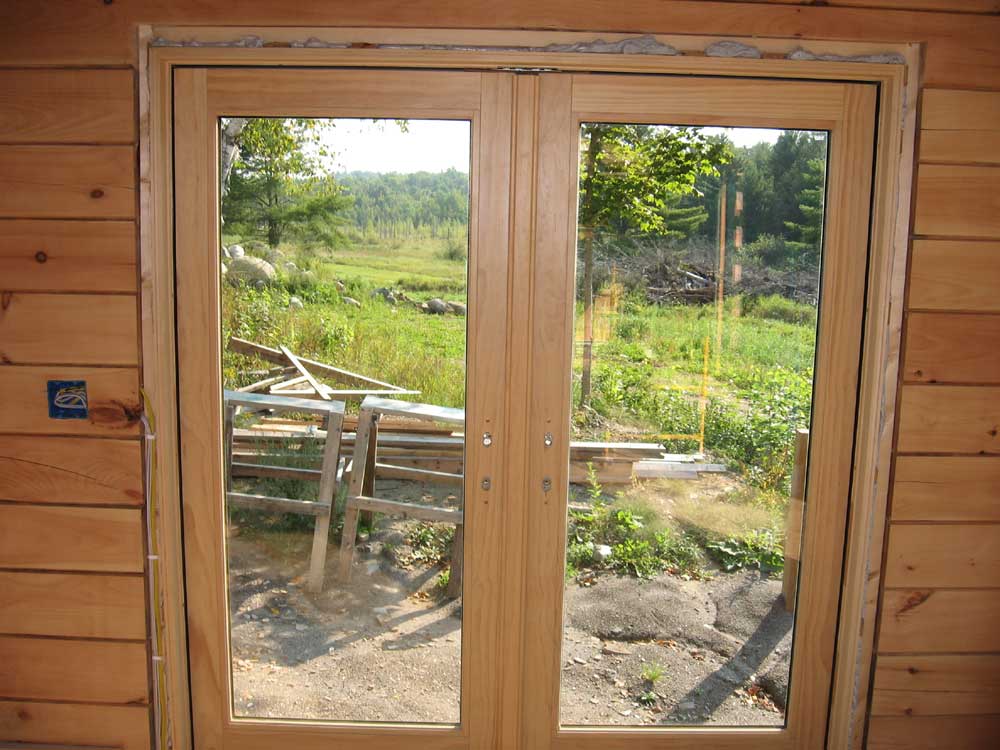
at this point. I removed the plastic from all the first floor
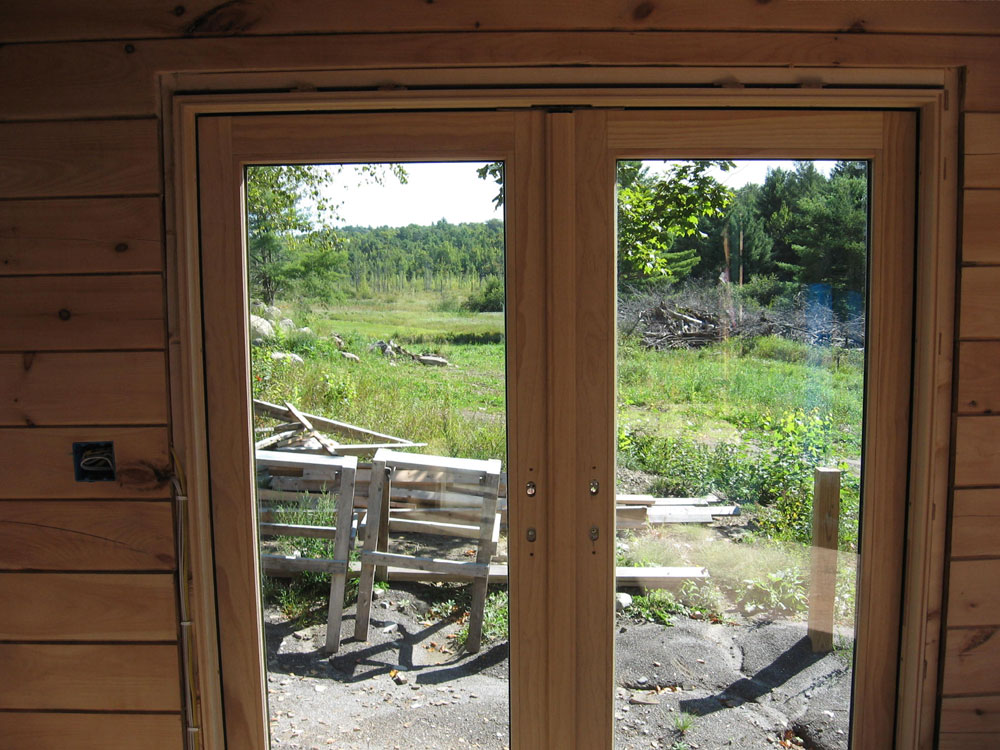
windows and the three French doors, and it made a huge difference.
It was nice to actually see the views from inside the house now. It
was a nice day, and I decided that I was sick of the plastic film
covering the windows. Since all the finishing was complete on
all the log walls, I figured I might as well remove the plastic on
these windows, as there was really no reason to have the protection
at this point. I removed the plastic from all the first floor
windows and the three French doors, and it made a huge difference.
It was nice to actually see the views from inside the house now.I did leave the plastic on the second floor windows, though, where it will remain until the walls are complete. |
|||
|
|
|||
|
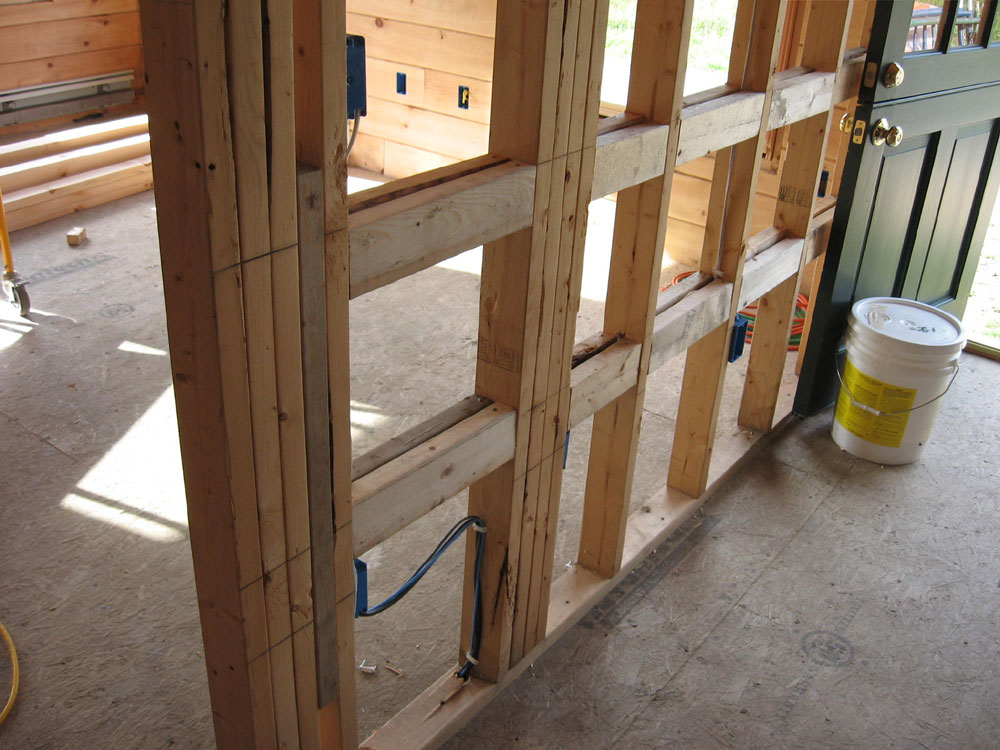
I worked to cut and install blocking at the tops of the stud walls, on both the first and second floors, where the stud walls met the 4x8 roof rafters and ceiling joists. The blocking is required to give sheetrock or other wall covering a place to be attached. This process went quite quickly, despite the need to schlep my big, awkward stepladder around upstairs in order to reach the tops of the walls. |
|||
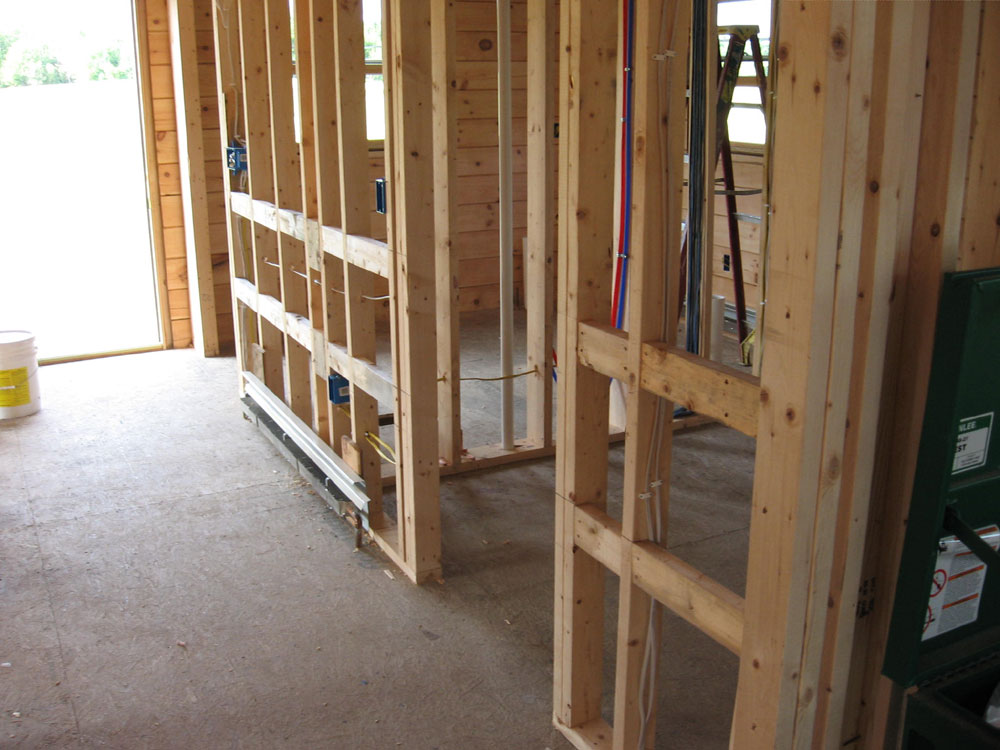 I
continued in this vein with some additional blocking in the stud
walls in the hallway downstairs. We planned to install 4"
v-match oriented vertically at the bottom of the walls, as a sort of
wainscoting, and there needed to be somewhere to nail the boards.
After determining the height of the boards (we had earlier decided
that they should be at about doorknob height, or around 39"), I cut
and installed horizontal 2x4 blocking between the studs, with one
section at the top of the boards, to allow the boards as well as the
sheetrock above to be secured, and a second set of blocking about
24" off the floor. I
continued in this vein with some additional blocking in the stud
walls in the hallway downstairs. We planned to install 4"
v-match oriented vertically at the bottom of the walls, as a sort of
wainscoting, and there needed to be somewhere to nail the boards.
After determining the height of the boards (we had earlier decided
that they should be at about doorknob height, or around 39"), I cut
and installed horizontal 2x4 blocking between the studs, with one
section at the top of the boards, to allow the boards as well as the
sheetrock above to be secured, and a second set of blocking about
24" off the floor. |
|||
 This
was a tedious and ultimately unsatisfying task, yet necessary in
order to continue closing in the walls. I had put this off
long enough, but after finishing the hallway I realized I had to do
one wall in Heidi's craft room as well, and the boredom and fatigue
set in. I had awakened around 2 in the morning for some
reason, and didn't really sleep again till just before my alarm went
off at 3:30. So I was a little draggy, and I didn't feel
too guilty when I knocked off at 5 PM to do some trash disposal
and site cleanup. But I made sure to finish all the blocking
first. This
was a tedious and ultimately unsatisfying task, yet necessary in
order to continue closing in the walls. I had put this off
long enough, but after finishing the hallway I realized I had to do
one wall in Heidi's craft room as well, and the boredom and fatigue
set in. I had awakened around 2 in the morning for some
reason, and didn't really sleep again till just before my alarm went
off at 3:30. So I was a little draggy, and I didn't feel
too guilty when I knocked off at 5 PM to do some trash disposal
and site cleanup. But I made sure to finish all the blocking
first. |
|||
MONDAY, SEPTEMBER 4, 2006 |
|||
 First
thing this morning, I moved the tub onto the new platform. It
was amazingly easy to lift one end up onto the platform, and then
pull/push/lift/slide the other end up. The ease with which I
got the tub up where it belonged only reinforced my decision last
night to not push my luck with the tub. First
thing this morning, I moved the tub onto the new platform. It
was amazingly easy to lift one end up onto the platform, and then
pull/push/lift/slide the other end up. The ease with which I
got the tub up where it belonged only reinforced my decision last
night to not push my luck with the tub.I realized I needed to install the drain/overflow setup on the tub before I could position it permanently, so I retrieved the drain from the shop, where I had stored it for safekeeping, and started to get to work. Almost immediately, though, I had to stop. I didn't seem to have any plumber's putty on hand, which I needed to seal the drain fitting to the tub. I ransacked my plumbing box, as I was sure I had a container, but it was fruitless. I added it to my shopping list, put the drain away, and moved on with other tasks. |
|||
 During
the heating installation, I had slapped some studs into the
kneewalls on either side of the front dormer, as they needed to
install pieces of heat there. At the time, I didn't bother
with a cross piece, or top plate, against the roof boards, but for
the best securing of sheetrock, I needed this piece. I cut a
2x4 lengthwise with a 45° angle, then cut it to length and nailed it
into place on each side. During
the heating installation, I had slapped some studs into the
kneewalls on either side of the front dormer, as they needed to
install pieces of heat there. At the time, I didn't bother
with a cross piece, or top plate, against the roof boards, but for
the best securing of sheetrock, I needed this piece. I cut a
2x4 lengthwise with a 45° angle, then cut it to length and nailed it
into place on each side. |
|||
 I
similarly built the kneewall in the loft. This construction
was slightly complicated by the fact that some bozo had piled all
the 8" V-match pine for the upstairs bedroom right on the loft deck,
in the way. I managed to work around it and build the small
wall. I had to glue the bottom plates to the floor with
construction adhesive since I couldn't risk driving nails through
the ceiling, where they might be visible from below, and the only
rafter beneath the kneewall also contained the wiring running out to
the ceiling tie lighting, so I couldn't nail into it. Soon,
though, I had all the studs installed, and also installed the final
wiring box for a switched outlet, the wiring for which I had run
during the electrical phase. I
similarly built the kneewall in the loft. This construction
was slightly complicated by the fact that some bozo had piled all
the 8" V-match pine for the upstairs bedroom right on the loft deck,
in the way. I managed to work around it and build the small
wall. I had to glue the bottom plates to the floor with
construction adhesive since I couldn't risk driving nails through
the ceiling, where they might be visible from below, and the only
rafter beneath the kneewall also contained the wiring running out to
the ceiling tie lighting, so I couldn't nail into it. Soon,
though, I had all the studs installed, and also installed the final
wiring box for a switched outlet, the wiring for which I had run
during the electrical phase. |
|||
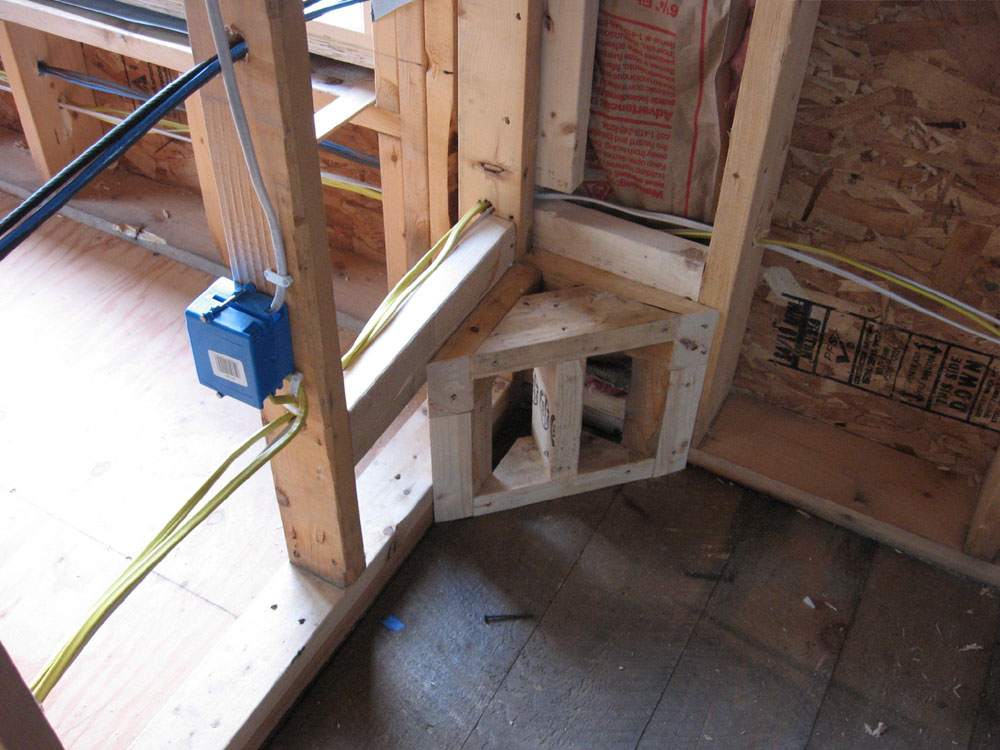 Next,
I built a little footrest in the shower for Heidi. This silly
little thing took quite some time to build, given the number of
pieces involved and all the angles and bevels required. Later,
I'll cover it with cement board and tile to match the rest of the
shower. Next,
I built a little footrest in the shower for Heidi. This silly
little thing took quite some time to build, given the number of
pieces involved and all the angles and bevels required. Later,
I'll cover it with cement board and tile to match the rest of the
shower.I cut and installed some small pieces of blocking above the top plate on the exterior stud wall upstairs, to fill in the area between ceiling and top plate to give the sheetrock or other wall covering a place to attach. |
|||
 In
the afternoon, I installed the insulation in the entire upstairs, on
all the exterior walls in the bedroom, bathroom, closet, and loft.
Insulation is always a fun task, particularly when the insulation is
faced with kraft paper. Normally, I hate kraft paper
insulation, but frankly, in this case I was grateful to save a step
in the process, so I didn't complain. In
the afternoon, I installed the insulation in the entire upstairs, on
all the exterior walls in the bedroom, bathroom, closet, and loft.
Insulation is always a fun task, particularly when the insulation is
faced with kraft paper. Normally, I hate kraft paper
insulation, but frankly, in this case I was grateful to save a step
in the process, so I didn't complain. |
|||
|
It all went well enough, but I was very happy to finish the last areas above the bathroom shower late in the afternoon. By the time I cleaned up the mess, it was quitting time, and I was pleased to have this behind me: one more step leading up to closing in all the interior walls. |
|||
|
|
|||
 We
had some great clouds along with low, slanting sunlight late in the
afternoon, and I just had to take some pictures. We
had some great clouds along with low, slanting sunlight late in the
afternoon, and I just had to take some pictures. |
|||
SUNDAY, SEPTEMBER 3, 2006 |
|||
|
Sundays tend to be a bit more relaxed
in pace for me, but I still worked all day and completed a number of
small and necessary projects. There are some small things that
I checked off my list that I couldn't deem worthy of writing about,
but it's all progress nonetheless. With the plumbing rough-in essentially done for now, other than plumbing in the washing machine valve in the basement, I pressed on with other chores, completion of which was necessary before I could truly close in the walls and ceilings (where applicable) in the near future.
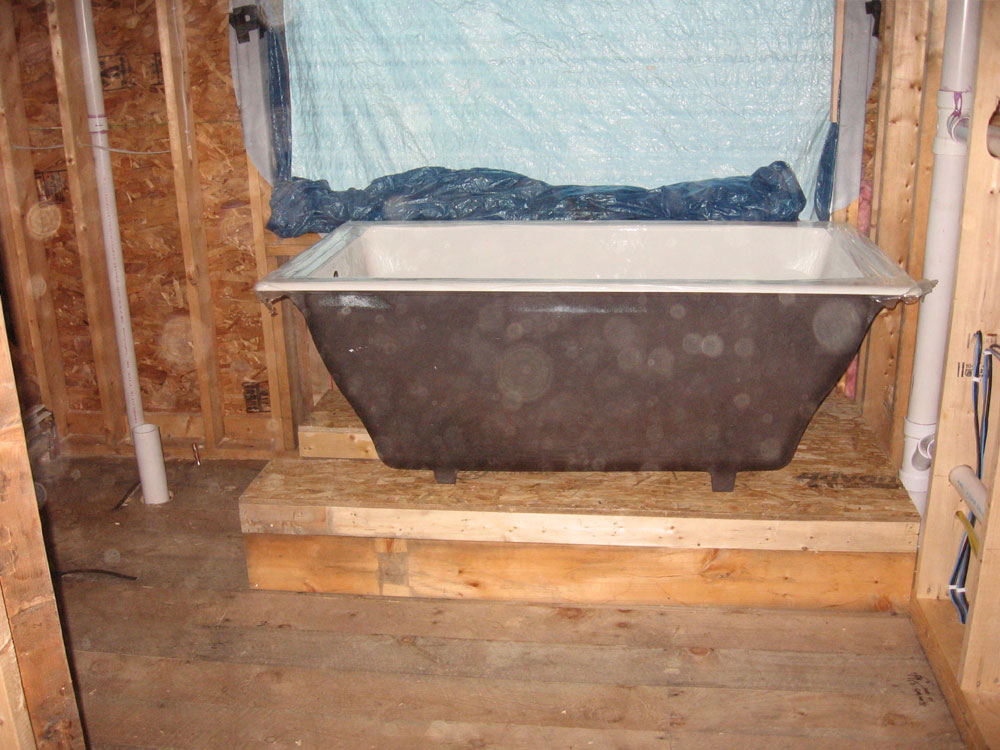
The shower is about 4'-6" square on the inside, with the outside corner chopped at a 45° angle (the blue plastic switch box in the photo is mounted on the angled wall). In this short angled wall, I will locate the shower head and controls, which should then point into the back corner of the stall away from the doorway...hopefully negating the need for a shower curtain or door. We saw similarly designed showers at my dad's house in Texas and instantly wanted one. Curtains and doors are such a hassle. Anyway, I built the short angled wall, which tied the two side walls together, and then framed in a ceiling. I didn't want the stall to continue all the way to the open ceiling in the bathroom, as it would have feel tunnel-like, and would have been difficult to finish to boot. I framed the ceiling with 2x10 dimensional lumber--massive overkill for a ceiling that would never support traffic or weight, but I needed the clearance in order to install a recessed light can in the ceiling. Actually, 2x8 framing would have been sufficient for this, but I had 2x10s on site and no 2x8s...so 2x10 it was. With the framing complete, I installed a recessed light can in the ceiling and ran the wiring from a new switch box. The water supply stubouts were already in place. |
|||
 While
I was in an electrical mode, I decided to install the cans in the
downstairs bathroom and pantry--the only rooms in the house with
flat, covered ceilings (rather than exposed beam). This was
uneventful, other than discovering that one of the cans I had bought
on Friday was missing pieces and parts--irritating. I don't
know why I didn't notice this when I pulled it off the shelf in the
store, but I didn't...perhaps because I sort of expect that I should
be able to pull items off the shelf without carefully inspecting
each. (Obviously, this is naive.) So while I finished
the cans and wiring in the pantry (2 fixtures), I could only install
2 of the three fixtures needed in the bathroom. The final one
would have to wait till I could return to the store for a new
replacement. While
I was in an electrical mode, I decided to install the cans in the
downstairs bathroom and pantry--the only rooms in the house with
flat, covered ceilings (rather than exposed beam). This was
uneventful, other than discovering that one of the cans I had bought
on Friday was missing pieces and parts--irritating. I don't
know why I didn't notice this when I pulled it off the shelf in the
store, but I didn't...perhaps because I sort of expect that I should
be able to pull items off the shelf without carefully inspecting
each. (Obviously, this is naive.) So while I finished
the cans and wiring in the pantry (2 fixtures), I could only install
2 of the three fixtures needed in the bathroom. The final one
would have to wait till I could return to the store for a new
replacement. |
|||
 I
bopped around a bit during the early afternoon, accomplishing little
of note to the untrained eye...but I was actually contemplating the
bathtub upstairs, and the need for a framed platform to support the
tub and raise it up to window height. We wanted the flange on
the tub to be at the same height as the bow window bottom, or just
above so that tile could extend beneath. I removed the
remaining packing materials from the bathtub, and determined the
height of the bottom of the flange (this was made easy by the
helpful Kohler rough-in guide, which presented the measurement to
me). I
bopped around a bit during the early afternoon, accomplishing little
of note to the untrained eye...but I was actually contemplating the
bathtub upstairs, and the need for a framed platform to support the
tub and raise it up to window height. We wanted the flange on
the tub to be at the same height as the bow window bottom, or just
above so that tile could extend beneath. I removed the
remaining packing materials from the bathtub, and determined the
height of the bottom of the flange (this was made easy by the
helpful Kohler rough-in guide, which presented the measurement to
me). |
|||
 Then,
I figured the height of the platform needed, and scrounged the site
for appropriate materials. I needed about 11-1/2", and I
wanted to build it today. Eventually, I determined that some
of the leftover (and badly weathered) pine 4x8 roof rafters, with a
2x4 frame on top, would provide me the right height along with a
piece of 5/8" Advantech on top. I built the framework, and
then covered it with the plywood (it's not really plywood, but I'm
speaking generically). The notch at the end is for access to
the plumbing and drain. The platform shown is also somewhat
longer than the tub itself. Then,
I figured the height of the platform needed, and scrounged the site
for appropriate materials. I needed about 11-1/2", and I
wanted to build it today. Eventually, I determined that some
of the leftover (and badly weathered) pine 4x8 roof rafters, with a
2x4 frame on top, would provide me the right height along with a
piece of 5/8" Advantech on top. I built the framework, and
then covered it with the plywood (it's not really plywood, but I'm
speaking generically). The notch at the end is for access to
the plumbing and drain. The platform shown is also somewhat
longer than the tub itself. |
|||
|
I finished up late in the afternoon, but I installed insulation batts behind the tub area, before I forgot, and then I considered trying to heave the tub up on the platform. However, it was way too late in the day to consider such a thing, so I (wisely, I think) decided to leave that chore till another time. |
|||
SATURDAY, SEPTEMBER 2, 2006 |
|||
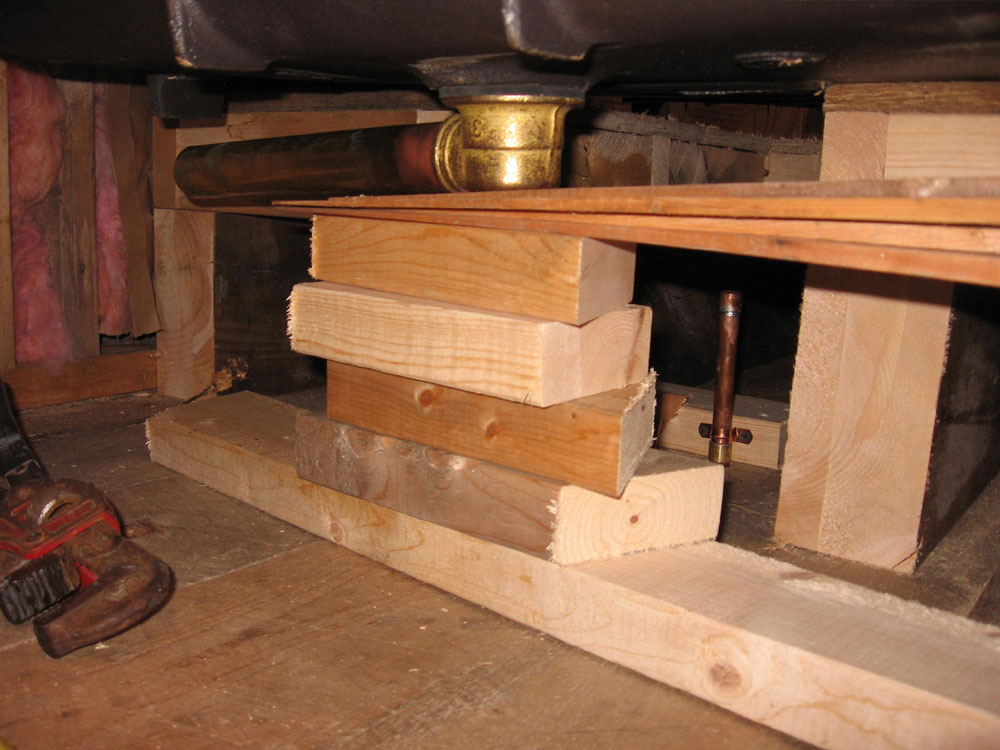
| Today, I finished up the plumbing supply. I started where I left off yesterday, and completed the work on the cold water manifold. My soldered manifold seemed to have developed scoliosis, with a slight curve to the entire unit. There wasn't much I could do about this, but when I hung it on the wall I found that the copper stubout at the bottom was at an odd angle and didn't line up. I removed the manifold and reheated the fitting so that I could twist it into the proper position. | |||
|
I like to take a step-by-step and logical approach to charging new soldered copper lines with water, doing each section at a time, beginning with the part closest to the supply. In this way, it seems easier to deal with the leaks that inevitably occur. To that end, I continued by installing the copper pipe needed to tie the well output in the corner in with  the
existing 3/4" piping that the boiler guys had run partway across the
room. I was unhappy to discover, however, that my purchasing
agent had failed to buy 3/4" straight couplings for joining two
lengths of pipe. I needed the coupling to continue with what I
was doing, and didn't really feel like going to any store. the
existing 3/4" piping that the boiler guys had run partway across the
room. I was unhappy to discover, however, that my purchasing
agent had failed to buy 3/4" straight couplings for joining two
lengths of pipe. I needed the coupling to continue with what I
was doing, and didn't really feel like going to any store.Since I only needed one coupling, I decided to use one of the 3/4" x 1/2" tees that I used in the manifold. I soldered a short piece of 1/2" copper with a cap into the tee, and then used the tee to act as a coupling. This isn't something I'd want to do if I needed more than one coupling, but I thought it would be fine here--and far better than wasting time trekking to a store. |
|||
 Next,
I discovered that the foolish purchasing agent had also failed to
buy the right threaded fitting adapter for the ball valve at the
water inlet. I think I'll fire him. I needed a 3/4"
thread to 3/4" female solder fitting; what I had was a 3/4" thread
to 3/4" male solder fitting. Without any straight
couplings, I couldn't use this fitting. Now, it looked like
I'd have to go to the store after all. Next,
I discovered that the foolish purchasing agent had also failed to
buy the right threaded fitting adapter for the ball valve at the
water inlet. I think I'll fire him. I needed a 3/4"
thread to 3/4" female solder fitting; what I had was a 3/4" thread
to 3/4" male solder fitting. Without any straight
couplings, I couldn't use this fitting. Now, it looked like
I'd have to go to the store after all.Fortunately, I discovered the fitting I needed on the Boiler Mate hot water tank, loosely threaded into the hot water output and awaiting my use for the hot water. But I could use the male fittings here, since I could run them into an elbow, which was the logical thing to do here anyway. So I stole the fitting, and went on my merry way. Piping up the water supply didn't take long, and required only two lengths of the 3/4" pipe. Then, I had to plumb from the fresh water takeoff valve, located near the boiler, over to my manifold, so as to supply the manifold--and eventually the entire house--with water. This took several short pieces of pipe to work the supply down to the manifold, but soon it was done. Then, I turned on the water to test the solder joints. No leaks! |
|||
|
After checking all the manifold valves to be sure they were closed, I opened the main valve at the top, allowing water into the manifold. With over 40 solder joints in the cold water manifold, I was almost certain to have a leak. No leaks! Outstanding. |
|||
 Finally,
I crimped the PEX tubing onto the barbed fittings that I threaded
into the outlet side of the valves. One line at a time, I
turned on the water and checked for leaks. None of the PEX
fittings leaked, but the cold water stub for the downstairs bathroom
sink had a pinhole leak at the bottom fitting, where it attached to
the PEX. I stupidly tried to resolder the joint, but this only
melted the PEX. I cut off the end and soldered up a new stub,
which I then crimped back onto the remaining PEX. None of the
other fittings leaked at first, but when I left the water on for
several minutes, the upstairs tub supply leaked--again, a pinhole in
one of my solder joints. I repeated the process described
above and took care of the problem. Finally,
I crimped the PEX tubing onto the barbed fittings that I threaded
into the outlet side of the valves. One line at a time, I
turned on the water and checked for leaks. None of the PEX
fittings leaked, but the cold water stub for the downstairs bathroom
sink had a pinhole leak at the bottom fitting, where it attached to
the PEX. I stupidly tried to resolder the joint, but this only
melted the PEX. I cut off the end and soldered up a new stub,
which I then crimped back onto the remaining PEX. None of the
other fittings leaked at first, but when I left the water on for
several minutes, the upstairs tub supply leaked--again, a pinhole in
one of my solder joints. I repeated the process described
above and took care of the problem. |
|||
|
After lunch, I repeated the process with the hot water side. I had to run the piping from the Boiler Mate over to the manifold, and also plumbed the pressure relief valve on the Boiler Mate. All my solder joints were leak-free to this point, and when I opened the valve into the manifold, I found no leaks either. |
|||
 After
I secured the red PEX tubing, I opened the valves to the six lines
and checked those for leaks--none. I was pretty happy with
this. After
I secured the red PEX tubing, I opened the valves to the six lines
and checked those for leaks--none. I was pretty happy with
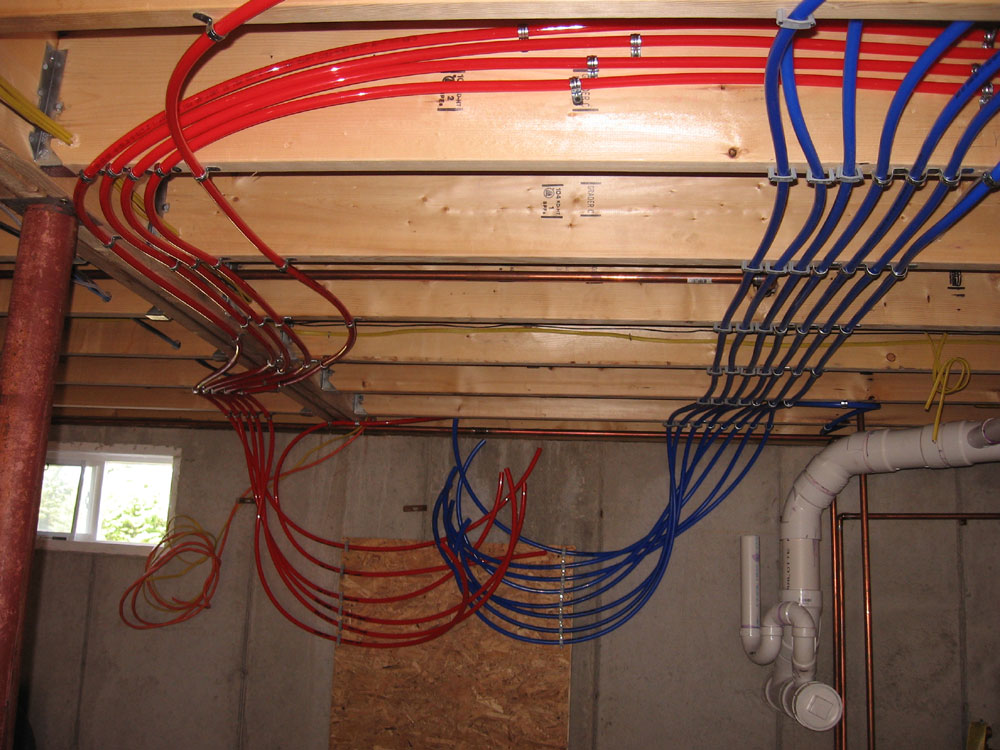
this.I was generally pleased with how the manifolds and piping looked when all was said and done. Despite my initial dislike of the PEX, I came around to see the benefits--it was very fast to install, and the crimp joints were simple to make and seemed far more secure than I thought they would be. If I hadn't insisted on such a complicated manifold and valve system, it would have been possible to plumb the entire house in a single day. |
|||
 There's
still a small amount of plumbing remaining: plumb in the water
valve for the washing machine, and a sillcock for outdoor water.
Those should be easy to take care of tomorrow, but in the meantime
the bulk of the plumbing was complete, and now I could call the
plumbing inspector to get the inspection and testing over with and
start covering walls. There's
still a small amount of plumbing remaining: plumb in the water
valve for the washing machine, and a sillcock for outdoor water.
Those should be easy to take care of tomorrow, but in the meantime
the bulk of the plumbing was complete, and now I could call the
plumbing inspector to get the inspection and testing over with and
start covering walls. |
|||
FRIDAY, SEPTEMBER 1, 2006 |
|||
|
After my traditional early-morning trip to the store for more supplies, I got right to work again on the plumbing. Over a short period of time (an hour or two), I ran all the hot water plumbing lines, roughly paralleling the routes I took with the cold water lines earlier. If anything, the red hot water tubing was somehow more difficult to handle than the blue tubing, perhaps because it was in a 300' roll (versus three 100' rolls of the blue that I used). I couldn't find any of the cable clamps that I had liked, or at least not in larger packages. Packs of 5 are useless to me...plus, Lowes only had two packages anyway. So I had to find something at the store that would work for me. The clamps sold for hanging PEX tubing were not available in large quantities at the store either--ridiculous. Who ever needs only 5 hanging clamps? So I didn't use those either. I ended up with one-hole metal conduit clamps, which I had used in part at the beginning of the blue tubing. As an aside, I shop at both Lowes and Home Despot. I generally prefer Lowes by a large margin--nicer stores, more helpful employees, shorter waits at checkout at any time of the day. Lowes has the disadvantage for me of being an hour away in Brunswick, while Home Despot in Augusta is about 30 minutes. However, sometimes it becomes clear that Home Despot is a better choice for bulk items--things like boxes of 50 service entry cable clamps, not just in packs of 5. But the stores are dark, disorganized, they open like one register no matter how many hundreds of people might be waiting, and the help--if you can find someone--is useless. Everything is a compromise, and each store serves its purpose for me. |
|||
 Back
to the topic at hand. I stubbed each line out with short
sections of copper at the fixture locations. I chose copper
stubs because my observations of the PEX materials at the stores
seemed to indicate that it would be more challenging to find the
right fittings to attach the various hoses for sinks and toilets.
There seemed to be far too many irrelevant PEX fittings on the
shelf, which made sorting out the right things frustrating and
wasteful of time. At least with copper, I know what fittings
are needed and what works, so it will make shopping for the final
fittings much easier. I used a few pre-fabricated 90° copper
stubs made for connecting to PEX tubing, but made up several of my
own as needed. I capped each fitting so that I could test the
plumbing. Back
to the topic at hand. I stubbed each line out with short
sections of copper at the fixture locations. I chose copper
stubs because my observations of the PEX materials at the stores
seemed to indicate that it would be more challenging to find the
right fittings to attach the various hoses for sinks and toilets.
There seemed to be far too many irrelevant PEX fittings on the
shelf, which made sorting out the right things frustrating and
wasteful of time. At least with copper, I know what fittings
are needed and what works, so it will make shopping for the final
fittings much easier. I used a few pre-fabricated 90° copper
stubs made for connecting to PEX tubing, but made up several of my
own as needed. I capped each fitting so that I could test the
plumbing. |
|||
|
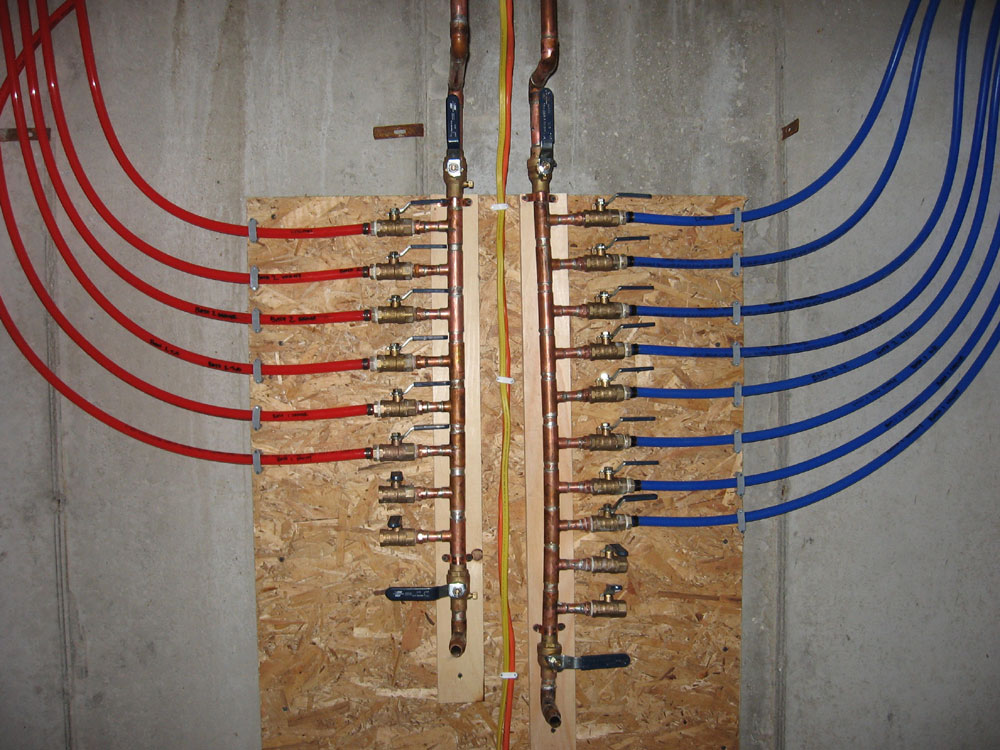
With all the supply lines run, I turned by attention to the copper manifold I wanted to build. I had purchased all the materials needed this morning, along with some 3/4" copper tubing so that I could finish running the main water line to the new expansion tank location in the basement. I probably got carried away with my manifolds, but I think they'll be handy down the road. I assembled each of the two manifolds (hot and cold water) from 3/4" copper pipe pieces together with 3/4" x 1/2" tees to branch off to each supply line. There were 8 runs of the cold water tubing, and six of the hot (since no hot water runs to the toilets). For future expansion, I installed two additional tees on each manifold. Finally, I added shutoff valves at the top and bottom of the manifold, and stubbed out for 1/2" copper at the bottom of each side, which I might use for additional expansion if needed, but more likely for running directly to the washing machine, which will be located in front of the manifold. |
|||
 Over
a period of several hours, I cut the various pipe pieces (2" long
pieces of pipe between each tee) and then soldered up the backbone
of the manifolds. I thought it looked kind of like a flute,
and considered going into business. Sadly, the sound quality
was extremely poor, so I abandoned my business plans and continued
building a plumbing manifold. Over
a period of several hours, I cut the various pipe pieces (2" long
pieces of pipe between each tee) and then soldered up the backbone
of the manifolds. I thought it looked kind of like a flute,
and considered going into business. Sadly, the sound quality
was extremely poor, so I abandoned my business plans and continued
building a plumbing manifold. |
|||
 I
soldered 2" pieces of 1/2" copper to each tee, then installed 1/2"
ball shutoff valves. On the output side of the valves, I
planned to install barbed fittings to accept the PEX tubing. I
didn't quite get that far today, though I did complete the cold
water manifold as far as the valves, and the shorter hot water
manifold nearly as far. With most of the soldering complete,
however, I expected the remainder of the manifold work to go much
more quickly in the morning. I
soldered 2" pieces of 1/2" copper to each tee, then installed 1/2"
ball shutoff valves. On the output side of the valves, I
planned to install barbed fittings to accept the PEX tubing. I
didn't quite get that far today, though I did complete the cold
water manifold as far as the valves, and the shorter hot water
manifold nearly as far. With most of the soldering complete,
however, I expected the remainder of the manifold work to go much
more quickly in the morning. |
|||
 The bow window for the upstairs
bathroom arrived this afternoon, which was great since I was just
wondering when it might show up. Dealing with this delivery,
as well as loading some materials that I needed to return for credit
(including the incorrect window originally sent), took up part of
the mid-afternoon. In addition, Bob the driver picked up my
cardboard templates for the truss plates, so the plates should be
back here in short order, I hope. The bow window for the upstairs
bathroom arrived this afternoon, which was great since I was just
wondering when it might show up. Dealing with this delivery,
as well as loading some materials that I needed to return for credit
(including the incorrect window originally sent), took up part of
the mid-afternoon. In addition, Bob the driver picked up my
cardboard templates for the truss plates, so the plates should be
back here in short order, I hope. |
|||
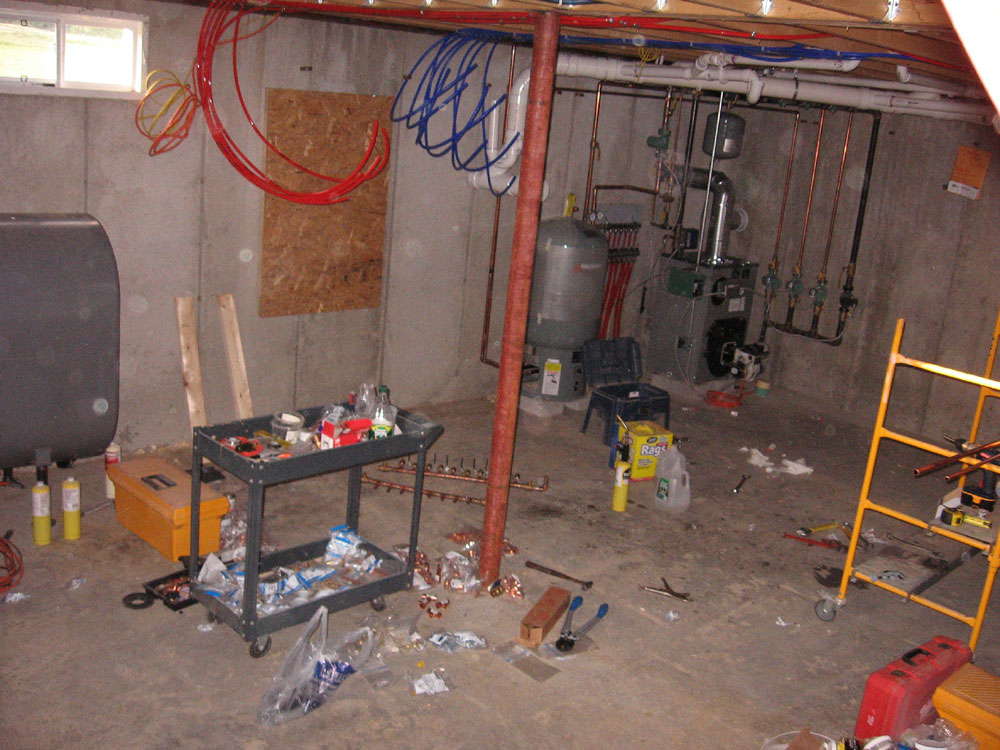 I
did manage to make quite a mess in the basement, with all my little
plumbing pieces scattered about and splattered flux from the bulk
soldering everywhere. I
did manage to make quite a mess in the basement, with all my little
plumbing pieces scattered about and splattered flux from the bulk
soldering everywhere.Tomorrow, I figured I could complete and install the manifolds and then run the remainder of the main supply line back to the well expansion tank. With that done, I should be ready to water test the system and see how many leaks I have. |
|||
|
|||