|
|||
|
|
~ The bLog Home ~ |
||
| Click here to continue to February, 2007 | |||
|
WEDNESDAY, JANUARY 31, 2007 |
|||
 My
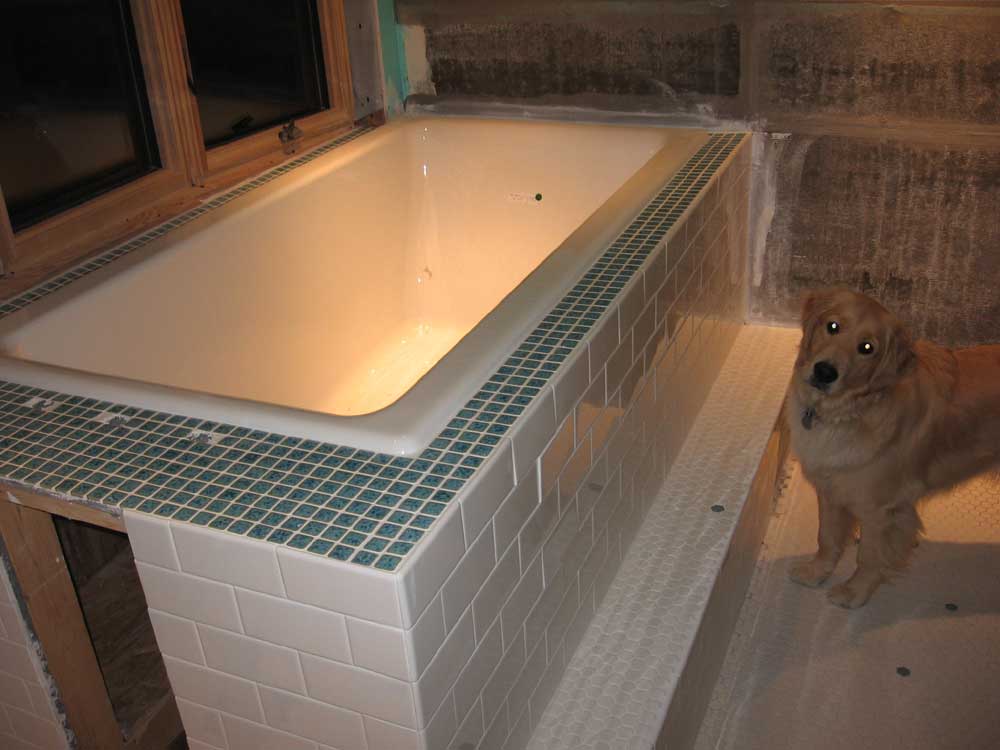
big house-related task of the day was to apply silicone sealant
(yes, my favorite) to the joint at the bottom of the shower walls.
But this was significant as the last step required to complete the
shower, other than to install the controls and hardware. My
big house-related task of the day was to apply silicone sealant
(yes, my favorite) to the joint at the bottom of the shower walls.
But this was significant as the last step required to complete the
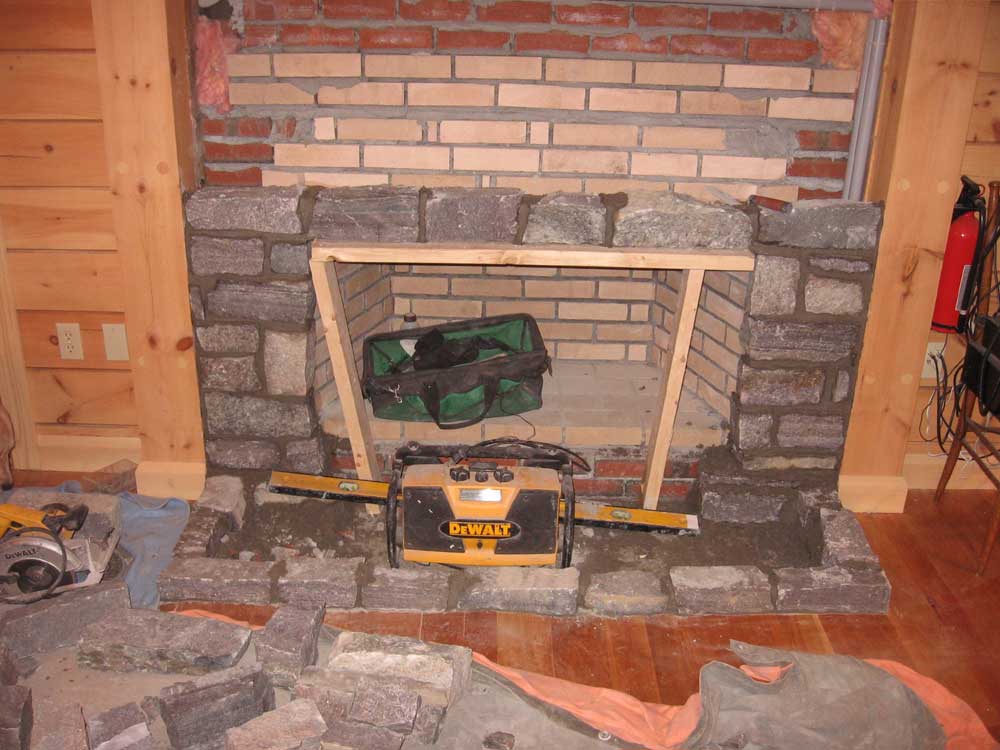
shower, other than to install the controls and hardware.Bob and Mike started laying the stone for the inside of the fireplace today. I was really pleased with how it looked. The granite we chose contained many color variations, from sage greens to ruby reds, as well as quartz-like ivory. Here's how far they got today. |
|||
|
TUESDAY, JANUARY 30, 2007 |
|||
|
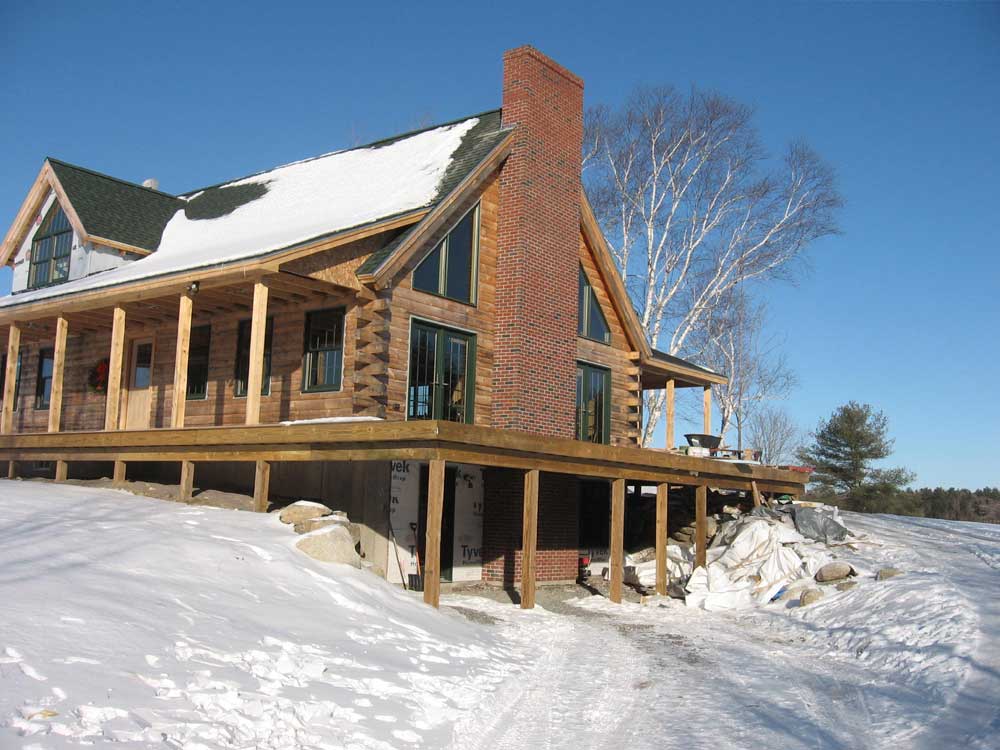
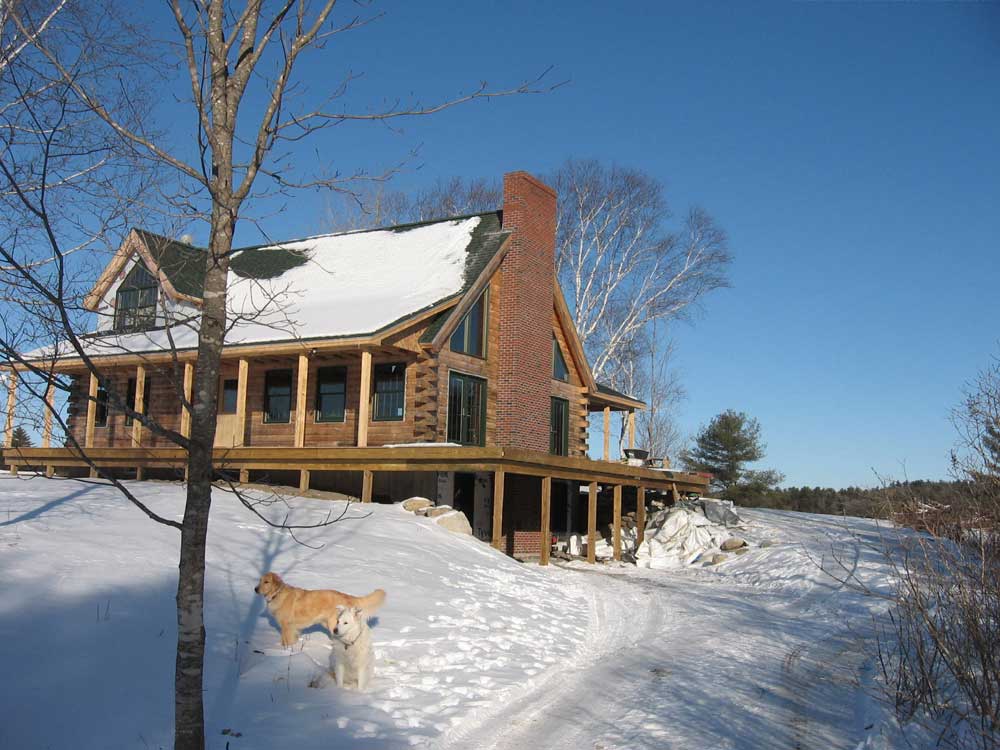
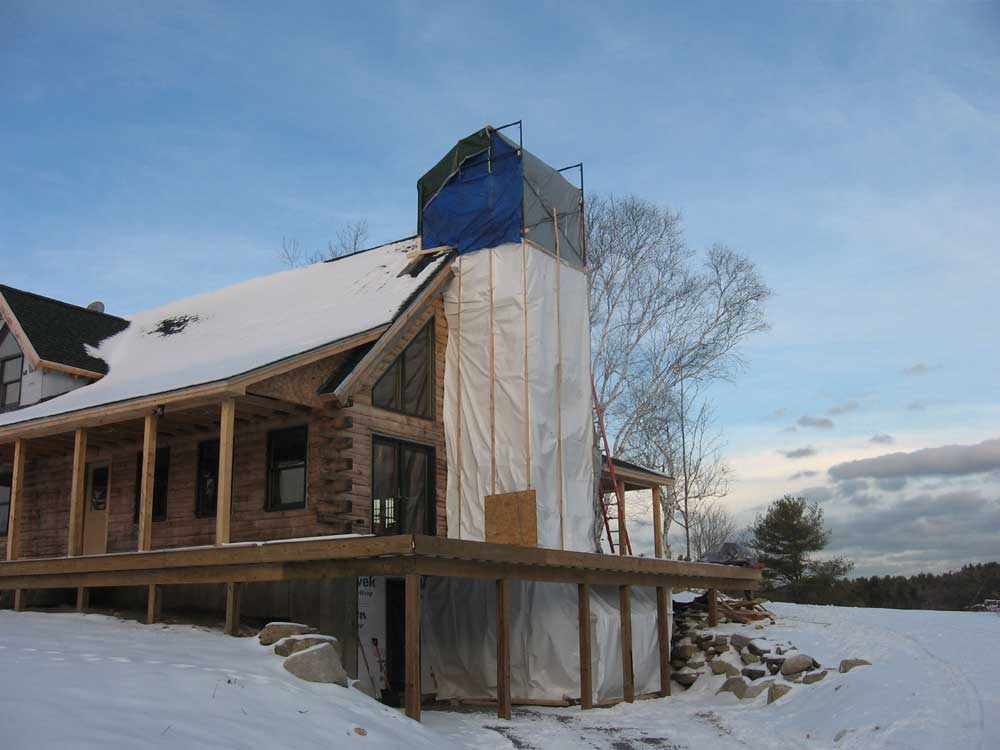
With better light, and the remainder of the tent removed, I took some better pictures of the new chimney (and of Bob's construction mess, which I am sure he will clean up once he's done--but yuck!). Today, after removing the tent around the bottom part of the chimney, he cut out the floor in way of the hearth inside, and poured a small slab to support the weight of the hearth. Earlier in the process, he had done some framing work beneath, so it was a straightforward matter today. This also revealed, for the first time, the inside of the firebox, which had been hiding behind the nice blue styrofoam for so many weeks. Even with the rough--and to be unseen--brickwork, it looked so much better already. |
|||
|
|
|||
|
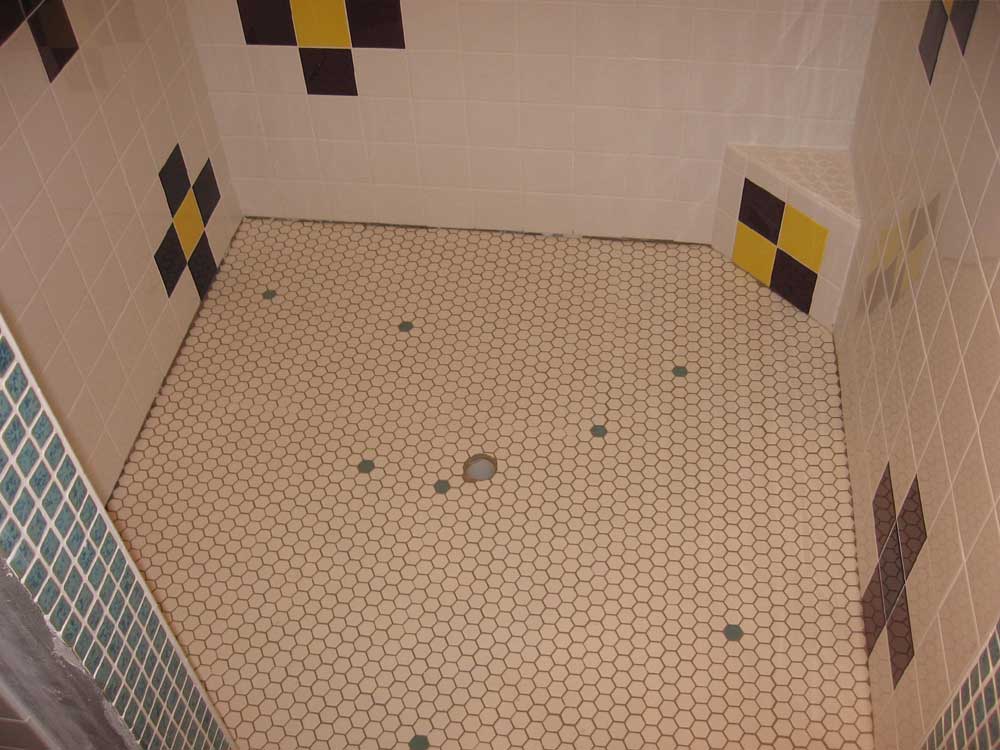
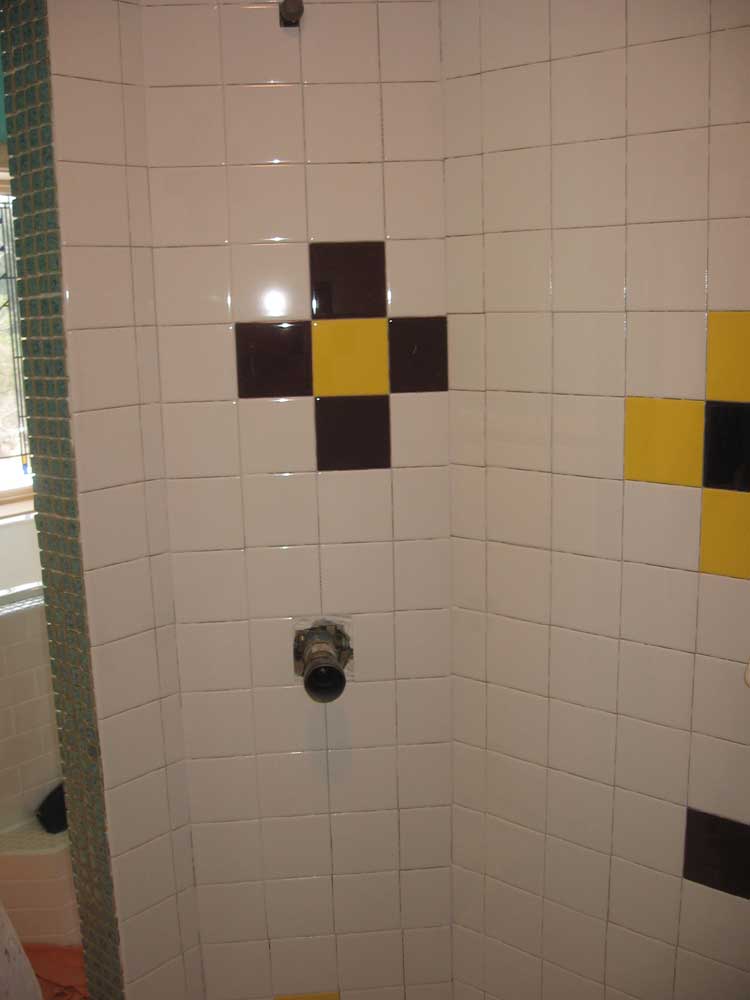
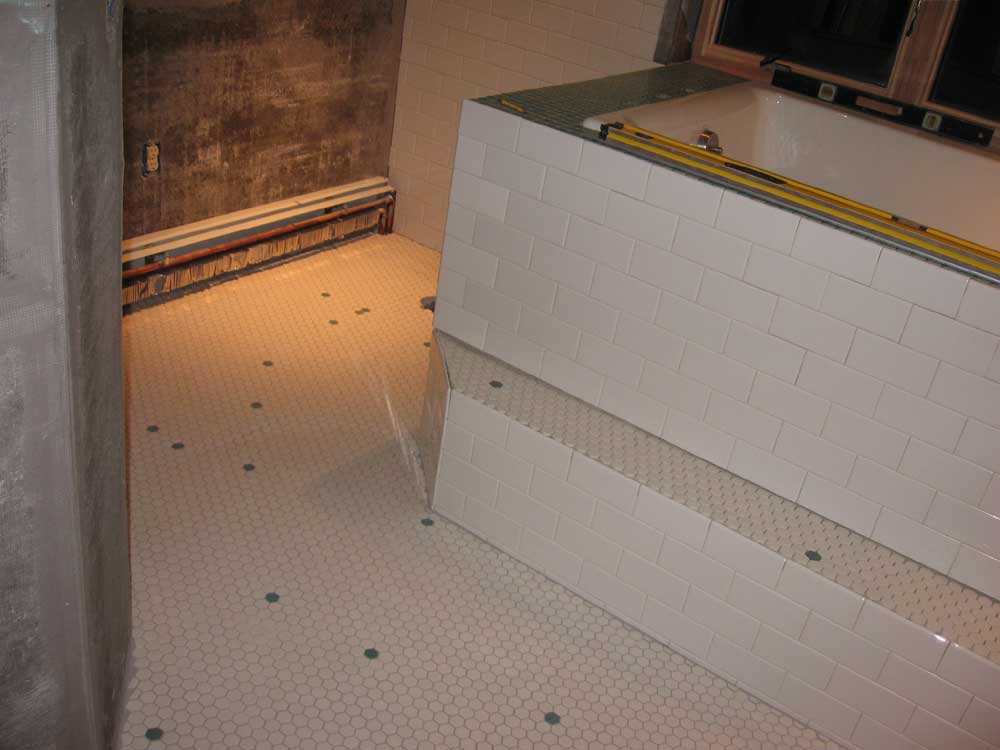
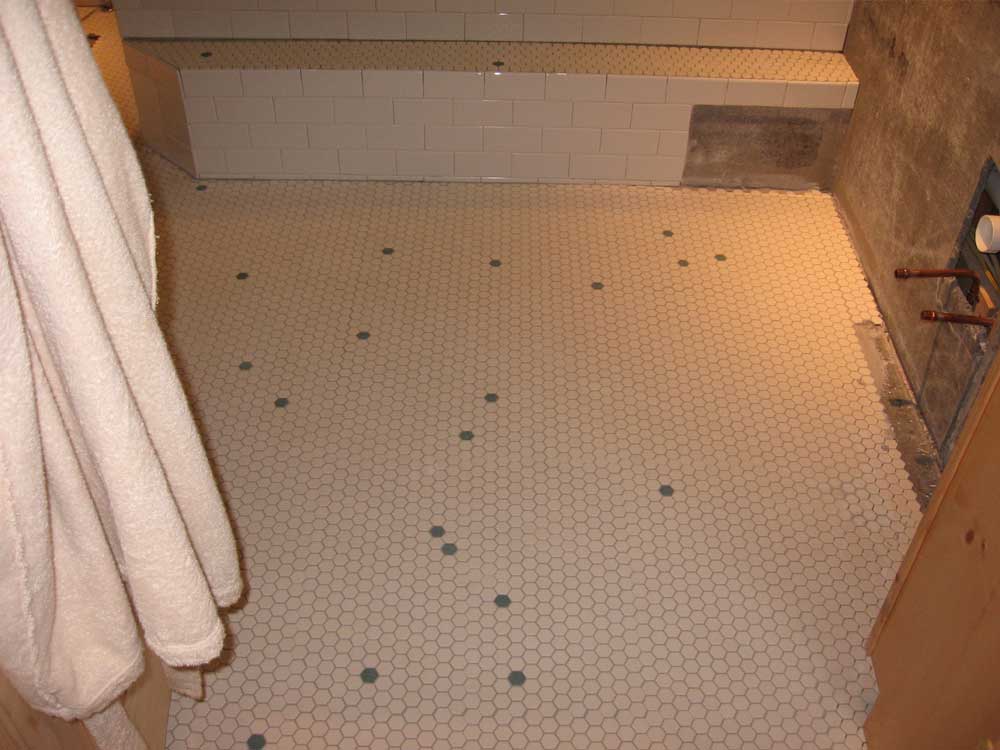
I was unexpectedly free after determining that I couldn't continue work today on the boat in the shop, so I decided to get the grout over with in the upstairs shower. It wasn't too bad; grouting first the walls, then the floor, took about 4 hours, all told. I was extremely happy to have it done! All that remains before putting this shower into commission is sealing the bottom of the tile, at the joint between wall and floor, with silicone sealant. |
|||
|
|
|||
|
MONDAY, JANUARY 29, 2007 |
|||
 The
exterior work on the chimney is done! The
exterior work on the chimney is done!Today, after a slow start thanks to a balky heater that needed repair, Bob and Mike (his helper) acid washed the chimney and then began to break down the staging and tent that had graced the end of the house for oh-so long. I managed to just catch a few photos as the sun started to set. Much more to come. Of course, there's still the hearth and interior of the fireplace still to go, but this is real progress! |
|||
|
|
|||
|
SATURDAY, JANUARY 27, 2007 |
|||
|
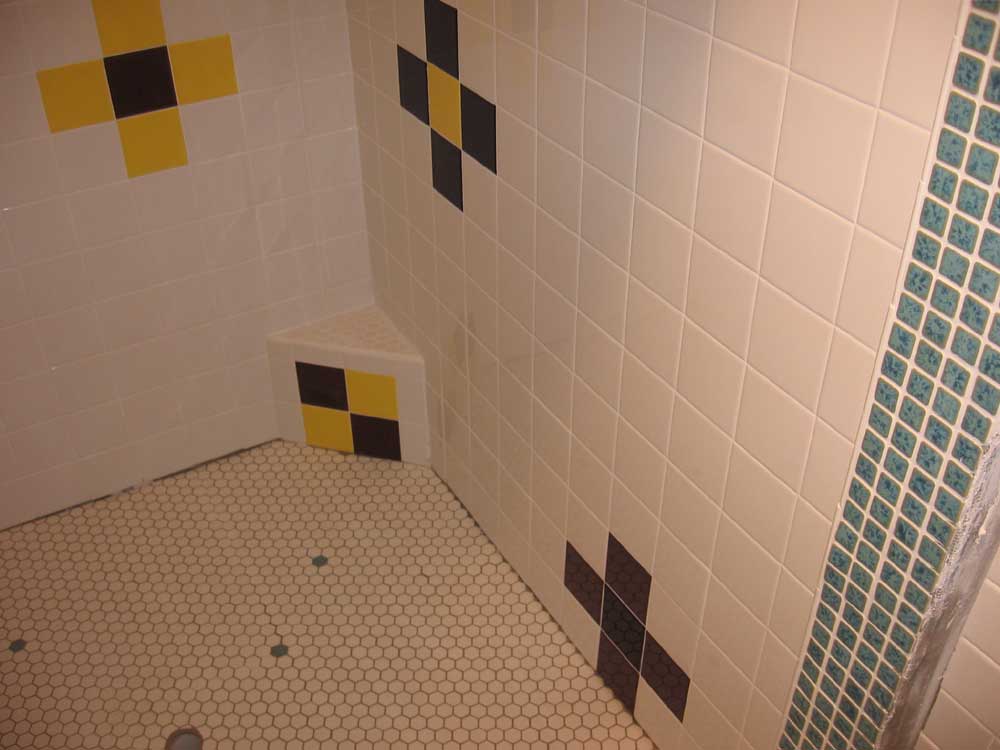
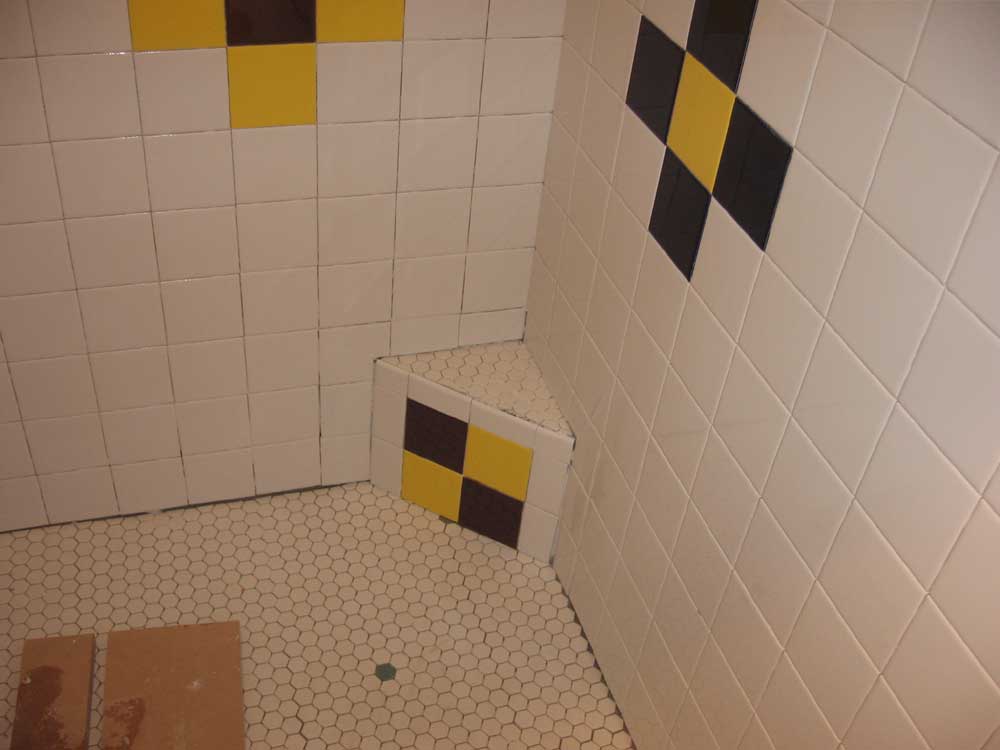
Wednesday night, I measured and cut a
whole series of tiles to be used to fill in the edges of the shower.
I didn't install them at the time, but they were ready to go. Today, I planned to finish installing the shower tile. I began with the cut pieces, and filled in at the corners where I left spaces the other day. I also installed the second corner shelf. |
|||
|
|
|||
|
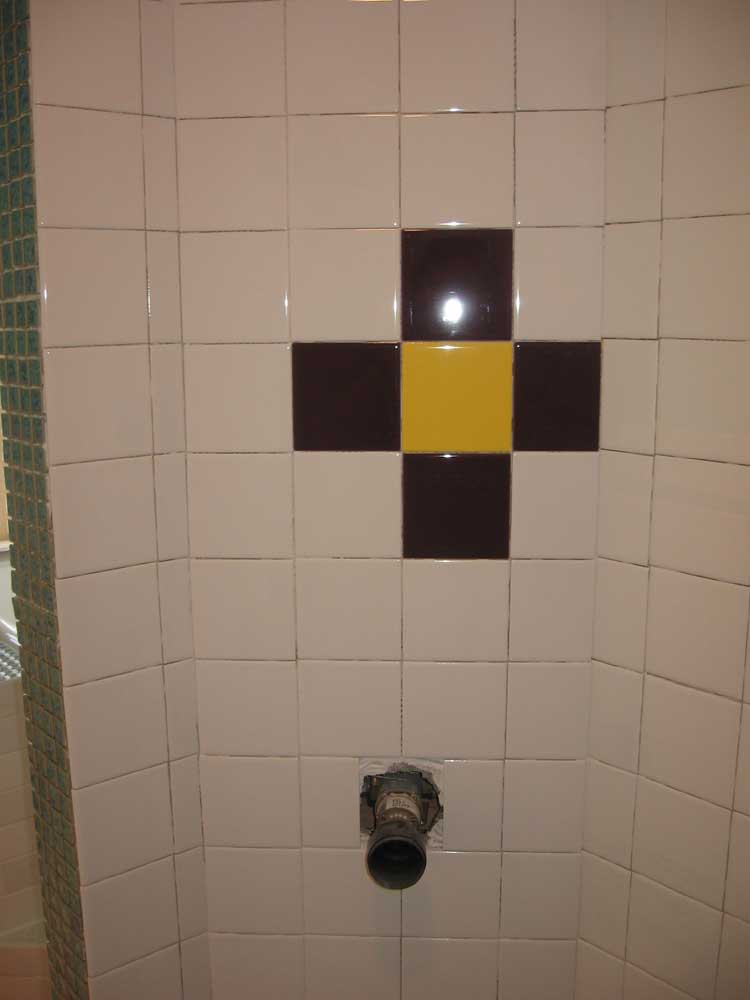
Next, I worked on the small angled wall containing the shower head and controls, and installed the full tiles there as appropriate. Then, I cut pieces to fit around the valve and s hower head, and on one side of the wall where there wasn't room for a full tile. |
|||
|
|
|||
|
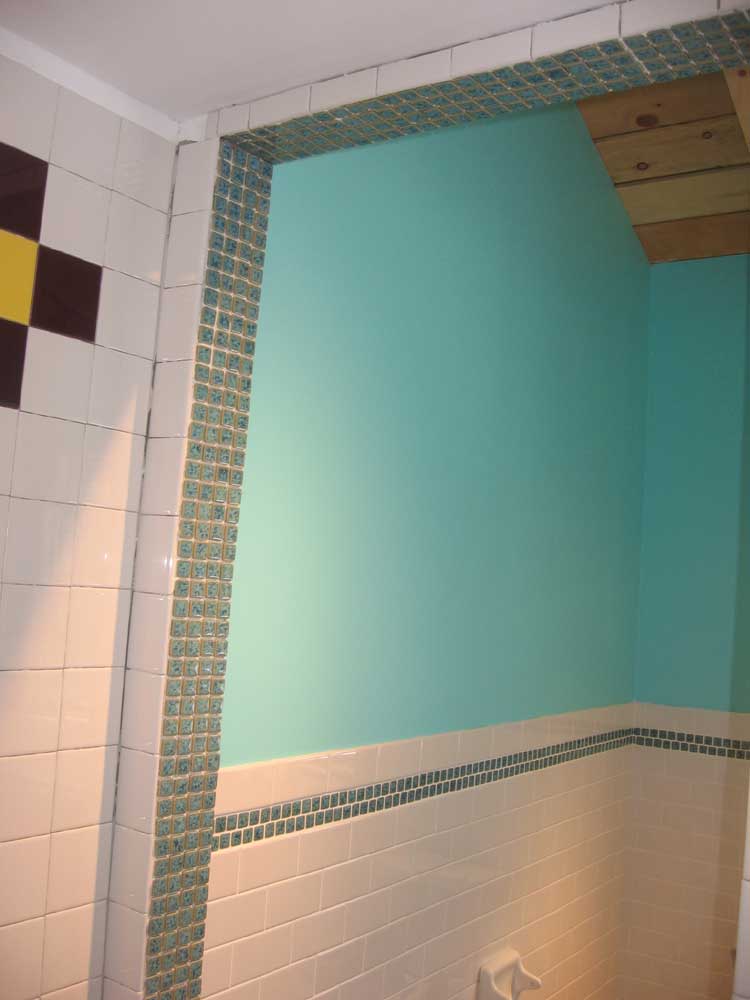
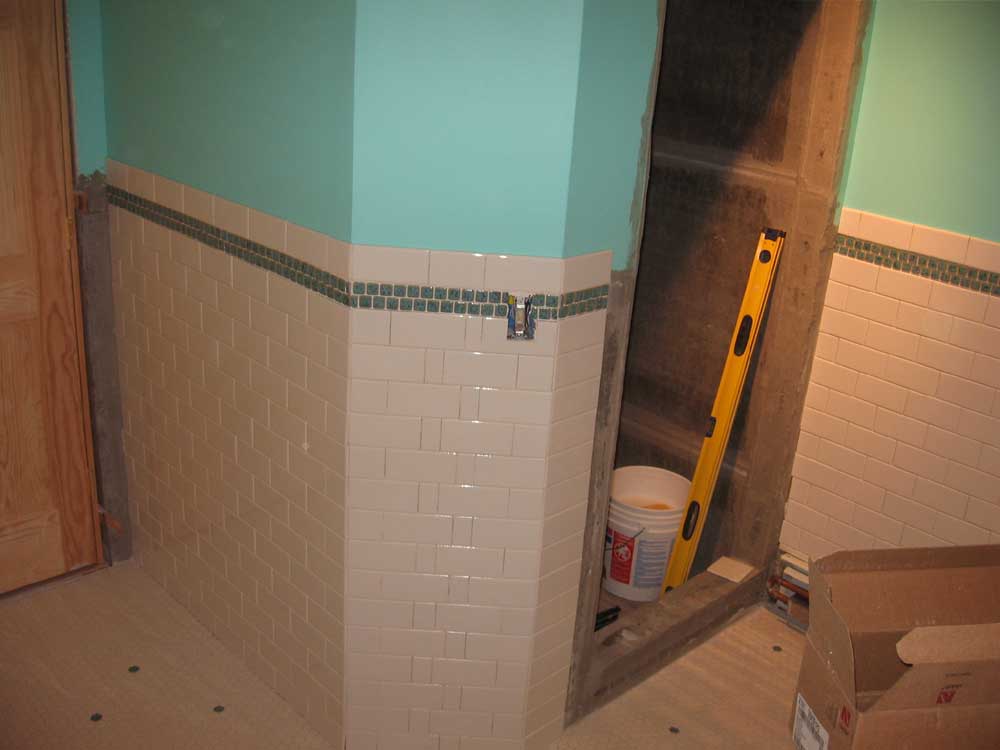
I continued with the doorway. I
used more of the 1" mosaic tile to tile the 4-1/2" wide edhes of the
opening, and then installed white bullnose tile on the inside.
Then, I filled in around the edges as needed with cut tiles.
This all took quite some time, actually. I finished up with the little corner step, which was all cuts and took a long time to complete. But the entire inside of the shower was done now, and only needed grout in order to be ready to use! I still have to install some trim tile on the outside of the shower door opening. I had had enough today, and besides, I think we'll need some number more of the bullnose tile so that I can complete this. It won't take long once I get to it, though, but for now the important part was done. |
|||
|
|
|||
|
TUESDAY, JANUARY 23, 2007 |
|||
|
I reached a point early this afternoon
in the shop where I really could proceed no further on the boat I
was working on, so I decided to utilize the time to my benefit and
get some serious work done in the shower up at the house. Last
evening, with the floor not quite cured enough to handle the heavy
traffic of tiling the walls, I simply prepared by carrying up a
number of boxes of wall tile from the basement to the upstairs
bedroom, and preparing my tools, rags, etc. so that everything would
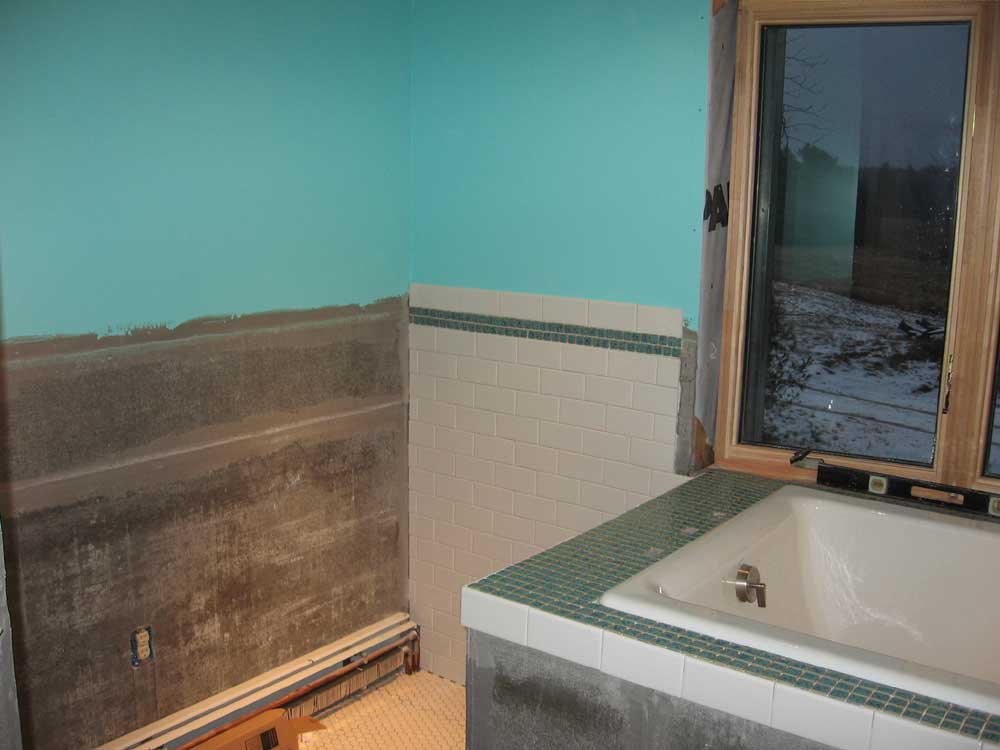
be ready to go whenever I had time to install the tile. Layout wasn't too complicated, though I had to determine where to start the first row of tile. I certainly wasn't going to count on the floor being at the same height all the way around, so I took a full tile (4-1/2" square) and, with the base on the floor, marked the top edge at both sides of each wall inside the shower. Then, using a level, I determined which was the highest, and drew that line all the way around the shower. This would be the top of the first row of tiles. |
|||
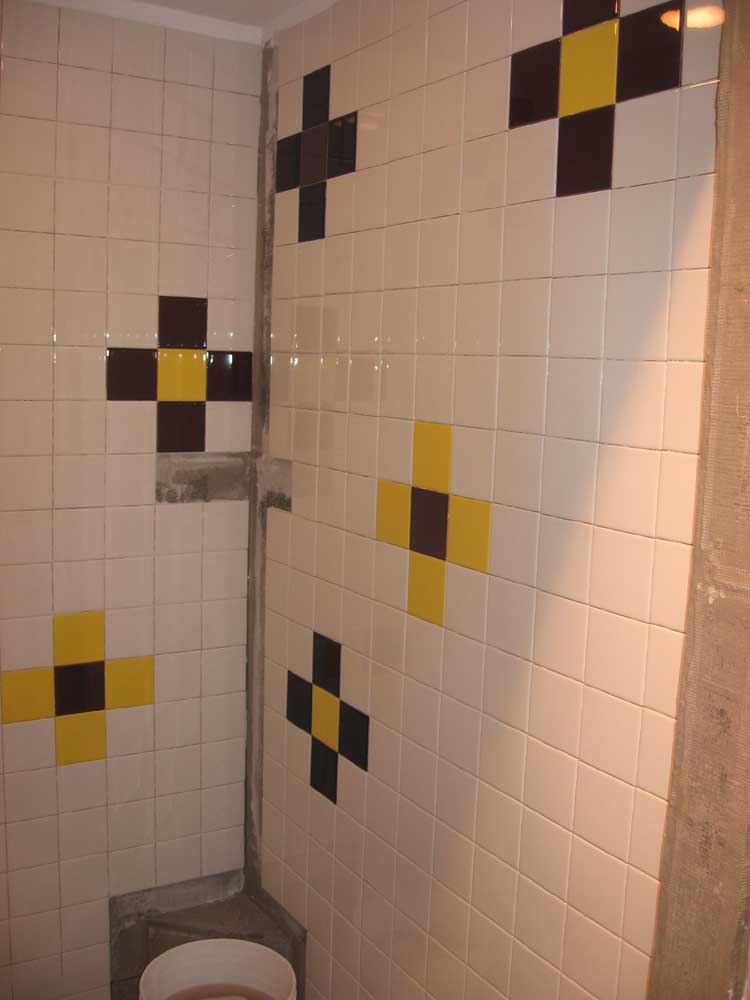
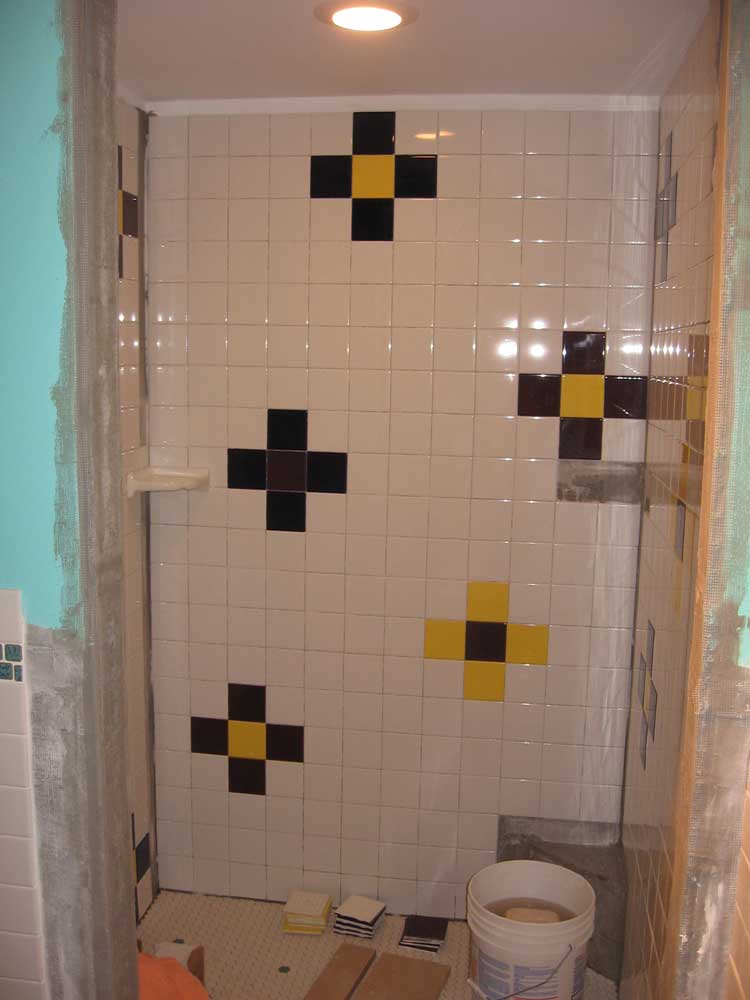
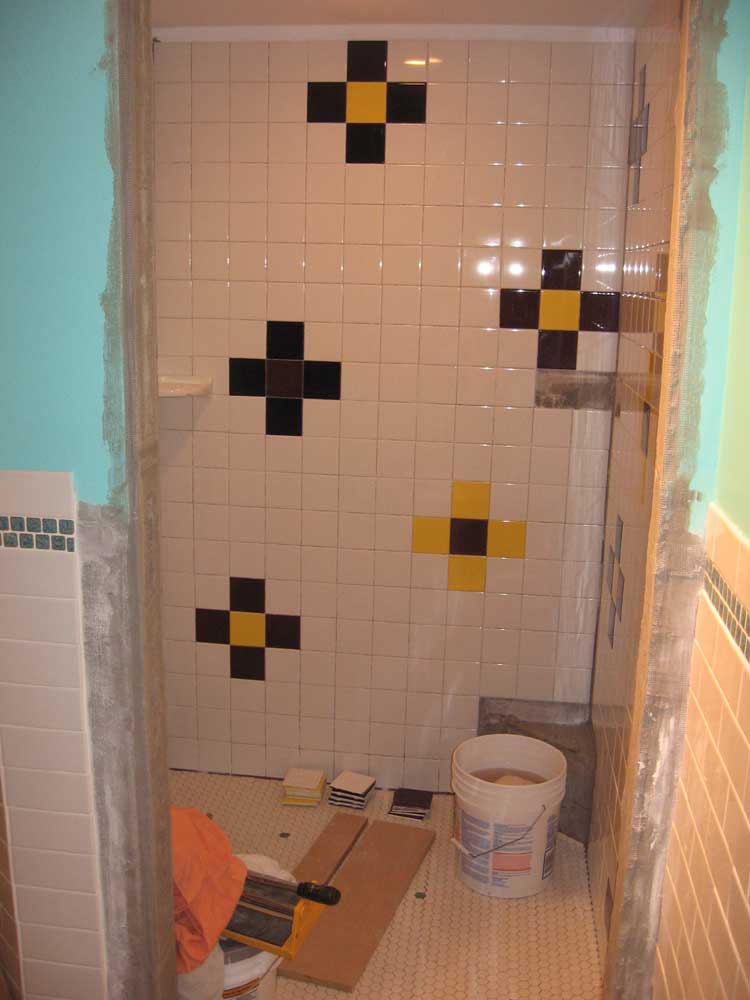
|
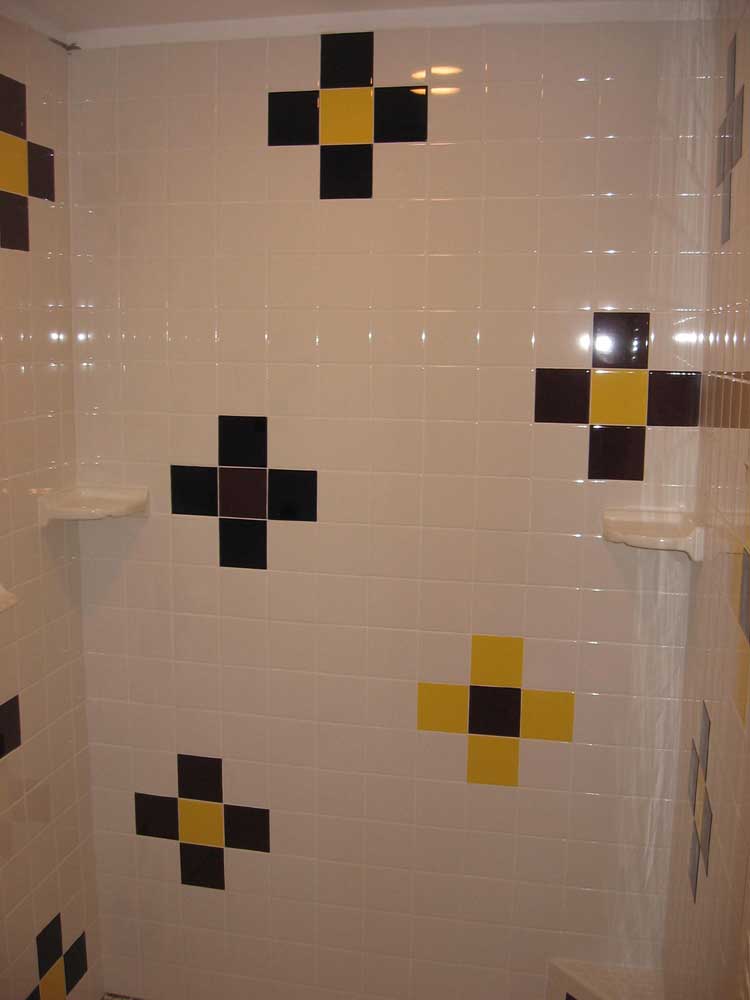
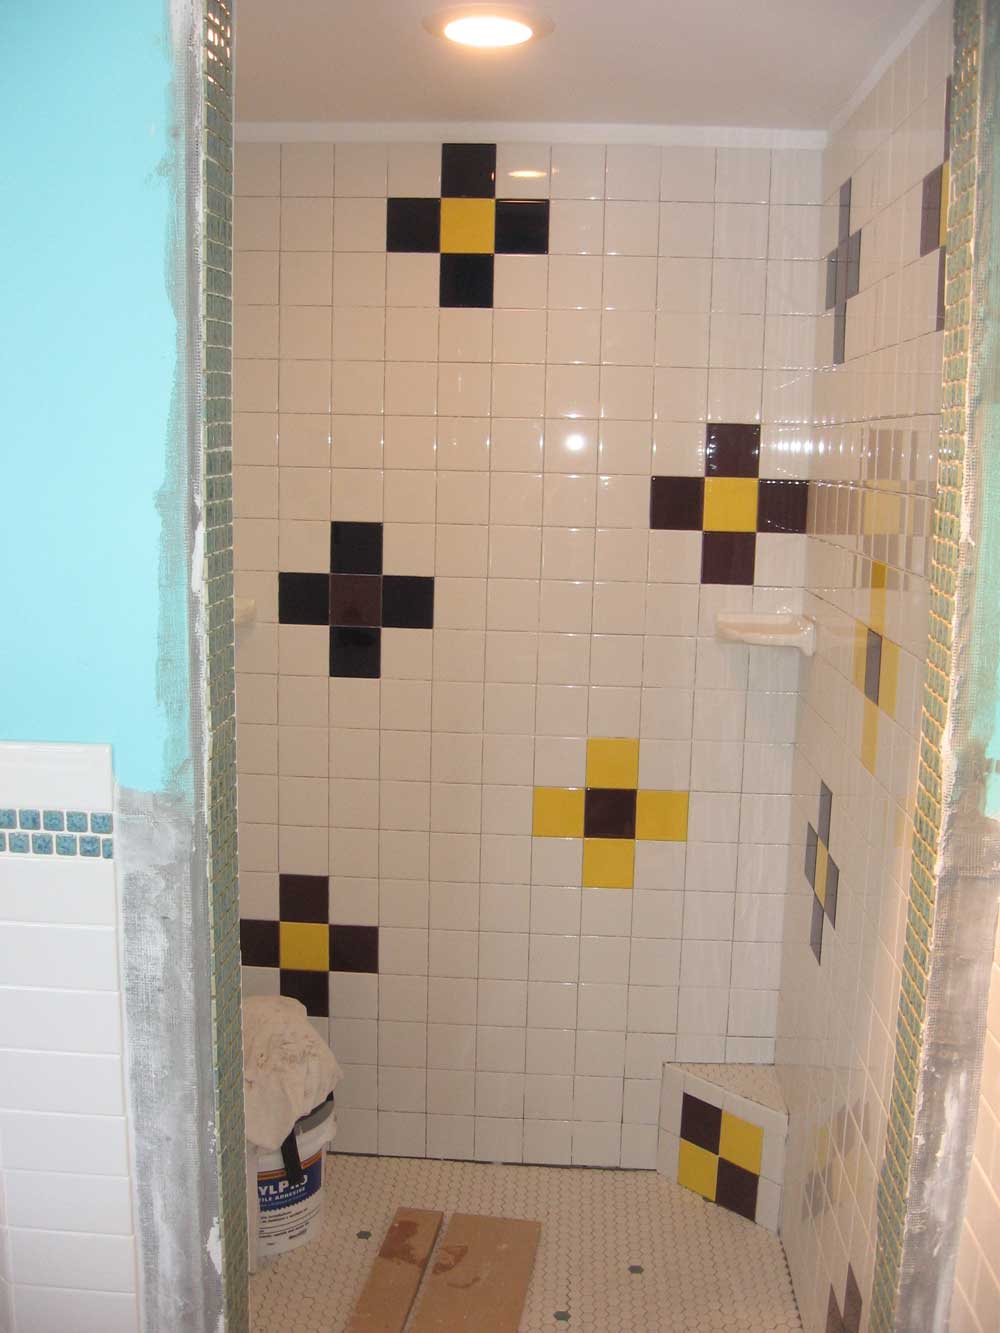
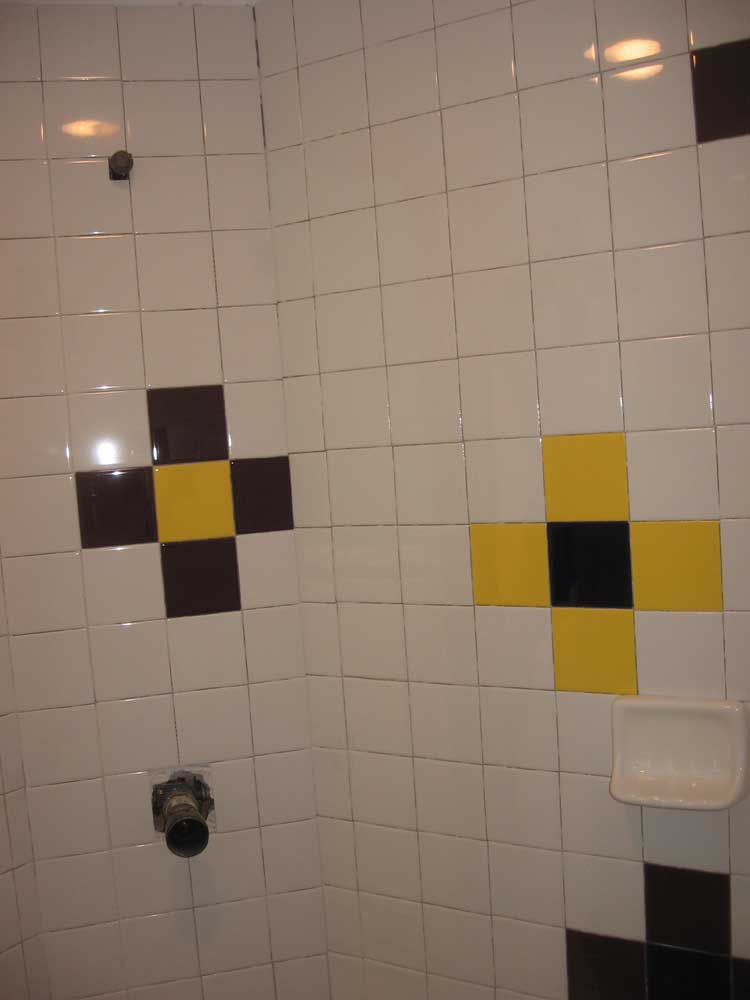
Things went quite well from there. I decided to install only full tiles, and to leave all the cut tiles for another day. So I could make rather swift progress once I got started. I began on the back wall, which fortunately was just the right width to allow for full tiles across the whole back, with no cuts required. The two large side walls would require cuts at one or both ends, however. We chose basic white tiles for the field, but I added splashes of color with three different colored tiles: deep purple, cobalt blue, and yellow. We had the blue and yellow tiles left over from downstairs, and picked the purple as an interesting third choice. Using various combinations of the three colors, I added random "medallions", which essentially formed the shape of a "+" sign, to the walls here and there. I added a soap dish, and one of two corner shelves; I left space for the second corner shelf to be added when I worked on the cut tiles. Working for about 4 or 5 hours, I managed to get all three large walls tiled, other than the cut tiles at the edges. This represented the bulk of the tile work, as all that remained was a short wall in the corner, and the wall containing the open doorway. Of course, all the cut tiles would take some time to cut and then install, so I had a couple more days' work ahead, plus grouting both the floor and the walls. But I was very pleased with the progress, though it started to get a little wearing as I neared the end of the last wall. |
|||
|
|
|||
|
SUNDAY, JANUARY 21, 2007 |
|||
|
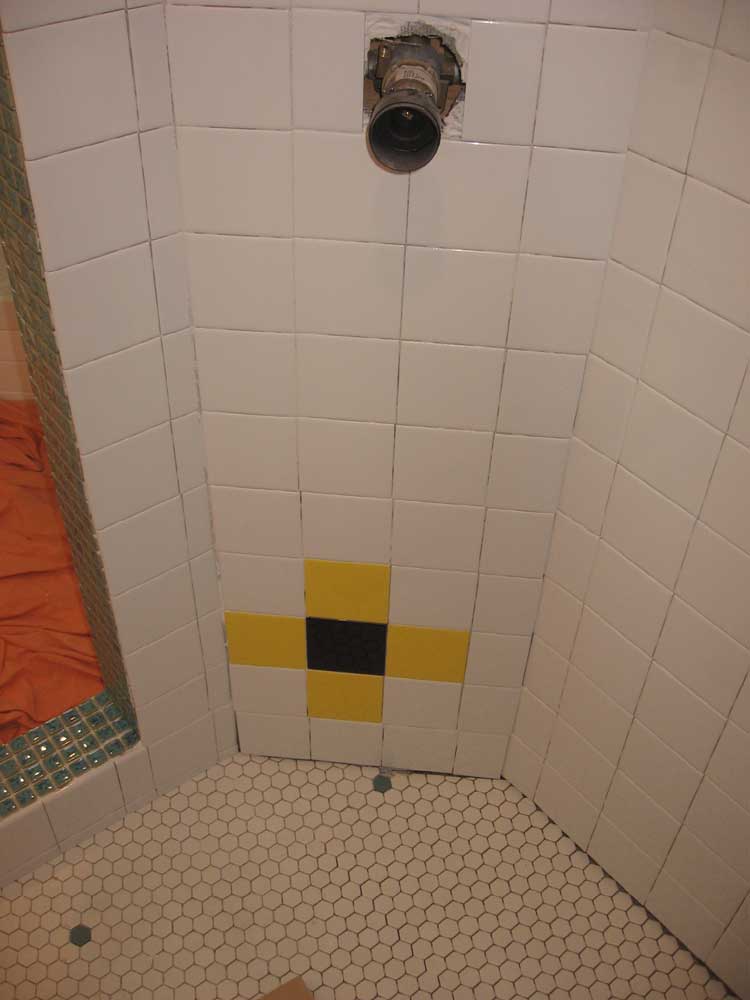
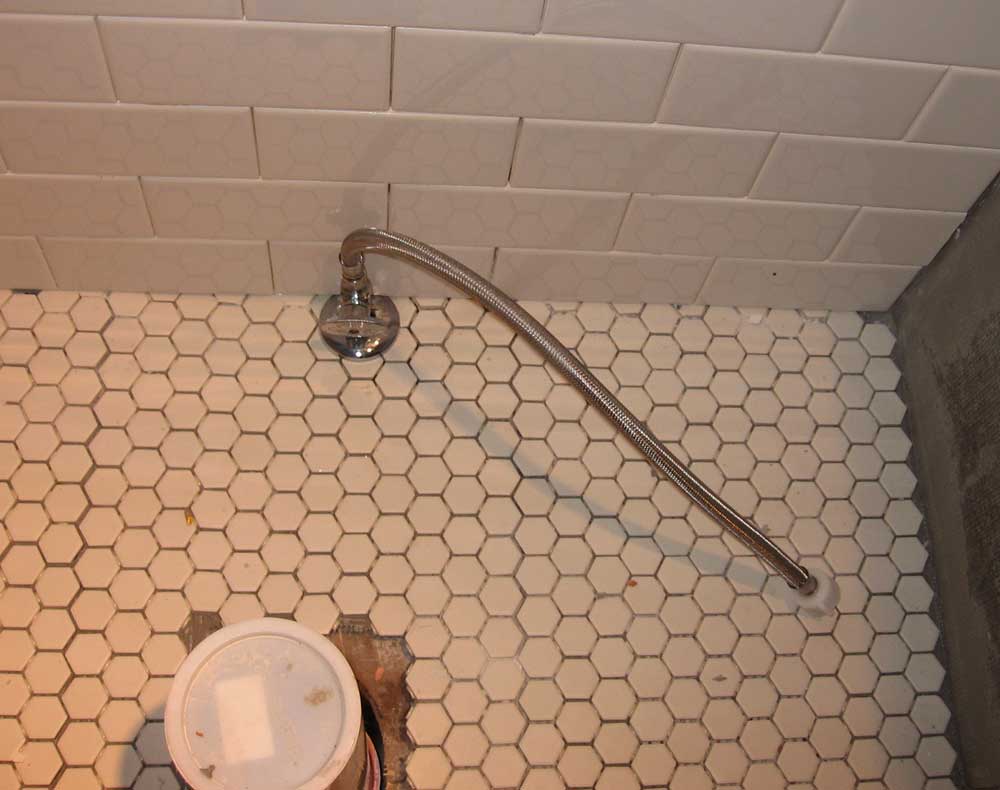
This afternoon, I installed the floor
tile in the shower. We used the same hexagonal tile as on the
main floor, but this time I smartened up and cut the full sheets on
the tile saw so that I wouldn't have to go back later and fill in
those small pieces around the edges like I did before. I had
determined earlier that cutting the full sheets worked pretty well
on the tile saw, though I discovered this too late to save my trauma
on the main floor. Laying out the tile, making the cuts (there are two 45° walls in the shower, necessitating similar angle cuts on the floor tile, of course), and fitting and otherwise preparing everything took a surprisingly long time--something around 2 or more hours. Then, actually installing the tile in the thinset mortar took about 10 minutes. It's kind of like spending all afternoon cooking a fancy meal, only to devour it in 15 minutes. I forgot my camera, so I have no pictures of the floor specifically. You'll see it during later steps, though! |
|||
|
SATURDAY, JANUARY 20, 2007 |
|||
|
Friday evening, I determined a need to
skim coat the mortar base of the shower with some additional mortar
to smooth some areas and fine tune it slightly. Unfortunately,
the top surface did not cure fully overnight, and as a result the
shower was not ready to be worked on today. I had hoped to lay
the floor tile today, but obviously that wasn't going to happen. Instead, I turned my attention to some woodworking: the window and door trim in the bathroom. Some weeks ago, I had milled my edge details on a series of pine boards down in the shop, and now all I needed to do was sand three of the boards that I'd need for the bow window and inside of the door to the bathroom. I brought my compressor up to the house, and was ready to go. To begin, I installed the head and seat boards in the bow window--laminated, veneered boards supplied by Andersen. In order to make these fit correctly, I had to install some 1/2" blocking beneath (or above, for the head board) these pieces so that they would be flush with the edge of the windows inside the unit--impossible to describe properly without seeing it, so just take my word for it. This required a trip to the shop to rip some pieces to the proper thickness. Once I had the blocking installed, I nailed the head and seat boards into place. Then, I cut to fit and installed the two side extension jambs, shimming them against the rough framing so that I could nail through the side. |
|||
 I
continued with the window casing. First, though, I remembered
that I needed to insulate around the rough opening. Of course,
all my scrap insulation was in storage down at the shop, so I took
another trip down for a piece of that. Installing the casing
went quickly enough, and was entirely uneventful. As always, I
was amazed at the transformation that a little bit of trim made in
the appearance of the window--duh, I know, but it's still impressive
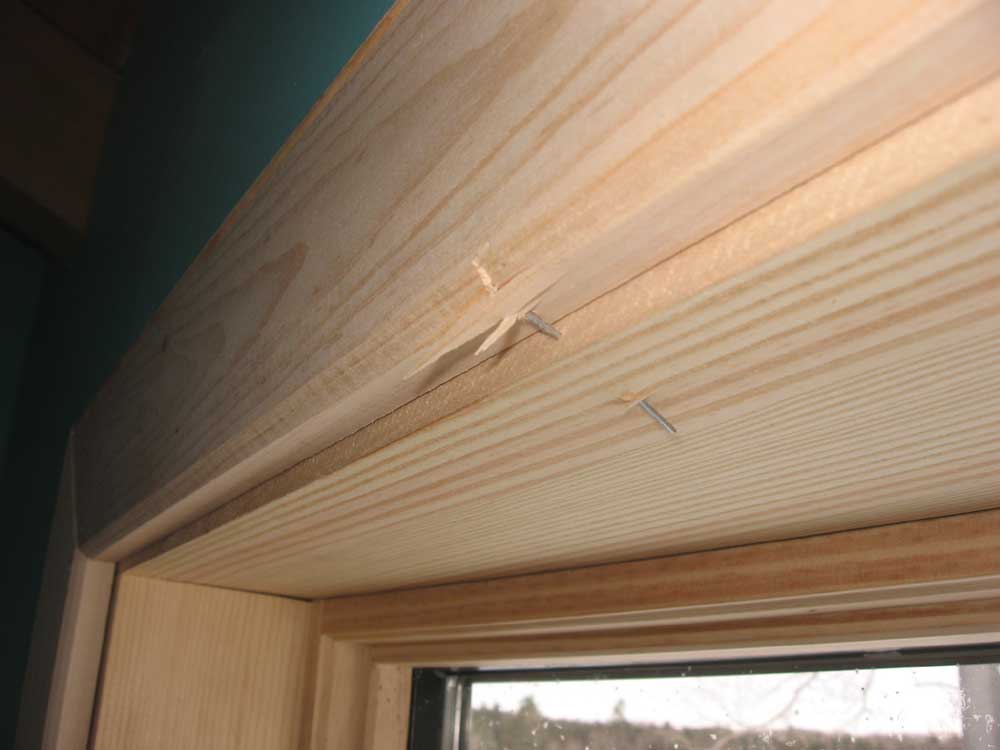
to me. I
continued with the window casing. First, though, I remembered
that I needed to insulate around the rough opening. Of course,
all my scrap insulation was in storage down at the shop, so I took
another trip down for a piece of that. Installing the casing
went quickly enough, and was entirely uneventful. As always, I
was amazed at the transformation that a little bit of trim made in
the appearance of the window--duh, I know, but it's still impressive
to me.I hate when this happens! Sometimes, one just gets the angle of the nail gun wrong, or perhaps the nail found a hard spot that forced it off its desired course. Sigh. |
|||
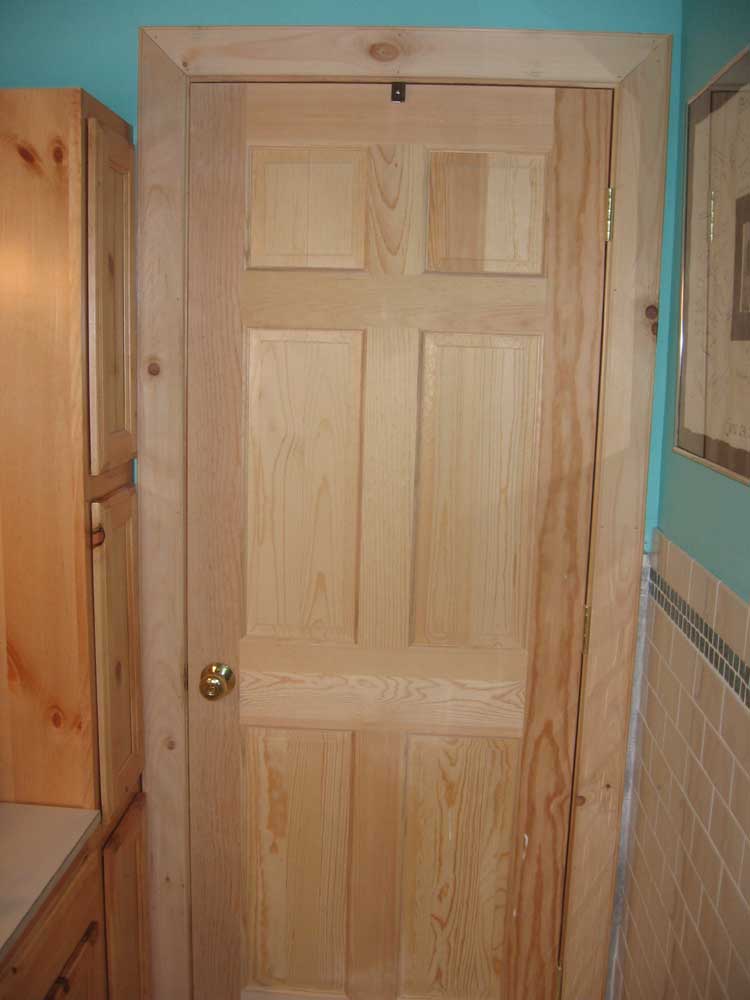 In
a similar vein, I installed the inside trim on the door to the
bathroom--again, an uneventful and, some might say, even boring
process. As with all projects undertaken since we moved in,
even these simple jobs took quite a long time, thanks to the need to
traverse two flights of stairs to the basement to grab forgotten
tools, or to cut a piece of trim, or what have you...as well as all
the trips back and forth to the shop to get all the other things I
needed. And so it goes. In
a similar vein, I installed the inside trim on the door to the
bathroom--again, an uneventful and, some might say, even boring
process. As with all projects undertaken since we moved in,
even these simple jobs took quite a long time, thanks to the need to
traverse two flights of stairs to the basement to grab forgotten
tools, or to cut a piece of trim, or what have you...as well as all
the trips back and forth to the shop to get all the other things I
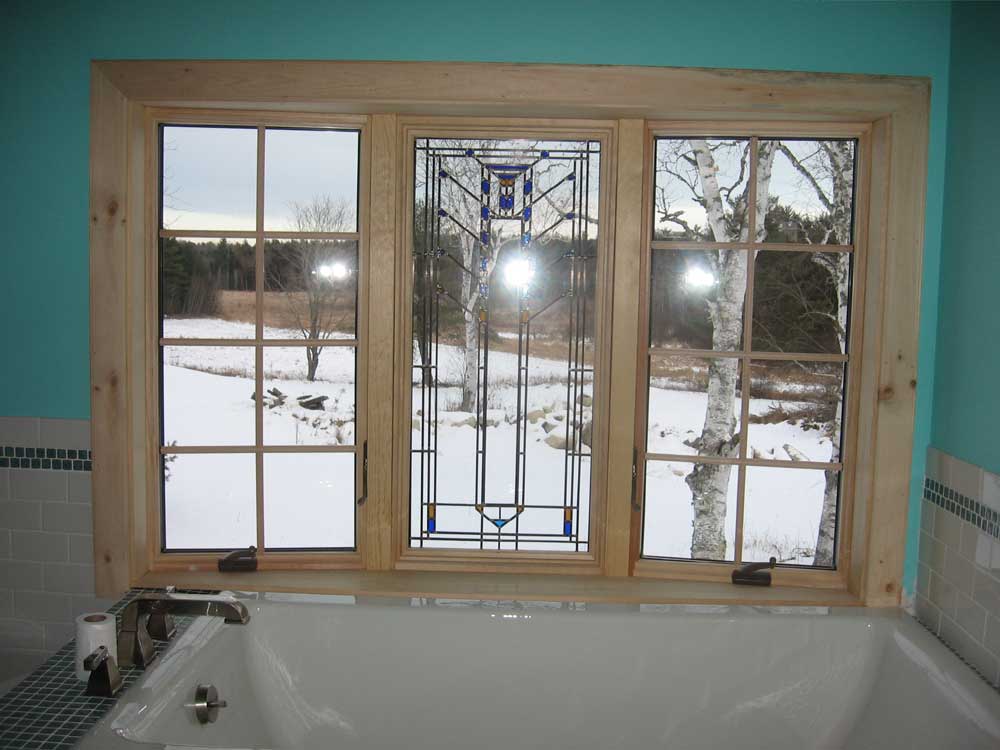
needed. And so it goes.With the window trim complete, I washed the windows and installed the interior grilles in two of the three sections. But for the center section, we had a little something special: an art glass panel. Heidi loves stain glass and the arts and crafts style, and this Frank Lloyd Wright panel was simple but elegant. |
|||
 Since
last July, the panel had resided in the basement, well ensconced in
its packing material. I never even looked at it, not wanting
to risk damage. Heidi had completely forgotten about it, and
in fact didn't even remember that we had ordered it. To
install the panel, I first had to install several plastic clips
around the inside of the center window frame, into which I gingerly
placed the fancy panel. The directions for installing the
panel were a dozen pages long, and filled with admonitions to be
really careful with the panel. I was. Since
last July, the panel had resided in the basement, well ensconced in
its packing material. I never even looked at it, not wanting
to risk damage. Heidi had completely forgotten about it, and
in fact didn't even remember that we had ordered it. To
install the panel, I first had to install several plastic clips
around the inside of the center window frame, into which I gingerly
placed the fancy panel. The directions for installing the
panel were a dozen pages long, and filled with admonitions to be
really careful with the panel. I was.
Once the panel was clipped in place, I installed wooden trim pieces around the edges to finish it off--all materials supplied in the kit, of course. |
|||
 The
window trim, and particularly the art glass, certainly made a
pleasing difference in the appearance of the bathroom. Now, if
I can just get that shower tiled! The
window trim, and particularly the art glass, certainly made a
pleasing difference in the appearance of the bathroom. Now, if
I can just get that shower tiled!
|
|||
|
THURSDAY, JANUARY 18, 2007 |
|||
|
After weeks of procrastination, I
decided last night that I needed to address the mortar bed for the
shower floor this morning. It just wasn't going to work trying
to approach this annoying job late in the day after work, so this
morning I got right to work on the shower, deciding to finish that
first and then go about my normal day.
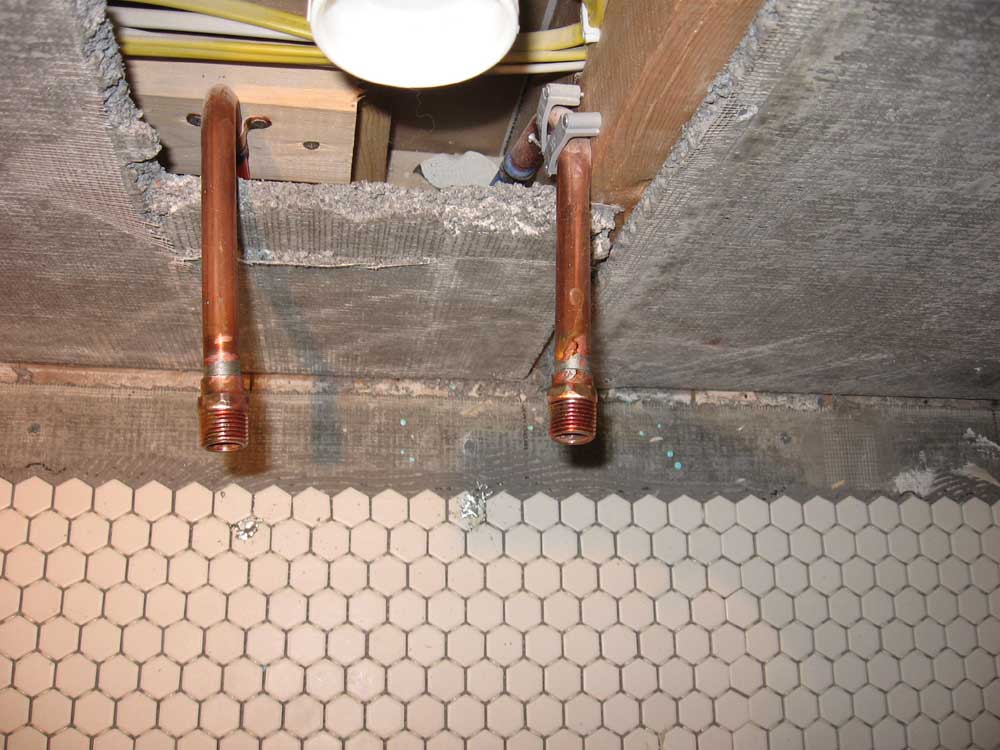
Next, I mixed up an 80 lb. bag of mortar. The point of the mortar bed is only to allow me to provide some pitch to the floor so that it will drain properly to the center drain. I hoped to minimize how much I needed, and to that end had searched long and hard for an appropriate drain fitting that wouldn't be so tall as to require a lot of mortar just to make it flush. On my last trip to Lowes, I found a little grate fitting that just slides inside the 2" PVC drain--perfect. Now, I didn't even need to bother with a fitting at all, since the grate would just go on after the fact. |
|||
|
This meant that I needed very little mortar thickness at the drain, and just enough at the shower walls to allow for natural drainage. So I used some 3/4" masking tape to mark a like 3/4" up from the floor on the walls; I used the tape (one strip for the spacing, then a second strip above to make the actual mark; then I removed the spacer strip) because I couldn't make actual marks on the ice and water shield. A 1/2" or so pitch over the half width of the shower (about 2') would be more than adequate to promote drainage.
I managed to get a rough shower floor packed in without too much difficulty, and fortunately I only needed to mix the one bag; I had two others on hand, but didn't miss the opportunity to mix them up. The floor was ugly, but it would do the job and would of course be hidden in tile anyway. Afterwards, I ran some errands to pick up some tile accessories (shower shelves, soap dish) and some more grout I'd need for the shower. |
|||
|
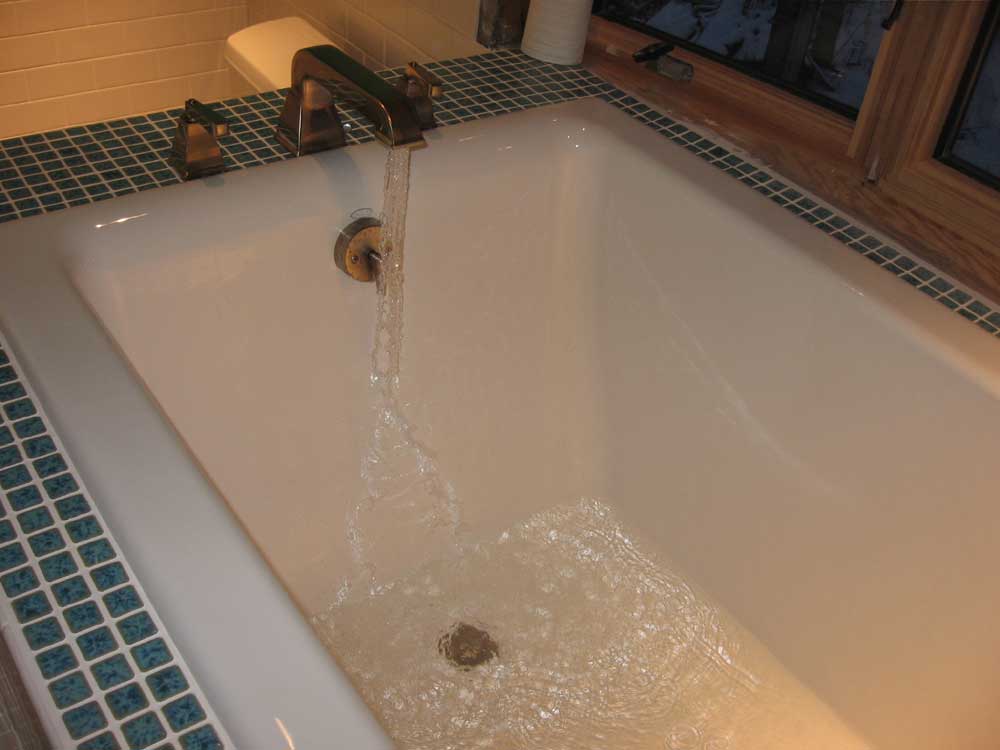
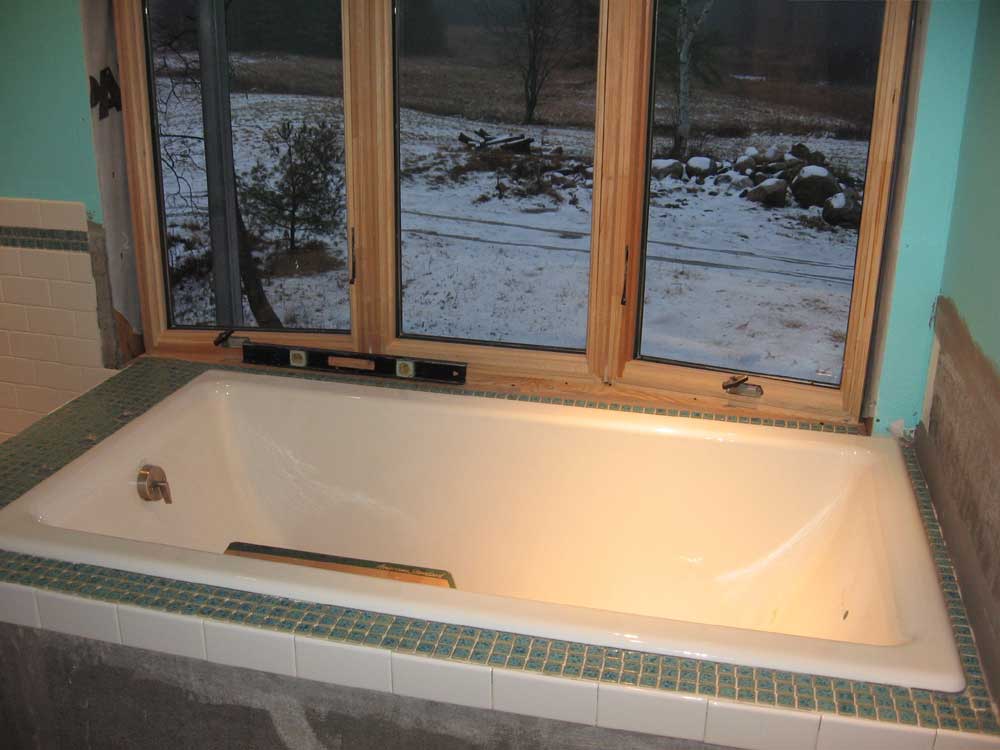
In other news: the tub is done!
However, after dispensing some water into the tub, I discovered that I couldn't open the drain! Good lord. It was late, and not the time to play with that, so I left it alone with the promise that I would guarantee to have the tub all set tonight. |
|||
 I
left work early in order to ensure that I had plenty of time to fix
the drain. Fortunately, it was pretty simple. I had
never been enamored with the way the drain had worked when I
installed it, but after some adjustment it had seemed OK (way
back when). This time, I think I actually got things so that
the worked the way they were designed. I
left work early in order to ensure that I had plenty of time to fix
the drain. Fortunately, it was pretty simple. I had
never been enamored with the way the drain had worked when I
installed it, but after some adjustment it had seemed OK (way
back when). This time, I think I actually got things so that
the worked the way they were designed.To fix the drain, I had to undo one of the overflow drain connections through the access panel in the tub deck, a straightforward task. This allowed me to slide up the pipe and expose the inner workings of the drain mechanism, and after some more adjustment and a realignment of the control at the top of the tub, I got things working properly. It took 10 minutes. If I'd allowed 10 minutes, it would have taken 2 hours. And so it goes. I'd even bought a rubber tub drain stopper just in case. |
|||
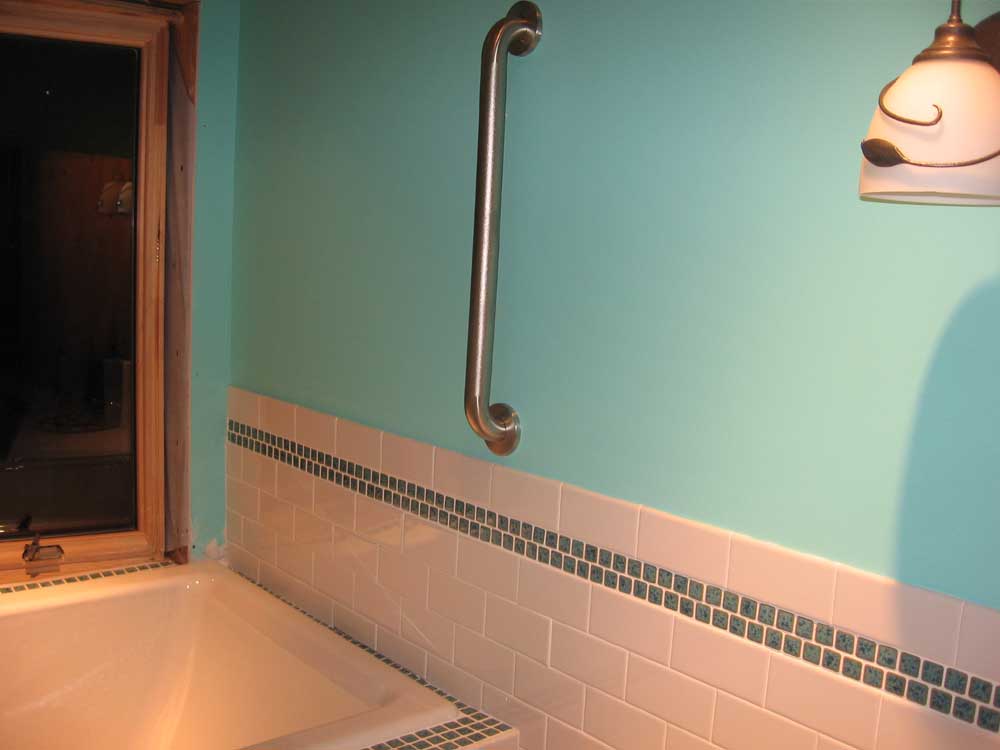 After
some testing, I reconnected the pipe and gave the tub a real test,
after completing the installation of the faucet levers. All
was good! I cleaned the tub, and then installed a sturdy grab
rail on the wall to assist in getting in and out of the tub. After
some testing, I reconnected the pipe and gave the tub a real test,
after completing the installation of the faucet levers. All
was good! I cleaned the tub, and then installed a sturdy grab
rail on the wall to assist in getting in and out of the tub. |
|||
 Chimney
update: Bob's been sick with the flu, or something, since last
Thursday. (As Heidi says, he came down with the "flue".
Ha!) He managed to come today and get the staging and tenting
set up over and above the roof so that he can finish the last bit of
the chimney. So that's all set, but as I wrote this on Friday
morning he called to say that he wouldn't be back till Monday,
as he's feeling worse again. Send him along your healthy
vibes! Chimney
update: Bob's been sick with the flu, or something, since last
Thursday. (As Heidi says, he came down with the "flue".
Ha!) He managed to come today and get the staging and tenting
set up over and above the roof so that he can finish the last bit of
the chimney. So that's all set, but as I wrote this on Friday
morning he called to say that he wouldn't be back till Monday,
as he's feeling worse again. Send him along your healthy
vibes! |
|||
|
SUNDAY, JANUARY 13, 2007 |
|||
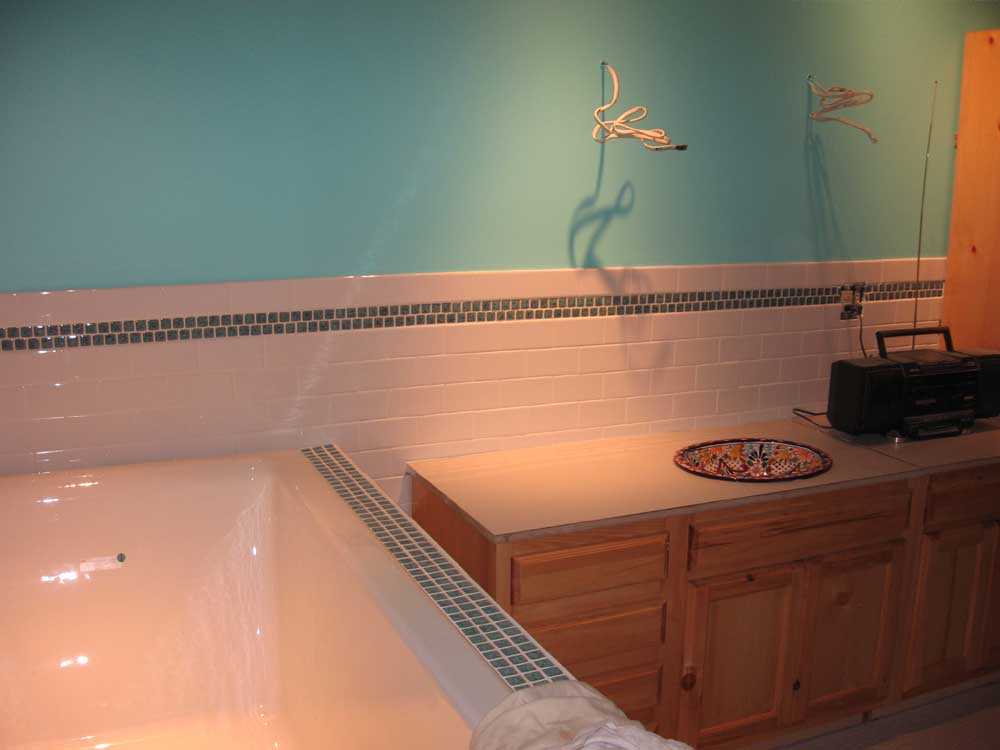
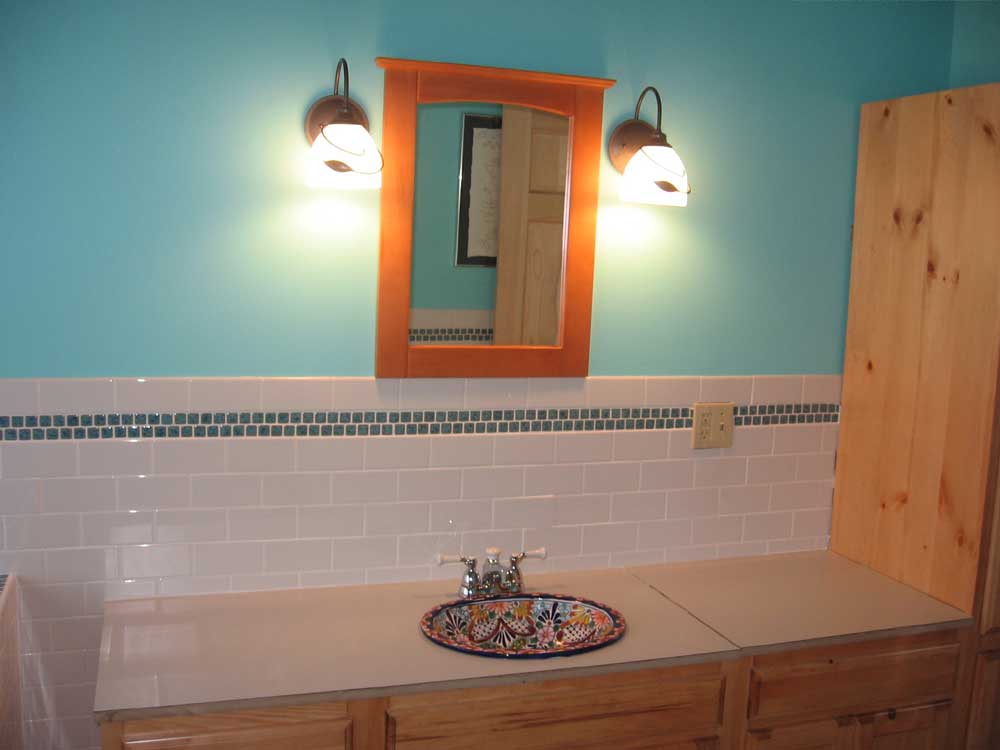 Big
progress today: I installed two wall sconces over the vanity,
and also the vanity mirror. Woo-hoo! Big
progress today: I installed two wall sconces over the vanity,
and also the vanity mirror. Woo-hoo!Nonetheless, these items really finished things off in the main part of the bathroom. I was so tired of the raw wires hanging out of the wall, and it was a relief to install the fixtures. They look nice, too. To install them, I first had to install "old work" round boxes in the wall, then a mounting bracket that screwed to the box. Unhelpfully, the light fixture instructions read, "new fixture boxes come with mounting screws". No, they don't. Fixture straps require a very specific thread type, and you'd think I'd have learned by now to keep bulk packages of these things around. I ran into this with another of these lights earlier, but somehow managed to forget to buy these screws. Fortunately, I still had four screws that I had found in the depths of some box in my shop that worked, even if they weren't strictly the right kind. So without any major problems, I got the lights up in relatively short order. The mirror is a mirror; it manages to reflect the image of oneself, which is really all we needed. We don't much like in-wall medicine cabinets, and had planned other storage arrangements to make up for the lack of one. Mirrors commonly available seem to either be very expensive, in poor taste, or, horribly, both at once. So we chose a small, simple, and relatively inexpensive (though still too much) mirror identical to the one in the downstairs bathroom, and one that matched as close as possible the simple design and color of the cabinets. |
|||
|
FRIDAY, JANUARY 12, 2007 |
|||
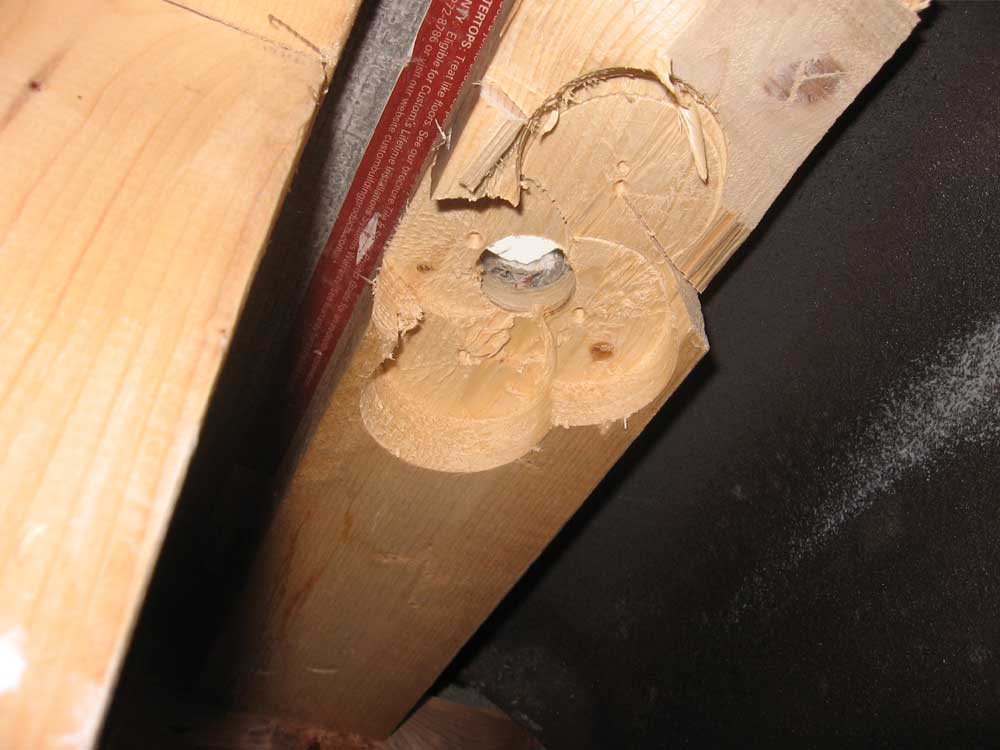 I
spent most of the day working in the bathroom today. I hoped
to get the tub up and running (finally), install the toilet, and
install the sink faucet and drain system. Two out of three
isn't bad. I
spent most of the day working in the bathroom today. I hoped
to get the tub up and running (finally), install the toilet, and
install the sink faucet and drain system. Two out of three
isn't bad.I began with what turned out to be the simple part. Having determined yesterday that some modification of the underpinnings of the tub deck was in order, I used a 2-1/2" Forstner bit in my drill (a bit that makes nice, flat-bottomed cuts) to reduce the thickness of the 2x4 framing in way of the faucet holes. By removing 1/2" - 3/4" of the material, I made plenty of room to secure the handle valves properly. |
|||
 Afterwards,
despite this initial success, the tub resisted yet more attempts to
make things work--even after a mid-afternoon trip to Home Despot
specifically to purchase items needed to adapt the various
connections. At the heart of my problem was the
incompatibility of thread types, and the lack of easy means to
convert one thread type to another. Afterwards,
despite this initial success, the tub resisted yet more attempts to
make things work--even after a mid-afternoon trip to Home Despot
specifically to purchase items needed to adapt the various
connections. At the heart of my problem was the
incompatibility of thread types, and the lack of easy means to
convert one thread type to another.(As an aside, is this really necessary? Why must there be so many different types of threads, why must they be incompatible, and why, given the assumption of the first two things, must adapting from one to the next be either difficult or, as it seems, impossible? Is there a truly logical and sound reason for the different thread types? Would it affect the fabric of the universe if (gasp!) compression threads were the same as pipe threads? I don't know, and I'm probably missing something. But it seems unnecessary and illogical. I'm sure there might have been some good reason once. Or maybe not.) |
|||
|
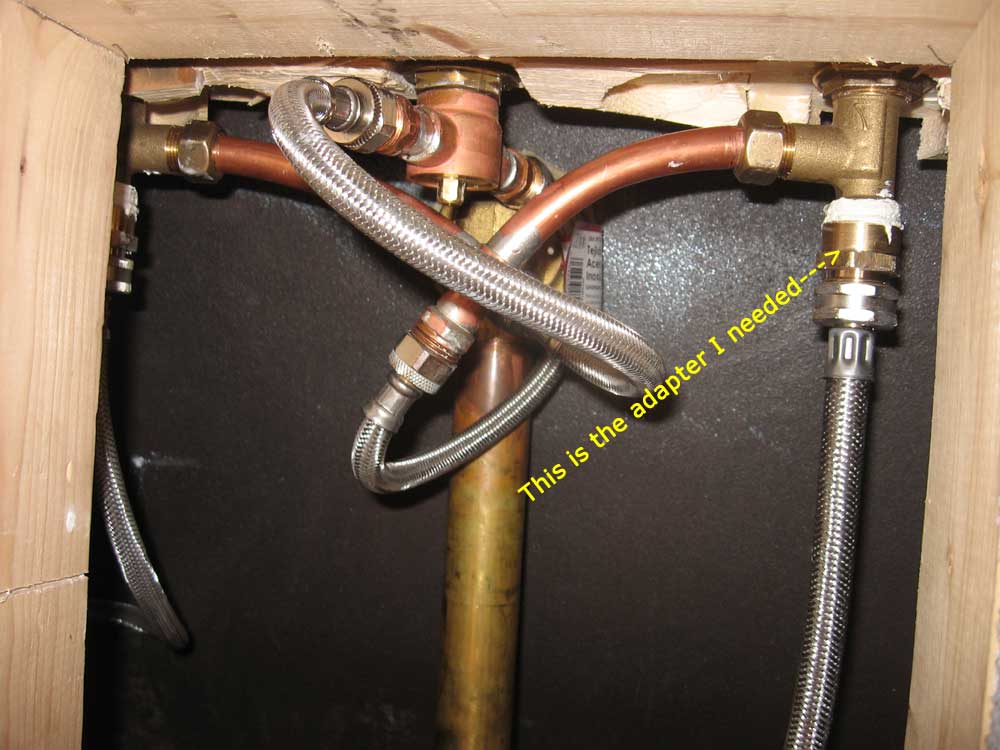
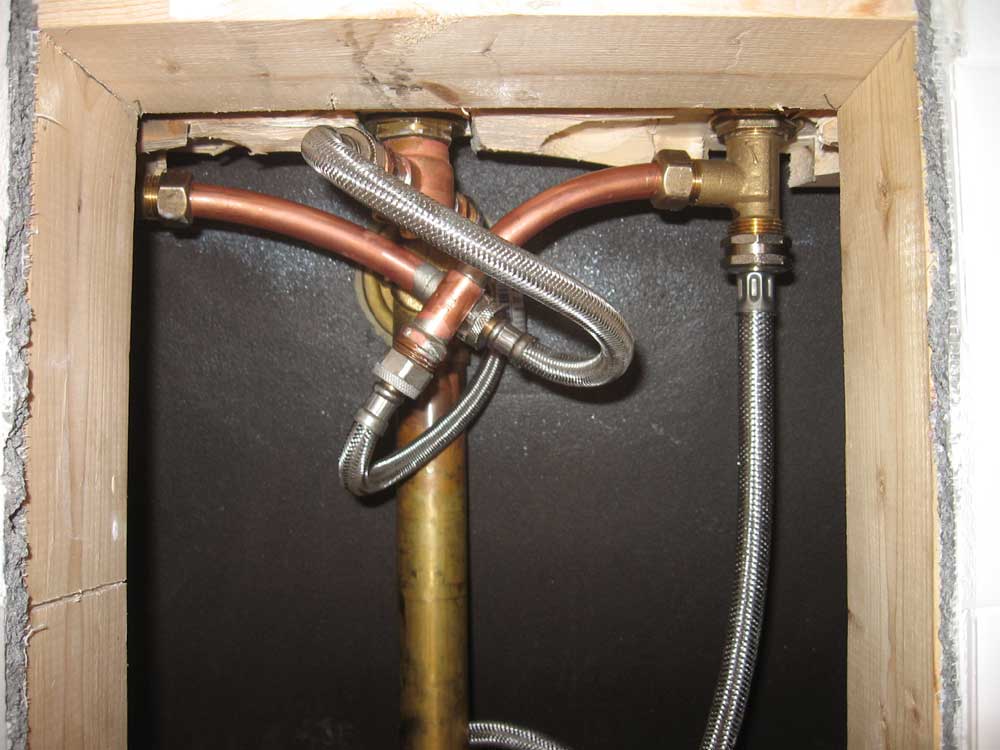
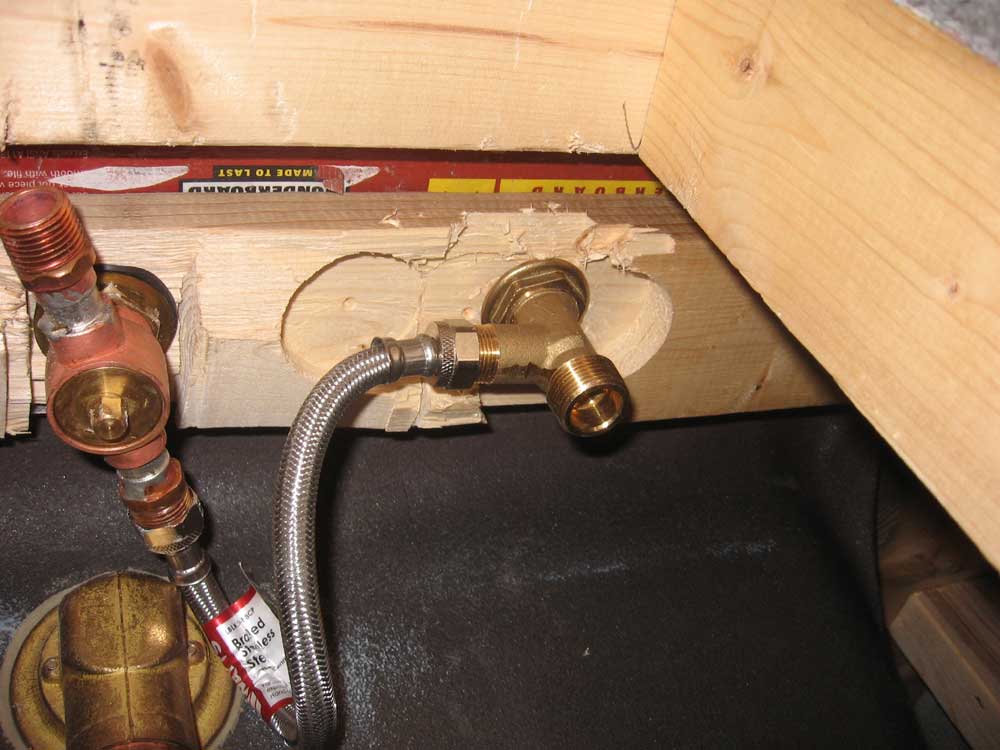
The brass threads on the bottoms of the hot and cold water valves had compression threads on their outlets. So my original plan of using flexible stainless steel water hoses to connect the valves to the center faucet failed since the threads of the hoses were different from those on the valves themselves--female pipe threads on one, male compression threads on the other. In addition, because of a stupid move on my part, I needed two additional adapters to convert the washing machine hoses that I was using for the supply lines from the floor to the inlets of the faucet valves. I had purchased two of these adapters, which I used at floor level, but stupidly didn't think I needed them at the top end. Well, I did need them, and didn't have them. OK, that was simple enough. Enter our trip to the store. Knowing now what I needed to do, I searched for the appropriate adapters to allow me to connect the 1/2" female pipe threads on the water supply hose to the 5/8" male compression threads on the faucet valve. Pipe threads are much coarser than compression threads. The adapter I needed didn't exist, apparently. I found the reverse thing, which featured male compression threads on one end and female pipe threads on the other, but that did me no good. After some minutes, I finally latched upon a plan to use short lengths of flexible copper piping with the proper compression fitting at one end (a female fitting for 5/8" threads), which I could attach to the faucet valve. Unfortunately, this necessitated buying a 10' roll of 5/8" OD soft copper pipe for $27. I needed perhaps 10" total, not 10'. Oh well. I bought various compression fittings, and also bought two adapters for the 3/4" garden hose to 3/4" pipe threads that I needed for the washing machine supply lines.
My plan to use the compression fittings and soft copper tubing worked fine...I think. As of this writing, with no proper adapters for the supply lines, I have not tested the system. But I soldered copper fittings with 1/2" male pipe threads on one end, installed the compression fittings on the other, and attached it to the faucet valves. Rube Goldberg would be proud. |
|||
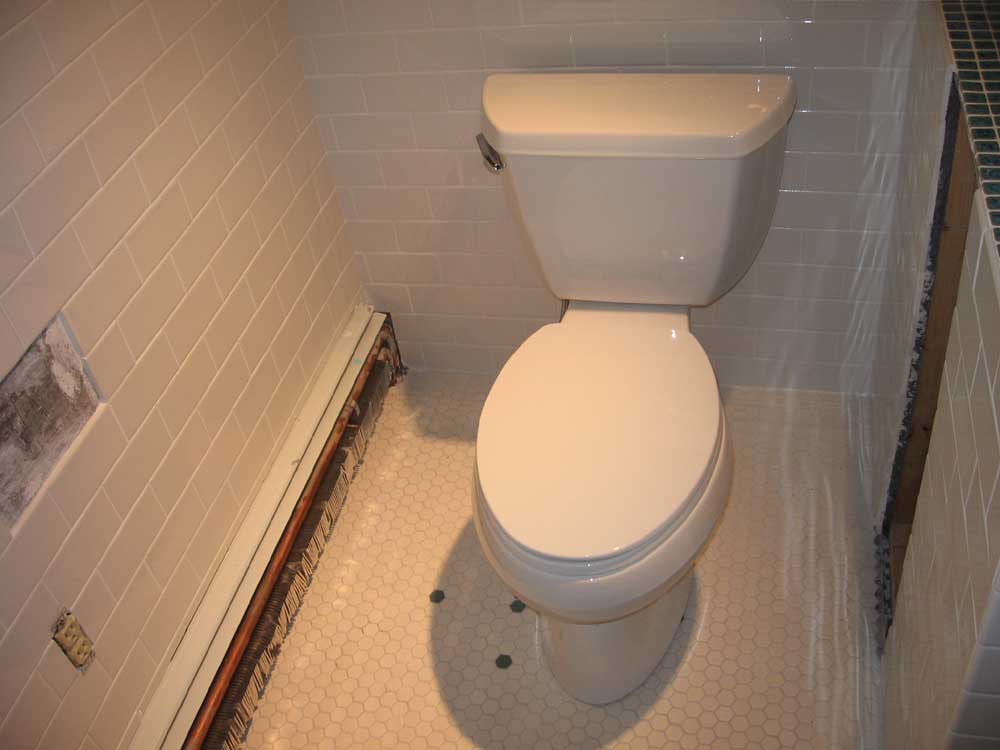 Later
that day, I did install the toilet successfully. Tragedy was
twice averted in the saga of the upstairs toilet. First, when
purchasing the toilet on Thursday morning, I noticed, as I loaded it
into the truck, that something was rattling inside the box
containing the bowl section of the toilet. Being one piece,
there should be no rattles, so I checked the box and found that the
bowl was broken. I immediately returned it and got another--a
simple 5 minute delay. Later
that day, I did install the toilet successfully. Tragedy was
twice averted in the saga of the upstairs toilet. First, when
purchasing the toilet on Thursday morning, I noticed, as I loaded it
into the truck, that something was rattling inside the box
containing the bowl section of the toilet. Being one piece,
there should be no rattles, so I checked the box and found that the
bowl was broken. I immediately returned it and got another--a
simple 5 minute delay.I was also smart enough to buy two wax rings. Every now and then, something just doesn't work right during installation, and the toilet must be removed. This destroys the wax ring. Wax rings are so cheap that I didn't think twice about buying a second, spare one. As it turned out, I needed it: something just wasn't seating right the first time, and I had to pull the bowl off the floor. The second time worked fine. |
|||
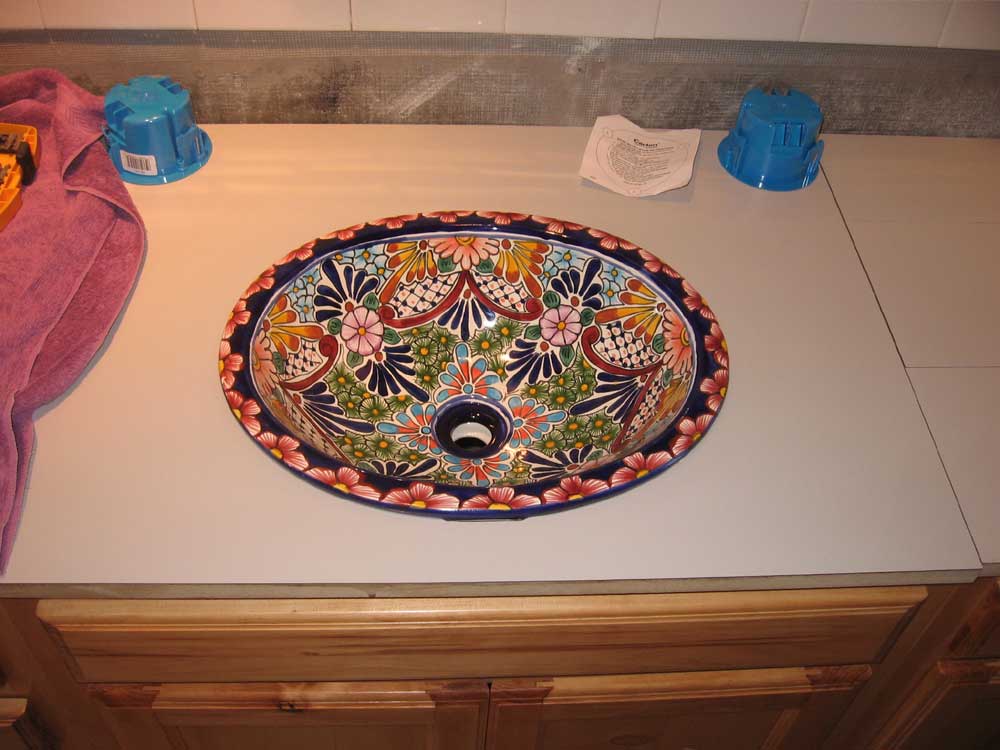
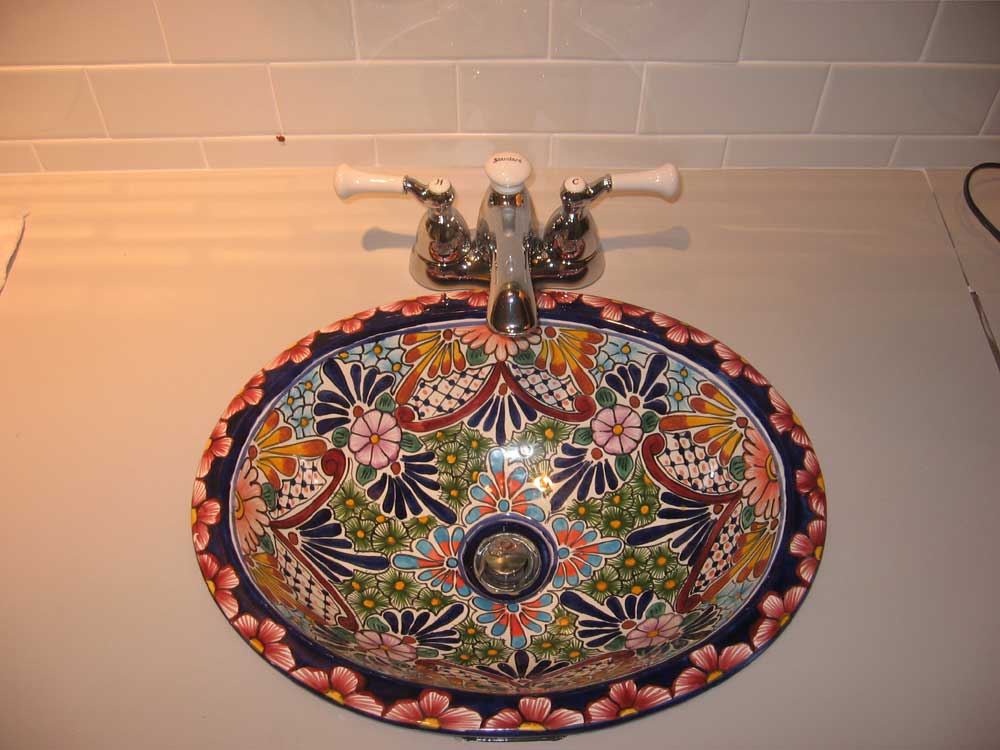 Finally,
I managed to install the sink faucet and drain with no problems.
I had all the PVC adapters required for the drain, having learned my
lesson with the downstairs sink a couple months ago. In short
order, I had the sink up and running. Finally,
I managed to install the sink faucet and drain with no problems.
I had all the PVC adapters required for the drain, having learned my
lesson with the downstairs sink a couple months ago. In short
order, I had the sink up and running. |
|||
|
THURSDAY, JANUARY 10, 2007 |
|||
|
I had hoped to make better progress
tonight. I hoped to install the faucet in the tub and get that
working, and expected to have time to install the toilet, or the
sink plumbing, or both. Alas, it was not to be. The tub faucet installation was greatly complicated by the fact that the faucet components were not long enough to pass through my tub deck construction. This wasn't the faucet's fault, but nonetheless is made things much more difficult. I had built my deck using 2x4s on the flat around the tub flange (1-1/2" thick), over which I laid the 1/2" cement board and 1/4" tile. Unfortunately, the clearance required for the faucet and tailpieces was 1-1/4" and 1-1/2", respectively. So I was up to 1/4" too thick to allow for proper installation. I don't want to go into my private thoughts of some aspects of the faucet's underpinnings; it serves no purpose. As with so many things, I saw what I, at least, perceived as some flaws in the designed setup that, if nothing else, made the installation more complicated and less universal than it would be. Suffice it to say that it took over two hours to even get the faucet installed, and I didn't get either of the handle valves installed. However, on a positive note, I did figure out how I was going to attack things tomorrow, so with an idea in mind, I quit for the night after a very frustrating few hours of work (with virtually no real progress). |
|||
|
WEDNESDAY, JANUARY 9, 2007 |
|||
|
I just didn't have enough time after
work on Tuesday to think about getting into grouting the walls, so I
postponed that until Wednesday. I did prepare a couple buckets
of clean water and got everything as ready as I could so that the
process would be easier on Wednesday. It took a couple hours to grout the walls, when I finally got to it. I didn't love the grout I had--it was a Home Despot brand, and I definitely liked it less than the white unsanded grout I had used in the downstairs shower a few months ago (which we got from the tile place). Nonetheless, it was pretty uneventful. It was nice to finish, which really finished the major work in the upstairs bathroom. Of course, there's still the whole shower to tile. But that won't be too bad, I don't think, at least once I get the floor done. More on that later. Meantime, I collected my list of pieces and parts and prepared for my traditional pre-dawn trip to Lowes in the morning to buy a bunch of things for the bathroom that I needed to hook up the tub and sink faucets, and a toilet. |
|||
|
|
|||
|
MONDAY, JANUARY 8, 2006 |
|||
 This
evening, I finished up the wall tile installation. I had one
longer wall, plus two short walls, to complete on the outside of the
shower area. There were a lot of cuts involved, particularly
on the short angled wall, but the job wasn't too bad or too
time-consuming. This
evening, I finished up the wall tile installation. I had one
longer wall, plus two short walls, to complete on the outside of the
shower area. There were a lot of cuts involved, particularly
on the short angled wall, but the job wasn't too bad or too
time-consuming.
|
|||
| I also finished up the tile above the new countertop--one full row plus one partial row of tile. | |||
|
|
|||
 Around
the entrance to the shower, I planned to install a full wrap of
tile, using 4-1/4" bullnose tiles. (The inside of the shower
will be tiled using 4-1/4" square tiles.) However, with a
limited supply on hand that I wasn't sure would do both sides, I
held off on the outside for now, preferring to save the bullnose
tiles on hand for the inside of the shower first. Once that's
done, in a week or so, I can see about finishing up the outside of
the opening. But I didn't want anything to stand in the way of
the shower's completion once I got started. Around
the entrance to the shower, I planned to install a full wrap of
tile, using 4-1/4" bullnose tiles. (The inside of the shower
will be tiled using 4-1/4" square tiles.) However, with a
limited supply on hand that I wasn't sure would do both sides, I
held off on the outside for now, preferring to save the bullnose
tiles on hand for the inside of the shower first. Once that's
done, in a week or so, I can see about finishing up the outside of
the opening. But I didn't want anything to stand in the way of
the shower's completion once I got started. |
|||
|
SUNDAY, JANUARY 7, 2007 |
|||
|
I didn't get that much done today.
I just didn't feel like grouting the tile I installed yesterday, so
instead I made a list of things I'd need to get at the store in
order to finish up the plumbing of the tub and sink faucets, as well
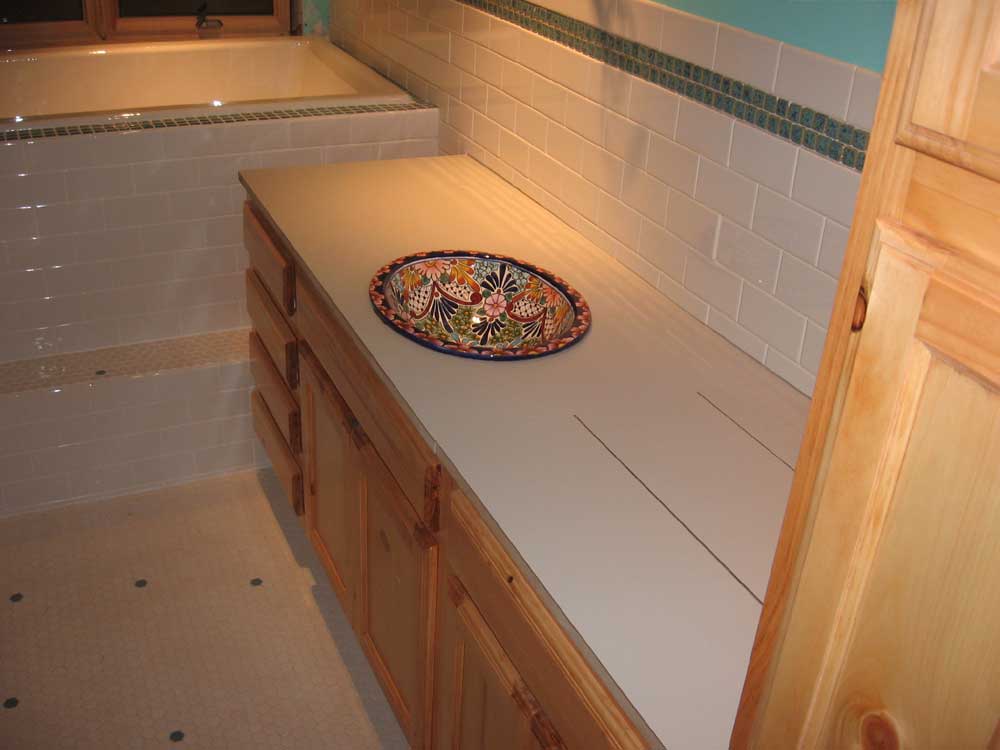
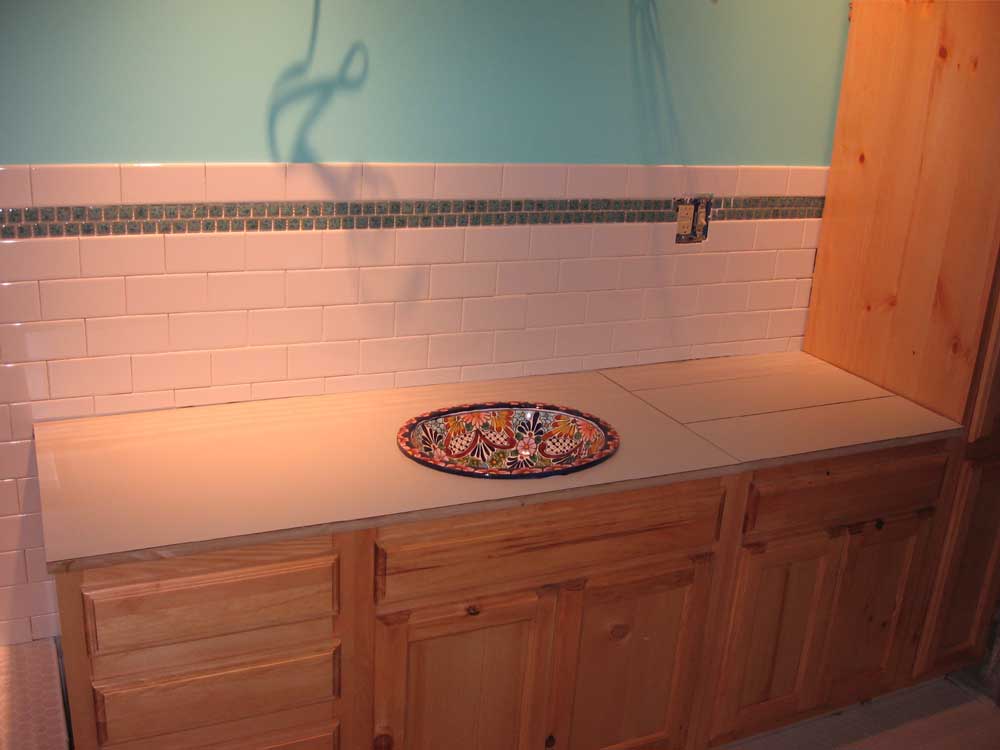
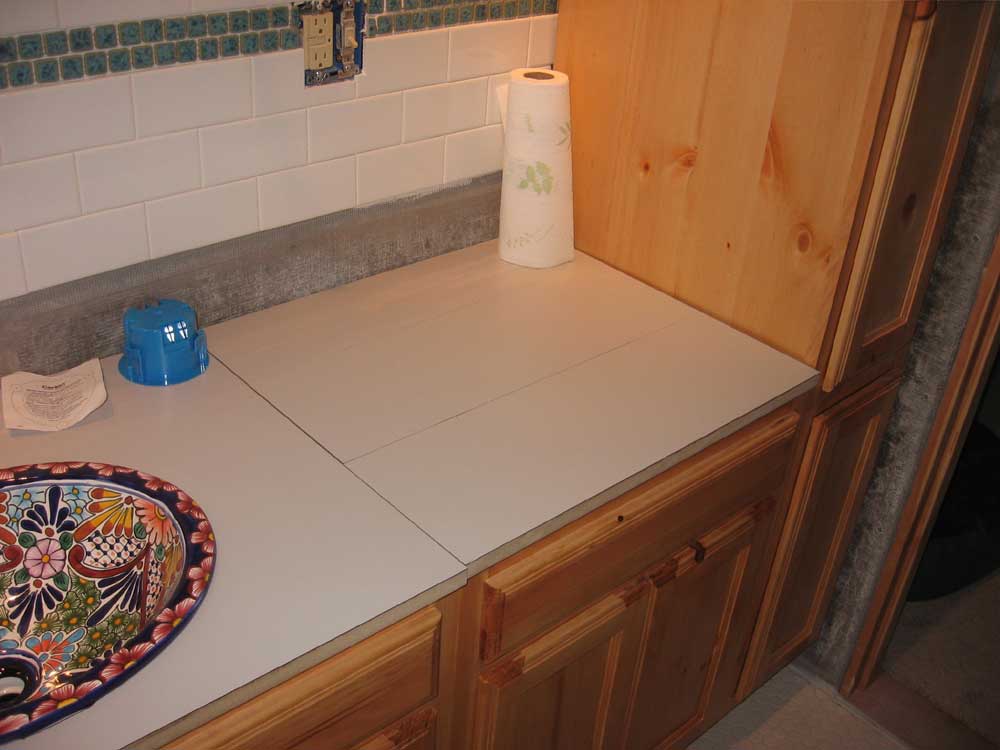
as whatever other supplies I could think of. Then, in the afternoon I decided to built the countertop for the vanity. The countertop was straightforward, but we planned on a top-access storage area over the cabinet to the right of the sink, inspired by the folding cover on the stove in our camper. Not being enamored of in-wall medicine cabinets, and certainly having no desire to have the various toiletries stored on the countertop itself, Heidi came up with the idea to build a simple bin beneath the countertop, with a hinged lid on top. This was pretty simple to execute. I built the countertop from MDF board and Pionite, in the same color as the downstairs bath counter. Once I built the countertop and applied the laminate (the longest part of the process was waiting for the contact cement to dry), I installed it on the vanity cabinets, driving screws up through plastic brackets in each cabinet. Then, I installed the sink basin in the hole that I cut in the countertop before applying the laminate.
Still to come: the wood facing for the countertop. |
|||
|
|
|||
|
SATURDAY, JANUARY 6, 2006 |
|||
|
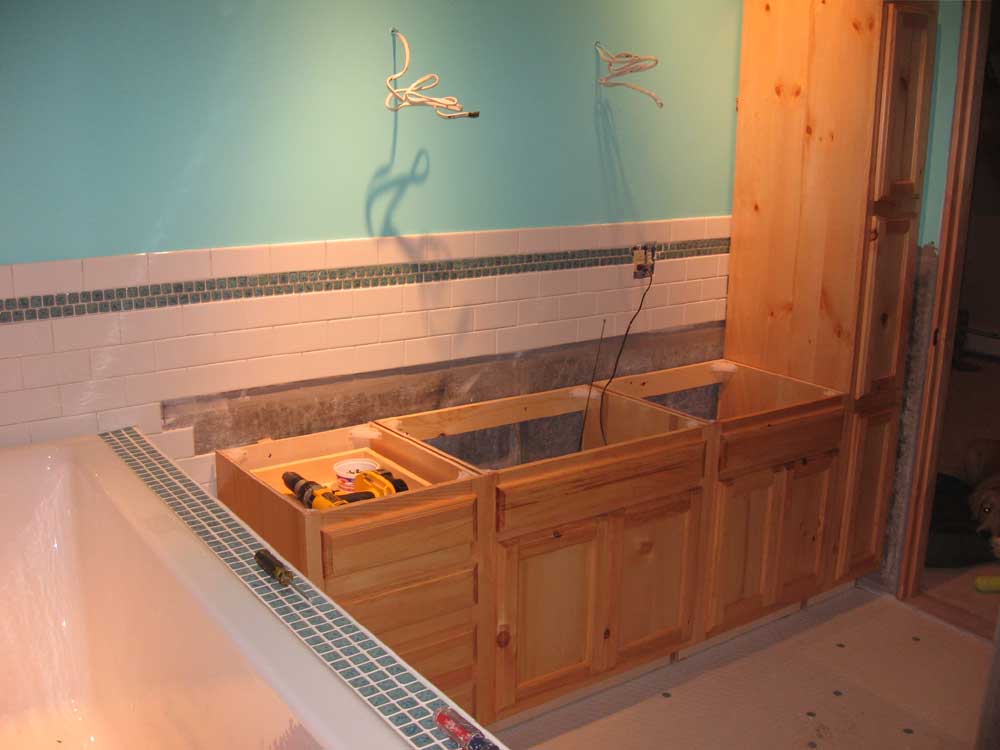
I had planned to install the Roman faucet on Heidi's tub this morning, but I discovered to my dismay that I lacked the right tools for the job. Allow me to explain. Earlier, as I began laying out the faucet location, I noted that because I had at some point lost a critical adapter for my hole saw set, I couldn't use my 1-1/8" hole saw (the required size) to drill the holes through the deck for the faucet components. No problem: after scouring my shop for an alternative, I eventually ordered a new 1-1/8" hole saw. Problem solved...I thought. So, with new hole saw (still in the box) in hand, I was all set to drill the holes this morning. I opened the box and found...well, I found that the new hole saw lacked an arbor (the drill bit that passes through the center on all hole saws) and that the threaded insert at the top was the same exact size as the still-useless 1-1/8" hole saw in my kit. Doh! I had never considered that the new one wouldn't have the arbor, though I should have known better. Now, it may be helpful at this juncture to explain a bit to those of you out there in readerland who may not understand where I live. A "quick" run to the hardware store takes at least an hour, round-trip. I don't take hour-long round trips for one silly tool, which is why I order almost everything that I need online. I can't simply run 3 miles down the road to the nearest store. This is an occasional inconvenience that I am happy to put up with, but it does require a readjustment of expectations at times. IN any event, this quelched the chance to install the faucet today. As it turned out, the design of the faucet underpinnings appeared to create a number of other challenges that might have stopped the progress as well, so no real harm done. I moved on to other projects. The gross 50+ weather outside (on January 6 in Main???) wasn't necessarily conducive for Heidi to take a hot relaxing soak, I suppose; somehow, that seems more attractive on a bitter winter evening. But I digress. |
|||
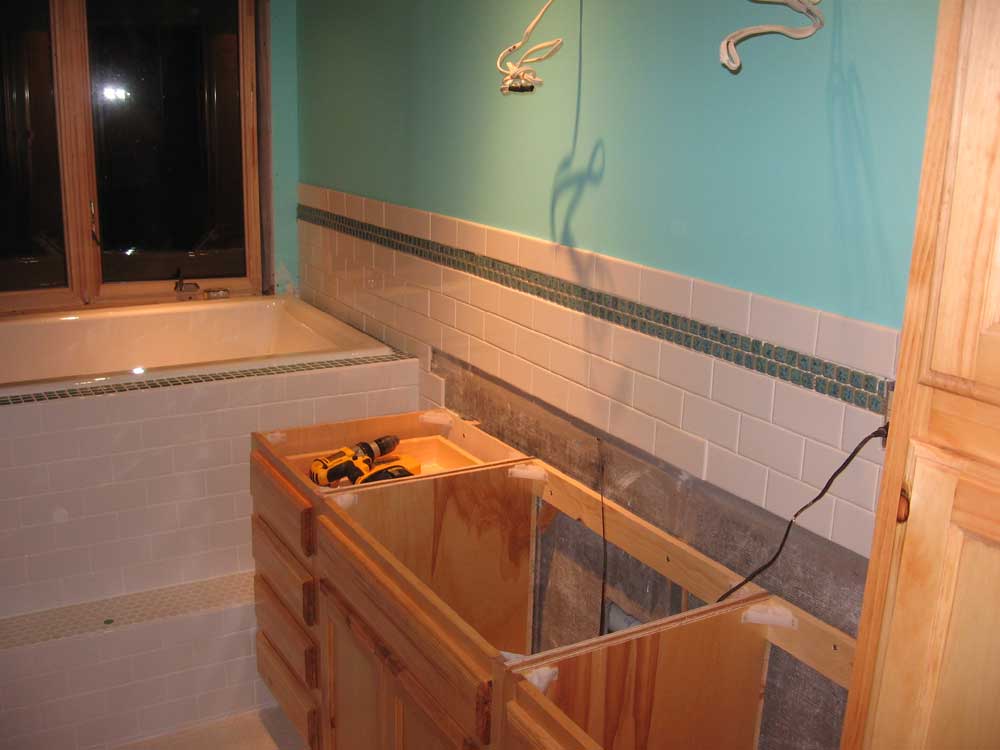
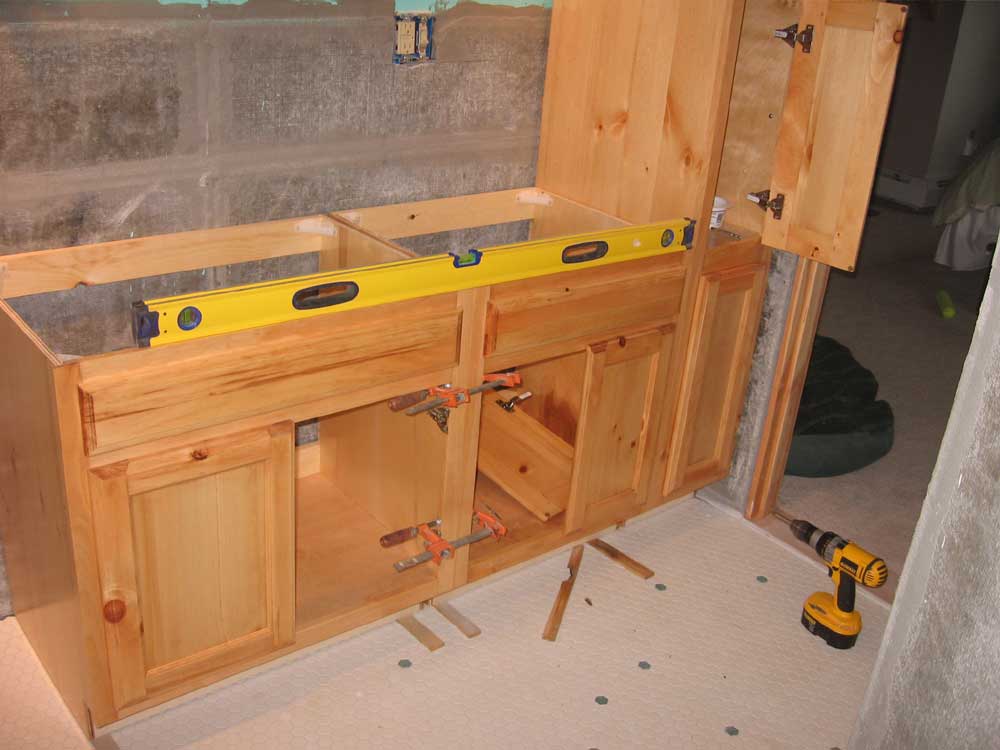 Instead, I decided to install the vanity cabinets. This was a
straightforward process. I began with the tall corner cabinet,
which fortunately was also located at the highest point of the floor
along that wall. I leveled it as necessary and screwed it to a
wall stud behind. Instead, I decided to install the vanity cabinets. This was a
straightforward process. I began with the tall corner cabinet,
which fortunately was also located at the highest point of the floor
along that wall. I leveled it as necessary and screwed it to a
wall stud behind.Next, I brought in the next three cabinets and screwed all three together through their face frames, and to the tall cabinet. With the fronts thusly aligned, I then shimmed and leveled the whole arrangement as needed, and secured all the cabinets to the wall. Nothing to it. |
|||
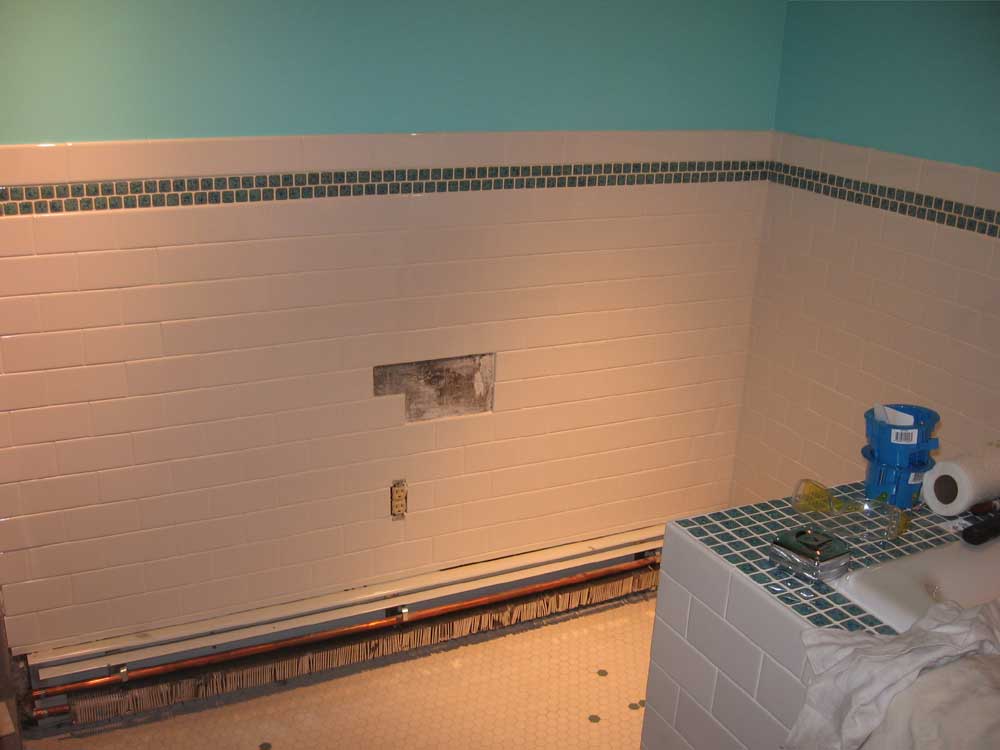
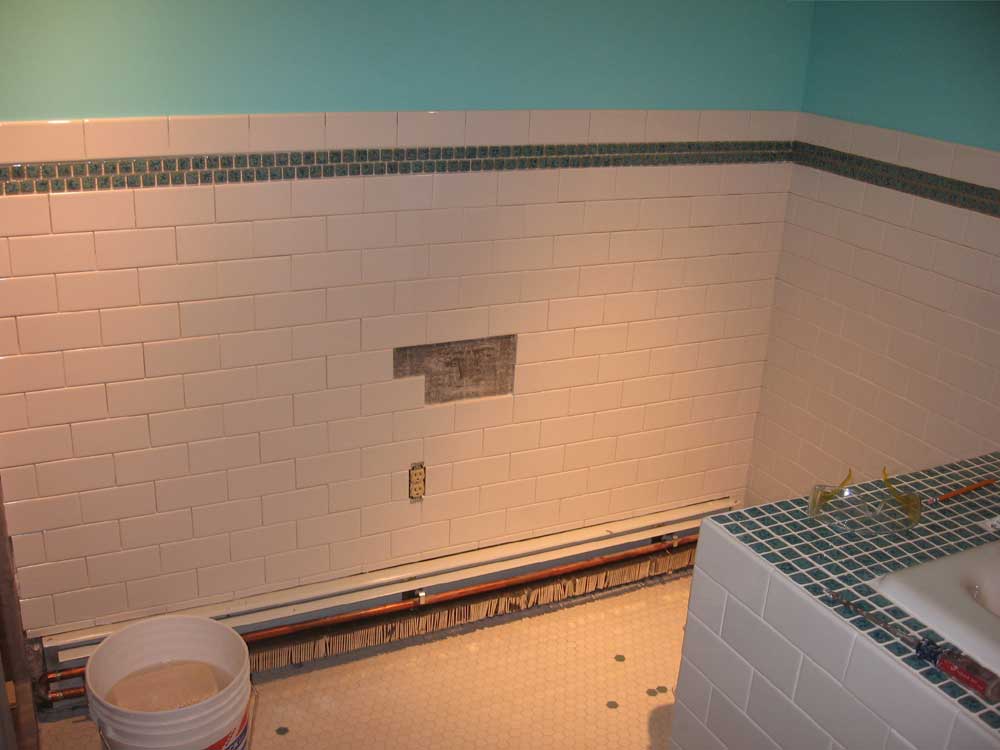
 With the cabinets installed, I continued work on the wall tile.
I began with the long wall at the back of the bathroom.
Because of a heat register at the floor level, I had to begin
several rows up, so I struck a level line even with the rows of tile
on the adjacent wall, and used this as my starting point. As I
tiled, I left an oversized space in the tile for an eventual toilet
paper holder, which we ordered last week but didn't have on hand
yet. Since I didn't know the size opening required for the
unit, I left a space plenty large. It would be easy to fill
these in around the accessory later. With the cabinets installed, I continued work on the wall tile.
I began with the long wall at the back of the bathroom.
Because of a heat register at the floor level, I had to begin
several rows up, so I struck a level line even with the rows of tile
on the adjacent wall, and used this as my starting point. As I
tiled, I left an oversized space in the tile for an eventual toilet
paper holder, which we ordered last week but didn't have on hand
yet. Since I didn't know the size opening required for the
unit, I left a space plenty large. It would be easy to fill
these in around the accessory later. |
|||
|
Finally, I tiled the wall on the cabinet side of the bathroom. I left two rows of tiles out above the cabinets to allow room for the countertop installation; later, the tiles will come down right over the countertop edge. With that, most of the wall tile was installed. I still had the walls on the outside of the shower enclosure, however, including the 45° angled wall. I expected to take care of those shortly, after which I could concentrate my efforts on getting the shower floor mudded and a drain fitting installed, and then move on to the shower tile. We were both getting excited to have the master bath ready for full operation! |
|||
|
|
|||
|
FRIDAY, JANUARY 5, 2006 |
|||
|
This evening, I grouted the tub deck, step, and surround, and most of the other wall that I had tiled the other day. I ran short of the mixed grout about a foot from the top of the last wall, but that was OK since I can easily grout that later on when I grout some of the many other wall areas that, as of this writing, remain to be tiled. There's nothing too exciting to report specifically about the job. Grout is grout. We chose white, unsanded grout for the narrow wall joints. It took a surprisingly long time to grout what seemed like a small area, though I guess there are quite a few square feet involved here. |
|||
|
|
|||
|
THURSDAY, JANUARY 4, 2007 |
|||
|
It was all I could do to prepare for
and install the grout in the floor tile tonight. I didn't
really feel like it, but wanted to get it done. Once I got
going on the process, it wasn't so bad, but at 5:30 when I got up to
the house from the shop, it seemed an almost insurmountable task. It took quite a while to set up for the job. I needed to sweep up the floor to remove debris, I had to move the vanity cabinets that I had stored in there, and I had to prepare two buckets of clean water for the grout rinsing process. Then, I had to get my electric drill from the shop (which I had forgotten to bring up) and mix up a pail of grout. Phew. I had half a bag (12 lb.) of "warm gray" grout on hand, and I didn't think I'd need all of it. I also wanted to save some for the shower floor, which would receive the same hexagonal tiles as the main floor and, I hoped, the same grout. So I mixed up a batch using part of the bag. It seemed like a lot at first, but almost as soon as it was mixed I was pretty sure it wasn't going to be enough for the whole floor. You never know, so I decided to just see how far it went. Of course it wasn't enough, and I had to mix a second batch about halfway through--not really a big deal. As it happened, even the second batch was barely enough to get me through, and left so little in the bag for another time that I figured I'd have to buy more anyway. The grout looked great, however. It's amazing what a difference the grout makes to the appearance of a tiled area. I had hoped to also grout the tub deck tonight, but I could see from the onset that there just wasn't enough time to do it all, so I decided to concentrate on the floor first. With the tiny amount of grout remaining in my pail, I filled in a gap between the floor tile in the downstairs bathroom and the hardwood floor in the hall. It was barely enough for this, so I made quite efficient use of my mixed grout, with no waste. I was glad that I had decided not to grout most of the area that would be hidden by the vanity cabinets upstairs; I would have run short. Serves me right for being stingy: I should have just mixed the whole half bag. And so incremental progress continues... Note: the righthand area of the lower tub step, which has no tiles, will be hidden by the vanity cabinet. |
|||
|
|
|||
|
WEDNESDAY, JANUARY 3, 2007 |
|||
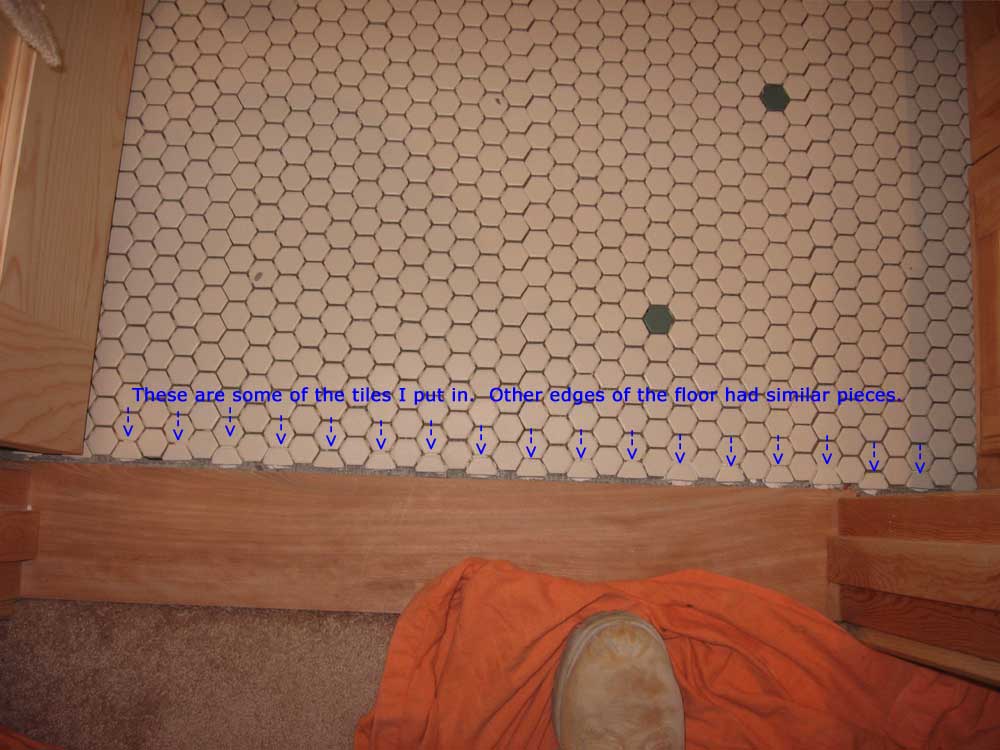 In
the evening, I worked on the little tile pieces required to fill in
parts of the floor, as well as the base of the tub surround.
This was tedious and time-consuming work, and despite working for
nearly 3 hours, there was virtually no visual progress.
Nonetheless, the small pieces needed to go in, as I couldn't begin
grouting till this was done. In
the evening, I worked on the little tile pieces required to fill in
parts of the floor, as well as the base of the tub surround.
This was tedious and time-consuming work, and despite working for
nearly 3 hours, there was virtually no visual progress.
Nonetheless, the small pieces needed to go in, as I couldn't begin
grouting till this was done. |
|||
 I
used the tile saw to cut the pieces as needed, using partial sheets
of the mosaic floor tile to cut the pieces needed. There were
several dozen pieces required, many of which were of consistent
shape, but I had a half dozen custom-shaped individual pieces for
select areas. Once I had all the floor tiles cut, I installed
them, one at a time, with some adhesive mastic that I dabbed on by
hand. I
used the tile saw to cut the pieces as needed, using partial sheets
of the mosaic floor tile to cut the pieces needed. There were
several dozen pieces required, many of which were of consistent
shape, but I had a half dozen custom-shaped individual pieces for
select areas. Once I had all the floor tiles cut, I installed
them, one at a time, with some adhesive mastic that I dabbed on by
hand.Later, the wall tile will cover most of the remaining gaps. I had to fill only the largest (1/2 tile or so) of the openings. |
|||
 I
cut a series of 1/2" wide slivers of the wall tile for the space at
the bottom of the tub surround, and installed them, maintaining the
running bond pattern from above. I
cut a series of 1/2" wide slivers of the wall tile for the space at
the bottom of the tub surround, and installed them, maintaining the
running bond pattern from above.Next: grout (I think). |
|||
|
|
|||
|
TUESDAY, JANUARY 2, 2007 |
|||
|
After work today, I spent a few hours
working on the bathroom tile during the evening. With the tile
project finally underway, I found a new drive to complete the job.
It's getting started on any new project that's the biggest obstacle;
once I'm on a roll, there's no problem seeing things through.
|
|||
 Next,
I completed the field tile on the tub surround, beginning at the top
beneath the bullnose that I installed yesterday. I was
fortunate in that the spacing down to the step allowed full tiles
the whole way, with only a slightly larger than normal grout space
left at the bottom edge. I used tiles with a bullnose on the
short edge at the lefthand corner of the surround. The running
bond pattern meant that I didn't have much leeway in terms of how
the tiles laid out, and I ended up with some 1/2" slivers of tile
next to the wall at the righthand side. But this was not a
noticeable area, as the vanity cabinets, when installed, would
minimize the view here. Next,
I completed the field tile on the tub surround, beginning at the top
beneath the bullnose that I installed yesterday. I was
fortunate in that the spacing down to the step allowed full tiles
the whole way, with only a slightly larger than normal grout space
left at the bottom edge. I used tiles with a bullnose on the
short edge at the lefthand corner of the surround. The running
bond pattern meant that I didn't have much leeway in terms of how
the tiles laid out, and I ended up with some 1/2" slivers of tile
next to the wall at the righthand side. But this was not a
noticeable area, as the vanity cabinets, when installed, would
minimize the view here.I continued with the tiles beneath the step, first installing a bullnose to match that at the top of the surround. Here, I ended up with about a 1" space at the bottom between the last row of tiles and the floor; for now, I left this space open. It would be easier to cut some tiles later on and install them another time, along with the small pieces still required to finish off the floor. I expected to do that tomorrow. |
|||
 I
finished up the evening with the short side of the tub surround, and
completed the tiles there. I haven't quite determined what I
am going to do to close off the access opening to the tub
plumbing, but in any event the tiling was done. I made
numerous trips down to the basement to make cuts on the tile saw; it
would be nice to have the saw closer, but the wet saw makes such a
mess with overspray from the spinning blade that it has to stay in
the basement. I
finished up the evening with the short side of the tub surround, and
completed the tiles there. I haven't quite determined what I
am going to do to close off the access opening to the tub
plumbing, but in any event the tiling was done. I made
numerous trips down to the basement to make cuts on the tile saw; it
would be nice to have the saw closer, but the wet saw makes such a
mess with overspray from the spinning blade that it has to stay in
the basement.Next: filling in some of the smaller cut pieces of tile, and hopefully some grout soon. |
|||
|
MONDAY, JANUARY 1, 2007 |
|||
|
Happy New Year! Over the weekend, I dubbed around a bit in the upstairs bathroom. On Saturday, the floor tile, which I laid on Friday afternoon, was not cured enough to allow foot traffic, so I didn't accomplish anything in the bathroom. Sunday, I had high hopes to get some tile laid, but by the time I gathered materials, tools, and other requirements, the morning was already gone. I did manage to lay out and mockup the tile on the tub deck, which happily worked out perfectly with no cut tiles required. I also cut holes through the cement board in the tub deck for the tub faucet, so that I could tile around the holes rather than attempt to cut them through the hard tile later on. |
|||
 Finally,
today I got going for real on the tile. Even so, it took a
surprising amount of prep work to get ready to go this morning.
Before beginning the tile on the tub deck, I needed to figure out
how the window trim was going to work--specifically, how the
supplied wooden seat board would work in the bow window and in
relation to the tub and tile. It turned out that the seat
board would nearly extend all the way to the tub flange, but I
decided to install some tile outboard of the tub (on the window
side) just to keep my options open, even though it would probably be
hidden. Finally,
today I got going for real on the tile. Even so, it took a
surprising amount of prep work to get ready to go this morning.
Before beginning the tile on the tub deck, I needed to figure out
how the window trim was going to work--specifically, how the
supplied wooden seat board would work in the bow window and in
relation to the tub and tile. It turned out that the seat
board would nearly extend all the way to the tub flange, but I
decided to install some tile outboard of the tub (on the window
side) just to keep my options open, even though it would probably be
hidden.I also had to determine where the window casing would go, since that would affect the tile layout on the nearby walls. So I mocked up the extension jamb and measured out appropriately for the window casing, where I marked a line on the wall. |
|||
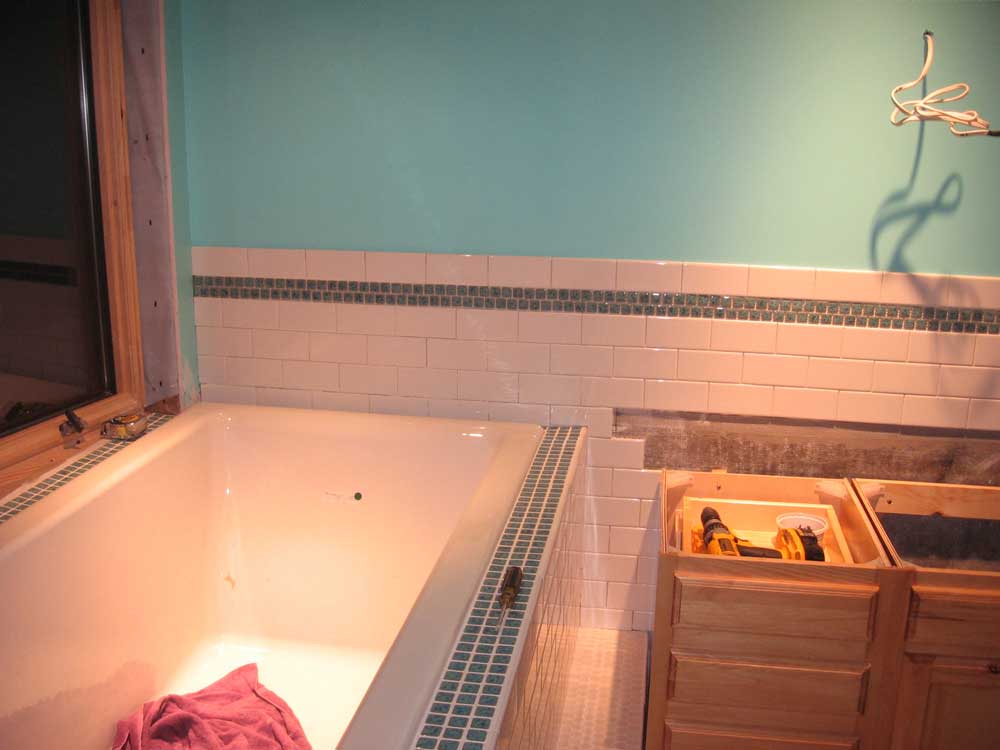
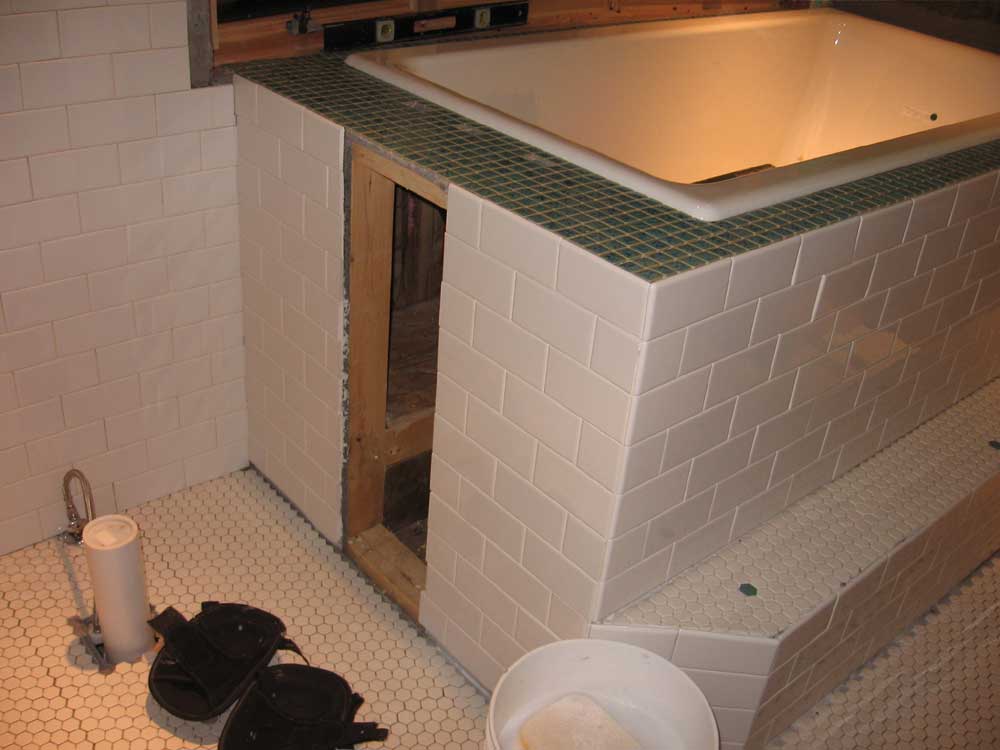
 With
the layout complete, I got to work actually installing tile.
We chose a 1" mosaic tile for the tub deck, with an interesting
glazed pattern. It turned out that this was actually swimming
pool tile, not that it mattered. The tile came in 1' square
sheets, with the small tiles laid out in a running bond (offset)
pattern, but for the tub deck I decided it would be better if the
tiles were aligned normally. So I cut strips of the tiles off
the mesh backing and laid them out parallel to each other.
This prevented the need for any cut tiles, and helped align the
tiles on all four sides of the tub. The tub deck width also
worked out well and allowed full tiles at both edges--against the
tub and at the outer edge. With
the layout complete, I got to work actually installing tile.
We chose a 1" mosaic tile for the tub deck, with an interesting
glazed pattern. It turned out that this was actually swimming
pool tile, not that it mattered. The tile came in 1' square
sheets, with the small tiles laid out in a running bond (offset)
pattern, but for the tub deck I decided it would be better if the
tiles were aligned normally. So I cut strips of the tiles off
the mesh backing and laid them out parallel to each other.
This prevented the need for any cut tiles, and helped align the
tiles on all four sides of the tub. The tub deck width also
worked out well and allowed full tiles at both edges--against the
tub and at the outer edge. |
|||
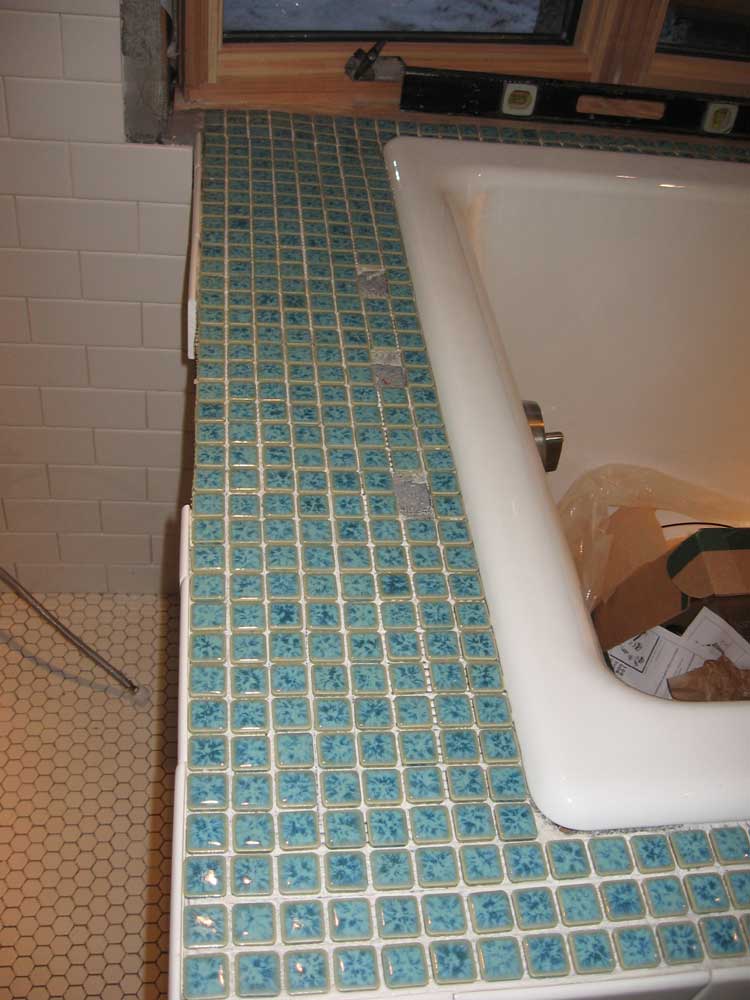 I
set the deck tiles in mastic, and also installed the top row of
vertical tiles around the two outside edges of the tub deck. I
used bullnose tiles for this top layer, aligning the top of the
bullnose with the plane of the deck tiles. The bullnose tile
matched the 3' x 6" brick-shaped white tiles that we had selected
for the walls in the bathroom. I
set the deck tiles in mastic, and also installed the top row of
vertical tiles around the two outside edges of the tub deck. I
used bullnose tiles for this top layer, aligning the top of the
bullnose with the plane of the deck tiles. The bullnose tile
matched the 3' x 6" brick-shaped white tiles that we had selected
for the walls in the bathroom.Next, I decided to install the wall tiles on the small wall at the back side of the toilet cubicle. These tiles had to go in before I could consider installing the flush, and it seemed like a good wall to try out the installation and pattern. First, though, I wanted to install the shutoff valve on the toilet supply line, which extended through the floor very close to the wall; I thought it'd be easier to do with the extra clearance before I installed tile. This turned out to be a time-consuming job. I had to remove a cap on the copper stubout, but when I tried to simply heat the cap and melt the solder, I found that it was requiring too much heat, and that I couldn't pull the cap off because the stubout would move up and down, as it was connected to PEX piping beneath the floor. I also didn't want to heat it so much that I might risk damaging the PEX, so I gave up on that attempt. |
|||
 The
clearance was too tight to allow use of even a mini pipe cutter, so
I tried Heidi's new Dremel tool. I fought with the tiny
mandrel and ridiculously tight screw on top of the mandrel so that I
could install a microscopic cutting disc. After intense
frustration, I managed to get the disk secured, though I was about
ready to through this fussy tool out the window. What a
system. The
clearance was too tight to allow use of even a mini pipe cutter, so
I tried Heidi's new Dremel tool. I fought with the tiny
mandrel and ridiculously tight screw on top of the mandrel so that I
could install a microscopic cutting disc. After intense
frustration, I managed to get the disk secured, though I was about
ready to through this fussy tool out the window. What a
system.The disc seemed to work well in cutting the copper pipe, though, till the disc widened its mounting hole to the point that the screw wouldn't hold it anymore. I managed to prevent myself from heaving the tool beneath a rock crusher for what would have been, to me, a very satisfying and deserving end, but I knew that I was all done with trying that tool out. I briefly tried a Sawz-all, but it shook the pipe too much. |
|||
 I
finally ended up trudging to the shop to get my hand hacksaw, which
worked fine to finish the cut on the pipe. Phew. Then I
had to sand off the drops of solder left over from the cap so that I
could fit the shutoff valve finally into position.
Sometimes the simplest things just aren't. I
finally ended up trudging to the shop to get my hand hacksaw, which
worked fine to finish the cut on the pipe. Phew. Then I
had to sand off the drops of solder left over from the cap so that I
could fit the shutoff valve finally into position.
Sometimes the simplest things just aren't.
After all that rigmarole with cutting
off a silly fitting, I soldered the valve on with success and ease
in about 20 seconds. I installed the flexible hose so that I
could run some water through and cool off the very hot fitting.
Having melted a PEX hose much earlier during initial plumbing
rough-in, I was pretty paranoid about ensuring that I didn't ruin a
now unreachable connection beneath the floor. |
|||
 Now,
I could get to work on the tile again. Tiling the small wall
was pretty straightforward, though it required plenty of cut tiles
at each corner. I installed 3" x 6" white tiles in a running
bond, brick-like pattern, starting with full tiles along the floor
and working up as needed. Once I reached the top of the cement
board area, I installed two rows of accent tiles--the same blue
tiles that I used on the tub deck. Here, I left the tiles in
their original orientation, with the running bond offset. I
capped the accent band off with a bullnose brick tile. Now,
I could get to work on the tile again. Tiling the small wall
was pretty straightforward, though it required plenty of cut tiles
at each corner. I installed 3" x 6" white tiles in a running
bond, brick-like pattern, starting with full tiles along the floor
and working up as needed. Once I reached the top of the cement
board area, I installed two rows of accent tiles--the same blue
tiles that I used on the tub deck. Here, I left the tiles in
their original orientation, with the running bond offset. I
capped the accent band off with a bullnose brick tile. |
|||
 We
were very pleased with the appearance of this wall. I looked
forward to continuing with the job over the next several days.
Before knocking off for the night, though, Heidi and I unboxed the
four cabinets for the vanity, which we hadn't even laid eyes on yet,
and mocked them up in the bathroom. I want to finish tiling
the tub surround before I think about permanently installing the
cabinets, but it was nice to get an idea how they looked and fit
first. We
were very pleased with the appearance of this wall. I looked
forward to continuing with the job over the next several days.
Before knocking off for the night, though, Heidi and I unboxed the
four cabinets for the vanity, which we hadn't even laid eyes on yet,
and mocked them up in the bathroom. I want to finish tiling
the tub surround before I think about permanently installing the
cabinets, but it was nice to get an idea how they looked and fit
first. |
|||
|
|
|||
|
|||